SlideShare una empresa de Scribd logo
1 de 7
1. Thoroughly clean and dry the glass

The following steps describe installation using the Standard Windshield

Mounting Bracket. This is the most common installation method and

applies to most sedans and light vehicles with sloped windshields and

standard rear view mirrors. See note below for available options.

CAUTION: This step is critical to prevent the bracket from falling off.

A) Select a location on the windshield behind the rear view mirror on the

passenger side of the vehicle.

B) Using the alcohol wipe provided, thoroughly clean the mounting area.

C) Using a clean, dry cloth, thoroughly dry the mounting area.

2. Carefully select a mounting location

The VER needs to be mounted in a location that provides an unobstructed view of the interior and
exterior (front) of the

vehicle. Ideally, the interior-facing lens should capture a view from the outside shoulder of the driver to
the outside

shoulder of a front seat passenger. The exterior-facing lens should capture a clear view of everything in
front of the

vehicle, beginning as close to the front of the vehicle as possible without cutting off the horizon.

CAUTION: An improperly positioned VER can significantly reduce the effectiveness of the DriveCam
Program.

A) Loosen the Torx screws so the VER can rotate in the bracket.

B) Adjust or move the mirror down to its lowest position.

C) Temporarily position the assembly (VER + bracket) behind the mirror, about one inch to the right of
the post,

providing access to the Torx screw and power connection.

Mounting Options: Refer to the DriveCam Mounting Guidelines (DRC 340) if you’re installing in a vehicle
without a standard
rear view mirror. The document provides additional details and diagrams about VER mounting in various
vehicle types,

including instructions for using the Extended (Bulkhead) Bracket and RAM-Mount (Articulating) Bracket.
Government

restrictions regarding the mounting of objects on the vehicle windshield and U.S. DOT exemptions are
also covered.DriveCam Standard Installation (303-D) 4

3. Mark the mounting location on the glass

CAUTION: Do not peel the backing from the adhesive strips

until the next step.

A) Hold the assembly in place and trace the outline of the

bracket on the windshield with a marker.

B) Remove the VER from the mounting bracket.

C) Check the fit of the bracket against the windshield.

If the windshield is curved, you may gently bend the bracket

so it will lie flush against the glass.

Final Location Check:

Before attaching the bracket in the next step, take a moment to verify that you have selected a good
mounting location.

Hold the assembly in place and sit in the driver’s seat. Make sure the VER does not block the driver’s
view of the road.

Rotate mirrors, sun visors, wipers, and other objects near the VER to make sure those items do not block
or interfere

with either lens.

4. Attach the bracket to the windshield

CAUTION: The adhesive is very sticky. Once the bracket is attached, it will not easily come off.

A) Make sure the glass is clean and dry and the air temperature is at least 50 F (10 C).

B) Remove the backing from the adhesive side of the bracket.

C) Make sure the large plastic washer is on the left side of the bracket (see image below or next page).
D) Start by placing the top edge of the bracket against the windshield, aligned with the marks, and make
sure it’s level.

E) Press the bracket firmly against the windshield starting at the top and pressing the sides downward.

Do not apply excessive pressure as it may cause the windshield to break.

F) Check from outside the vehicle to make sure there are no large air bubbles under the bracket.

You may need to (carefully) apply additional pressure to the bracket and remove any large air bubbles.
Use a small

pin to create an escape path for the air if the problem is persistent.DriveCam Standard Installation (303-
D) 5

5. Mount the VER in the bracket

A) Plug the DC3 Power Cable (14 ft.) into the VER.

B) Place the VER in the bracket.

C) Adjust the VER so that it hangs vertically (plumb).

D) Secure the VER in the bracket using the two Torx screws

and Torx wrench (provided).

Washer Placement:

The large plastic washer on the left side of the bracket is designed to

partially cover the cable connector so that it cannot be unplugged.

The plastic washers can be easily removed from the metal bracket if you

need to switch sides after mounting.

Make sure the larger of the two washers is on the left side of the bracket.

6. Route the DC3 Power Cable

You may need to remove the window and door trim to route the cable underneath. These typically snap
on and off

using special clips. In vehicles with side and curtain airbags, these clips are often one-time use and may
need to be

replaced after removal. Please refer to the vehicle service manual for information.
WARNING: When installing the cable in a vehicle with SIDE OR CURTAIN AIRBAGS, be certain that
neither the cable nor

your installation activities interferes with any airbag related mechanisms or otherwise risks affecting
airbag deployment.

A) Starting just above the rear view mirror, route the cable under the trim or headliner across to the
door pillar.

B) Route the cable down the door pillar underneath the vertical door/window trim then out under the
lower part of

the dashboard to the location where the 5-Port HUB will be mounted and the electrical connections will
be made.

Secure the Cable:

Make sure the cable is secured and cannot come loose. We recommend using cable ties every few
inches along the

route to secure it in place. Keep the cable clear of any sharp edges, moving parts and cannot get pinched
in the door

jam. Be very careful working around vehicle airbags.DriveCam Standard Installation (303-D) 6

7. Electrical connections

The black, red and brown wires are the three required connections for the VER to function. The red wire
provides

primary power and must be connected to a continuous power source. The brown wire is an ignition-
sense, used by the

VER to activate the IR Illuminator (page 8) when the vehicle ignition is switched on. The black wire is
ground.

A) Find a suitable location to make electrical connections (usually under the dashboard or vehicle
electrical panel).

B) Connect the power cable to the vehicle as described below.

C) Test the connections in steps 8 and 9 before finalizing the connections.

Connecting the RED WIRE to a 12V-24V power source that is ALWAYS ON

The VER requires a power source that is not controlled by the key nor any other device or switch. This
connection is
usually made just after the fuse box on the battery-side of any vehicle control modules. Use a voltmeter
to make sure

the circuit provides continuous 12V or 24V power when the key is removed from the ignition and all
lights, devices and

switches are off. Test this connection in Step 9.

Current Draw: If you’re tapping into an existing vehicle wire, make sure it can handle the additional
current draw of

the VER. A wire that reads 12V on a voltmeter may not necessarily be able to supply enough current

to the existing circuit and the VER. The gauge of wire being tapped into provides a good indication. A

larger gauge wire is often the best choice, but make sure to test it with a load.

Connecting the BROWN WIRE to a 12V-24V power source that is IGNITION-SWITCHED

This connection senses when the ignition is switched on. This requires a power source that is “on” only
when the key is

turned all the way forward to the “on” position and when the engine is running. It’s very important that
this is

connected properly. Test this connection in Step 10.

Common Error: This connection is often (mistakenly) made to a modulated circuit – one that comes out
of a computer

control module running some subsystem in the vehicle – which can give false ignition on/off signals.

To avoid this, make sure to connect this wire to a circuit that is on the battery side of any modules.

Consult the vehicle wiring schematics or a local authorized dealership to obtain this information.

Extending Wires

If wires need to be extended, extend the ground wire first. If you must extend the red or brown wires,
keep them as

short as possible. If the extended length exceeds 16 inches, place an inline fuse (1-3 Amp) between the
extended wire

and the power connection. You may cut the Inline Fuses (shown above) and move them to the end to
the extension if
needed. The gauge of wire used for the extension must be the same gauge as the power cable wires or
larger. DriveCam Standard Installation (303-D) 7

8. Test the RED WIRE connection (continuous power)

Once the power and ground connections are made and the vehicle ignition is switched on, the status
light to the right of

the interior-facing lens should be lit (either a red or green light).

Note: VERs are configured for hibernation mode, meaning it will automatically switch off (status lights
will go dark)

after the vehicle ignition has been off for a certain amount of time (15 minutes – several hours). Switch
on the vehicle

ignition or press one of the VER buttons to “wake up” the VER from hibernation. See page 8 for more
information.

A) Wait about 30 seconds after connecting power (red) and ground (black).

B) Turn the key to the Ignition / Switched-On position. The status light to the left of the lens will light
solid green for

about 30 seconds after power is first applied and then switch OFF. The status light to the right of the
lens should

then switch ON and stay on (see note above).

Other status light behaviors that are commonly seen:

Left light blinking green: Searching for a wireless signal.

Right light blinking red: Data transfer in progress.

Right light blinking red & green: Event recording in progress.

Both lights blinking red & green: Firmware upgrade in progress.

C) These behaviors may continue for several minutes. All of them indicate

that the VER is properly powered. Go to step 9.

Errors: If the status lights did not light at all, check the wiring and fuses.

If you see any other status light behaviors, contact DriveCam Technical Support at (866) 910-0403.

9. Test the BROWN WIRE connection (ignition-switched power)
Underneath the translucent cover surrounding the interior-facing lens are six small, infrared lights.
These are the VER’s

Infrared (IR) Illuminators, providing infrared light for recording video in low light situations. These lights
can only be

seen when they are lit, and they are only lit when power is being sensed through the brown wire (i.e.
when the engine is

running or when the key is turned all the way forward to the ignition ON position).

A) Turn the key to the Ignition / Switched-On position.

B) Look closely for the six red lights underneath the translucent cover.

C) Turn the key to the OFF position. The six red lights should go out.

D) If the test worked as described, the brown wire has been connected properly. Go to the next page.

If the test did not work as described, try it again in a darker area or cup your hands around the cover;
the lights can

be difficult to see. Next, check the wiring and fuses. It may have been connected to a modulated circuit
(page 6).DriveCam Standard Installation (303-D) 8

10. Finishing up

DC3 Standard Installation is complete. Follow these steps to finish up:

A) Make sure the cable is tucked safely under the trim and cannot get pinched in the door jam or any
moving parts.

B) Reaffirm that you have taken the appropriate safety precautions while working around vehicle
airbags.

C) Finalize all electrical connections. Use cable-ties to bundle and secure all wires so they don’t come
loose.

D) Make a note of the VER serial number and the vehicle in which it is installed. Provide this to
management.

E) Keep the Torx wrench and this guide in a safe place for future use.

The DriveCam-equipped vehicle is ready to be placed in-service with the DriveCam Program.

Más contenido relacionado

Similar a 1

1997 toyota avensis service repair manual
1997 toyota avensis service repair manual1997 toyota avensis service repair manual
1997 toyota avensis service repair manualfujsejfkskemem
 
Chip upgrade installation instruction for audi tt vw jetta gti golf
Chip upgrade installation instruction for audi tt vw jetta gti golfChip upgrade installation instruction for audi tt vw jetta gti golf
Chip upgrade installation instruction for audi tt vw jetta gti golfautoobdtools
 
Camden CM-324-4N Instruction Manual
Camden CM-324-4N Instruction ManualCamden CM-324-4N Instruction Manual
Camden CM-324-4N Instruction ManualJMAC Supply
 
User guide powermax_series screens
User guide powermax_series screensUser guide powermax_series screens
User guide powermax_series screensDukaneAVMarketing
 
KIA sportage 2008 Manual
KIA sportage 2008 ManualKIA sportage 2008 Manual
KIA sportage 2008 ManualOBD Codex
 
309 360 Installation V2009.04.23
309 360 Installation V2009.04.23309 360 Installation V2009.04.23
309 360 Installation V2009.04.23gueste52dbf
 
Digital Watchdog DWC-V4363DB User Manual
Digital Watchdog DWC-V4363DB User ManualDigital Watchdog DWC-V4363DB User Manual
Digital Watchdog DWC-V4363DB User ManualJMAC Supply
 
Digital Watchdog DWC-V4363TIRB User Manual
Digital Watchdog DWC-V4363TIRB User ManualDigital Watchdog DWC-V4363TIRB User Manual
Digital Watchdog DWC-V4363TIRB User ManualJMAC Supply
 
Camden CM-325 Instruction Manual
Camden CM-325 Instruction ManualCamden CM-325 Instruction Manual
Camden CM-325 Instruction ManualJMAC Supply
 
Har 1014 Vortec DBW Wiring Harness Manual and Instructions
Har 1014 Vortec DBW Wiring Harness Manual and Instructions Har 1014 Vortec DBW Wiring Harness Manual and Instructions
Har 1014 Vortec DBW Wiring Harness Manual and Instructions PSI Conversion
 
Har 1015 Vortec DBW Wiring Harness Instructions and Manual
Har 1015 Vortec DBW Wiring Harness Instructions and Manual Har 1015 Vortec DBW Wiring Harness Instructions and Manual
Har 1015 Vortec DBW Wiring Harness Instructions and Manual PSI Conversion
 
Samsung 193T User Manual.pdf
Samsung 193T User Manual.pdfSamsung 193T User Manual.pdf
Samsung 193T User Manual.pdfssuser942942
 
Ed3 & ed4 print installation & calibration v!)!
Ed3 & ed4 print installation & calibration v!)!Ed3 & ed4 print installation & calibration v!)!
Ed3 & ed4 print installation & calibration v!)!tedjurca
 

Similar a 1 (20)

1997 toyota avensis service repair manual
1997 toyota avensis service repair manual1997 toyota avensis service repair manual
1997 toyota avensis service repair manual
 
Chip upgrade installation instruction for audi tt vw jetta gti golf
Chip upgrade installation instruction for audi tt vw jetta gti golfChip upgrade installation instruction for audi tt vw jetta gti golf
Chip upgrade installation instruction for audi tt vw jetta gti golf
 
Rns 510 install
Rns 510 installRns 510 install
Rns 510 install
 
Camden CM-324-4N Instruction Manual
Camden CM-324-4N Instruction ManualCamden CM-324-4N Instruction Manual
Camden CM-324-4N Instruction Manual
 
BlackVue Dash Cam Installation
BlackVue Dash Cam InstallationBlackVue Dash Cam Installation
BlackVue Dash Cam Installation
 
User guide powermax_series screens
User guide powermax_series screensUser guide powermax_series screens
User guide powermax_series screens
 
User guide home_series
User guide home_seriesUser guide home_series
User guide home_series
 
KIA sportage 2008 Manual
KIA sportage 2008 ManualKIA sportage 2008 Manual
KIA sportage 2008 Manual
 
309 360 Installation V2009.04.23
309 360 Installation V2009.04.23309 360 Installation V2009.04.23
309 360 Installation V2009.04.23
 
Digital Watchdog DWC-V4363DB User Manual
Digital Watchdog DWC-V4363DB User ManualDigital Watchdog DWC-V4363DB User Manual
Digital Watchdog DWC-V4363DB User Manual
 
Digital Watchdog DWC-V4363TIRB User Manual
Digital Watchdog DWC-V4363TIRB User ManualDigital Watchdog DWC-V4363TIRB User Manual
Digital Watchdog DWC-V4363TIRB User Manual
 
Camden CM-325 Instruction Manual
Camden CM-325 Instruction ManualCamden CM-325 Instruction Manual
Camden CM-325 Instruction Manual
 
Tesla Model X Rear Lighted T Installation Guide
Tesla Model X Rear Lighted T Installation GuideTesla Model X Rear Lighted T Installation Guide
Tesla Model X Rear Lighted T Installation Guide
 
Har 1014 Vortec DBW Wiring Harness Manual and Instructions
Har 1014 Vortec DBW Wiring Harness Manual and Instructions Har 1014 Vortec DBW Wiring Harness Manual and Instructions
Har 1014 Vortec DBW Wiring Harness Manual and Instructions
 
Har 1015 Vortec DBW Wiring Harness Instructions and Manual
Har 1015 Vortec DBW Wiring Harness Instructions and Manual Har 1015 Vortec DBW Wiring Harness Instructions and Manual
Har 1015 Vortec DBW Wiring Harness Instructions and Manual
 
Szdalos
SzdalosSzdalos
Szdalos
 
Rain collector sensor rainfall sensor
Rain collector sensor rainfall sensorRain collector sensor rainfall sensor
Rain collector sensor rainfall sensor
 
Samsung 193T User Manual.pdf
Samsung 193T User Manual.pdfSamsung 193T User Manual.pdf
Samsung 193T User Manual.pdf
 
Ed3 & ed4 print installation & calibration v!)!
Ed3 & ed4 print installation & calibration v!)!Ed3 & ed4 print installation & calibration v!)!
Ed3 & ed4 print installation & calibration v!)!
 
Rodeo manuel
Rodeo manuelRodeo manuel
Rodeo manuel
 

1

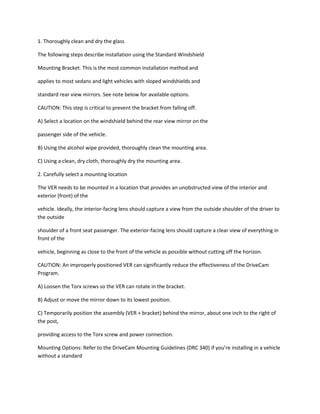
  • 1. 1. Thoroughly clean and dry the glass The following steps describe installation using the Standard Windshield Mounting Bracket. This is the most common installation method and applies to most sedans and light vehicles with sloped windshields and standard rear view mirrors. See note below for available options. CAUTION: This step is critical to prevent the bracket from falling off. A) Select a location on the windshield behind the rear view mirror on the passenger side of the vehicle. B) Using the alcohol wipe provided, thoroughly clean the mounting area. C) Using a clean, dry cloth, thoroughly dry the mounting area. 2. Carefully select a mounting location The VER needs to be mounted in a location that provides an unobstructed view of the interior and exterior (front) of the vehicle. Ideally, the interior-facing lens should capture a view from the outside shoulder of the driver to the outside shoulder of a front seat passenger. The exterior-facing lens should capture a clear view of everything in front of the vehicle, beginning as close to the front of the vehicle as possible without cutting off the horizon. CAUTION: An improperly positioned VER can significantly reduce the effectiveness of the DriveCam Program. A) Loosen the Torx screws so the VER can rotate in the bracket. B) Adjust or move the mirror down to its lowest position. C) Temporarily position the assembly (VER + bracket) behind the mirror, about one inch to the right of the post, providing access to the Torx screw and power connection. Mounting Options: Refer to the DriveCam Mounting Guidelines (DRC 340) if you’re installing in a vehicle without a standard
  • 2. rear view mirror. The document provides additional details and diagrams about VER mounting in various vehicle types, including instructions for using the Extended (Bulkhead) Bracket and RAM-Mount (Articulating) Bracket. Government restrictions regarding the mounting of objects on the vehicle windshield and U.S. DOT exemptions are also covered.DriveCam Standard Installation (303-D) 4 3. Mark the mounting location on the glass CAUTION: Do not peel the backing from the adhesive strips until the next step. A) Hold the assembly in place and trace the outline of the bracket on the windshield with a marker. B) Remove the VER from the mounting bracket. C) Check the fit of the bracket against the windshield. If the windshield is curved, you may gently bend the bracket so it will lie flush against the glass. Final Location Check: Before attaching the bracket in the next step, take a moment to verify that you have selected a good mounting location. Hold the assembly in place and sit in the driver’s seat. Make sure the VER does not block the driver’s view of the road. Rotate mirrors, sun visors, wipers, and other objects near the VER to make sure those items do not block or interfere with either lens. 4. Attach the bracket to the windshield CAUTION: The adhesive is very sticky. Once the bracket is attached, it will not easily come off. A) Make sure the glass is clean and dry and the air temperature is at least 50 F (10 C). B) Remove the backing from the adhesive side of the bracket. C) Make sure the large plastic washer is on the left side of the bracket (see image below or next page).
  • 3. D) Start by placing the top edge of the bracket against the windshield, aligned with the marks, and make sure it’s level. E) Press the bracket firmly against the windshield starting at the top and pressing the sides downward. Do not apply excessive pressure as it may cause the windshield to break. F) Check from outside the vehicle to make sure there are no large air bubbles under the bracket. You may need to (carefully) apply additional pressure to the bracket and remove any large air bubbles. Use a small pin to create an escape path for the air if the problem is persistent.DriveCam Standard Installation (303- D) 5 5. Mount the VER in the bracket A) Plug the DC3 Power Cable (14 ft.) into the VER. B) Place the VER in the bracket. C) Adjust the VER so that it hangs vertically (plumb). D) Secure the VER in the bracket using the two Torx screws and Torx wrench (provided). Washer Placement: The large plastic washer on the left side of the bracket is designed to partially cover the cable connector so that it cannot be unplugged. The plastic washers can be easily removed from the metal bracket if you need to switch sides after mounting. Make sure the larger of the two washers is on the left side of the bracket. 6. Route the DC3 Power Cable You may need to remove the window and door trim to route the cable underneath. These typically snap on and off using special clips. In vehicles with side and curtain airbags, these clips are often one-time use and may need to be replaced after removal. Please refer to the vehicle service manual for information.
  • 4. WARNING: When installing the cable in a vehicle with SIDE OR CURTAIN AIRBAGS, be certain that neither the cable nor your installation activities interferes with any airbag related mechanisms or otherwise risks affecting airbag deployment. A) Starting just above the rear view mirror, route the cable under the trim or headliner across to the door pillar. B) Route the cable down the door pillar underneath the vertical door/window trim then out under the lower part of the dashboard to the location where the 5-Port HUB will be mounted and the electrical connections will be made. Secure the Cable: Make sure the cable is secured and cannot come loose. We recommend using cable ties every few inches along the route to secure it in place. Keep the cable clear of any sharp edges, moving parts and cannot get pinched in the door jam. Be very careful working around vehicle airbags.DriveCam Standard Installation (303-D) 6 7. Electrical connections The black, red and brown wires are the three required connections for the VER to function. The red wire provides primary power and must be connected to a continuous power source. The brown wire is an ignition- sense, used by the VER to activate the IR Illuminator (page 8) when the vehicle ignition is switched on. The black wire is ground. A) Find a suitable location to make electrical connections (usually under the dashboard or vehicle electrical panel). B) Connect the power cable to the vehicle as described below. C) Test the connections in steps 8 and 9 before finalizing the connections. Connecting the RED WIRE to a 12V-24V power source that is ALWAYS ON The VER requires a power source that is not controlled by the key nor any other device or switch. This connection is
  • 5. usually made just after the fuse box on the battery-side of any vehicle control modules. Use a voltmeter to make sure the circuit provides continuous 12V or 24V power when the key is removed from the ignition and all lights, devices and switches are off. Test this connection in Step 9. Current Draw: If you’re tapping into an existing vehicle wire, make sure it can handle the additional current draw of the VER. A wire that reads 12V on a voltmeter may not necessarily be able to supply enough current to the existing circuit and the VER. The gauge of wire being tapped into provides a good indication. A larger gauge wire is often the best choice, but make sure to test it with a load. Connecting the BROWN WIRE to a 12V-24V power source that is IGNITION-SWITCHED This connection senses when the ignition is switched on. This requires a power source that is “on” only when the key is turned all the way forward to the “on” position and when the engine is running. It’s very important that this is connected properly. Test this connection in Step 10. Common Error: This connection is often (mistakenly) made to a modulated circuit – one that comes out of a computer control module running some subsystem in the vehicle – which can give false ignition on/off signals. To avoid this, make sure to connect this wire to a circuit that is on the battery side of any modules. Consult the vehicle wiring schematics or a local authorized dealership to obtain this information. Extending Wires If wires need to be extended, extend the ground wire first. If you must extend the red or brown wires, keep them as short as possible. If the extended length exceeds 16 inches, place an inline fuse (1-3 Amp) between the extended wire and the power connection. You may cut the Inline Fuses (shown above) and move them to the end to the extension if
  • 6. needed. The gauge of wire used for the extension must be the same gauge as the power cable wires or larger. DriveCam Standard Installation (303-D) 7 8. Test the RED WIRE connection (continuous power) Once the power and ground connections are made and the vehicle ignition is switched on, the status light to the right of the interior-facing lens should be lit (either a red or green light). Note: VERs are configured for hibernation mode, meaning it will automatically switch off (status lights will go dark) after the vehicle ignition has been off for a certain amount of time (15 minutes – several hours). Switch on the vehicle ignition or press one of the VER buttons to “wake up” the VER from hibernation. See page 8 for more information. A) Wait about 30 seconds after connecting power (red) and ground (black). B) Turn the key to the Ignition / Switched-On position. The status light to the left of the lens will light solid green for about 30 seconds after power is first applied and then switch OFF. The status light to the right of the lens should then switch ON and stay on (see note above). Other status light behaviors that are commonly seen: Left light blinking green: Searching for a wireless signal. Right light blinking red: Data transfer in progress. Right light blinking red & green: Event recording in progress. Both lights blinking red & green: Firmware upgrade in progress. C) These behaviors may continue for several minutes. All of them indicate that the VER is properly powered. Go to step 9. Errors: If the status lights did not light at all, check the wiring and fuses. If you see any other status light behaviors, contact DriveCam Technical Support at (866) 910-0403. 9. Test the BROWN WIRE connection (ignition-switched power)
  • 7. Underneath the translucent cover surrounding the interior-facing lens are six small, infrared lights. These are the VER’s Infrared (IR) Illuminators, providing infrared light for recording video in low light situations. These lights can only be seen when they are lit, and they are only lit when power is being sensed through the brown wire (i.e. when the engine is running or when the key is turned all the way forward to the ignition ON position). A) Turn the key to the Ignition / Switched-On position. B) Look closely for the six red lights underneath the translucent cover. C) Turn the key to the OFF position. The six red lights should go out. D) If the test worked as described, the brown wire has been connected properly. Go to the next page. If the test did not work as described, try it again in a darker area or cup your hands around the cover; the lights can be difficult to see. Next, check the wiring and fuses. It may have been connected to a modulated circuit (page 6).DriveCam Standard Installation (303-D) 8 10. Finishing up DC3 Standard Installation is complete. Follow these steps to finish up: A) Make sure the cable is tucked safely under the trim and cannot get pinched in the door jam or any moving parts. B) Reaffirm that you have taken the appropriate safety precautions while working around vehicle airbags. C) Finalize all electrical connections. Use cable-ties to bundle and secure all wires so they don’t come loose. D) Make a note of the VER serial number and the vehicle in which it is installed. Provide this to management. E) Keep the Torx wrench and this guide in a safe place for future use. The DriveCam-equipped vehicle is ready to be placed in-service with the DriveCam Program.