SlideShare una empresa de Scribd logo
1 de 24
Descargar para leer sin conexión
.ANALOGUE / DIGITAL RECORDER. 
DN-200 
Instruction Manual 
www.datavideo-tek.com 
1
Contents 
Warnings and Precautions ............................................................................... 4 
Warranty ............................................................................................................. 5 
Standard Warranty ..................................................................................................................... 5 
Two Year Warranty ..................................................................................................................... 5 
Disposal ...................................................................................................................................... 5 
Packing List ................................................................................................................................ 5 
Product Overview .............................................................................................. 6 
Features ..................................................................................................................................... 6 
Connections & Controls ................................................................................... 7 
Front Panel ................................................................................................................................. 7 
DN-200 Clip Status Display Explained ....................................................................................... 7 
Rear Panel Connections ............................................................................................................. 8 
Powering On ............................................................................................................................... 8 
DN-200 Menus ................................................................................................... 9 
Main Menu Options .................................................................................................................... 9 
Record Setup Options .............................................................................................................. 10 
Play Setup Options ................................................................................................................... 10 
System Setup Options .............................................................................................................. 11 
DN-200 General Setup Notes .......................................................................... 12 
Set the signal type .................................................................................................................... 12 
Set HDD partition to 1 or 2 ....................................................................................................... 12 
Choose a file operating system, FAT32 or NTFS .................................................................... 12 
Set the HDD volume ID ............................................................................................................ 12 
Select which time code to display ............................................................................................ 12 
Empty the current or all bins ..................................................................................................... 12 
Normal Recording ........................................................................................... 13 
Select the video source ............................................................................................................ 13 
Set the file type ......................................................................................................................... 13 
Synchronize to tape motion ...................................................................................................... 13 
Select the audio sampling rate in DV mode ............................................................................. 13 
Set the record date (optional) ................................................................................................... 13 
Before starting to Record.......................................................................................................... 13 
Starting the Record Process .................................................................................................... 13 
Pausing the Record Process .................................................................................................... 14 
Marking the Recording ............................................................................................................. 14 
Stop a recording before powering down ................................................................................... 14 
Power on auto record ..................................................................................... 14 
Time Lapse Recording .................................................................................... 14 
Using Record Pre-trigger ................................................................................ 14 
2
DN-200 GPI Trigger connection and operation ............................................. 15 
GPI Trigger cabling and circuit ................................................................................................. 15 
SET GPI TRIGGER MODE ...................................................................................................... 15 
PULSE trigger Record process ................................................................................................ 15 
LEVEL trigger Record process ................................................................................................. 15 
PULSE trigger Playback process ............................................................................................. 15 
LEVEL trigger Playback process .............................................................................................. 15 
Playback ........................................................................................................... 16 
Set up loop play ........................................................................................................................ 16 
Power on auto play ................................................................................................................... 16 
Play out ..................................................................................................................................... 16 
Pause and Go To Mark ............................................................................................................ 16 
MAKE MEDIA FILES ................................................................................................................ 17 
Preparation ............................................................................................................................... 17 
Connection to a Computer in AV HDD Mode ............................................... 17 
Operating File System limitations ............................................................................................. 17 
File Organization ...................................................................................................................... 17 
Updating DN-200 Firmware ............................................................................ 18 
DN-200 RS-232 Controller Command Set ...................................................... 19 
Connector Pin Assignment ....................................................................................................... 19 
System Control ......................................................................................................................... 20 
Sense Request ......................................................................................................................... 20 
Transport Control ...................................................................................................................... 21 
USER Notes ..................................................................................................... 23 
Service and Support ....................................................................................... 24 
Disclaimer of Product and Services 
The information offered in this instruction manual is intended as a guide only. At all times, Datavideo Technologies will try to 
give correct, complete and suitable information. However, Datavideo Technologies cannot exclude that some information in this 
manual, from time to time, may not be correct or may be incomplete. This manual may contain typing errors, omissions or 
incorrect information. Datavideo Technologies always recommend that you double check the information in this document for 
accuracy before making any purchase decision or using the product. Datavideo Technologies is not responsible for any 
omissions or errors, or for any subsequent loss or damage caused by using the information contained within this manual. 
Further advice on the content of this manual or on the product can be obtained by contacting your local Datavideo Office or 
dealer. 
3
Warnings and Precautions 
1. Read all of these warnings and save them for later reference. 
2. Follow all warnings and instructions marked on this unit. 
3. Unplug this unit from the wall outlet before cleaning. Do not use liquid or aerosol cleaners. 
4 
Use a slightly damp cloth for cleaning. 
4. Do not use this unit in or near water. 
5. Do not place this unit on an unstable surface, cart, stand, or table. The unit may fall, causing 
serious damage. 
6. Any slots and openings on the case top, back, and bottom are provided for ventilation. To 
ensure safe and reliable operation of this unit, and to protect it from overheating, do not block 
or cover these openings. Do not place this unit on a bed, sofa, rug, or similar surface, as the 
ventilation openings may become blocked. This unit should never be placed near or over a 
heat source or radiator. This unit should not be placed in a built-in installation unless proper 
ventilation is provided. 
7. This product should only be operated from the type of power source indicated on the marking 
label of the AC adapter. If you are not sure of the type of power available, consult your 
Datavideo dealer or your local power company. 
8. Do not allow anything to rest on the power cord. Do not locate this unit where the power cord 
will be walked on, rolled over, damaged or otherwise stressed. 
9. If an extension cord must be used with this unit, make sure that the total of the ampere ratings 
on the products plugged into the extension cord do not exceed the extension cord’s rating. 
10. Make sure that the total amperes of all the units that are plugged into a single wall outlet do 
not exceed 15 amperes. 
11. Never push objects of any kind into this unit through the case ventilation slots, as they may 
touch dangerous voltage points or short out parts that could result in risk of fire or electric 
shock. Never spill liquid of any kind onto or into this unit. 
12. Except as specifically explained elsewhere in this manual, do not attempt to service this 
product yourself. Opening or removing covers that are marked “Do Not Remove” may expose 
you to dangerous voltage points or other risks, and will void your warranty. Refer all service 
issues to qualified service personnel. 
13. Unplug this product from the wall outlet and refer to qualified service personnel under the 
following conditions: 
a. When the power cord is damaged or frayed; 
b. When liquid has spilled into the unit; 
c. When the product has been exposed to rain or water; 
d. When the product does not operate normally under normal operating conditions. 
Adjust only those controls that are covered by the operating instructions in this 
manual; improper adjustment of other controls may result in damage to the unit and 
may often require extensive work by a qualified technician to restore the unit to 
normal operation; 
e. When the product has been dropped or the case has been damaged; 
f. When the product exhibits a distinct change in performance, indicating a need for 
service.
5 
Warranty 
Standard Warranty 
 Datavideo equipment is guaranteed against any manufacturing defects for one year from the 
date of purchase. 
 The original purchase invoice or other documentary evidence should be supplied at the time 
of any request for repair under warranty. 
 Damage caused by accident, misuse, unauthorized repairs, sand, grit or water is not covered 
by this warranty. 
 All mail or transportation costs including insurance are at the expense of the owner. 
 All other claims of any nature are not covered. 
 Cables & batteries are not covered under warranty. 
 Warranty only valid within the country or region of purchase. 
 Your statutory rights are not affected. 
Two Year Warranty 
 All Datavideo products purchased after 01-Oct.-2008 qualify for a free one year extension to the 
standard Warranty, providing the product is registered with Datavideo within 30 days of 
purchase. For information on how to register please visit www.datavideo-tek.com or contact 
your local Datavideo office or authorized Distributors 
 Certain parts with limited lifetime expectancy such as LCD Panels, DVD Drives, Hard Drives are 
only covered for the first 10,000 hours, or 1 year (whichever comes first). 
Any second year warranty claims must be made to your local Datavideo office or one of its authorized 
Distributors before the extended warranty expires. 
Disposal 
For EU Customers only - WEEE Marking 
This symbol on the product indicates that it should not be treated as household 
waste. It must be handed over to the applicable take-back scheme for the 
recycling of waste electrical and electronic equipment. For more detailed 
information about the recycling of this product, please contact your local Datavideo 
office. 
Packing List 
Item No. Description Quantity 
1 Instruction Manual 1 
2 DN-200 Recorder 1 
3 12V DC 1A PSU 1 
4 3.5mm Jack to RCA Breakout cable 1
Product Overview 
The DN-200 is a small and portable video recorder/player capable of very long record times. A built-in, 
large capacity hard drive (HDD) stores the video. It can record up to 23 hours of video depending 
on the recording format, drive settings and hard drive size. The DN-200 HDD can have one or two 
partitions. A second 6GB partition can be set up. The recorder will have no affect on this partition so 
the user is free to name it, format it, store any type of data on it with complete confidence that the 
recorder will not alter it. The unit can easily be set up for FAT32 or NTFS; PAL, NTSC or HDV frame 
rates too. 
This unit is capable of recording from digital or analogue sources using IEEE-1394 or Composite and 
RCA stereo connections. It can also be set up to record PAL or NTSC Time Lapse sequences at a 
variety of standard or triggered intervals. Set it up to buffer live video and when you press record 
within 8 seconds of an event you can be confident that you have recorded that must have shot. 
Once recorded Drag and Drop these video files directly to the time-line of your Non-Linear Editing 
program using popular DV file wrappers such as Microsoft AVI type 2, Canopus AVI, QuickTime 
MOV, MXF OP1A as well as HDV M2T. With this many useful features the DN-200 is ideal for a 
variety applications within broadcast, education, animation, science, medical, construction and 
security, etc. 
Features 
 Small, easy to carry, high capacity hard drive recorder 
 Input Video Connections: 
Composite video (BNC) and RCA stereo audio (PAL or NTSC) 
IEEE-1394 supports DV,HDV including embedded external Time Code Input 
6 
 Output Connections: 
Composite video (BNC) and RCA stereo audio (PAL or NTSC) via breakout cable 
 IEEE-1394 in playback can supply DV,HDV signals 
 IEEE-1394 connection in AVHDD Mode also supports PC and Mac FW400 connections 
 Supports DV AVI, DV MOV, DV MXF-OP1A and M2T file formats directly, QuickTime HDV 
and MXF-OP1A through a quick utility program 
 Set audio sampling rate to match 48KHz (16bit) or 32KHz (12bit) 
 Time-lapse single frame recording at standard intervals 
 Manually triggered single frame recording. Useful in model animation recordings 
 8 second pre-record buffer, useful in recording unexpected events especially in science 
research, outdoor recording, Health & Safety or security applications 
 Loop Playback of video in a selected bin 
 Auto record or Playback to or from current video bin when powered on 
 Backlit LCD panel showing a comprehensive layout of the recorders status 
 Allocate a second 6GB HDD partition as a dedicated area for other files 
 Built-in 2.5" 320GB SATA HDD, allows up to 23 hours of video to be recorded* 
 RS-232 and GPI interfaces for simple update, trigger and control 
*subject to HDD size, partitioning chosen, available HDD space and video data rate
7 
Connections & Controls 
Front Panel 
1. Menu Button - Calls up the menu display which is navigated using buttons 6 & 7. 
2. Display Panel - Displays the status and set up of the DN-200 unit or if the Menu 
Button is pressed the DN-200 Menu options. 
3. Play / Pause Button - Starts playback of a track, or pauses playback of a track with 
the current status shown on the Display Panel. Also Starts / Pauses a recording when 
the unit is in Record mode. 
4. Stop Button - Stops playback or record. 
5. Record Button - Puts the DN-200 into Record Mode. To start recording press the 
Record Button and the Play Button simultaneously. The unit will not record if no 
video signal is present. 
6. Navigation Button – Used to navigate the menus and confirm set up choices. 
7. Navigation Button – Used to navigate the menus and confirm set up choices. 
DN-200 Clip Status Display Explained 
1. Sync to Tape Indicator OFF=ST0 and ON=ST1 
2. Analogue / Digital Source indicator 
3. Loop Playback indicator 
4. Remaining Recording Space in Hours and Minutes 
5. Current Bin and Clip 
6. File type indicator 
7. Current Time Code or total length of clip 
8. Menu options 
9. Record, Pause, FFWD, REV and Playback indication
8 
Rear Panel Connections 
1. TC IN – This BNC connection allows the unit to record External Time Code 
from a source Camera or Deck. 
2. CVBS IN – This BNC connection allows the unit to accept an analogue 
Composite NTSC or PAL video input. 
3. AUDIO IN – These RCA L & R channel inputs allow line level analogue audio 
to be recorded to the same clip as input 2 above. 
4. A/V OUT – Allows output of Composite video and analogue L & R channel 
audio via a breakout cable from a 3.5mm jack connection. 
5. GPI socket – Can be used for simple external control. The DN-200 can 
accept pulse or level trigger inputs, these can trigger record, playback and 
pause commands. 
6. RS-232 Socket – The DN-200 can be controlled via RS-232 from external 
devices. See Page 19. 
7. 6 Pin IEEE-1394 In/Out Port – supports DV25 / HDV M2T input sources or 
output a DV25 signal to a monitor or supports Firewire 400 communication 
with a PC/Mac for file transfer. 
8. Power On/Off Switch. 
9. DC In Socket. Connect the supplied power adaptor to this socket. The 
connection can be secured by screwing the outer fastening ring of the DC In 
plug to the socket. 
Powering On 
Connect the DN-200’s own power supply to the rear DC In socket. Ensure the power supply unit is 
connected to a suitable mains socket. Switch the power ON/OFF switch to the ON position. 
The LCD display panel will show “FOR AVHDD MODE PLEASE PRESS MENU”, ignore this message 
and after a few seconds the Clip Status Display will be shown. The DN-200 is now ready for use as a 
recorder or playback device.
DN-200 Menus 
The DN-200 is a menu driven unit; there are several menus which are used to set up the unit. The 
menu settings are non-volatile (settings are stored even when the unit is switched off). So general 
settings, such as date and file type, may only need to be set once. We will look at specific set ups in 
more detail later on in this manual, but here is an overview of the available menu options. 
Pressing the Navigation Button labelled NEXT will display the next menu option. If all menu options 
have been displayed and next is selected then the unit loops back to the first menu option once more. 
Pressing the Navigation Button labelled ENTER will select the displayed menu option. The next level 
of menu options or a specific setting choice will then be displayed. Pressing the MENU Button will 
allow exit of the current menu or setting. 
Example menu selection: 
Main Menu Options 
There are 8 initial main menu level options and they are: 
menu = exit 
SELECT SOURCE 
ENTER NEXT 
menu = exit 
SELECT SOURCE 
ANA DIG* 
Menu Option Action taken 
MAKE MEDIA FILES This process should be the last step in the record session before transfer 
of your recorded video footage to an edit / storage system. It prepares 
ALL recorded video by wrapping the clips as a selected file type such as 
.AVI or .MOV. These files can then be seen by the computer when in the 
AVHDD mode. After successful transfer / backup of ALL files to computer 
the DN-200 should then be wiped with EMPTY ALL BINS so the unit is 
then ready for the next record session. 
EMPTY THIS BIN Empties or erases the content within the selected bin, this action cannot 
be undone once selected. 
SELECT SOURCE The signal to be recorded can be chosen to come either from the IEEE- 
1394 input (DIG) as a digital signal or come from the BNC and RCA inputs 
as NTSC or PAL analogue signals (ANA). 
EMPTY ALL BINS Empties or erases the content in ALL of the bins. This action cannot be 
9 
undone once selected. 
RECORD SETUP Enters the Record Setup Menu group detailed on page 10 
PLAY SETUP Enters the Play Setup Menu group detailed on page 10 
SYSTEM SETUP Enters the System Setup Menu group detailed on page 11 
FIRMWARE REVISION Displays the current firmware revision for the DN-200 
Table 1 Main Menu 
menu = exit 
EMPTY THIS BIN ? 
ENTER NEXT 
menu = exit 
MAKE MEDIA FILES 
ENTER NEXT
Record Setup Options 
Entered from the Main Menu, this set of options enable various record related parameters and modes 
to be setup. 
Menu Option Action taken 
SET RECORD FILE TYPE Where the choice of file type is made for all un-recorded bins. File 
types cannot be mixed within a bin. Choices are .mov, 2 types of .avi, 
.mxf and for HDV .m2t only. Note that the current type chosen will be 
marked with an asterisk as well as being indicated on the 2nd line of 
the Clip Status Display, see Page 7. 
SYNCtoTAPE CONTROL ST1, where the recorder will look to the time code changing to 
indicate the need to record. If the time code pauses then the 
recording is paused. With this setting turned off, ST0, the record 
process will continue regardless of the time code behaviour. Note 
that the current selection will be marked with an asterisk as well as 
being indicated on the top line of the Clip Status Display, see Page 7. 
SET RECORD DATE This option always modifies the date attribute of the created file when 
the source is analogue. When the source is digital if the date in the 
digital stream is invalid then the unit will use this date instead. 
RECORD PRE-TRIGGER When enabled, the last 8 seconds of video before the record trigger 
is captured ahead of the video following the trigger. Note that the 
video in the pre trigger buffer is lost when the unit is power cycled. 
SET DEFAULT DV AUDIO When the audio source is analogue, this option sets the audio 
sampling frequency to 48KHz or 32KHz. When the source is digital, 
this option helps the recorder match the incoming audio sampling 
frequency. Note that the current selection will be marked with an 
asterisk. 
SET ASPECT RATIO When the source is analogue, this option sets the 16:9 or 4:3 aspect 
ratio flag in the stream to be recorded. 
TIMELAPSE RECORD Allows the recording of NTSC or PAL video at slower than real time 
through a choice of 6 options. Note that the current selection will be 
marked with an asterisk. 
PWR ON AUTO RECORD When enabled, the recorder will go directly into record mode in the 
last bin selected once power is applied. 
10 
Table 2 Record Setup Menu 
Play Setup Options 
Entered from the Main Menu, this set of options enable various record related parameters and modes 
to be setup. 
Menu Option Action taken 
SET LOOP PLAY When enabled the DN-200 will loop play all clips in the current bin, the 
playback will continuously loop until stopped. Note that the chosen 
mode is indicated by an asterisk as well as the presence or absence of 
the loop play icon on the top line of the Clip Status Display, see page 7. 
PWR ON AUTO PLAY When enabled, the recorder will go directly into a play mode in the last 
bin selected once power is applied. 
Table 3 Play Setup Menu
System Setup Options 
Entered from the Main Menu, this set of options enable various record related parameters and modes 
to be setup. 
Menu Option Action taken 
SET SIGNAL TYPE Where the recorder is set to operate with one of three signal types, 
NTSC, PAL or HDV. Note: Changing between signal types will 
erase the content in all bins and the DN-200 will restart. Backup any 
content first. The current selection will be marked with an asterisk. 
SET FAT32 / NTFS This option will set up the file system type seen by the computer in 
AVHDD mode as either NTFS or FAT32. Note: Changing between 
types will erase the content in all bins and the DN-200 will restart. 
Backup any content first. The current selection will be marked with 
an asterisk. 
MODIFY HDD VOLUME ID When connecting as an HDD the DN-200 volume name is shown as 
Mediapac_xx. This option sets the xx value between 0 and 99. A 
useful feature when connecting multiple units at the same time from 
a multi-shoot. 
SETUP HDD PARTITION The DN-200 HDD can have one or two partitions. A second 6GB 
partition can be set up. The recorder will have no affect on this 
partition so the user is free to name it, format it, store any type of 
data on it with complete confidence that the recorder will not alter it. 
SET TIMECODE DISPLAY During recording and playback, this option allows display of either 
the Internal or the External time code. Note that the current 
selection will be marked with an asterisk. 
SET REMOTE CONTROL This option either enables or disables the remote control capability. 
Note that the current selection will be marked with an asterisk. 
TOTAL SPACE Displays the video capacity of the DN-200 hard drive in Hours, 
Minutes, Seconds and Frames HH:MM:SS:FF. 
UPGRADE FIRMWARE Allows the user to update the firmware of the recorder, provided a 
proper file has been copied on to the DN-200 hard drive in AVHDD 
mode. 
SET GPI TRIGGER MODE The GPI socket can be used for simple trigger control. The DN-200 
can accept Pulse or Level inputs on this socket, which will trigger 
record, playback and pause commands. See Page 15 
SET FACTORY DEFAULT Recall FACTORY DEFAULT to be loaded into current setup 
NTSC SETUP LEVEL The setup level is set to 7.5 or 0 IRE. 7.5 IRE is most commonly 
used in the U.S.A. and Canada and 0 IRE in far eastern countries 
such as Japan. Not used in PAL or HDV modes. 
11 
Table 4 System Setup Menu
DN-200 General Setup Notes 
Before using your DN-200 for the first time, there are a few basic operational settings that must be 
chosen. These are found under the System Setup option in the menu tree (see Table 4 on the 
previous page). 
Set the signal type 
WARNING: Changing between signal types will erase the content in all bins. Backup any content first. 
Select between NTSC, PAL or HDV. If the standard chosen is NTSC, then a choice of NTSC SETUP 
LEVEL is also given. This allows the IRE Black level to be set to 0 or 7.5 for NTSC. 7.5 IRE is most 
commonly used in the U.S.A. and Canada and 0 IRE in far eastern countries such as Japan. 
Set HDD partition to 1 or 2 
WARNING: Changing SETUP HDD PARTITION will erase all content. Backup any content first. 
The HDD storage space can be broken into 2 partitions; the second partition reserves 6GB and is not 
seen or used by the recorder. The second partition will appear as a second drive to the computer and 
the user is then free to use this drive to store any data including stills, text documents, spreadsheets, 
metadata and/or finished work. The DN-200 is guaranteed not to overwrite data in this second 
partition. Deleting all bins will also not erase any data in this second partition. The recorder will show 
a total record capacity less approximately 30 minutes record time once the second partition is 
created. 
Choose a file operating system, FAT32 or NTFS 
This option will set up the file system type seen by the computer in AVHDD mode. NTFS does not 
have the same 2GB file size limitation imposed by the FAT32 file system. An NTFS recorded clip 
stays as one file no matter what its length. This choice should only be made once before making any 
media files. Note: Some editing systems cannot handle NTFS files larger than 40GB. 
Set the HDD volume ID 
When connecting as an HDD the DN-200 volume name is shown as Mediapac_xx. If your application 
calls for multiple DN-200s to be connected to the computer, it becomes helpful to have a unique 
volume name for each DN-200. This option allows xx to be set between 00 and 99. 
Select which time code to display 
With DV, whilst recording or playing, the time code displayed can be either externally or internally 
generated. If the input signal is analogue and no time code is supplied then the External Time Code 
generated by the DN-200 is in the dropped-frame format. The internal time code referred to here is 
the absolute frame number of the recording in the selected bin and is in the non-dropped-frame 
format. The absolute frame number starts from 00:00:00:00 in each bin. When the content is 
changed to files, the time code presented to the editing system starts with the External value of the 
first frame of the content; if this value is invalid then 00:00:00:00 is substituted. For HDV, the time 
code displayed is always the External time code. 
Empty the current or all bins 
The DN-200 is primarily a capture device, as opposed to an archiving device, and it is best to start out 
with a fresh DN-200 on each project just remember to backup any existing content to computer first. 
Emptying (erasing) ALL bins will not only clear the DN-200 but it will also conveniently reset the file 
system. 
12
Normal Recording 
A few parameters must be set properly for standard recording and they are mostly grouped in the 
menu RECORD SETUP. 
Select the video source 
For any recordings use SELECT SOURCE in the Main menu. Recordings can be made from the 
analogue BNC composite connection (ANA) or the IEEE-1394/DV/HDV port (DIG). 
Note: The breakout AVOUT port, Composite and RCA audio from 3.5mm jack connection, is always 
live, regardless of the SD input signal source, ANA or DIG. When the source is analogue, the signal is 
also converted to DV digital and output on the IEEE-1394 port. 
Note: In a HDV set up, both input and output is sent through the same IEEE-1394 port and the 
analogue connections are made redundant. 
Set the file type 
Should you wish to connect the DN-200, in AVHDD mode, to your computer and drag and drop your 
video content to it as files. The choices for file types are Microsoft .avi (Type II), Canopus .avi, both 
commonly used in PCs, QuickTime .mov format used in Macs and .mxf (OP1A) for use with other 
systems such as Avid. In HDV mode, the only file type supplied is .m2t and this may need conversion 
before being edited, depending on your computer’s specifications and its editing software. 
Note: The file format started within one bin will apply to all subsequent recordings within that bin and 
can only be changed after the bin content is erased or emptied. 
Synchronize to tape motion 
DN-200 recording sessions can be synchronized to the camera’s record button by turning Sync to 
Tape ON (ST1 is shown on the Clip Status Display, see page 7). Whenever the tape deck in the 
camera is rolling, so will the time code. The DN-200 recognizes this information and will record along 
with the deck. When the deck stops, the DN-200 will pause the recording. To record continuously 
without regard for tape or deck motion, switch Sync To Tape off (ST0 is shown). Some cameras 
control the DN-200 directly through the IEEE-1394 interface and in these cases use ST0 and let the 
camera do the work. 
Select the audio sampling rate in DV mode 
This option will set the audio sampling rate to 32KHz or 48KHz when the video source is analogue. 
When the video source is digital this setting will be used to match the audio portion of the digital 
stream. If the audio sampling rate is incorrect and does not match then the first two frames of data will 
be discarded as the DN-200 resets itself. 
Note: Only one type of audio sampling rate can be used within a bin. 
Set the record date (optional) 
The date attribute of the created file is set to this value when the source is analogue. Each file 
representing a clip gets it own date. If the source is digital then the record date from the digital stream 
is used. If that date is not valid then the current record date set by this option is used instead. 
Before starting to Record 
Select an empty Bin by pressing the PREVIOUS or NEXT keys when looking at the Clip Status 
Display (see page 7). An empty Bin will display 00:00:00:00. 
Starting the Record Process 
Common ways of starting to record with the DN-200 are: 
1) Manually, by holding the Record button down and then pressing the Play button. 
2) Automatically, the camera or device connected to the IEEE-1394 port controls the record action. 
A third way is to issue a record command via the Remote Serial interface or RS-232 port. The DN-200 
RS-232 command protocol is listed in this manual from page 19 onwards. 
13
Pausing the Record Process 
The DN-200 will automatically pause recording if time code is not moving and ST1 (Sync to Tape) is 
displayed. When the video source is digital this time code is embedded in the data stream and it is 
always recorded. However, when the video source is analogue, the time code used is the SMPTE 
longitudinal time code supplied on the BNC connection. To cause the recording to pause, that time 
code must be valid but not moving. If SMPTE time code is not present at all then a DN-200 generated 
time code is substituted starting at 00:00:00:00 for each bin and incrementing from there in a 
dropped-frame manner (NTSC only). In this case, ST1 (Sync to Tape) has no meaning. It is also 
possible to pause a recording by pressing the PLAY key, in this mode, recording is resumed by 
pressing the PLAY key once more and a new clip is created within the same bin. 
Warning: If power is interrupted whilst the recording is paused, all clip numbers added during the 
current record session will be lost. No content however will be lost. Future firmware upgrades may fix 
this behaviour. 
Note: If power is interrupted while recording, up to two seconds of the last video may be lost. 
Marking the Recording 
Whilst recording the right hand navigation button is labelled MARK. Pressing this key whilst recording 
will start a new clip within the current bin, no frames are lost in doing this. Each time a recording is 
Marked a new clip is created. A single recording can be marked up 97 times within the current bin. 
Note: Recording is started in an empty bin. A clip is automatically started at the beginning of 
recording to the bin. A clip can never be inserted in between other clips already in the bin. Marking or 
Pausing a recording forces clip numbers to be incremented, each clip is written to the current bin. 
Note: The minimum length of a clip is 2 seconds. 
Stop a recording before powering down 
It is best to stop a recording session by pressing the Stop key before turning the DN-200’s power off, 
otherwise the whole recording or part of it may be lost. 
Power on auto record 
When this option is enabled and the unit is powered on the DN-200 will attempt to begin recording 
immediately to a chosen bin using the latest stored settings for source, file type etc. 
Time Lapse Recording 
In this option a recording can be set up to capture using one of six time lapse settings. 
These are: 1 frame per second 1 frame per 2 seconds 1 frame per 5 seconds 
every 4th frame every other frame or 1 frame per trigger 
Note: When power is interrupted and then restored the unit will need to be restarted within a new bin. 
Note: A new clip is created only at the beginning of a time lapse recording. Frames are appended. 
Note: This option is currently not available with HDV sources. 
Using Record Pre-trigger 
When this option is enabled the DN-200 is always in a record-ready mode when it is not playing. In 
this mode it is continuously storing live data in its internal buffer which is 8 seconds in length. In this 
manner, when a recording is started the last 8 seconds of history prior to the trigger is then captured 
to disk and video after the trigger is appended after it. 
Note: This mode is not saved when power is interrupted and the 8 second buffer is flushed. 
14
DN-200 GPI Trigger connection and operation 
GPI Trigger cabling and circuit 
The DN-200 GPI circuit runs on less than 5V DC. This current is supplied by the DN-200 GPI port. 
You will need a pre-manufactured GPI trigger cable or, you could make your own GPI trigger using a 
3.5mm stereo jack connected by 2 core cabling to a simple ‘contact on closure’ button or similar 
trigger. Wiring from Tip and sleeve on the 3.5mm stereo jack should show roughly 3.28V DC when 
plugged into the DN-200 GPI port. Jack Tip is positive(+), jack sleeve is negative(-) and ring is not 
used. 
SET GPI TRIGGER MODE 
In the DN-200 SYSTEM SETUP menu use the option labelled SET GPI TRIGGER MODE. You can 
then make a choice between the PULSE or LEVEL trigger. The selected choice is marked with an 
asterisk. 
PULSE trigger Record process 
Using the Clip Status Display and navigation buttons select an empty DN-200 bin. Make sure the 
source device is connected and working and the target file type on the DN-200 has been chosen. 
Press and hold in the Record button on the front panel and then press the Play button. This should 
start the record process. The button on the connected GPI cabling is then pressed forcing the unit into 
record pause mode. The unit is then ready to activate record on the next press of the contact closure 
button. Each time the DN-200 starts recording a new clip will be added to the bin. Press the stop 
button on the front panel of the DN-200 to end recording to the bin. 
LEVEL trigger Record process 
Using the Clip Status Display and navigation buttons select an empty DN-200 bin. Make sure the 
source device is connected and working and the target file type on the DN-200 has been chosen. 
Press and hold in the Record button on the front panel and then press the Play button. This should 
start the record process. The button on the connected GPI cabling is then pressed forcing the unit into 
record pause mode for the length of the press. However, when the button is released the recording 
process starts again. Each time the DN-200 starts recording a new clip will be added to the bin. Press 
the stop button on the front panel of the DN-200 to end recording to the bin. 
The contact closure button may be working in the opposite way to the type of action you want to 
perform. A mechanical change to the GPI contact closure trigger should fix this. IE when pressed 
down the circuit is broken and recording starts. When released the contact is made causing the pause 
action. 
Note: You may a have a couple of seconds footage at the beginning of the bin that you may wish to 
remove later once the footage is transferred to a computer for editing. 
PULSE trigger Playback process 
Using the Clip Status Display and navigation buttons select a pre-recorded DN-200 bin. Make sure 
the output device/monitor is connected and working with the DN-200. Press in the Play button on the 
DN-200 front panel. This should start the playback. The button on the connected GPI cabling is then 
pressed forcing the unit into play pause mode. The unit is then ready to playback from this point on 
the next press of the contact closure button. Press the stop button on the front panel of the DN-200 to 
end playback of the bin. 
LEVEL trigger Playback process 
Using the Clip Status Display and navigation buttons select a pre-recorded DN-200 bin. Make sure 
the output device/monitor is connected and working with the DN-200. Press in the Play button on the 
DN-200 front panel. This should start the playback. The button on the connected GPI cabling is then 
pressed forcing the unit into play pause mode for the length of the press. However, when the button is 
released the playback starts again. Press the stop button on the front panel of the DN-200 to end 
playback of the bin. 
15
Playback 
Set up loop play 
When loop play is enabled and the last frame of the last clip is reached the DN-200 will start over 
playing from the first frame of the first clip seamlessly. 
Power on auto play 
When this option is enabled at power up the DN-200 will begin playing back immediately from the first 
clip of the last selected bin. 
Play out 
Play out mode can be entered by one of three ways, the most common is to press the PLAY button; 
the other two are by issuing a PLAY command through the IEEE-1394 interface or the serial port 
interface if it is enabled. 
When playing, the time displayed is controlled by the TC DISPLAY FORMAT option. When play back 
is stopped, the time displayed is the time code of the last frame displayed. 
When entering play back the soft keys will be fast reverse FREV and fast forward FFWD respectively. 
Repeatedly pressing either soft key will cause the play function to go repeatedly faster in the chosen 
direction up to 32x speed. A speed other than 1x is displayed in the bottom line. 
Also whilst playing out pressing the Menu button will give an alternate set of soft keys; SLOW and 
FAST. These keys, while keeping the same current play direction, will extend the control of the speed 
down to the slow motion range of 1/32x. The menu button will toggle between the two sets of keys. 
If play back is entered after a recording, the play back will start at the beginning of the first clip of the 
current bin. For example, a record session starts with clip 1, during the record the Make key is used to 
create clips 2 and 3. Play back will start at clip 1. This will remain until another bin is selected or 
power is turned off. 
Pause and Go To Mark 
While playing, pressing the PLAY key will pause the image. Pressing Play again will return to 1x play 
in the forward direction. 
While in the play-pause mode, the soft keys will be l< and >l. These keys allow direct access to the 
marks that are the starting and end frames of each clip. Counting the end frame of the last clip, there 
will always be one more mark than there are clips. In this mode, the clip number display will be 
substituted with a mark number display. 
Again, pressing the Menu key will present an alternate set of soft keys, these will be <ll and ll> for 
frame stepping reverse and forward respectively. Holding either key down for more than 2 seconds 
will cause a rapid stepping. 
16
MAKE MEDIA FILES 
This process should be the last step in the record session before transfer of your recorded video 
footage to an edit / storage system. It prepares ALL recorded video by wrapping the clips as a 
selected file type such as .AVI, MOV, MXF or M2T. These files can then be seen by the computer 
when in the AVHDD mode. After successful transfer / backup of ALL files to computer the DN-200 
should then be wiped with EMPTY ALL BINS so the unit is then ready for the next record session. 
Preparation 
Prior to using the DN-200 in the AV HDD mode and seeing your video as files instead of clips the 
MAKING MEDIA FILES menu process must be undertaken. 
Connection to a Computer in AV HDD Mode 
The AV HDD mode is where the DN-200 appears to the computer as a Hard Disk Drive (HDD) and 
not as a video device. The connection to the computer is via the IEEE-1394 connector. The AVHDD 
mode is entered by pressing the Menu key within the 5 seconds just after the DN-200 is powered on. 
When connecting as an HDD the DN-200 volume name is shown as Mediapac_xx. 
Note: Care must be taken when connecting the 6pin IEEE-1394 cable in the DN-200 when the other 
end is already connected to the computer. Do not attempt to insert the connector backwards as DC 
power from the computer is present on the cable and can damage the sensitive receiver circuits in the 
DN-200. 
Note: No software drivers are necessary for the computer to recognize the DN-200 as a Firewire 
HDD. Please see SET FAT32 / NTFS under SYSTEM SET UP to ensure compatibility with your 
computer operating system. 
Operating File System limitations 
The FAT32 format is compatible with both Macs and PCs. However, this format limits the size of a file 
to a maximum of 2GB, in DV that translates to approximately 9+ minutes of video. A clip that lasts 
longer than 9min is broken into multiple files, each 2GB long, with the last one making up the 
remaining time. 
If this sequence of 2GB files are placed in the correct order and end to end on an editing time line no 
frames are lost at the joins. In addition, FAT32 has a clip boundary that has a limit of 2 seconds so the 
beginning of a clip other than the first in a bin is most likely to contain the end of the previous clip, up 
to 2 seconds' worth. Conversely the end of a clip is most likely to be found in the first file of the next 
clip. For an accurate correlation of clip numbers between the VTR and the HDD mode, it is best to 
keep each clip longer than 2 seconds and to have fewer than 97 clips per bin. 
The NTFS format is fully compatible with PCs and is read compatible with Macs. Its main advantage 
is that it does not impose a file size limitation to the DN-200 resulting in one file per clip. NTFS’ clip 
boundary is frame accurate and therefore has perfect correlation with clip numbers in the VTR mode. 
Note: Some NLEs cannot accept file sizes greater than 40GB, make sure your NLE is not one 
of them if you plan on shooting one continuous take greater then 3 hours and using NTFS. 
File Organization 
After the media conversion is made, all bins that contained video will appear to the computer as 
folders named BINxx where xx represents the BIN number ranging from 01 to 99. Inside each folder, 
each clip will be represented as a file with an extension name .avi, .mov e.g. depending on the type 
chosen prior to recording. Each file will be named BxxCnnyy where xx again represents the bin 
number; nn represents the Clip number ranging from 01 to 97. The number yy is the number of the 
spilt file caused by the FAT32 limitation 
17
Updating DN-200 Firmware 
From time to time Datavideo may release new firmware to either add new features or to fix reported 
bugs in the current DN-200 firmware. Customers can update the DN-200 firmware themselves if they 
wish or they can contact their local dealer or reseller for assistance should they prefer this method. 
This page describes the firmware update process, it should take approximately 15 minutes total 
time to complete. 
Once started the update process should not be interrupted in any way as this could result in a 
non-responsive unit. 
As well as a working DN-200 you will need: 
 The latest Firmware update for the DN-200. 
This can be obtained from your local Datavideo office. 
18 
 The DN-200 power supply. 
 A 6 pin IEEE-1394 cable. 
 A PC or Mac computer. 
The AV HDD mode is where the DN-200 appears to the computer as a Hard Disk Drive (HDD) and 
not as a video device. The connection to the computer is done via the IEEE-1394 connector. The 
AVHDD mode is entered by pressing the Menu key within the 5 seconds just after the DN-200 is 
powered on. When connecting as an HDD the DN-200 volume name is shown as Mediapac_xx. 
Note: Care must be taken when connecting the 6pin IEEE-1394 cable in the DN-200 when the other 
end is already connected to the computer. Do not attempt to insert the connector backwards as DC 
power from the computer is present on the cable and can damage the sensitive receiver circuits in the 
DN-200. Note: No software drivers are necessary for the computer to recognize the DN-200 as an 
HDD. 
To update the DN-200’s firmware: 
1. Take a DN-200 that has been set to the FAT32 file system and has been taken through 
the MAKE MEDIA FILES process and connect it to your computer in AVHDD mode as 
described above. 
2. Copy the firmware update file to the root directory level, where all bin folders usually 
appear, and rename it flash.bin. 
3. Next, dis-mount or eject the DN-200 from the computer and power cycle the unit. 
4. Once re-started enter the SYSTEM SETUP menu and select the UPDATE FIRMWARE 
option. 
5. Follow the display screen instructions.* 
6. The unit will re-start itself once the process is complete. 
*WARNING: Once the ERASE FLASH option has been selected, DO NOT turn power off until the 
firmware has been updated. If the update is prematurely ended the recorder will be made inoperable.
DN-200 RS-232 Controller Command Set 
Rev 3.1 July 29, 2006 
Communication Format: 
Mode: No synchronization 
Character Length: 1 start bit + 8 data bits + 1 parity bit + 1 stop bit 
Data Rate: 38,400 Baud 
Parity: Odd 
Command Format: 
CMD1, CMD2, Data bytes …., Checksum byte 
A Command is made up of two address bytes, CMD1 and CMD2, a variable number of Data bytes 
(Data from 0 up to 15) and a Checksum byte. The Checksum byte is the modulo 256 sum of all 
preceding bytes. 
The most significant nibble of the CMD1 byte represents the command group. The least significant 
nibble represents the number of Data bytes to follow the CMD2 byte. 
Command Protocol: 
CMD1, CMD2, Data bytes …., Checksum byte 
Response: ACK 
Other than the sense command, the unit will respond to all commands affirmatively by sending a three 
byte acknowledgement (ACK) if the Checksum is valid. If the Checksum is not valid, the DN-200 will 
ignore the command. Most commands will be responded to within 8 msec. However, a PLAY 
command from an idle state will result in response delay of up to 700 msec. During this busy time, all 
commands will be ignored. 
Summary List of Commands 
Command Name Response Name 
19 
System Control 
00h, 11h, 11h Device Type Request 12h, 11h, 00h, 00h, 23h Device Type 
00h, F1h, F1h Next Bin 10h, 01h, 11h ACK 
00h, F2h, F2h Previous Bin 10h, 01h, 11h ACK 
00h, F4h, F4h Disable Loop Play 10h, 01h, 11h ACK 
00h, F5h, F5h Enable Loop Play 10h, 01h, 11h ACK 
01h, F0h, XXh, csum Select Bin 10h, 01h, 11h ACK 
Connector Pin Assignment 
Interface : 9 pin D-Sub female to 3.5mm Jack 
The pin assignment of the Controller and DN-200 is shown in the following table: 
9 Pin D-Sub Controller (P1) DN-200 (P2) 3.5mm Jack 
Pin 2 (Rx) 2 Jack Ring 
Pin 3 (Tx) 1 Jack Tip 
Pin 5 (GND) 3 Jack Sleeve
System Control 
00h, 11h Device Type request 
The response is 00, 00 indicating Quick Capture 
00h, F1h Next Bin 
When this command is issued from the Idle state the next bin is selected. If the present bin is 99 then 
the next bin is 1. 
00h, F2h Previous Bin 
When this command is issued from the Idle state the previous bin is selected. If the present bin is 1 
then the next bin is 99. 
00h, F4h Disable Loop Play 
When this command is issued from the Idle state the Loop Play feature is disabled. Loop Play is 
where the the last play command is repeated from its beginning when the end is reached. 
00h, F4h Enable Loop Play 
When this command is issued from the Idle state the Loop Play feature is enabled. Loop Play is 
where the the last play command is repeated from its beginning when the end is reached. 
01h, F0h, XXh Select Bin XX 
When this command is issued from the Idle state bin XX is selected. XX varies between 1 and 99. 
Illegal bins are ignored. 
01h, F3h, XXh Select and Empty Bin XX 
When this command is issued from the Idle state bin XX is selected and all of its content is 
permanently deleted. XX varies between 1 and 99. Illegal bins are ignored. 
Sense Request 
61h, 0Ch, 04h Current Time Sense 
Requests the Time code data. The unit responds with 4 bytes indicating the present time code in 
Binary-Coded-Decimal. The first byte holds the frame number, the second byte holds the seconds, 
the third the minutes and the fourth the hour. In the play state, the time code returned is the time 
associated with the current frame being played, in the record state, the time code returned represents 
the elapsed time recorded in the present bin. 
Command Name Response Name 
61h, 20h, OL, csum Status Sense 7Lh, 20h, Stat(L), csum Status 
61h, F0h, 04h, 55h Current Frame Offset 74h, 00h, FO(3:0), csum Frame Offset 
61h, F1h, 01h, 53h Current Bin 61h, 00h, nn, csum Bin Number 
24h, F1h, nn Play Offset nn 
Frame Offset number nn is played. The number nn is made up of 4 binary encoded bytes and sent 
out with the least significant byte first. This command may be issued from the idle state or any other 
Play state. Note: Frame Offset are represented in absolute frame numbers where the first frame of 
the bin is 0. 
24h, F2h, nn Play from Offset nn 
Content of the present bin is played at 1x speed starting at Frame Offset nn. This command may be 
issued from the Idle state or any other Play state. 
24h, F3h, bb, nn Select Bin and Play Offset 
Bin number bb is selected and Frame Offset number nn is played. This command may be issued from 
the idle state or any other Play state. 
24h, F4h, bb, nn Select Bin and Play from Offset 
Content of the bin number bb is played at 1x speed starting at Frame Offset nn. This command may 
be issued from the idle state or any other Play state. 
20
24h, F5h, nn Play to Offset nn 
Content of the present bin is played at 1x speed starting from present Frame Offset until Frame Offset 
nn at which point it pauses. Frame Offset nn is 4 bytes and starts with the LSB. This command may 
be issued from the idle state or any other Play state. 
25h, F5h, bb, nn Select Bin and Play to Offset 
Content of the bin number bb is played at 1x speed starting at Frame Offset 0 to Frame Offset nn then 
pause. Frame Offset nn is 4 bytes and starts with the LSB. This command may be issued from the 
idle state or any other Play state. 
29h, F5h, bb, nn, ee Select Bin and Play from Offset to Offset 
Content of the bin number bb is played at 1x speed starting at Frame Offset nn to Frame Offset ee 
then pause. Frame Offsets nn and ee are 4 bytes and start with the LSB. This 
Transport Control 
20h, 00h, Stop 
The unit enters the idle state. In the A2D, the outputs reflect the video source as selected by the Front 
Panel. 
20h, 01h Play 
Content of the present bin is played at 1x speed. This command may be issued from the idle state or 
any other Play state. 
20h 02h Record 
The video is recorded from the selected source onto the current Bin. This command may be issued 
only from the idle state. 
20h, 10h Fast Forward 
A play state where video is played at the highest speed of 32x in the forward direction. 
20h, 20h Fast Rewind 
A play state where video is played at the highest speed of 32x in the reverse direction. 
NOTE: When receiving one of the following commands (JOG, VARIABLE or SHUTTLE ), the unit will 
play forward or backward according to the speed data. 
The first data byte may only be a maximum of 80: 
Play Speed=10(nn/32-2) 
Note that setting nn to 0 will result in pausing the unit. 
21h, 11h, nnh Jog Forward 
21h, 12h, nnh Variable Forward 
21h, 13h, nnh Shuttle Forward 
A Play state where video is played at the commanded play speed as described above in the forward 
direction. Note: Setting the speed to 0 causes the play to pause. 
21h, 21h, nnh Jog Reverse 
21h, 22h, nnh Variable Reverse 
21h, 23h, nnh Shuttle Reverse 
A Play state where video is played at the commanded play speed as described above in the reverse 
direction. Note: Setting the speed to 0 causes the play to pause. 
21h, F0h, nnh Select Bin and Play 
Content of the bin number nn is played at 1x speed from the beginning. This command may be issued 
from the idle state or any other Play state 
21
22
23 
USER Notes
24 
Service and Support 
It is our goal to make your products ownership a satisfying experience. Our support staff is available 
to assist you in setting up and operating your system. Please refer to our web site www.datavideo-tek. 
com for answers to common questions, support requests or contact your local office below. 
Datavideo Global Website: www.datavideo-tek.com 
Datavideo Corporation 
Tel: +1 562 696 2324 Fax: +1 562-698-6930 E-Mail: contactus@datavideo.us 
Datavideo Technologies Europe BV 
Tel: +31-30-261-96-56 Fax: +31-30 261-96-57 E-Mail: service@datavideo.nl 
Datavideo UK Limited 
Tel: +44 1457 851 000 Fax: +44 1457 850 964 E-Mail: sales@datavideo.co.uk 
Datavideo Technologies Co., Ltd 
Tel: +886 2 8227 2888 Fax: +886-2-8227-2777 E-mail: service@datavideo.com.tw 
Datavideo Technologies China Co., Ltd 
Tel: +86 21-5603 6599 Fax:+86 21-5603 6770 E-mail: service@datavideo.cn 
Datavideo Technologies (S) PTE Ltd 
Tel: +65-6749 6866 Fax: +65-6749 3266 E-mail: sales@datavideo.sg 
Datavideo HK Ltd 
Tel: +852 2833 1981 Fax: +852-2833-9916 E-mail: info@datavideo.com.hk 
Datavideo France s.a.r.l. 
Tel: +33 1 60 37 02 46 Fax: +33 1 60 37 67 32 E-mail: info@datavideo.fr 
Datavideo Technologies India PVT LTD. 
Tel: +91 120 4309120 Fax: +91 120 4309121 E-mail: sales@datavideo.in 
All the trademarks are the properties of their respective owners. 
Datavideo Technologies Co., Ltd. All rights reserved 2012. 
Rev Date: 20/07/2012 P/N: G082060404E4

Más contenido relacionado

La actualidad más candente

Ar drone-uk-manual-flying-guide
Ar drone-uk-manual-flying-guideAr drone-uk-manual-flying-guide
Ar drone-uk-manual-flying-guidesmashingdrones
 
8860039 c tri carb reference manual
8860039 c tri carb reference manual8860039 c tri carb reference manual
8860039 c tri carb reference manualMahbubul Hassan
 
Daewoo doosan solar 75 v excavator service repair manual
Daewoo doosan solar 75 v excavator service repair manualDaewoo doosan solar 75 v excavator service repair manual
Daewoo doosan solar 75 v excavator service repair manualfujsjekfkkseme
 
Dell Inspiron 7537 Card rời 2GB hỗ trợ đồ họa
Dell Inspiron 7537 Card rời 2GB hỗ trợ đồ họaDell Inspiron 7537 Card rời 2GB hỗ trợ đồ họa
Dell Inspiron 7537 Card rời 2GB hỗ trợ đồ họaLAPTOP TRẦN PHÁT
 
1645 nv iface series user manual_1.1.7
1645 nv iface series user manual_1.1.71645 nv iface series user manual_1.1.7
1645 nv iface series user manual_1.1.7Gonzalo Coliqueo
 
Dell latitude e5570 Service Manual PDF (English) / User Guide
Dell latitude e5570 Service Manual PDF (English) / User GuideDell latitude e5570 Service Manual PDF (English) / User Guide
Dell latitude e5570 Service Manual PDF (English) / User Guidemanualsheet
 
Dell Latitude 15 5000 Series (E5570) Service Manual PDF (English) / User ...
    Dell Latitude 15 5000 Series (E5570) Service Manual PDF (English) / User ...    Dell Latitude 15 5000 Series (E5570) Service Manual PDF (English) / User ...
Dell Latitude 15 5000 Series (E5570) Service Manual PDF (English) / User ...manualsheet
 
Faronics Anti-virus User Guide
Faronics Anti-virus User GuideFaronics Anti-virus User Guide
Faronics Anti-virus User GuideFaronics
 
Dukane camera 445 user guide
Dukane camera 445 user guideDukane camera 445 user guide
Dukane camera 445 user guideSchoolVision Inc.
 
คู่มือการใช้งาน LG G2 ภาษาไทย / อังกฤษ
คู่มือการใช้งาน LG G2 ภาษาไทย / อังกฤษคู่มือการใช้งาน LG G2 ภาษาไทย / อังกฤษ
คู่มือการใช้งาน LG G2 ภาษาไทย / อังกฤษdiginoom
 
Alcatel SHINE LITE Manual / User Guide
Alcatel SHINE LITE Manual / User GuideAlcatel SHINE LITE Manual / User Guide
Alcatel SHINE LITE Manual / User Guidemanualsheet
 
Case ih dx34 tractor service repair manual
Case ih dx34 tractor service repair manualCase ih dx34 tractor service repair manual
Case ih dx34 tractor service repair manualjfdjjskfkksmemm
 

La actualidad más candente (14)

Ar drone-uk-manual-flying-guide
Ar drone-uk-manual-flying-guideAr drone-uk-manual-flying-guide
Ar drone-uk-manual-flying-guide
 
8860039 c tri carb reference manual
8860039 c tri carb reference manual8860039 c tri carb reference manual
8860039 c tri carb reference manual
 
Daewoo doosan solar 75 v excavator service repair manual
Daewoo doosan solar 75 v excavator service repair manualDaewoo doosan solar 75 v excavator service repair manual
Daewoo doosan solar 75 v excavator service repair manual
 
Dell Inspiron 7537 Card rời 2GB hỗ trợ đồ họa
Dell Inspiron 7537 Card rời 2GB hỗ trợ đồ họaDell Inspiron 7537 Card rời 2GB hỗ trợ đồ họa
Dell Inspiron 7537 Card rời 2GB hỗ trợ đồ họa
 
1645 nv iface series user manual_1.1.7
1645 nv iface series user manual_1.1.71645 nv iface series user manual_1.1.7
1645 nv iface series user manual_1.1.7
 
Dell latitude e5570 Service Manual PDF (English) / User Guide
Dell latitude e5570 Service Manual PDF (English) / User GuideDell latitude e5570 Service Manual PDF (English) / User Guide
Dell latitude e5570 Service Manual PDF (English) / User Guide
 
Dell Latitude 15 5000 Series (E5570) Service Manual PDF (English) / User ...
    Dell Latitude 15 5000 Series (E5570) Service Manual PDF (English) / User ...    Dell Latitude 15 5000 Series (E5570) Service Manual PDF (English) / User ...
Dell Latitude 15 5000 Series (E5570) Service Manual PDF (English) / User ...
 
Faronics Anti-virus User Guide
Faronics Anti-virus User GuideFaronics Anti-virus User Guide
Faronics Anti-virus User Guide
 
Dukane dvp509 user manual
Dukane dvp509 user manualDukane dvp509 user manual
Dukane dvp509 user manual
 
Dukane camera 445 user guide
Dukane camera 445 user guideDukane camera 445 user guide
Dukane camera 445 user guide
 
คู่มือการใช้งาน LG G2 ภาษาไทย / อังกฤษ
คู่มือการใช้งาน LG G2 ภาษาไทย / อังกฤษคู่มือการใช้งาน LG G2 ภาษาไทย / อังกฤษ
คู่มือการใช้งาน LG G2 ภาษาไทย / อังกฤษ
 
12 7156 R01
12 7156 R0112 7156 R01
12 7156 R01
 
Alcatel SHINE LITE Manual / User Guide
Alcatel SHINE LITE Manual / User GuideAlcatel SHINE LITE Manual / User Guide
Alcatel SHINE LITE Manual / User Guide
 
Case ih dx34 tractor service repair manual
Case ih dx34 tractor service repair manualCase ih dx34 tractor service repair manual
Case ih dx34 tractor service repair manual
 

Destacado

Sony Powersupply Battery Charger Brochure
Sony Powersupply Battery Charger BrochureSony Powersupply Battery Charger Brochure
Sony Powersupply Battery Charger BrochureAV ProfShop
 
GoPro HD Hero 3 Silver
GoPro HD Hero 3 SilverGoPro HD Hero 3 Silver
GoPro HD Hero 3 SilverAV ProfShop
 
Datavideo TP-600 Prompter KIt for Shoulder-mount ENG Camara
Datavideo TP-600 Prompter KIt for Shoulder-mount ENG CamaraDatavideo TP-600 Prompter KIt for Shoulder-mount ENG Camara
Datavideo TP-600 Prompter KIt for Shoulder-mount ENG CamaraAV ProfShop
 
JVC VF-HP790 LCD Studio Viewfinder
JVC VF-HP790 LCD Studio ViewfinderJVC VF-HP790 LCD Studio Viewfinder
JVC VF-HP790 LCD Studio ViewfinderAV ProfShop
 
JVC DT-R17L4D 17-insch HD monitor
JVC DT-R17L4D 17-insch HD monitorJVC DT-R17L4D 17-insch HD monitor
JVC DT-R17L4D 17-insch HD monitorAV ProfShop
 
Datavideo HDR-60 Desktop HD-SDI 1080p Hard Disk Recorder
Datavideo HDR-60 Desktop HD-SDI 1080p Hard Disk RecorderDatavideo HDR-60 Desktop HD-SDI 1080p Hard Disk Recorder
Datavideo HDR-60 Desktop HD-SDI 1080p Hard Disk RecorderAV ProfShop
 
JVC GY-HM790 Camcorder
JVC GY-HM790 CamcorderJVC GY-HM790 Camcorder
JVC GY-HM790 CamcorderAV ProfShop
 
JVC RM-LP25U Remote Control Panel
JVC RM-LP25U Remote Control PanelJVC RM-LP25U Remote Control Panel
JVC RM-LP25U Remote Control PanelAV ProfShop
 
JVC DT-X71C Portable ProHD Monitorjn
JVC DT-X71C Portable ProHD MonitorjnJVC DT-X71C Portable ProHD Monitorjn
JVC DT-X71C Portable ProHD MonitorjnAV ProfShop
 
Sony PXW-X500 Camcorder
Sony PXW-X500 CamcorderSony PXW-X500 Camcorder
Sony PXW-X500 CamcorderAV ProfShop
 
JVC GY-HM70 Camcorder
JVC GY-HM70 CamcorderJVC GY-HM70 Camcorder
JVC GY-HM70 CamcorderAV ProfShop
 
Sony PXW-FS7 Camcorder
Sony PXW-FS7 CamcorderSony PXW-FS7 Camcorder
Sony PXW-FS7 CamcorderAV ProfShop
 
Datavideo CG-350
Datavideo CG-350Datavideo CG-350
Datavideo CG-350AV ProfShop
 
Datavideo SE-700 4 input Digital Video Switcher
Datavideo SE-700 4 input Digital Video SwitcherDatavideo SE-700 4 input Digital Video Switcher
Datavideo SE-700 4 input Digital Video SwitcherAV ProfShop
 
Panasonic AV-HS400A Mixer Brochure
Panasonic AV-HS400A Mixer BrochurePanasonic AV-HS400A Mixer Brochure
Panasonic AV-HS400A Mixer BrochureAV ProfShop
 
Panasonic AV-HS450 AW-HS50N Mixer Brochure
Panasonic AV-HS450 AW-HS50N Mixer BrochurePanasonic AV-HS450 AW-HS50N Mixer Brochure
Panasonic AV-HS450 AW-HS50N Mixer BrochureAV ProfShop
 
JVC GY-HM620 Brochure AVProfShop
JVC GY-HM620 Brochure AVProfShopJVC GY-HM620 Brochure AVProfShop
JVC GY-HM620 Brochure AVProfShopAV ProfShop
 

Destacado (18)

Sony Powersupply Battery Charger Brochure
Sony Powersupply Battery Charger BrochureSony Powersupply Battery Charger Brochure
Sony Powersupply Battery Charger Brochure
 
AV Mixer
AV MixerAV Mixer
AV Mixer
 
GoPro HD Hero 3 Silver
GoPro HD Hero 3 SilverGoPro HD Hero 3 Silver
GoPro HD Hero 3 Silver
 
Datavideo TP-600 Prompter KIt for Shoulder-mount ENG Camara
Datavideo TP-600 Prompter KIt for Shoulder-mount ENG CamaraDatavideo TP-600 Prompter KIt for Shoulder-mount ENG Camara
Datavideo TP-600 Prompter KIt for Shoulder-mount ENG Camara
 
JVC VF-HP790 LCD Studio Viewfinder
JVC VF-HP790 LCD Studio ViewfinderJVC VF-HP790 LCD Studio Viewfinder
JVC VF-HP790 LCD Studio Viewfinder
 
JVC DT-R17L4D 17-insch HD monitor
JVC DT-R17L4D 17-insch HD monitorJVC DT-R17L4D 17-insch HD monitor
JVC DT-R17L4D 17-insch HD monitor
 
Datavideo HDR-60 Desktop HD-SDI 1080p Hard Disk Recorder
Datavideo HDR-60 Desktop HD-SDI 1080p Hard Disk RecorderDatavideo HDR-60 Desktop HD-SDI 1080p Hard Disk Recorder
Datavideo HDR-60 Desktop HD-SDI 1080p Hard Disk Recorder
 
JVC GY-HM790 Camcorder
JVC GY-HM790 CamcorderJVC GY-HM790 Camcorder
JVC GY-HM790 Camcorder
 
JVC RM-LP25U Remote Control Panel
JVC RM-LP25U Remote Control PanelJVC RM-LP25U Remote Control Panel
JVC RM-LP25U Remote Control Panel
 
JVC DT-X71C Portable ProHD Monitorjn
JVC DT-X71C Portable ProHD MonitorjnJVC DT-X71C Portable ProHD Monitorjn
JVC DT-X71C Portable ProHD Monitorjn
 
Sony PXW-X500 Camcorder
Sony PXW-X500 CamcorderSony PXW-X500 Camcorder
Sony PXW-X500 Camcorder
 
JVC GY-HM70 Camcorder
JVC GY-HM70 CamcorderJVC GY-HM70 Camcorder
JVC GY-HM70 Camcorder
 
Sony PXW-FS7 Camcorder
Sony PXW-FS7 CamcorderSony PXW-FS7 Camcorder
Sony PXW-FS7 Camcorder
 
Datavideo CG-350
Datavideo CG-350Datavideo CG-350
Datavideo CG-350
 
Datavideo SE-700 4 input Digital Video Switcher
Datavideo SE-700 4 input Digital Video SwitcherDatavideo SE-700 4 input Digital Video Switcher
Datavideo SE-700 4 input Digital Video Switcher
 
Panasonic AV-HS400A Mixer Brochure
Panasonic AV-HS400A Mixer BrochurePanasonic AV-HS400A Mixer Brochure
Panasonic AV-HS400A Mixer Brochure
 
Panasonic AV-HS450 AW-HS50N Mixer Brochure
Panasonic AV-HS450 AW-HS50N Mixer BrochurePanasonic AV-HS450 AW-HS50N Mixer Brochure
Panasonic AV-HS450 AW-HS50N Mixer Brochure
 
JVC GY-HM620 Brochure AVProfShop
JVC GY-HM620 Brochure AVProfShopJVC GY-HM620 Brochure AVProfShop
JVC GY-HM620 Brochure AVProfShop
 

Similar a Datavideo DN-200D HD / SD HDD Recorder

DR-200 Dual View Car Camera DVR Manual SpyChest.com
DR-200 Dual View Car Camera DVR Manual SpyChest.comDR-200 Dual View Car Camera DVR Manual SpyChest.com
DR-200 Dual View Car Camera DVR Manual SpyChest.comSpy Chest
 
Hoàng Phương 0938067186 Thang Nâng Điện - Thang Nâng Người - Thang Nâng Tự Động
Hoàng Phương 0938067186 Thang Nâng Điện - Thang Nâng Người - Thang Nâng Tự ĐộngHoàng Phương 0938067186 Thang Nâng Điện - Thang Nâng Người - Thang Nâng Tự Động
Hoàng Phương 0938067186 Thang Nâng Điện - Thang Nâng Người - Thang Nâng Tự ĐộngFORKLIFT NOBLELIFT
 
scarlett2i4-user-guide.pdf
scarlett2i4-user-guide.pdfscarlett2i4-user-guide.pdf
scarlett2i4-user-guide.pdfssusera78a1c
 
KTA, Pinjaman Tanpa Jaminan, Dana Pinjaman Tanpa Jaminan
KTA, Pinjaman Tanpa Jaminan, Dana Pinjaman Tanpa JaminanKTA, Pinjaman Tanpa Jaminan, Dana Pinjaman Tanpa Jaminan
KTA, Pinjaman Tanpa Jaminan, Dana Pinjaman Tanpa JaminanPinjamanTanpaJaminan
 
Gigaset QV830 Tablet User Guide
Gigaset QV830 Tablet User GuideGigaset QV830 Tablet User Guide
Gigaset QV830 Tablet User GuideTelephones Online
 
Encompass-CdTe-Users_Manual-English-Rev26.pdf
Encompass-CdTe-Users_Manual-English-Rev26.pdfEncompass-CdTe-Users_Manual-English-Rev26.pdf
Encompass-CdTe-Users_Manual-English-Rev26.pdfAmjdKsm
 
1996 sea doo bombardier personal watercraft service repair manual
1996 sea doo  bombardier personal watercraft service repair manual1996 sea doo  bombardier personal watercraft service repair manual
1996 sea doo bombardier personal watercraft service repair manualfjsekfsmeme
 
Mountain Stream Group: Portfolio Sample - Technical Manual Development
Mountain Stream Group: Portfolio Sample - Technical Manual DevelopmentMountain Stream Group: Portfolio Sample - Technical Manual Development
Mountain Stream Group: Portfolio Sample - Technical Manual DevelopmentMountain Stream Group, Inc.
 
1998 sea doo bombardier personal watercraft service repair manual
1998 sea doo  bombardier personal watercraft service repair manual1998 sea doo  bombardier personal watercraft service repair manual
1998 sea doo bombardier personal watercraft service repair manualfjkekfmefmm
 
Instruction Manual ATN Odin Series Thermal Monocular | Optics Trade
Instruction Manual ATN Odin Series Thermal Monocular | Optics TradeInstruction Manual ATN Odin Series Thermal Monocular | Optics Trade
Instruction Manual ATN Odin Series Thermal Monocular | Optics TradeOptics-Trade
 

Similar a Datavideo DN-200D HD / SD HDD Recorder (20)

Dvp509 user manual
Dvp509 user manualDvp509 user manual
Dvp509 user manual
 
DR-200 Dual View Car Camera DVR Manual SpyChest.com
DR-200 Dual View Car Camera DVR Manual SpyChest.comDR-200 Dual View Car Camera DVR Manual SpyChest.com
DR-200 Dual View Car Camera DVR Manual SpyChest.com
 
Hoàng Phương 0938067186 Thang Nâng Điện - Thang Nâng Người - Thang Nâng Tự Động
Hoàng Phương 0938067186 Thang Nâng Điện - Thang Nâng Người - Thang Nâng Tự ĐộngHoàng Phương 0938067186 Thang Nâng Điện - Thang Nâng Người - Thang Nâng Tự Động
Hoàng Phương 0938067186 Thang Nâng Điện - Thang Nâng Người - Thang Nâng Tự Động
 
scarlett2i4-user-guide.pdf
scarlett2i4-user-guide.pdfscarlett2i4-user-guide.pdf
scarlett2i4-user-guide.pdf
 
KTA, Pinjaman Tanpa Jaminan, Dana Pinjaman Tanpa Jaminan
KTA, Pinjaman Tanpa Jaminan, Dana Pinjaman Tanpa JaminanKTA, Pinjaman Tanpa Jaminan, Dana Pinjaman Tanpa Jaminan
KTA, Pinjaman Tanpa Jaminan, Dana Pinjaman Tanpa Jaminan
 
Gigaset QV830 Tablet User Guide
Gigaset QV830 Tablet User GuideGigaset QV830 Tablet User Guide
Gigaset QV830 Tablet User Guide
 
Blood Gas Analyzer
Blood Gas AnalyzerBlood Gas Analyzer
Blood Gas Analyzer
 
Hp 625
Hp 625Hp 625
Hp 625
 
Encompass-CdTe-Users_Manual-English-Rev26.pdf
Encompass-CdTe-Users_Manual-English-Rev26.pdfEncompass-CdTe-Users_Manual-English-Rev26.pdf
Encompass-CdTe-Users_Manual-English-Rev26.pdf
 
Jh0 manual(v1.0)
Jh0 manual(v1.0)Jh0 manual(v1.0)
Jh0 manual(v1.0)
 
1996 sea doo bombardier personal watercraft service repair manual
1996 sea doo  bombardier personal watercraft service repair manual1996 sea doo  bombardier personal watercraft service repair manual
1996 sea doo bombardier personal watercraft service repair manual
 
Dukane dvp509 user manual
Dukane dvp509 user manualDukane dvp509 user manual
Dukane dvp509 user manual
 
Mountain Stream Group: Portfolio Sample - Technical Manual Development
Mountain Stream Group: Portfolio Sample - Technical Manual DevelopmentMountain Stream Group: Portfolio Sample - Technical Manual Development
Mountain Stream Group: Portfolio Sample - Technical Manual Development
 
446 user manual
446 user manual446 user manual
446 user manual
 
446 user manual
446 user manual446 user manual
446 user manual
 
446 user manual
446 user manual446 user manual
446 user manual
 
Scart manual
Scart manualScart manual
Scart manual
 
Scart manual
Scart manualScart manual
Scart manual
 
1998 sea doo bombardier personal watercraft service repair manual
1998 sea doo  bombardier personal watercraft service repair manual1998 sea doo  bombardier personal watercraft service repair manual
1998 sea doo bombardier personal watercraft service repair manual
 
Instruction Manual ATN Odin Series Thermal Monocular | Optics Trade
Instruction Manual ATN Odin Series Thermal Monocular | Optics TradeInstruction Manual ATN Odin Series Thermal Monocular | Optics Trade
Instruction Manual ATN Odin Series Thermal Monocular | Optics Trade
 

Más de AV ProfShop

Decimator MD-HX hardware-manual_fv1.3
Decimator MD-HX hardware-manual_fv1.3Decimator MD-HX hardware-manual_fv1.3
Decimator MD-HX hardware-manual_fv1.3AV ProfShop
 
Panasonic AV-HS410 Multiformat Vision Mixer HD/SD
Panasonic AV-HS410 Multiformat Vision Mixer HD/SDPanasonic AV-HS410 Multiformat Vision Mixer HD/SD
Panasonic AV-HS410 Multiformat Vision Mixer HD/SDAV ProfShop
 
Panasonic AW-HE40SW/SK/HW/HK PTZ Camera with HD-SDI / HDMI Output
Panasonic AW-HE40SW/SK/HW/HK PTZ Camera with HD-SDI / HDMI OutputPanasonic AW-HE40SW/SK/HW/HK PTZ Camera with HD-SDI / HDMI Output
Panasonic AW-HE40SW/SK/HW/HK PTZ Camera with HD-SDI / HDMI OutputAV ProfShop
 
Sony MCX-500 Live Production Switcher
Sony MCX-500 Live Production SwitcherSony MCX-500 Live Production Switcher
Sony MCX-500 Live Production SwitcherAV ProfShop
 
JVC GY-HM200 GY-HM170 Brochure AVProfShop
JVC GY-HM200 GY-HM170 Brochure AVProfShopJVC GY-HM200 GY-HM170 Brochure AVProfShop
JVC GY-HM200 GY-HM170 Brochure AVProfShopAV ProfShop
 
JVC GY-HM660 Brochure AVProfShop
JVC GY-HM660 Brochure AVProfShopJVC GY-HM660 Brochure AVProfShop
JVC GY-HM660 Brochure AVProfShopAV ProfShop
 
Datavideo TP Kit (Teleprompter) Brochure
Datavideo TP Kit (Teleprompter) BrochureDatavideo TP Kit (Teleprompter) Brochure
Datavideo TP Kit (Teleprompter) BrochureAV ProfShop
 
Datavideo MS-2800 Brochure
Datavideo MS-2800 BrochureDatavideo MS-2800 Brochure
Datavideo MS-2800 BrochureAV ProfShop
 
Datavideo HS-2800 Brochure
Datavideo HS-2800 BrochureDatavideo HS-2800 Brochure
Datavideo HS-2800 BrochureAV ProfShop
 
Datavideo CG-350 Brochure
Datavideo CG-350 BrochureDatavideo CG-350 Brochure
Datavideo CG-350 BrochureAV ProfShop
 
Datavideo DVK-200 Brochure
Datavideo DVK-200 BrochureDatavideo DVK-200 Brochure
Datavideo DVK-200 BrochureAV ProfShop
 
Datavideo ITC-100 Brochure
Datavideo ITC-100 BrochureDatavideo ITC-100 Brochure
Datavideo ITC-100 BrochureAV ProfShop
 
Datavideo RMC-180 Brochure
Datavideo RMC-180 BrochureDatavideo RMC-180 Brochure
Datavideo RMC-180 BrochureAV ProfShop
 
Datavideo HS-600 Hand Carry System Brochure
Datavideo HS-600 Hand Carry System BrochureDatavideo HS-600 Hand Carry System Brochure
Datavideo HS-600 Hand Carry System BrochureAV ProfShop
 
Datavideo SE-600 Brochure
Datavideo SE-600 BrochureDatavideo SE-600 Brochure
Datavideo SE-600 BrochureAV ProfShop
 
Datavideo SE-500 Brochure
Datavideo SE-500 BrochureDatavideo SE-500 Brochure
Datavideo SE-500 BrochureAV ProfShop
 
Atomos Range Brochure
Atomos Range BrochureAtomos Range Brochure
Atomos Range BrochureAV ProfShop
 
Datavideo SE-2200 6 input HD broadcast quality switcher
Datavideo SE-2200 6 input HD broadcast quality switcherDatavideo SE-2200 6 input HD broadcast quality switcher
Datavideo SE-2200 6 input HD broadcast quality switcherAV ProfShop
 
Blackmagic Design Pocket Cinema Camera Brochure
Blackmagic Design Pocket Cinema Camera BrochureBlackmagic Design Pocket Cinema Camera Brochure
Blackmagic Design Pocket Cinema Camera BrochureAV ProfShop
 

Más de AV ProfShop (20)

Decimator MD-HX hardware-manual_fv1.3
Decimator MD-HX hardware-manual_fv1.3Decimator MD-HX hardware-manual_fv1.3
Decimator MD-HX hardware-manual_fv1.3
 
Panasonic AV-HS410 Multiformat Vision Mixer HD/SD
Panasonic AV-HS410 Multiformat Vision Mixer HD/SDPanasonic AV-HS410 Multiformat Vision Mixer HD/SD
Panasonic AV-HS410 Multiformat Vision Mixer HD/SD
 
Panasonic AW-HE40SW/SK/HW/HK PTZ Camera with HD-SDI / HDMI Output
Panasonic AW-HE40SW/SK/HW/HK PTZ Camera with HD-SDI / HDMI OutputPanasonic AW-HE40SW/SK/HW/HK PTZ Camera with HD-SDI / HDMI Output
Panasonic AW-HE40SW/SK/HW/HK PTZ Camera with HD-SDI / HDMI Output
 
Sony MCX-500 Live Production Switcher
Sony MCX-500 Live Production SwitcherSony MCX-500 Live Production Switcher
Sony MCX-500 Live Production Switcher
 
JVC GY-HM200 GY-HM170 Brochure AVProfShop
JVC GY-HM200 GY-HM170 Brochure AVProfShopJVC GY-HM200 GY-HM170 Brochure AVProfShop
JVC GY-HM200 GY-HM170 Brochure AVProfShop
 
JVC GY-HM660 Brochure AVProfShop
JVC GY-HM660 Brochure AVProfShopJVC GY-HM660 Brochure AVProfShop
JVC GY-HM660 Brochure AVProfShop
 
Datavideo TP Kit (Teleprompter) Brochure
Datavideo TP Kit (Teleprompter) BrochureDatavideo TP Kit (Teleprompter) Brochure
Datavideo TP Kit (Teleprompter) Brochure
 
Datavideo MS-2800 Brochure
Datavideo MS-2800 BrochureDatavideo MS-2800 Brochure
Datavideo MS-2800 Brochure
 
Datavideo HS-2800 Brochure
Datavideo HS-2800 BrochureDatavideo HS-2800 Brochure
Datavideo HS-2800 Brochure
 
Datavideo CG-350 Brochure
Datavideo CG-350 BrochureDatavideo CG-350 Brochure
Datavideo CG-350 Brochure
 
Datavideo DVK-200 Brochure
Datavideo DVK-200 BrochureDatavideo DVK-200 Brochure
Datavideo DVK-200 Brochure
 
Datavideo ITC-100 Brochure
Datavideo ITC-100 BrochureDatavideo ITC-100 Brochure
Datavideo ITC-100 Brochure
 
Datavideo RMC-180 Brochure
Datavideo RMC-180 BrochureDatavideo RMC-180 Brochure
Datavideo RMC-180 Brochure
 
Datavideo HS-600 Hand Carry System Brochure
Datavideo HS-600 Hand Carry System BrochureDatavideo HS-600 Hand Carry System Brochure
Datavideo HS-600 Hand Carry System Brochure
 
Datavideo SE-600 Brochure
Datavideo SE-600 BrochureDatavideo SE-600 Brochure
Datavideo SE-600 Brochure
 
Datavideo SE-500 Brochure
Datavideo SE-500 BrochureDatavideo SE-500 Brochure
Datavideo SE-500 Brochure
 
Atomos Range Brochure
Atomos Range BrochureAtomos Range Brochure
Atomos Range Brochure
 
Sony PXW-Z450
Sony PXW-Z450Sony PXW-Z450
Sony PXW-Z450
 
Datavideo SE-2200 6 input HD broadcast quality switcher
Datavideo SE-2200 6 input HD broadcast quality switcherDatavideo SE-2200 6 input HD broadcast quality switcher
Datavideo SE-2200 6 input HD broadcast quality switcher
 
Blackmagic Design Pocket Cinema Camera Brochure
Blackmagic Design Pocket Cinema Camera BrochureBlackmagic Design Pocket Cinema Camera Brochure
Blackmagic Design Pocket Cinema Camera Brochure
 

Último

Dubai Call Girls Centerfold O525547819 Call Girls Dubai Cfnm
Dubai Call Girls Centerfold O525547819 Call Girls Dubai CfnmDubai Call Girls Centerfold O525547819 Call Girls Dubai Cfnm
Dubai Call Girls Centerfold O525547819 Call Girls Dubai Cfnmkojalkojal131
 
Enjoy Night ≽ 8448380779 ≼ Call Girls In Gurgaon Sector 52 (Gurgaon)
Enjoy Night ≽ 8448380779 ≼ Call Girls In Gurgaon Sector 52 (Gurgaon)Enjoy Night ≽ 8448380779 ≼ Call Girls In Gurgaon Sector 52 (Gurgaon)
Enjoy Night ≽ 8448380779 ≼ Call Girls In Gurgaon Sector 52 (Gurgaon)Delhi Call girls
 
Sector 8, Noida Call girls :8448380779 Model Escorts | 100% verified
Sector 8, Noida Call girls :8448380779 Model Escorts | 100% verifiedSector 8, Noida Call girls :8448380779 Model Escorts | 100% verified
Sector 8, Noida Call girls :8448380779 Model Escorts | 100% verifiedDelhi Call girls
 
Dubai Call Girls Will Eats O528786472 Call Girls Dubai Moore
Dubai Call Girls Will Eats O528786472 Call Girls Dubai MooreDubai Call Girls Will Eats O528786472 Call Girls Dubai Moore
Dubai Call Girls Will Eats O528786472 Call Girls Dubai Moorehf8803863
 
Jual Obat Aborsi Palembang ( Asli No.1 ) 085657271886 Obat Penggugur Kandunga...
Jual Obat Aborsi Palembang ( Asli No.1 ) 085657271886 Obat Penggugur Kandunga...Jual Obat Aborsi Palembang ( Asli No.1 ) 085657271886 Obat Penggugur Kandunga...
Jual Obat Aborsi Palembang ( Asli No.1 ) 085657271886 Obat Penggugur Kandunga...ZurliaSoop
 
Enjoy Night ≽ 8448380779 ≼ Call Girls In Gurgaon Sector 68 (Gurgaon)
Enjoy Night ≽ 8448380779 ≼ Call Girls In Gurgaon Sector 68 (Gurgaon)Enjoy Night ≽ 8448380779 ≼ Call Girls In Gurgaon Sector 68 (Gurgaon)
Enjoy Night ≽ 8448380779 ≼ Call Girls In Gurgaon Sector 68 (Gurgaon)Delhi Call girls
 
Enjoy Night ≽ 8448380779 ≼ Call Girls In Gurgaon Sector 53 (Gurgaon)
Enjoy Night ≽ 8448380779 ≼ Call Girls In Gurgaon Sector 53 (Gurgaon)Enjoy Night ≽ 8448380779 ≼ Call Girls In Gurgaon Sector 53 (Gurgaon)
Enjoy Night ≽ 8448380779 ≼ Call Girls In Gurgaon Sector 53 (Gurgaon)Delhi Call girls
 
Busty Desi⚡Call Girls in Pari Chowk Escorts, Noida >༒8448380779 Escort Service
Busty Desi⚡Call Girls in Pari Chowk Escorts, Noida >༒8448380779 Escort ServiceBusty Desi⚡Call Girls in Pari Chowk Escorts, Noida >༒8448380779 Escort Service
Busty Desi⚡Call Girls in Pari Chowk Escorts, Noida >༒8448380779 Escort ServiceDelhi Call girls
 
call girls in Indirapuram (Ghaziabad) 🔝 >༒8448380779 🔝 genuine Escort Service...
call girls in Indirapuram (Ghaziabad) 🔝 >༒8448380779 🔝 genuine Escort Service...call girls in Indirapuram (Ghaziabad) 🔝 >༒8448380779 🔝 genuine Escort Service...
call girls in Indirapuram (Ghaziabad) 🔝 >༒8448380779 🔝 genuine Escort Service...Delhi Call girls
 
Busty Desi⚡Call Girls in Pari Chowk Escorts, Noida >༒8448380779 Escort Service
Busty Desi⚡Call Girls in Pari Chowk Escorts, Noida >༒8448380779 Escort ServiceBusty Desi⚡Call Girls in Pari Chowk Escorts, Noida >༒8448380779 Escort Service
Busty Desi⚡Call Girls in Pari Chowk Escorts, Noida >༒8448380779 Escort ServiceDelhi Call girls
 
Sector 2, Noida Call girls :8448380779 Model Escorts | 100% verified
Sector 2, Noida Call girls :8448380779 Model Escorts | 100% verifiedSector 2, Noida Call girls :8448380779 Model Escorts | 100% verified
Sector 2, Noida Call girls :8448380779 Model Escorts | 100% verifiedDelhi Call girls
 
Enjoy Night ≽ 8448380779 ≼ Call Girls In Gurgaon Sector 65 (Gurgaon)
Enjoy Night ≽ 8448380779 ≼ Call Girls In Gurgaon Sector 65 (Gurgaon)Enjoy Night ≽ 8448380779 ≼ Call Girls In Gurgaon Sector 65 (Gurgaon)
Enjoy Night ≽ 8448380779 ≼ Call Girls In Gurgaon Sector 65 (Gurgaon)Delhi Call girls
 
Genuine Escort ℂaℓℓ Giℜℓs In DoubleTree by Hilton Hotel Gurgaon - New Delhi N...
Genuine Escort ℂaℓℓ Giℜℓs In DoubleTree by Hilton Hotel Gurgaon - New Delhi N...Genuine Escort ℂaℓℓ Giℜℓs In DoubleTree by Hilton Hotel Gurgaon - New Delhi N...
Genuine Escort ℂaℓℓ Giℜℓs In DoubleTree by Hilton Hotel Gurgaon - New Delhi N...rajputriyana310
 
Enjoy Night ≽ 8448380779 ≼ Call Girls In Gurgaon Sector 55 (Gurgaon)
Enjoy Night ≽ 8448380779 ≼ Call Girls In Gurgaon Sector 55 (Gurgaon)Enjoy Night ≽ 8448380779 ≼ Call Girls In Gurgaon Sector 55 (Gurgaon)
Enjoy Night ≽ 8448380779 ≼ Call Girls In Gurgaon Sector 55 (Gurgaon)Delhi Call girls
 
GENUINE Babe,Call Girls IN Dwarka Delhi | +91-8377087607
GENUINE Babe,Call Girls IN Dwarka Delhi | +91-8377087607GENUINE Babe,Call Girls IN Dwarka Delhi | +91-8377087607
GENUINE Babe,Call Girls IN Dwarka Delhi | +91-8377087607dollysharma2066
 
Busty Desi⚡Call Girls in Surajpur Greater Noida >༒8448380779 Escort Service
Busty Desi⚡Call Girls in Surajpur Greater Noida  >༒8448380779 Escort ServiceBusty Desi⚡Call Girls in Surajpur Greater Noida  >༒8448380779 Escort Service
Busty Desi⚡Call Girls in Surajpur Greater Noida >༒8448380779 Escort ServiceDelhi Call girls
 
Enjoy Night ≽ 8448380779 ≼ Call Girls In Gurgaon Sector 49 (Gurgaon)
Enjoy Night ≽ 8448380779 ≼ Call Girls In Gurgaon Sector 49 (Gurgaon)Enjoy Night ≽ 8448380779 ≼ Call Girls In Gurgaon Sector 49 (Gurgaon)
Enjoy Night ≽ 8448380779 ≼ Call Girls In Gurgaon Sector 49 (Gurgaon)Delhi Call girls
 
Busty Desi⚡Call Girls in Vasundhara Ghaziabad >༒8448380779 Escort Service
Busty Desi⚡Call Girls in Vasundhara Ghaziabad >༒8448380779 Escort ServiceBusty Desi⚡Call Girls in Vasundhara Ghaziabad >༒8448380779 Escort Service
Busty Desi⚡Call Girls in Vasundhara Ghaziabad >༒8448380779 Escort ServiceDelhi Call girls
 
Enjoy Night ≽ 8448380779 ≼ Call Girls In Gurgaon Sector 54 (Gurgaon)
Enjoy Night ≽ 8448380779 ≼ Call Girls In Gurgaon Sector 54 (Gurgaon)Enjoy Night ≽ 8448380779 ≼ Call Girls In Gurgaon Sector 54 (Gurgaon)
Enjoy Night ≽ 8448380779 ≼ Call Girls In Gurgaon Sector 54 (Gurgaon)Delhi Call girls
 
Enjoy Night ≽ 8448380779 ≼ Call Girls In Gurgaon Sector 66 (Gurgaon)
Enjoy Night ≽ 8448380779 ≼ Call Girls In Gurgaon Sector 66 (Gurgaon)Enjoy Night ≽ 8448380779 ≼ Call Girls In Gurgaon Sector 66 (Gurgaon)
Enjoy Night ≽ 8448380779 ≼ Call Girls In Gurgaon Sector 66 (Gurgaon)Delhi Call girls
 

Último (20)

Dubai Call Girls Centerfold O525547819 Call Girls Dubai Cfnm
Dubai Call Girls Centerfold O525547819 Call Girls Dubai CfnmDubai Call Girls Centerfold O525547819 Call Girls Dubai Cfnm
Dubai Call Girls Centerfold O525547819 Call Girls Dubai Cfnm
 
Enjoy Night ≽ 8448380779 ≼ Call Girls In Gurgaon Sector 52 (Gurgaon)
Enjoy Night ≽ 8448380779 ≼ Call Girls In Gurgaon Sector 52 (Gurgaon)Enjoy Night ≽ 8448380779 ≼ Call Girls In Gurgaon Sector 52 (Gurgaon)
Enjoy Night ≽ 8448380779 ≼ Call Girls In Gurgaon Sector 52 (Gurgaon)
 
Sector 8, Noida Call girls :8448380779 Model Escorts | 100% verified
Sector 8, Noida Call girls :8448380779 Model Escorts | 100% verifiedSector 8, Noida Call girls :8448380779 Model Escorts | 100% verified
Sector 8, Noida Call girls :8448380779 Model Escorts | 100% verified
 
Dubai Call Girls Will Eats O528786472 Call Girls Dubai Moore
Dubai Call Girls Will Eats O528786472 Call Girls Dubai MooreDubai Call Girls Will Eats O528786472 Call Girls Dubai Moore
Dubai Call Girls Will Eats O528786472 Call Girls Dubai Moore
 
Jual Obat Aborsi Palembang ( Asli No.1 ) 085657271886 Obat Penggugur Kandunga...
Jual Obat Aborsi Palembang ( Asli No.1 ) 085657271886 Obat Penggugur Kandunga...Jual Obat Aborsi Palembang ( Asli No.1 ) 085657271886 Obat Penggugur Kandunga...
Jual Obat Aborsi Palembang ( Asli No.1 ) 085657271886 Obat Penggugur Kandunga...
 
Enjoy Night ≽ 8448380779 ≼ Call Girls In Gurgaon Sector 68 (Gurgaon)
Enjoy Night ≽ 8448380779 ≼ Call Girls In Gurgaon Sector 68 (Gurgaon)Enjoy Night ≽ 8448380779 ≼ Call Girls In Gurgaon Sector 68 (Gurgaon)
Enjoy Night ≽ 8448380779 ≼ Call Girls In Gurgaon Sector 68 (Gurgaon)
 
Enjoy Night ≽ 8448380779 ≼ Call Girls In Gurgaon Sector 53 (Gurgaon)
Enjoy Night ≽ 8448380779 ≼ Call Girls In Gurgaon Sector 53 (Gurgaon)Enjoy Night ≽ 8448380779 ≼ Call Girls In Gurgaon Sector 53 (Gurgaon)
Enjoy Night ≽ 8448380779 ≼ Call Girls In Gurgaon Sector 53 (Gurgaon)
 
Busty Desi⚡Call Girls in Pari Chowk Escorts, Noida >༒8448380779 Escort Service
Busty Desi⚡Call Girls in Pari Chowk Escorts, Noida >༒8448380779 Escort ServiceBusty Desi⚡Call Girls in Pari Chowk Escorts, Noida >༒8448380779 Escort Service
Busty Desi⚡Call Girls in Pari Chowk Escorts, Noida >༒8448380779 Escort Service
 
call girls in Indirapuram (Ghaziabad) 🔝 >༒8448380779 🔝 genuine Escort Service...
call girls in Indirapuram (Ghaziabad) 🔝 >༒8448380779 🔝 genuine Escort Service...call girls in Indirapuram (Ghaziabad) 🔝 >༒8448380779 🔝 genuine Escort Service...
call girls in Indirapuram (Ghaziabad) 🔝 >༒8448380779 🔝 genuine Escort Service...
 
Busty Desi⚡Call Girls in Pari Chowk Escorts, Noida >༒8448380779 Escort Service
Busty Desi⚡Call Girls in Pari Chowk Escorts, Noida >༒8448380779 Escort ServiceBusty Desi⚡Call Girls in Pari Chowk Escorts, Noida >༒8448380779 Escort Service
Busty Desi⚡Call Girls in Pari Chowk Escorts, Noida >༒8448380779 Escort Service
 
Sector 2, Noida Call girls :8448380779 Model Escorts | 100% verified
Sector 2, Noida Call girls :8448380779 Model Escorts | 100% verifiedSector 2, Noida Call girls :8448380779 Model Escorts | 100% verified
Sector 2, Noida Call girls :8448380779 Model Escorts | 100% verified
 
Enjoy Night ≽ 8448380779 ≼ Call Girls In Gurgaon Sector 65 (Gurgaon)
Enjoy Night ≽ 8448380779 ≼ Call Girls In Gurgaon Sector 65 (Gurgaon)Enjoy Night ≽ 8448380779 ≼ Call Girls In Gurgaon Sector 65 (Gurgaon)
Enjoy Night ≽ 8448380779 ≼ Call Girls In Gurgaon Sector 65 (Gurgaon)
 
Genuine Escort ℂaℓℓ Giℜℓs In DoubleTree by Hilton Hotel Gurgaon - New Delhi N...
Genuine Escort ℂaℓℓ Giℜℓs In DoubleTree by Hilton Hotel Gurgaon - New Delhi N...Genuine Escort ℂaℓℓ Giℜℓs In DoubleTree by Hilton Hotel Gurgaon - New Delhi N...
Genuine Escort ℂaℓℓ Giℜℓs In DoubleTree by Hilton Hotel Gurgaon - New Delhi N...
 
Enjoy Night ≽ 8448380779 ≼ Call Girls In Gurgaon Sector 55 (Gurgaon)
Enjoy Night ≽ 8448380779 ≼ Call Girls In Gurgaon Sector 55 (Gurgaon)Enjoy Night ≽ 8448380779 ≼ Call Girls In Gurgaon Sector 55 (Gurgaon)
Enjoy Night ≽ 8448380779 ≼ Call Girls In Gurgaon Sector 55 (Gurgaon)
 
GENUINE Babe,Call Girls IN Dwarka Delhi | +91-8377087607
GENUINE Babe,Call Girls IN Dwarka Delhi | +91-8377087607GENUINE Babe,Call Girls IN Dwarka Delhi | +91-8377087607
GENUINE Babe,Call Girls IN Dwarka Delhi | +91-8377087607
 
Busty Desi⚡Call Girls in Surajpur Greater Noida >༒8448380779 Escort Service
Busty Desi⚡Call Girls in Surajpur Greater Noida  >༒8448380779 Escort ServiceBusty Desi⚡Call Girls in Surajpur Greater Noida  >༒8448380779 Escort Service
Busty Desi⚡Call Girls in Surajpur Greater Noida >༒8448380779 Escort Service
 
Enjoy Night ≽ 8448380779 ≼ Call Girls In Gurgaon Sector 49 (Gurgaon)
Enjoy Night ≽ 8448380779 ≼ Call Girls In Gurgaon Sector 49 (Gurgaon)Enjoy Night ≽ 8448380779 ≼ Call Girls In Gurgaon Sector 49 (Gurgaon)
Enjoy Night ≽ 8448380779 ≼ Call Girls In Gurgaon Sector 49 (Gurgaon)
 
Busty Desi⚡Call Girls in Vasundhara Ghaziabad >༒8448380779 Escort Service
Busty Desi⚡Call Girls in Vasundhara Ghaziabad >༒8448380779 Escort ServiceBusty Desi⚡Call Girls in Vasundhara Ghaziabad >༒8448380779 Escort Service
Busty Desi⚡Call Girls in Vasundhara Ghaziabad >༒8448380779 Escort Service
 
Enjoy Night ≽ 8448380779 ≼ Call Girls In Gurgaon Sector 54 (Gurgaon)
Enjoy Night ≽ 8448380779 ≼ Call Girls In Gurgaon Sector 54 (Gurgaon)Enjoy Night ≽ 8448380779 ≼ Call Girls In Gurgaon Sector 54 (Gurgaon)
Enjoy Night ≽ 8448380779 ≼ Call Girls In Gurgaon Sector 54 (Gurgaon)
 
Enjoy Night ≽ 8448380779 ≼ Call Girls In Gurgaon Sector 66 (Gurgaon)
Enjoy Night ≽ 8448380779 ≼ Call Girls In Gurgaon Sector 66 (Gurgaon)Enjoy Night ≽ 8448380779 ≼ Call Girls In Gurgaon Sector 66 (Gurgaon)
Enjoy Night ≽ 8448380779 ≼ Call Girls In Gurgaon Sector 66 (Gurgaon)
 

Datavideo DN-200D HD / SD HDD Recorder

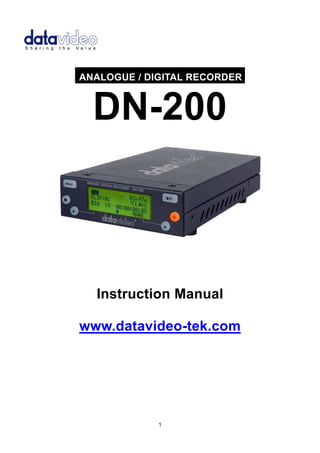
  • 1. .ANALOGUE / DIGITAL RECORDER. DN-200 Instruction Manual www.datavideo-tek.com 1
  • 2. Contents Warnings and Precautions ............................................................................... 4 Warranty ............................................................................................................. 5 Standard Warranty ..................................................................................................................... 5 Two Year Warranty ..................................................................................................................... 5 Disposal ...................................................................................................................................... 5 Packing List ................................................................................................................................ 5 Product Overview .............................................................................................. 6 Features ..................................................................................................................................... 6 Connections & Controls ................................................................................... 7 Front Panel ................................................................................................................................. 7 DN-200 Clip Status Display Explained ....................................................................................... 7 Rear Panel Connections ............................................................................................................. 8 Powering On ............................................................................................................................... 8 DN-200 Menus ................................................................................................... 9 Main Menu Options .................................................................................................................... 9 Record Setup Options .............................................................................................................. 10 Play Setup Options ................................................................................................................... 10 System Setup Options .............................................................................................................. 11 DN-200 General Setup Notes .......................................................................... 12 Set the signal type .................................................................................................................... 12 Set HDD partition to 1 or 2 ....................................................................................................... 12 Choose a file operating system, FAT32 or NTFS .................................................................... 12 Set the HDD volume ID ............................................................................................................ 12 Select which time code to display ............................................................................................ 12 Empty the current or all bins ..................................................................................................... 12 Normal Recording ........................................................................................... 13 Select the video source ............................................................................................................ 13 Set the file type ......................................................................................................................... 13 Synchronize to tape motion ...................................................................................................... 13 Select the audio sampling rate in DV mode ............................................................................. 13 Set the record date (optional) ................................................................................................... 13 Before starting to Record.......................................................................................................... 13 Starting the Record Process .................................................................................................... 13 Pausing the Record Process .................................................................................................... 14 Marking the Recording ............................................................................................................. 14 Stop a recording before powering down ................................................................................... 14 Power on auto record ..................................................................................... 14 Time Lapse Recording .................................................................................... 14 Using Record Pre-trigger ................................................................................ 14 2
  • 3. DN-200 GPI Trigger connection and operation ............................................. 15 GPI Trigger cabling and circuit ................................................................................................. 15 SET GPI TRIGGER MODE ...................................................................................................... 15 PULSE trigger Record process ................................................................................................ 15 LEVEL trigger Record process ................................................................................................. 15 PULSE trigger Playback process ............................................................................................. 15 LEVEL trigger Playback process .............................................................................................. 15 Playback ........................................................................................................... 16 Set up loop play ........................................................................................................................ 16 Power on auto play ................................................................................................................... 16 Play out ..................................................................................................................................... 16 Pause and Go To Mark ............................................................................................................ 16 MAKE MEDIA FILES ................................................................................................................ 17 Preparation ............................................................................................................................... 17 Connection to a Computer in AV HDD Mode ............................................... 17 Operating File System limitations ............................................................................................. 17 File Organization ...................................................................................................................... 17 Updating DN-200 Firmware ............................................................................ 18 DN-200 RS-232 Controller Command Set ...................................................... 19 Connector Pin Assignment ....................................................................................................... 19 System Control ......................................................................................................................... 20 Sense Request ......................................................................................................................... 20 Transport Control ...................................................................................................................... 21 USER Notes ..................................................................................................... 23 Service and Support ....................................................................................... 24 Disclaimer of Product and Services The information offered in this instruction manual is intended as a guide only. At all times, Datavideo Technologies will try to give correct, complete and suitable information. However, Datavideo Technologies cannot exclude that some information in this manual, from time to time, may not be correct or may be incomplete. This manual may contain typing errors, omissions or incorrect information. Datavideo Technologies always recommend that you double check the information in this document for accuracy before making any purchase decision or using the product. Datavideo Technologies is not responsible for any omissions or errors, or for any subsequent loss or damage caused by using the information contained within this manual. Further advice on the content of this manual or on the product can be obtained by contacting your local Datavideo Office or dealer. 3
  • 4. Warnings and Precautions 1. Read all of these warnings and save them for later reference. 2. Follow all warnings and instructions marked on this unit. 3. Unplug this unit from the wall outlet before cleaning. Do not use liquid or aerosol cleaners. 4 Use a slightly damp cloth for cleaning. 4. Do not use this unit in or near water. 5. Do not place this unit on an unstable surface, cart, stand, or table. The unit may fall, causing serious damage. 6. Any slots and openings on the case top, back, and bottom are provided for ventilation. To ensure safe and reliable operation of this unit, and to protect it from overheating, do not block or cover these openings. Do not place this unit on a bed, sofa, rug, or similar surface, as the ventilation openings may become blocked. This unit should never be placed near or over a heat source or radiator. This unit should not be placed in a built-in installation unless proper ventilation is provided. 7. This product should only be operated from the type of power source indicated on the marking label of the AC adapter. If you are not sure of the type of power available, consult your Datavideo dealer or your local power company. 8. Do not allow anything to rest on the power cord. Do not locate this unit where the power cord will be walked on, rolled over, damaged or otherwise stressed. 9. If an extension cord must be used with this unit, make sure that the total of the ampere ratings on the products plugged into the extension cord do not exceed the extension cord’s rating. 10. Make sure that the total amperes of all the units that are plugged into a single wall outlet do not exceed 15 amperes. 11. Never push objects of any kind into this unit through the case ventilation slots, as they may touch dangerous voltage points or short out parts that could result in risk of fire or electric shock. Never spill liquid of any kind onto or into this unit. 12. Except as specifically explained elsewhere in this manual, do not attempt to service this product yourself. Opening or removing covers that are marked “Do Not Remove” may expose you to dangerous voltage points or other risks, and will void your warranty. Refer all service issues to qualified service personnel. 13. Unplug this product from the wall outlet and refer to qualified service personnel under the following conditions: a. When the power cord is damaged or frayed; b. When liquid has spilled into the unit; c. When the product has been exposed to rain or water; d. When the product does not operate normally under normal operating conditions. Adjust only those controls that are covered by the operating instructions in this manual; improper adjustment of other controls may result in damage to the unit and may often require extensive work by a qualified technician to restore the unit to normal operation; e. When the product has been dropped or the case has been damaged; f. When the product exhibits a distinct change in performance, indicating a need for service.
  • 5. 5 Warranty Standard Warranty  Datavideo equipment is guaranteed against any manufacturing defects for one year from the date of purchase.  The original purchase invoice or other documentary evidence should be supplied at the time of any request for repair under warranty.  Damage caused by accident, misuse, unauthorized repairs, sand, grit or water is not covered by this warranty.  All mail or transportation costs including insurance are at the expense of the owner.  All other claims of any nature are not covered.  Cables & batteries are not covered under warranty.  Warranty only valid within the country or region of purchase.  Your statutory rights are not affected. Two Year Warranty  All Datavideo products purchased after 01-Oct.-2008 qualify for a free one year extension to the standard Warranty, providing the product is registered with Datavideo within 30 days of purchase. For information on how to register please visit www.datavideo-tek.com or contact your local Datavideo office or authorized Distributors  Certain parts with limited lifetime expectancy such as LCD Panels, DVD Drives, Hard Drives are only covered for the first 10,000 hours, or 1 year (whichever comes first). Any second year warranty claims must be made to your local Datavideo office or one of its authorized Distributors before the extended warranty expires. Disposal For EU Customers only - WEEE Marking This symbol on the product indicates that it should not be treated as household waste. It must be handed over to the applicable take-back scheme for the recycling of waste electrical and electronic equipment. For more detailed information about the recycling of this product, please contact your local Datavideo office. Packing List Item No. Description Quantity 1 Instruction Manual 1 2 DN-200 Recorder 1 3 12V DC 1A PSU 1 4 3.5mm Jack to RCA Breakout cable 1
  • 6. Product Overview The DN-200 is a small and portable video recorder/player capable of very long record times. A built-in, large capacity hard drive (HDD) stores the video. It can record up to 23 hours of video depending on the recording format, drive settings and hard drive size. The DN-200 HDD can have one or two partitions. A second 6GB partition can be set up. The recorder will have no affect on this partition so the user is free to name it, format it, store any type of data on it with complete confidence that the recorder will not alter it. The unit can easily be set up for FAT32 or NTFS; PAL, NTSC or HDV frame rates too. This unit is capable of recording from digital or analogue sources using IEEE-1394 or Composite and RCA stereo connections. It can also be set up to record PAL or NTSC Time Lapse sequences at a variety of standard or triggered intervals. Set it up to buffer live video and when you press record within 8 seconds of an event you can be confident that you have recorded that must have shot. Once recorded Drag and Drop these video files directly to the time-line of your Non-Linear Editing program using popular DV file wrappers such as Microsoft AVI type 2, Canopus AVI, QuickTime MOV, MXF OP1A as well as HDV M2T. With this many useful features the DN-200 is ideal for a variety applications within broadcast, education, animation, science, medical, construction and security, etc. Features  Small, easy to carry, high capacity hard drive recorder  Input Video Connections: Composite video (BNC) and RCA stereo audio (PAL or NTSC) IEEE-1394 supports DV,HDV including embedded external Time Code Input 6  Output Connections: Composite video (BNC) and RCA stereo audio (PAL or NTSC) via breakout cable  IEEE-1394 in playback can supply DV,HDV signals  IEEE-1394 connection in AVHDD Mode also supports PC and Mac FW400 connections  Supports DV AVI, DV MOV, DV MXF-OP1A and M2T file formats directly, QuickTime HDV and MXF-OP1A through a quick utility program  Set audio sampling rate to match 48KHz (16bit) or 32KHz (12bit)  Time-lapse single frame recording at standard intervals  Manually triggered single frame recording. Useful in model animation recordings  8 second pre-record buffer, useful in recording unexpected events especially in science research, outdoor recording, Health & Safety or security applications  Loop Playback of video in a selected bin  Auto record or Playback to or from current video bin when powered on  Backlit LCD panel showing a comprehensive layout of the recorders status  Allocate a second 6GB HDD partition as a dedicated area for other files  Built-in 2.5" 320GB SATA HDD, allows up to 23 hours of video to be recorded*  RS-232 and GPI interfaces for simple update, trigger and control *subject to HDD size, partitioning chosen, available HDD space and video data rate
  • 7. 7 Connections & Controls Front Panel 1. Menu Button - Calls up the menu display which is navigated using buttons 6 & 7. 2. Display Panel - Displays the status and set up of the DN-200 unit or if the Menu Button is pressed the DN-200 Menu options. 3. Play / Pause Button - Starts playback of a track, or pauses playback of a track with the current status shown on the Display Panel. Also Starts / Pauses a recording when the unit is in Record mode. 4. Stop Button - Stops playback or record. 5. Record Button - Puts the DN-200 into Record Mode. To start recording press the Record Button and the Play Button simultaneously. The unit will not record if no video signal is present. 6. Navigation Button – Used to navigate the menus and confirm set up choices. 7. Navigation Button – Used to navigate the menus and confirm set up choices. DN-200 Clip Status Display Explained 1. Sync to Tape Indicator OFF=ST0 and ON=ST1 2. Analogue / Digital Source indicator 3. Loop Playback indicator 4. Remaining Recording Space in Hours and Minutes 5. Current Bin and Clip 6. File type indicator 7. Current Time Code or total length of clip 8. Menu options 9. Record, Pause, FFWD, REV and Playback indication
  • 8. 8 Rear Panel Connections 1. TC IN – This BNC connection allows the unit to record External Time Code from a source Camera or Deck. 2. CVBS IN – This BNC connection allows the unit to accept an analogue Composite NTSC or PAL video input. 3. AUDIO IN – These RCA L & R channel inputs allow line level analogue audio to be recorded to the same clip as input 2 above. 4. A/V OUT – Allows output of Composite video and analogue L & R channel audio via a breakout cable from a 3.5mm jack connection. 5. GPI socket – Can be used for simple external control. The DN-200 can accept pulse or level trigger inputs, these can trigger record, playback and pause commands. 6. RS-232 Socket – The DN-200 can be controlled via RS-232 from external devices. See Page 19. 7. 6 Pin IEEE-1394 In/Out Port – supports DV25 / HDV M2T input sources or output a DV25 signal to a monitor or supports Firewire 400 communication with a PC/Mac for file transfer. 8. Power On/Off Switch. 9. DC In Socket. Connect the supplied power adaptor to this socket. The connection can be secured by screwing the outer fastening ring of the DC In plug to the socket. Powering On Connect the DN-200’s own power supply to the rear DC In socket. Ensure the power supply unit is connected to a suitable mains socket. Switch the power ON/OFF switch to the ON position. The LCD display panel will show “FOR AVHDD MODE PLEASE PRESS MENU”, ignore this message and after a few seconds the Clip Status Display will be shown. The DN-200 is now ready for use as a recorder or playback device.
  • 9. DN-200 Menus The DN-200 is a menu driven unit; there are several menus which are used to set up the unit. The menu settings are non-volatile (settings are stored even when the unit is switched off). So general settings, such as date and file type, may only need to be set once. We will look at specific set ups in more detail later on in this manual, but here is an overview of the available menu options. Pressing the Navigation Button labelled NEXT will display the next menu option. If all menu options have been displayed and next is selected then the unit loops back to the first menu option once more. Pressing the Navigation Button labelled ENTER will select the displayed menu option. The next level of menu options or a specific setting choice will then be displayed. Pressing the MENU Button will allow exit of the current menu or setting. Example menu selection: Main Menu Options There are 8 initial main menu level options and they are: menu = exit SELECT SOURCE ENTER NEXT menu = exit SELECT SOURCE ANA DIG* Menu Option Action taken MAKE MEDIA FILES This process should be the last step in the record session before transfer of your recorded video footage to an edit / storage system. It prepares ALL recorded video by wrapping the clips as a selected file type such as .AVI or .MOV. These files can then be seen by the computer when in the AVHDD mode. After successful transfer / backup of ALL files to computer the DN-200 should then be wiped with EMPTY ALL BINS so the unit is then ready for the next record session. EMPTY THIS BIN Empties or erases the content within the selected bin, this action cannot be undone once selected. SELECT SOURCE The signal to be recorded can be chosen to come either from the IEEE- 1394 input (DIG) as a digital signal or come from the BNC and RCA inputs as NTSC or PAL analogue signals (ANA). EMPTY ALL BINS Empties or erases the content in ALL of the bins. This action cannot be 9 undone once selected. RECORD SETUP Enters the Record Setup Menu group detailed on page 10 PLAY SETUP Enters the Play Setup Menu group detailed on page 10 SYSTEM SETUP Enters the System Setup Menu group detailed on page 11 FIRMWARE REVISION Displays the current firmware revision for the DN-200 Table 1 Main Menu menu = exit EMPTY THIS BIN ? ENTER NEXT menu = exit MAKE MEDIA FILES ENTER NEXT
  • 10. Record Setup Options Entered from the Main Menu, this set of options enable various record related parameters and modes to be setup. Menu Option Action taken SET RECORD FILE TYPE Where the choice of file type is made for all un-recorded bins. File types cannot be mixed within a bin. Choices are .mov, 2 types of .avi, .mxf and for HDV .m2t only. Note that the current type chosen will be marked with an asterisk as well as being indicated on the 2nd line of the Clip Status Display, see Page 7. SYNCtoTAPE CONTROL ST1, where the recorder will look to the time code changing to indicate the need to record. If the time code pauses then the recording is paused. With this setting turned off, ST0, the record process will continue regardless of the time code behaviour. Note that the current selection will be marked with an asterisk as well as being indicated on the top line of the Clip Status Display, see Page 7. SET RECORD DATE This option always modifies the date attribute of the created file when the source is analogue. When the source is digital if the date in the digital stream is invalid then the unit will use this date instead. RECORD PRE-TRIGGER When enabled, the last 8 seconds of video before the record trigger is captured ahead of the video following the trigger. Note that the video in the pre trigger buffer is lost when the unit is power cycled. SET DEFAULT DV AUDIO When the audio source is analogue, this option sets the audio sampling frequency to 48KHz or 32KHz. When the source is digital, this option helps the recorder match the incoming audio sampling frequency. Note that the current selection will be marked with an asterisk. SET ASPECT RATIO When the source is analogue, this option sets the 16:9 or 4:3 aspect ratio flag in the stream to be recorded. TIMELAPSE RECORD Allows the recording of NTSC or PAL video at slower than real time through a choice of 6 options. Note that the current selection will be marked with an asterisk. PWR ON AUTO RECORD When enabled, the recorder will go directly into record mode in the last bin selected once power is applied. 10 Table 2 Record Setup Menu Play Setup Options Entered from the Main Menu, this set of options enable various record related parameters and modes to be setup. Menu Option Action taken SET LOOP PLAY When enabled the DN-200 will loop play all clips in the current bin, the playback will continuously loop until stopped. Note that the chosen mode is indicated by an asterisk as well as the presence or absence of the loop play icon on the top line of the Clip Status Display, see page 7. PWR ON AUTO PLAY When enabled, the recorder will go directly into a play mode in the last bin selected once power is applied. Table 3 Play Setup Menu
  • 11. System Setup Options Entered from the Main Menu, this set of options enable various record related parameters and modes to be setup. Menu Option Action taken SET SIGNAL TYPE Where the recorder is set to operate with one of three signal types, NTSC, PAL or HDV. Note: Changing between signal types will erase the content in all bins and the DN-200 will restart. Backup any content first. The current selection will be marked with an asterisk. SET FAT32 / NTFS This option will set up the file system type seen by the computer in AVHDD mode as either NTFS or FAT32. Note: Changing between types will erase the content in all bins and the DN-200 will restart. Backup any content first. The current selection will be marked with an asterisk. MODIFY HDD VOLUME ID When connecting as an HDD the DN-200 volume name is shown as Mediapac_xx. This option sets the xx value between 0 and 99. A useful feature when connecting multiple units at the same time from a multi-shoot. SETUP HDD PARTITION The DN-200 HDD can have one or two partitions. A second 6GB partition can be set up. The recorder will have no affect on this partition so the user is free to name it, format it, store any type of data on it with complete confidence that the recorder will not alter it. SET TIMECODE DISPLAY During recording and playback, this option allows display of either the Internal or the External time code. Note that the current selection will be marked with an asterisk. SET REMOTE CONTROL This option either enables or disables the remote control capability. Note that the current selection will be marked with an asterisk. TOTAL SPACE Displays the video capacity of the DN-200 hard drive in Hours, Minutes, Seconds and Frames HH:MM:SS:FF. UPGRADE FIRMWARE Allows the user to update the firmware of the recorder, provided a proper file has been copied on to the DN-200 hard drive in AVHDD mode. SET GPI TRIGGER MODE The GPI socket can be used for simple trigger control. The DN-200 can accept Pulse or Level inputs on this socket, which will trigger record, playback and pause commands. See Page 15 SET FACTORY DEFAULT Recall FACTORY DEFAULT to be loaded into current setup NTSC SETUP LEVEL The setup level is set to 7.5 or 0 IRE. 7.5 IRE is most commonly used in the U.S.A. and Canada and 0 IRE in far eastern countries such as Japan. Not used in PAL or HDV modes. 11 Table 4 System Setup Menu
  • 12. DN-200 General Setup Notes Before using your DN-200 for the first time, there are a few basic operational settings that must be chosen. These are found under the System Setup option in the menu tree (see Table 4 on the previous page). Set the signal type WARNING: Changing between signal types will erase the content in all bins. Backup any content first. Select between NTSC, PAL or HDV. If the standard chosen is NTSC, then a choice of NTSC SETUP LEVEL is also given. This allows the IRE Black level to be set to 0 or 7.5 for NTSC. 7.5 IRE is most commonly used in the U.S.A. and Canada and 0 IRE in far eastern countries such as Japan. Set HDD partition to 1 or 2 WARNING: Changing SETUP HDD PARTITION will erase all content. Backup any content first. The HDD storage space can be broken into 2 partitions; the second partition reserves 6GB and is not seen or used by the recorder. The second partition will appear as a second drive to the computer and the user is then free to use this drive to store any data including stills, text documents, spreadsheets, metadata and/or finished work. The DN-200 is guaranteed not to overwrite data in this second partition. Deleting all bins will also not erase any data in this second partition. The recorder will show a total record capacity less approximately 30 minutes record time once the second partition is created. Choose a file operating system, FAT32 or NTFS This option will set up the file system type seen by the computer in AVHDD mode. NTFS does not have the same 2GB file size limitation imposed by the FAT32 file system. An NTFS recorded clip stays as one file no matter what its length. This choice should only be made once before making any media files. Note: Some editing systems cannot handle NTFS files larger than 40GB. Set the HDD volume ID When connecting as an HDD the DN-200 volume name is shown as Mediapac_xx. If your application calls for multiple DN-200s to be connected to the computer, it becomes helpful to have a unique volume name for each DN-200. This option allows xx to be set between 00 and 99. Select which time code to display With DV, whilst recording or playing, the time code displayed can be either externally or internally generated. If the input signal is analogue and no time code is supplied then the External Time Code generated by the DN-200 is in the dropped-frame format. The internal time code referred to here is the absolute frame number of the recording in the selected bin and is in the non-dropped-frame format. The absolute frame number starts from 00:00:00:00 in each bin. When the content is changed to files, the time code presented to the editing system starts with the External value of the first frame of the content; if this value is invalid then 00:00:00:00 is substituted. For HDV, the time code displayed is always the External time code. Empty the current or all bins The DN-200 is primarily a capture device, as opposed to an archiving device, and it is best to start out with a fresh DN-200 on each project just remember to backup any existing content to computer first. Emptying (erasing) ALL bins will not only clear the DN-200 but it will also conveniently reset the file system. 12
  • 13. Normal Recording A few parameters must be set properly for standard recording and they are mostly grouped in the menu RECORD SETUP. Select the video source For any recordings use SELECT SOURCE in the Main menu. Recordings can be made from the analogue BNC composite connection (ANA) or the IEEE-1394/DV/HDV port (DIG). Note: The breakout AVOUT port, Composite and RCA audio from 3.5mm jack connection, is always live, regardless of the SD input signal source, ANA or DIG. When the source is analogue, the signal is also converted to DV digital and output on the IEEE-1394 port. Note: In a HDV set up, both input and output is sent through the same IEEE-1394 port and the analogue connections are made redundant. Set the file type Should you wish to connect the DN-200, in AVHDD mode, to your computer and drag and drop your video content to it as files. The choices for file types are Microsoft .avi (Type II), Canopus .avi, both commonly used in PCs, QuickTime .mov format used in Macs and .mxf (OP1A) for use with other systems such as Avid. In HDV mode, the only file type supplied is .m2t and this may need conversion before being edited, depending on your computer’s specifications and its editing software. Note: The file format started within one bin will apply to all subsequent recordings within that bin and can only be changed after the bin content is erased or emptied. Synchronize to tape motion DN-200 recording sessions can be synchronized to the camera’s record button by turning Sync to Tape ON (ST1 is shown on the Clip Status Display, see page 7). Whenever the tape deck in the camera is rolling, so will the time code. The DN-200 recognizes this information and will record along with the deck. When the deck stops, the DN-200 will pause the recording. To record continuously without regard for tape or deck motion, switch Sync To Tape off (ST0 is shown). Some cameras control the DN-200 directly through the IEEE-1394 interface and in these cases use ST0 and let the camera do the work. Select the audio sampling rate in DV mode This option will set the audio sampling rate to 32KHz or 48KHz when the video source is analogue. When the video source is digital this setting will be used to match the audio portion of the digital stream. If the audio sampling rate is incorrect and does not match then the first two frames of data will be discarded as the DN-200 resets itself. Note: Only one type of audio sampling rate can be used within a bin. Set the record date (optional) The date attribute of the created file is set to this value when the source is analogue. Each file representing a clip gets it own date. If the source is digital then the record date from the digital stream is used. If that date is not valid then the current record date set by this option is used instead. Before starting to Record Select an empty Bin by pressing the PREVIOUS or NEXT keys when looking at the Clip Status Display (see page 7). An empty Bin will display 00:00:00:00. Starting the Record Process Common ways of starting to record with the DN-200 are: 1) Manually, by holding the Record button down and then pressing the Play button. 2) Automatically, the camera or device connected to the IEEE-1394 port controls the record action. A third way is to issue a record command via the Remote Serial interface or RS-232 port. The DN-200 RS-232 command protocol is listed in this manual from page 19 onwards. 13
  • 14. Pausing the Record Process The DN-200 will automatically pause recording if time code is not moving and ST1 (Sync to Tape) is displayed. When the video source is digital this time code is embedded in the data stream and it is always recorded. However, when the video source is analogue, the time code used is the SMPTE longitudinal time code supplied on the BNC connection. To cause the recording to pause, that time code must be valid but not moving. If SMPTE time code is not present at all then a DN-200 generated time code is substituted starting at 00:00:00:00 for each bin and incrementing from there in a dropped-frame manner (NTSC only). In this case, ST1 (Sync to Tape) has no meaning. It is also possible to pause a recording by pressing the PLAY key, in this mode, recording is resumed by pressing the PLAY key once more and a new clip is created within the same bin. Warning: If power is interrupted whilst the recording is paused, all clip numbers added during the current record session will be lost. No content however will be lost. Future firmware upgrades may fix this behaviour. Note: If power is interrupted while recording, up to two seconds of the last video may be lost. Marking the Recording Whilst recording the right hand navigation button is labelled MARK. Pressing this key whilst recording will start a new clip within the current bin, no frames are lost in doing this. Each time a recording is Marked a new clip is created. A single recording can be marked up 97 times within the current bin. Note: Recording is started in an empty bin. A clip is automatically started at the beginning of recording to the bin. A clip can never be inserted in between other clips already in the bin. Marking or Pausing a recording forces clip numbers to be incremented, each clip is written to the current bin. Note: The minimum length of a clip is 2 seconds. Stop a recording before powering down It is best to stop a recording session by pressing the Stop key before turning the DN-200’s power off, otherwise the whole recording or part of it may be lost. Power on auto record When this option is enabled and the unit is powered on the DN-200 will attempt to begin recording immediately to a chosen bin using the latest stored settings for source, file type etc. Time Lapse Recording In this option a recording can be set up to capture using one of six time lapse settings. These are: 1 frame per second 1 frame per 2 seconds 1 frame per 5 seconds every 4th frame every other frame or 1 frame per trigger Note: When power is interrupted and then restored the unit will need to be restarted within a new bin. Note: A new clip is created only at the beginning of a time lapse recording. Frames are appended. Note: This option is currently not available with HDV sources. Using Record Pre-trigger When this option is enabled the DN-200 is always in a record-ready mode when it is not playing. In this mode it is continuously storing live data in its internal buffer which is 8 seconds in length. In this manner, when a recording is started the last 8 seconds of history prior to the trigger is then captured to disk and video after the trigger is appended after it. Note: This mode is not saved when power is interrupted and the 8 second buffer is flushed. 14
  • 15. DN-200 GPI Trigger connection and operation GPI Trigger cabling and circuit The DN-200 GPI circuit runs on less than 5V DC. This current is supplied by the DN-200 GPI port. You will need a pre-manufactured GPI trigger cable or, you could make your own GPI trigger using a 3.5mm stereo jack connected by 2 core cabling to a simple ‘contact on closure’ button or similar trigger. Wiring from Tip and sleeve on the 3.5mm stereo jack should show roughly 3.28V DC when plugged into the DN-200 GPI port. Jack Tip is positive(+), jack sleeve is negative(-) and ring is not used. SET GPI TRIGGER MODE In the DN-200 SYSTEM SETUP menu use the option labelled SET GPI TRIGGER MODE. You can then make a choice between the PULSE or LEVEL trigger. The selected choice is marked with an asterisk. PULSE trigger Record process Using the Clip Status Display and navigation buttons select an empty DN-200 bin. Make sure the source device is connected and working and the target file type on the DN-200 has been chosen. Press and hold in the Record button on the front panel and then press the Play button. This should start the record process. The button on the connected GPI cabling is then pressed forcing the unit into record pause mode. The unit is then ready to activate record on the next press of the contact closure button. Each time the DN-200 starts recording a new clip will be added to the bin. Press the stop button on the front panel of the DN-200 to end recording to the bin. LEVEL trigger Record process Using the Clip Status Display and navigation buttons select an empty DN-200 bin. Make sure the source device is connected and working and the target file type on the DN-200 has been chosen. Press and hold in the Record button on the front panel and then press the Play button. This should start the record process. The button on the connected GPI cabling is then pressed forcing the unit into record pause mode for the length of the press. However, when the button is released the recording process starts again. Each time the DN-200 starts recording a new clip will be added to the bin. Press the stop button on the front panel of the DN-200 to end recording to the bin. The contact closure button may be working in the opposite way to the type of action you want to perform. A mechanical change to the GPI contact closure trigger should fix this. IE when pressed down the circuit is broken and recording starts. When released the contact is made causing the pause action. Note: You may a have a couple of seconds footage at the beginning of the bin that you may wish to remove later once the footage is transferred to a computer for editing. PULSE trigger Playback process Using the Clip Status Display and navigation buttons select a pre-recorded DN-200 bin. Make sure the output device/monitor is connected and working with the DN-200. Press in the Play button on the DN-200 front panel. This should start the playback. The button on the connected GPI cabling is then pressed forcing the unit into play pause mode. The unit is then ready to playback from this point on the next press of the contact closure button. Press the stop button on the front panel of the DN-200 to end playback of the bin. LEVEL trigger Playback process Using the Clip Status Display and navigation buttons select a pre-recorded DN-200 bin. Make sure the output device/monitor is connected and working with the DN-200. Press in the Play button on the DN-200 front panel. This should start the playback. The button on the connected GPI cabling is then pressed forcing the unit into play pause mode for the length of the press. However, when the button is released the playback starts again. Press the stop button on the front panel of the DN-200 to end playback of the bin. 15
  • 16. Playback Set up loop play When loop play is enabled and the last frame of the last clip is reached the DN-200 will start over playing from the first frame of the first clip seamlessly. Power on auto play When this option is enabled at power up the DN-200 will begin playing back immediately from the first clip of the last selected bin. Play out Play out mode can be entered by one of three ways, the most common is to press the PLAY button; the other two are by issuing a PLAY command through the IEEE-1394 interface or the serial port interface if it is enabled. When playing, the time displayed is controlled by the TC DISPLAY FORMAT option. When play back is stopped, the time displayed is the time code of the last frame displayed. When entering play back the soft keys will be fast reverse FREV and fast forward FFWD respectively. Repeatedly pressing either soft key will cause the play function to go repeatedly faster in the chosen direction up to 32x speed. A speed other than 1x is displayed in the bottom line. Also whilst playing out pressing the Menu button will give an alternate set of soft keys; SLOW and FAST. These keys, while keeping the same current play direction, will extend the control of the speed down to the slow motion range of 1/32x. The menu button will toggle between the two sets of keys. If play back is entered after a recording, the play back will start at the beginning of the first clip of the current bin. For example, a record session starts with clip 1, during the record the Make key is used to create clips 2 and 3. Play back will start at clip 1. This will remain until another bin is selected or power is turned off. Pause and Go To Mark While playing, pressing the PLAY key will pause the image. Pressing Play again will return to 1x play in the forward direction. While in the play-pause mode, the soft keys will be l< and >l. These keys allow direct access to the marks that are the starting and end frames of each clip. Counting the end frame of the last clip, there will always be one more mark than there are clips. In this mode, the clip number display will be substituted with a mark number display. Again, pressing the Menu key will present an alternate set of soft keys, these will be <ll and ll> for frame stepping reverse and forward respectively. Holding either key down for more than 2 seconds will cause a rapid stepping. 16
  • 17. MAKE MEDIA FILES This process should be the last step in the record session before transfer of your recorded video footage to an edit / storage system. It prepares ALL recorded video by wrapping the clips as a selected file type such as .AVI, MOV, MXF or M2T. These files can then be seen by the computer when in the AVHDD mode. After successful transfer / backup of ALL files to computer the DN-200 should then be wiped with EMPTY ALL BINS so the unit is then ready for the next record session. Preparation Prior to using the DN-200 in the AV HDD mode and seeing your video as files instead of clips the MAKING MEDIA FILES menu process must be undertaken. Connection to a Computer in AV HDD Mode The AV HDD mode is where the DN-200 appears to the computer as a Hard Disk Drive (HDD) and not as a video device. The connection to the computer is via the IEEE-1394 connector. The AVHDD mode is entered by pressing the Menu key within the 5 seconds just after the DN-200 is powered on. When connecting as an HDD the DN-200 volume name is shown as Mediapac_xx. Note: Care must be taken when connecting the 6pin IEEE-1394 cable in the DN-200 when the other end is already connected to the computer. Do not attempt to insert the connector backwards as DC power from the computer is present on the cable and can damage the sensitive receiver circuits in the DN-200. Note: No software drivers are necessary for the computer to recognize the DN-200 as a Firewire HDD. Please see SET FAT32 / NTFS under SYSTEM SET UP to ensure compatibility with your computer operating system. Operating File System limitations The FAT32 format is compatible with both Macs and PCs. However, this format limits the size of a file to a maximum of 2GB, in DV that translates to approximately 9+ minutes of video. A clip that lasts longer than 9min is broken into multiple files, each 2GB long, with the last one making up the remaining time. If this sequence of 2GB files are placed in the correct order and end to end on an editing time line no frames are lost at the joins. In addition, FAT32 has a clip boundary that has a limit of 2 seconds so the beginning of a clip other than the first in a bin is most likely to contain the end of the previous clip, up to 2 seconds' worth. Conversely the end of a clip is most likely to be found in the first file of the next clip. For an accurate correlation of clip numbers between the VTR and the HDD mode, it is best to keep each clip longer than 2 seconds and to have fewer than 97 clips per bin. The NTFS format is fully compatible with PCs and is read compatible with Macs. Its main advantage is that it does not impose a file size limitation to the DN-200 resulting in one file per clip. NTFS’ clip boundary is frame accurate and therefore has perfect correlation with clip numbers in the VTR mode. Note: Some NLEs cannot accept file sizes greater than 40GB, make sure your NLE is not one of them if you plan on shooting one continuous take greater then 3 hours and using NTFS. File Organization After the media conversion is made, all bins that contained video will appear to the computer as folders named BINxx where xx represents the BIN number ranging from 01 to 99. Inside each folder, each clip will be represented as a file with an extension name .avi, .mov e.g. depending on the type chosen prior to recording. Each file will be named BxxCnnyy where xx again represents the bin number; nn represents the Clip number ranging from 01 to 97. The number yy is the number of the spilt file caused by the FAT32 limitation 17
  • 18. Updating DN-200 Firmware From time to time Datavideo may release new firmware to either add new features or to fix reported bugs in the current DN-200 firmware. Customers can update the DN-200 firmware themselves if they wish or they can contact their local dealer or reseller for assistance should they prefer this method. This page describes the firmware update process, it should take approximately 15 minutes total time to complete. Once started the update process should not be interrupted in any way as this could result in a non-responsive unit. As well as a working DN-200 you will need:  The latest Firmware update for the DN-200. This can be obtained from your local Datavideo office. 18  The DN-200 power supply.  A 6 pin IEEE-1394 cable.  A PC or Mac computer. The AV HDD mode is where the DN-200 appears to the computer as a Hard Disk Drive (HDD) and not as a video device. The connection to the computer is done via the IEEE-1394 connector. The AVHDD mode is entered by pressing the Menu key within the 5 seconds just after the DN-200 is powered on. When connecting as an HDD the DN-200 volume name is shown as Mediapac_xx. Note: Care must be taken when connecting the 6pin IEEE-1394 cable in the DN-200 when the other end is already connected to the computer. Do not attempt to insert the connector backwards as DC power from the computer is present on the cable and can damage the sensitive receiver circuits in the DN-200. Note: No software drivers are necessary for the computer to recognize the DN-200 as an HDD. To update the DN-200’s firmware: 1. Take a DN-200 that has been set to the FAT32 file system and has been taken through the MAKE MEDIA FILES process and connect it to your computer in AVHDD mode as described above. 2. Copy the firmware update file to the root directory level, where all bin folders usually appear, and rename it flash.bin. 3. Next, dis-mount or eject the DN-200 from the computer and power cycle the unit. 4. Once re-started enter the SYSTEM SETUP menu and select the UPDATE FIRMWARE option. 5. Follow the display screen instructions.* 6. The unit will re-start itself once the process is complete. *WARNING: Once the ERASE FLASH option has been selected, DO NOT turn power off until the firmware has been updated. If the update is prematurely ended the recorder will be made inoperable.
  • 19. DN-200 RS-232 Controller Command Set Rev 3.1 July 29, 2006 Communication Format: Mode: No synchronization Character Length: 1 start bit + 8 data bits + 1 parity bit + 1 stop bit Data Rate: 38,400 Baud Parity: Odd Command Format: CMD1, CMD2, Data bytes …., Checksum byte A Command is made up of two address bytes, CMD1 and CMD2, a variable number of Data bytes (Data from 0 up to 15) and a Checksum byte. The Checksum byte is the modulo 256 sum of all preceding bytes. The most significant nibble of the CMD1 byte represents the command group. The least significant nibble represents the number of Data bytes to follow the CMD2 byte. Command Protocol: CMD1, CMD2, Data bytes …., Checksum byte Response: ACK Other than the sense command, the unit will respond to all commands affirmatively by sending a three byte acknowledgement (ACK) if the Checksum is valid. If the Checksum is not valid, the DN-200 will ignore the command. Most commands will be responded to within 8 msec. However, a PLAY command from an idle state will result in response delay of up to 700 msec. During this busy time, all commands will be ignored. Summary List of Commands Command Name Response Name 19 System Control 00h, 11h, 11h Device Type Request 12h, 11h, 00h, 00h, 23h Device Type 00h, F1h, F1h Next Bin 10h, 01h, 11h ACK 00h, F2h, F2h Previous Bin 10h, 01h, 11h ACK 00h, F4h, F4h Disable Loop Play 10h, 01h, 11h ACK 00h, F5h, F5h Enable Loop Play 10h, 01h, 11h ACK 01h, F0h, XXh, csum Select Bin 10h, 01h, 11h ACK Connector Pin Assignment Interface : 9 pin D-Sub female to 3.5mm Jack The pin assignment of the Controller and DN-200 is shown in the following table: 9 Pin D-Sub Controller (P1) DN-200 (P2) 3.5mm Jack Pin 2 (Rx) 2 Jack Ring Pin 3 (Tx) 1 Jack Tip Pin 5 (GND) 3 Jack Sleeve
  • 20. System Control 00h, 11h Device Type request The response is 00, 00 indicating Quick Capture 00h, F1h Next Bin When this command is issued from the Idle state the next bin is selected. If the present bin is 99 then the next bin is 1. 00h, F2h Previous Bin When this command is issued from the Idle state the previous bin is selected. If the present bin is 1 then the next bin is 99. 00h, F4h Disable Loop Play When this command is issued from the Idle state the Loop Play feature is disabled. Loop Play is where the the last play command is repeated from its beginning when the end is reached. 00h, F4h Enable Loop Play When this command is issued from the Idle state the Loop Play feature is enabled. Loop Play is where the the last play command is repeated from its beginning when the end is reached. 01h, F0h, XXh Select Bin XX When this command is issued from the Idle state bin XX is selected. XX varies between 1 and 99. Illegal bins are ignored. 01h, F3h, XXh Select and Empty Bin XX When this command is issued from the Idle state bin XX is selected and all of its content is permanently deleted. XX varies between 1 and 99. Illegal bins are ignored. Sense Request 61h, 0Ch, 04h Current Time Sense Requests the Time code data. The unit responds with 4 bytes indicating the present time code in Binary-Coded-Decimal. The first byte holds the frame number, the second byte holds the seconds, the third the minutes and the fourth the hour. In the play state, the time code returned is the time associated with the current frame being played, in the record state, the time code returned represents the elapsed time recorded in the present bin. Command Name Response Name 61h, 20h, OL, csum Status Sense 7Lh, 20h, Stat(L), csum Status 61h, F0h, 04h, 55h Current Frame Offset 74h, 00h, FO(3:0), csum Frame Offset 61h, F1h, 01h, 53h Current Bin 61h, 00h, nn, csum Bin Number 24h, F1h, nn Play Offset nn Frame Offset number nn is played. The number nn is made up of 4 binary encoded bytes and sent out with the least significant byte first. This command may be issued from the idle state or any other Play state. Note: Frame Offset are represented in absolute frame numbers where the first frame of the bin is 0. 24h, F2h, nn Play from Offset nn Content of the present bin is played at 1x speed starting at Frame Offset nn. This command may be issued from the Idle state or any other Play state. 24h, F3h, bb, nn Select Bin and Play Offset Bin number bb is selected and Frame Offset number nn is played. This command may be issued from the idle state or any other Play state. 24h, F4h, bb, nn Select Bin and Play from Offset Content of the bin number bb is played at 1x speed starting at Frame Offset nn. This command may be issued from the idle state or any other Play state. 20
  • 21. 24h, F5h, nn Play to Offset nn Content of the present bin is played at 1x speed starting from present Frame Offset until Frame Offset nn at which point it pauses. Frame Offset nn is 4 bytes and starts with the LSB. This command may be issued from the idle state or any other Play state. 25h, F5h, bb, nn Select Bin and Play to Offset Content of the bin number bb is played at 1x speed starting at Frame Offset 0 to Frame Offset nn then pause. Frame Offset nn is 4 bytes and starts with the LSB. This command may be issued from the idle state or any other Play state. 29h, F5h, bb, nn, ee Select Bin and Play from Offset to Offset Content of the bin number bb is played at 1x speed starting at Frame Offset nn to Frame Offset ee then pause. Frame Offsets nn and ee are 4 bytes and start with the LSB. This Transport Control 20h, 00h, Stop The unit enters the idle state. In the A2D, the outputs reflect the video source as selected by the Front Panel. 20h, 01h Play Content of the present bin is played at 1x speed. This command may be issued from the idle state or any other Play state. 20h 02h Record The video is recorded from the selected source onto the current Bin. This command may be issued only from the idle state. 20h, 10h Fast Forward A play state where video is played at the highest speed of 32x in the forward direction. 20h, 20h Fast Rewind A play state where video is played at the highest speed of 32x in the reverse direction. NOTE: When receiving one of the following commands (JOG, VARIABLE or SHUTTLE ), the unit will play forward or backward according to the speed data. The first data byte may only be a maximum of 80: Play Speed=10(nn/32-2) Note that setting nn to 0 will result in pausing the unit. 21h, 11h, nnh Jog Forward 21h, 12h, nnh Variable Forward 21h, 13h, nnh Shuttle Forward A Play state where video is played at the commanded play speed as described above in the forward direction. Note: Setting the speed to 0 causes the play to pause. 21h, 21h, nnh Jog Reverse 21h, 22h, nnh Variable Reverse 21h, 23h, nnh Shuttle Reverse A Play state where video is played at the commanded play speed as described above in the reverse direction. Note: Setting the speed to 0 causes the play to pause. 21h, F0h, nnh Select Bin and Play Content of the bin number nn is played at 1x speed from the beginning. This command may be issued from the idle state or any other Play state 21
  • 22. 22
  • 24. 24 Service and Support It is our goal to make your products ownership a satisfying experience. Our support staff is available to assist you in setting up and operating your system. Please refer to our web site www.datavideo-tek. com for answers to common questions, support requests or contact your local office below. Datavideo Global Website: www.datavideo-tek.com Datavideo Corporation Tel: +1 562 696 2324 Fax: +1 562-698-6930 E-Mail: contactus@datavideo.us Datavideo Technologies Europe BV Tel: +31-30-261-96-56 Fax: +31-30 261-96-57 E-Mail: service@datavideo.nl Datavideo UK Limited Tel: +44 1457 851 000 Fax: +44 1457 850 964 E-Mail: sales@datavideo.co.uk Datavideo Technologies Co., Ltd Tel: +886 2 8227 2888 Fax: +886-2-8227-2777 E-mail: service@datavideo.com.tw Datavideo Technologies China Co., Ltd Tel: +86 21-5603 6599 Fax:+86 21-5603 6770 E-mail: service@datavideo.cn Datavideo Technologies (S) PTE Ltd Tel: +65-6749 6866 Fax: +65-6749 3266 E-mail: sales@datavideo.sg Datavideo HK Ltd Tel: +852 2833 1981 Fax: +852-2833-9916 E-mail: info@datavideo.com.hk Datavideo France s.a.r.l. Tel: +33 1 60 37 02 46 Fax: +33 1 60 37 67 32 E-mail: info@datavideo.fr Datavideo Technologies India PVT LTD. Tel: +91 120 4309120 Fax: +91 120 4309121 E-mail: sales@datavideo.in All the trademarks are the properties of their respective owners. Datavideo Technologies Co., Ltd. All rights reserved 2012. Rev Date: 20/07/2012 P/N: G082060404E4