RUBBLE PATIO, STEPS, AND RETAINING WALLS DESIGN
•
0 recomendaciones•738 vistas

The document describes the landscaping of a backyard, including permeable patios and steps made of reclaimed materials, grass berms, shade structures, and various water features. Privacy and climate control were priorities in the design. Nodes for different activities were created with sunny and shady spots. Native and drought-tolerant plants were added in the fall. The owner plans to restore the uphill area to native plantings, taking inspiration from a local gardener's book on natural history restoration.

Recomendados
Más contenido relacionado
La actualidad más candente
La actualidad más candente (10)
Similar a RUBBLE PATIO, STEPS, AND RETAINING WALLS DESIGN
Similar a RUBBLE PATIO, STEPS, AND RETAINING WALLS DESIGN (20)
Último
Último (20)
RUBBLE PATIO, STEPS, AND RETAINING WALLS DESIGN
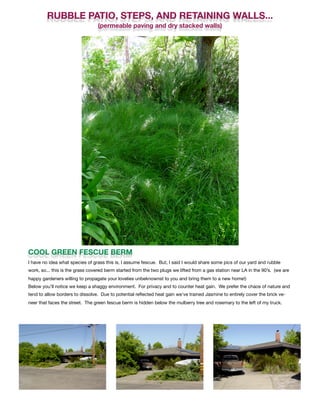
- 1. RUBBLE PATIO, STEPS, AND RETAINING WALLS... (permeable paving and dry stacked walls) COOL GREEN FESCUE BERM I have no idea what species of grass this is, I assume fescue. But, I said I would share some pics of our yard and rubble work, so... this is the grass covered berm started from the two plugs we lifted from a gas station near LA in the 90’s. (we are happy gardeners willing to propagate your lovelies unbeknownst to you and bring them to a new home!) Below you’ll notice we keep a shaggy environment. For privacy and to counter heat gain. We prefer the chaos of nature and tend to allow borders to dissolve. Due to potential reflected heat gain we’ve trained Jasmine to entirely cover the brick ve- neer that faces the street. The green fescue berm is hidden below the mulberry tree and rosemary to the left of my truck.
- 2. 2 ENTRY GATE AS IMPRESSION OF BEYOND... or, how portals are important in design. It’s that personal contact with elements such as hardware that stimulates our sense of touch. Or, aesthetics such as the use of a reclaimed cast iron heat grate that’s used for a peek-a-boo opening in the gate, that make a design stand out in our memory. Crossing through the gate one is immediately greeted with a cool shady deck area just off our kitchen. You’ll notice we’ve used shade cloth surrounded by a tra- ditional pergola style frame. Us- ing 6x6 posts we create the im- pression of a substantial struc- ture. The beauty of this shade cloth option is that we can draw the cloth back during the winter months for solar heat/light gain. This would not be possible with a traditional pergola with a lattice shade structure on top. There are times when one may want that sunshine! Originally, when we bought the house, there was a single deck filling the entire area from the kitchen to the master bedroom. To create a sense of separation and privacy, we provided an area of contained Dolcis Bamboo. This is the hot spot of the house. Without these two tactics provid- ing shade and privacy our back- yard would be a solar oven!
- 3. LOOKING TO THE REAR INVITING NODES OF ACTIVITY... Exterior design is similar to interiors in that one must create a logical path of travel intersecting nodes of activity. Shady spots, sunny spots, wet areas, dry areas, steep terrain, level terrain, they all have their unique functions and solutions. It’s our goal to identify and encourage the best from each. Here we seem invited to sit in the sun or shade. The really cool thing is that each of these areas are subject to varying climates at different times of the day/ season. The main design tool used here is to allow the user to see the options in order to be enticed to actually go and use the space. Allure comes to mind. Closer in, just beyond those pillows, is our first water feature. It is made up of a pot in a bowl. Within the pot is a sub- mersible pump that draws water from the bowl via a tube in the bottom and then overflows into the bowl. It was in this setup that we introduced ourselves to our turtle and koi. 3 WATER FEATURE Looking down at the feature we see duck weed in it’s seasonal show of force. Some don’t like the stuff, we do. We’ve seen birds frolicking in the pot and we have also seen some birds dipping in the bowl! SHADY SPOT FOR MUGZ Yes, build it and they will come... the cats, too! This guy loves to eat grass. And, he loves shady spots. Just thought to intro- duce you to him. MOSQUITO FISH A requirement for this style water feature. This shot is from another season. Notice the duck weed is gone and the water lily is coming up. Must be getting close to August.
- 4. 4 ALLURE... In this case, kinetic sculpture. This is a shot of John Tyler’s Thai Chi. This sculpture moves gracefully even during extreme windstorms. It is quite amazing to observe. Beyond are our rubble walls and steps to the upper patio. Made of reclaimed materials from a variety of jobs and places we include: urbanite (concrete waste), bricks, precast piers, bottles filled w/gravel or sand, and purchased stones. The trick is to weave the materials together in a pleasing manner allowing plantings to play a part, as well. Using earth as mortar, this is what allows plants to intermingle and ties it to the earth. Below is a detail shot of a terra cotta saucer used for a bird bath. This style of water feature requires daily maintenance to assure there is fresh water and no mosquitos. The birds use it year ‘round in our mild climate.
- 5. 5 ON THE OPPO- SITE SIDE... leading to the upper patio we’ve created another set of steps out of reclaimed mate- rials and purchased stone. In this case there was a minor existing concrete rubble re- taining wall at the lower patio level. We broke out a section to place recycled brick as the first riser nosing. This is lower than the retaining wall and in sequence with the average riser height. It’s con- trasting color calls it out as the first step appropriately. Drought tolerant grasses, creeping thyme, creeping rosemary, mint, dierama and agapanthus help to anchor the scene. In the lower photograph we see a detail of the reclaimed materials at the upper patio: precast piers, bricks, bottles, and urbanite are the main building materials. This patio area is built-up fill com- pressed behind the rubble wall. As we built the lower course of rubble, we would compress the backfilled earth to an equal height using our feet or hand powered tam- pers to compress the earth. Then, we add the next course, more earth and tamping, and so on. From here we’ll begin work on the mid-point access.
- 6. ONTO TREAD #2 MOCK UP after backfilling tread #1. Additionally, we weave in the retaining wall that will support the extension of the upper patio. TREAD #3 AND RETAINING WALL mock up are complete. Eventually, in the cool of the fall, we will plant sun-loving, rock-hugging plants that will help to tie the system to the earth. BACKFILL COMPLETE AT RETAINING and steps finished. We now focus our at- tention on the upper patio. The easy part! MID-POINT ACCESS... 6 BEFORE SHOT AT MID-POINT Now we focus on this terrain to discover the path of travel to the upper patio (still under design/construction). This view is from the butterfly chairs. UPON CLOSER INSPECTION... we notice a native rush overpowering the pathway and a steep incline to the upper patio. THE SOLUTION... arrived at $10 per cubic yard from MMRRC for Urbanite and $200 for approx 1/2 cu yard of selected Old Town stone pavers from American Soils. WE BEGIN BY REMOVING THE RUSH and mocking up the layout via string lines and the riser heights via taped points on an adjacent stake. A COMBINATION OF CUT AND FILL is used to achieve a planar surface for the treads. We’re careful not to disturb existing soil and we compress the fill using hand tamping. MOCK UP OF FIRST AND LAST TREAD as a means of verifying riser heights and alignments prior to backfilling tread #1 w/ soil. Our soil is of a high clay content mak- ing it useful mortar.
- 7. THE UPPER PATIO... 7 WE EXTEND THE UPPER PATIO TO MEET THE RETAINING WALL and create an impromptu dragon fly bench adjacent tread #1. We will delay installing our plantings until the cool of the fall. By doing so we avoid potential plant loss and water waste. We installed 1/4” inline drip tubing to feed our patio ground cover, Dymondia margaretae, during the dry months. THE RESULT shows how we’ve tied the upper patio to both sides of the property using reclaimed materials. COMPASS ROSE A close friend shared long ago the value of adding a compass to a project design for orientation. It’s always nice to know where one stands on Planet Earth. OUR IMAGINATIONS FLOW as we sort through materials and we lay a radiating heart right next to our magical dragonfly bench. Our neigh- bor brought over 8 bricks left over from their project. Another inspiration from the gifted materials is a compass rose. Everything seems to fall magi- cally into place!
- 8. FALL COLORS... call for shorter daylight hours, cooler days, and potential rains. Now is the time to select ground cover and other plantings. WE’VE SELECTED... all drought tolerant species for our arid climate. Some are natives and some not. Drought tolerance will be the main criteria in this area of our yard. Our long term goal is to bring in as many natives as possible attempting to create a zone of California natives in the open space beyond our domestic garden. 8
- 9. WE CAREFULLY TUCK THEM IN... for the fall/winter season. The drip irrigation is set to provide regular waterings to be turned off once the rains begin. The cool of the fall allows for less watering than had we planted in the heat of the summer. 9
- 10. EXPANDING FURTHER and using a similar technique, we decided to create a deep shade patio under a stand of liquid amber and oak. In this case the lower light conditions and continuous leaf drop from the trees would make using ground cover difficult between the pavers. So, we will use a mix of different sized gravel be- tween the pavers to allow water to seep in to feed the tree roots and aquifer. While building the upper patio we realized how cool this place was as we took breaks from the summer sun in this shady spot. Contrasts in design, such as cool and hot, play important roles as lures. By recognizing these factors the designer can then provide appropriate means of enjoyment. Here, while some may prefer the direct sunlight, others may want to relax in the cool shade of the trees. Providing just enough space for these activities allows more room for plant- ing in the landscape. 10 PLACING THE PAVERS FIRST Using sharp sand and 1 1/2” - 3” gravel as base for leveling and setting the pavers first. FILLING BETWEEN PAVERS Using 1/2” - 3/4” gravel next with pea gravel over to allow water seepage and as a debris filter. FINISHED PERMEABLE PATIO SURFACE Falling leaves and debris will be kept from filling between the pavers by the pea gravel. An occasional sweeping should be all that’s needed to maintain the surface.
- 11. 11 SO, HERE IT IS... in all it’s winter splendor, our summer shady spot lit up by the low lying winter sun! It’s awesome that things shift during the seasons. Who would have guessed that in the winter we would be sit- ting here to gain some sun- shine? With the hardscape behind us, now we’ll focus in on the plantings. We have plans to restore this uphill area to na- tive plantings. Recently, we went to Bolinas to visit Judith Larner Lowrey’s home/studio to see her garden first hand and to pick up her newest book “The Landscaping Ideas of Jays” -a natural history of the backyard res- toration garden. Her ro- mance with history and this region has captured our hearts. In her book she pre- scribes a method of restora- tion. Over the next many years we will continue to study, ob- serve, and cultivate this ‘wild’ portion of the backyard using her vision as guidance. Without doubt, we are on the brink of something wonderful. We sense it even through the violence represented in our media. We seem to be ap- proaching a tipping point. Somehow our collective con- sciousness will prevail and we shall attain harmony with Nature.
- 12. 12