SlideShare una empresa de Scribd logo
1 de 11
Descargar para leer sin conexión
Using Microsoft Photostory 3
David Jakes
Instructional Technology Coordinator
Community High School District 99
Downers Grove, IL 60563

PREP: On your machine, or network drive, create a folder or directory, and name it
appropriately. All images, music and Photostory 3 files will be stored in this folder. This tutorial
assumes you have located the images you will use to create your digital story.

STEP 1:

    1. Open Photostory 3.
    2. Select “Begin a New Story”
    3. Click Next.


This step also allows you to edit a previously made story or play a story.


                    This work published under a Creative Commons Attribution-NonCommercial license.
STEP 2: Import and arrange your pictures

Things you can do: import images, remove black borders, rotate imagery, simple photo editing.

   1. Click Import Pictures. Locate the folder where your images are located. If you have not
      found images, visit http://www.jakesonline.org/websearching2.htm to access a list of
      search tools that can be used to locate digital imagery.

   2. Click on your first image. Hold the shift key down. Click on the last image-this will
      select all images. To select images non-sequentially, hold the control key down and
      select. Click OK once selected. The images will now load into the timeline.

   3. To reorder your images, click and drag and reposition in the timeline.

NOTE: you can always add other imagery by repeating step 2 above.
4. OPTIONAL: Once the order of the images have been determined (this may be
              predetermined in a storyboard), you may wish to remove the black borders of your
              images. Click Remove Black borders. Click Yes to All. Click OK.


                                                                                            Remove black
Simple image                                                                                borders here.
editing tools
are located
here.


   Reposition imagery by
   dragging to a new                        Save Project here.
   location in the timeline.


       Editing Effects: Rotate and Crop, Auto Fix and Add Effect

       Add Effect: None, Black and White, Chalk and Charcoal, Colored Pencil, Diffuse Glow,
       Negative, Outline-Black, Outline-Grey, Sepia, Washout, and Water Color.


       5. SAVE EARLY SAVE OFTEN!!! At this point, save your file. Save it to the folder created
          in the Prep step above. Be sure that your images and Photostory file are in the same folder.

       6. Click Next.
STEP 3: Add a title to your pictures

     Things you can do: add titles and add effects to your imagery.

         1. Click on the slide you wish to add text tool. Type your title into the window and use the
            various tools to change the font, font color and the positioning of the title on the slide.

         2. Click Next.


                                                                                   Type title here. Change
                                                                                   font characteristics and
                                                                                   positioning of the title
                                                                                   using the position icons.


                 Effects can also be accessed here. Click on the arrows to
                 move through the slides to add text to any image. See
                 effects descriptions on the previous page.


You may wish to add text to slides to create an additional effect. Also consider adding a
black image at the beginning of the digital story to hold the title. Adding a black image for a
title slide would require producing a black image outside Photostory 3 with a graphics editing
program OR accessing http://www.jakesonline.org/blankslides.htm and right-clicking on the
links and choosing Save Target As….
STEP 4: Recording Your Voice-over (Narrate your pictures) and Customizing Motion

         Things you can do: add narration to each individual slide, customize motion by adding
         transitions, pans and zooms, set the amount of time for each image, and preview your movie.

         SET UP: To record sound, insert your microphone into the appropriate ports in your computer.
         Configure the microphone and sound level by running the Sound Hardware Test Wizard.

             1.   Select the image you want to record sound on.
             2.   Click on the record sound button.
             3.   Record your narration. Click on the stop button.
             4.   Test your voice-over by selecting the Preview button
             5.   If acceptable, repeat steps 1-4. If the voice over needs to be redone, remove the voice
                  over by clicking on the appropriate button and following steps 1-4.


                                              Step 3. Click this               Step 5: (Optional) if, after
                                              button to stop recording         preview, you would like to re-
                                              your voice-over.                 record your voice-over, click here
                                                                               to remove the recorded voice.

                                              Step 2.
Step 1. Select                                Click this
the image you                                 button to
wish to record                                begin
your voice                                    recording.
over on.                                      Begin
                                              speaking to
                                              record your
                                              voice-over.                                           Step 4. Previews
                                                                                                    the slide and the
                                                                                                    recorded voice over.
Customizing Motion

   1. Click on the image in the timeline you wish to work with.
   2. Click on the Customize motion button directly below the picture


                                                        Go to the next image.


   3. The program defaults to the motion and duration tab. This allows you to determine pans
      and zooms.

   4. Click the Specify start and end position of motion. The images in the Start position and
      the End position will have handles appear. Use the handles to position the images for the
      desired effect. In the example above, when this image appears in the movie, it begins as
      a large image and zooms inward upon completion of the image in the movie.

       Additional options:
       Set start position to be the same as end position of the previous picture. This will allow
       for smooth transitions between the images.

       Set end position to be the same as the start position. Use this effect to have no change
       throughout the time the image is displayed in the digital story.

       Number of seconds to display the picture: overrides the automatic feature above, allows
       for more specific user control of image display.
5. Preview the effect
   6. Save the effect. NOTE: this is a save function just for this image effect-it does not save
      the project.
   7. Use the arrows to migrate to the next image.

Transitions:

NOTE 1: Cross dissolve is the default function
NOTE 2: Just because you can does not mean you should. Be careful with transitions.

   1. Click the Transition tab across the top.


   2. The program displays the previous picture and the current picture with the effect between
      it.
   3. Use the scroll on the right side of the window to select the transition and preview. Use
      the arrows below the time display to migrate from picture to picture.
   4. Click Save (again, saves the transition effect to the slide and not the file itself) and then
      Close if you are done.
   5. Repeat as necessary.
STEP 5: Add background music

Things you can do: add background music.


   1. Click either the Select Music button or the Create Music button. The Select Button
      enables the user to select mp3 files created or downloaded from a source outside of
      Photostory. The Create Music button enables the user to take advantage of the onboard
      music of Photostory 3.

   2. For our purposes, we will use the Create Music button to add music.

NOTE: mp3 music files can be obtained at freeplaymusic.com or ccmixter.org. Files from
freeplaymusic can be used royalty free.
Using the pull-down menus,
                                                              users can select from different
                                                              genres, different styles, bands,
                                                              and moods.

                                                              Tempo and intensity controls
                                                              are also available.

                                                              Play to preview the music
                                                              before including it in the digital
                                                              story.


3. Play to preview the music. If you like it, click OK.

4. The music will now load into the track.

5. Be sure to reduce the volume of the music track. See next image on next page.

6. Go next.
Set the volume here to be
                                             able to set the music                     Once music
                                             volume appropriately so                   has been
                                             that the voice over                       added, the
                                             recordings can be heard.                  delete music
                                                                                       button enables.

                                             Music appears here as
                                             a gold bar.


To add more than one music track, select another image in the timeline and repeat the above
process. The second track will appear in green. NOTE: Photostory 3 will drop the level of the
first music track to transition to the second music track.

Go to the next page to finish your movie.
STEP 6: Save your story

Things you can do: complete your movie. This process is known as rendering and converts your
raw Photostory 3 file into a Windows Media Player file. This is an obvious advantage-any PC
typically has Windows Media Player installed (machines would typically not have Photostory 3),
so that the completed digital story can be played on virtually any machine.

Please note: the Photostory 3 file is not altered, so if you do not like the finished product, go back
to your Photostory 3 file, change what you need to and re-render.


                                                  Users will typically select this
                                                  option-this creates a Windows
                                                  Media File, playable with
                                                  Windows Media Player.


                                                  Select a location to store the
                                                  file.


                                                    Select the proper setting-the default is
                                                    640X480 so the movie will render at this
                                                    screen resolution-this works well for playback
                                                    on a computer.


    You may wish to render the movie as a 320X240 file if your intent is to post the movies
    online.

    1.      Select the location of the completed movie.

    2.      Click next. Photostory builds your movie.

    3.      Click view your story.

Congratulations!!! You now have a completed digital story.

Más contenido relacionado

La actualidad más candente

Media evaluation on the effects that the cannon sx40 hs has
Media evaluation on the effects that the cannon sx40 hs hasMedia evaluation on the effects that the cannon sx40 hs has
Media evaluation on the effects that the cannon sx40 hs hasTanishaB
 
Common motifs used in music videos
Common motifs used in music videosCommon motifs used in music videos
Common motifs used in music videosTaylorGoodwin1
 
How to add features to your screencast
How to add features to your screencastHow to add features to your screencast
How to add features to your screencastDawn Anthony
 
Matthew Ewing Evaluation Q4 Part 2
Matthew Ewing Evaluation Q4 Part 2Matthew Ewing Evaluation Q4 Part 2
Matthew Ewing Evaluation Q4 Part 2mewing27
 
Mobile Photo Editing with Snapseed
Mobile Photo Editing with SnapseedMobile Photo Editing with Snapseed
Mobile Photo Editing with SnapseedJonathan Bacon
 
Sound examples
Sound examplesSound examples
Sound examplesndann98
 
My Peliminary Task
My Peliminary TaskMy Peliminary Task
My Peliminary TaskDrizzyCole
 
Media evaluation chris demetriou with sound
Media evaluation chris demetriou with soundMedia evaluation chris demetriou with sound
Media evaluation chris demetriou with soundchrisd24
 
Assignment 14 part 2
Assignment 14   part 2Assignment 14   part 2
Assignment 14 part 2Abc Abc
 
Techniques Used in Photography
Techniques Used in PhotographyTechniques Used in Photography
Techniques Used in PhotographyTheJellehKed
 
Post-Production in Snapseed
Post-Production in SnapseedPost-Production in Snapseed
Post-Production in SnapseedJill Hopke
 

La actualidad más candente (15)

Media evaluation on the effects that the cannon sx40 hs has
Media evaluation on the effects that the cannon sx40 hs hasMedia evaluation on the effects that the cannon sx40 hs has
Media evaluation on the effects that the cannon sx40 hs has
 
Common motifs used in music videos
Common motifs used in music videosCommon motifs used in music videos
Common motifs used in music videos
 
How to add features to your screencast
How to add features to your screencastHow to add features to your screencast
How to add features to your screencast
 
Matthew Ewing Evaluation Q4 Part 2
Matthew Ewing Evaluation Q4 Part 2Matthew Ewing Evaluation Q4 Part 2
Matthew Ewing Evaluation Q4 Part 2
 
Grade 4 Computer
Grade 4 Computer Grade 4 Computer
Grade 4 Computer
 
Landscape Photoshoot
Landscape PhotoshootLandscape Photoshoot
Landscape Photoshoot
 
Mobile Photo Editing with Snapseed
Mobile Photo Editing with SnapseedMobile Photo Editing with Snapseed
Mobile Photo Editing with Snapseed
 
Sound examples
Sound examplesSound examples
Sound examples
 
Jameel terminology
Jameel terminologyJameel terminology
Jameel terminology
 
My Peliminary Task
My Peliminary TaskMy Peliminary Task
My Peliminary Task
 
Media evaluation chris demetriou with sound
Media evaluation chris demetriou with soundMedia evaluation chris demetriou with sound
Media evaluation chris demetriou with sound
 
Assignment 14 part 2
Assignment 14   part 2Assignment 14   part 2
Assignment 14 part 2
 
Techniques Used in Photography
Techniques Used in PhotographyTechniques Used in Photography
Techniques Used in Photography
 
Post-Production in Snapseed
Post-Production in SnapseedPost-Production in Snapseed
Post-Production in Snapseed
 
Jameel terminology
Jameel terminologyJameel terminology
Jameel terminology
 

Similar a Photo story 3 tutorial

Photostory presentation
Photostory presentationPhotostory presentation
Photostory presentationNancy Gross
 
Creating with Photostory 3
Creating with Photostory 3Creating with Photostory 3
Creating with Photostory 3dpurvines
 
Creating a PhotoStory
Creating a PhotoStoryCreating a PhotoStory
Creating a PhotoStoryksamf01
 
Photo Story 3 Tutorial Modified 2
Photo  Story 3  Tutorial  Modified 2Photo  Story 3  Tutorial  Modified 2
Photo Story 3 Tutorial Modified 2JC Sawyer Dolphins
 
title how to
title how totitle how to
title how tobrharvey1
 
Photo Story 3 Tutorial
Photo Story 3 TutorialPhoto Story 3 Tutorial
Photo Story 3 TutorialKaren Brooks
 
Photo story 101
Photo story 101Photo story 101
Photo story 101TarnzC
 
Question 4 Evaluation
Question 4 Evaluation Question 4 Evaluation
Question 4 Evaluation mpavey
 
Photostory presentation
Photostory presentationPhotostory presentation
Photostory presentationkosovoireland
 
Poetry through music teacher lesson plan
Poetry through music teacher lesson planPoetry through music teacher lesson plan
Poetry through music teacher lesson planjmwerner
 
Power pointlabs quick tutorial
Power pointlabs quick tutorialPower pointlabs quick tutorial
Power pointlabs quick tutorialDa Huang
 

Similar a Photo story 3 tutorial (20)

Photostory presentation
Photostory presentationPhotostory presentation
Photostory presentation
 
Question 4
Question 4Question 4
Question 4
 
How to use glogster
How to use glogsterHow to use glogster
How to use glogster
 
Creating with Photostory 3
Creating with Photostory 3Creating with Photostory 3
Creating with Photostory 3
 
DE Material Photostory
DE Material PhotostoryDE Material Photostory
DE Material Photostory
 
Creating a PhotoStory
Creating a PhotoStoryCreating a PhotoStory
Creating a PhotoStory
 
Photo Story 3 Tutorial Modified 2
Photo  Story 3  Tutorial  Modified 2Photo  Story 3  Tutorial  Modified 2
Photo Story 3 Tutorial Modified 2
 
Writing de materials
Writing de materialsWriting de materials
Writing de materials
 
title how to
title how totitle how to
title how to
 
Windows Movie Maker
Windows Movie MakerWindows Movie Maker
Windows Movie Maker
 
Power point
Power pointPower point
Power point
 
Movie maker notes
Movie maker notesMovie maker notes
Movie maker notes
 
Photo Story 3 Tutorial
Photo Story 3 TutorialPhoto Story 3 Tutorial
Photo Story 3 Tutorial
 
ED-TECH report/ppt
ED-TECH report/pptED-TECH report/ppt
ED-TECH report/ppt
 
Photo story 101
Photo story 101Photo story 101
Photo story 101
 
Question 4 Evaluation
Question 4 Evaluation Question 4 Evaluation
Question 4 Evaluation
 
Photostory presentation
Photostory presentationPhotostory presentation
Photostory presentation
 
Poetry through music teacher lesson plan
Poetry through music teacher lesson planPoetry through music teacher lesson plan
Poetry through music teacher lesson plan
 
Photo Story3
Photo Story3Photo Story3
Photo Story3
 
Power pointlabs quick tutorial
Power pointlabs quick tutorialPower pointlabs quick tutorial
Power pointlabs quick tutorial
 

Más de CyMedina

Photo story 3 guide
Photo story 3 guidePhoto story 3 guide
Photo story 3 guideCyMedina
 
Mira int. podcasting
Mira int. podcastingMira int. podcasting
Mira int. podcastingCyMedina
 
Introduction to Blogs
Introduction to BlogsIntroduction to Blogs
Introduction to BlogsCyMedina
 
Mira Podcasting Agenda
Mira Podcasting AgendaMira Podcasting Agenda
Mira Podcasting AgendaCyMedina
 
Edmodo Presentation
Edmodo PresentationEdmodo Presentation
Edmodo PresentationCyMedina
 

Más de CyMedina (10)

Photo story 3 guide
Photo story 3 guidePhoto story 3 guide
Photo story 3 guide
 
Mira int. podcasting
Mira int. podcastingMira int. podcasting
Mira int. podcasting
 
Introduction to Blogs
Introduction to BlogsIntroduction to Blogs
Introduction to Blogs
 
Blogs
BlogsBlogs
Blogs
 
U:\blogs2
U:\blogs2U:\blogs2
U:\blogs2
 
Blogs2
Blogs2Blogs2
Blogs2
 
Mira Podcasting Agenda
Mira Podcasting AgendaMira Podcasting Agenda
Mira Podcasting Agenda
 
Edmodo Presentation
Edmodo PresentationEdmodo Presentation
Edmodo Presentation
 
Ch02
Ch02Ch02
Ch02
 
Ch01
Ch01Ch01
Ch01
 

Último

DevEX - reference for building teams, processes, and platforms
DevEX - reference for building teams, processes, and platformsDevEX - reference for building teams, processes, and platforms
DevEX - reference for building teams, processes, and platformsSergiu Bodiu
 
Dev Dives: Streamline document processing with UiPath Studio Web
Dev Dives: Streamline document processing with UiPath Studio WebDev Dives: Streamline document processing with UiPath Studio Web
Dev Dives: Streamline document processing with UiPath Studio WebUiPathCommunity
 
Ensuring Technical Readiness For Copilot in Microsoft 365
Ensuring Technical Readiness For Copilot in Microsoft 365Ensuring Technical Readiness For Copilot in Microsoft 365
Ensuring Technical Readiness For Copilot in Microsoft 3652toLead Limited
 
Unleash Your Potential - Namagunga Girls Coding Club
Unleash Your Potential - Namagunga Girls Coding ClubUnleash Your Potential - Namagunga Girls Coding Club
Unleash Your Potential - Namagunga Girls Coding ClubKalema Edgar
 
The Future of Software Development - Devin AI Innovative Approach.pdf
The Future of Software Development - Devin AI Innovative Approach.pdfThe Future of Software Development - Devin AI Innovative Approach.pdf
The Future of Software Development - Devin AI Innovative Approach.pdfSeasiaInfotech2
 
Vertex AI Gemini Prompt Engineering Tips
Vertex AI Gemini Prompt Engineering TipsVertex AI Gemini Prompt Engineering Tips
Vertex AI Gemini Prompt Engineering TipsMiki Katsuragi
 
"ML in Production",Oleksandr Bagan
"ML in Production",Oleksandr Bagan"ML in Production",Oleksandr Bagan
"ML in Production",Oleksandr BaganFwdays
 
Designing IA for AI - Information Architecture Conference 2024
Designing IA for AI - Information Architecture Conference 2024Designing IA for AI - Information Architecture Conference 2024
Designing IA for AI - Information Architecture Conference 2024Enterprise Knowledge
 
Advanced Test Driven-Development @ php[tek] 2024
Advanced Test Driven-Development @ php[tek] 2024Advanced Test Driven-Development @ php[tek] 2024
Advanced Test Driven-Development @ php[tek] 2024Scott Keck-Warren
 
Story boards and shot lists for my a level piece
Story boards and shot lists for my a level pieceStory boards and shot lists for my a level piece
Story boards and shot lists for my a level piececharlottematthew16
 
Beyond Boundaries: Leveraging No-Code Solutions for Industry Innovation
Beyond Boundaries: Leveraging No-Code Solutions for Industry InnovationBeyond Boundaries: Leveraging No-Code Solutions for Industry Innovation
Beyond Boundaries: Leveraging No-Code Solutions for Industry InnovationSafe Software
 
Bun (KitWorks Team Study 노별마루 발표 2024.4.22)
Bun (KitWorks Team Study 노별마루 발표 2024.4.22)Bun (KitWorks Team Study 노별마루 발표 2024.4.22)
Bun (KitWorks Team Study 노별마루 발표 2024.4.22)Wonjun Hwang
 
Integration and Automation in Practice: CI/CD in Mule Integration and Automat...
Integration and Automation in Practice: CI/CD in Mule Integration and Automat...Integration and Automation in Practice: CI/CD in Mule Integration and Automat...
Integration and Automation in Practice: CI/CD in Mule Integration and Automat...Patryk Bandurski
 
Search Engine Optimization SEO PDF for 2024.pdf
Search Engine Optimization SEO PDF for 2024.pdfSearch Engine Optimization SEO PDF for 2024.pdf
Search Engine Optimization SEO PDF for 2024.pdfRankYa
 
"Subclassing and Composition – A Pythonic Tour of Trade-Offs", Hynek Schlawack
"Subclassing and Composition – A Pythonic Tour of Trade-Offs", Hynek Schlawack"Subclassing and Composition – A Pythonic Tour of Trade-Offs", Hynek Schlawack
"Subclassing and Composition – A Pythonic Tour of Trade-Offs", Hynek SchlawackFwdays
 
Anypoint Exchange: It’s Not Just a Repo!
Anypoint Exchange: It’s Not Just a Repo!Anypoint Exchange: It’s Not Just a Repo!
Anypoint Exchange: It’s Not Just a Repo!Manik S Magar
 
Install Stable Diffusion in windows machine
Install Stable Diffusion in windows machineInstall Stable Diffusion in windows machine
Install Stable Diffusion in windows machinePadma Pradeep
 
AI as an Interface for Commercial Buildings
AI as an Interface for Commercial BuildingsAI as an Interface for Commercial Buildings
AI as an Interface for Commercial BuildingsMemoori
 
SIP trunking in Janus @ Kamailio World 2024
SIP trunking in Janus @ Kamailio World 2024SIP trunking in Janus @ Kamailio World 2024
SIP trunking in Janus @ Kamailio World 2024Lorenzo Miniero
 

Último (20)

DevEX - reference for building teams, processes, and platforms
DevEX - reference for building teams, processes, and platformsDevEX - reference for building teams, processes, and platforms
DevEX - reference for building teams, processes, and platforms
 
DMCC Future of Trade Web3 - Special Edition
DMCC Future of Trade Web3 - Special EditionDMCC Future of Trade Web3 - Special Edition
DMCC Future of Trade Web3 - Special Edition
 
Dev Dives: Streamline document processing with UiPath Studio Web
Dev Dives: Streamline document processing with UiPath Studio WebDev Dives: Streamline document processing with UiPath Studio Web
Dev Dives: Streamline document processing with UiPath Studio Web
 
Ensuring Technical Readiness For Copilot in Microsoft 365
Ensuring Technical Readiness For Copilot in Microsoft 365Ensuring Technical Readiness For Copilot in Microsoft 365
Ensuring Technical Readiness For Copilot in Microsoft 365
 
Unleash Your Potential - Namagunga Girls Coding Club
Unleash Your Potential - Namagunga Girls Coding ClubUnleash Your Potential - Namagunga Girls Coding Club
Unleash Your Potential - Namagunga Girls Coding Club
 
The Future of Software Development - Devin AI Innovative Approach.pdf
The Future of Software Development - Devin AI Innovative Approach.pdfThe Future of Software Development - Devin AI Innovative Approach.pdf
The Future of Software Development - Devin AI Innovative Approach.pdf
 
Vertex AI Gemini Prompt Engineering Tips
Vertex AI Gemini Prompt Engineering TipsVertex AI Gemini Prompt Engineering Tips
Vertex AI Gemini Prompt Engineering Tips
 
"ML in Production",Oleksandr Bagan
"ML in Production",Oleksandr Bagan"ML in Production",Oleksandr Bagan
"ML in Production",Oleksandr Bagan
 
Designing IA for AI - Information Architecture Conference 2024
Designing IA for AI - Information Architecture Conference 2024Designing IA for AI - Information Architecture Conference 2024
Designing IA for AI - Information Architecture Conference 2024
 
Advanced Test Driven-Development @ php[tek] 2024
Advanced Test Driven-Development @ php[tek] 2024Advanced Test Driven-Development @ php[tek] 2024
Advanced Test Driven-Development @ php[tek] 2024
 
Story boards and shot lists for my a level piece
Story boards and shot lists for my a level pieceStory boards and shot lists for my a level piece
Story boards and shot lists for my a level piece
 
Beyond Boundaries: Leveraging No-Code Solutions for Industry Innovation
Beyond Boundaries: Leveraging No-Code Solutions for Industry InnovationBeyond Boundaries: Leveraging No-Code Solutions for Industry Innovation
Beyond Boundaries: Leveraging No-Code Solutions for Industry Innovation
 
Bun (KitWorks Team Study 노별마루 발표 2024.4.22)
Bun (KitWorks Team Study 노별마루 발표 2024.4.22)Bun (KitWorks Team Study 노별마루 발표 2024.4.22)
Bun (KitWorks Team Study 노별마루 발표 2024.4.22)
 
Integration and Automation in Practice: CI/CD in Mule Integration and Automat...
Integration and Automation in Practice: CI/CD in Mule Integration and Automat...Integration and Automation in Practice: CI/CD in Mule Integration and Automat...
Integration and Automation in Practice: CI/CD in Mule Integration and Automat...
 
Search Engine Optimization SEO PDF for 2024.pdf
Search Engine Optimization SEO PDF for 2024.pdfSearch Engine Optimization SEO PDF for 2024.pdf
Search Engine Optimization SEO PDF for 2024.pdf
 
"Subclassing and Composition – A Pythonic Tour of Trade-Offs", Hynek Schlawack
"Subclassing and Composition – A Pythonic Tour of Trade-Offs", Hynek Schlawack"Subclassing and Composition – A Pythonic Tour of Trade-Offs", Hynek Schlawack
"Subclassing and Composition – A Pythonic Tour of Trade-Offs", Hynek Schlawack
 
Anypoint Exchange: It’s Not Just a Repo!
Anypoint Exchange: It’s Not Just a Repo!Anypoint Exchange: It’s Not Just a Repo!
Anypoint Exchange: It’s Not Just a Repo!
 
Install Stable Diffusion in windows machine
Install Stable Diffusion in windows machineInstall Stable Diffusion in windows machine
Install Stable Diffusion in windows machine
 
AI as an Interface for Commercial Buildings
AI as an Interface for Commercial BuildingsAI as an Interface for Commercial Buildings
AI as an Interface for Commercial Buildings
 
SIP trunking in Janus @ Kamailio World 2024
SIP trunking in Janus @ Kamailio World 2024SIP trunking in Janus @ Kamailio World 2024
SIP trunking in Janus @ Kamailio World 2024
 

Photo story 3 tutorial

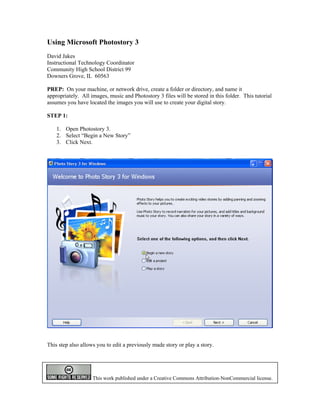
  • 1. Using Microsoft Photostory 3 David Jakes Instructional Technology Coordinator Community High School District 99 Downers Grove, IL 60563 PREP: On your machine, or network drive, create a folder or directory, and name it appropriately. All images, music and Photostory 3 files will be stored in this folder. This tutorial assumes you have located the images you will use to create your digital story. STEP 1: 1. Open Photostory 3. 2. Select “Begin a New Story” 3. Click Next. This step also allows you to edit a previously made story or play a story. This work published under a Creative Commons Attribution-NonCommercial license.
  • 2. STEP 2: Import and arrange your pictures Things you can do: import images, remove black borders, rotate imagery, simple photo editing. 1. Click Import Pictures. Locate the folder where your images are located. If you have not found images, visit http://www.jakesonline.org/websearching2.htm to access a list of search tools that can be used to locate digital imagery. 2. Click on your first image. Hold the shift key down. Click on the last image-this will select all images. To select images non-sequentially, hold the control key down and select. Click OK once selected. The images will now load into the timeline. 3. To reorder your images, click and drag and reposition in the timeline. NOTE: you can always add other imagery by repeating step 2 above.
  • 3. 4. OPTIONAL: Once the order of the images have been determined (this may be predetermined in a storyboard), you may wish to remove the black borders of your images. Click Remove Black borders. Click Yes to All. Click OK. Remove black Simple image borders here. editing tools are located here. Reposition imagery by dragging to a new Save Project here. location in the timeline. Editing Effects: Rotate and Crop, Auto Fix and Add Effect Add Effect: None, Black and White, Chalk and Charcoal, Colored Pencil, Diffuse Glow, Negative, Outline-Black, Outline-Grey, Sepia, Washout, and Water Color. 5. SAVE EARLY SAVE OFTEN!!! At this point, save your file. Save it to the folder created in the Prep step above. Be sure that your images and Photostory file are in the same folder. 6. Click Next.
  • 4. STEP 3: Add a title to your pictures Things you can do: add titles and add effects to your imagery. 1. Click on the slide you wish to add text tool. Type your title into the window and use the various tools to change the font, font color and the positioning of the title on the slide. 2. Click Next. Type title here. Change font characteristics and positioning of the title using the position icons. Effects can also be accessed here. Click on the arrows to move through the slides to add text to any image. See effects descriptions on the previous page. You may wish to add text to slides to create an additional effect. Also consider adding a black image at the beginning of the digital story to hold the title. Adding a black image for a title slide would require producing a black image outside Photostory 3 with a graphics editing program OR accessing http://www.jakesonline.org/blankslides.htm and right-clicking on the links and choosing Save Target As….
  • 5. STEP 4: Recording Your Voice-over (Narrate your pictures) and Customizing Motion Things you can do: add narration to each individual slide, customize motion by adding transitions, pans and zooms, set the amount of time for each image, and preview your movie. SET UP: To record sound, insert your microphone into the appropriate ports in your computer. Configure the microphone and sound level by running the Sound Hardware Test Wizard. 1. Select the image you want to record sound on. 2. Click on the record sound button. 3. Record your narration. Click on the stop button. 4. Test your voice-over by selecting the Preview button 5. If acceptable, repeat steps 1-4. If the voice over needs to be redone, remove the voice over by clicking on the appropriate button and following steps 1-4. Step 3. Click this Step 5: (Optional) if, after button to stop recording preview, you would like to re- your voice-over. record your voice-over, click here to remove the recorded voice. Step 2. Step 1. Select Click this the image you button to wish to record begin your voice recording. over on. Begin speaking to record your voice-over. Step 4. Previews the slide and the recorded voice over.
  • 6. Customizing Motion 1. Click on the image in the timeline you wish to work with. 2. Click on the Customize motion button directly below the picture Go to the next image. 3. The program defaults to the motion and duration tab. This allows you to determine pans and zooms. 4. Click the Specify start and end position of motion. The images in the Start position and the End position will have handles appear. Use the handles to position the images for the desired effect. In the example above, when this image appears in the movie, it begins as a large image and zooms inward upon completion of the image in the movie. Additional options: Set start position to be the same as end position of the previous picture. This will allow for smooth transitions between the images. Set end position to be the same as the start position. Use this effect to have no change throughout the time the image is displayed in the digital story. Number of seconds to display the picture: overrides the automatic feature above, allows for more specific user control of image display.
  • 7. 5. Preview the effect 6. Save the effect. NOTE: this is a save function just for this image effect-it does not save the project. 7. Use the arrows to migrate to the next image. Transitions: NOTE 1: Cross dissolve is the default function NOTE 2: Just because you can does not mean you should. Be careful with transitions. 1. Click the Transition tab across the top. 2. The program displays the previous picture and the current picture with the effect between it. 3. Use the scroll on the right side of the window to select the transition and preview. Use the arrows below the time display to migrate from picture to picture. 4. Click Save (again, saves the transition effect to the slide and not the file itself) and then Close if you are done. 5. Repeat as necessary.
  • 8. STEP 5: Add background music Things you can do: add background music. 1. Click either the Select Music button or the Create Music button. The Select Button enables the user to select mp3 files created or downloaded from a source outside of Photostory. The Create Music button enables the user to take advantage of the onboard music of Photostory 3. 2. For our purposes, we will use the Create Music button to add music. NOTE: mp3 music files can be obtained at freeplaymusic.com or ccmixter.org. Files from freeplaymusic can be used royalty free.
  • 9. Using the pull-down menus, users can select from different genres, different styles, bands, and moods. Tempo and intensity controls are also available. Play to preview the music before including it in the digital story. 3. Play to preview the music. If you like it, click OK. 4. The music will now load into the track. 5. Be sure to reduce the volume of the music track. See next image on next page. 6. Go next.
  • 10. Set the volume here to be able to set the music Once music volume appropriately so has been that the voice over added, the recordings can be heard. delete music button enables. Music appears here as a gold bar. To add more than one music track, select another image in the timeline and repeat the above process. The second track will appear in green. NOTE: Photostory 3 will drop the level of the first music track to transition to the second music track. Go to the next page to finish your movie.
  • 11. STEP 6: Save your story Things you can do: complete your movie. This process is known as rendering and converts your raw Photostory 3 file into a Windows Media Player file. This is an obvious advantage-any PC typically has Windows Media Player installed (machines would typically not have Photostory 3), so that the completed digital story can be played on virtually any machine. Please note: the Photostory 3 file is not altered, so if you do not like the finished product, go back to your Photostory 3 file, change what you need to and re-render. Users will typically select this option-this creates a Windows Media File, playable with Windows Media Player. Select a location to store the file. Select the proper setting-the default is 640X480 so the movie will render at this screen resolution-this works well for playback on a computer. You may wish to render the movie as a 320X240 file if your intent is to post the movies online. 1. Select the location of the completed movie. 2. Click next. Photostory builds your movie. 3. Click view your story. Congratulations!!! You now have a completed digital story.