
Recomendados
Más contenido relacionado
Destacado
Destacado (17)
Último
Último (15)
Create a facebook event page for your DuVita meeting
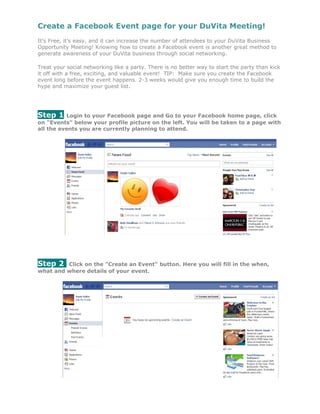
- 1. Create a Facebook Event page for your DuVita Meeting! It’s Free, it’s easy, and it can increase the number of attendees to your DuVita Business Opportunity Meeting! Knowing how to create a Facebook event is another great method to generate awareness of your DuVita business through social networking. Treat your social networking like a party. There is no better way to start the party than kick it off with a free, exciting, and valuable event! TIP: Make sure you create the Facebook event long before the event happens. 2-3 weeks would give you enough time to build the hype and maximize your guest list. Step 1 Login to your Facebook page and Go to your Facebook home page, click on "Events" below your profile picture on the left. You will be taken to a page with all the events you are currently planning to attend. Step 2 Click on the "Create an Event" button. Here you will fill in the when, what and where details of your event.
- 2. Step 3 Fill in all the details about your event, including the time and place. You can always edit these later, but try to get as much detail in as you can initially. “What are you planning?” This is where you will create the name of your DuVita meeting as follows: (CITY | STATE) Discover DuVita Meeting Enter the event details: DATE | BEGINNING TIME & ENDING TIME | LOCATION | ADDRESS TIP: In the “More info?” section on the Event page, this is where you put all the info about the meeting and encourage people to attend. Below is a template to follow- Just copy, paste, and fill in the blanks for your Event: DON'T MISS the (CITY / STATE) DuVita Business Opportunity Meeting! Hosted by: (YOUR NAME /DUVITA TITLE) Guest speaker(s): (LIST SPEAKER NAMES AND THEIR DUVITA TITLES) Presenters: (LIST PRESENTER NAMES/ DUVITA TITLES) Details: Discover how you can make a difference in your life and the lives of others! DuVita’s Business opportunity will be presented at this event. Meet DuVita’s leaders and special guest speakers. Hear testimonials and experience the wonderful opportunity that DuVita offers. *This meeting is open to the public for anyone who wants to attend! Registration: $10 for DuVita Associates, Guests FREE Tasting Table: $2 for DuVita Associates, Guests FREE *For more information contact: (YOUR NAME) at (PHONE NUMBER/ EMAIL)
- 3. Step 4 Choose the level of access to your event. Since this is a Business Opportunity, you want this to be open to the public, so that it can be found on Facebook searches, and people can add themselves to the guest list. Make sure this box is checked: Anyone can view and RSVP (public event) Step 5 Click "Create Event" to complete your event details. Once your event is created, you will be taken to your event page. Step 6 Now that your event has been created, you can upload a photo in the top left sidebar. You will want to use the DuVita Independent Associate logo, which can be downloaded in your Associate back office, under forms in the Marketing Materials section.
- 4. Step 7 Invite your friends to the event. Under the logo on the event page, click “Select Guests to Invite”. Select your friends on Facebook and other users to attend your event. You can even send emails to people not on Facebook. TIP: Send a personal message along with the event invites. You would not believe how many event invites everyone gets in one day…so make your message unique and personal. Here is an example: “I’d like to share an opportunity with you that has changed my life. I’d also like to share with you FREE samples of DuVita’s all-natural health and weight management supplements. I truly hope you can make it to this event." Step 8 Share with your Friends on Facebook and Promote the Event! Share your event with your Facebook friends by clicking on “Share” at the top of the event page. Customize your message that will appear on your friend’s Facebook feeds. TIP: Post two times a week about the benefits of attending this event. Do not overwhelm people by posting about your event every day. Your friends will most likely delete you or ignore you because they will find your posts repetitive.