SlideShare una empresa de Scribd logo
1 de 21
Descargar para leer sin conexión
Solaris Commands For SA-I & SA-II
1
SUN SOLARIS
SA-I
S.No Commands Functions
1 ls | ls –l To list the files at current location
2 mkdir <name> To create a directory
3 cd <name> | cd .. For logging in to a directory
4 df | df –k To view disk free
5 du To view disk usage
6 cat > <file> Catenation – to create a file
7 pwd To view current location
8 rm <file>| rmdir | rm-r To remove file and directory
9 cp <file> <new name> To copy a file
10 mv <file> <path> To move a file and to rename
11 touch <file> To create a file
12 chmod < 777 > <file>
chmod u+w,g-r,o+w <file>
To set permission | rwxrwxrwx =777 | owner
group & other | i.e. : r=4 w=2 x=1 by total 7
13 clear To clear the screen
14 man <command> To view manual
15 bc Binary count
16 cal To view calculator
17 banner <content> To view banner
18 date To view date
19 find / -name <file> To find a specific file
20 grep <word> <file> To grep a word from a file
21 getent <admin file> <value> To search using specific entry in admin file
22 wc <file> To view word count
23 sort <file> To sort the content of a file
24 head -<100> <file> To list only the first <100> lines
25 tail -<100> <file> To list only the last <100> lines
26 ln <exist file> <new file> hard link – both file points the i-node
number, link count increases
27 ln –s _ for soft link If source is lost entire content is lost, L will
be at the front of filename
28 useradd –m –d <home dir>
<user name>| -u –g –G
To create a user account | u-user id, g-pri.
group, G-sec. group, m-mk dir, d-path
29 passwd <user name> To set password for an user
30 usermod |userdel <user> To modify and to delete a user account
31 groupadd –g <gid> <group> To create a new group |-o to reallocated gid
32 /usr/sadm/bin/smuser
add -- -n <user name> -u <uid>
-g <gid> -d <home dir> -s
/bin/ksh
To create a SM-User
33 /usr/sadm/bin/smuser
modify -- -n <old user> -N
<new user> -d <home dir> -s
/bin/ksh
To modify a present user
34 /usr/sadm/bin/smuser
delete -- -n <user name>
To delete a present user
35 smgroup | same as above 3 To create, modify and to delete a smgroup
36 smc& To invoke the SMC tool in GUI mode
37 umask <value 022> This value will make effect on permission
i.e “/etc/profile” | attains default – restarted
38 vi <file> To open a file through VI-Editor
Solaris Commands For SA-I & SA-II
2
39 Prtconf To view system config–memory, peripheral
40 prstat –a To view the system process status
41 Psrinfo –v To view information about the processor
42 iostat -En |-xtc 5 To view the i/o device status
43 Sdtprocess To view the current system process status
44 sar <sec_1> <report_10> To view the system activity in average
45 kill <process id> To kill a process which is listed in prstat
46 Format To make slices in an hard disk
47 devfsadm –v To identify the hardware changes
48 devfsadm –C To invoke cleanup | then only –v fn works
49 newfs /dev/rdsk/c#t#d#s# To make a new file system on the disk
50 mount /dev/dsk/c#t#d#s#
/<mount point>
To mount the new disk for use
51 Dmesg To view the diagnostic messages
52 Eeprom To view the environment messages
53 uname –m | -a To view the m/c name, version, archi. etc.,
54 /usr/platform/”uname-m”/
sbin/prtdiag –v
To view the entire system status includes
memory, cpu, patches, os-version, etc.,
55 pkgadd –d <path> <pkg
name> | -s spool
To install a package | if –s spool is used in
btw_only copies the pkg to spool directory
56 pkgchk <pkg name> To check for error in a particular package
57 pkginfo <pkg name> To get info about package in local machine
58 pkgrm <pkg name> To remove a package from local machine
59 pkginfo |wc –l To check for number of packages installed
60 fstyp –v /dev/rdsk/ctd#s# To check for the current “minfree” value
61 tunefs –m #
/dev/rdsk/ctds
To set minfree value i.e #% with that of root
62 fsck –o f,p /dev/rdsk/ctds# To run file system check | -o f, p for yes to all
63 fsck –o b=# /dev/rdsk/ctds To restore backup sup. Block|#-sup. Block
64 quot |-af root To view summarized FS ownership
65 mountall To mount all FS which have entry at vfstab
66 mountall –l To mount only the local FS listed in ‘vfstab’
67 umount <mt pt> |/dev/dsk To unmount the mounted file system 1 by 1
68 umount -f ---do--- To unmount forcible | may affect data
69 Umountall To unmount all mounted FS includes N/W
70 umountall –l To unmount all locally mounted FS
71 fuser <mount pt> | -c or –cu To view any process is accessing the FS
72 fuser –ck <mt pt> To kill all process which access the FS
73 Volcheck To check whether the floppy is ready or not
74 /etc/init.d/volmgt start To start the volume mgt | to stop, give stop
75 mount –F hsfs –o r0
/dev/dsk/ct#d#s# /cdrom
To mount a cdrom manually
76 mount –F pcfs
/dev/diskette/pcfs
To mount a floppy drive manually
77 tar –xvf <file.tar> To uncompress a tar file
78 patchadd <patch> | -d To install a patch |–d is for no rollback
79 patchrm <patch> To uninstall and rollbacks the patch
80 init 0 To OK prompt
81 init 1 To single user mode
82 init 2 To multi user without network
83 init 3 To console – super user | multiuser with nfs
84 init 5 To shutdown the server
85 init 6 To restart the server
86 init s To single user mode
Solaris Commands For SA-I & SA-II
3
87 shutdown –y –g <#> -i <run
level number> <Message>
To shutdown the system |-y for interactive
mode| # - grace time in seconds
88 Halt To switch over to OK prompt suddenly
89 poweroff | Reboot Alternate command to switch-off & restart
90 who –r To view the current run level
91 who | -a To view all logged-in users in the local sys
92 who –m To view the current user name alone
93 whoami | who I am To view effective user | To view actual user
94 rusers –l To identify all users logged in through n/w
95 finger |-m <username> To view the activity of the users
96 last | <username> To view full details for all users | record
97 last -n 5 reboot To view only the last five reboot activity
98 chown root : sys
/var/adm/loginlog
To activate loginlog entry i.e. to note the
failure login |you must create the directory
99 su <username> | su -<usern> To switch into another user | home dir – acti
100 chown <user> filename To change the ownership of a file|-R for dir
101 chmod 1777 <dir name> Sticky bit permission | user can access dir
102 chmod 4555 <exe file name> Users exe this file will get root privilege
103 chmod 2555 <exe file name> Group exe this file will get root privilege
104 lpadmin –d <prt name> To config a printer manually | -x to remove
105 lpstat –d To view the systems default printer
106 lp <file name> To give an print request
107 reject <prt name> To stop the queuing printer request
108 disable <prt name> To stop the printer
109 enable <prt name> To activate the printer
110 accept <prt name> To start the queuing printer request
111 /usr/lib/lpsched | lpshut
(or) /etc/init.d/lp start | stop
To start the LP printer service | To stop
the LP printer service
112 lp –d <prtname> <filename> To divert your printing job to a new printer
113 lpstat –a <prt name> To view the status of the printer
114 lpmove <fault prt> <nw prt> To divert one prt job to another printer
115 at <hh:mm> |at> job |ctrl d To assign job at AT schedule| ctrl d to close
116 crontab –e |-r to remove job To assign a job in crontab – it opens a editor
117 at -l & crontab –l To view the AT and crontab content
118 ufsdump 0uf /dev/rmt/0n
/dev/dsk/c#t#d#s#
To perform backup | 0-full backup, uupdate{/
etc/dump dates}, 0-drive or disk
number i.e for incremental, n-no rewind
119 ufsrestore rvf /dev/rmt/0 To restore the backup
120 ufsrestore i /dev/rmt/0 To view the list of files present in the tape
121 mt status |rewind |offline To view the status| To rewind | To eject
122 mt fsf count To move the tape forward count records
123 fssnap –F ufs –o
bs=/var/tmp /export/home
To perform a snapshot backup which
usually stores at /dev/fssnap/0
124 fssnap –i To display a list of snapshot ct avail in sys.
125 prtvtoc /dev/rdsk/ct0ds2 >
/<file>
To store the structure of the given hard disk
to an file through prtvtoc
126 fmthard –s /<file>
/dev/rdsk/ct1ds2
To copy the structure from /<file> and to
make available on the destiny hard disk
Solaris Commands For SA-I & SA-II
4
Vi Editor Commands
S.No Commands Functions
1 vi <file name> To open vi editor for a specific file
2 Esc h To move the cursor left - command mode
3 Esc l To move the cursor right - command mode
4 Esc j To move the cursor down - command mode
5 Esc k To move the cursor up - command mode
6 Esc i To Enter into Insertion mode
7 Esc x | 4x To delete a character | deletes 4 character
8 Esc X | 4X To delete left i.e. Back-Space
9 Esc R To over-write a character
10 Esc o To insert a line below the cursor
11 Esc O To insert a line above the cursor
12 Esc u Undo
13 Esc G To move to the last line first character
14 Esc w To move word by word right
15 Esc b To move word by word left
16 Esc H To move to the first line of the current page
17 Esc M To move to the middle of the current page
18 Esc L To move to the last line of current page
19 Esc I To move to the beginning of the line &
append
20 Esc A To move to the end of the line & append
21 Esc dw To delete a word to the right
22 Esc dd To delete the current line completely
23 Esc yy To copy the current line – yanking
24 Esc p To paste the copied content
25 Esc yw To copy a word – cursor must be at the
starting
26 Esc J To join two separate line
27 Esc ~ To change the case i.e. upper to lower & V-
via
28 Esc : wq To save & quit a file – EX-command mode
29 Esc : wq! To save & quit a file forcibly
30 Esc : !sh To go to shell temp. & type Exit to come
back
31 Esc : r! <command> To add the output into the file
32 Esc : r <file name> To add the content of <file> into the current
file
33 Esc : q To quit the file without saving
34 Esc : q! To quit the file without saving – forcibly
35 Esc : w To save the file and continue working
36 Esc ZZ To save & quit the file
37 Esc : set nu To assign the number for the lines
38 Esc : set nonu To remove the assigned number for the lines
39 ctrl f Page down
40 ctrl b Page Up
Solaris Commands For SA-I & SA-II
5
OK Prompt Commands
S.No Commands Functions
1 stop a To get into OK prompt
2 stop d For extensive post diagnostics
3 stop n To set default parameter |press until kbd led
flashes
4 boot cdrom To boot from cdrom
5 boot cdrom –s To boot and get into single user mode using
cdrom
6 boot –r To reconfigure |config result will be at
/reconfigure
7 Boot To boot through the default configuration
8 boot disk To boot via specified disk|devalias - entry
must exist
9 boot –s To get into the single user mode
10 boot –a For interactive booting
11 boot –v Detailed device information to the console
12 Help To get command details at OK prompt
13 Printenv To print the environment detail
14 setenv <prm> <val> To set environment for a specific parameter
15 reset-all To save the changes and followed by reboot
16 set-defaults To set the values to the manufacturers
setting
17 set-defaults <param> To set the value for a specific parameter
alone
18 probe-scsi | -ide To check for internal scsi/ide status
19 probe-scsi-all |-ide-all To check for internal & external scsi/ide
status
20 probe-fcall-all To check for fiber optics status
21 Devalias To view the alias name & to which its
mapped
22 nvalias <alias> <add> To add the alias and its physical address to
the list
23 nvunalias <alias> To remove an alias from the current list
24 show-disks To see the physical add of all drives i.e. sec
storage
25 .version To view the version, Ethernet address
details etc.,
26 .speed To view cpu speed, bus speed, etc.,
27 .enet-addr To view only the Ethernet address
28 Showdevs To view all the devices i.e. secondary
storage only
29 Banner To view the ip, mac add, subnet mask etc
30 watch-net To view the status of NIC card
31 watch-net-all To view the status of NIC and network cable
Solaris Commands For SA-I & SA-II
6
Abbreviation
S.No Abbreviation Expansion – Purpose
1 Hme Network Interface Card
2 Qfe Quad Fast Ethernet
3 c0t0d0s0 Controller Target Disk Slice
4 Sparc Scalable Process Architecture
5 UFS Unix File System – for disk mgt
6 HSFS | under ufs High Sierra FS – for SCSI cdrom’s
7 PCFS | under ufs PC-DOS Formatted FS – for floopys
8 NFS | under Distributed FS Network File System – for network
9 TmpFS | under Pseudo FS Temp. FS – for avoid Overhead writing
10 SwapFS | under Pseudo FS Swap FS – for Kernel use
11 FDFS | under Pseudo FS File Descriptor FS – for explicit names
12 Explicit Name It’s the representative of Directory’s
13 ProcFS | under Pseudo FS Process FS –for currently running proc.
14 MntFS | under Pseudo FS Mount FS – for locally mounted FS
Important Locations
S.No Important Locations Purpose / Usage
1 /etc/profile umask value | profile during login
2 /etc/path_to_inst Physical address mapping - for kernel
3 /usr/bin/dmesg
/usr/sbin/dmesg
Diagnostic message will be here dmesg _
shows the content of this files
4 /etc/default/kbd
kbd –I _ To initialization above
file
Put # before keyboard_abort=disable |this is
for
preventing stop A in console
5 /var/sadm/install/contents Contains details about installed packages
6 /var/spool/pkg Default location for adding a package
7 /var/sadm/pkg It has the currently installed package
8 /etc/vfstab _ Manual Entry Entries for mounting FS during booting
9 /etc/mnttab _ Auto Entry Entries for currently mounted FS
10 /var/sadm/patch It has the currently installed patches
11 /usr/bin Mostly all commands will be here
12 /var/adm/utmpx Who command reads this location Alone
13 /var/adm/wtmpx last -n command reads this location |
in case root is full then clear this file.
14 /var/adm/loginlog _ create it To view the failed login attempts
15 /etc/default/su To view the switching attempts | For this
remove # in console= /dev/console and put #
in more /var/adm/sulog
16 /etc/default/login_ edit this file
for root logging restrictions |
If PASSREQ=no then null
password for root
If #console=/dev/console _ remote
root login is allowed, if no # _ only
through single machine, if
console=<blankspace> then root cant
be logged anywhere
17 /etc/ftpd/ftpusers Users listed here are not allowed for ftp
18 /var/spool/lp It holds the request and the print Queue
19 /var/lp/logs It holds the history of the printer jobs
20 /etc/lp It has the LP server configuration
21 /etc/hosts _ manual entry contains IP and hostnames of sys. In n/w
22 /etc/cron.d/at.deny|cron.allow To restrict users from using AT & Cron
Solaris Commands For SA-I & SA-II
7
Hints & Purposes
S.No Commands Functions
1 Host Bus Adopter All harddisk will have a common HBA
2 Max 7 Slices Only 7 slices are possible in a hard disk
3 Slice S2 – Back Up Points entire disk – cant be changed or used
4 SUNWCxall Entire Distribution with OEM support 64 bit
5 SUNWCall Entire Distri 64 bit – no 3rd party support
6 SUNWCprog Developer Sys Supp –only manuals & network
7 SUNWCuser End User Sys Supp – limited network support
8 SUNWCreg Core Sys Support – no network
9 Web Installation 1st Installation CD then 1 of 2 CD & 2 of 2 CD
10 JumpStart Installation Installing the OS through network
11 Vi Editor – 3 Modes Command, Insert and Ex-Command Mode
12 OE file system Disk based(ufs), Distributed(nfs) &
Pseudo(swap)
13 File Types – 4 types Regular, directories, symbolic link & device files
14 Device naming Logical, physical(actual) & instance(kernal)
name
15 Sd n | dad n For scsi | ide n-number – instance name
16 NV Ram – EEPROM Removable chip, inbuilt Lithium battery, host id
17 # before any line in a file This makes that particular line or process
inactive
18 what happens during the
Booting of Sun
System
Post, generic devi ce drivers, loads config done
by admin, other default parameter, then OS files
19 Backup Superblock It resides at several areas of disk| for restoration
20 Cylinder group – size Default size is 16 cylinders per group
21 Boot block – active for ‘/’ Boot strap program resides here – 15 disk sector
22 Pointer types Direct Pointer and Indirect Pointer
23 “Minfree” Value It’s the space utilized by the operating sys in root
24 Preen During sys boot fsck runs at Non Intractive mode
25 Vol Mgr -/etc/vold.conf Automatically mounts the cdrom and floopy
26 105050-01 patch name 105050 is base code & 01 is the revision number
27 sys wide & user environ While user logs this files get executed by shell
28 Restoresymtable This is a image file of tape formed in hard disk
29 /etc/hosts It is an link to /etc/inet/hosts
30 /opt Common location for utilities and 3rd party tools
31 RSC Remote System Console |consist of serial, n/w
mgt port and modem
32 LOM Light Out Management | consists of only serial
port and not a part of OS.
33 ALOM Advanced LOM | Consists of serial port and a
part of OS and also an n/w mgt port.
34 SCC System Controller Card | nvram data are stored
here its an removable card – resp’ble for booting
35 KVM switch Keyboard Video Mouse switch |common unit
36 Part Number Identity Number 300-4250 |product-exact no/.
Solaris Commands For SA-I & SA-II
8
Shell Sys-wide
Initialization
files
Primary user
initialization files
read at login
User Initialization
files read when a
new shell is started
Shell path
name
Bourne /etc/profile $home/.profile /bin/sh
Korn /etc/profile $home/.profile
$home/.kshrc
$home/.kshrc /bin/ksh
C /etc/.login $home/.profile
$home/.cshrc
$home/.cshrc /bin/csh
Default User Initialization File
Shell Initialization file templates User initialization files
Bourne /etc/skel/local.profile $home/.profile
Korn /etc/skel/local.profile $home/.profile
C /etc/skel/local.cshrc
/etc/skel/local.login
$home/.cshrc
$home/.login
Steps Involved In Restoring Root From Tape
ok boot cdrom –s
$ newfs /dev/rdsk/ c0t0d0s0
$ mount /dev/dsk/ c0t0d0s0 /a
$ cd /a
$ ufsrestore rf /dev/rmt/0
$ cd /usr/platform/”uname-m”/lib/fs/ufs
$ installboot bootblk /dev/rdsk/c0t0d0s0
$ umount /a
$ fsck /dev/rdsk/c0t0d0s0
usr/bin -> for all users usr/sbin -> only for root
Solaris Commands For SA-I & SA-II
9
SUN SOLARIS
SA-II
S.No Abbreviation Expansion – Purpose
1 sys-unconfig _ sys restarts To get into the network config. Section
2 ifconfig –a To view ip, mac add, subnet mask,etc status
3 ifconfig hme0 <ip#> netmask
<netmask#> up
To assign IP address, netmask and as well
as
to make the network up
4 ifconfig hme0 up | down To enable network interface | disable
5 snoop <source ip> <dest. ip> To capture and inspect the network pkgs
6 rpcinfo –p | <hostname> To list the registered RPC services
7 rpcinfo –d <prog no> version
| pkill-HUP inetd
To delete a RPC service registration
| To reactivate your service again
8 etc/init.d/init.wbem status
| start | stop
To view the status of the SMC service |To
start service | To stop service
9 Smc To open SMC
10 smc edit To open SMC toolbox editor
11 pagesize | default is 8192 b To view the size of memory page
12 /var/sadm/smc/toolboxes/smc/
smc.tbx &
/var/sadm/smc/toolboxes/
this_computer/this_computer.tbx
Default location for SMC toolbar
smc edit command will make effect on this
two files
Introduction To IP - Version IV
/etc/rcS.d/S30network.sh _solaris 8|/etc/rcS.d/S30rootusr.sh _sol 7 & below
During booting of sys these files get exe. This uses ifconfig utility & searches
etc/hostname.xxn to identify instance |xx _ hme/nic
/etc/inet/hosts _ this can be used instead of DNS, NIS, NIS+. It contains ip,
hostname, nickname, comments.
Starting server processes : To start and stop any event at starting
During the booting of system, the inetd daemon starts few services [ like NIS, TCP-IP,
DNS, etc. ] which are not automatically start at boot time. We can view the list of services
that were started by inetd are at /etc/rc2.d/S72inetsvc. Apart from this file the inetd
consults the /etc/inetd.conf to find the service to activate.
In order to stop any event init just put # before the service in the /etc/rc2.d/S72inetsvc
and then execute pkill-HUP inetd command for instant effect.
Six important files responsible for the network
Files Pattern of Entry (or) content in the file
/etc/nodename Hostname of the server eg: bomexport
/etc/hostname.xxn Hostname of the service or server
/etc/inet/hosts All IP address and hostname of other servers
/etc/net/ticlts/hosts Hostname of the server twice – transport layer independent
/etc/net/ticots/hosts Hostname of the server twice – transport layer independent
/etc/net/ticotsord/hosts Hostname of the server twice – transport layer independent
Either edit these files or else give sys-unconfig in order to configure the network
Solaris Commands For SA-I & SA-II
10
SWAP Expansion
#swap –s _ to display the virtual swap area
#swap –l _ to display the physical swap area
Adding swap space by slice:
_ create a slice of required size in hard-disk
_ add the entry for that slice in /etc/vfstab for an permanent effect
_ swap –a /dev/dsk/c#t#d#S# | to activate the swap space
Adding swap space by file:
_ #mkfile <size#> <mount point>
_ #swap –a /<path of above file> | to activate the swap file
_ #also add an entry in the /etc/vfstab for an permanent effect
e.g: export/swapfile -- -- swap -- no --
Removing a swap space:
_ #swap –d <path of swap area> _ this is to de-activate the swap area
_ remove the entry from the /etc/vfstab
_ delete the slice or file to free the utilized space
Crash Dump
#dumpadm _ its to activate the crash dump device for the fore-coming fault
Procedure to read the crash message:
_ cd /var/crash/”uname-n”/ -> log-into this location
_ mdb unix.# vmcore.# | mdb or adb
when you execute above command the prompt will change as below
> |when prompt is as shown
> ::status
> $c
> $q |to quit the prompt
when there is no prompt type $p>
then you will get the prompt as >
NFS - Network File System
_ Allows the multiple computers to use the same file, to reduce storage cost,
provide data consistency & reliability.
_ NFS daemon starts only when the system enters the run level 3
S.No Command Operation
1 /etc/init.d/nfs.server start | stop To start & stop the NFS service manually
2 share –F nfs –o <ro/rw>
<path>
To share a file for NFS service
3 mount –F nfs <hostname>:
<path> <mount point>
To mount the shared file
4 unshare –F nfs <path> To unshared a file from NFS service
5 shareall -F nfs To share all resources listed in
/etc/dfs/dfstab
6 unshareall –F nfs To un-share all resources listed as above
7 dfshares –F nfs <host> To display the currently shared NFS
8 dfmounts -F nfs <host> To display the NFS mounted resources
9 mountall -r -F nfs To mount all remote file resources
10 umountall -r -F nfs To un-mount all remote file resources
S.No Command Operation
1 /etc/dfs/dfstab Local resources that as to share at boot time
2 /etc/dfs/sharetab Currently shared local resources – auto entry
3 /etc/dfs/fstypes Default file-system for remote file system
4 /etc/rmtab FS that remotely mounted by NFS – auto entry
5 /etc/dfs/nfslog.conf NFS logging configuration file
6 /etc/default/nfslogd Configuration files for the nfslogd daemon
Solaris Commands For SA-I & SA-II
11
Syslog functions - configuring system messaging
The syslogd daemon and the input from /etc/syslog.conf files work together to facilitate
the syslog messaging for the OE
It can write message to the system log , centralized log host , messaging a user or at
the system console.
For this put the entry in /etc/syslog.conf file. The entries are the type of error [ i.e.
user.err ] and the action field [ i.e. /filename _ the target file, @host _ for specific host,
user _ for specific user, * _ for all logged in users ]
Daemons involved: /etc/rc2.d/S74 syslog
# /etc/init.d/syslog start | stop _ this is to start and stop the daemon.
Auto FS
_ It provides an automatic mounting using NFS protocol
_ Its an client side service
Components of auto-mount facility:
Auto FS file system, Auto-mountd daemon, Auto-mount command , Auto FS file system
mount-point is defined in the auto-mount maps on the client system.
Configuring Master Map:
For all types of auto sharing methods the entry must be here. Hence this remains the
base entry for all sharing methods. Edit /etc/auto_master
----------------------entries-------------------
+auto_master # +_ indicates that consider automountd daemon
/home auto_home -browse, (or) -nobrowse
<mount point> <map name> <mount options>
#- browse _ allow the users to view the mount-point
--------------------------------------------------
#automount _ reactivate the above file again
Then shared resources get mounted below the /home/<auto_home – file mount point>
Direct map entries:
This map is only for general directory’s, and common sharing files (eg: softwares). In
case 1 server is down then it can be get from other. Edit /etc/auto_direct
----------------------entries-------------------
/usr/share/man -ro, soft ser1, ser2, ser3:/usr/share/man
<local mnt pt> <permission> <hostname>:<path>
#/- auto_direct -ro _ this entry in auto_master
--------------------------------------------------
#automount _ reactivate the above file again
Indirect Map Entries:
This mapping is for user home directories and for their files.
Edit /etc/auto_home
----------------------entries-------------------
magi server_primary:/export/home/babu
<local mnt pt> <hostname>:<home dir path>
#/home auto_home -nobrowse _ this entry in auto_master
--------------------------------------------------
procedure:
_ Create the account for the user in both the servers with same UID & GID
_ Put the entry for auto_home as shown above for a desired user e.g. babu
_ # passwd –h babu | in secondary server (/export/home/babu)? /home/magi | change
the home dir as desired
_ # cd /home/magi |in sec server to enter into the pri servers home dir. After all this files
are edited just type #automount -t <time#> -v this is to activate the desired mountpoint.
If time is mentioned in –t then upto that time the FS remains mounted when its not in
use.
Solaris Commands For SA-I & SA-II
12
After all this files are edited just type #automount -t <time#> -v this is to activate the
desired mountpoint. If time is mentioned in –t then upto that time the FS remains
mounted when its not in use.
RBAC - Role Based Access Control
This is to assign a specific role for a specific user. For these process four files comes
into picture. They are
/etc/user_attr /etc/security/prof_attr
/etc/security/exec_attr /etc/security/auth_attr
Example: assign a role of shut down , for a specific user
_ #roleadd –u 500 –g 10 –m –d /export/home/role_shut role_shut _
create a role named roleshut
_ vi /etc/security/prof_attr
profile_shut ::: able to shutdown the system_comment: |creating profile
_ # rolemod -P profile_shut , all role_shut |adding profile to the role
_ verify that the role is included in the etc/user_attr
_ #useradd -u 200 -g 10 –m –d /export/home/user_shut –R role_shut
user_shut | this is to create a user and assigning the desired role
_ #passwd user_shut
_ #grep user_shut /etc/user_attr | to check the role attribute for the user
_ #vi /etc/security/exec_attr
profile_shut : suser : cmd : : : /usr/sbin/shutdown : uid=0 |bold area is the location of the
shutdown command this must be searched manually and entered here. | This is to assign
the shutdown command to the profile.
This is how to assign a role for a specific user .
How the user shutdown the system using this role:
_ first login as the user
_ $profiles | this is to list the various RBAC profiles that he associated
_ $role | this is to list the various roles that he associated
_ $su role_shut
_ $/usr/sbin/shutdown –i 5 –g 0 |now the system will go down
Name Server
Name service switching files Location
Local files /etc/nsswitch.files
DNS /etc/nsswitch.dns
NIS /etc/nsswitch.nis
NIS+ /etc/nsswitch.nisplus
LDAP /etc/nsswitch.ldap
DNS & LDAP
DNS and LDAP configuration were similar to NIS only service activation
command and configuration files vary.
#ldapclient _ for ldap client activation |#ldapclient uninit_ un-configure ldap.
Solaris Commands For SA-I & SA-II
13
NIS
The NIS maps are located at /var/yp/domainname/<host>.byname.pag |& .dir
Similarly /var/yp/domainname/<host>.byaddr.pag |& .dir
Daemons used: ypserv, ypbind, rpc.yppasswdd, ypxfrd, rpc.updated
All five are utilized by server and only first two by clients. Through NIS service a centralized user-
account can be provided.
Configuring a machine as the NIS master server :
_ #cp /etc/nsswitch.nis / etc/nsswitch.conf
_ #domainname accel.com
_ #touch /etc/defaultdomain
_ #domainname > /etc/defaultdomain
_ #cd /etc
_ #touch ethers bootparams locale timezone netgroup netmasks
_ #ypinit -m _ To initialize the master server
_ #/usr/lib/netsvc/yp/ypstart _ To start the NIS daemons
Configuring a machine as the NIS client :
The steps were same as above but instead of ypinit –m give ypinit –c to start client service and also
put the server IP entry in the /etc/hosts.
ACL - Access Control List
It provides greater data access control for each file. Permission for a specific user is also
possible using ACL.
Syntax: setfacl {entry type : UID or GID : permission }
owner [u] user name R,W,X
group [g] group name
other [o] uid/gid
Command Usage
getfacl < file name > To see the present FACL entry
setfacl –s <new entry> <existing file>
setfacl –s u::rwx,g::rw-,o::r--,m:7 file1
To set a permission for existing file |
m_ to set mask value
getfacl file1 | setfacl –f – file2 Copies file permission from f1-f2
setfacl –d u:root:7 file1 To delete an entry from a file
setfacl –m u:root:7 file1 Adding one by one entry in a file
setfacl -r -m u:user:7 file1 rewrites mask in accordance to user
Root Mirroring
_ create a slice of 50mb for state database ||let it be slice 7 i.e. s7
_ #prtvtoc /dev/rdsk/c0t0d0s2 | fmthard –s - /dev/rdsk/c#t#d0s2
_ #metadb -afc3 c0t0d0s7 c0t#d0s7 c#t#d0s7 || To create 3 replicas in each state db | 3 hard-disk
because (n/2)+1 replicas
_ #metadb -i ||To check for status
_ #metainit -f d10 1 1 c0t0d0s0 ||To create primary sub-mirror
_ #metastat
_ #metainit -f d20 1 1 c0t#d0s0 ||To create secondary sub-mirror
_ #metainit d50 -m d10 || mapping to main mirror
_ #metaroot d50 ||To put an auto entry in vfs tab
_ reboot the system now # init 6
_ #metattach d50 d20 ||resynchronization starts now
Replacing the defective disk in case of failure :
# metareplace <defective disk c#t#d#s#> <newly attached disk c#t#d#s#>
Breaking the Mirror :
_ #metadetach d50 d20 ||breaking secondary sub-mirror
_ #metaroot /dev/dsk/c0t0d0s0 ||role-back the vfs entry
_ #init 6
_ #metaclear -r d50 ||removing main mirror
_ #metaclear d20 ||removing secondary mirror
_ #metadb -d -f c0t0d0s7 c0t#d0s7 c#t#d0s7 ||removing the replicas
Solaris Commands For SA-I & SA-II
14
Hot Spare with Mirror Meta Device
It’s not applicable for mounted file system i.e. for root. Consider c1 and c2
are the two disks for this c3 be the hot spare let it be the scenario. In this if c1 & c2
are in mirror if any one goes down then c3 will come into picture.
_ create a slice of 50mb for state database ||let it be slice 7 i.e. s7
_ #metadb -afc3 c1t0d0s7 c2t0d0s7 c3t0d0s7 || To create 3 replicas
_ #metahs -hsp001 c3t0d0s1 ||To create the hot spare
_ #metainit d13 1 1 c1t0d0s1 ||To create primary sub-mirror
_ #metainit d23 1 1 c2t0d0s1 ||To create secondary sub-mirror
_ #metaparam -h hsp001 d13 ||Assigning hot spare to sub-mirror
_ #metaparam -h hsp001 d23 ||Assigning hot spare to sub-mirror
_ #metainit d150 -m d13 ||Mapping to main mirror
_ #metattach d150 d23 ||To synchronize the sub mirrors
_ #newfs /dev/md/rdsk/d150 ||Making new file system
_ #mkdir /mirror ||Create a directory for mounting
_ #mount /dev/md/rdsk/d150 /mirror ||mount the partition
Let us consider c2 goes down in above scenario so hot spare (c3) will be there in the role or c2
then replace the disk c2 by new one and follow the procedure
_ #metareplace -e d150 c2t0d0s1 ||To switch back hard-disk from c3 to c2
_ #metahs -e c3t0d0s4 || To re-enable the hot-spare c3 once again
RAID – 5 With Hot Spare
Let c1, c2 & c3 be the 3 disk in which s1 of all disk are under raid-5. The s3 of disk c2 & c3 be the
hot-spare which acts during the failure of s1. Let it be the scenario.
_ create a slice of 50mb for state database ||let it be slice 7 i.e. s7
_ #metadb -afc2 c1t0d0s7 c2t0d0s7 c3t0d0s7 || To create 2 replicas
_ #metahs -a -hsp009 c2t0d0s3 c3t0d0s3 ||To create the hot spare
_ #metainit d101 -r c1t0d0s1 c2t0d0s1 c3t0d0s1
_ #metaparam -h hsp009 d101
_ #newfs /dev/md/dsk/d101 ||Making new file system
_ #mkdir /raid5dir ||Create a directory for mounting
_ #mount /dev/md/rdsk/d101 /raid5dir ||mount the partition
In case if any disk fails & hot-spare comes into picture then replace the disk, then
_ #metareplace -e d <the disk that has replaced c#t#d#s#>
_ #metahs -e <hot spare disk that has to be reactivated c#t#d#s#>
Disk Set -- adding Soft Slices
Maximum of 128 soft slices can be created in a disk set. To change the default
number of soft slice edit “md.conf” & then change the value to “nmd=128”
Steps Involved in creating a soft slice :
_ metaset -s <share name> -a c#t1d# c#t3d#| adding share name for storage
_ metaset -s <share name> -a -h <node name>|assigning system to storage
_ metaset -s <share name> <replica_d500> 1 1 /dev/dsk/ c#t1d#s#|replica
_ metaset -s <share name> <replica_d501> 1 1 /dev/dsk/ c#t3d#s#|replica
_ newfs /dev/md/<share name>/rdsk/<d500> | similarly for d501
_ metainit -s <share name> <soft_slice_d555> -p <d500> <size_gb>| only
this command is for the soft slice rest is only to create a disk-set.
Steps Involved in creating a Disk-Set :
Repeat the above steps one by one the only changes are add the another servers
node name also at the end of second command. If soft slice required then provide
the last command or else leave it.
When the control of diskset is need by the other node server the type this system
from the system which is requesting for service,
# metaset -s <share name> -r |this is for request
# metaset -s <share name> -t |this is when the another node is down
# metaset -s <share name> -t -f |takes the control forcibly this can be given
when the next system is up but after this the main node will go to a panic state
Solaris Commands For SA-I & SA-II
15
Steps Jump Start Installation
1 Configure the NIS master sever first
#cp /etc/nsswitch.nis / etc/nsswitch.conf
#domainname accel.com
#touch /etc/defaultdomain
#domainname > /etc/defaultdomain
#cd /etc
#touch ethers bootparams locale timezone netgroup netmasks
#ypinit -m -> To initialize the master server
#/usr/lib/netsvc/yp/ypstart -> To start the NIS daemons
2 Edit /etc/ethers and add the following entries
#vi /etc/ethers
--------------------entry---------------------
< MAC add of destination sys_8:0:20:95:f0:d0:> <server host name>
-------------------------------------------------
3 Edit /etc/hosts and add the following entries
#vi /etc/hosts
--------------------entry---------------------
200.100.50.1 accel.com loghost timehost
200.100.50.2 <host name>
200.100.50.3 <host name>
-------------------------------------------------
4 Edit /etc/netmasks and add the following entries
#vi /etc/netmasks
--------------------entry---------------------
200.100.50.0 255.255.255.0
-------------------------------------------------
5 Edit /etc/timezone and add the following entries
#vi /etc/timezone
--------------------entry---------------------
US/mountain accel.com
-------------------------------------------------
6 Edit /etc/locale and add the following entries
#vi /etc/locale
--------------------entry---------------------
accel.com en-us
-------------------------------------------------
7 Update the NIS maps
#cd /var/yp
#usr/ccs/bin/make
8 #mkdir /jump ||create a directory to copy jump start files – size 2gb
9 Insert Solaris CD - 1/2
#cd /cdrom/cdrom0/s0/Solaris_8/Tools
#./setup_install_server /jump
10 Insert Solaris CD - 2/2
#cd /cdrom/cdrom0/Solaris_8/Tools
#./setup_install_server /jump
11 Copy the sample jumpstart scripts from Solaris CD – 1/2 to /jump
#cd /cdrom/cdrom0/s0/Solaris_8/Misc/jumpstart_sample
#cp -r * /jump
12 Create system identification details
#cd /jump
#mkdir sysidcfg-dir
#cd sysidcfg-dir
#mkdir <hostname of system to which we have to run jump start>
Solaris Commands For SA-I & SA-II
16
#cd <hostname of system to which we have to run jump start>
#vi sysidcfg
-------------------------entries-----------------------------
system_locale=en_US
timezone=US/Central
terminal=xterms
name_service=NONE
timeservice=<servers IP 200.100.50.1>
security_policy=NONE
network_interface=hme0
{hostname=<host name of destination> ip_address=<destini IP>
netmask=<destini mask> protocol_ipv6=no}
-----------------------------------------------------------
13 Create the profile file
# cd /jump
# vi .profile
--------------------------entry----------------------------
install_type initial_install
system_type server
partitioning explicit
filesys c0t0d0s0 3000 /
filesys c0t0d0s1 750 swap
(note: you can create other slices if required)
geo N_America
cluster SUNWCall (entire distribution)
(optional: you can add additional packages if required using the command:
package <packagename> add
-----------------------------------------------------------
14 Add the entry in rules file
# cd /jump
# vi rules
-------------------------entry-----------------------------
any - - .profile –
-----------------------------------------------------------
15 Validate the rules.ok file
# ./check
16 Add the client
# cd /jump/Solaris_8/Tools
# ./add_install_client –c <destination server hostname>:/jump –p
<destination server hostname>:/jump/sysidcfg-dir/e450 e450 sun4u
17 Edit the /etc/dfs/dfstab file
# vi /etc/dfs/dfstab
-------------------------entry-----------------------------
share –F nfs –o ro,anon=0 /jump
-----------------------------------------------------------
18 Update the NIS maps once again
# cd /var/yp
# /usr/ccs/bin/make
19 19. To start the jumpstart installation
Go to destination server and from there you just give the following
command form OK: prompt
20 Ok : boot net – install
Solaris Commands For SA-I & SA-II
17
Remote Access
Put a “+” or “user name” in the “.rhost” file at home directory or else in /etc location so that users
from other system can login to the local system remotely.
Command Function
rcp <host name>:<path> <destiny> Remote copy
rlogin Remote login lllar to telnet
rsh <host name> mt staus To utilize the other system h/w |tape
Hints Purpose
Well-known ports Ranges upto 1024 _ located at /etc/inet/services
Dynamic ports From 1025 to 65535_ at /etc/inet/services
Veritas Volume Manager
Installation :
Insert Veritas cd & goto the package location and give pkgadd –d . ,after adding the package just
give #vxinstall this is to start installation of the veritas. Then it will ask few question give
appropriate answer for it. At any-cost don’t do the encapsulation this process is to add the root
hard disk under veritas.
Daemons Used : vxconfigd , vxiod – i/o operation, vxrelocd – hot relocation
Disk Group : Collection of physical disk which were under veritas
Volume (V) : Collection of disk is said to be as a volume.
Plux (Pl) : Volumes were subdivided into pluxes. Maximum 32 plux in a volume & at least 1 plux
per volume.
Subdisk (Sd) : Each and ever Plux is subdivided into a subdisk. All subdisk
within a volume must fall under a same Disk Group.
Commands Functions
Vxprint To view the status of VxVM
Vxdiskadm To view the Vx menu |press q – quit
vxassist make <con1> <size>
newfs /dev/vx/rdsk/<con1>
To create concatenation | con1 is the
name of concate | mount & use it
vxvol stop <con1>
vxedit -rf rm <con1>
To remove the concatenation |-rf rm –
remove forcibely, remove volume.
vxassist make <str1> <size>
layout=stripe
To create stripe of desired size | run
newfs and mount the device
vxvol stop <str1>
vxedit -rf rm <str1>
To remove the stripe |-rf rm – remove
forcibely, remove volume.
vxassist mirror rootvol
vxassist mirror swapvol
To create root mirror|don’t run newfs
|run encapsulation here – vxdiskadm
vxplex -o –rm dis <rootvol-02>
vxplex -o –rm dis <swapvol-02>
/etc/vx/bin/vxunroot
To break the root mirror | don’t give
<rootvol-01> at any-cost it will crash
the system
vxassist make <mirror> <size>
layout=mirror
To create a data mirror | run newfs
and mount the device
vxvol stop <mirror>
vxplex -o –rm dis <mirror>
To break the data mirror
vxassist make <raid5> <size>
layout=raid5
To create disk space for Raid 5
vxvol stop <raid5>
vxplex -o –rm dis <raid5>
To break the Raid 5
vxdctl stop
vxiod -f set0
init 6
To stop the VxVm daemon
To terminate the i/o operation
Restart & uninstall veritas using cd
Solaris Commands For SA-I & SA-II
18
SUN CLUSTER
Required Components:
Terminal Concentrator, Cluster host, Storage array, Public network, Administrative workstation –
sun cluster console software SUNWccon It won’t support multiple connections from a same
server to a single storage box.
Topologies: Clustered Pair Topology, N+1 Topology, Pair + N topology. Clustered Pair
Topology : If two are more pairs of nodes operating under a single cluster administrative
framework. In this the Nodes are configured in pairs-two, four, six or eight
nodes
N+1 Topology : This is providing one system to act as the back-up for the other system in
the group.
Pair + N topology : It is adding or including a pair of cluster in an existing cluster pair
only for the purpose of storage sharing. In this there is no direct connection between them.
NOTE:
Once cluster is installed the init command won’t work to shutdown the system use
# scshutdown -y g <grace period in minuter ##>
Configuration steps of sun cluster 3.0
Steps involved :
_ Install Disk Suit
_ Change SCSI Initiator ID
_ Initial Installation - Sun Cluster Software Installation
_ Configuring Quorum device
_ Disk Set using Disk Suit
_ Data Service Configuration
Changing SCSI Initiator ID : { do this steps only in any one server node }
Ok: probe-scsi-all | To view the physical disk path of the hard disk | note this for disk set
Ok: nvedit
0: probe-all install-console banner
1: cd < physical path or external hard disk_@1f,2000/scsi@1>
2: 6 “ scsi-initiator-id” integer-property
3: device-end
4: cd < physical path or external hard disk_@1f,2000/scsi@1>
5: 6 “ scsi-initiator-id” integer-property
6: device-end
7: banner < to save press ctrl c >
Ok: nvstore
Ok: setenv use-nvramrc? true
Ok: setenv auto-boot? true
Ok: reset-all
Ok: cd < physical path or external hard disk_@1f,2000/scsi@1>
Ok: .properties | This is to view the changed SCSI initiator ID
Creating Slices : { do this step in all the servers/nodes }
For an sun cluster 4 slices are important they are root, swap, /globaldevices, 50mb for replica.
Edit /etc/host : { do this step in all the servers/nodes }
-----------------------entry-----------------------
<server ip address> <host name>
<service/logical ip address> <service/logical name_nfs-server> | its virtual IP
----------------------------------------------------
Assigning Logical or Virtual IP Address For the Service : { do in all servers/nodes }
# ifconfig hme0:1 plumb
# ifconfig hme0:1 <service ip address> netmask <netmask> up
# init6 | restart all the nodes in a same instant
Cluster Installation : { do in all servers/nodes }
# cd /cdrom/cdrom0/SunCluster_3.0/Tools
Solaris Commands For SA-I & SA-II
19
# ./scinstall | A installation menu will appear in that provide all the details
Create and Edit /.rhosts : { do in all servers/nodes }
-----------------------entry-----------------------
<server’s node name>
----------------------------------------------------
(or)
Add root users to the sysadmin group i.e. /etc/group { do in all servers/nodes }
Entry : sysadmin::14::root | add this entry in /etc/group
Install the required patches such as 110648-33,111488-08,112108-07and Restart
Edit /etc/profile : add following entry { do in all servers/nodes }
-----------------------entry-----------------------
PATH=/usr/bin::/usr/sbin::/usr/cluster/bin export PATH
MANPATH=/usr/cluster/man export MANPATH
----------------------------------------------------
Configure the Quorum Device : { do in any one servers/node } | for voting purpose
# scdidadm -L | to see the DID instance name on the storage box
# scsetup
continue (y/n) :y
Quorum device : <DID instance
name>
Add another quorum device (y/n) :n
Reset installmode (y/n) :y
Or
# scconf -a -q globaldev=d9
# scconf -c -q reset
# scstat -q | to see status
Disk Set Configuration Steps : { do in all servers/node }
Install Disk Suit from Solaris 2 of 2 CD and then create state db replica.
# metaset -s <disk set name> -a -h <host name_ser1> <host name_ser2>
# metaset -s <disk set name> -a /dev/did/rdisk/<DID instance name>
Creating Concate / Stribes : { do in all servers/node }
# metainit -s <disk set name> <d99> 1 1 /dev/did/rdsk/<DID instance name>s0
# newfs /dev/md/<disk set name>/rdsk/<d99>
# mkdir /global/nfs
# mount -g /dev/md/<disk set name>/dsk/<d99> /global/nfs
Edit /etc/vfstab : for permanent entry { do in all servers/node }
/dev/md/<disk set name>/dsk/<d99> /dev/md/<disk set name>/rdsk/<d99>
/global/nfs ufs 2 yes global,logging | 2 is for no-run fsck at boot
NAFO – Network Adaptor Fail Over - for public n/w management
In case of failure of the network adaptor which is responsible for public network
then due to this also the public can’t able to access the server, in order to avoid that we
can provide a standby adaptor and that has to be configured in NAFO to take charge.
# pnmstat -l | To view the status
# pnmset | To creat NAFO
continue (y/n) :y
Number NAFO backup groups : 1
Group Number :0 | i.e nafo0
Enter adaptor names : <hme0 hme1>
Solaris Commands For SA-I & SA-II
20
Data Service Configuration : Services like apache, oracle, dns, iws etc., Insert sun
cluster 2nd CD & give ./scinstall and then choose 4 for adding support for data service.
In case of nfs select it and quit and then add required patched for the service eg. 111555-
07 and then restart the system by scshutdown -y -g0
Resource Group Manager (RGM) : { do in any one servers/node }
Responsible for controlling the starting and stoping of resource group on selected
nodes of the cluster.
# cd /global/nfs
# mkdir admin data
# cd admin
# mkdir SUNW.nfs
# cd SUNW.nfs
# touch dfstab.<resource group name>
# chmod 777 /global/nfs/data
Edit dfstab.<resource group name>
-----------------------entry-----------------------
share -F nfs -o rw /global/nfs/data
----------------------------------------------------
Register the Appropriate Resource type (NFS) :
# scrgadm -a -t SUNW.nfs
# scrgadm -a -g <resource group name_nfs-server-rg> -h <all node name> -y path
prefix=/global/nfs/admin
# scrgadm -a -L -j <resource name_ nfs-server-rf> -g < resource group name_nfsserver-
rg > -l <logical add_nfs-server>
# scrgadm -a -j <resource name_ nfs-server-rf> -g < resource group name_nfs-server-rg
> -t SUNW.nfs
Enabling & Bringing Resources Online :
# scswitch -Z -g nfs-server-rg
# scrgadm -a -L -g < resource group name_nfs-server-rg > -l <logical name_nfs-server>
-n <nafo0@e450, nafo1@e250> | To associate pubic n/w mgt with resource group
Disabling nfs resources :
# scswitch -n -M -j <resource name_ nfs-server-rf>
Enabling nfs resources :
# scswitch -e -M -j <resource name_ nfs-server-rf>
# scstat -g | To view the status
# scrgadm -p | To view the resource type, group, installed resources etc.,
In Client Side :
_ Create a mount point # mkdir suncluster
_ Mount the directory # mount <logical host_nfs-server>:/global/nfs/data/suncluster
_ Edit /etc/hosts _ entry is <logical ip address> <logical name>
To Manually switch the service from one node to the another :
# scswitch -z -h <node which has to made active> -g <resource group name>
Solaris Commands For SA-I & SA-II
21
FLASH Installation
Flash installation is getting and saving the network configuration & setting of your system to
an existing extra disk. In case of any failure in your system you put the extra disk in some
other machine and restore the configuration by locating it while reinstallation of OS on your
system.
#flarcreate -n <archive_name> -a <author name> -R / -x </var/tmp>
</flashdisk/file.archive – path in the destiny disk> _ To create a flash archive.
Installing Explorer & Getting Explorer Output
_ Get the SUNWexplo from CD or online
_ Install it by placing it in /opt location
_ To get the explorer output goto /opt/SUNWexplo/bin & give explorer -i
_ Then output of explorer will be in the same location or in output directory.
The file name will be explorer.<host id>.<hostname>-<date>.tar.gz
_ If you want to read the content execute suncheckup for further details.

Más contenido relacionado

La actualidad más candente

La actualidad más candente (18)

Examples -partII
Examples -partIIExamples -partII
Examples -partII
 
Basic linux commands
Basic linux commandsBasic linux commands
Basic linux commands
 
Rhel1
Rhel1Rhel1
Rhel1
 
Solaris
SolarisSolaris
Solaris
 
Unix commands
Unix commandsUnix commands
Unix commands
 
Linux command line cheatsheet
Linux command line cheatsheetLinux command line cheatsheet
Linux command line cheatsheet
 
Solaris_quickref.pdf
Solaris_quickref.pdfSolaris_quickref.pdf
Solaris_quickref.pdf
 
[PDF] 2021 Termux basic commands list
[PDF] 2021 Termux basic commands list [PDF] 2021 Termux basic commands list
[PDF] 2021 Termux basic commands list
 
Linux Commands
Linux CommandsLinux Commands
Linux Commands
 
Rpm Introduction
Rpm IntroductionRpm Introduction
Rpm Introduction
 
50 most frequently used unix
50 most frequently used unix50 most frequently used unix
50 most frequently used unix
 
Termux commands-list
Termux commands-listTermux commands-list
Termux commands-list
 
linux_Commads
linux_Commadslinux_Commads
linux_Commads
 
Gnome terminal basics
Gnome terminal basicsGnome terminal basics
Gnome terminal basics
 
Perintah perintah dasar linux Operating Sistem
Perintah perintah dasar linux Operating SistemPerintah perintah dasar linux Operating Sistem
Perintah perintah dasar linux Operating Sistem
 
50 Most Frequently Used UNIX Linux Commands -hmftj
50 Most Frequently Used UNIX  Linux Commands -hmftj50 Most Frequently Used UNIX  Linux Commands -hmftj
50 Most Frequently Used UNIX Linux Commands -hmftj
 
50 Perintah Dasar pada linux
50 Perintah Dasar pada linux50 Perintah Dasar pada linux
50 Perintah Dasar pada linux
 
Linux Shortcuts and Commands:
Linux Shortcuts and Commands:Linux Shortcuts and Commands:
Linux Shortcuts and Commands:
 

Destacado

Final presentation compressed
Final presentation compressedFinal presentation compressed
Final presentation compressedRay Cox
 
Οδηγός Ενδοεπιχειρησιακής Εκπαίδευσης - Semifind.gr
Οδηγός Ενδοεπιχειρησιακής Εκπαίδευσης - Semifind.grΟδηγός Ενδοεπιχειρησιακής Εκπαίδευσης - Semifind.gr
Οδηγός Ενδοεπιχειρησιακής Εκπαίδευσης - Semifind.grsemifind
 
Final power point 3
Final power point 3Final power point 3
Final power point 3Ray Cox
 
Hand hygiene [autosaved]
Hand hygiene [autosaved]Hand hygiene [autosaved]
Hand hygiene [autosaved]Narendra Dongre
 
Azure virtual machines
Azure virtual machinesAzure virtual machines
Azure virtual machinesAnil Kumar
 
Azure websites Overview
Azure websites OverviewAzure websites Overview
Azure websites OverviewAnil Kumar
 
Final power point
Final power pointFinal power point
Final power pointRay Cox
 
What do you know?
What do you know?What do you know?
What do you know?mrpanaccio
 

Destacado (9)

Final presentation compressed
Final presentation compressedFinal presentation compressed
Final presentation compressed
 
Timeline
TimelineTimeline
Timeline
 
Οδηγός Ενδοεπιχειρησιακής Εκπαίδευσης - Semifind.gr
Οδηγός Ενδοεπιχειρησιακής Εκπαίδευσης - Semifind.grΟδηγός Ενδοεπιχειρησιακής Εκπαίδευσης - Semifind.gr
Οδηγός Ενδοεπιχειρησιακής Εκπαίδευσης - Semifind.gr
 
Final power point 3
Final power point 3Final power point 3
Final power point 3
 
Hand hygiene [autosaved]
Hand hygiene [autosaved]Hand hygiene [autosaved]
Hand hygiene [autosaved]
 
Azure virtual machines
Azure virtual machinesAzure virtual machines
Azure virtual machines
 
Azure websites Overview
Azure websites OverviewAzure websites Overview
Azure websites Overview
 
Final power point
Final power pointFinal power point
Final power point
 
What do you know?
What do you know?What do you know?
What do you know?
 

Similar a Commands

Linux commands
Linux commandsLinux commands
Linux commandsshekhar70
 
Unix / Linux Command Reference
Unix / Linux Command ReferenceUnix / Linux Command Reference
Unix / Linux Command ReferenceSumankumar Panchal
 
Basic command for linux
Basic command for linuxBasic command for linux
Basic command for linuxgt0ne
 
The one page linux manual
The one page linux manualThe one page linux manual
The one page linux manualSaikat Rakshit
 
The one page linux manual
The one page linux manualThe one page linux manual
The one page linux manualCraig Cannon
 
프로토추천♬♬W­Е­4­9­닷­С­О­М♬♬고액배팅사이트め고액배팅사이트め프로토
프로토추천♬♬W­Е­4­9­닷­С­О­М♬♬고액배팅사이트め고액배팅사이트め프로토프로토추천♬♬W­Е­4­9­닷­С­О­М♬♬고액배팅사이트め고액배팅사이트め프로토
프로토추천♬♬W­Е­4­9­닷­С­О­М♬♬고액배팅사이트め고액배팅사이트め프로토itsming
 
Rhel 6.2 complete ebook
Rhel 6.2  complete ebookRhel 6.2  complete ebook
Rhel 6.2 complete ebookYash Gulati
 
Rhel 6.2 complete ebook
Rhel 6.2 complete ebookRhel 6.2 complete ebook
Rhel 6.2 complete ebookYash Gulati
 
InstructionsInstructions for numberguessernumberGuesser.html.docx
InstructionsInstructions for numberguessernumberGuesser.html.docxInstructionsInstructions for numberguessernumberGuesser.html.docx
InstructionsInstructions for numberguessernumberGuesser.html.docxdirkrplav
 
Introduction to linux day-3
Introduction to linux day-3Introduction to linux day-3
Introduction to linux day-3Gourav Varma
 
Linux Commandos Cheat
Linux Commandos CheatLinux Commandos Cheat
Linux Commandos CheatAlvaro Gomes
 
Bash cheat sheet
Bash cheat sheetBash cheat sheet
Bash cheat sheetJogesh Rao
 

Similar a Commands (20)

Linux commands
Linux commandsLinux commands
Linux commands
 
Unix / Linux Command Reference
Unix / Linux Command ReferenceUnix / Linux Command Reference
Unix / Linux Command Reference
 
Rhel2
Rhel2Rhel2
Rhel2
 
Basic command for linux
Basic command for linuxBasic command for linux
Basic command for linux
 
The one page linux manual
The one page linux manualThe one page linux manual
The one page linux manual
 
The one page linux manual
The one page linux manualThe one page linux manual
The one page linux manual
 
Clase4 (consola linux)
Clase4 (consola linux)Clase4 (consola linux)
Clase4 (consola linux)
 
프로토추천♬♬W­Е­4­9­닷­С­О­М♬♬고액배팅사이트め고액배팅사이트め프로토
프로토추천♬♬W­Е­4­9­닷­С­О­М♬♬고액배팅사이트め고액배팅사이트め프로토프로토추천♬♬W­Е­4­9­닷­С­О­М♬♬고액배팅사이트め고액배팅사이트め프로토
프로토추천♬♬W­Е­4­9­닷­С­О­М♬♬고액배팅사이트め고액배팅사이트め프로토
 
Linux.pdf
Linux.pdfLinux.pdf
Linux.pdf
 
Rhel 6.2 complete ebook
Rhel 6.2  complete ebookRhel 6.2  complete ebook
Rhel 6.2 complete ebook
 
Rhel 6.2 complete ebook
Rhel 6.2 complete ebookRhel 6.2 complete ebook
Rhel 6.2 complete ebook
 
Day 2-some fun coding
Day 2-some fun codingDay 2-some fun coding
Day 2-some fun coding
 
lec2.docx
lec2.docxlec2.docx
lec2.docx
 
InstructionsInstructions for numberguessernumberGuesser.html.docx
InstructionsInstructions for numberguessernumberGuesser.html.docxInstructionsInstructions for numberguessernumberGuesser.html.docx
InstructionsInstructions for numberguessernumberGuesser.html.docx
 
Linux cheat sheet
Linux cheat sheetLinux cheat sheet
Linux cheat sheet
 
Introduction to linux day-3
Introduction to linux day-3Introduction to linux day-3
Introduction to linux day-3
 
Linux Commandos Cheat
Linux Commandos CheatLinux Commandos Cheat
Linux Commandos Cheat
 
Linux cheat-sheet
Linux cheat-sheetLinux cheat-sheet
Linux cheat-sheet
 
Linux cheat-sheet
Linux cheat-sheetLinux cheat-sheet
Linux cheat-sheet
 
Bash cheat sheet
Bash cheat sheetBash cheat sheet
Bash cheat sheet
 

Último

The State of Passkeys with FIDO Alliance.pptx
The State of Passkeys with FIDO Alliance.pptxThe State of Passkeys with FIDO Alliance.pptx
The State of Passkeys with FIDO Alliance.pptxLoriGlavin3
 
Generative AI for Technical Writer or Information Developers
Generative AI for Technical Writer or Information DevelopersGenerative AI for Technical Writer or Information Developers
Generative AI for Technical Writer or Information DevelopersRaghuram Pandurangan
 
What is DBT - The Ultimate Data Build Tool.pdf
What is DBT - The Ultimate Data Build Tool.pdfWhat is DBT - The Ultimate Data Build Tool.pdf
What is DBT - The Ultimate Data Build Tool.pdfMounikaPolabathina
 
Gen AI in Business - Global Trends Report 2024.pdf
Gen AI in Business - Global Trends Report 2024.pdfGen AI in Business - Global Trends Report 2024.pdf
Gen AI in Business - Global Trends Report 2024.pdfAddepto
 
SIP trunking in Janus @ Kamailio World 2024
SIP trunking in Janus @ Kamailio World 2024SIP trunking in Janus @ Kamailio World 2024
SIP trunking in Janus @ Kamailio World 2024Lorenzo Miniero
 
SAP Build Work Zone - Overview L2-L3.pptx
SAP Build Work Zone - Overview L2-L3.pptxSAP Build Work Zone - Overview L2-L3.pptx
SAP Build Work Zone - Overview L2-L3.pptxNavinnSomaal
 
Moving Beyond Passwords: FIDO Paris Seminar.pdf
Moving Beyond Passwords: FIDO Paris Seminar.pdfMoving Beyond Passwords: FIDO Paris Seminar.pdf
Moving Beyond Passwords: FIDO Paris Seminar.pdfLoriGlavin3
 
Take control of your SAP testing with UiPath Test Suite
Take control of your SAP testing with UiPath Test SuiteTake control of your SAP testing with UiPath Test Suite
Take control of your SAP testing with UiPath Test SuiteDianaGray10
 
How AI, OpenAI, and ChatGPT impact business and software.
How AI, OpenAI, and ChatGPT impact business and software.How AI, OpenAI, and ChatGPT impact business and software.
How AI, OpenAI, and ChatGPT impact business and software.Curtis Poe
 
New from BookNet Canada for 2024: Loan Stars - Tech Forum 2024
New from BookNet Canada for 2024: Loan Stars - Tech Forum 2024New from BookNet Canada for 2024: Loan Stars - Tech Forum 2024
New from BookNet Canada for 2024: Loan Stars - Tech Forum 2024BookNet Canada
 
unit 4 immunoblotting technique complete.pptx
unit 4 immunoblotting technique complete.pptxunit 4 immunoblotting technique complete.pptx
unit 4 immunoblotting technique complete.pptxBkGupta21
 
WordPress Websites for Engineers: Elevate Your Brand
WordPress Websites for Engineers: Elevate Your BrandWordPress Websites for Engineers: Elevate Your Brand
WordPress Websites for Engineers: Elevate Your Brandgvaughan
 
"Subclassing and Composition – A Pythonic Tour of Trade-Offs", Hynek Schlawack
"Subclassing and Composition – A Pythonic Tour of Trade-Offs", Hynek Schlawack"Subclassing and Composition – A Pythonic Tour of Trade-Offs", Hynek Schlawack
"Subclassing and Composition – A Pythonic Tour of Trade-Offs", Hynek SchlawackFwdays
 
The Role of FIDO in a Cyber Secure Netherlands: FIDO Paris Seminar.pptx
The Role of FIDO in a Cyber Secure Netherlands: FIDO Paris Seminar.pptxThe Role of FIDO in a Cyber Secure Netherlands: FIDO Paris Seminar.pptx
The Role of FIDO in a Cyber Secure Netherlands: FIDO Paris Seminar.pptxLoriGlavin3
 
Dev Dives: Streamline document processing with UiPath Studio Web
Dev Dives: Streamline document processing with UiPath Studio WebDev Dives: Streamline document processing with UiPath Studio Web
Dev Dives: Streamline document processing with UiPath Studio WebUiPathCommunity
 
How to write a Business Continuity Plan
How to write a Business Continuity PlanHow to write a Business Continuity Plan
How to write a Business Continuity PlanDatabarracks
 
Use of FIDO in the Payments and Identity Landscape: FIDO Paris Seminar.pptx
Use of FIDO in the Payments and Identity Landscape: FIDO Paris Seminar.pptxUse of FIDO in the Payments and Identity Landscape: FIDO Paris Seminar.pptx
Use of FIDO in the Payments and Identity Landscape: FIDO Paris Seminar.pptxLoriGlavin3
 
Transcript: New from BookNet Canada for 2024: Loan Stars - Tech Forum 2024
Transcript: New from BookNet Canada for 2024: Loan Stars - Tech Forum 2024Transcript: New from BookNet Canada for 2024: Loan Stars - Tech Forum 2024
Transcript: New from BookNet Canada for 2024: Loan Stars - Tech Forum 2024BookNet Canada
 
A Deep Dive on Passkeys: FIDO Paris Seminar.pptx
A Deep Dive on Passkeys: FIDO Paris Seminar.pptxA Deep Dive on Passkeys: FIDO Paris Seminar.pptx
A Deep Dive on Passkeys: FIDO Paris Seminar.pptxLoriGlavin3
 
SALESFORCE EDUCATION CLOUD | FEXLE SERVICES
SALESFORCE EDUCATION CLOUD | FEXLE SERVICESSALESFORCE EDUCATION CLOUD | FEXLE SERVICES
SALESFORCE EDUCATION CLOUD | FEXLE SERVICESmohitsingh558521
 

Último (20)

The State of Passkeys with FIDO Alliance.pptx
The State of Passkeys with FIDO Alliance.pptxThe State of Passkeys with FIDO Alliance.pptx
The State of Passkeys with FIDO Alliance.pptx
 
Generative AI for Technical Writer or Information Developers
Generative AI for Technical Writer or Information DevelopersGenerative AI for Technical Writer or Information Developers
Generative AI for Technical Writer or Information Developers
 
What is DBT - The Ultimate Data Build Tool.pdf
What is DBT - The Ultimate Data Build Tool.pdfWhat is DBT - The Ultimate Data Build Tool.pdf
What is DBT - The Ultimate Data Build Tool.pdf
 
Gen AI in Business - Global Trends Report 2024.pdf
Gen AI in Business - Global Trends Report 2024.pdfGen AI in Business - Global Trends Report 2024.pdf
Gen AI in Business - Global Trends Report 2024.pdf
 
SIP trunking in Janus @ Kamailio World 2024
SIP trunking in Janus @ Kamailio World 2024SIP trunking in Janus @ Kamailio World 2024
SIP trunking in Janus @ Kamailio World 2024
 
SAP Build Work Zone - Overview L2-L3.pptx
SAP Build Work Zone - Overview L2-L3.pptxSAP Build Work Zone - Overview L2-L3.pptx
SAP Build Work Zone - Overview L2-L3.pptx
 
Moving Beyond Passwords: FIDO Paris Seminar.pdf
Moving Beyond Passwords: FIDO Paris Seminar.pdfMoving Beyond Passwords: FIDO Paris Seminar.pdf
Moving Beyond Passwords: FIDO Paris Seminar.pdf
 
Take control of your SAP testing with UiPath Test Suite
Take control of your SAP testing with UiPath Test SuiteTake control of your SAP testing with UiPath Test Suite
Take control of your SAP testing with UiPath Test Suite
 
How AI, OpenAI, and ChatGPT impact business and software.
How AI, OpenAI, and ChatGPT impact business and software.How AI, OpenAI, and ChatGPT impact business and software.
How AI, OpenAI, and ChatGPT impact business and software.
 
New from BookNet Canada for 2024: Loan Stars - Tech Forum 2024
New from BookNet Canada for 2024: Loan Stars - Tech Forum 2024New from BookNet Canada for 2024: Loan Stars - Tech Forum 2024
New from BookNet Canada for 2024: Loan Stars - Tech Forum 2024
 
unit 4 immunoblotting technique complete.pptx
unit 4 immunoblotting technique complete.pptxunit 4 immunoblotting technique complete.pptx
unit 4 immunoblotting technique complete.pptx
 
WordPress Websites for Engineers: Elevate Your Brand
WordPress Websites for Engineers: Elevate Your BrandWordPress Websites for Engineers: Elevate Your Brand
WordPress Websites for Engineers: Elevate Your Brand
 
"Subclassing and Composition – A Pythonic Tour of Trade-Offs", Hynek Schlawack
"Subclassing and Composition – A Pythonic Tour of Trade-Offs", Hynek Schlawack"Subclassing and Composition – A Pythonic Tour of Trade-Offs", Hynek Schlawack
"Subclassing and Composition – A Pythonic Tour of Trade-Offs", Hynek Schlawack
 
The Role of FIDO in a Cyber Secure Netherlands: FIDO Paris Seminar.pptx
The Role of FIDO in a Cyber Secure Netherlands: FIDO Paris Seminar.pptxThe Role of FIDO in a Cyber Secure Netherlands: FIDO Paris Seminar.pptx
The Role of FIDO in a Cyber Secure Netherlands: FIDO Paris Seminar.pptx
 
Dev Dives: Streamline document processing with UiPath Studio Web
Dev Dives: Streamline document processing with UiPath Studio WebDev Dives: Streamline document processing with UiPath Studio Web
Dev Dives: Streamline document processing with UiPath Studio Web
 
How to write a Business Continuity Plan
How to write a Business Continuity PlanHow to write a Business Continuity Plan
How to write a Business Continuity Plan
 
Use of FIDO in the Payments and Identity Landscape: FIDO Paris Seminar.pptx
Use of FIDO in the Payments and Identity Landscape: FIDO Paris Seminar.pptxUse of FIDO in the Payments and Identity Landscape: FIDO Paris Seminar.pptx
Use of FIDO in the Payments and Identity Landscape: FIDO Paris Seminar.pptx
 
Transcript: New from BookNet Canada for 2024: Loan Stars - Tech Forum 2024
Transcript: New from BookNet Canada for 2024: Loan Stars - Tech Forum 2024Transcript: New from BookNet Canada for 2024: Loan Stars - Tech Forum 2024
Transcript: New from BookNet Canada for 2024: Loan Stars - Tech Forum 2024
 
A Deep Dive on Passkeys: FIDO Paris Seminar.pptx
A Deep Dive on Passkeys: FIDO Paris Seminar.pptxA Deep Dive on Passkeys: FIDO Paris Seminar.pptx
A Deep Dive on Passkeys: FIDO Paris Seminar.pptx
 
SALESFORCE EDUCATION CLOUD | FEXLE SERVICES
SALESFORCE EDUCATION CLOUD | FEXLE SERVICESSALESFORCE EDUCATION CLOUD | FEXLE SERVICES
SALESFORCE EDUCATION CLOUD | FEXLE SERVICES
 

Commands

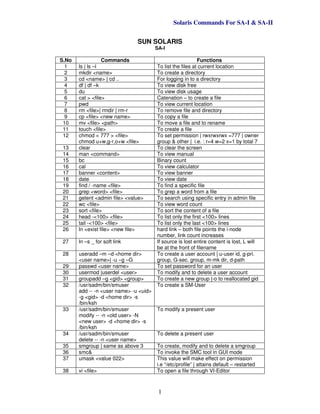
  • 1. Solaris Commands For SA-I & SA-II 1 SUN SOLARIS SA-I S.No Commands Functions 1 ls | ls –l To list the files at current location 2 mkdir <name> To create a directory 3 cd <name> | cd .. For logging in to a directory 4 df | df –k To view disk free 5 du To view disk usage 6 cat > <file> Catenation – to create a file 7 pwd To view current location 8 rm <file>| rmdir | rm-r To remove file and directory 9 cp <file> <new name> To copy a file 10 mv <file> <path> To move a file and to rename 11 touch <file> To create a file 12 chmod < 777 > <file> chmod u+w,g-r,o+w <file> To set permission | rwxrwxrwx =777 | owner group & other | i.e. : r=4 w=2 x=1 by total 7 13 clear To clear the screen 14 man <command> To view manual 15 bc Binary count 16 cal To view calculator 17 banner <content> To view banner 18 date To view date 19 find / -name <file> To find a specific file 20 grep <word> <file> To grep a word from a file 21 getent <admin file> <value> To search using specific entry in admin file 22 wc <file> To view word count 23 sort <file> To sort the content of a file 24 head -<100> <file> To list only the first <100> lines 25 tail -<100> <file> To list only the last <100> lines 26 ln <exist file> <new file> hard link – both file points the i-node number, link count increases 27 ln –s _ for soft link If source is lost entire content is lost, L will be at the front of filename 28 useradd –m –d <home dir> <user name>| -u –g –G To create a user account | u-user id, g-pri. group, G-sec. group, m-mk dir, d-path 29 passwd <user name> To set password for an user 30 usermod |userdel <user> To modify and to delete a user account 31 groupadd –g <gid> <group> To create a new group |-o to reallocated gid 32 /usr/sadm/bin/smuser add -- -n <user name> -u <uid> -g <gid> -d <home dir> -s /bin/ksh To create a SM-User 33 /usr/sadm/bin/smuser modify -- -n <old user> -N <new user> -d <home dir> -s /bin/ksh To modify a present user 34 /usr/sadm/bin/smuser delete -- -n <user name> To delete a present user 35 smgroup | same as above 3 To create, modify and to delete a smgroup 36 smc& To invoke the SMC tool in GUI mode 37 umask <value 022> This value will make effect on permission i.e “/etc/profile” | attains default – restarted 38 vi <file> To open a file through VI-Editor
  • 2. Solaris Commands For SA-I & SA-II 2 39 Prtconf To view system config–memory, peripheral 40 prstat –a To view the system process status 41 Psrinfo –v To view information about the processor 42 iostat -En |-xtc 5 To view the i/o device status 43 Sdtprocess To view the current system process status 44 sar <sec_1> <report_10> To view the system activity in average 45 kill <process id> To kill a process which is listed in prstat 46 Format To make slices in an hard disk 47 devfsadm –v To identify the hardware changes 48 devfsadm –C To invoke cleanup | then only –v fn works 49 newfs /dev/rdsk/c#t#d#s# To make a new file system on the disk 50 mount /dev/dsk/c#t#d#s# /<mount point> To mount the new disk for use 51 Dmesg To view the diagnostic messages 52 Eeprom To view the environment messages 53 uname –m | -a To view the m/c name, version, archi. etc., 54 /usr/platform/”uname-m”/ sbin/prtdiag –v To view the entire system status includes memory, cpu, patches, os-version, etc., 55 pkgadd –d <path> <pkg name> | -s spool To install a package | if –s spool is used in btw_only copies the pkg to spool directory 56 pkgchk <pkg name> To check for error in a particular package 57 pkginfo <pkg name> To get info about package in local machine 58 pkgrm <pkg name> To remove a package from local machine 59 pkginfo |wc –l To check for number of packages installed 60 fstyp –v /dev/rdsk/ctd#s# To check for the current “minfree” value 61 tunefs –m # /dev/rdsk/ctds To set minfree value i.e #% with that of root 62 fsck –o f,p /dev/rdsk/ctds# To run file system check | -o f, p for yes to all 63 fsck –o b=# /dev/rdsk/ctds To restore backup sup. Block|#-sup. Block 64 quot |-af root To view summarized FS ownership 65 mountall To mount all FS which have entry at vfstab 66 mountall –l To mount only the local FS listed in ‘vfstab’ 67 umount <mt pt> |/dev/dsk To unmount the mounted file system 1 by 1 68 umount -f ---do--- To unmount forcible | may affect data 69 Umountall To unmount all mounted FS includes N/W 70 umountall –l To unmount all locally mounted FS 71 fuser <mount pt> | -c or –cu To view any process is accessing the FS 72 fuser –ck <mt pt> To kill all process which access the FS 73 Volcheck To check whether the floppy is ready or not 74 /etc/init.d/volmgt start To start the volume mgt | to stop, give stop 75 mount –F hsfs –o r0 /dev/dsk/ct#d#s# /cdrom To mount a cdrom manually 76 mount –F pcfs /dev/diskette/pcfs To mount a floppy drive manually 77 tar –xvf <file.tar> To uncompress a tar file 78 patchadd <patch> | -d To install a patch |–d is for no rollback 79 patchrm <patch> To uninstall and rollbacks the patch 80 init 0 To OK prompt 81 init 1 To single user mode 82 init 2 To multi user without network 83 init 3 To console – super user | multiuser with nfs 84 init 5 To shutdown the server 85 init 6 To restart the server 86 init s To single user mode
  • 3. Solaris Commands For SA-I & SA-II 3 87 shutdown –y –g <#> -i <run level number> <Message> To shutdown the system |-y for interactive mode| # - grace time in seconds 88 Halt To switch over to OK prompt suddenly 89 poweroff | Reboot Alternate command to switch-off & restart 90 who –r To view the current run level 91 who | -a To view all logged-in users in the local sys 92 who –m To view the current user name alone 93 whoami | who I am To view effective user | To view actual user 94 rusers –l To identify all users logged in through n/w 95 finger |-m <username> To view the activity of the users 96 last | <username> To view full details for all users | record 97 last -n 5 reboot To view only the last five reboot activity 98 chown root : sys /var/adm/loginlog To activate loginlog entry i.e. to note the failure login |you must create the directory 99 su <username> | su -<usern> To switch into another user | home dir – acti 100 chown <user> filename To change the ownership of a file|-R for dir 101 chmod 1777 <dir name> Sticky bit permission | user can access dir 102 chmod 4555 <exe file name> Users exe this file will get root privilege 103 chmod 2555 <exe file name> Group exe this file will get root privilege 104 lpadmin –d <prt name> To config a printer manually | -x to remove 105 lpstat –d To view the systems default printer 106 lp <file name> To give an print request 107 reject <prt name> To stop the queuing printer request 108 disable <prt name> To stop the printer 109 enable <prt name> To activate the printer 110 accept <prt name> To start the queuing printer request 111 /usr/lib/lpsched | lpshut (or) /etc/init.d/lp start | stop To start the LP printer service | To stop the LP printer service 112 lp –d <prtname> <filename> To divert your printing job to a new printer 113 lpstat –a <prt name> To view the status of the printer 114 lpmove <fault prt> <nw prt> To divert one prt job to another printer 115 at <hh:mm> |at> job |ctrl d To assign job at AT schedule| ctrl d to close 116 crontab –e |-r to remove job To assign a job in crontab – it opens a editor 117 at -l & crontab –l To view the AT and crontab content 118 ufsdump 0uf /dev/rmt/0n /dev/dsk/c#t#d#s# To perform backup | 0-full backup, uupdate{/ etc/dump dates}, 0-drive or disk number i.e for incremental, n-no rewind 119 ufsrestore rvf /dev/rmt/0 To restore the backup 120 ufsrestore i /dev/rmt/0 To view the list of files present in the tape 121 mt status |rewind |offline To view the status| To rewind | To eject 122 mt fsf count To move the tape forward count records 123 fssnap –F ufs –o bs=/var/tmp /export/home To perform a snapshot backup which usually stores at /dev/fssnap/0 124 fssnap –i To display a list of snapshot ct avail in sys. 125 prtvtoc /dev/rdsk/ct0ds2 > /<file> To store the structure of the given hard disk to an file through prtvtoc 126 fmthard –s /<file> /dev/rdsk/ct1ds2 To copy the structure from /<file> and to make available on the destiny hard disk
  • 4. Solaris Commands For SA-I & SA-II 4 Vi Editor Commands S.No Commands Functions 1 vi <file name> To open vi editor for a specific file 2 Esc h To move the cursor left - command mode 3 Esc l To move the cursor right - command mode 4 Esc j To move the cursor down - command mode 5 Esc k To move the cursor up - command mode 6 Esc i To Enter into Insertion mode 7 Esc x | 4x To delete a character | deletes 4 character 8 Esc X | 4X To delete left i.e. Back-Space 9 Esc R To over-write a character 10 Esc o To insert a line below the cursor 11 Esc O To insert a line above the cursor 12 Esc u Undo 13 Esc G To move to the last line first character 14 Esc w To move word by word right 15 Esc b To move word by word left 16 Esc H To move to the first line of the current page 17 Esc M To move to the middle of the current page 18 Esc L To move to the last line of current page 19 Esc I To move to the beginning of the line & append 20 Esc A To move to the end of the line & append 21 Esc dw To delete a word to the right 22 Esc dd To delete the current line completely 23 Esc yy To copy the current line – yanking 24 Esc p To paste the copied content 25 Esc yw To copy a word – cursor must be at the starting 26 Esc J To join two separate line 27 Esc ~ To change the case i.e. upper to lower & V- via 28 Esc : wq To save & quit a file – EX-command mode 29 Esc : wq! To save & quit a file forcibly 30 Esc : !sh To go to shell temp. & type Exit to come back 31 Esc : r! <command> To add the output into the file 32 Esc : r <file name> To add the content of <file> into the current file 33 Esc : q To quit the file without saving 34 Esc : q! To quit the file without saving – forcibly 35 Esc : w To save the file and continue working 36 Esc ZZ To save & quit the file 37 Esc : set nu To assign the number for the lines 38 Esc : set nonu To remove the assigned number for the lines 39 ctrl f Page down 40 ctrl b Page Up
  • 5. Solaris Commands For SA-I & SA-II 5 OK Prompt Commands S.No Commands Functions 1 stop a To get into OK prompt 2 stop d For extensive post diagnostics 3 stop n To set default parameter |press until kbd led flashes 4 boot cdrom To boot from cdrom 5 boot cdrom –s To boot and get into single user mode using cdrom 6 boot –r To reconfigure |config result will be at /reconfigure 7 Boot To boot through the default configuration 8 boot disk To boot via specified disk|devalias - entry must exist 9 boot –s To get into the single user mode 10 boot –a For interactive booting 11 boot –v Detailed device information to the console 12 Help To get command details at OK prompt 13 Printenv To print the environment detail 14 setenv <prm> <val> To set environment for a specific parameter 15 reset-all To save the changes and followed by reboot 16 set-defaults To set the values to the manufacturers setting 17 set-defaults <param> To set the value for a specific parameter alone 18 probe-scsi | -ide To check for internal scsi/ide status 19 probe-scsi-all |-ide-all To check for internal & external scsi/ide status 20 probe-fcall-all To check for fiber optics status 21 Devalias To view the alias name & to which its mapped 22 nvalias <alias> <add> To add the alias and its physical address to the list 23 nvunalias <alias> To remove an alias from the current list 24 show-disks To see the physical add of all drives i.e. sec storage 25 .version To view the version, Ethernet address details etc., 26 .speed To view cpu speed, bus speed, etc., 27 .enet-addr To view only the Ethernet address 28 Showdevs To view all the devices i.e. secondary storage only 29 Banner To view the ip, mac add, subnet mask etc 30 watch-net To view the status of NIC card 31 watch-net-all To view the status of NIC and network cable
  • 6. Solaris Commands For SA-I & SA-II 6 Abbreviation S.No Abbreviation Expansion – Purpose 1 Hme Network Interface Card 2 Qfe Quad Fast Ethernet 3 c0t0d0s0 Controller Target Disk Slice 4 Sparc Scalable Process Architecture 5 UFS Unix File System – for disk mgt 6 HSFS | under ufs High Sierra FS – for SCSI cdrom’s 7 PCFS | under ufs PC-DOS Formatted FS – for floopys 8 NFS | under Distributed FS Network File System – for network 9 TmpFS | under Pseudo FS Temp. FS – for avoid Overhead writing 10 SwapFS | under Pseudo FS Swap FS – for Kernel use 11 FDFS | under Pseudo FS File Descriptor FS – for explicit names 12 Explicit Name It’s the representative of Directory’s 13 ProcFS | under Pseudo FS Process FS –for currently running proc. 14 MntFS | under Pseudo FS Mount FS – for locally mounted FS Important Locations S.No Important Locations Purpose / Usage 1 /etc/profile umask value | profile during login 2 /etc/path_to_inst Physical address mapping - for kernel 3 /usr/bin/dmesg /usr/sbin/dmesg Diagnostic message will be here dmesg _ shows the content of this files 4 /etc/default/kbd kbd –I _ To initialization above file Put # before keyboard_abort=disable |this is for preventing stop A in console 5 /var/sadm/install/contents Contains details about installed packages 6 /var/spool/pkg Default location for adding a package 7 /var/sadm/pkg It has the currently installed package 8 /etc/vfstab _ Manual Entry Entries for mounting FS during booting 9 /etc/mnttab _ Auto Entry Entries for currently mounted FS 10 /var/sadm/patch It has the currently installed patches 11 /usr/bin Mostly all commands will be here 12 /var/adm/utmpx Who command reads this location Alone 13 /var/adm/wtmpx last -n command reads this location | in case root is full then clear this file. 14 /var/adm/loginlog _ create it To view the failed login attempts 15 /etc/default/su To view the switching attempts | For this remove # in console= /dev/console and put # in more /var/adm/sulog 16 /etc/default/login_ edit this file for root logging restrictions | If PASSREQ=no then null password for root If #console=/dev/console _ remote root login is allowed, if no # _ only through single machine, if console=<blankspace> then root cant be logged anywhere 17 /etc/ftpd/ftpusers Users listed here are not allowed for ftp 18 /var/spool/lp It holds the request and the print Queue 19 /var/lp/logs It holds the history of the printer jobs 20 /etc/lp It has the LP server configuration 21 /etc/hosts _ manual entry contains IP and hostnames of sys. In n/w 22 /etc/cron.d/at.deny|cron.allow To restrict users from using AT & Cron
  • 7. Solaris Commands For SA-I & SA-II 7 Hints & Purposes S.No Commands Functions 1 Host Bus Adopter All harddisk will have a common HBA 2 Max 7 Slices Only 7 slices are possible in a hard disk 3 Slice S2 – Back Up Points entire disk – cant be changed or used 4 SUNWCxall Entire Distribution with OEM support 64 bit 5 SUNWCall Entire Distri 64 bit – no 3rd party support 6 SUNWCprog Developer Sys Supp –only manuals & network 7 SUNWCuser End User Sys Supp – limited network support 8 SUNWCreg Core Sys Support – no network 9 Web Installation 1st Installation CD then 1 of 2 CD & 2 of 2 CD 10 JumpStart Installation Installing the OS through network 11 Vi Editor – 3 Modes Command, Insert and Ex-Command Mode 12 OE file system Disk based(ufs), Distributed(nfs) & Pseudo(swap) 13 File Types – 4 types Regular, directories, symbolic link & device files 14 Device naming Logical, physical(actual) & instance(kernal) name 15 Sd n | dad n For scsi | ide n-number – instance name 16 NV Ram – EEPROM Removable chip, inbuilt Lithium battery, host id 17 # before any line in a file This makes that particular line or process inactive 18 what happens during the Booting of Sun System Post, generic devi ce drivers, loads config done by admin, other default parameter, then OS files 19 Backup Superblock It resides at several areas of disk| for restoration 20 Cylinder group – size Default size is 16 cylinders per group 21 Boot block – active for ‘/’ Boot strap program resides here – 15 disk sector 22 Pointer types Direct Pointer and Indirect Pointer 23 “Minfree” Value It’s the space utilized by the operating sys in root 24 Preen During sys boot fsck runs at Non Intractive mode 25 Vol Mgr -/etc/vold.conf Automatically mounts the cdrom and floopy 26 105050-01 patch name 105050 is base code & 01 is the revision number 27 sys wide & user environ While user logs this files get executed by shell 28 Restoresymtable This is a image file of tape formed in hard disk 29 /etc/hosts It is an link to /etc/inet/hosts 30 /opt Common location for utilities and 3rd party tools 31 RSC Remote System Console |consist of serial, n/w mgt port and modem 32 LOM Light Out Management | consists of only serial port and not a part of OS. 33 ALOM Advanced LOM | Consists of serial port and a part of OS and also an n/w mgt port. 34 SCC System Controller Card | nvram data are stored here its an removable card – resp’ble for booting 35 KVM switch Keyboard Video Mouse switch |common unit 36 Part Number Identity Number 300-4250 |product-exact no/.
  • 8. Solaris Commands For SA-I & SA-II 8 Shell Sys-wide Initialization files Primary user initialization files read at login User Initialization files read when a new shell is started Shell path name Bourne /etc/profile $home/.profile /bin/sh Korn /etc/profile $home/.profile $home/.kshrc $home/.kshrc /bin/ksh C /etc/.login $home/.profile $home/.cshrc $home/.cshrc /bin/csh Default User Initialization File Shell Initialization file templates User initialization files Bourne /etc/skel/local.profile $home/.profile Korn /etc/skel/local.profile $home/.profile C /etc/skel/local.cshrc /etc/skel/local.login $home/.cshrc $home/.login Steps Involved In Restoring Root From Tape ok boot cdrom –s $ newfs /dev/rdsk/ c0t0d0s0 $ mount /dev/dsk/ c0t0d0s0 /a $ cd /a $ ufsrestore rf /dev/rmt/0 $ cd /usr/platform/”uname-m”/lib/fs/ufs $ installboot bootblk /dev/rdsk/c0t0d0s0 $ umount /a $ fsck /dev/rdsk/c0t0d0s0 usr/bin -> for all users usr/sbin -> only for root
  • 9. Solaris Commands For SA-I & SA-II 9 SUN SOLARIS SA-II S.No Abbreviation Expansion – Purpose 1 sys-unconfig _ sys restarts To get into the network config. Section 2 ifconfig –a To view ip, mac add, subnet mask,etc status 3 ifconfig hme0 <ip#> netmask <netmask#> up To assign IP address, netmask and as well as to make the network up 4 ifconfig hme0 up | down To enable network interface | disable 5 snoop <source ip> <dest. ip> To capture and inspect the network pkgs 6 rpcinfo –p | <hostname> To list the registered RPC services 7 rpcinfo –d <prog no> version | pkill-HUP inetd To delete a RPC service registration | To reactivate your service again 8 etc/init.d/init.wbem status | start | stop To view the status of the SMC service |To start service | To stop service 9 Smc To open SMC 10 smc edit To open SMC toolbox editor 11 pagesize | default is 8192 b To view the size of memory page 12 /var/sadm/smc/toolboxes/smc/ smc.tbx & /var/sadm/smc/toolboxes/ this_computer/this_computer.tbx Default location for SMC toolbar smc edit command will make effect on this two files Introduction To IP - Version IV /etc/rcS.d/S30network.sh _solaris 8|/etc/rcS.d/S30rootusr.sh _sol 7 & below During booting of sys these files get exe. This uses ifconfig utility & searches etc/hostname.xxn to identify instance |xx _ hme/nic /etc/inet/hosts _ this can be used instead of DNS, NIS, NIS+. It contains ip, hostname, nickname, comments. Starting server processes : To start and stop any event at starting During the booting of system, the inetd daemon starts few services [ like NIS, TCP-IP, DNS, etc. ] which are not automatically start at boot time. We can view the list of services that were started by inetd are at /etc/rc2.d/S72inetsvc. Apart from this file the inetd consults the /etc/inetd.conf to find the service to activate. In order to stop any event init just put # before the service in the /etc/rc2.d/S72inetsvc and then execute pkill-HUP inetd command for instant effect. Six important files responsible for the network Files Pattern of Entry (or) content in the file /etc/nodename Hostname of the server eg: bomexport /etc/hostname.xxn Hostname of the service or server /etc/inet/hosts All IP address and hostname of other servers /etc/net/ticlts/hosts Hostname of the server twice – transport layer independent /etc/net/ticots/hosts Hostname of the server twice – transport layer independent /etc/net/ticotsord/hosts Hostname of the server twice – transport layer independent Either edit these files or else give sys-unconfig in order to configure the network
  • 10. Solaris Commands For SA-I & SA-II 10 SWAP Expansion #swap –s _ to display the virtual swap area #swap –l _ to display the physical swap area Adding swap space by slice: _ create a slice of required size in hard-disk _ add the entry for that slice in /etc/vfstab for an permanent effect _ swap –a /dev/dsk/c#t#d#S# | to activate the swap space Adding swap space by file: _ #mkfile <size#> <mount point> _ #swap –a /<path of above file> | to activate the swap file _ #also add an entry in the /etc/vfstab for an permanent effect e.g: export/swapfile -- -- swap -- no -- Removing a swap space: _ #swap –d <path of swap area> _ this is to de-activate the swap area _ remove the entry from the /etc/vfstab _ delete the slice or file to free the utilized space Crash Dump #dumpadm _ its to activate the crash dump device for the fore-coming fault Procedure to read the crash message: _ cd /var/crash/”uname-n”/ -> log-into this location _ mdb unix.# vmcore.# | mdb or adb when you execute above command the prompt will change as below > |when prompt is as shown > ::status > $c > $q |to quit the prompt when there is no prompt type $p> then you will get the prompt as > NFS - Network File System _ Allows the multiple computers to use the same file, to reduce storage cost, provide data consistency & reliability. _ NFS daemon starts only when the system enters the run level 3 S.No Command Operation 1 /etc/init.d/nfs.server start | stop To start & stop the NFS service manually 2 share –F nfs –o <ro/rw> <path> To share a file for NFS service 3 mount –F nfs <hostname>: <path> <mount point> To mount the shared file 4 unshare –F nfs <path> To unshared a file from NFS service 5 shareall -F nfs To share all resources listed in /etc/dfs/dfstab 6 unshareall –F nfs To un-share all resources listed as above 7 dfshares –F nfs <host> To display the currently shared NFS 8 dfmounts -F nfs <host> To display the NFS mounted resources 9 mountall -r -F nfs To mount all remote file resources 10 umountall -r -F nfs To un-mount all remote file resources S.No Command Operation 1 /etc/dfs/dfstab Local resources that as to share at boot time 2 /etc/dfs/sharetab Currently shared local resources – auto entry 3 /etc/dfs/fstypes Default file-system for remote file system 4 /etc/rmtab FS that remotely mounted by NFS – auto entry 5 /etc/dfs/nfslog.conf NFS logging configuration file 6 /etc/default/nfslogd Configuration files for the nfslogd daemon
  • 11. Solaris Commands For SA-I & SA-II 11 Syslog functions - configuring system messaging The syslogd daemon and the input from /etc/syslog.conf files work together to facilitate the syslog messaging for the OE It can write message to the system log , centralized log host , messaging a user or at the system console. For this put the entry in /etc/syslog.conf file. The entries are the type of error [ i.e. user.err ] and the action field [ i.e. /filename _ the target file, @host _ for specific host, user _ for specific user, * _ for all logged in users ] Daemons involved: /etc/rc2.d/S74 syslog # /etc/init.d/syslog start | stop _ this is to start and stop the daemon. Auto FS _ It provides an automatic mounting using NFS protocol _ Its an client side service Components of auto-mount facility: Auto FS file system, Auto-mountd daemon, Auto-mount command , Auto FS file system mount-point is defined in the auto-mount maps on the client system. Configuring Master Map: For all types of auto sharing methods the entry must be here. Hence this remains the base entry for all sharing methods. Edit /etc/auto_master ----------------------entries------------------- +auto_master # +_ indicates that consider automountd daemon /home auto_home -browse, (or) -nobrowse <mount point> <map name> <mount options> #- browse _ allow the users to view the mount-point -------------------------------------------------- #automount _ reactivate the above file again Then shared resources get mounted below the /home/<auto_home – file mount point> Direct map entries: This map is only for general directory’s, and common sharing files (eg: softwares). In case 1 server is down then it can be get from other. Edit /etc/auto_direct ----------------------entries------------------- /usr/share/man -ro, soft ser1, ser2, ser3:/usr/share/man <local mnt pt> <permission> <hostname>:<path> #/- auto_direct -ro _ this entry in auto_master -------------------------------------------------- #automount _ reactivate the above file again Indirect Map Entries: This mapping is for user home directories and for their files. Edit /etc/auto_home ----------------------entries------------------- magi server_primary:/export/home/babu <local mnt pt> <hostname>:<home dir path> #/home auto_home -nobrowse _ this entry in auto_master -------------------------------------------------- procedure: _ Create the account for the user in both the servers with same UID & GID _ Put the entry for auto_home as shown above for a desired user e.g. babu _ # passwd –h babu | in secondary server (/export/home/babu)? /home/magi | change the home dir as desired _ # cd /home/magi |in sec server to enter into the pri servers home dir. After all this files are edited just type #automount -t <time#> -v this is to activate the desired mountpoint. If time is mentioned in –t then upto that time the FS remains mounted when its not in use.
  • 12. Solaris Commands For SA-I & SA-II 12 After all this files are edited just type #automount -t <time#> -v this is to activate the desired mountpoint. If time is mentioned in –t then upto that time the FS remains mounted when its not in use. RBAC - Role Based Access Control This is to assign a specific role for a specific user. For these process four files comes into picture. They are /etc/user_attr /etc/security/prof_attr /etc/security/exec_attr /etc/security/auth_attr Example: assign a role of shut down , for a specific user _ #roleadd –u 500 –g 10 –m –d /export/home/role_shut role_shut _ create a role named roleshut _ vi /etc/security/prof_attr profile_shut ::: able to shutdown the system_comment: |creating profile _ # rolemod -P profile_shut , all role_shut |adding profile to the role _ verify that the role is included in the etc/user_attr _ #useradd -u 200 -g 10 –m –d /export/home/user_shut –R role_shut user_shut | this is to create a user and assigning the desired role _ #passwd user_shut _ #grep user_shut /etc/user_attr | to check the role attribute for the user _ #vi /etc/security/exec_attr profile_shut : suser : cmd : : : /usr/sbin/shutdown : uid=0 |bold area is the location of the shutdown command this must be searched manually and entered here. | This is to assign the shutdown command to the profile. This is how to assign a role for a specific user . How the user shutdown the system using this role: _ first login as the user _ $profiles | this is to list the various RBAC profiles that he associated _ $role | this is to list the various roles that he associated _ $su role_shut _ $/usr/sbin/shutdown –i 5 –g 0 |now the system will go down Name Server Name service switching files Location Local files /etc/nsswitch.files DNS /etc/nsswitch.dns NIS /etc/nsswitch.nis NIS+ /etc/nsswitch.nisplus LDAP /etc/nsswitch.ldap DNS & LDAP DNS and LDAP configuration were similar to NIS only service activation command and configuration files vary. #ldapclient _ for ldap client activation |#ldapclient uninit_ un-configure ldap.
  • 13. Solaris Commands For SA-I & SA-II 13 NIS The NIS maps are located at /var/yp/domainname/<host>.byname.pag |& .dir Similarly /var/yp/domainname/<host>.byaddr.pag |& .dir Daemons used: ypserv, ypbind, rpc.yppasswdd, ypxfrd, rpc.updated All five are utilized by server and only first two by clients. Through NIS service a centralized user- account can be provided. Configuring a machine as the NIS master server : _ #cp /etc/nsswitch.nis / etc/nsswitch.conf _ #domainname accel.com _ #touch /etc/defaultdomain _ #domainname > /etc/defaultdomain _ #cd /etc _ #touch ethers bootparams locale timezone netgroup netmasks _ #ypinit -m _ To initialize the master server _ #/usr/lib/netsvc/yp/ypstart _ To start the NIS daemons Configuring a machine as the NIS client : The steps were same as above but instead of ypinit –m give ypinit –c to start client service and also put the server IP entry in the /etc/hosts. ACL - Access Control List It provides greater data access control for each file. Permission for a specific user is also possible using ACL. Syntax: setfacl {entry type : UID or GID : permission } owner [u] user name R,W,X group [g] group name other [o] uid/gid Command Usage getfacl < file name > To see the present FACL entry setfacl –s <new entry> <existing file> setfacl –s u::rwx,g::rw-,o::r--,m:7 file1 To set a permission for existing file | m_ to set mask value getfacl file1 | setfacl –f – file2 Copies file permission from f1-f2 setfacl –d u:root:7 file1 To delete an entry from a file setfacl –m u:root:7 file1 Adding one by one entry in a file setfacl -r -m u:user:7 file1 rewrites mask in accordance to user Root Mirroring _ create a slice of 50mb for state database ||let it be slice 7 i.e. s7 _ #prtvtoc /dev/rdsk/c0t0d0s2 | fmthard –s - /dev/rdsk/c#t#d0s2 _ #metadb -afc3 c0t0d0s7 c0t#d0s7 c#t#d0s7 || To create 3 replicas in each state db | 3 hard-disk because (n/2)+1 replicas _ #metadb -i ||To check for status _ #metainit -f d10 1 1 c0t0d0s0 ||To create primary sub-mirror _ #metastat _ #metainit -f d20 1 1 c0t#d0s0 ||To create secondary sub-mirror _ #metainit d50 -m d10 || mapping to main mirror _ #metaroot d50 ||To put an auto entry in vfs tab _ reboot the system now # init 6 _ #metattach d50 d20 ||resynchronization starts now Replacing the defective disk in case of failure : # metareplace <defective disk c#t#d#s#> <newly attached disk c#t#d#s#> Breaking the Mirror : _ #metadetach d50 d20 ||breaking secondary sub-mirror _ #metaroot /dev/dsk/c0t0d0s0 ||role-back the vfs entry _ #init 6 _ #metaclear -r d50 ||removing main mirror _ #metaclear d20 ||removing secondary mirror _ #metadb -d -f c0t0d0s7 c0t#d0s7 c#t#d0s7 ||removing the replicas
  • 14. Solaris Commands For SA-I & SA-II 14 Hot Spare with Mirror Meta Device It’s not applicable for mounted file system i.e. for root. Consider c1 and c2 are the two disks for this c3 be the hot spare let it be the scenario. In this if c1 & c2 are in mirror if any one goes down then c3 will come into picture. _ create a slice of 50mb for state database ||let it be slice 7 i.e. s7 _ #metadb -afc3 c1t0d0s7 c2t0d0s7 c3t0d0s7 || To create 3 replicas _ #metahs -hsp001 c3t0d0s1 ||To create the hot spare _ #metainit d13 1 1 c1t0d0s1 ||To create primary sub-mirror _ #metainit d23 1 1 c2t0d0s1 ||To create secondary sub-mirror _ #metaparam -h hsp001 d13 ||Assigning hot spare to sub-mirror _ #metaparam -h hsp001 d23 ||Assigning hot spare to sub-mirror _ #metainit d150 -m d13 ||Mapping to main mirror _ #metattach d150 d23 ||To synchronize the sub mirrors _ #newfs /dev/md/rdsk/d150 ||Making new file system _ #mkdir /mirror ||Create a directory for mounting _ #mount /dev/md/rdsk/d150 /mirror ||mount the partition Let us consider c2 goes down in above scenario so hot spare (c3) will be there in the role or c2 then replace the disk c2 by new one and follow the procedure _ #metareplace -e d150 c2t0d0s1 ||To switch back hard-disk from c3 to c2 _ #metahs -e c3t0d0s4 || To re-enable the hot-spare c3 once again RAID – 5 With Hot Spare Let c1, c2 & c3 be the 3 disk in which s1 of all disk are under raid-5. The s3 of disk c2 & c3 be the hot-spare which acts during the failure of s1. Let it be the scenario. _ create a slice of 50mb for state database ||let it be slice 7 i.e. s7 _ #metadb -afc2 c1t0d0s7 c2t0d0s7 c3t0d0s7 || To create 2 replicas _ #metahs -a -hsp009 c2t0d0s3 c3t0d0s3 ||To create the hot spare _ #metainit d101 -r c1t0d0s1 c2t0d0s1 c3t0d0s1 _ #metaparam -h hsp009 d101 _ #newfs /dev/md/dsk/d101 ||Making new file system _ #mkdir /raid5dir ||Create a directory for mounting _ #mount /dev/md/rdsk/d101 /raid5dir ||mount the partition In case if any disk fails & hot-spare comes into picture then replace the disk, then _ #metareplace -e d <the disk that has replaced c#t#d#s#> _ #metahs -e <hot spare disk that has to be reactivated c#t#d#s#> Disk Set -- adding Soft Slices Maximum of 128 soft slices can be created in a disk set. To change the default number of soft slice edit “md.conf” & then change the value to “nmd=128” Steps Involved in creating a soft slice : _ metaset -s <share name> -a c#t1d# c#t3d#| adding share name for storage _ metaset -s <share name> -a -h <node name>|assigning system to storage _ metaset -s <share name> <replica_d500> 1 1 /dev/dsk/ c#t1d#s#|replica _ metaset -s <share name> <replica_d501> 1 1 /dev/dsk/ c#t3d#s#|replica _ newfs /dev/md/<share name>/rdsk/<d500> | similarly for d501 _ metainit -s <share name> <soft_slice_d555> -p <d500> <size_gb>| only this command is for the soft slice rest is only to create a disk-set. Steps Involved in creating a Disk-Set : Repeat the above steps one by one the only changes are add the another servers node name also at the end of second command. If soft slice required then provide the last command or else leave it. When the control of diskset is need by the other node server the type this system from the system which is requesting for service, # metaset -s <share name> -r |this is for request # metaset -s <share name> -t |this is when the another node is down # metaset -s <share name> -t -f |takes the control forcibly this can be given when the next system is up but after this the main node will go to a panic state
  • 15. Solaris Commands For SA-I & SA-II 15 Steps Jump Start Installation 1 Configure the NIS master sever first #cp /etc/nsswitch.nis / etc/nsswitch.conf #domainname accel.com #touch /etc/defaultdomain #domainname > /etc/defaultdomain #cd /etc #touch ethers bootparams locale timezone netgroup netmasks #ypinit -m -> To initialize the master server #/usr/lib/netsvc/yp/ypstart -> To start the NIS daemons 2 Edit /etc/ethers and add the following entries #vi /etc/ethers --------------------entry--------------------- < MAC add of destination sys_8:0:20:95:f0:d0:> <server host name> ------------------------------------------------- 3 Edit /etc/hosts and add the following entries #vi /etc/hosts --------------------entry--------------------- 200.100.50.1 accel.com loghost timehost 200.100.50.2 <host name> 200.100.50.3 <host name> ------------------------------------------------- 4 Edit /etc/netmasks and add the following entries #vi /etc/netmasks --------------------entry--------------------- 200.100.50.0 255.255.255.0 ------------------------------------------------- 5 Edit /etc/timezone and add the following entries #vi /etc/timezone --------------------entry--------------------- US/mountain accel.com ------------------------------------------------- 6 Edit /etc/locale and add the following entries #vi /etc/locale --------------------entry--------------------- accel.com en-us ------------------------------------------------- 7 Update the NIS maps #cd /var/yp #usr/ccs/bin/make 8 #mkdir /jump ||create a directory to copy jump start files – size 2gb 9 Insert Solaris CD - 1/2 #cd /cdrom/cdrom0/s0/Solaris_8/Tools #./setup_install_server /jump 10 Insert Solaris CD - 2/2 #cd /cdrom/cdrom0/Solaris_8/Tools #./setup_install_server /jump 11 Copy the sample jumpstart scripts from Solaris CD – 1/2 to /jump #cd /cdrom/cdrom0/s0/Solaris_8/Misc/jumpstart_sample #cp -r * /jump 12 Create system identification details #cd /jump #mkdir sysidcfg-dir #cd sysidcfg-dir #mkdir <hostname of system to which we have to run jump start>
  • 16. Solaris Commands For SA-I & SA-II 16 #cd <hostname of system to which we have to run jump start> #vi sysidcfg -------------------------entries----------------------------- system_locale=en_US timezone=US/Central terminal=xterms name_service=NONE timeservice=<servers IP 200.100.50.1> security_policy=NONE network_interface=hme0 {hostname=<host name of destination> ip_address=<destini IP> netmask=<destini mask> protocol_ipv6=no} ----------------------------------------------------------- 13 Create the profile file # cd /jump # vi .profile --------------------------entry---------------------------- install_type initial_install system_type server partitioning explicit filesys c0t0d0s0 3000 / filesys c0t0d0s1 750 swap (note: you can create other slices if required) geo N_America cluster SUNWCall (entire distribution) (optional: you can add additional packages if required using the command: package <packagename> add ----------------------------------------------------------- 14 Add the entry in rules file # cd /jump # vi rules -------------------------entry----------------------------- any - - .profile – ----------------------------------------------------------- 15 Validate the rules.ok file # ./check 16 Add the client # cd /jump/Solaris_8/Tools # ./add_install_client –c <destination server hostname>:/jump –p <destination server hostname>:/jump/sysidcfg-dir/e450 e450 sun4u 17 Edit the /etc/dfs/dfstab file # vi /etc/dfs/dfstab -------------------------entry----------------------------- share –F nfs –o ro,anon=0 /jump ----------------------------------------------------------- 18 Update the NIS maps once again # cd /var/yp # /usr/ccs/bin/make 19 19. To start the jumpstart installation Go to destination server and from there you just give the following command form OK: prompt 20 Ok : boot net – install
  • 17. Solaris Commands For SA-I & SA-II 17 Remote Access Put a “+” or “user name” in the “.rhost” file at home directory or else in /etc location so that users from other system can login to the local system remotely. Command Function rcp <host name>:<path> <destiny> Remote copy rlogin Remote login lllar to telnet rsh <host name> mt staus To utilize the other system h/w |tape Hints Purpose Well-known ports Ranges upto 1024 _ located at /etc/inet/services Dynamic ports From 1025 to 65535_ at /etc/inet/services Veritas Volume Manager Installation : Insert Veritas cd & goto the package location and give pkgadd –d . ,after adding the package just give #vxinstall this is to start installation of the veritas. Then it will ask few question give appropriate answer for it. At any-cost don’t do the encapsulation this process is to add the root hard disk under veritas. Daemons Used : vxconfigd , vxiod – i/o operation, vxrelocd – hot relocation Disk Group : Collection of physical disk which were under veritas Volume (V) : Collection of disk is said to be as a volume. Plux (Pl) : Volumes were subdivided into pluxes. Maximum 32 plux in a volume & at least 1 plux per volume. Subdisk (Sd) : Each and ever Plux is subdivided into a subdisk. All subdisk within a volume must fall under a same Disk Group. Commands Functions Vxprint To view the status of VxVM Vxdiskadm To view the Vx menu |press q – quit vxassist make <con1> <size> newfs /dev/vx/rdsk/<con1> To create concatenation | con1 is the name of concate | mount & use it vxvol stop <con1> vxedit -rf rm <con1> To remove the concatenation |-rf rm – remove forcibely, remove volume. vxassist make <str1> <size> layout=stripe To create stripe of desired size | run newfs and mount the device vxvol stop <str1> vxedit -rf rm <str1> To remove the stripe |-rf rm – remove forcibely, remove volume. vxassist mirror rootvol vxassist mirror swapvol To create root mirror|don’t run newfs |run encapsulation here – vxdiskadm vxplex -o –rm dis <rootvol-02> vxplex -o –rm dis <swapvol-02> /etc/vx/bin/vxunroot To break the root mirror | don’t give <rootvol-01> at any-cost it will crash the system vxassist make <mirror> <size> layout=mirror To create a data mirror | run newfs and mount the device vxvol stop <mirror> vxplex -o –rm dis <mirror> To break the data mirror vxassist make <raid5> <size> layout=raid5 To create disk space for Raid 5 vxvol stop <raid5> vxplex -o –rm dis <raid5> To break the Raid 5 vxdctl stop vxiod -f set0 init 6 To stop the VxVm daemon To terminate the i/o operation Restart & uninstall veritas using cd
  • 18. Solaris Commands For SA-I & SA-II 18 SUN CLUSTER Required Components: Terminal Concentrator, Cluster host, Storage array, Public network, Administrative workstation – sun cluster console software SUNWccon It won’t support multiple connections from a same server to a single storage box. Topologies: Clustered Pair Topology, N+1 Topology, Pair + N topology. Clustered Pair Topology : If two are more pairs of nodes operating under a single cluster administrative framework. In this the Nodes are configured in pairs-two, four, six or eight nodes N+1 Topology : This is providing one system to act as the back-up for the other system in the group. Pair + N topology : It is adding or including a pair of cluster in an existing cluster pair only for the purpose of storage sharing. In this there is no direct connection between them. NOTE: Once cluster is installed the init command won’t work to shutdown the system use # scshutdown -y g <grace period in minuter ##> Configuration steps of sun cluster 3.0 Steps involved : _ Install Disk Suit _ Change SCSI Initiator ID _ Initial Installation - Sun Cluster Software Installation _ Configuring Quorum device _ Disk Set using Disk Suit _ Data Service Configuration Changing SCSI Initiator ID : { do this steps only in any one server node } Ok: probe-scsi-all | To view the physical disk path of the hard disk | note this for disk set Ok: nvedit 0: probe-all install-console banner 1: cd < physical path or external hard disk_@1f,2000/scsi@1> 2: 6 “ scsi-initiator-id” integer-property 3: device-end 4: cd < physical path or external hard disk_@1f,2000/scsi@1> 5: 6 “ scsi-initiator-id” integer-property 6: device-end 7: banner < to save press ctrl c > Ok: nvstore Ok: setenv use-nvramrc? true Ok: setenv auto-boot? true Ok: reset-all Ok: cd < physical path or external hard disk_@1f,2000/scsi@1> Ok: .properties | This is to view the changed SCSI initiator ID Creating Slices : { do this step in all the servers/nodes } For an sun cluster 4 slices are important they are root, swap, /globaldevices, 50mb for replica. Edit /etc/host : { do this step in all the servers/nodes } -----------------------entry----------------------- <server ip address> <host name> <server ip address> <host name> <service/logical ip address> <service/logical name_nfs-server> | its virtual IP ---------------------------------------------------- Assigning Logical or Virtual IP Address For the Service : { do in all servers/nodes } # ifconfig hme0:1 plumb # ifconfig hme0:1 <service ip address> netmask <netmask> up # init6 | restart all the nodes in a same instant Cluster Installation : { do in all servers/nodes } # cd /cdrom/cdrom0/SunCluster_3.0/Tools
  • 19. Solaris Commands For SA-I & SA-II 19 # ./scinstall | A installation menu will appear in that provide all the details Create and Edit /.rhosts : { do in all servers/nodes } -----------------------entry----------------------- <server’s node name> <server’s node name> ---------------------------------------------------- (or) Add root users to the sysadmin group i.e. /etc/group { do in all servers/nodes } Entry : sysadmin::14::root | add this entry in /etc/group Install the required patches such as 110648-33,111488-08,112108-07and Restart Edit /etc/profile : add following entry { do in all servers/nodes } -----------------------entry----------------------- PATH=/usr/bin::/usr/sbin::/usr/cluster/bin export PATH MANPATH=/usr/cluster/man export MANPATH ---------------------------------------------------- Configure the Quorum Device : { do in any one servers/node } | for voting purpose # scdidadm -L | to see the DID instance name on the storage box # scsetup continue (y/n) :y Quorum device : <DID instance name> Add another quorum device (y/n) :n Reset installmode (y/n) :y Or # scconf -a -q globaldev=d9 # scconf -c -q reset # scstat -q | to see status Disk Set Configuration Steps : { do in all servers/node } Install Disk Suit from Solaris 2 of 2 CD and then create state db replica. # metaset -s <disk set name> -a -h <host name_ser1> <host name_ser2> # metaset -s <disk set name> -a /dev/did/rdisk/<DID instance name> Creating Concate / Stribes : { do in all servers/node } # metainit -s <disk set name> <d99> 1 1 /dev/did/rdsk/<DID instance name>s0 # newfs /dev/md/<disk set name>/rdsk/<d99> # mkdir /global/nfs # mount -g /dev/md/<disk set name>/dsk/<d99> /global/nfs Edit /etc/vfstab : for permanent entry { do in all servers/node } /dev/md/<disk set name>/dsk/<d99> /dev/md/<disk set name>/rdsk/<d99> /global/nfs ufs 2 yes global,logging | 2 is for no-run fsck at boot NAFO – Network Adaptor Fail Over - for public n/w management In case of failure of the network adaptor which is responsible for public network then due to this also the public can’t able to access the server, in order to avoid that we can provide a standby adaptor and that has to be configured in NAFO to take charge. # pnmstat -l | To view the status # pnmset | To creat NAFO continue (y/n) :y Number NAFO backup groups : 1 Group Number :0 | i.e nafo0 Enter adaptor names : <hme0 hme1>
  • 20. Solaris Commands For SA-I & SA-II 20 Data Service Configuration : Services like apache, oracle, dns, iws etc., Insert sun cluster 2nd CD & give ./scinstall and then choose 4 for adding support for data service. In case of nfs select it and quit and then add required patched for the service eg. 111555- 07 and then restart the system by scshutdown -y -g0 Resource Group Manager (RGM) : { do in any one servers/node } Responsible for controlling the starting and stoping of resource group on selected nodes of the cluster. # cd /global/nfs # mkdir admin data # cd admin # mkdir SUNW.nfs # cd SUNW.nfs # touch dfstab.<resource group name> # chmod 777 /global/nfs/data Edit dfstab.<resource group name> -----------------------entry----------------------- share -F nfs -o rw /global/nfs/data ---------------------------------------------------- Register the Appropriate Resource type (NFS) : # scrgadm -a -t SUNW.nfs # scrgadm -a -g <resource group name_nfs-server-rg> -h <all node name> -y path prefix=/global/nfs/admin # scrgadm -a -L -j <resource name_ nfs-server-rf> -g < resource group name_nfsserver- rg > -l <logical add_nfs-server> # scrgadm -a -j <resource name_ nfs-server-rf> -g < resource group name_nfs-server-rg > -t SUNW.nfs Enabling & Bringing Resources Online : # scswitch -Z -g nfs-server-rg # scrgadm -a -L -g < resource group name_nfs-server-rg > -l <logical name_nfs-server> -n <nafo0@e450, nafo1@e250> | To associate pubic n/w mgt with resource group Disabling nfs resources : # scswitch -n -M -j <resource name_ nfs-server-rf> Enabling nfs resources : # scswitch -e -M -j <resource name_ nfs-server-rf> # scstat -g | To view the status # scrgadm -p | To view the resource type, group, installed resources etc., In Client Side : _ Create a mount point # mkdir suncluster _ Mount the directory # mount <logical host_nfs-server>:/global/nfs/data/suncluster _ Edit /etc/hosts _ entry is <logical ip address> <logical name> To Manually switch the service from one node to the another : # scswitch -z -h <node which has to made active> -g <resource group name>
  • 21. Solaris Commands For SA-I & SA-II 21 FLASH Installation Flash installation is getting and saving the network configuration & setting of your system to an existing extra disk. In case of any failure in your system you put the extra disk in some other machine and restore the configuration by locating it while reinstallation of OS on your system. #flarcreate -n <archive_name> -a <author name> -R / -x </var/tmp> </flashdisk/file.archive – path in the destiny disk> _ To create a flash archive. Installing Explorer & Getting Explorer Output _ Get the SUNWexplo from CD or online _ Install it by placing it in /opt location _ To get the explorer output goto /opt/SUNWexplo/bin & give explorer -i _ Then output of explorer will be in the same location or in output directory. The file name will be explorer.<host id>.<hostname>-<date>.tar.gz _ If you want to read the content execute suncheckup for further details.