SlideShare una empresa de Scribd logo
1 de 8
Using Technologies on Photoshop
  A step by step guide showing how I used the Technologies to
             achieve professional looking products.
Step One:
The first step was to open my Image in
Adobe Photoshop. I used Photoshop as it
contains a variety of facilities for me to edit
my picture. I have used Photoshop before,
therefore I understood how to remove the
green background and manipulate the
Image into looking professional and
appropriate for my Ancillaries.

I chose to use this Photo of Cason as he is
looking directly into the camera, giving the
reader direct address. The shot is a Medium
Close up which is perfect for the Front
Cover of my Magazine. The image is clear
and the lighting is also good.
Step Two:
The second step was for me to click on the
Background Eraser Tool (Highlighted in
blue) in order to remove the green
background off my star.
I then changed the settings at the top
(Highlighted in red) I changed the brush
size to a medium size 40, as this was small
enough for me to use around his hair. I also
changed the Tolerance to 30% meaning the
when I ran the eraser around my star, the
green background would be removed,
however his hair and t-shirt would stay. I
found that this was the easiest and most
professional way for the background to be
removed.
Step Three:
Continuing from Step Two; I zoomed in on
my star (Highlighted in blue) in order to get
a better view of the area that I was erasing.
I held down the left mouse button and
slowly started to erase any green
background. I traced around all of my star
until I was happy with the result.


                       After erasing all
                       the green from
                       around my star,
                       this was the
                       finished result
                       for this step.
Step Four:
Step Four was to finish off removing the
green background. As shown in Step Three,
I traced around my star using the
Background Eraser Tool. I then clicked on
the Magic Eraser Tool (Highlighted in blue)
in order to remove the remaining
background. On Photoshop, the checker
background behind the star means that if
you then copy this image onto Publisher,
the background will be transparent.
Step Five:
As you can see on the image, there is a
fuzzy brown line around Cason’s hair. Step
Five shows how I removed this. Firstly I
locked in the Transparent pixels so that
nothing else moved (Highlighted in red). I
clicked onto the Paintbrush (Highlighted in
purple) in order to have a precise
application. I had to change the top settings
(Highlighted in yellow) I changed the brush
size to 65, in order to cover a large surface
area. I also changed the mode (Highlighted
in blue) to ‘Color’ in order to just remove
the brown fuzziness.
Step Six:
Once Step Five was completed, I had to
remove the small patches of green behind
Cason’s hair. To do this, I firstly selected the
smaller Paintbrush (Highlighted in orange).
I clicked the left button on my mouse onto
Cason’s hair in order to mimic his hair
colour (Colour highlighted in blue) This
would then change the green to a dark
brown. This made my image look a lot
more professional.
Step Seven:
The last step was for me to remove any
redness off Cason’s face. I selected the
Plaster and then the Healing Brush
(Highlighted in blue) in order to get Cason’s
skin matching. I did this because it is a
convention of the Made in Chelsea stars to
have ‘perfect’ looking skin. (Shown below).

Más contenido relacionado

La actualidad más candente (17)

Lighting roles
Lighting rolesLighting roles
Lighting roles
 
Photoshop b&a
Photoshop b&aPhotoshop b&a
Photoshop b&a
 
Creating a poster graphic
Creating a poster graphicCreating a poster graphic
Creating a poster graphic
 
Using photoshop
Using photoshop Using photoshop
Using photoshop
 
Lemon mix up
Lemon mix upLemon mix up
Lemon mix up
 
Annatation 5
Annatation 5Annatation 5
Annatation 5
 
Photoshop steps
Photoshop stepsPhotoshop steps
Photoshop steps
 
Photoshop
PhotoshopPhotoshop
Photoshop
 
Poster
Poster Poster
Poster
 
Photoshop- what I've learbed
Photoshop- what I've learbedPhotoshop- what I've learbed
Photoshop- what I've learbed
 
Image Manipulation
Image ManipulationImage Manipulation
Image Manipulation
 
Dps photo manip
Dps photo manipDps photo manip
Dps photo manip
 
Creating a new drawing1
Creating a new drawing1Creating a new drawing1
Creating a new drawing1
 
Film poster drafts
Film poster draftsFilm poster drafts
Film poster drafts
 
Laser eyes
Laser eyesLaser eyes
Laser eyes
 
Green screen
Green screenGreen screen
Green screen
 
Editing
Editing Editing
Editing
 

Similar a Using Photoshop

Music mag con photoshop
Music mag con photoshopMusic mag con photoshop
Music mag con photoshop
Charlene
 
Editing final poster - step by step
Editing final poster - step by step Editing final poster - step by step
Editing final poster - step by step
rachh456
 
Photography club part 4
Photography club part 4Photography club part 4
Photography club part 4
BeigeBanana
 
Presenting my edited photographs
Presenting my edited photographsPresenting my edited photographs
Presenting my edited photographs
alexjr1996
 
Presenting my edited photographs
Presenting my edited photographsPresenting my edited photographs
Presenting my edited photographs
codheadshotx12
 
How I Edited My Images
How I Edited My ImagesHow I Edited My Images
How I Edited My Images
luciejm
 
How i created my front cover
How i created my front coverHow i created my front cover
How i created my front cover
8060media
 
3. FMP Production Experiments
3. FMP Production Experiments3. FMP Production Experiments
3. FMP Production Experiments
georgewetton1
 

Similar a Using Photoshop (20)

Music mag con photoshop
Music mag con photoshopMusic mag con photoshop
Music mag con photoshop
 
Question 6
Question 6Question 6
Question 6
 
Print screen for contents
Print screen for contentsPrint screen for contents
Print screen for contents
 
Editing final poster - step by step
Editing final poster - step by step Editing final poster - step by step
Editing final poster - step by step
 
Tutorials
TutorialsTutorials
Tutorials
 
How To Replace Color In Photoshop
How To Replace Color In PhotoshopHow To Replace Color In Photoshop
How To Replace Color In Photoshop
 
How I Used Photoshop for my A2 Media
How I Used Photoshop for my A2 MediaHow I Used Photoshop for my A2 Media
How I Used Photoshop for my A2 Media
 
Photography club part 4
Photography club part 4Photography club part 4
Photography club part 4
 
How to Make a Gradient in Photoshop
How to Make a Gradient in PhotoshopHow to Make a Gradient in Photoshop
How to Make a Gradient in Photoshop
 
How to Create Simple Manipulation Using Lighting Effects
How to Create Simple Manipulation Using Lighting EffectsHow to Create Simple Manipulation Using Lighting Effects
How to Create Simple Manipulation Using Lighting Effects
 
Advert 2 creation
Advert 2 creationAdvert 2 creation
Advert 2 creation
 
Advert 2- online advert creation process
Advert 2- online advert creation processAdvert 2- online advert creation process
Advert 2- online advert creation process
 
Changing eye colour in photoshop
 Changing eye colour in photoshop Changing eye colour in photoshop
Changing eye colour in photoshop
 
Presenting my edited photographs
Presenting my edited photographsPresenting my edited photographs
Presenting my edited photographs
 
Presenting my edited photographs
Presenting my edited photographsPresenting my edited photographs
Presenting my edited photographs
 
How I Edited My Images
How I Edited My ImagesHow I Edited My Images
How I Edited My Images
 
Eval Q4 Photoshop
Eval Q4 PhotoshopEval Q4 Photoshop
Eval Q4 Photoshop
 
How i created my front cover
How i created my front coverHow i created my front cover
How i created my front cover
 
3. FMP Production Experiments
3. FMP Production Experiments3. FMP Production Experiments
3. FMP Production Experiments
 
Image manipulation advert hair dye
Image manipulation advert hair dyeImage manipulation advert hair dye
Image manipulation advert hair dye
 

Más de KateWigley

Lynching PowerPoint
Lynching PowerPointLynching PowerPoint
Lynching PowerPoint
KateWigley
 
Question One - Billboard Comparison
Question One - Billboard ComparisonQuestion One - Billboard Comparison
Question One - Billboard Comparison
KateWigley
 
Question One - Magazine Comparison
Question One - Magazine ComparisonQuestion One - Magazine Comparison
Question One - Magazine Comparison
KateWigley
 
Question One - Use, Develop or Challenge Powerpoint
Question One - Use, Develop or Challenge PowerpointQuestion One - Use, Develop or Challenge Powerpoint
Question One - Use, Develop or Challenge Powerpoint
KateWigley
 
Codes + Conventions
Codes + ConventionsCodes + Conventions
Codes + Conventions
KateWigley
 
Codes + Conventions
Codes + ConventionsCodes + Conventions
Codes + Conventions
KateWigley
 
Unwanted BillBoard Images
Unwanted BillBoard ImagesUnwanted BillBoard Images
Unwanted BillBoard Images
KateWigley
 
Creating my Title Cards
Creating my Title CardsCreating my Title Cards
Creating my Title Cards
KateWigley
 
Social Realism
Social RealismSocial Realism
Social Realism
KateWigley
 
Australian Soaps
Australian SoapsAustralian Soaps
Australian Soaps
KateWigley
 
TOWIE - Storyboard (3)
TOWIE - Storyboard (3)TOWIE - Storyboard (3)
TOWIE - Storyboard (3)
KateWigley
 
TOWE - Storyboard (2)
TOWE - Storyboard (2)TOWE - Storyboard (2)
TOWE - Storyboard (2)
KateWigley
 
TOWIE - Storyboard (1)
TOWIE - Storyboard (1)TOWIE - Storyboard (1)
TOWIE - Storyboard (1)
KateWigley
 
Kate & Grace - Melodrama Presentation
Kate & Grace - Melodrama PresentationKate & Grace - Melodrama Presentation
Kate & Grace - Melodrama Presentation
KateWigley
 

Más de KateWigley (20)

Lynching PowerPoint
Lynching PowerPointLynching PowerPoint
Lynching PowerPoint
 
Question One - Billboard Comparison
Question One - Billboard ComparisonQuestion One - Billboard Comparison
Question One - Billboard Comparison
 
Question One - Magazine Comparison
Question One - Magazine ComparisonQuestion One - Magazine Comparison
Question One - Magazine Comparison
 
Question One - Use, Develop or Challenge Powerpoint
Question One - Use, Develop or Challenge PowerpointQuestion One - Use, Develop or Challenge Powerpoint
Question One - Use, Develop or Challenge Powerpoint
 
Codes + Conventions
Codes + ConventionsCodes + Conventions
Codes + Conventions
 
Codes + Conventions
Codes + ConventionsCodes + Conventions
Codes + Conventions
 
Unwanted BillBoard Images
Unwanted BillBoard ImagesUnwanted BillBoard Images
Unwanted BillBoard Images
 
Creating my Title Cards
Creating my Title CardsCreating my Title Cards
Creating my Title Cards
 
Social Realism
Social RealismSocial Realism
Social Realism
 
Melodrama
MelodramaMelodrama
Melodrama
 
Australian Soaps
Australian SoapsAustralian Soaps
Australian Soaps
 
Telenovelas
TelenovelasTelenovelas
Telenovelas
 
TOWIE - Storyboard (3)
TOWIE - Storyboard (3)TOWIE - Storyboard (3)
TOWIE - Storyboard (3)
 
TOWE - Storyboard (2)
TOWE - Storyboard (2)TOWE - Storyboard (2)
TOWE - Storyboard (2)
 
TOWIE - Storyboard (1)
TOWIE - Storyboard (1)TOWIE - Storyboard (1)
TOWIE - Storyboard (1)
 
Sub-Genre - Melodrama
Sub-Genre - MelodramaSub-Genre - Melodrama
Sub-Genre - Melodrama
 
Kate & Grace - Melodrama Presentation
Kate & Grace - Melodrama PresentationKate & Grace - Melodrama Presentation
Kate & Grace - Melodrama Presentation
 
Telenovelas
TelenovelasTelenovelas
Telenovelas
 
Realism
RealismRealism
Realism
 
Melodrama
MelodramaMelodrama
Melodrama
 

Último

BASLIQ CURRENT LOOKBOOK LOOKBOOK(1) (1).pdf
BASLIQ CURRENT LOOKBOOK  LOOKBOOK(1) (1).pdfBASLIQ CURRENT LOOKBOOK  LOOKBOOK(1) (1).pdf
BASLIQ CURRENT LOOKBOOK LOOKBOOK(1) (1).pdf
SoniaTolstoy
 
1029 - Danh muc Sach Giao Khoa 10 . pdf
1029 -  Danh muc Sach Giao Khoa 10 . pdf1029 -  Danh muc Sach Giao Khoa 10 . pdf
1029 - Danh muc Sach Giao Khoa 10 . pdf
QucHHunhnh
 
Ecosystem Interactions Class Discussion Presentation in Blue Green Lined Styl...
Ecosystem Interactions Class Discussion Presentation in Blue Green Lined Styl...Ecosystem Interactions Class Discussion Presentation in Blue Green Lined Styl...
Ecosystem Interactions Class Discussion Presentation in Blue Green Lined Styl...
fonyou31
 

Último (20)

General AI for Medical Educators April 2024
General AI for Medical Educators April 2024General AI for Medical Educators April 2024
General AI for Medical Educators April 2024
 
Presentation by Andreas Schleicher Tackling the School Absenteeism Crisis 30 ...
Presentation by Andreas Schleicher Tackling the School Absenteeism Crisis 30 ...Presentation by Andreas Schleicher Tackling the School Absenteeism Crisis 30 ...
Presentation by Andreas Schleicher Tackling the School Absenteeism Crisis 30 ...
 
Q4-W6-Restating Informational Text Grade 3
Q4-W6-Restating Informational Text Grade 3Q4-W6-Restating Informational Text Grade 3
Q4-W6-Restating Informational Text Grade 3
 
Web & Social Media Analytics Previous Year Question Paper.pdf
Web & Social Media Analytics Previous Year Question Paper.pdfWeb & Social Media Analytics Previous Year Question Paper.pdf
Web & Social Media Analytics Previous Year Question Paper.pdf
 
Student login on Anyboli platform.helpin
Student login on Anyboli platform.helpinStudent login on Anyboli platform.helpin
Student login on Anyboli platform.helpin
 
Nutritional Needs Presentation - HLTH 104
Nutritional Needs Presentation - HLTH 104Nutritional Needs Presentation - HLTH 104
Nutritional Needs Presentation - HLTH 104
 
Measures of Dispersion and Variability: Range, QD, AD and SD
Measures of Dispersion and Variability: Range, QD, AD and SDMeasures of Dispersion and Variability: Range, QD, AD and SD
Measures of Dispersion and Variability: Range, QD, AD and SD
 
social pharmacy d-pharm 1st year by Pragati K. Mahajan
social pharmacy d-pharm 1st year by Pragati K. Mahajansocial pharmacy d-pharm 1st year by Pragati K. Mahajan
social pharmacy d-pharm 1st year by Pragati K. Mahajan
 
Sports & Fitness Value Added Course FY..
Sports & Fitness Value Added Course FY..Sports & Fitness Value Added Course FY..
Sports & Fitness Value Added Course FY..
 
BASLIQ CURRENT LOOKBOOK LOOKBOOK(1) (1).pdf
BASLIQ CURRENT LOOKBOOK  LOOKBOOK(1) (1).pdfBASLIQ CURRENT LOOKBOOK  LOOKBOOK(1) (1).pdf
BASLIQ CURRENT LOOKBOOK LOOKBOOK(1) (1).pdf
 
1029 - Danh muc Sach Giao Khoa 10 . pdf
1029 -  Danh muc Sach Giao Khoa 10 . pdf1029 -  Danh muc Sach Giao Khoa 10 . pdf
1029 - Danh muc Sach Giao Khoa 10 . pdf
 
Ecosystem Interactions Class Discussion Presentation in Blue Green Lined Styl...
Ecosystem Interactions Class Discussion Presentation in Blue Green Lined Styl...Ecosystem Interactions Class Discussion Presentation in Blue Green Lined Styl...
Ecosystem Interactions Class Discussion Presentation in Blue Green Lined Styl...
 
Grant Readiness 101 TechSoup and Remy Consulting
Grant Readiness 101 TechSoup and Remy ConsultingGrant Readiness 101 TechSoup and Remy Consulting
Grant Readiness 101 TechSoup and Remy Consulting
 
Advance Mobile Application Development class 07
Advance Mobile Application Development class 07Advance Mobile Application Development class 07
Advance Mobile Application Development class 07
 
Z Score,T Score, Percential Rank and Box Plot Graph
Z Score,T Score, Percential Rank and Box Plot GraphZ Score,T Score, Percential Rank and Box Plot Graph
Z Score,T Score, Percential Rank and Box Plot Graph
 
SOCIAL AND HISTORICAL CONTEXT - LFTVD.pptx
SOCIAL AND HISTORICAL CONTEXT - LFTVD.pptxSOCIAL AND HISTORICAL CONTEXT - LFTVD.pptx
SOCIAL AND HISTORICAL CONTEXT - LFTVD.pptx
 
Holdier Curriculum Vitae (April 2024).pdf
Holdier Curriculum Vitae (April 2024).pdfHoldier Curriculum Vitae (April 2024).pdf
Holdier Curriculum Vitae (April 2024).pdf
 
fourth grading exam for kindergarten in writing
fourth grading exam for kindergarten in writingfourth grading exam for kindergarten in writing
fourth grading exam for kindergarten in writing
 
Disha NEET Physics Guide for classes 11 and 12.pdf
Disha NEET Physics Guide for classes 11 and 12.pdfDisha NEET Physics Guide for classes 11 and 12.pdf
Disha NEET Physics Guide for classes 11 and 12.pdf
 
Explore beautiful and ugly buildings. Mathematics helps us create beautiful d...
Explore beautiful and ugly buildings. Mathematics helps us create beautiful d...Explore beautiful and ugly buildings. Mathematics helps us create beautiful d...
Explore beautiful and ugly buildings. Mathematics helps us create beautiful d...
 

Using Photoshop

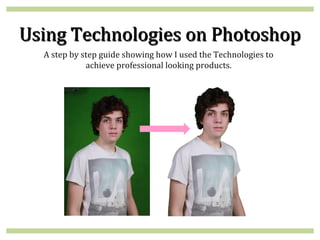
  • 1. Using Technologies on Photoshop A step by step guide showing how I used the Technologies to achieve professional looking products.
  • 2. Step One: The first step was to open my Image in Adobe Photoshop. I used Photoshop as it contains a variety of facilities for me to edit my picture. I have used Photoshop before, therefore I understood how to remove the green background and manipulate the Image into looking professional and appropriate for my Ancillaries. I chose to use this Photo of Cason as he is looking directly into the camera, giving the reader direct address. The shot is a Medium Close up which is perfect for the Front Cover of my Magazine. The image is clear and the lighting is also good.
  • 3. Step Two: The second step was for me to click on the Background Eraser Tool (Highlighted in blue) in order to remove the green background off my star. I then changed the settings at the top (Highlighted in red) I changed the brush size to a medium size 40, as this was small enough for me to use around his hair. I also changed the Tolerance to 30% meaning the when I ran the eraser around my star, the green background would be removed, however his hair and t-shirt would stay. I found that this was the easiest and most professional way for the background to be removed.
  • 4. Step Three: Continuing from Step Two; I zoomed in on my star (Highlighted in blue) in order to get a better view of the area that I was erasing. I held down the left mouse button and slowly started to erase any green background. I traced around all of my star until I was happy with the result. After erasing all the green from around my star, this was the finished result for this step.
  • 5. Step Four: Step Four was to finish off removing the green background. As shown in Step Three, I traced around my star using the Background Eraser Tool. I then clicked on the Magic Eraser Tool (Highlighted in blue) in order to remove the remaining background. On Photoshop, the checker background behind the star means that if you then copy this image onto Publisher, the background will be transparent.
  • 6. Step Five: As you can see on the image, there is a fuzzy brown line around Cason’s hair. Step Five shows how I removed this. Firstly I locked in the Transparent pixels so that nothing else moved (Highlighted in red). I clicked onto the Paintbrush (Highlighted in purple) in order to have a precise application. I had to change the top settings (Highlighted in yellow) I changed the brush size to 65, in order to cover a large surface area. I also changed the mode (Highlighted in blue) to ‘Color’ in order to just remove the brown fuzziness.
  • 7. Step Six: Once Step Five was completed, I had to remove the small patches of green behind Cason’s hair. To do this, I firstly selected the smaller Paintbrush (Highlighted in orange). I clicked the left button on my mouse onto Cason’s hair in order to mimic his hair colour (Colour highlighted in blue) This would then change the green to a dark brown. This made my image look a lot more professional.
  • 8. Step Seven: The last step was for me to remove any redness off Cason’s face. I selected the Plaster and then the Healing Brush (Highlighted in blue) in order to get Cason’s skin matching. I did this because it is a convention of the Made in Chelsea stars to have ‘perfect’ looking skin. (Shown below).