SlideShare una empresa de Scribd logo
1 de 12
Descargar para leer sin conexión
Biplane II by Marc Kirschenbaum (NY)                                                                     ©1996

Complex
A 10" square makes a model with a 4" wingspan


   1. This will be the color of the   2. Valley the corners to the      3. Pleat along existing creases.
      body. Precrease along angle        intersections of creases and
      bisectors.                         unfold.


   4. Valley to center.               5. Turn over.                     6. Fold sides to center, allowing
                                                                           flaps to swing outwards.


   7. Unfold entirely.                8. Collapse.                      9. Squash the center flap.
            9-10


   10. Valley down as far as          11. Spread open to reveal small   12. Sink triangularly halfway.
       possible and unfold. Repeat        flap.
       steps 9-10 behind.
12-13


13. Close back up. Repeat steps     14. Petal fold.                     15. Valley to intersection of
    12-13 on the other side.                                                creases.


        14-16


16. Precrease sides of flap and     17. Valley corners. Turn over.      18. Swing a flap over, front and
    then open up. Repeat steps                                              back.
    14-16 behind.


19. Precrease through all layers.   20. Unfold bottom flap.             21. Squash. Do not flatten
                                                                            completely.


22. Wrap around to make             23. Pull out single layer.          24. Valley over.
    symetrical.


                                                        23-26                  18-26


25. Reverse fold.                   26. Swing over flap while           27. Repeat steps 18-26 in mirror
                                        incorporating a reverse fold.       image.
                                        Repeat steps 23-26 behind.
28. Valley up corners.           29. Pull out hidden corners.      30. Pull out hidden points.


31. Crimp sides.                 32. Valley down four points.      33. Stretch apart sides.


                                    33-34


34. View from step 33. Double-   35. Repeat steps 33-34 on other   36. Lightly swing up top section.
    crimp upwards and flatten.       side.


                                                           36-37

37. Swing back down while        38. Repeat steps 36-37 behind.    39. Swing down flaps.
    collapsing the top single
    layer outwards.
40. Swing over a layer, undoing       41. Wrap around a single layer.   42. Swing back. Repeat behind.
    reverse fold. Repeat behind.          Repeat behind.


43. Pull flap out, releasing layers   44. Asymmetrical squash.          45. Valley layer through. Repeat
    at left. Repeat behind.               Repeat behind.                    behind.


46. Swivel down. Repeat               47. Swivel over. Repeat behind.   48. Bring single layer to surface
    behind.                                                                 (closed sink). Repeat
                                                                            behind.


49. Sink triangularly, so as to       50. Sink triangularly again.      51. Wrap around a single layer.
    match up with the folded              Repeat behind.                    Repeat behind.
    edge in the middle. Repeat
    behind.
52. Swing flap over while           53. Swing over two layers.          54. Pull out single layer from
    incorporating a reverse fold        Model will not lie flat.            behind.
    along existing creases.


55. Swivel under.                   56. Swing single layer back.        57. Swivel up.


                                                                                                         52-59


58. Wrap single layer around        59. Close model back up.            60. Repeat steps 52-59 behind.
    (closed sink).


61. Swing over flap while pulling   62. Valley along existing crease.   63. Swivel down hidden middle
    up a layer through the              Repeat behind.                      layer into pocket. Repeat
    pocket. Repeat behind                                                   behind.
64. Bring single layer to surface   65. Closed sink along existing   66. Pull point outwards.
    (closed sink). Repeat               crease. Repeat behind.
    behind.


67. Bring the bottom points to      68. Swing down.                  69. Precrease. Repeat with
    the top, allowing the corners                                        adjacent flap.
    to spread sink.


70. Spread apart.                   71. View from step 71. Sink      72. The edges of the wing
                                        single layer through from        should now be flush. Close
                                        behind, using the creases        the model up.
                                        from step 69.
                        68-72


73. Repeat steps 68-72 behind.      74. Sink triangularly along      75. Closed sink along existing
                                        existing crease. Repeat          crease. Repeat behind.
                                        behind.
76. Outside reverse fold along     77. Detail of tail. Valley along      78. Unfold.
    existing crease.                   angle bisectors.


                                                 Point A                               Point A


79. Swivel fold. Repeat behind.    80. Crimp upwards, so point A         81. Valley down. Repeat behind.
                                       meets colored raw edge.


82. Valley along angle bisector.   83. Swivel over. Repeat behind.       84. Valley up. Repeat behind.
    Repeat behind.


85. Mountain top flaps into        86. Mountain the double layer         87. Reverse fold back. Repeat
    pocket.                            about 1/4th the width.                behind.
                                       Towards the tail, the fold will
                                       terminate at an angle, and
                                       at the other end, a swivel
                                       will form. Repeat behind.
88. Mountain behind wing.        89. Valley to existing crease.    90. Crimp the tail section. See
    Repeat behind.                   Repeat behind.                    step 91 for positioning.


91. Collapse upwards.            92. Outside reverse fold.         93. Sink the indicated regions.


94. Reverse fold the indicated   95. Valley over a single layer.   96. Pull the center flap fowards
    areas.                           Repeat behind.                    while pulling the side flaps
                                                                       outwards.


97. Open sink.                   98. Reverse the four hidden       99. Reverse the first of the three
                                     corners down.                     points down. Note how the
                                                                       bottom five layers are
                                                                       distributed.
99-101


100. Swivel.                     101. Reverse into pocket.          102. Swivel.
                                      Repeat steps 99-101
                                      behind.


103. Tuck the bottom hidden      104. Spread apart the flap flat,   105. Valley down.
     points into the center of        while pulling it into an
     the model.                       upright position.


106. Valley up.                  107. Valley down.                  108. Undo pleat.
106-108

109. Repeat steps 106-108 in            110. Asymmetrical squash.   111. Squash.
     mirror image.


112. Pull out single layer.             113. Squash.                114. Precrease.


115. Rabbit ear.                        116. Unsink.                117. Swivel up.


118. Valley over.                       119. Swivel.                120. Mountain behind.


121. Mountain behind.                   122. Flip the points.       123. Valley through intersection
                                                                         of creases. See step 124
                                                                         for positioning.
124. Spread squash.                 125. Swivel at each side.         126. Swivel at right. Bring
                                                                           colored layer to surface.


127. Pleat downwards.               128. Completed propeller.         129. Valley up (there are no
                                                                           reference points).

                                                                        129-131


130. Pull the single layer up as    131. Pleat the excess into the    132. Repeat steps 129-131
     far as possible.                    center pocket.                    behind.


133. Sread the wings apart,         134. Collapse the sides inwards   135. Completed cowl.
     allowing the front to spread        at 90º. You can trim the
     apart too. To flatten, fold         sides to taste with
     the top of the cowl over.           mountain folds.
136. View of lower wing.   137. Valley at 45º          138. Wrap a single layer     139. Squash over.
     Precrease.                 through intersection        around.
                                of precrease and
                                center.


140. Wrap a single layer   141. Spread squash.         142. Rabbit ear the tip of   143. Raise the wing and
     around.                                                the strut.                   strut, tucking its tip
                                                                                         into the pocket on
                                                                                         the upper wing.
                                                                                         Repeat steps 136-
                                                                                         143 on other wing.


144. Detail of landing     145. Valley up.             146. Pull out a single       147. Valley down while
     gear. Precrease.                                       layer from each              incorporating
                                                            side.                        reverse folds.


148. Shape with            149. Round off with         150. Completed wheel.
     mountain folds.            mountain folds.             Repeat steps 144-
                                                            149 behind.


                           151. Completed Biplane II
                                ©1996 Marc Kirschenbaum

Más contenido relacionado

Similar a Biplane model instructions

Similar a Biplane model instructions (20)

Arrowhrt
ArrowhrtArrowhrt
Arrowhrt
 
dollar-koi-fihs-origami
dollar-koi-fihs-origamidollar-koi-fihs-origami
dollar-koi-fihs-origami
 
Eagle koh
Eagle kohEagle koh
Eagle koh
 
Arrow
ArrowArrow
Arrow
 
Flower
FlowerFlower
Flower
 
Giant+anteater+ +quentin+trollip
Giant+anteater+ +quentin+trollipGiant+anteater+ +quentin+trollip
Giant+anteater+ +quentin+trollip
 
Acrocanthosaurus
AcrocanthosaurusAcrocanthosaurus
Acrocanthosaurus
 
Arrowhrt
ArrowhrtArrowhrt
Arrowhrt
 
Simple dragon-shuki kato
Simple dragon-shuki katoSimple dragon-shuki kato
Simple dragon-shuki kato
 
Edragon
EdragonEdragon
Edragon
 
Eagle
EagleEagle
Eagle
 
TABLE NAPKIN FOLDING (BBTE)
TABLE NAPKIN FOLDING (BBTE)TABLE NAPKIN FOLDING (BBTE)
TABLE NAPKIN FOLDING (BBTE)
 
Birdofparadise
BirdofparadiseBirdofparadise
Birdofparadise
 
Birdofparadise
BirdofparadiseBirdofparadise
Birdofparadise
 
Pokimon
PokimonPokimon
Pokimon
 
B Wing
B WingB Wing
B Wing
 
Lilyfly
LilyflyLilyfly
Lilyfly
 
Acrocanthosaurus.pdf
Acrocanthosaurus.pdfAcrocanthosaurus.pdf
Acrocanthosaurus.pdf
 
Azalea
AzaleaAzalea
Azalea
 
Ms. g's napkins 101
Ms. g's napkins 101Ms. g's napkins 101
Ms. g's napkins 101
 

Más de Kukuasu

(Ebook Pdf) The Brainwashing Manual
(Ebook   Pdf) The Brainwashing Manual(Ebook   Pdf) The Brainwashing Manual
(Ebook Pdf) The Brainwashing ManualKukuasu
 
A Blueprint For World Dictatorship Mike Ruppert (2)
A Blueprint For World Dictatorship Mike Ruppert (2)A Blueprint For World Dictatorship Mike Ruppert (2)
A Blueprint For World Dictatorship Mike Ruppert (2)Kukuasu
 
Albert Einstein The World As I See It
Albert Einstein The World As I See ItAlbert Einstein The World As I See It
Albert Einstein The World As I See ItKukuasu
 
Aleister Crowley Ambergris (Share Me) (Ebook Occult Pdf)
Aleister Crowley   Ambergris (Share Me) (Ebook   Occult   Pdf)Aleister Crowley   Ambergris (Share Me) (Ebook   Occult   Pdf)
Aleister Crowley Ambergris (Share Me) (Ebook Occult Pdf)Kukuasu
 
Zen The Religion Of The Samurai
Zen   The Religion Of The SamuraiZen   The Religion Of The Samurai
Zen The Religion Of The SamuraiKukuasu
 
(Ebook English) The Complete Dark Zen Teachings
(Ebook   English) The Complete Dark Zen Teachings(Ebook   English) The Complete Dark Zen Teachings
(Ebook English) The Complete Dark Zen TeachingsKukuasu
 
Towerbox
TowerboxTowerbox
TowerboxKukuasu
 
Candy Wrapper Dragon
Candy Wrapper DragonCandy Wrapper Dragon
Candy Wrapper DragonKukuasu
 
Armadillo
ArmadilloArmadillo
ArmadilloKukuasu
 
Armadill
ArmadillArmadill
ArmadillKukuasu
 
Arasaurolopus Baby
Arasaurolopus BabyArasaurolopus Baby
Arasaurolopus BabyKukuasu
 
Angel Fehl
Angel FehlAngel Fehl
Angel FehlKukuasu
 
Ak 47, Ak 74 Headspace Checks
Ak 47, Ak 74 Headspace ChecksAk 47, Ak 74 Headspace Checks
Ak 47, Ak 74 Headspace ChecksKukuasu
 
Africanelephant
AfricanelephantAfricanelephant
AfricanelephantKukuasu
 

Más de Kukuasu (20)

(Ebook Pdf) The Brainwashing Manual
(Ebook   Pdf) The Brainwashing Manual(Ebook   Pdf) The Brainwashing Manual
(Ebook Pdf) The Brainwashing Manual
 
A Blueprint For World Dictatorship Mike Ruppert (2)
A Blueprint For World Dictatorship Mike Ruppert (2)A Blueprint For World Dictatorship Mike Ruppert (2)
A Blueprint For World Dictatorship Mike Ruppert (2)
 
Albert Einstein The World As I See It
Albert Einstein The World As I See ItAlbert Einstein The World As I See It
Albert Einstein The World As I See It
 
Aleister Crowley Ambergris (Share Me) (Ebook Occult Pdf)
Aleister Crowley   Ambergris (Share Me) (Ebook   Occult   Pdf)Aleister Crowley   Ambergris (Share Me) (Ebook   Occult   Pdf)
Aleister Crowley Ambergris (Share Me) (Ebook Occult Pdf)
 
Zen The Religion Of The Samurai
Zen   The Religion Of The SamuraiZen   The Religion Of The Samurai
Zen The Religion Of The Samurai
 
(Ebook English) The Complete Dark Zen Teachings
(Ebook   English) The Complete Dark Zen Teachings(Ebook   English) The Complete Dark Zen Teachings
(Ebook English) The Complete Dark Zen Teachings
 
Towerbox
TowerboxTowerbox
Towerbox
 
Candy Wrapper Dragon
Candy Wrapper DragonCandy Wrapper Dragon
Candy Wrapper Dragon
 
Beker
BekerBeker
Beker
 
Balloon
BalloonBalloon
Balloon
 
Badger
BadgerBadger
Badger
 
Armadillo
ArmadilloArmadillo
Armadillo
 
Armadill
ArmadillArmadill
Armadill
 
Arasaurolopus Baby
Arasaurolopus BabyArasaurolopus Baby
Arasaurolopus Baby
 
Angel Fehl
Angel FehlAngel Fehl
Angel Fehl
 
Angel
AngelAngel
Angel
 
Andrea
AndreaAndrea
Andrea
 
Alien
AlienAlien
Alien
 
Ak 47, Ak 74 Headspace Checks
Ak 47, Ak 74 Headspace ChecksAk 47, Ak 74 Headspace Checks
Ak 47, Ak 74 Headspace Checks
 
Africanelephant
AfricanelephantAfricanelephant
Africanelephant
 

Biplane model instructions

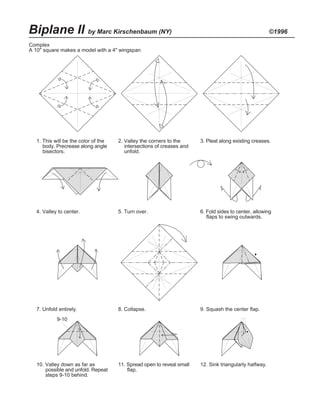
  • 1. Biplane II by Marc Kirschenbaum (NY) ©1996 Complex A 10" square makes a model with a 4" wingspan 1. This will be the color of the 2. Valley the corners to the 3. Pleat along existing creases. body. Precrease along angle intersections of creases and bisectors. unfold. 4. Valley to center. 5. Turn over. 6. Fold sides to center, allowing flaps to swing outwards. 7. Unfold entirely. 8. Collapse. 9. Squash the center flap. 9-10 10. Valley down as far as 11. Spread open to reveal small 12. Sink triangularly halfway. possible and unfold. Repeat flap. steps 9-10 behind.
  • 2. 12-13 13. Close back up. Repeat steps 14. Petal fold. 15. Valley to intersection of 12-13 on the other side. creases. 14-16 16. Precrease sides of flap and 17. Valley corners. Turn over. 18. Swing a flap over, front and then open up. Repeat steps back. 14-16 behind. 19. Precrease through all layers. 20. Unfold bottom flap. 21. Squash. Do not flatten completely. 22. Wrap around to make 23. Pull out single layer. 24. Valley over. symetrical. 23-26 18-26 25. Reverse fold. 26. Swing over flap while 27. Repeat steps 18-26 in mirror incorporating a reverse fold. image. Repeat steps 23-26 behind.
  • 3. 28. Valley up corners. 29. Pull out hidden corners. 30. Pull out hidden points. 31. Crimp sides. 32. Valley down four points. 33. Stretch apart sides. 33-34 34. View from step 33. Double- 35. Repeat steps 33-34 on other 36. Lightly swing up top section. crimp upwards and flatten. side. 36-37 37. Swing back down while 38. Repeat steps 36-37 behind. 39. Swing down flaps. collapsing the top single layer outwards.
  • 4. 40. Swing over a layer, undoing 41. Wrap around a single layer. 42. Swing back. Repeat behind. reverse fold. Repeat behind. Repeat behind. 43. Pull flap out, releasing layers 44. Asymmetrical squash. 45. Valley layer through. Repeat at left. Repeat behind. Repeat behind. behind. 46. Swivel down. Repeat 47. Swivel over. Repeat behind. 48. Bring single layer to surface behind. (closed sink). Repeat behind. 49. Sink triangularly, so as to 50. Sink triangularly again. 51. Wrap around a single layer. match up with the folded Repeat behind. Repeat behind. edge in the middle. Repeat behind.
  • 5. 52. Swing flap over while 53. Swing over two layers. 54. Pull out single layer from incorporating a reverse fold Model will not lie flat. behind. along existing creases. 55. Swivel under. 56. Swing single layer back. 57. Swivel up. 52-59 58. Wrap single layer around 59. Close model back up. 60. Repeat steps 52-59 behind. (closed sink). 61. Swing over flap while pulling 62. Valley along existing crease. 63. Swivel down hidden middle up a layer through the Repeat behind. layer into pocket. Repeat pocket. Repeat behind behind.
  • 6. 64. Bring single layer to surface 65. Closed sink along existing 66. Pull point outwards. (closed sink). Repeat crease. Repeat behind. behind. 67. Bring the bottom points to 68. Swing down. 69. Precrease. Repeat with the top, allowing the corners adjacent flap. to spread sink. 70. Spread apart. 71. View from step 71. Sink 72. The edges of the wing single layer through from should now be flush. Close behind, using the creases the model up. from step 69. 68-72 73. Repeat steps 68-72 behind. 74. Sink triangularly along 75. Closed sink along existing existing crease. Repeat crease. Repeat behind. behind.
  • 7. 76. Outside reverse fold along 77. Detail of tail. Valley along 78. Unfold. existing crease. angle bisectors. Point A Point A 79. Swivel fold. Repeat behind. 80. Crimp upwards, so point A 81. Valley down. Repeat behind. meets colored raw edge. 82. Valley along angle bisector. 83. Swivel over. Repeat behind. 84. Valley up. Repeat behind. Repeat behind. 85. Mountain top flaps into 86. Mountain the double layer 87. Reverse fold back. Repeat pocket. about 1/4th the width. behind. Towards the tail, the fold will terminate at an angle, and at the other end, a swivel will form. Repeat behind.
  • 8. 88. Mountain behind wing. 89. Valley to existing crease. 90. Crimp the tail section. See Repeat behind. Repeat behind. step 91 for positioning. 91. Collapse upwards. 92. Outside reverse fold. 93. Sink the indicated regions. 94. Reverse fold the indicated 95. Valley over a single layer. 96. Pull the center flap fowards areas. Repeat behind. while pulling the side flaps outwards. 97. Open sink. 98. Reverse the four hidden 99. Reverse the first of the three corners down. points down. Note how the bottom five layers are distributed.
  • 9. 99-101 100. Swivel. 101. Reverse into pocket. 102. Swivel. Repeat steps 99-101 behind. 103. Tuck the bottom hidden 104. Spread apart the flap flat, 105. Valley down. points into the center of while pulling it into an the model. upright position. 106. Valley up. 107. Valley down. 108. Undo pleat.
  • 10. 106-108 109. Repeat steps 106-108 in 110. Asymmetrical squash. 111. Squash. mirror image. 112. Pull out single layer. 113. Squash. 114. Precrease. 115. Rabbit ear. 116. Unsink. 117. Swivel up. 118. Valley over. 119. Swivel. 120. Mountain behind. 121. Mountain behind. 122. Flip the points. 123. Valley through intersection of creases. See step 124 for positioning.
  • 11. 124. Spread squash. 125. Swivel at each side. 126. Swivel at right. Bring colored layer to surface. 127. Pleat downwards. 128. Completed propeller. 129. Valley up (there are no reference points). 129-131 130. Pull the single layer up as 131. Pleat the excess into the 132. Repeat steps 129-131 far as possible. center pocket. behind. 133. Sread the wings apart, 134. Collapse the sides inwards 135. Completed cowl. allowing the front to spread at 90º. You can trim the apart too. To flatten, fold sides to taste with the top of the cowl over. mountain folds.
  • 12. 136. View of lower wing. 137. Valley at 45º 138. Wrap a single layer 139. Squash over. Precrease. through intersection around. of precrease and center. 140. Wrap a single layer 141. Spread squash. 142. Rabbit ear the tip of 143. Raise the wing and around. the strut. strut, tucking its tip into the pocket on the upper wing. Repeat steps 136- 143 on other wing. 144. Detail of landing 145. Valley up. 146. Pull out a single 147. Valley down while gear. Precrease. layer from each incorporating side. reverse folds. 148. Shape with 149. Round off with 150. Completed wheel. mountain folds. mountain folds. Repeat steps 144- 149 behind. 151. Completed Biplane II ©1996 Marc Kirschenbaum