
Recomendados
Más contenido relacionado
La actualidad más candente
La actualidad más candente (20)
Destacado
Destacado (15)
Similar a The process of developing the image to go on the front cover, contents page and double page spread of my Music Magazine
Similar a The process of developing the image to go on the front cover, contents page and double page spread of my Music Magazine (20)
Último
Último (20)
The process of developing the image to go on the front cover, contents page and double page spread of my Music Magazine
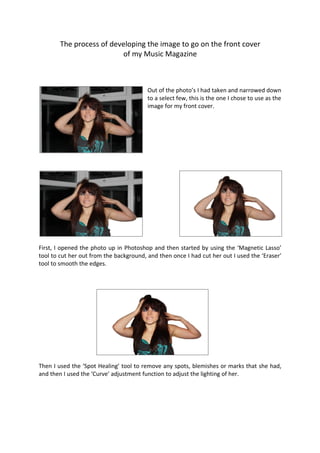
- 1. The process of developing the image to go on the front cover of my Music Magazine Out of the photo’s I had taken and narrowed down to a select few, this is the one I chose to use as the image for my front cover. First, I opened the photo up in Photoshop and then started by using the ‘Magnetic Lasso’ tool to cut her out from the background, and then once I had cut her out I used the ‘Eraser’ tool to smooth the edges. Then I used the ‘Spot Healing’ tool to remove any spots, blemishes or marks that she had, and then I used the ‘Curve’ adjustment function to adjust the lighting of her.
- 2. Then I decided to airbrush the photo, to give it a more flawless effect. I done this by duplicating the layer, then using the ‘Gaussian Blur’ technique and adjusting it to how blurred I wanted it, then I used the ‘Layer Mask’ option and then ‘Hide All’ to make the blurred layer hidden, so when I used the ‘Air Bush’ brush tool the blurred effect came through – and I simply applied it to the areas I wanted – and then right clicked on the layer and chose the ‘Merge Down’ option. Once I had air brushed her, I then chose to adjust the colour of her eyes to make them brighter and to stand out more. I done this by using the ‘Colour Replacement’ tool to make them completely one colour, then I used the ‘Dodge’ tool to brighten the irises and used the ‘Burn’ tool to darken the pupil. Then I decided to adjust her make up, I used the ‘Burn’ tool to make her eyelashes longer and eyeliner darker and thicker – I done this to make her eyes stand out more.
- 3. Then I decided to adjust her lips; to make them brighter and stand out more. I done this by using the ‘Colour Replacement’ tool, which evened out the colour and placed it all the way to her lip line, then I used the ‘Dodge’ tool, to make them brighter and add shine to areas, and finally I used the ‘Sharpen’ tool, to make the lips stand out more. Once I done that I decided to brighten her teeth; I done this by using the ‘Colour Replacement’ tool, to make them all the same colour as each other, then I used the ‘Dodge’ tool, to make them brighter, and finally I used the ‘Sharpen’ tool to make them more noticeable. Once I had done both the lips and the teeth, I used the ‘Liquify’ option to enlarge the lips and make them equal. I also decided to change the colour of her hair, I done this by using the ‘Colour Replacement’ tool, then I changed the colour to a red – I done this because I thought it made her look more interesting and eye catching.
- 4. Finally, I decided to change the colour of her clothes. I done this by using the ‘Colour Replacement’ tool, and picked a colour that I liked, then changed the blue to green.
- 5. The process of developing the image to go on the contents page of my Music Magazine Out of the photo’s I had taken and narrowed down to a select few, this is the one I chose to use as the image for my contents page. First, I opened the photo up in Photoshop and then started by using the ‘Magnetic Lasso’ tool to cut her out from the background, and then once I had cut her out I used the ‘Eraser’ tool to smooth the edges. I used the ‘Spot Healing’ tool to remove any spots, blemishes or marks that she had, and once I done that I decided to use the ‘Curve’ adjustment function – which adjusted the lighting of her. I also decided – once her spots, blemishes and marks were removed – to airbrush the photo, to give it a more flawless effect. I done this by duplicating the layer, then using the ‘Gaussian Blur’ technique and on that I adjusting it to how blurred I wanted it, then I used the ‘Layer Mask’ option and then ‘Hide All’ to make the blurred layer hidden, so when I used the ‘Air Bush’ brush tool the blurred effect came through – and then once I had done all of that I simply applied it to the areas I wanted – and then right clicked on the layer and chose the ‘Merge Down’ option.
- 6. Once I had finished with air brushing her skin, I decided to adjust the colour of her eyes – I wanted to make them brighter so they would stand out more. I done this by using the ‘Colour Replacement’ tool to make them both one colour, once that was done I used the ‘Dodge’ tool to brighten the irises and used the ‘Burn’ tool to darken the pupil. Then after adjusting here eyes I decided to touch up her make up so it stood out more, I done this by using the ‘Burn’ tool to make her eyelashes longer and eyeliner darker and thicker. After doing her eyes and make up I decided to adjust her lips, in order to make them brighter and stand out more. I done this process by using the ‘Colour Replacement’ tool, doing this evened out the colour and placed it all the way to her lip line, after that I used the ‘Dodge’ tool, to make them brighter and add shine, and finally I used the ‘Sharpen’ tool, this was to make the lips stand out more. After I had done that I decided to brighten her teeth; I done this by using the ‘Colour Replacement’ tool, which was to make them all the same colour as each other, and then I used the ‘Dodge’ tool, to make them brighter, finally I used the ‘Sharpen’ tool, this was to make them more noticeable. After I had done both the lips and the teeth, I decided to use the ‘Liquify’ option to enlarge the lips and make them equal.
- 7. Then, I chose to change the colour of her hair, I done this by using the ‘Colour Replacement’ tool, then I changed the colour to a red – I done this because I thought it made her look more interesting and eye catching, but to also keep her looking the same as the imagery on the front cover. Finally, I decided to change the colour of her clothes, since I had done so with the imagery on the front cover. I done this by using the ‘Colour Replacement’ tool, and picked a colour that I liked, then changed the blue to purple.
- 8. The process of developing the image to go on the double page spread of my Music Magazine Out of the photo’s I had taken and narrowed down to a select few, these are the ones I chose to use as the images for my double page spread. Some of the photos are done at different stages – e.g. some images had their hair done before their eyes, but some had their eyes done before their hair – but I decided for displaying the stages on here I would do all the images in the same order. First, I opened the photo up in Photoshop and unlocked the background layer so I could edit on it, and then started by using the ‘Magnetic Lasso’ tool to cut her out from the background. Once I had cut her out I used the ‘Eraser’ tool which was to smooth the edges.
- 9. Once I had cut her out I used the ‘Curve’ adjustment function to adjust the lighting of her. After that I used the ‘Spot Healing’ tool to remove any spots, blemishes or marks that she had, and then decided to airbrush the photo, to give it a more flawless effect – I done this by duplicating the layer, then using the ‘Gaussian Blur’ technique, then I used the ‘Layer Mask’ option and then ‘Hide All’ to make the blurred layer hidden, so when I used the ‘Air Bush’ brush tool the blurred effect came through – and then once I had done that I right clicked on the layer and chose the ‘Merge Down’ option.
- 10. After I had finished with the air brushing, I chose to adjust the colour of her eyes because I wanted to make them brighter and stand out more. I done this by using the ‘Colour Replacement’ too – l to make them both one colour – and then I used the ‘Dodge’ and ‘Burn’ tool. Then I decided to touch up her make up so it stood out more, I done this by using the ‘Burn’ tool to make her eyeliner darker and thicker and her eyelashes longer.
- 11. Then when I had finished doing her eyes and make up I decided to edit her lips and make up on her lips, in order to make them brighter and stand out more. I done this by using the ‘Colour Replacement’ tool – doing this process evened out the colour and also placed it all the way to her lip line. Then after that I used the ‘Dodge’ tool, to make them brighter and add shine, and finally I used the ‘Sharpen’ tool – this was to make the lips stand out more. Once I had done that I chose to brighten her teeth, which I done by using the ‘Colour Replacement’ tool, which was to make them all the same colour, then I used the ‘Dodge’ tool to make them brighter, and finally I used the ‘Sharpen’ tool – this was to make them more noticeable. After that I decided to use the ‘Liquify’ option to enlarge the lips, and also to make them equal.
- 12. After that I chose to change the colour of her hair, which I done by using the ‘Colour Replacement’ tool, then I changed the colour to a red – as I had done so with the other imagery’s.
- 13. And finally, I decided to change the colour of her clothes – I done this by using the ‘Colour Replacement’ tool, and picked a colour that I liked, and then changed the blue to orange/dark purple/yellow/a brighter blue.