
Recomendados
Más contenido relacionado
La actualidad más candente
La actualidad más candente (17)
Similar a Step to step process of First draft
Similar a Step to step process of First draft (20)
Más de LouiseJHudson
Último
Último (20)
Step to step process of First draft
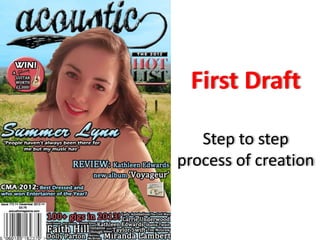
- 1. First Draft Step to step process of creation
- 2. The first step I took in creating the first draft of my magazine was adjusting the background. I had already taken this photo up on a hill near my house. But as I had taken it in the autumn season, it was very dull and didn’t represent the country music genre that I was aiming for. I decided early on that I would use this picture for the backdrop for my main image. I decided to adjust it to make the scene look like it was spring or summer as this fits with country music more. I used the colour replacement tool to do this, I picked my colour of sky blue and coloured the whole sky in this colour, zooming in closely to avoid going over the edges. While it looks obviously edited and fake, once I add the main image, masthead and everything else, it will be less obvious.
- 3. The next of creating my draft was the editing of the main image before I added it to the background shown in the slide earlier. To get rid of the background, I used the magic wand and select tool. Although at some times, I had to zoom in to delete any other bits of background that the magic wand and quick select tool failed to pick up.
- 4. After placing my main image in a separate file over my background. To make it look more realistic I decided to zoom in even closer and erase any more tiny bits of background that minimize its realism. After I did this, I added a very subtle shadow effect make it blend into the background and increase it’s realism.
- 5. After cutting out the background the same way as I did with my main image, I decided to add an effect to my masthead to make it look more 3D and stand out among the background and main image. So, I added a the bevel and emboss effect which I think really makes it stand out more that it did previously.
- 6. Next, I first of all adjusted the lighting and brightness in my main image to make it fit into my background better. I also added in the masthead and placed it behind my main image so the head of my model slightly covers it, I did this as it’s a common convention for magazine front covers and adds realism. Lastly, I added in my barcode as this is again an important convention of a magazine. I added a white box above it and clearly stated the issue number, the date, the price and the website for my magazine as a lot of magazines put these bits of information in the same position.
- 7. Next, I came up with the name for my artist and added this as a headline. I coloured it in the same colour as the sky in the background, as blue is one of my main colours in the front cover. I also added a stroke effect to make it more visible and added the bevel and emboss effect to make it look more 3D. Then, I added a quote underneath as part of the headline and I also used the stroke and bevel and emboss effect.
- 8. Next, I added in one small feature and a plug. “The 2012 Hot List” was inspired by a Rolling Stone cover that I have mentioned earlier. I created this earlier with some boxes and text. I also added a bevel and emboss effect to again make it look more 3D. The plug was created using a circle, some text and some small pictures. I added a bevel and emboss effect on the circle to make it look more like a sticker and I also added a stroke effect on the text to make it more noticeable. I also added two pictures, one of the gibson logo and a gibson guitar to show the prize.
- 9. The next part of the process was adding my main features. I decided early on that I would have a small number of features on my front page due the fact that my background adds much more depth as it is. I added these using the text box tool and I coloured them in blue and white which are two of my colour choices. Then, I used the stroke effect to make the text stand out. I used the font sizing option to adjust the font size to fit my needs. The final touch was adding a picture of the album that the feature was based on. I used the bevel and emboss tool to make it look more 3D to give my magazine more depth. I also rotated it slightly to make it look like it’s on a slant.
- 10. The next part of the process was creating the banner for the front cover of my music magazine. I used a box in one of my chosen colours, sky blue. And I added a transparency effect to make it blend in better with the magazine and look elegant. I decided after that that I would use this as a feature as well as a banner. I added the title of this feature using the text box tool and used the fill tool to make this title in one of my three chosen colours, light red or pink.
- 11. I then came up with a very spontaneous idea that I feel was one of the best decisions I’ve made with my magazine. I came up with names of all the different country and folk artists and typed the name in the text box. I started with Faith Hill, as this was my first, I made it the biggest of my artist names, I then placed it into a sector of the box. I added all the different artist but made them differentiate in size and made them all fit into place like a collage, so there was no gaps in the box. I then added a stroke effect onto each of the artist names to make them stand out as they were all in a white font. And that was the last step into making the first draft of my music magazine!
- 12. FINISHED FIRST DRAFT