More Related Content
Similar to NSWFB CO2 Vehicle - Workshop Manual
Similar to NSWFB CO2 Vehicle - Workshop Manual (12)
NSWFB CO2 Vehicle - Workshop Manual
- 1. CRN: 12/685F PART NUMBER: 99-1-0757
© 2003 THIS DOCUMENT IS SUBJECT TO COPYRIGHT, NO PORTION CAN BE COPIED OR
DISTRIBUTED TO THIRD PARTIES WITHOUT PRIOR WRITTEN CONSENT FROM MILLS-TUI
AUSTRALIA PTY LTD
Page 1 of 69
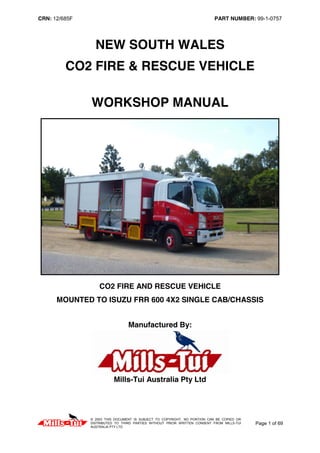
NEW SOUTH WALES
CO2 FIRE & RESCUE VEHICLE
WORKSHOP MANUAL
CO2 FIRE AND RESCUE VEHICLE
MOUNTED TO ISUZU FRR 600 4X2 SINGLE CAB/CHASSIS
Manufactured By:
Mills-Tui Australia Pty Ltd
- 2. CRN: 12/685F PART NUMBER: 99-1-0757
© 2003 THIS DOCUMENT IS SUBJECT TO COPYRIGHT, NO PORTION CAN BE COPIED OR
DISTRIBUTED TO THIRD PARTIES WITHOUT PRIOR WRITTEN CONSENT FROM MILLS-TUI
AUSTRALIA PTY LTD
Page 2 of 69
1 REVIEW AND AMENDMENT RECORD
Document
Issue
Status
Description of Change Date Checked Approved
A First Issue 04/07/2012 LS BAT
DISTRIBUTION
Maintained Copies of this document are provided to those formally registered in the MTA
Document Control Register. Those copies shall be identified as such with a coloured stamp
on the cover sheet.
GENERAL DESCRIPTION
This workshop manual contains general information, maintenance information, system
operation and part lists for the Mills-Tui Australia (MTA) CO2 Fire and Rescue Vehicle as
supplied to New South Wales Fire brigade (NSWFB).
This manual has been compiled to satisfy Order Number 4500096582 and is intended to give
guidance with the effective operation of the CO2 Fire and Heavy Rescue Vehicle. The
operator is advised to familiarise themselves with all statutory regulations, requirements and
any specific FRNSW requirements before commencement of operation or maintenance
activities.
WARNING / CAUTION / NOTES
Warnings, Cautions and Notes are used in this manual to emphasise special information.
These are defined below:
NNOOTTEESS
Used to provide additional information.
CCAAUUTTIIOONN
Indicates the presence of a hazard that may cause equipment damage.
WWAARRNNIINNGG
Indicates the presence of a hazard that can cause personal injury if not avoided.
- 3. CRN: 12/685F PART NUMBER: 99-1-0757
© 2003 THIS DOCUMENT IS SUBJECT TO COPYRIGHT, NO PORTION CAN BE COPIED OR
DISTRIBUTED TO THIRD PARTIES WITHOUT PRIOR WRITTEN CONSENT FROM MILLS-TUI
AUSTRALIA PTY LTD
Page 3 of 69
TABLE OF CONTENTS
SECTION TITLE PAGE
1 REVIEW AND AMENDMENT RECORD 2
2 LOCKER LAYOUT & EQUIPMENT STOWAGE 6
2.1 Locker Layout.........................................................................................................6
2.1.1 Nearside Locker Layout 6
2.1.2 Offside Locker Layout 6
2.1.3 Rear Locker Layout 7
2.2 Equipment Stowage ...............................................................................................8
2.2.1 Nearside Stowage 8
2.2.2 Offside Stowage 8
2.2.3 Rear Stowage 9
2.3 Nearside 1 Locker ................................................................................................10
2.4 Nearside 2 Locker ................................................................................................11
2.5 Nearside 3 Locker ................................................................................................12
2.6 Nearside 4 Locker ................................................................................................13
2.7 Offside 1 Locker ...................................................................................................14
2.8 Offside 2 Locker ...................................................................................................15
2.9 Offside 3 Locker ...................................................................................................16
2.10 Offside 4 Locker ...................................................................................................17
2.11 Rear Locker..........................................................................................................18
3 TRAYS AND SLIDE SYSTEMS 19
3.1 Rear Pull Out Steps..............................................................................................19
3.2 Pull Out Stowage Trays........................................................................................20
3.3 Wheel Arch Steps.................................................................................................20
4 OPERATION OF CO2 SYSTEM 24
4.1 Introduction ..........................................................................................................24
4.2 Layout and equipment..........................................................................................24
4.3 Precautions prior to discharging CO2 gas at any sub-station................................25
4.4 Prior to discharging CO2 gas................................................................................26
4.5 Cylinder discharging.............................................................................................27
4.6 After discharging gas............................................................................................27
4.7 Information on suburban sub-stations...................................................................28
4.8 On arrival at above ground fires ...........................................................................28
4.9 Hose reel operation ..............................................................................................29
5 ELECTRICAL 30
5.1 Cabin Internal.......................................................................................................30
5.1.1 Cab Internal Auxiliary Control System (ACS) Console 30
5.1.2 Cab Internal Map Light 32
5.1.3 Cab Internal Communications Box 32
5.1.4 Cab Internal Torch 32
5.1.5 Cab Internal Centre Console 32
5.1.6 Cab Internal Rear Mounted Camera Display Monitor 33
5.1.7 Cab Internal Global positioning System (GPS) 33
5.1.8 Cab Internal Government Radio Network (GRN) 33
5.1.9 Digital Clock 33
5.1.10 Cab Internal Mobile Phone Charging Base 33
5.1.11 Spot Light Control 34
5.1.12 Cab Internal DPD Regeneration Dash Switch 34
5.1.12.1 Automatic Regeneration of DPD 34
5.1.12.1 Manual Regeneration of DPD 34
- 4. CRN: 12/685F PART NUMBER: 99-1-0757
© 2003 THIS DOCUMENT IS SUBJECT TO COPYRIGHT, NO PORTION CAN BE COPIED OR
DISTRIBUTED TO THIRD PARTIES WITHOUT PRIOR WRITTEN CONSENT FROM MILLS-TUI
AUSTRALIA PTY LTD
Page 4 of 69
5.2 Cab External ........................................................................................................35
5.2.1 Cab External Emergency Warning Lights 35
5.2.2 Cab External Air Horn 35
5.3 Body Instrumentations and Controls.....................................................................36
5.3.1 Body Control Console (BCC) 36
5.3.2 Message Board Remote Control 36
5.3.3 Hose Reel Rewind Switches 36
5.3.4 CO2 System 36
5.3.4.1 CO2 Stowage Platform 36
5.3.4.2 Applicator 36
5.3.4.3 Swivel Coupling 37
5.3.5 Hose Reel 37
5.4 Body and Locker Electrical ...................................................................................38
5.4.1 Locker Lights 38
5.4.2 Work Lights 38
5.4.3 GRN Speaker 38
5.4.4 Warning Lights 38
5.4.5 Peripheral Lighting 39
5.4.6 Message Board 39
5.4.7 Hose Reel Speed Controller 39
5.4.8 External Vehicle Battery Charger Inlet 39
5.4.9 Body Electrical Module 40
5.4.10 Chassis Electrical Module 40
5.4.11 Circuit Breaker 41
5.4.12 Welding 41
5.5 Safety General .....................................................................................................41
6 MAINTENANCE INSTRUCTIONS 42
6.1 General ................................................................................................................42
6.2 Daily Maintenance Inspection Sheet.....................................................................43
6.3 Weekly Maintenance Inspection Sheet.................................................................44
6.4 Regular Inspections..............................................................................................45
6.4.1 45
6.4.1.1 Exterior 45
6.4.1.2 Interior 45
6.4.1.3 Within engine compartment 45
6.4.1.4 Within front lid 45
6.4.1.5 Within cab 45
6.4.1.6 After starting engine 46
6.4.1.7 Stopping engine 46
6.5 Extended Vehicle Maintenance ............................................................................46
6.5.1 Cab / Chassis 46
6.5.2 Isuzu Transmission 46
6.5.3 To Remove Cab from Cab / Chassis 46
6.5.4 Cab Internal Dash Switches and Warning Lights 46
6.5.5 Cab Internal Siren & Radios 46
6.6 Message Board ....................................................................................................46
6.7 Hose Reels...........................................................................................................47
6.7.1 Body 47
6.7.1.1 Removing the Body Module 47
6.7.2 Roller Shutter Doors 48
6.7.2.1 To Remove Roller Shutter Doors 48
6.7.3 Access Steps 48
6.7.3.1 Slide Out Front Access Steps 48
6.8 Electrical...............................................................................................................48
6.8.1 Circuit Breakers/Fuses 48
- 5. CRN: 12/685F PART NUMBER: 99-1-0757
© 2003 THIS DOCUMENT IS SUBJECT TO COPYRIGHT, NO PORTION CAN BE COPIED OR
DISTRIBUTED TO THIRD PARTIES WITHOUT PRIOR WRITTEN CONSENT FROM MILLS-TUI
AUSTRALIA PTY LTD
Page 5 of 69
6.8.2 Corrosion guard 49
6.9 Safety General .....................................................................................................49
7 FAULT FINDING 50
8 PARTS LIST 52
8.1 General ................................................................................................................52
8.2 External Vehicle ...................................................................................................52
8.2.1 Cabin 52
8.2.2 Nearside Vehicle 53
8.2.3 Offside Vehicle 54
8.2.4 Rear Vehicle 55
8.3 Internal Vehicle.....................................................................................................56
8.3.1 Cabin 56
8.3.2 Nearside 1 Locker 57
8.3.3 Nearside 2 Locker 58
8.3.4 Nearside 3 Locker 59
8.3.5 Nearside 4 Locker 60
8.3.6 Offside 1 Locker & Battery Housing 61
8.3.7 Offside 2 Locker 62
8.3.8 Offside 3 Locker 63
8.3.9 Offside 4 Locker 64
8.3.10 Rear Locker 65
8.3.11 CO2 System Parts List 66
8.4 Electrical Components..........................................................................................67
9 MODIFICATIONS 69
- 6. CRN: 12/685F PART NUMBER: 99-1-0757
© 2003 THIS DOCUMENT IS SUBJECT TO COPYRIGHT, NO PORTION CAN BE COPIED OR
DISTRIBUTED TO THIRD PARTIES WITHOUT PRIOR WRITTEN CONSENT FROM MILLS-TUI
AUSTRALIA PTY LTD
Page 6 of 69
2 LOCKER LAYOUT & EQUIPMENT STOWAGE
2.1 Locker Layout
2.1.1 Nearside Locker Layout
Figure 1
2.1.2 Offside Locker Layout
Figure 2
NS 4NS 3NS 2NS 1
OS 1OS 2OS 3OS 4
- 7. CRN: 12/685F PART NUMBER: 99-1-0757
© 2003 THIS DOCUMENT IS SUBJECT TO COPYRIGHT, NO PORTION CAN BE COPIED OR
DISTRIBUTED TO THIRD PARTIES WITHOUT PRIOR WRITTEN CONSENT FROM MILLS-TUI
AUSTRALIA PTY LTD
Page 7 of 69
2.1.3 Rear Locker Layout
Figure 3
RP 1
RD 1
- 8. CRN: 12/685F PART NUMBER: 99-1-0757
© 2003 THIS DOCUMENT IS SUBJECT TO COPYRIGHT, NO PORTION CAN BE COPIED OR
DISTRIBUTED TO THIRD PARTIES WITHOUT PRIOR WRITTEN CONSENT FROM MILLS-TUI
AUSTRALIA PTY LTD
Page 8 of 69
2.2 Equipment Stowage
2.2.1 Nearside Stowage
Figure 4
2.2.2 Offside Stowage
Figure 5
NS 1.1
PPE
Locker
NS
1.3
NS
1.2
NS 2 NS
3.3
NS
3.4
NS
3.2
OS
3.2
NS 3.1
NS 4.1
NS 4.2
NS
4.3
OS 2
OS 1.1
OS
3.3
OS
3.4
OS 3.1
OS 4.1
OS 4.2
OS
4.3
OS
3.2
OS
3.2
- 9. CRN: 12/685F PART NUMBER: 99-1-0757
© 2003 THIS DOCUMENT IS SUBJECT TO COPYRIGHT, NO PORTION CAN BE COPIED OR
DISTRIBUTED TO THIRD PARTIES WITHOUT PRIOR WRITTEN CONSENT FROM MILLS-TUI
AUSTRALIA PTY LTD
Page 9 of 69
2.2.3 Rear Stowage
Figure 6
RP 1
RD 1
- 10. CRN: 12/685F PART NUMBER: 99-1-0757
© 2003 THIS DOCUMENT IS SUBJECT TO COPYRIGHT, NO PORTION CAN BE COPIED OR
DISTRIBUTED TO THIRD PARTIES WITHOUT PRIOR WRITTEN CONSENT FROM MILLS-TUI
AUSTRALIA PTY LTD
Page 10 of 69
2.3 Nearside 1 Locker
Figure 7
Description Qty Location Securing Method
ELECTROLYTE SUPPLEMENT 8 Nearside 1.2 (In Esky) In Esky
CLEANING SET, BREATHING
APPARATUS
1 Nearside 1.2 N/A
COOLER, ESKY 15L 1 Nearside 1.2 L Bracket
WATER, DRINKING, BOTTLED 600 ML 8 Nearside 1.2 (In Esky) In Esky
BREATHING APPARATUS, SELF
CONTAINED, AIR SET
2 Nearside 1.3 Pull out tray
TALLY BOARD, STAGE 1 1 Nearside 1.1 Bracket
TALLY BOARD, STAGE 2 1 Nearside 1.1 Bracket
REFRESHMENT PACKS 8 Nearside 1.2 (In Esky) In Esky
BLANKET BAG KIT 1 Nearside 1.2 N/A
EXTENSION MASK SET 2 Nearside 1.2 N/A
SHARPS CONTAINER 1 Nearside 1.1 Bracket
CYLINDER, COMPRESSED GAS,
MEDICAL, RESUSCITATION, OXYGEN
1 Nearside 1.1 Bracket
MEDICAL EQUIPMENT SET, TRAUMA,
FIELD - EMT
1 Nearside 1.1 Strap #4
DEFRIBULATOR 1 Nearside 1.1 Strap #2
- 11. CRN: 12/685F PART NUMBER: 99-1-0757
© 2003 THIS DOCUMENT IS SUBJECT TO COPYRIGHT, NO PORTION CAN BE COPIED OR
DISTRIBUTED TO THIRD PARTIES WITHOUT PRIOR WRITTEN CONSENT FROM MILLS-TUI
AUSTRALIA PTY LTD
Page 11 of 69
2.4 Nearside 2 Locker
Figure 8
Description Qty Location Securing Method
CO2 Cylinder (not shown) 8 Nearside 2.1 Bracket
- 12. CRN: 12/685F PART NUMBER: 99-1-0757
© 2003 THIS DOCUMENT IS SUBJECT TO COPYRIGHT, NO PORTION CAN BE COPIED OR
DISTRIBUTED TO THIRD PARTIES WITHOUT PRIOR WRITTEN CONSENT FROM MILLS-TUI
AUSTRALIA PTY LTD
Page 12 of 69
2.5 Nearside 3 Locker
Figure 9
Description Qty Location Securing Method
BLACK HOSE 6 Nearside 3.1 N/A
CYLINDER, COMPRESSED GAS,
BREATHING APPARATUS
40 Nearside 3.2 Bracket
EXTINGUISHER, FIRE, CARBON
DIOXIDE
3 Nearside 3.3 Pull out tray
EXTINGUISHER, FIRE DP CHEM
AB(E), 9KG
2 Nearside 3.3 Pull out tray
CROWBAR, 1800 X 25MM 1 Nearside 3.4 Bracket
STAND LIGHT TRIPOD 1 Nearside 3.4 Bracket
- 13. CRN: 12/685F PART NUMBER: 99-1-0757
© 2003 THIS DOCUMENT IS SUBJECT TO COPYRIGHT, NO PORTION CAN BE COPIED OR
DISTRIBUTED TO THIRD PARTIES WITHOUT PRIOR WRITTEN CONSENT FROM MILLS-TUI
AUSTRALIA PTY LTD
Page 13 of 69
2.6 Nearside 4 Locker
Figure 10
Description Qty Location Securing Method
EXTENSION LEAD 4 Nearside 4.1 L-Bracket
BARRIER BRACKET (FOR LIGHTS) 1 Nearside 4.1 Strap # 1
LIGHTING KIT - GOLIATH LIGHTS 4 Nearside 4.1 Strap # 4
POWER DISTRIBUTION BOARD 1 Nearside 4.1 Strap # 2
ELECTRICAL SAFETY KIT 1 Nearside 4.1 Strap # 1
MARKER, TRAFFIC, RED CONE,
450MM
8 Nearside 4.2 N/A
LIGHT, WARNING, CLEAR STROBE
LIGHT KIT
1 Nearside 4.2 N/A
SIGN SET, TRAFFIC, HAZARD
TRIANGLES
1 Set Nearside 4.2 N/A
WHEEL CHOCKS 2 Nearside 4.2 Bracket
SUNSCREEN 1 Nearside 4 LHS Wall Bracket
HAND CLEANER 1 Nearside 4 LHS Wall Bracket
CLEANING TOOL SET, VACUUM
CLEANER ACCESSORIES
1 Nearside 4 Rear Wall Clips
VENTILATOR, POSITIVE PRESSURE,
ELECTRIC POWERED
1 Nearside 4.3 Pull out tray
CLEANER, VACUUM, ELECTRIC,
WET/DRY (WATERVAC)
1 Nearside 4.3 Pull out tray
- 14. CRN: 12/685F PART NUMBER: 99-1-0757
© 2003 THIS DOCUMENT IS SUBJECT TO COPYRIGHT, NO PORTION CAN BE COPIED OR
DISTRIBUTED TO THIRD PARTIES WITHOUT PRIOR WRITTEN CONSENT FROM MILLS-TUI
AUSTRALIA PTY LTD
Page 14 of 69
2.7 Offside 1 Locker
Figure 11
Description Qty Location Securing Method
BROOM, PUSH, BASSINE, 450MM 1 Offside1.1 (rear wall) Bracket
DETECTOR, GAS, AUTOMATIC
(COMBUSTION) FOUR HEAD
2 Offside1.1 Strap # 2
TAPE, BARRICADE, HOT ZONE, 500M 1 Offside1.1 Angle
TAPE, BARRICADE, 500M 1 Offside1.1 Angle
FOAM GENERATOR ACCESSORIES -
WHITE PLASTIC TUBING ROLLS
2 Offside1.2 Bracket
COAT, ALL WEATHER 2 Offside1.2 Crate 4
BLANKET, FIRE 4 Offside1.2 Crate 3
PROTECTIVE EQUIPMENT SET 1 Offside1.2 Crate 3
THERMAL GLOVES 2 Pairs Offside1.2 Crate 3
DUST MASKS - P2 (BOX) 2 Offside1.2 Crate 2
TYVEK SUITS (DISPOSABLE OVERALLS) -
EXTRA LARGE
6 Offside1.2 Crate 2
TYVEK SUITS (DISPOSABLE OVERALLS) -
LARGE
6 Offside1.2 Crate 2
TAG, CONTAMINATED CLOTHING
(SINGLE BAG)
25 Offside1.2 Crate 2
BAG, ASBESTOS CLOTHING ( SINGLE
PACK)
5 Offside1.2 Crate 2
BAG, CONTAMINATED CLOTHING (
SINGLE PACK)
5 Offside1.2 Crate 2
GLOVES, LATEX, INCLUDES DISPENSER 1 Box Offside1.2 Crate 1
CHEMICAL GLOVES (IN BAG) 12 Offside1.2 Crate 1
GUM BOOTS 2 Offside1.2 Crate 1
SUIT KIT, CHEMICAL PROTECTIVE,
SPLASH
2 Offside1.2 Crate 1
- 15. CRN: 12/685F PART NUMBER: 99-1-0757
© 2003 THIS DOCUMENT IS SUBJECT TO COPYRIGHT, NO PORTION CAN BE COPIED OR
DISTRIBUTED TO THIRD PARTIES WITHOUT PRIOR WRITTEN CONSENT FROM MILLS-TUI
AUSTRALIA PTY LTD
Page 15 of 69
2.8 Offside 2 Locker
Figure 12
Description Qty Location Securing Method
CO2 Cylinder (not shown) 8 Offside 2.1 Bracket
- 16. CRN: 12/685F PART NUMBER: 99-1-0757
© 2003 THIS DOCUMENT IS SUBJECT TO COPYRIGHT, NO PORTION CAN BE COPIED OR
DISTRIBUTED TO THIRD PARTIES WITHOUT PRIOR WRITTEN CONSENT FROM MILLS-TUI
AUSTRALIA PTY LTD
Page 16 of 69
2.9 Offside 3 Locker
Figure 13
Description Qty Location Securing Method
FOAM GENERATOR ACCESSORIES -
COLLAPSIBLE DUCTING
2 Offside 3.1 N/A
FOAM GENERATOR ACCESSORIES -
CHANNELS
4 Offside 3.1 N/A
FOAM, LIQUID, FIRE EXTINGUISHING 4 Offside 3.2 Bracket
SHOVEL, HAND. D HANDLE, SQUARE
MOUTH
1 Offside 3.3 Bracket
- 17. CRN: 12/685F PART NUMBER: 99-1-0757
© 2003 THIS DOCUMENT IS SUBJECT TO COPYRIGHT, NO PORTION CAN BE COPIED OR
DISTRIBUTED TO THIRD PARTIES WITHOUT PRIOR WRITTEN CONSENT FROM MILLS-TUI
AUSTRALIA PTY LTD
Page 17 of 69
2.10 Offside 4 Locker
Figure 14
Description Qty Location Securing Method
BLANKETS (LARGE GREY) 2 Offside 4.1 Strap # 2
SHEET, NON-METALLIC,
PROTECTIVE, SALVAGE, 3600 X
3600MM
2 Offside 4.1 Strap # 4
COUPLING - SMALL 1 Offside 4.2 N/A
COUPLING - LARGE 1 Offside 4.2 N/A
FIBERGLASS BLANK 1 Offside 4.2 N/A
ASSORTED FITTINGS (ADAPTERS) -
PELICAN CASE
1 Offside 4.2 N/A
FOAM GENERATOR "HI EXPANSION" 1 Offside 4.3 Strap # 3
- 18. CRN: 12/685F PART NUMBER: 99-1-0757
© 2003 THIS DOCUMENT IS SUBJECT TO COPYRIGHT, NO PORTION CAN BE COPIED OR
DISTRIBUTED TO THIRD PARTIES WITHOUT PRIOR WRITTEN CONSENT FROM MILLS-TUI
AUSTRALIA PTY LTD
Page 18 of 69
2.11 Rear Locker
Figure 15
Description Qty Location Securing Method
SIGN SET, TRAFFIC, HAZARD AHEAD 1 Rear Pocket MTA Straps
'WRENCH, SOCKET, HYDRANT,
HYDRANT COVER LIFTER
2 RP 1 Clip
'WRENCH, SOCKET, HYDRANT KEY 1 RP 1 Clip
HYDRANT, FIRE, STANDPIPE, SINGLE
HEAD
1 RP 1 Strap # 1
HYDRANT, FIRE, DELIVERY ELBOW 1 RP 1 Strap # 1
BAR, PRY, FIRE HYDRANT, STRAIGHT
BLADE, 600MM
1 RP 1 Clip
HOSE, LAYFLAT 25MM X 10M LONG 1 RP 1 With Goat Bag
FIREFIGHTING EQUIPMENT SET, INITIAL
ATTACK PACK, HIGH RISE
1 RP 1 Strap # 2
TOOL KIT (RED BOX) 1 RP 1 Strap # 2
CUTTER, BOLT, 750MM 1 RP 2 Drawer
FORCED ENTRY TOOL, HAND,
COMBINATION
1 RP 2 Drawer
WRENCH, (PIPE - STILLSONS) 2 RP 2 Drawer
SINGLE INJECTOR POINT SPANNER 1 RP 2 Drawer
DOUBLE INJECTOR POINT SPANNER 1 RP 2 Drawer
SHIP-TO-SHORE COUPLING 1 RP 2 Drawer
TUBE SPANNER 1 RP 2 Drawer
DISPERSER 1 RP 2 Drawer
MANIFOLD ADAPTER 1 RP 2 Drawer
- 19. CRN: 12/685F PART NUMBER: 99-1-0757
© 2003 THIS DOCUMENT IS SUBJECT TO COPYRIGHT, NO PORTION CAN BE COPIED OR
DISTRIBUTED TO THIRD PARTIES WITHOUT PRIOR WRITTEN CONSENT FROM MILLS-TUI
AUSTRALIA PTY LTD
Page 19 of 69
3 TRAYS AND SLIDE SYSTEMS
3.1 Rear Pull Out Steps
The vehicle is fitted with two (2) pull out steps which are mounted to Marshall Fitzroy S-100W
slides. The steps are fitted below the rear locker to aid access to the high storage areas. The
step slides use a spring loaded pin to lock in a stowed position. The pin is operated by pulling
the red T-bar handle towards the operator and pulling the step until it has reached its full
extension. To stow the step again pull gently on the T-bar handle, and slide the step back
under the vehicle until the pin locks back into the stowed position.
Figure 16
Figure 17
WWAARRNNIINNGG
Indicates the presence of a hazard that can cause personal injury if not avoided.
T-Bar
Handle
Step
Housed
Step
Unhoused
- 20. CRN: 12/685F PART NUMBER: 99-1-0757
© 2003 THIS DOCUMENT IS SUBJECT TO COPYRIGHT, NO PORTION CAN BE COPIED OR
DISTRIBUTED TO THIRD PARTIES WITHOUT PRIOR WRITTEN CONSENT FROM MILLS-TUI
AUSTRALIA PTY LTD
Page 20 of 69
Warning: Always ensure the step is securely locked to the extended position before standing
on the step.
Warning: Always step is securely locked in the closed position before moving the vehicle.
Warning: Do not drive the vehicle when the light is illuminated.
warning light on the ACS console in the cabin will activate when a
step is pulled out for use. The 24 hour clock on the front header will show which step is
unhoused.
3.2 Pull Out Stowage Trays
The vehicle is fitted with eight (8) pull out trays which are mounted to Marshall Fitzroy S-
100W slides. The slides are located in the following locations:
Battery tray
Offside high expansion foam generator tray
Offside rear pull out step
Rear pull out tray (locker deck)
Rear pull out drawer (between chassis rails)
Nearside water vac and PPV tray
Nearside rear pull out step
Nearside extinguisher tray
Nearside SCBA sets tray
The slide out trays are lockable in the two (2) extreme positions, stowed and working
positions, which are controlled by T-bar handles. When the T-bar handle is pulled forward a
spring loaded pin is released on the slide and the operator can pull the tray until it reaches its
full extension. To stow the tray again pull gently on the T-bar handle, and slide the step back
until the pin locks into the stowed position.
Warning: Do not pull the T-bar handle forward too far forward; otherwise damage to the
release mechanism will occur.
Warning: Do not drive the vehicle when the light is illuminated.
warning light on the ACS console in the cabin will activate when
any of the rear pull out trays are unhoused. The 24 hour clock on the front header will show
which tray is unhoused.
3.3 Wheel Arch Steps
Two (2) fold-down steps are fitted below the wheel arch locker deck to aid access to the high
storage areas. These steps contain two (2) spring loaded pins which lock the step assembly
in a stowed position and servicing position. When unlocked and in a working position the
mesh area can be lifted perpendicular to the step, and housed within the wheel arch deck
area in a servicing position. This allows access to the wheel of the vehicle for maintenance
purposes. The following are steps to get the step from a stowed position to a servicing
position:
WWAARRNNIINNGG
Indicates the presence of a hazard that can cause personal injury if not avoided.
- 21. CRN: 12/685F PART NUMBER: 99-1-0757
© 2003 THIS DOCUMENT IS SUBJECT TO COPYRIGHT, NO PORTION CAN BE COPIED OR
DISTRIBUTED TO THIRD PARTIES WITHOUT PRIOR WRITTEN CONSENT FROM MILLS-TUI
AUSTRALIA PTY LTD
Page 21 of 69
Unlock the spring loaded pin at the right hand side of the step and fully lower step,
Lift the mesh area of the step perpendicular to the main assembly,
Remove spring loaded pin from tubular housing by pressing and holding the push
button on top of the pin,
When removed press and hold the push button on top of pin and push the pin through
the allocated holes in the mesh and main step assemblies,
Once the pin is fully pushed through the step assemblies remove hand from spring
loaded pin,
Open the lower wheel arch door upwards to expose lower locker,
Lift the step assemblies upwards into lower wheel arch locker,
When the step is inside the lower wheel arch locker lock step in place by using the
right hand side spring lock pin.
Figure 18
Detail A
Spring
Loaded Pin
Step (main
assembly)
Housed
Step Mesh
Area
Stowed
Spring
Loaded Pin
- 22. CRN: 12/685F PART NUMBER: 99-1-0757
© 2003 THIS DOCUMENT IS SUBJECT TO COPYRIGHT, NO PORTION CAN BE COPIED OR
DISTRIBUTED TO THIRD PARTIES WITHOUT PRIOR WRITTEN CONSENT FROM MILLS-TUI
AUSTRALIA PTY LTD
Page 22 of 69
Figure 19
Figure 20 Figure 21
Figure 22
Step
Unhoused
Stowed Spring
Loaded Pin
Spring Loaded Pin
in Unfolded
Servicing position
Lower Wheel
Arch Locker
Door
Lower Wheel
Arch Locker
Door
Step in Unfolded
Servicing Position
- 23. CRN: 12/685F PART NUMBER: 99-1-0757
© 2003 THIS DOCUMENT IS SUBJECT TO COPYRIGHT, NO PORTION CAN BE COPIED OR
DISTRIBUTED TO THIRD PARTIES WITHOUT PRIOR WRITTEN CONSENT FROM MILLS-TUI
AUSTRALIA PTY LTD
Page 23 of 69
Figure 23
Warning: Step is a two person lift step.
Warning: Do not let the step drop down unaided.
Warning: Always check step is securely locked in the closed position before moving the
vehicle.
warning light on the ACS console in the cabin will activate when a
step is folded out for use. The 24 hour clock on the front header will show which step is
unhoused.
WWAARRNNIINNGG
Indicates the presence of a hazard that can cause personal injury if not avoided.
Step in
Servicing
Position
Spring
Loaded Pin in
Servicing
Position
- 24. CRN: 12/685F PART NUMBER: 99-1-0757
© 2003 THIS DOCUMENT IS SUBJECT TO COPYRIGHT, NO PORTION CAN BE COPIED OR
DISTRIBUTED TO THIRD PARTIES WITHOUT PRIOR WRITTEN CONSENT FROM MILLS-TUI
AUSTRALIA PTY LTD
Page 24 of 69
4 OPERATION OF CO2 SYSTEM
4.1 Introduction
The CO2 appliance consists of a CO2 injection system mounted on an Isuzu cab chassis.
The purpose of the appliance is to respond to fires in underground and basement sub-
stations, large electrical switchboards and computer rooms, grain silos, hoppers, ducting and
chemical fires as required. The appliance and crew also provide logistic support for BA
control and cylinder change over, fire water run-off and atmospheric monitoring.
4.2 Layout and equipment
The CO2 appliance carries sixteen (16) 24.5kg liquid CO2 cylinders. These are on two (2)
platforms, one either side of the appliance, each platform carrying eight (8) cylinders. The
platforms are loaded and unloaded by forklift truck.
Caution: Each cylinder is stamped with an inspection date and must be re-inspected five
years after this date; cylinders must not be filled if passed inspection date.
An inductor tube is fitted into each of the cylinders. This tube reaches nearly to the bottom of
the cylinder and ensures that CO2 is discharged through the cylinder valve head, flexible
hoses and manifold as a liquid. When the liquid discharges from the applicator it changes to
a gas.
Two (2) remote handles are provided in the CO2 locker, one (1) on each side of the vehicle.
These handles are attached to the shut off valves installed between the hose reels and the
manifold. The remote handles connected to the shut off valves remain in a closed (up)
position while the CO2 system is not in operation. In order to operate the system the remote
handles connected to the shut off valves must be turned to an open (down) position.
The system has an operating firing sequence in which the cylinders follow during discharge,
starting with cylinder one (1) through to cylinder eight (8). After turning the valves to an open
(down) position with the remote handles the next step is to break the seal on the pin and
pulling the lever on each cylinder, starting with cylinder one (1) in the firing sequence. This
operation applies to each side of the vehicle and the nearside and offside work
independently of each other.
Non-return valves are fitted between the manifold and the flexible hoses to ensure gas does
not blow back into discharged cylinders. Additional non-return valves are fitted between the
hose reels and the manifold to prevent such occurrences.
The hose reel contains 60m of hose and is terminated with a female coupling, which attaches
to the substation inlet manifold or portable applicator.
In circumstances where all the CO2 cylinders have been emptied there is an inlet valve
provided to allow external bulk supply of CO2 gas. The inlet valve is located in the nearside
front locker and requires the roller shutter to be open in order to use. A pressure gauge has
been fitted above the inlet valve to indicate the operating pressure of the system.
CCAAUUTTIIOONN
Indicates the presence of a hazard that may cause equipment damage.
- 25. CRN: 12/685F PART NUMBER: 99-1-0757
© 2003 THIS DOCUMENT IS SUBJECT TO COPYRIGHT, NO PORTION CAN BE COPIED OR
DISTRIBUTED TO THIRD PARTIES WITHOUT PRIOR WRITTEN CONSENT FROM MILLS-TUI
AUSTRALIA PTY LTD
Page 25 of 69
Note: This can only be used to supply CO2 to the hose reel not to refill the cylinders.
4.3 Precautions prior to discharging CO2 gas at any sub-station
Standard Operation Guidelines (SOGS) for fires in underground and basement sub-stations
require that Fire Brigade Communications notify the Energy Authority System Operator.
Warning: Except in the company of an Energy Supply Authority District Operator or for the
purposes of rescue no member of the NSW Fire Brigade should enter any electrical sub-
station due to:
Large quantities of oil and other flammable matter associated with sub-stations.
The high risk of electrocution from live electrical equipment.
The likelihood of fire and or explosion.
On arrival at a basement or sub-station fire, Brigade personnel are to:
Locate the inlet manifold.
Note: Each basement or sub-station requires a definite number of cylinders to be
discharged. The number of cylinders is embossed on the top of the octagonal manifold inlet
cap.
Connect the CO2 delivery hose from the CO2 appliance to the inlet manifold.
Locate the hatches or doors, and ventilation grilles to the sub-station.
Place heat resistant blankets near ventilation grilles.
Ensure that Energy Supply staff have vacated the sub-station. Only if a rescue is to
be attempted is entry to be made to the sub-station.
NNOOTTEESS
Used to provide additional information.
NNOOTTEESS
Used to provide additional information.
WWAARRNNIINNGG
Indicates the presence of a hazard that can cause personal injury if not avoided.
- 26. CRN: 12/685F PART NUMBER: 99-1-0757
© 2003 THIS DOCUMENT IS SUBJECT TO COPYRIGHT, NO PORTION CAN BE COPIED OR
DISTRIBUTED TO THIRD PARTIES WITHOUT PRIOR WRITTEN CONSENT FROM MILLS-TUI
AUSTRALIA PTY LTD
Page 26 of 69
Note: A joint search may be conducted by the NSW Fire Brigades and the Energy Supply
Authority District Operator if one or more doors or hatches are open and no one is available
to report the evacuation of all staff.
The NSW Fire Brigade Incident Controller will make the determination on the discharge of
CO2. Considerations may include:
Hatches or doors are open.
All Energy Supply staff are reported to be clear of the sub-station.
Discharge necessary to prevent the spread of fire and damage to surrounding
property, or danger to life or the environment, either directly or indirectly.
Note: Energy Supply Authority employees are only authorised to use the auxiliary face mask
and extension airline.
Warning: Fire Brigade staff are not to attempt to operate any switches or equipment within
the sub-station.
Warning: Energy Supply Authority employees can disconnect the high voltage supply to the
sub-station from some of the access hatchways. This may not remove the low voltage (415v)
supply in the sub-station. This voltage is dangerous to life and extreme care is still to be
taken when working within the sub-station.
4.4 Prior to discharging CO2 gas
The Incident Controller will decide on the use of portable extinguishers or the CO2
flood system.
If the CO2 flood system is used, all hatches and doors are to be closed and the
ventilation grilles in the roadway or footpath covered with heat resistant blankets or
other suitable equipment.
In the case of a basement sub-station, the Fire Brigade Incident Controller is to
ensure that all occupants in the area have been evacuated and that all openings and
access doorways into the sub-station are sealed.
WWAARRNNIINNGG
Indicates the presence of a hazard that can cause personal injury if not avoided.
NNOOTTEESS
Used to provide additional information.
NNOOTTEESS
Used to provide additional information.
- 27. CRN: 12/685F PART NUMBER: 99-1-0757
© 2003 THIS DOCUMENT IS SUBJECT TO COPYRIGHT, NO PORTION CAN BE COPIED OR
DISTRIBUTED TO THIRD PARTIES WITHOUT PRIOR WRITTEN CONSENT FROM MILLS-TUI
AUSTRALIA PTY LTD
Page 27 of 69
When all precautions have been taken, the required number of cylinders are to be
discharged.
4.5 Cylinder discharging
Ensure delivery hose is connected to inlet manifold.
Ensure ventilation hatches are sealed with heat resistant blankets.
Warning: The operator of the appliance is to ensure that the visor is pulled down on their
helmet before breaking seals and pulling levers of cylinders.
Turn the shut of valve to an open (down) position.
Break the seal and pull the lever of the required cylinders, allow 50 secs between
each cylinder to discharge gas.
In circumstances where the trigger of the applicator becomes too cold to for the operator
keep pressed inwards by hand a Velcro strap has been provided to slip over the handle and
ensure the trigger remains pulled. When the operator is finished with the applicator the strap
can be simply pulled down off the trigger and remain at the base of the applicator nozzle until
required again.
4.6 After discharging gas
The sub-station is to remain sealed for approximately twenty minutes before the
hatches are opened.
Checks are to be made to ensure that the fire has been extinguished, using
thermometers, Thermal Image Cameras or visual inspection.
Another injection of CO2 may be necessary to totally extinguish the fire.
Positive Pressure Ventilation (PPV) fan/s are to be used to ensure all gases have
been removed from the sub-station.
Warning: No entry is to be made to the sub-station until this has been done.
Following directions from the Fire Brigades Incident Controller a joint inspection is to
be made of the sub-station by Fire Brigade staff wearing SCBA and the Energy
Supply Authority District Operator wearing an auxiliary face mask and short air line.
Warning:
the sub-station.
WWAARRNNIINNGG
Indicates the presence of a hazard that can cause personal injury if not avoided.
WWAARRNNIINNGG
Indicates the presence of a hazard that can cause personal injury if not avoided.
- 28. CRN: 12/685F PART NUMBER: 99-1-0757
© 2003 THIS DOCUMENT IS SUBJECT TO COPYRIGHT, NO PORTION CAN BE COPIED OR
DISTRIBUTED TO THIRD PARTIES WITHOUT PRIOR WRITTEN CONSENT FROM MILLS-TUI
AUSTRALIA PTY LTD
Page 28 of 69
To ensure O2 and CO levels are within limits, atmospheric monitoring must be
conducted and clearance given by the Fire Brigades Incident Controller before any
personnel can enter the sub-station without respiratory protection.
If, as a result of the test, gas levels are outside the required levels to sustain life, the
Brigade is to continue to ventilate the sub-station until the chamber is cleared.
Note: The Fire Brigades Incident Controller is responsible for the respiratory protection of the
Energy Supply Authority employees while they are in the sub-station.
Note: The Energy Supply Authority District Operator is responsible for the safety of Brigade
personnel with regard to electrical hazards within the sub-station.
4.7 Information on suburban sub-stations
Ground level sub-stations outside the city area are not equipped with CO2 injection
manifolds, while most basement and underground sub-stations are. If a fire occurs in a sub-
station not equipped with a manifold system the CO2 is to be discharged from the cylinders
via the hose reel and applicator into the sub-station.
For any of these sub-stations, eight (8) cylinders of CO2 should be discharged. In certain
sub-stations, fire resistant, isolating doors are provided between the sub-station chamber
and the entrance hatchway. In these cases, it is essential that the door associated with the
hatchway, at which the CO2 is being injected, be opened sufficiently to allow the CO2 gas to
flood the sub-station chamber.
Note: A static electric charge may be generated by the discharge of CO2 gas and may
discharge from the applicator head.
4.8 On arrival at above ground fires
If the CO2 appliance is responded to an above ground fire or any other situation where the
hand held applicator or other portable injection system is used e.g. ducting, hoppers and
silos:
The hose with the applicator or portable injection attachment is to be taken to the
scene of the fire.
The motor driver is to break the seal and pull the lever of the first cylinder, allowing 50
sec between each cylinder to discharge gas. Communication must be maintained
between the motor driver and the applicator operator, to ensure that only the required
number of cylinders are discharged.
NNOOTTEESS
Used to provide additional information.
NNOOTTEESS
Used to provide additional information.
- 29. CRN: 12/685F PART NUMBER: 99-1-0757
© 2003 THIS DOCUMENT IS SUBJECT TO COPYRIGHT, NO PORTION CAN BE COPIED OR
DISTRIBUTED TO THIRD PARTIES WITHOUT PRIOR WRITTEN CONSENT FROM MILLS-TUI
AUSTRALIA PTY LTD
Page 29 of 69
WWAARRNNIINNGG
Indicates the presence of a hazard that can cause personal injury if not avoided.
The operator of the applicator must turn the shut of valve to an open (down) position,
break the seal on the cylinder head, and pull the securing pin to depress the trigger to
release the gas. The operator must wear SCBA and protective gloves suitable for this
operation.
Warning: To ensure O2 and CO2 levels are within limits, atmospheric monitoring must be
conducted and a clearance given by the NSW Fire Brigade Incident Controller before any
personnel can enter the sub-station without respiratory protection.
4.9 Hose reel operation
To use the hose reel first turn the remote handle to the open (down) position. The applicator
must be unhoused from its strap on the CO2 cylinder framework and then the hose can be
dragged off the reel. When the operations finish press the HOSE REEL REWIND button
whilst guiding the hose onto the reel and secure the hose applicator back in its strap on the
CO2 framework.
In circumstances where the HOSE REEL REWIND button is not working a manual rewind
handle is provided for the operator. There are two (2) on this vehicle, one in each wheel arch
locker.
Warning: Gloves must be worn when the hose is being rewound to prevent injuries from
debris and the couplings between lengths of the hose.
Warning: After the operation of the CO2 system return the remote handles connected to the
shut off valves to an OFF position.
Warning: After the operation of the bulk supply line return the shut off valves to an OFF
position.
Note: Rewind speed is approx. ½ meter per second.
Note: The electric rewind motors require the Isuzu ignition to be switched on
Note: An inlet for the supply of bulk CO2 is positioned above the hose reel. This can only be
used to supply CO2 to the hose reel not to refill the cylinders.
NNOOTTEESS
Used to provide additional information.
WWAARRNNIINNGG
Indicates the presence of a hazard that can cause personal injury if not avoided.
- 30. CRN: 12/685F PART NUMBER: 99-1-0757
© 2003 THIS DOCUMENT IS SUBJECT TO COPYRIGHT, NO PORTION CAN BE COPIED OR
DISTRIBUTED TO THIRD PARTIES WITHOUT PRIOR WRITTEN CONSENT FROM MILLS-TUI
AUSTRALIA PTY LTD
Page 30 of 69
5 ELECTRICAL
The vehicle is equipped with a number of controls for the appliances warning lights, sirens
and communication systems as well as electrical panels these are as follows:
5.1 Cabin Internal
5.1.1 Cab Internal Auxiliary Control System (ACS) Console
The ACS consolidates the primary system controls into one location and contains the
following primary features:
All primary operational switches.
Warning indicators for system failures.
The main processor for primary system control.
Time keeper and standby battery for the 24 hour clock.
Figure 24
Item Description Operation Interlocks Alarms
1 Charger
-Illuminates when charger is connected
-When active, start-inhibit and standby
switch are activated
Nil
ACS alarm if park
brake released and
ignition on
3
2
1
4
5
7 8 9 11
12
13
14
6
10
6
- 31. CRN: 12/685F PART NUMBER: 99-1-0757
© 2003 THIS DOCUMENT IS SUBJECT TO COPYRIGHT, NO PORTION CAN BE COPIED OR
DISTRIBUTED TO THIRD PARTIES WITHOUT PRIOR WRITTEN CONSENT FROM MILLS-TUI
AUSTRALIA PTY LTD
Page 31 of 69
2
Check Vehicle
Body
-Illuminates when body doors, steps or
CO2 trays are not housed
-When active, standby switch will hold on
Standby switch
must be on to
enable warning
light and alarm
ACS alarm if park
brake released and
ignition on
3
Vehicle Battery
Low
-Illuminates when vehicle battery voltage
drops below 22v for 10 seconds
-If voltage stays below 22v for 20
seconds low battery mode is invoked
Standby switch
must be on to
enable warning
light and alarm
ACS alarm if
ignition on.
Charger alarm if
ignition off
4
Comms
Battery Low
-Illuminates when communications
battery voltage drops below 11.5v
Standby switch
must be on to
enable warning
light and alarm
ACS alarm if
ignition on.
Charger alarm if
ignition off
5
Main System
Fault
-Illuminates when a fuse is blown in the
APD module
-When active, standby switch will hold on
Standby switch
must be on to
enable warning
light and alarm
ACS alarm if
ignition on.
Charger alarm if
ignition off
6
Warning Light
Spare 1 & 2
N/A N/A N/A
7
Standby/
Activate
-Enables all accessories and monitoring
circuits to activate.
-LED flashes amber if ignition is on and
standby switch is off. Green LED when
standby is on
Nil
ACS alarm if
ignition on and
standby switch is
off
8 Set/Reset
-Resets warning buzzer.
-Hold reset button for LED and alarm
test.
-Clock set
Turn ignition off,
Turn standby switch on,
Quickly press reset button once,
clock display will flash.
Press reset again to display
hours,
change hours,
Press reset again to display
minutes,
change minutes,
Press reset again for normal
operation
Standby switch on
Standby switch on
Ignition must be off
Set/Reset
9 Aux Power
-Activates the following:
Rear control panel enabled
Work lights enable
Locker lights enable
Area lights enable (auto turn on
if park lights are on)
Step lights
Standby switch on
and ignition on
And park lights on
And appropriate
door open
And appropriate
step open
ACS alarm if park
brake released
10 Cabin Light
-Down momentary switch, toggles
between on and off
-Up - Off
-Down Cabin light On
Standby switch on
and ignition on or
accessories on
N/A
11
Switch
Spare 1
N/A N/A N/A
12
Wail Yelp
High Low
-Up momentary switch, toggles
between wail and yelp
-Centre - Off
-Down high/low siren
Standby switch on
and siren switch
on
Nil
- 32. CRN: 12/685F PART NUMBER: 99-1-0757
© 2003 THIS DOCUMENT IS SUBJECT TO COPYRIGHT, NO PORTION CAN BE COPIED OR
DISTRIBUTED TO THIRD PARTIES WITHOUT PRIOR WRITTEN CONSENT FROM MILLS-TUI
AUSTRALIA PTY LTD
Page 32 of 69
13 Siren
-Up siren momentary On
-Centre - Off
-Down continuous siren
Standby switch on Nil
14
Scene On
Response
-UP - primary warning lights On
-Centre Off
-Down all warning lights On
Standby switch on
and ignition on
Nil
Table 1
5.1.2 Cab Internal Map Light
A map light is fitted on the passenger side of the cabin. The map light arm is housed in a clip
located on the A pillar of the vehicle. The light arm is flexible and can be removed and
adjusted to suit passenger user. There is an ON/OFF switch on the lamp itself.
Figure 25
5.1.3 Cab Internal Communications Box
The communications box contains the following primary features and is located behind the
The communications box houses the main radio systems. Included is independent
fusing which is the protection for communication batteries.
The communications power supply is designed to be used in conjunction with a
sealed lead acid battery; this will provide a 12 volt outlet to the transceivers.
The PPE container is removable and once removed an access opening is provide in the PPE
mounting platform for ease of maintenance.
5.1.4 Cab Internal Torch
Two (2) intrinsically safe Wolflite torches are fitted in the cabin complete with charging bases.
Both torches are installed on the floor in front of the centre console.
Refer to OEM for operating procedures.
5.1.5 Cab Internal Centre Console
A centre console is installed between the cabin seats. This console incorporates the GRN
radio head, the ACS front panels and stowage for the fuel cards.
ON / OFF
Switch
- 33. CRN: 12/685F PART NUMBER: 99-1-0757
© 2003 THIS DOCUMENT IS SUBJECT TO COPYRIGHT, NO PORTION CAN BE COPIED OR
DISTRIBUTED TO THIRD PARTIES WITHOUT PRIOR WRITTEN CONSENT FROM MILLS-TUI
AUSTRALIA PTY LTD
Page 33 of 69
Figure 26
5.1.6 Cab Internal Rear Mounted Camera Display Monitor
A rear mounted camera display monitor is fitted in the cabin as an aid for vehicle reversing.
The monitor is an OEM Isuzu FRR 600 monitor and the camera is the Mongoose CV78HD24
reversing camera kit.
5.1.7 Cab Internal Global positioning System (GPS)
A GPN is installed on a bracket located to the front of the centre console. The ACS provides
all the necessary components and wiring required for the operation.
5.1.8 Cab Internal Government Radio Network (GRN)
A NSW Government Radio Network (GRN) UHF radio is fitted in the cabin and incorporated
into the ACS.
5.1.9 Digital Clock
An electric 24-hour clock display is installed in the cabin front header above the driver. The
clock includes fault finding facilities and the ability to accumulate time for the engine running
hours via differing combination of switches on the ACS console.
5.1.10 Cab Internal Mobile Phone Charging Base
A mobile phone charging base is installed on the dash in the cabin. The ACS provides all the
necessary components and wiring for the operation of the mobile phone. A 12V power cable
for the operation of the mobile phone is provided in the front centre console
Spot Light
Control
GRN
Radio
ACS
Mobile
Phone
Charging
base
- 34. CRN: 12/685F PART NUMBER: 99-1-0757
© 2003 THIS DOCUMENT IS SUBJECT TO COPYRIGHT, NO PORTION CAN BE COPIED OR
DISTRIBUTED TO THIRD PARTIES WITHOUT PRIOR WRITTEN CONSENT FROM MILLS-TUI
AUSTRALIA PTY LTD
Page 34 of 69
5.1.11 Spot Light Control
The remote spot light control
allows the operator to rotate the spot light on top of the cabin in any direction desirable.
To turn on the remote spot light, press the activation button at the front of the remote. The
spot light is adjustable upward 105°, downward 35° from horizontal and rotate 360°. This is
easily achieved by pushing the joystick in the desired direction.
Figure 27
5.1.12 Cab Internal DPD Regeneration Dash Switch
The DPD regeneration switch is located on the left hand side of the steering wheel on the
dash. The DPD combines an oxidation catalyst to clean nitrogen oxides and hydrocarbons,
and a ceramic filter that traps 'particulate matter'. Once a certain amount of 'particulate
matter' is detected the ceramic filter regenerates, or cleans.
Figure 28
5.1.12.1 Automatic Regeneration of DPD
Under most operating conditions the DPD will regenerate automatically.
5.1.12.1 Manual Regeneration of DPD
The manual regeneration of the DPD should be operated according to the following
instructions:
DPD Dash
Switch
Spot Light
Control
- 35. CRN: 12/685F PART NUMBER: 99-1-0757
© 2003 THIS DOCUMENT IS SUBJECT TO COPYRIGHT, NO PORTION CAN BE COPIED OR
DISTRIBUTED TO THIRD PARTIES WITHOUT PRIOR WRITTEN CONSENT FROM MILLS-TUI
AUSTRALIA PTY LTD
Page 35 of 69
Below are general guidelines for manual regeneration of the DPD:
Under most operating conditions regeneration occurs automatically. A DPD indicator on the
dash will illuminate when regeneration occurs, rasing awareness to the driver. However, in
some circumstances the filter will require manual regeneration.
The truck engine must reach normal operating temperature for automatic regeneration.
Where this does not occur (generally due to short distances travelled or the truck's engine
being frequently started & stopped) manual regeneration may be required.
The DPD warning lamp in the instrument cluster will begin to flash slowly alerting the driver
that manual regeneration will be required within the next 60 to 100 kilometres. Within this
distance, the driver will need to engage the manual regeneration cycle ie. stop the truck,
keep the engine idling and press the DPD button. Regeneration takes between 15-20
minutes, during which time the truck must remain stationary
It is critical that the DPD filter be regenerated within the 60 to 100 kilometre period.
Nearing the end of this time frame, the DPD warning lamp will flash more rapidly (three times
per second), indicating that manual regeneration must occur immediately. If this is ignored
the 'engine check' lamp becomes illuminated and the truck enters 'limp home' mode (max
speed 20 km/h). At this point the filter cannot be manually regenerated and must be driven to
an Isuzu Dealership under reduced power, where the 'particulate matter' in the filter can be
cleared via special regeneration equipment
Warning: It is strongly recommended all vehicle operators are familiar with the correct
procedures for regeneration of the DPD & relevant sections of the Isuzu Owners Manuals.
5.2 Cab External
5.2.1 Cab External Emergency Warning Lights
The vehicle is fitted with standard emergency warning system lights. Two (2) Code 3, 2100
LED pod bars are installed on the cabin roof, two (2) Code 3, LEDX wide Optix grill and two
(2) intersecting LED lights are installed at the front of the vehicle. To operate emergency
warning lights turn on the switch on the ACS panel.
5.2.2 Cab External Air Horn
A Yankee HYW 100 dual tone electrical operated air horn is installed and located behind the
bumper. The air horn is operated via On/Off switch on the dash panel. An
indicating air horn light is provided to indicate when the air horn is active.
WWAARRNNIINNGG
Indicates the presence of a hazard that can cause personal injury if not avoided.
- 36. CRN: 12/685F PART NUMBER: 99-1-0757
© 2003 THIS DOCUMENT IS SUBJECT TO COPYRIGHT, NO PORTION CAN BE COPIED OR
DISTRIBUTED TO THIRD PARTIES WITHOUT PRIOR WRITTEN CONSENT FROM MILLS-TUI
AUSTRALIA PTY LTD
Page 36 of 69
5.3 Body Instrumentations and Controls
5.3.1 Body Control Console (BCC)
The BCC module provides controls for one of the hose reel rewind motors, the work lights,
locker and body area lights. The BCC is located in the front nearside locker and requires the
roller shutter to be opened in order to access module controls.
5.3.2 Message Board Remote Control
A message board remote control is provided at the rear of the vehicle on the wall in the
nearside 4 locker. The roller shutter needs to be opened in order to access module controls.
5.3.3 Hose Reel Rewind Switches
The two (2) hose reels are provided with rewind switches, the nearside is incorporated into
the BCC panel while the offside switch is located underneath the wheel arch locker, beside
the CO2 locker.
5.3.4 CO2 System
The CO2 system consists of sixteen (16) high pressure cylinders, eight (8) are accessed
from the nearside and eight (8) from the offside in the CO2 locker. The cylinders are
mounted in a pallet type stowage platform which is removable using a forklift. Each set of
cylinders has its own manifold and piping which lead to a common manifold which are linked
to the hose reels.
The CO2 gas may be discharged manually, one at a time, by the operator in one of two
ways:
1) by using the applicator, and
2) by connecting the swivel coupling directly to the transformer distribution system of
the relevant Electricity Supply Authority in NSW.
Refer to section 11 for complete CO2 system operation.
5.3.4.1 CO2 Stowage Platform
Two (2) removable CO2 stowage platforms are stored in the CO2 locker, one each side of
the vehicle. The platforms always remain in a locked position except when the cylinders need
to be removed and replaced. The platforms can be removed by unbolting the ten (10) bolts
fixed to the body, eight (8) are located underneath the platform, four (4) either side and two
(2) are located on the top angle of the platform, one (1) either side.
5.3.4.2 Applicator
Two (2) applicators are located in the CO2 locker at the front and centre of the CO2 cylinder
stowage platform. The 60m hose is connected from the hose reel to the base of the
applicator using a swivel coupling and connector fitting. A secure strap is attached to the
CO2 cylinder stowage platform and wraps around the applicator to keep it locked in place
when not in use. When the applicator is required the operator pulls the yellow tab on the
securing strap for release and it is immediately ready for use.
In circumstances where the trigger of the applicator becomes too cold to for the operator
keep pressed inwards by hand a Velcro strap has been provided to slip over the handle and
- 37. CRN: 12/685F PART NUMBER: 99-1-0757
© 2003 THIS DOCUMENT IS SUBJECT TO COPYRIGHT, NO PORTION CAN BE COPIED OR
DISTRIBUTED TO THIRD PARTIES WITHOUT PRIOR WRITTEN CONSENT FROM MILLS-TUI
AUSTRALIA PTY LTD
Page 37 of 69
ensure the trigger remains pulled. When the operator is finished with the applicator the strap
can be simply pulled down off the trigger and remain at the base of the applicator nozzle until
required again.
5.3.4.3 Swivel Coupling
Two (2) swivel couplings made of brass are required for each hose end, this coupling directly
attaches into the sub-station rooms.
5.3.5 Hose Reel
Two (2) ReCoila hose reels are installed in the CO2 locker, one (1) each side of the body
which are mounted to the roof. The 60m hose reel has electric rewind capability with a
maximum speed of 0.5m/s. The nearside electric rewind button is located on the BCC control
panel in the nearside front locker. The offside hose reel rewind button is located underneath
the wheel arch locker, adjacent to the CO2 locker.
Figure 29
To use the hose reel first turn the remote handle to the open (down) position. The applicator
must be unhoused from its strap on the CO2 cylinder framework and then the hose can be
dragged off the reel. When the operations finish press the HOSE REEL REWIND button
whilst guiding the hose onto the reel and secure the hose applicator back in its strap on the
CO2 framework.
In circumstances where the HOSE REEL REWIND button is not working a manual rewind
handle is provided for the operator. There are two (2) on this vehicle, one in each wheel arch
locker 3.2.
NNOOTTEESS
Used to provide additional information.
- 38. CRN: 12/685F PART NUMBER: 99-1-0757
© 2003 THIS DOCUMENT IS SUBJECT TO COPYRIGHT, NO PORTION CAN BE COPIED OR
DISTRIBUTED TO THIRD PARTIES WITHOUT PRIOR WRITTEN CONSENT FROM MILLS-TUI
AUSTRALIA PTY LTD
Page 38 of 69
Note: the electric rewind motors require the Isuzu ignition to be switched on
There are no OEM spare parts manuals or instruction manuals available for this product.
5.4 Body and Locker Electrical
Warning: Only suitably qualified electricians are to work on the electrical system.
5.4.1 Locker Lights
Locker lighting is provided in each locker using Dapro fluro lighting. The locker lights come
on automatically when a locker door is opened. If a nearside locker door is opened all the
nearside lockers lights come on. If an offside locker door is opened all the offside lockers
lights come on.
Note: The vehicle park lights must be on before the locker light system will operate. A
warning light is located in the cabin to warn if a locker door is open.
5.4.2 Work Lights
roof.
The work lights are enabled by the ancillary power switch on the ACS console and lights for
each side of the vehicle are independently switched.
5.4.3 GRN Speaker
An external GRN speaker is located in the CO2 locker on the nearside of the vehicle. The
speaker provides audio output with volume control.
5.4.4 Warning Lights
Flashing warning lights are fitted to access steps located at the side of the body, rear pull out
trays and the rear pull out drawer. A Check Vehicle Body on
the ACS console in the centre of the cabin which will activate when a step/tray is unhoused.
NNOOTTEESS
Used to provide additional information.
WWAARRNNIINNGG
Indicates the presence of a hazard that can cause personal injury if not avoided.
- 39. CRN: 12/685F PART NUMBER: 99-1-0757
© 2003 THIS DOCUMENT IS SUBJECT TO COPYRIGHT, NO PORTION CAN BE COPIED OR
DISTRIBUTED TO THIRD PARTIES WITHOUT PRIOR WRITTEN CONSENT FROM MILLS-TUI
AUSTRALIA PTY LTD
Page 39 of 69
5.4.5 Peripheral Lighting
Peripheral Dapro fluorescent lights are mounted within painted aluminium channels, on both
sides and the rear of the vehicle. These lights are enabled by the auxiliary power switch on
the ACS console and are also independently toggled from the BCC.
5.4.6 Message Board
A message board is installed at the rear of the vehicle within a stainless steel enclosure for
protection from damage and the environment.
5.4.7 Hose Reel Speed Controller
Each hose reel has a separate controller which contains the following features:
Slow start
Variable speed control
A stall overall threshold field adjustable between 20-40 amps
Spool out retard
The controller is housed inside the electrical body module which is located on the front
internal wall in the front locker.
5.4.8 External Vehicle Battery Charger Inlet
The vehicle is fitted with a battery charger inlet for connection to an external battery charger.
The battery charger inlet provides the vehicle with electrical current when it is parked within
the fire station. The charging unit is fully automatic and will fully charge the vehicle electrical
system and maintain it indefinitely without over charging. The vehicle must be plugged into
the wall mounted battery charger at all times when in the station to prevent the batteries from
going flat.
Figure 30
The vehicle starting system is isolated when connected to the battery charger. Prior to
entering the vehicle, the battery charger plug MUST be disconnected from the vehicle.
WWAARRNNIINNGG
Indicates the presence of a hazard that can cause personal injury if not avoided.
Battery
Charger
Inlet
- 40. CRN: 12/685F PART NUMBER: 99-1-0757
© 2003 THIS DOCUMENT IS SUBJECT TO COPYRIGHT, NO PORTION CAN BE COPIED OR
DISTRIBUTED TO THIRD PARTIES WITHOUT PRIOR WRITTEN CONSENT FROM MILLS-TUI
AUSTRALIA PTY LTD
Page 40 of 69
Warning: Should any faults be observed, report the fault to the appropriate maintenance
officer.
5.4.9 Body Electrical Module
The body electrical module is located on the front internal wall in the front locker. The body
electrical module contains 3 rear control modules, hose reel speed controls and all the
vehicle body wiring. For maintenance instructions refer Section 10.
Figure 31
5.4.10 Chassis Electrical Module
The chassis electrical module is located externally on the offside front wall of the body. The
chassis electrical module contains all the auxiliary power distribution (APD) fuses and
negative links.
Figure 32
Electrical
Body
module
APD
Box
- 41. CRN: 12/685F PART NUMBER: 99-1-0757
© 2003 THIS DOCUMENT IS SUBJECT TO COPYRIGHT, NO PORTION CAN BE COPIED OR
DISTRIBUTED TO THIRD PARTIES WITHOUT PRIOR WRITTEN CONSENT FROM MILLS-TUI
AUSTRALIA PTY LTD
Page 41 of 69
5.4.11 Circuit Breaker
A circuit breaker is located in the centre console in the cabin which provides protection for
the rear fog lights.
5.4.12 Welding
The electrical system of this appliance is equipped with computer processors which are
original Isuzu equipment. The vehicle batteries and these processors must be disconnected
before welding. Disconnect the following before welding:
Batteries - at the ground terminal on the chassis frame
Isuzu Electronic Refer Isuzu workshop manual
Caution: When welding the earth electrode must be attached to the plate being welded as
close to the weld as possible.
5.5 Safety General
Warning: a number of decals are located on the appliance to bring potential dangerous
issues or specific operational requirements to the attention of the operator. In conjunction
with these warning items, safety aids have also been included to minimize the potential for
injury during normal operation. Some of these features, such as step treads or handrails are
finished in safety yellow or anti-slip material to alert the operator of their presence. Before
the commencement of each shift the operators are to ensure all safety aids are in a
serviceable condition.
The operators and maintainers of the Mills-Tui Heavy Rescue Vehicle are to familiarise
themselves with the position and content of all such decals to ensure the appliance is used
safely and correctly.
The operators and maintainers of the Mills-Tui Heavy Rescue Vehicle are to familiarise
themselves with this and all OEM Manuals before they commence to operate or maintain the
equipment to ensure it is used safely and correctly.
CCAAUUTTIIOONN
Indicates the presence of a hazard that may cause equipment damage.
WWAARRNNIINNGG
Indicates the presence of a hazard that can cause personal injury if not avoided.
- 42. CRN: 12/685F PART NUMBER: 99-1-0757
© 2003 THIS DOCUMENT IS SUBJECT TO COPYRIGHT, NO PORTION CAN BE COPIED OR
DISTRIBUTED TO THIRD PARTIES WITHOUT PRIOR WRITTEN CONSENT FROM MILLS-TUI
AUSTRALIA PTY LTD
Page 42 of 69
6 MAINTENANCE INSTRUCTIONS
6.1 General
The components requiring maintenance on the Mills-Tui CO2 Rescue Vehicle are detailed in
the appropriate sections below.
The overall general condition of the vehicle shall be examined at the start of each shift to
ensure the appliance is in a safe and operational condition.
Warning: to maintain or access certain components or areas of the appliance may require
working on the roof of the body. Special care should be taken to ensure the roof area is free
from water or other fluids which may make the surface slippery. Caution must be exercised
when working on any elevated areas.
No personnel are permitted to work on the roof of the appliance.
The operators and maintainers of Mills-tui CO2 Rescue Vehicle are to familiarise themselves
with this and all OEM Manuals before they commence to operate or maintain the equipment
to ensure it is used safely and correctly.
WWAARRNNIINNGG
Indicates the presence of a hazard that can cause personal injury if not avoided.
- 43. CRN: 12/685F PART NUMBER: 99-1-0757
© 2003 THIS DOCUMENT IS SUBJECT TO COPYRIGHT, NO PORTION CAN BE COPIED OR
DISTRIBUTED TO THIRD PARTIES WITHOUT PRIOR WRITTEN CONSENT FROM MILLS-TUI
AUSTRALIA PTY LTD
Page 43 of 69
6.2 Daily Maintenance Inspection Sheet
FBY Number: Date:
Item Inspection Pass/Fail
1
Manually wash the vehicle exterior with a warm water soap solution and
a soft brush.
NOTE:
Avoid automatic vehicle washers. Do not wash in direct sunlight or
leave to dry in the sun.
NOTE:
Avoid using high pressure hoses to clean the vehicle.
NOTE:
Avoid spraying electrical components.
2 Clean the vehicle interior with a luke warm soap solution or water.
3
Check all tyre pressures; inspect tyres for tread wear and damage and
objects between duals.
4 Check all wheel nuts and front wheel bearing oil level.
5
Check if any damage has occurred to the roller shutters, shelves, slides
and stowage straps.
6
Check for any signs of leaks:
Engine oil
Transmission oil
Engine coolant
Power steering
Fuel
7
Inspect the chassis frame and brackets on the chassis for cracks, loose
bolts and rivets.
8 Drain air tanks.
9 Check engine oil level.
10 Check transmission oil level. In-cab method only
11 Check the level of electrolyte in the battery.
12 Check engine coolant level.
13 Check power steering fluid level.
14 Check emergency lighting system (lights/siren).
15 Check all vehicle lights, slide out steps warning light and roller door
16
Visually inspect all seat belts and belt operation. There must be no
loose threads on the belt straps.
17 Check operation and inspect fold down/pull out steps for any damages.
18 Check PTO engagement and disengagement.
19
Check condition of all labels and warnings. Note any missing and have
them replaced.
20 Check level of windscreen washer solution and wiper operation
21 Check fuel level. Refuel if below 1/4 full.
- 44. CRN: 12/685F PART NUMBER: 99-1-0757
© 2003 THIS DOCUMENT IS SUBJECT TO COPYRIGHT, NO PORTION CAN BE COPIED OR
DISTRIBUTED TO THIRD PARTIES WITHOUT PRIOR WRITTEN CONSENT FROM MILLS-TUI
AUSTRALIA PTY LTD
Page 44 of 69
6.3 Weekly Maintenance Inspection Sheet
FBY Number: Date:
Item Inspection Pass/Fail
1 Clean vehicle exterior
2 Clean vehicle interior
3 Tyre pressures and condition
4 Wheel nuts
5 Doors, shelves, slides and stowage straps
6 Vehicle leads
7 Chassis frame
8 Drain air tanks
9 Engine oil level
10 Transmission oil level
11 Battery check
12 Engine coolant level
13 Power steering level
14 Emergency lighting system
15 Vehicle lights and steps
16 Seat belt inspection
17 Fold down steps
18 Pull out steps
19 Hose reel operation
20 Signage and label check
- 45. CRN: 12/685F PART NUMBER: 99-1-0757
© 2003 THIS DOCUMENT IS SUBJECT TO COPYRIGHT, NO PORTION CAN BE COPIED OR
DISTRIBUTED TO THIRD PARTIES WITHOUT PRIOR WRITTEN CONSENT FROM MILLS-TUI
AUSTRALIA PTY LTD
Page 45 of 69
6.4 Regular Inspections
6.4.1 heck List
The following checks should be performed to maintain safe and dependable vehicle
-up procedures).
6.4.1.1 Exterior
Check tyres for inflation pressure and damage.
Check wheel nuts for looseness.
6 and 7 Stud Disc Wheel - The wheel nuts on the right side wheels have right hand
threads and the wheel nuts on the left side wheels have left hand threads
10 Stud Disc Wheel - All wheel nuts on the wheels have right hand threads.
Check front wheel hub bearing oil level (if so equipped).
Check chassis springs for damage.
6.4.1.2 Interior
Check tyres for inflation pressure and damage.
Check wheel nuts for looseness.
6 and 7 Stud Disc Wheel - The wheel nuts on the right side wheels have right hand
threads and the wheel nuts on the left side wheels have left hand threads.
10 Stud Disc Wheel - All wheel nuts on the wheels have right hand threads.
Check front wheel hub bearing oil level (if so equipped).
Check chassis springs for damage.
Check operation of lights.
Check for any oil, water, fuel, brake fluid and power steering fluid leaks.
Drain the air tanks.
Check level of electrolyte in each cell of the batteries.
Check water separator level (Fuel sedimentary)
6.4.1.3 Within engine compartment
Check engine oil level.
Check fan belt tension.
Check engine coolant level and radiator cap looseness.
Check level of power steering fluid. Power steering fluid tank location:
6H : Right hand side of the engine
6S & 6ST : Behind the cab.
6.4.1.4 Within front lid
Check level of windshield washer solution in the tank.
6.4.1.5 Within cab
Check for steering wheel free play and looseness in mount. The wheel free play
should be checked with the engine running.
Check parking brake lever travel and function.
Check operation of horns, windshield wipers and turn signals.
Check operation of instruments and indicator lights.
Check level of fuel in the fuel tank against fuel gauge.
Check operation of door locking mechanism.
- 46. CRN: 12/685F PART NUMBER: 99-1-0757
© 2003 THIS DOCUMENT IS SUBJECT TO COPYRIGHT, NO PORTION CAN BE COPIED OR
DISTRIBUTED TO THIRD PARTIES WITHOUT PRIOR WRITTEN CONSENT FROM MILLS-TUI
AUSTRALIA PTY LTD
Page 46 of 69
6.4.1.6 After starting engine
With the engine running, check that the indicator lights go out and remain out.
Check brake pedal freeplay and function.
Check charging condition of air tank.
Check for abnormal engine noise and colour of exhaust gases.
When the engine is thoroughly warmed up, return the idle control knob to the
normal idling position.
6.4.1.7 Stopping engine
If the engine shows signs of overheating, do not stop immediately, keep it running at
a fast idle until engine temperature decreases.
6.5 Extended Vehicle Maintenance
6.5.1 Cab / Chassis
The Isuzu FRR600 4x2 Crew cab / chassis requires regular maintenance. For maintenance
& spare parts instructions refer to the Isuzu Workshop Manual.
6.5.2 Isuzu Transmission
Refer to the Isuzu Workshop Manual.
6.5.3 To Remove Cab from Cab / Chassis
Removal of the cab from cab / chassis is to be completed as per the Isuzu Workshop
Manual. Firstly, the following sequence must be performed to disconnect the MTA supplied
electrical services:
a) Disconnect the batteries,
b) Unplug the Deutsch plugs under the front of the cabin,
c) Disconnect the positive and negative terminals located underneath the Wolflite
torches on the floor in the cabin and pull through the floor,
d) Proceed to the Isuzu Workshop manual.
To replace the cab, follow the above procedure in reverse order.
6.5.4 Cab Internal Dash Switches and Warning Lights
There are no items requiring specific maintenance actions in this area.
6.5.5 Cab Internal Siren & Radios
There are no items requiring specific maintenance actions in this area.
6.6 Message Board
Refer to OEM Manuals for maintenance and spare parts information.
- 47. CRN: 12/685F PART NUMBER: 99-1-0757
© 2003 THIS DOCUMENT IS SUBJECT TO COPYRIGHT, NO PORTION CAN BE COPIED OR
DISTRIBUTED TO THIRD PARTIES WITHOUT PRIOR WRITTEN CONSENT FROM MILLS-TUI
AUSTRALIA PTY LTD
Page 47 of 69
6.7 Hose Reels
The hose reels mounting bolts should be periodically checked for play. Tighten the M12 bolts
to 77Nm torque. Check all other hose reel bolts for play periodically.
There are 2 grease nipples per hose reel which require lubricating every 6 months.
To remove a hose reel:
a) Disconnect:
i. Flexible hoses from the shut off valves,
ii. Electrical harness from the rewind motor,
b) Support the hose reel with a forklift,
c) Remove fasteners from body framework,
d) Lower the hose reel.
Installing the hose reel is a reverse of the removal procedure.
6.7.1 Body
The MTA body is constructed as two (2) separate modules using aluminium sheet and tube
sections. The two (2) modules are isolated from chassis induced stress via a flexible
mounting system. There are four (4) spring mounts at the front and two (2) fixed mounts at
the rear of the module.
The front body module can be removed independently of the rear body module and vice
versa.
Caution: under no circumstances are the body modules to be lifted with equipment in the
lockers. Prior to removing either body module ensure all equipment is removed from the
respective lockers.
6.7.1.1 Removing the Body Module
To remove the front body module perform the following sequence:
a) Tilt the cabin,
b) Disconnect the batteries,
c) Disconnect the chassis body plug,
d) Disconnect the plugs from the front steps and remove the cable ties,
e) Remove harness from front wall,
f) Remove reverse camera cable from cabin,
g) Remove the body mount access covers inside lockers in body module,
h) Remove the bolts and springs from the body mounts,
i) Using the correct lifting equipment connected to the lifting eyes in the roof of the body
strike or jam against the water tank or ROPS.
To replace, reverse the above procedure and ensure all fasteners are replaced and tightened
to the correct torque setting. When replacing body module spring mounts ensure springs are
compressed no more than 3mm from their static length.
CCAAUUTTIIOONN
Indicates the presence of a hazard that may cause equipment damage.
- 48. CRN: 12/685F PART NUMBER: 99-1-0757
© 2003 THIS DOCUMENT IS SUBJECT TO COPYRIGHT, NO PORTION CAN BE COPIED OR
DISTRIBUTED TO THIRD PARTIES WITHOUT PRIOR WRITTEN CONSENT FROM MILLS-TUI
AUSTRALIA PTY LTD
Page 48 of 69
6.7.2 Roller Shutter Doors
When the roller shutters are difficult to slide apply silicone spray to the shutter guides.
6.7.2.1 To Remove Roller Shutter Doors
a)
b) Drill rivets from tracks then remove same
c) Working from the inside with the door in the down position, place a pin, nail or similar
object in the hole through the bearing. When it is aligned with the one in the axle, this
retains the required spring tension for a particular door
d) With assistance lift the weight of the door slightly and disengage the joining slats
e) The door now can be removed toward the over-side of the vehicle
f) The drum and axle can now be taken from the mounting brackets by removing the
g) Replacement is the reverse of this procedure
6.7.3 Access Steps
6.7.3.1 Slide Out Front Access Steps
Periodically check for loose bolts and tighten as required.
Warning: Support the wheel arch step if removal is required.
6.8 Electrical
Warning: Only suitably qualified electricians are to work on the electrical system.
6.8.1 Circuit Breakers/Fuses
There are no items requiring specific maintenance actions in this area.
WWAARRNNIINNGG
Indicates the presence of a hazard that can cause personal injury if not avoided.
CCAAUUTTIIOONN
Indicates the presence of a hazard that may cause equipment damage.
WWAARRNNIINNGG
Indicates the presence of a hazard that can cause personal injury if not avoided.
- 49. CRN: 12/685F PART NUMBER: 99-1-0757
© 2003 THIS DOCUMENT IS SUBJECT TO COPYRIGHT, NO PORTION CAN BE COPIED OR
DISTRIBUTED TO THIRD PARTIES WITHOUT PRIOR WRITTEN CONSENT FROM MILLS-TUI
AUSTRALIA PTY LTD
Page 49 of 69
6.8.2 Corrosion guard
The following electrical modules are fitted with corrosion protection pads (Vapagaurd P2E):
a) Cabin electrical module
b) Body electrical module
c) Chassis electrical module
These pads protect the electrical components from damage by moisture and have been
added as a precaution. The pads must be replaced once a year.
6.9 Safety General
On a regular basis ensure all warning instructions and decals are securely fitted to the
appliance. Check step treads and handrails are securely attached and in a serviceable
condition.
- 50. CRN: 12/685F PART NUMBER: 99-1-0757
© 2003 THIS DOCUMENT IS SUBJECT TO COPYRIGHT, NO PORTION CAN BE COPIED OR
DISTRIBUTED TO THIRD PARTIES WITHOUT PRIOR WRITTEN CONSENT FROM MILLS-TUI
AUSTRALIA PTY LTD
Page 50 of 69
7 FAULT FINDING
Note: Advise fleet manager when fault occurs frequently.
System Fault Finding
System Problem Possible causes Solution
Fog lights
Front fog light will not
operate
Park lights off.
Fuse blown.
Turn park lights on.
Replace fuse in cabin
electrical cabinet.
Rear fog lights will
not operate
Front fog lights off.
Fuse blown.
Turn front fog lights on.
Replace fuse in cabin
electrical cabinet.
Air horn
Air horn will not
operate
Air horn switch not
activated.
Turn on air horn switch.
Emergency
lighting
Beacons will not
operate
Fuse blown.
Replace fuse in cab relay
box.
Rear strobes will not
operate
Fuse blown.
Replace fuse in cab relay
box.
N/S beacon will not
operate
Vehicle battery low.
Turn off ancillary
equipment & increase
engine RPM.
Front strobes will not
operate
Vehicle battery low.
Fuse blown.
Incorrect switch
selection.
Turn off ancillary
equipment & increase
engine RPM.
Replace fuse in cab relay
box.
Switch to lights 2.
Head light flashers
will not operate
Incorrect switch
selection.
Fuse blown.
Vehicle battery low.
Park lights on.
Switch to lights 2.
Replace fuse in cab relay
box.
Turn off ancillary
equipment and increase
engine RPM.
Turn park lights off.
Siren Siren will not operate Fuse blown.
Replace fuse in cab relay
box.
Cabin light
Cabin light will not
operate
Fuse blown.
Replace fuse in cab relay
box.
Locker lights will not
operate
Locker light master
switch off.
Turn switch on.
Body lights
Light in individual
lockers will not
operate
Faulty door switch. Test door switches.
Area lights will not
operate
Rear panel master
switch off.
Turn switch on.
NNOOTTEESS
Used to provide additional information.
- 51. CRN: 12/685F PART NUMBER: 99-1-0757
© 2003 THIS DOCUMENT IS SUBJECT TO COPYRIGHT, NO PORTION CAN BE COPIED OR
DISTRIBUTED TO THIRD PARTIES WITHOUT PRIOR WRITTEN CONSENT FROM MILLS-TUI
AUSTRALIA PTY LTD
Page 51 of 69
Slide & rear flood
lights not operating
Fuse blown
Rear panel master
switch off.
Replace fuse in rear relay
box.
Turn switch on.
Door & stepwell lights
will not operate
Rear panel master
switch off.
Fuse blown.
Turn switch on.
Replace fuse in rear relay
box.
Radio Will not operate Isolation switch off. Turn on.
Blown fuse.
Replace fuse in
communication box.
Faulty isolation switch.
Turn on switch in
communications box.
Communications battery
flat.
Charge battery - test
vehicle charging.
Step lights Will not operate Blown fuse
Replace fuse in rear relay
box.
Switch not on. Turn rear panel switch on.
Step switch faulty. Clean and test switches.
Map light Will not operate Blown fuse.
Replace fuse in cab
electrical cabinet.
Blown bulb. Replace bulb.
PTO Will not engage Park brake off. Apply park brake.
Not in neutral. Select neutral.
Engine revs over 900
RPM.
Reduce RPM to idle.
Blown fuse.
Replace fuse in electrical
cabinet.
PTO switched
incorrectly.
See manual - operations.
Hose reels Will not operate Rear panel switch off. Turn switch on.
Blown fuse.
Replace fusable link in
power distribution box.
- 52. CRN: 12/685F PART NUMBER: 99-1-0757
© 2003 THIS DOCUMENT IS SUBJECT TO COPYRIGHT, NO PORTION CAN BE COPIED OR
DISTRIBUTED TO THIRD PARTIES WITHOUT PRIOR WRITTEN CONSENT FROM MILLS-TUI
AUSTRALIA PTY LTD
Page 52 of 69
8 PARTS LIST
8.1 General
This section of the manual lists all part numbers of both fabricated & purchased parts used
on the appliance.
8.2 External Vehicle
8.2.1 Cabin
Figure 33
Item Description Vendor Part No.
1 Intersecting LED Lights Britax Free Issue
2 Optix LED Grill Lights Britax Free Issue
3 Cabin Spot Light
Federal Signals
Corporation
Visibeam VB24S
4 Pod Bar Britax Free Issue
5 Cab Mounting Beacon Bar MTA 25-1-0457
6 Air Horn (not shown) Yankee HYW 1000
1 1
2 2
3
4 5
- 53. CRN: 12/685F PART NUMBER: 99-1-0757
© 2003 THIS DOCUMENT IS SUBJECT TO COPYRIGHT, NO PORTION CAN BE COPIED OR
DISTRIBUTED TO THIRD PARTIES WITHOUT PRIOR WRITTEN CONSENT FROM MILLS-TUI
AUSTRALIA PTY LTD
Page 53 of 69
8.2.2 Nearside Vehicle
Figure 34
Item Description Vendor Part No.
1 Work Lights Hella 1513
2 Dapro Light 26W Dapro 30-3-1355
3 Dapro Light 13W Dapro 445434
4 Dapro Light 8W Dapro 445433
5 Bracket Charger Inlet MTA 30-1-2854
6 Nearside 1 Roller Shutter Austral Monsoon 20-3-7705
7 Nearside 1 Fold Down Step MTA 20-1-8028
8 Amber Side Reflector Hella 2919
9 Hose Reel - Right Hand Recoila 60-3-1115
10 Nearside 3 Roller Shutter Austral Monsoon 20-3-7706
11 Nearside 3 Fold Down Step MTA 20-1-8120
12 Duobeam LED Lights Britax Free Issue
13 Nearside 4 Roller Shutter Austral Monsoon 20-3-7707
14 Nearside 4 Pull Out Step MTA 20-1-8139
15 Side Marker Hella 2053
1 2 3 4
5
6 7
8
8
11
9 10 12
13
14
15
1
- 54. CRN: 12/685F PART NUMBER: 99-1-0757
© 2003 THIS DOCUMENT IS SUBJECT TO COPYRIGHT, NO PORTION CAN BE COPIED OR
DISTRIBUTED TO THIRD PARTIES WITHOUT PRIOR WRITTEN CONSENT FROM MILLS-TUI
AUSTRALIA PTY LTD
Page 54 of 69
8.2.3 Offside Vehicle
Figure 35
Item Description Vendor Part No.
1 Work Lights Hella 1513
2 Dapro Light 26W Dapro 30-3-1355
3 Dapro Light 13W Dapro 445434
4 Dapro Light 8W Dapro 445433
5 Bracket Charger Inlet MTA 30-1-2854
6 Offside 1 Roller Shutter Austral Monsoon 20-3-7705
7 Offside 1 Fold Down Step MTA 20-1-8028
8 Amber Side Reflector Hella 2919
9 Hose Reel - Left Hand Recoila 60-3-1141
10 Offside 3 Roller Shutter Austral Monsoon 20-3-7706
11 Offside 3 Fold Down Step MTA 20-1-8120
12 Duobeam LED Lights Britax Free Issue
13 Offside 4 Roller Shutter Austral Monsoon 20-3-7707
14 Offside 4 Pull Out Step MTA 20-1-8139
15 Side Marker Hella 2053
1 2 3 4
5
6
7 8
8
11
910
12
13
14
15
1
- 55. CRN: 12/685F PART NUMBER: 99-1-0757
© 2003 THIS DOCUMENT IS SUBJECT TO COPYRIGHT, NO PORTION CAN BE COPIED OR
DISTRIBUTED TO THIRD PARTIES WITHOUT PRIOR WRITTEN CONSENT FROM MILLS-TUI
AUSTRALIA PTY LTD
Page 55 of 69
8.2.4 Rear Vehicle
Figure 36
Item Description Vendor Part No.
1 Message Board Hazard Systems 30-3-1600
2 Reversing Camera
Mongoose Safety
and Security
CV78HD24
3 Dapro Light 13W Dapro 445434
4 Dapro Light 8W Dapro 445433
5 Rear End Outline Marker Hella 2308
6 Rear Roller Shutter Austral Monsoon 20-3-7708
7 Rear Reflector Hella 2920
8 Combination Lamp
LED
Technologies
100BARRWM
9 Fog Lamp Britax 738-00
10 License Plate Lamp Hella 2559
11 Door Rear Pull Out Drawer MTA 20-1-8166
12 Removable Tow Bar MTA 15-1-1291
13 Adjustable Tongue Tow Bar Hayman Reese 21187
14 Retaining Pin and Clip Hayman Reese 555025BL
1
2
3
4
5
6
77
8 8
9910 10 12
11
13 14
5
- 56. CRN: 12/685F PART NUMBER: 99-1-0757
© 2003 THIS DOCUMENT IS SUBJECT TO COPYRIGHT, NO PORTION CAN BE COPIED OR
DISTRIBUTED TO THIRD PARTIES WITHOUT PRIOR WRITTEN CONSENT FROM MILLS-TUI
AUSTRALIA PTY LTD
Page 56 of 69
8.3 Internal Vehicle
8.3.1 Cabin
Figure 37 Figure 38
Figure 39 Figure 40
Item Description Vendor Part No.
1 Centre Console Fiberglass Kensim Pty Ltd 25-1-0235
2 80mm Packer Centre Console MTA 25-1-0739
3 Panel Impart Centre Console MTA 25-1-0466
4 24 Hour Clock
Inventis
Technology
ELS CL51-A
5 Torches
Wolf Safety Lamp
Company
Wolflite 127/129
6 Communications Box MTA 25-2-0736
7 Communications Box Lid MTA 25-1-0735
8 Document Stowage Container MTA 25-1-0730
9 PPE Stowage Container MTA 25-1-0729
10 Platform Rear Cabin MTA 25-1-0732
11 Bracket Mounting Foot Switch MTA 300491
1 2 3
4
5 569 7
8
10
11
- 57. CRN: 12/685F PART NUMBER: 99-1-0757
© 2003 THIS DOCUMENT IS SUBJECT TO COPYRIGHT, NO PORTION CAN BE COPIED OR
DISTRIBUTED TO THIRD PARTIES WITHOUT PRIOR WRITTEN CONSENT FROM MILLS-TUI
AUSTRALIA PTY LTD
Page 57 of 69
8.3.2 Nearside 1 Locker
Figure 41
Item Description Vendor Part No.
1 Shelf Front Locker MTA 20-1-7928
2 Bracket for SCBA Sets MTA 20-1-7980
3 Slide Bracket SCBA Sets Marshall Fitzroy 20-3-7585
4
Mounting Bracket Control Panel &
Valve
MTA 20-1-8100
5 Bracket BA Board MTA 20-1-7983
6 Bracket Spare Oxygen Cylinder MTA 20-1-8064
7 Bracket Sharps Container (not shown) MTA 20-1-8065
8 Breeching Dees (not shown)
Industrial
Evolutions
FIB-JA
9 Strap # 2 - Defibrillator Just Straps 20-3-2099
10 Strap # 4 - EMT Just Straps 20-3-8009
11 Electrical Box Front Locker MTA 20-1-8142
1
23
4
5
6
9
10
11
- 58. CRN: 12/685F PART NUMBER: 99-1-0757
© 2003 THIS DOCUMENT IS SUBJECT TO COPYRIGHT, NO PORTION CAN BE COPIED OR
DISTRIBUTED TO THIRD PARTIES WITHOUT PRIOR WRITTEN CONSENT FROM MILLS-TUI
AUSTRALIA PTY LTD
Page 58 of 69
8.3.3 Nearside 2 Locker
Figure 42
Item Description Vendor Part No.
1 Pallet CO2 Bottles MTA 20-1-7801
2 CO2 Bottles Clamps MTA 20-1-7803
3 Mounting Bracket CO2 Manifold MTA 20-1-8101
4 Hose Reel Roof mounts MTA 20-1-8014
1
2
3
4
- 59. CRN: 12/685F PART NUMBER: 99-1-0757
© 2003 THIS DOCUMENT IS SUBJECT TO COPYRIGHT, NO PORTION CAN BE COPIED OR
DISTRIBUTED TO THIRD PARTIES WITHOUT PRIOR WRITTEN CONSENT FROM MILLS-TUI
AUSTRALIA PTY LTD
Page 59 of 69
8.3.4 Nearside 3 Locker
Figure 43
Item Description Vendor Part No.
1 Lower Wheel Arch Door MTA 20-1-7876
2 Bracket Crowbar MTA 20-1-8147
3 Bracket Tripod MTA 20-1-8148
4 Assembly SCBA Cylinder Storage MTA 20-2-7945
5 Bracket Extinguisher NS W/A Locker MTA 20-1-7981
6 Slide Bracket Extinguisher Marshall Fitzroy 20-3-7586
7 Shelf Wheel Arch Locker MTA 20-1-7929
1
2
3
4
5
7
6
- 60. CRN: 12/685F PART NUMBER: 99-1-0757
© 2003 THIS DOCUMENT IS SUBJECT TO COPYRIGHT, NO PORTION CAN BE COPIED OR
DISTRIBUTED TO THIRD PARTIES WITHOUT PRIOR WRITTEN CONSENT FROM MILLS-TUI
AUSTRALIA PTY LTD
Page 60 of 69
8.3.5 Nearside 4 Locker
Figure 44
Item Description Vendor Part No.
1 NS Rear Pull Out Tray MTA 20-1-8054
2 NS & OS Rear Slide Marshall Fitzroy 20-3-7587
3 Shelf NS Rear Lower MTA 20-1-7931
4 Shelf NS Rear Upper MTA 20-1-7930
5 Breeching Dees (not shown)
Industrial
Evolutions
FIB-JA
6 Strap # 4 Goliath Lights Just Straps 20-3-8009
7
Strap # 1 Electrical Safety Kit
(not shown)
Just Straps 20-3-2098
8
Strap # 2 Power Distribution Board
(not shown)
Just Straps 20-3-2099
9 Strap # 1 Barrier Bracket (not shown) Just Straps 20-3-2098
1
3
4
2
6
- 61. CRN: 12/685F PART NUMBER: 99-1-0757
© 2003 THIS DOCUMENT IS SUBJECT TO COPYRIGHT, NO PORTION CAN BE COPIED OR
DISTRIBUTED TO THIRD PARTIES WITHOUT PRIOR WRITTEN CONSENT FROM MILLS-TUI
AUSTRALIA PTY LTD
Page 61 of 69
8.3.6 Offside 1 Locker & Battery Housing
Figure 45
Item Description Vendor Part No.
1 Bracket Plastic Rolls MTA 20-1-7980
2 Bracket Broom MTA 20-1-8066
3 Breeching Dees (not shown)
Industrial
Evolutions
FIB-JA
4 Strap # 2 Gas Detector Just Straps 20-3-2099
5 Battery Slide Out Tray MTA 20-1-8056
6 Slide Battery Tray Marshall Fitzroy 20-3-7590
1
2
4
5
6
- 62. CRN: 12/685F PART NUMBER: 99-1-0757
© 2003 THIS DOCUMENT IS SUBJECT TO COPYRIGHT, NO PORTION CAN BE COPIED OR
DISTRIBUTED TO THIRD PARTIES WITHOUT PRIOR WRITTEN CONSENT FROM MILLS-TUI
AUSTRALIA PTY LTD
Page 62 of 69
8.3.7 Offside 2 Locker
Figure 46
Item Description Vendor Part No.
1 Pallet CO2 Bottles MTA 20-1-7801
2 CO2 Bottles Clamps MTA 20-1-7803
3 Mounting Bracket CO2 Manifold MTA 20-1-8101
4 Hose Reel Roof mounts MTA 20-1-8014
1
2
3
4
- 63. CRN: 12/685F PART NUMBER: 99-1-0757
© 2003 THIS DOCUMENT IS SUBJECT TO COPYRIGHT, NO PORTION CAN BE COPIED OR
DISTRIBUTED TO THIRD PARTIES WITHOUT PRIOR WRITTEN CONSENT FROM MILLS-TUI
AUSTRALIA PTY LTD
Page 63 of 69
8.3.8 Offside 3 Locker
Figure 47
Item Description Vendor Part No.
1 Lower Wheel Arch Door MTA 20-1-7876
2 Bracket Shovel MTA 20-1-8146
3 Bracket Foam Drums MTA 20-1-7962
4 Assembly SCBA Cylinder Storage MTA 20-2-7945
5 Shelf Wheel Arch Locker MTA 20-1-7929
1
2
3
4
5
- 64. CRN: 12/685F PART NUMBER: 99-1-0757
© 2003 THIS DOCUMENT IS SUBJECT TO COPYRIGHT, NO PORTION CAN BE COPIED OR
DISTRIBUTED TO THIRD PARTIES WITHOUT PRIOR WRITTEN CONSENT FROM MILLS-TUI
AUSTRALIA PTY LTD
Page 64 of 69
8.3.9 Offside 4 Locker
Figure 48
Item Description Vendor Part No.
1 OS Rear Pull Out Tray MTA 20-1-8055
2 NS & OS Rear Slide Marshall Fitzroy 20-3-7587
3 Shelf NS Rear Lower MTA 20-1-7931
4 Shelf NS Rear Upper MTA 20-1-7930
5 Breeching Dees (not shown)
Industrial
Evolutions
FIB-JA
6 Strap # 2 Grey Blankets (not shown) Just Straps 20-3-2099
7 Strap # 4 Salvage (not shown) Just Straps 20-3-8009
1
2
3
4
- 65. CRN: 12/685F PART NUMBER: 99-1-0757
© 2003 THIS DOCUMENT IS SUBJECT TO COPYRIGHT, NO PORTION CAN BE COPIED OR
DISTRIBUTED TO THIRD PARTIES WITHOUT PRIOR WRITTEN CONSENT FROM MILLS-TUI
AUSTRALIA PTY LTD
Page 65 of 69
8.3.10 Rear Locker
Figure 49
Item Description Vendor Part No.
1 Rear Pull Out Drawer MTA 20-1-7875
2 Slide Rear Drawer Marshall Fitzroy 20-3-7589
3 Rear Pull Out Tray MTA 20-1-8053
4 Slide Rear Tray Marshall Fitzroy 20-3-7589
5 Breeching Dees (not shown)
Industrial
Evolutions
FIB-JA
6 Strap # 1 Standpipe (not shown) Just Straps 20-3-2098
7 Strap # 2 Goat Bag Just Straps 20-3-2099
8 Strap # 2 Tool Box Just Straps 20-3-2099
9 Bracket Hazard Sign MTA 20-1-8057
1
2
3
4
8
7
9
- 66. CRN: 12/685F PART NUMBER: 99-1-0757
© 2003 THIS DOCUMENT IS SUBJECT TO COPYRIGHT, NO PORTION CAN BE COPIED OR
DISTRIBUTED TO THIRD PARTIES WITHOUT PRIOR WRITTEN CONSENT FROM MILLS-TUI
AUSTRALIA PTY LTD
Page 66 of 69
8.3.11 CO2 System Parts List
- 67. CRN: 12/685F PART NUMBER: 99-1-0757
© 2003 THIS DOCUMENT IS SUBJECT TO COPYRIGHT, NO PORTION CAN BE COPIED OR
DISTRIBUTED TO THIRD PARTIES WITHOUT PRIOR WRITTEN CONSENT FROM MILLS-TUI
AUSTRALIA PTY LTD
Page 67 of 69
8.4 Electrical Components
Item Description Vendor Part No.
1 Buzzer Hella Burson Automotive 6023
2 Base Relay Hella Burson Automotive 4973
3 Horn Air Yankee
Queensland Diesel
Spares P/L
7001163-S
4 Convertor 24/12V 3-5 Amp Coach Audio Visual VRC5
5 Battery N70Z Turbo Batteries N70Z (N70Z15)
6 Bar Negative Thermal Bus 4 Link MTA 30-2-1676
7 Bar Positive Thermal Bus 4 Link MTA 30-2-1738
8 LED Number Plate Lamp Hella AME Products 2559
9 Visibeam AME Products VB24S
10 Lamp Courtesy Hella Burson Automotive 98050101
11 CanBus Module Impart
Inventis Technology Pty
Ltd
30-3-0536
12 CanBus Siren Impart
Inventis Technology Pty
Ltd
30-3-0538
13 Lamp Rear Position/MK LED Hella Burson Automotive 2308
14 Soleniod 24V 85A
Britax Automotive
Equipment P/L
24063-06
15 Lamp Fluro Dapro 26W Dapro FL5/26
16 Lamp Fluro Dapro 13W Dapro 23923
17 Lamp Fluro Dapro 8W Dapro 24529
18 Plug External Start C.E.C.A. Pty Ltd H S8350
19 Resistor 470 OHM .25W
RS Components Pty
Ltd
148-427
20 Sender Oil Pressure
SGESCO Max
Instruments
360-002
21 Sender Water Temperature
SGESCO Max
Instruments
320-093
22 Message Board 24V Kit
Hazard Systems Pty
Ltd
889-006R
23 Clock 24V
Inventis Technology Pty
Ltd
ELS CL51-A
24 Logger Data CAN 12 Input
Inventis Technology Pty
Ltd
ELS FR24-A
25 Switch Toggle ON/MOM/OFF AME Product 03.55049
26
Cover Dust Suit 350 Amp Anderson
Plug
AME Products 04.23802.1
27 Lamp Reading Hella AME Products 2639
28 Camera IR AV Touch Screen Brisbane Isuzu 92956333
29 Lamp 24V LED Cab Marker Burson Automotive 2057
30 Tail Lights Combination OZLED Pty Ltd 100BARRWM
31 Switch Isuzu Air Horn Brisbane Isuzu IG*1823503320
32 Switch Isuzu Fog Lamp Brisbane Isuzu IG*8973870313
33 Switch Reed Change Over ELEMENT14 PRC 175/30
34 Circuit Breaker 10 Amp
Ashdown Enterprises
Pty Ltd
N/A
35 Switch Locker Omron Cetnaj Pty Ltd D4C-1220
36 Aerial Base UHF 22mm RF Industries Pty Ltd MB10
37 Circuit Breaker 10 Amp Auto Electrical Imports S5510
- 68. CRN: 12/685F PART NUMBER: 99-1-0757
© 2003 THIS DOCUMENT IS SUBJECT TO COPYRIGHT, NO PORTION CAN BE COPIED OR
DISTRIBUTED TO THIRD PARTIES WITHOUT PRIOR WRITTEN CONSENT FROM MILLS-TUI
AUSTRALIA PTY LTD
Page 68 of 69
38 Lamp Spot Hella AME Products 1513
39 Block Junction balck Auto Electrical Imports JB3816-2
40 Circuit Breaker 40 Amp Auto Electrical Imports CB184F-40A
41 Connector 50 Amp C.E.C.A. Pty Ltd HSB50
42 Reflector Red Hella Burson Automotive 2920
43 Reflector Orange Hella Burson Automotive 2919
44 Plug C.E.C.A. Pty Ltd HD36-24-31ST
45 Socket C.E.C.A. Pty Ltd
HD34-24-31PT +
WASHERS ETC
46 Speaker
Comwide
Communications Pty
Ltd
SPK005W
47 Lamp Fog Rear
Britax Automotive
Equipment P/L
738-00
48 Lamp Tail Red Hella Burson Automotive 2322
49 Battery Industrail 12V Turbo Batteries B12180
50 Switch Limit Haymans Electrical TEEZCK-J1H29
51 Switch Limit Haymans Electrical OMRD4N-4162
52 Socket Clipsal Haymans Electrical CLI56S0710GY
53 Switch Push Dash Isuzu Brisbane Isuzu 1823404040
54 Lamp LED Green 24V
RS Components Pty
Ltd
RSC 205022
55 Switch Foot Push Button
Britax Automotive
Equipment P/L
9183
56 Relay 24V 30A AME Products 03.62388
57 Plug Housing C.E.C.A. Pty Ltd DRC16-40S
58 Microphone PA
Inventis Technology Pty
Ltd
ELS MV1
59 Speaker 100W
Inventis Technology Pty
Ltd
ELS P100-SB1
60 Block Terminal 2 Way 40Amp Haymans Electrical BLUBPC312
61 Socket C.E.C.A. Pty Ltd DRC12-40PA
62 Controller Hose Reel Speed
Inventis Technology Pty
Ltd
ELS F306
63
SouthCo Fasteners Pty
Ltd
D7-201-721-010
64 Fastner Receptacle
SouthCo Fasteners Pty
Ltd
D7-201-802-010
65 Connector Deutsch 1 Pin C.E.C.A. Pty Ltd DTHD04-1-8P
66 Connector Deutsch 1 Pin Socket C.E.C.A. Pty Ltd DTHD06-1-8S
- 69. CRN: 12/685F PART NUMBER: 99-1-0757
© 2003 THIS DOCUMENT IS SUBJECT TO COPYRIGHT, NO PORTION CAN BE COPIED OR
DISTRIBUTED TO THIRD PARTIES WITHOUT PRIOR WRITTEN CONSENT FROM MILLS-TUI
AUSTRALIA PTY LTD
Page 69 of 69
9 MODIFICATIONS
Item Description of Modification Date Checked Approved