OPWL 551 E- Learning Content Design Job Aid Project
•
1 like•367 views

This project is based on a scenario for a commercial photographer needing a job aid for their photographers to remind them of proper lighting technique.

Recommended
More Related Content
Viewers also liked
Viewers also liked (15)
Recently uploaded
Recently uploaded (20)
OPWL 551 E- Learning Content Design Job Aid Project
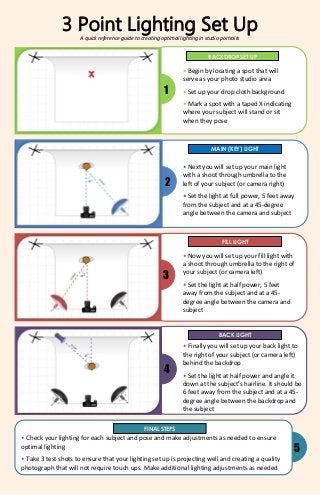
- 1. A quick reference guide to creating optimal lighting in studio portraits 1 2 4 3 3 Point Lighting Set Up • Begin by locating a spot that will serve as your photo studio area • Set up your drop cloth background • Mark a spot with a taped X indicating where your subject will stand or sit when they pose • Next you will set up your main light with a shoot through umbrella to the left of your subject (or camera right) • Set the light at full power, 5 feet away from the subject and at a 45-degree angle between the camera and subject BACKDROP SET UP MAIN (KEY) LIGHT • Now you will set up your fill light with a shoot through umbrella to the right of your subject (or camera left) • Set the light at half power, 5 feet away from the subject and at a 45- degree angle between the camera and subject FILL LIGHT • Finally you will set up your back light to the right of your subject (or camera left) behind the backdrop • Set the light at half power and angle it down at the subject’s hairline. It should be 6 feet away from the subject and at a 45- degree angle between the backdrop and the subject BACK LIGHT 5 FINAL STEPS • Check your lighting for each subject and pose and make adjustments as needed to ensure optimal lighting • Take 3 test shots to ensure that your lighting set up is projecting well and creating a quality photograph that will not require touch ups. Make additional lighting adjustments as needed