SlideShare una empresa de Scribd logo
1 de 10
“Adding Dynamic Lighting & Spotlighting to Create
Dramatic Images”
1. Open a photograph in Photoshop
2. IMAGE  MODE  GRAYSCALE
3. IMAGE  MODE  RGB
4. Edit the IMAGE to taste using
LEVELS, CURVES, BRIGHTNESS & CONTRAST and
CROPPING
5. DUPLICATE LAYER  LAYER MODE  MULTIPLY
6. FILTER  RENDER  LIGHTING EFFECTS  and
use a light to taste (I used the DEFAULT
DIRECTIONAL LIGHT and put it in the top right
corner – you should use whatever light will
enhance your highlights and be opposite the
shadows)
7. USE the ERASER TOOL and set it so that it is a
SOFT BRUSH and OPACITY 50%
8. Erase areas that are important or are too dark
9. Make a NEW BLANK LAYER
10. FILL BUCKET it BLACK
11. FILTER  RENDER  LENS FLARE
12. Use the LENS FLARE to create a glare – to taste
13. Change the LAYER MODE to SCREEN, LIGHTEN or
LINEAR DODGE (to taste)
“Edge Enhancement & Clarity”
1. Open a photograph that has a little camera shake
in Photoshop (only photos with a small amount of
camera shake will benefits from this tutorial)
2. IMAGE  MODE  GRAYSCALE
3. IMAGE  MODE  RGB
4. DUPLICATE LAYER
5. FILTER  STYLIZE  EMBOSS  set HEIGHT and
AMOUNT so that a fine black and white edge
outlines the image and everything else is gray
6. Change LAYER MODE to OVERLAY
7. LAYER  FLATTEN IMAGE
8. Edit the IMAGE to taste using
LEVELS, CURVES, BRIGHTNESS & CONTRAST and
CROPPING
9. DUPLICATE LAYER  LAYER MODE  MULTIPLY
“Isolating Color in a B&W Photo”
1. Open a color image in Photoshop
2. SELECT ALL  EDIT COPY
3. CTRL D (deselect)
4. IMAGE  MODE  GRAYSCALE
5. IMAGE  MODE  RGB
6. IMAGE  ADJUST  LEVELS, CURVES, and
BRIGHTNESS/CONTRAST to taste
7. EDIT PASTE (you should now have two layers –
one is B&W and one should be color)
8. Use the ERASER TOOL and select a SOFT BRUSH
9. ERASE areas that you want to be B&W, do not
ERASE areas that you want to keep colored
10. Experiment with LAYER BLENDING MODES and
see how this adjusts the color
“Photochrome and Hand-Colored Prints”
1. Open a color image in Photoshop
2. Use the EYEDROPPER to select one of the colors
on the image
3. IMAGE  MODE  GRAYSCALE
4. IMAGE  MODE  RGB
5. IMAGE  ADJUST  LEVELS, CURVES, and
BRIGHTNESS/CONTRAST to taste
6. Make a NEW BLANK LAYER – set OPACITY to 65%
7. Use the BRUSH TOOL set to a SOFT BRUSH
8. Paint over some of the objects or areas of the
image
9. Use the ERASER TOOL with SOFT BRUSH setting
and clean up the “edges”
10. Make a NEW BLANK LAYER – set OPACITY to 65%
11. Try using a different color and paint over a
different area following STEPS 7 – 9
12. Experiment with LAYER BLENDING MODES
A Photochrome is a color photo lithograph, produced from a
black-and-white image. Hand-coloring is a watercolor applied to a
black-and-white print. Below you can see traditional hand-
colored and photochrome prints.
“Extending the Background”
1. Open an image in Photoshop
2. DO NOT CROP IMAGE
3. Edit image using standard editing tools:
B&W EDITS:
• Grayscale, Channel Mixer or Black And White
• Levels and/or Curves
• Brightness/Contrast
• Burn & Dodge
4. CROP TOOL  crop this image but before hitting enter, click
on the anchor point to the top left or top right corner. Then
drag the anchor point up and out to increase the area of the
photo. (See the image to the right)
5. Hit ENTER to apply the CROP. When you do, you should see
your image has a white area extending the picture size.
6. WINDOW  CLONE SOURCE
7. Select the CLONE TOOL
8. We will use the CLONE TOOL to cover up the white area and
fill in the background. In the CLONE SOURCE MENU change
the SIZE W/H to 125% to 200% depending on the image.
Change the OPACITY to 75%.
9. ALT-CLICK a portion of blank background
10. CLONE the background to fill it in
11. Try different settings to complete the clone:
• Change BRUSH SIZE
• Change BRUSH TYPE
• Change CLONE SOURCE SIZE
• Change CLONE SOURCE OPACITY
“Color Replacement”
1. Open an image in Photoshop
2. Edit image using STANDARD PHOTOSHOP EDITS from the
LAYERS ADJUSTMENT WINDOW  keep the image COLOR
3. From the BRUSH TOOL select the COLOR REPLACEMENT TOOL
(they share the same pull-down in the TOOLBAR)
4. This tool works similar to the CLONE in that you SAMPLE a
COLOR (the SOURCE) and replace that with a NEW COLOR
SAMPLE.
5. The easiest SAMPLING is CONTINUOUS (the first of the
options after the MODE). This looks like a pair of eyedroppers
over a line (the first eyedropper is transparent). Click this
option.
6. Choose the BRUSH OPTION in the top left. Change the
HARDNESS to 50% or so. Then click somewhere on the
background to close this menu.
7. Change your FOREGROUND COLOR. You may want to use the
EYEDROPPER and pick a color from the image. If you hold
down ALT the EYEDROPPER appears.
8. Whatever you paint will now COLOR TINT the image.
9. You can continually change your FOREGROUND COLOR by
holding ALT and eyedropping colors in the image.
“Using the GRID to CROP”
1. Open an image in Photoshop
2. DO NOT CROP IMAGE
3. Edit image using standard editing tools:
B&W EDITS:
• Grayscale, Channel Mixer or Black And
White
• Levels and/or Curves
• Brightness/Contrast
COLOR EDITS:
• Color Balance
• Hue/Saturation
• Channel Mixer
• Photo Filter
4. Make a BLANK NEW LAYER
5. Select the CUSTOM SHAPE TOOL and choose the RULE OF
THIRDS GRID (make sure to select FILL PIXELS in the
STATUS BAR)
6. Draw a GRID shape while holding SHIFT
7. Draw this shape so that:
• The subject matter is NOT bull’s-eyed
• The subject matter fills in the left or right side of
the grid
• The focal point(s) fall on horizontal and vertical
axes
8. Use the CROP TOOL (without any size restrictions) and
then CROP your image matching the grid
9. Delete the GRID LAYER
10. Now go to the HISTORY window and backup to the
CUSTOM SHAPE TOOL STEP
11. CROP the image using standard crop sizes:
11x14, 11x17, 16x20 or 8x10 (you will not be able to crop
exactly but use the grid as a guideline)
12. DELETE the GRID LAYER
“Faking Differential Focus/ Depth of Field”
1. Open an image with at least 2 defined subject
matters, preferably one in the foreground and one in the
background – both need to be in focus!
2. CROP and EDIT photo using standard editing tools
3. At the bottom of the TOOL BAR you will find the QUICK
MASK TOOL (it looks like a “circle in a square button” as
picture to the right)
4. Click it to ENTER QUICK MASK MODE
5. Make sure your FOREGROUND COLOR is BLACK and
BACKGROUND COLOR is WHITE (hit D on the keyboard)
6. Select the GRADIENT TOOL and make sure your gradient is
a BLACK to WHITE, LINEAR, NORMAL 100% Gradient
7. Draw a gradient by clicking, drawing a line by dragging and
then letting go (use the crosshairs to line this up)
• This will create a RED shadowy area which is the
MASK (a protected area of the image)
• To make this work draw a gradient so that one of
the subject matters is masked and the other is not
• If you need to try again, use: SELECT ALL 
DELETE KEY  CTRL D
8. Exit QUICK MASK by clicking the button again
9. The UNMASKED portion will be a SELECTION
10. FILTER  BLUR  GAUSSIAN BLUR  to taste
11. Repeat steps until DIFFERENTIAL FOCUS is created
NOTE: on the next page you can find more examples of
differential/focus and depth of field
“Faking Differential Focus/ Depth of Field”
1. Open an image with at least 2 defined subject
matters, preferably one in the foreground and one in the
background – both need to be in focus!
2. CROP and EDIT photo using standard editing tools
3. We will use the QUICK MASK tool to create DEPTH OF
FIELD/DIFFERENTIAL FOCUS again
4. ENTER QUICK MASK
5. Make sure your FOREGROUND/BACKGROUND colors are
correct (again, hit D on the keyboard to reset these)
6. Instead of using the gradient, we are going to use the
PAINTBRUSH  choose a SOFT BLURR BRUSH of medium
size and 100% opacity
7. Paint over the subject matter that you want to keep in
focus – you do not have to be accurate, just cover that
subject matter in RED
8. EXIT QUICK MASK
9. FILTER  BLUR  GAUSSIAN BLUR  to taste
10. Repeat until satisfied
greaterdepthoffield
shallowdepthoffield
“Removing Object from an Image”
1. Open an image with an object that you want to remove
from the photograph
2. CROP and EDIT photo using standard editing tools
3. Select the CLONE STAMP TOOL  it looks like a stamp
press (as pictured to the right)
4. To use this tool you have to follow these steps:
• Find the object that you want to remove
• Then move your mouse away from the object over
a part of the background
• hold down ALT and click
• Then click over the object
• Wherever you ALT clicked this will be the copied
area that will be cloned
• Wherever you click this will be the area covered
up by the clone
• See the diagram below
5. The CLONE TOOL will block out areas of an image using
the “pickup point”
6. Use the RECTANGULAR MARQUEE TOOL
7. SELECT an area of the BACKGROUND
8. COPY & PASTE (a new layer should appear)
9. Use a SOFT BLURRY ERASER and erase the background
Alt
before
after

Más contenido relacionado

La actualidad más candente

Case study 02
Case study 02Case study 02
Case study 02MrLawler
 
Photoshop techniques
Photoshop techniquesPhotoshop techniques
Photoshop techniquesHeywoodmedia
 
Photoshop layers
Photoshop layersPhotoshop layers
Photoshop layersMarche Ygar
 
Portrait retouching with photoshop
Portrait retouching with photoshopPortrait retouching with photoshop
Portrait retouching with photoshophmazzuto
 
Watercolor effect using photoshop
Watercolor effect using photoshopWatercolor effect using photoshop
Watercolor effect using photoshophmazzuto
 
Editing My Main Image - Double-Page Spread
Editing My Main Image - Double-Page SpreadEditing My Main Image - Double-Page Spread
Editing My Main Image - Double-Page SpreadCharlotte Daly
 
Using photoshop elements to create a logo
Using photoshop elements to create a logoUsing photoshop elements to create a logo
Using photoshop elements to create a logoDB3igs
 
Photoshop Basics - Review of All Tools
Photoshop Basics - Review of All ToolsPhotoshop Basics - Review of All Tools
Photoshop Basics - Review of All Toolsnombre thera
 
Using Adjustment Layers and Lighting in Photoshop
Using Adjustment Layers and Lighting in PhotoshopUsing Adjustment Layers and Lighting in Photoshop
Using Adjustment Layers and Lighting in Photoshopnombre thera
 
Adobe Photoshop and its role in society ( Introduction)
Adobe Photoshop and its role in society ( Introduction) Adobe Photoshop and its role in society ( Introduction)
Adobe Photoshop and its role in society ( Introduction) Grayzon Gonzales, LPT
 
Presentation 1
Presentation 1Presentation 1
Presentation 1Marsavi
 
Clone stamp and spot healer
Clone stamp and spot healerClone stamp and spot healer
Clone stamp and spot healerWhitney Brooks
 
3. FMP Production Experiments
3. FMP Production Experiments3. FMP Production Experiments
3. FMP Production Experimentsgeorgewetton1
 
Advanced PhotoShop Magazine Tutorial
Advanced PhotoShop Magazine TutorialAdvanced PhotoShop Magazine Tutorial
Advanced PhotoShop Magazine Tutorialmrballantyne
 
Low and high viewpoint
Low and high viewpointLow and high viewpoint
Low and high viewpointBrooke Nelson
 

La actualidad más candente (20)

Case study 02
Case study 02Case study 02
Case study 02
 
Photoshop techniques
Photoshop techniquesPhotoshop techniques
Photoshop techniques
 
Photoshop layers
Photoshop layersPhotoshop layers
Photoshop layers
 
Portrait retouching with photoshop
Portrait retouching with photoshopPortrait retouching with photoshop
Portrait retouching with photoshop
 
Watercolor effect using photoshop
Watercolor effect using photoshopWatercolor effect using photoshop
Watercolor effect using photoshop
 
Editing My Main Image - Double-Page Spread
Editing My Main Image - Double-Page SpreadEditing My Main Image - Double-Page Spread
Editing My Main Image - Double-Page Spread
 
Using photoshop elements to create a logo
Using photoshop elements to create a logoUsing photoshop elements to create a logo
Using photoshop elements to create a logo
 
Photoshop Basics - Review of All Tools
Photoshop Basics - Review of All ToolsPhotoshop Basics - Review of All Tools
Photoshop Basics - Review of All Tools
 
Smartphone Camera Workshop
Smartphone Camera WorkshopSmartphone Camera Workshop
Smartphone Camera Workshop
 
Using Adjustment Layers and Lighting in Photoshop
Using Adjustment Layers and Lighting in PhotoshopUsing Adjustment Layers and Lighting in Photoshop
Using Adjustment Layers and Lighting in Photoshop
 
Adobe Photoshop and its role in society ( Introduction)
Adobe Photoshop and its role in society ( Introduction) Adobe Photoshop and its role in society ( Introduction)
Adobe Photoshop and its role in society ( Introduction)
 
Presentation 1
Presentation 1Presentation 1
Presentation 1
 
Chap40
Chap40Chap40
Chap40
 
Clone stamp and spot healer
Clone stamp and spot healerClone stamp and spot healer
Clone stamp and spot healer
 
Chap32
Chap32Chap32
Chap32
 
3. FMP Production Experiments
3. FMP Production Experiments3. FMP Production Experiments
3. FMP Production Experiments
 
7 Photoshop Must-Knows For Beginners
7 Photoshop Must-Knows For Beginners 7 Photoshop Must-Knows For Beginners
7 Photoshop Must-Knows For Beginners
 
Adobe ps color palettes
Adobe ps color palettesAdobe ps color palettes
Adobe ps color palettes
 
Advanced PhotoShop Magazine Tutorial
Advanced PhotoShop Magazine TutorialAdvanced PhotoShop Magazine Tutorial
Advanced PhotoShop Magazine Tutorial
 
Low and high viewpoint
Low and high viewpointLow and high viewpoint
Low and high viewpoint
 

Similar a Principles of Design - Photoshopping Basics

Unit 6 - Masters Tutorials (11)
Unit 6 - Masters Tutorials (11)Unit 6 - Masters Tutorials (11)
Unit 6 - Masters Tutorials (11)MrLawler
 
Unit 2 Tutorials (Part A)
Unit 2 Tutorials (Part A)Unit 2 Tutorials (Part A)
Unit 2 Tutorials (Part A)MrLawler
 
Unit 2 Tutorials Part B
Unit 2 Tutorials Part BUnit 2 Tutorials Part B
Unit 2 Tutorials Part BMrLawler
 
Case Studies - Masters
Case Studies - MastersCase Studies - Masters
Case Studies - MastersMrLawler
 
Photoshop editing booklet 2019
Photoshop editing booklet 2019Photoshop editing booklet 2019
Photoshop editing booklet 2019missfcmay
 
Information Communication Technology
Information Communication TechnologyInformation Communication Technology
Information Communication TechnologyNancyDaro
 
How to-edit-in-photoshop-part-2
How to-edit-in-photoshop-part-2How to-edit-in-photoshop-part-2
How to-edit-in-photoshop-part-2victorlansang
 
Case Study and Tutorials
Case Study and TutorialsCase Study and Tutorials
Case Study and TutorialsMrLawler
 
adobephotoshop_frerking
adobephotoshop_frerking adobephotoshop_frerking
adobephotoshop_frerking Agung Yuwono
 
Crazy Photos: An Introduction to GIMP
Crazy Photos: An Introduction to GIMPCrazy Photos: An Introduction to GIMP
Crazy Photos: An Introduction to GIMPRino Landa
 
Photo combination how to
Photo combination how toPhoto combination how to
Photo combination how toaztechtchr
 
quicktip_scanphotoshop
quicktip_scanphotoshopquicktip_scanphotoshop
quicktip_scanphotoshoptutorialsruby
 
quicktip_scanphotoshop
quicktip_scanphotoshopquicktip_scanphotoshop
quicktip_scanphotoshoptutorialsruby
 
Paths, Masks And Blend Modes
Paths, Masks And Blend ModesPaths, Masks And Blend Modes
Paths, Masks And Blend ModesShan
 

Similar a Principles of Design - Photoshopping Basics (20)

Unit 6 - Masters Tutorials (11)
Unit 6 - Masters Tutorials (11)Unit 6 - Masters Tutorials (11)
Unit 6 - Masters Tutorials (11)
 
Unit 2 Tutorials (Part A)
Unit 2 Tutorials (Part A)Unit 2 Tutorials (Part A)
Unit 2 Tutorials (Part A)
 
Unit 2 Tutorials Part B
Unit 2 Tutorials Part BUnit 2 Tutorials Part B
Unit 2 Tutorials Part B
 
Case Studies - Masters
Case Studies - MastersCase Studies - Masters
Case Studies - Masters
 
Lec 3
Lec 3Lec 3
Lec 3
 
Photoshop editing booklet 2019
Photoshop editing booklet 2019Photoshop editing booklet 2019
Photoshop editing booklet 2019
 
Information Communication Technology
Information Communication TechnologyInformation Communication Technology
Information Communication Technology
 
How to-edit-in-photoshop-part-2
How to-edit-in-photoshop-part-2How to-edit-in-photoshop-part-2
How to-edit-in-photoshop-part-2
 
Case Study and Tutorials
Case Study and TutorialsCase Study and Tutorials
Case Study and Tutorials
 
adobephotoshop_frerking
adobephotoshop_frerking adobephotoshop_frerking
adobephotoshop_frerking
 
Crazy Photos: An Introduction to GIMP
Crazy Photos: An Introduction to GIMPCrazy Photos: An Introduction to GIMP
Crazy Photos: An Introduction to GIMP
 
Cours photoshop
Cours photoshopCours photoshop
Cours photoshop
 
Photoshop basics
Photoshop basicsPhotoshop basics
Photoshop basics
 
Basic tutorials
Basic tutorialsBasic tutorials
Basic tutorials
 
Basic tutorials
Basic tutorialsBasic tutorials
Basic tutorials
 
Writing ED material
Writing ED materialWriting ED material
Writing ED material
 
Photo combination how to
Photo combination how toPhoto combination how to
Photo combination how to
 
quicktip_scanphotoshop
quicktip_scanphotoshopquicktip_scanphotoshop
quicktip_scanphotoshop
 
quicktip_scanphotoshop
quicktip_scanphotoshopquicktip_scanphotoshop
quicktip_scanphotoshop
 
Paths, Masks And Blend Modes
Paths, Masks And Blend ModesPaths, Masks And Blend Modes
Paths, Masks And Blend Modes
 

Más de MrLawler

Final project (pbl)
Final project (pbl)Final project (pbl)
Final project (pbl)MrLawler
 
Hum 201 microlesson mod 2
Hum 201 microlesson mod 2Hum 201 microlesson mod 2
Hum 201 microlesson mod 2MrLawler
 
Hum 201 microlesson mod 1
Hum 201 microlesson mod 1Hum 201 microlesson mod 1
Hum 201 microlesson mod 1MrLawler
 
History of Animation
History of AnimationHistory of Animation
History of AnimationMrLawler
 
Final Review
Final ReviewFinal Review
Final ReviewMrLawler
 
Cultural study
Cultural studyCultural study
Cultural studyMrLawler
 
Tips on taking good photos
Tips on taking good photosTips on taking good photos
Tips on taking good photosMrLawler
 
Alyson Martinez
Alyson MartinezAlyson Martinez
Alyson MartinezMrLawler
 
DID/COMM: URBAN TOY
DID/COMM: URBAN TOYDID/COMM: URBAN TOY
DID/COMM: URBAN TOYMrLawler
 
DID/COMM: URBAN TOY
DID/COMM: URBAN TOYDID/COMM: URBAN TOY
DID/COMM: URBAN TOYMrLawler
 
You Pick-Three Part 2
You Pick-Three Part 2You Pick-Three Part 2
You Pick-Three Part 2MrLawler
 
YOU PICK THREE
YOU PICK THREEYOU PICK THREE
YOU PICK THREEMrLawler
 
DPI 1 and DPI 2 Texture Mapping
DPI 1 and DPI 2 Texture MappingDPI 1 and DPI 2 Texture Mapping
DPI 1 and DPI 2 Texture MappingMrLawler
 
DID Children's Book
DID Children's BookDID Children's Book
DID Children's BookMrLawler
 
Origins of photography
Origins of photographyOrigins of photography
Origins of photographyMrLawler
 
DPI 2: Final
DPI 2: FinalDPI 2: Final
DPI 2: FinalMrLawler
 
DPI Final Instructions
DPI Final InstructionsDPI Final Instructions
DPI Final InstructionsMrLawler
 
Digital illustration final
Digital illustration finalDigital illustration final
Digital illustration finalMrLawler
 
Masters search requirements
Masters search requirementsMasters search requirements
Masters search requirementsMrLawler
 
Unit 4 Photo Check
Unit 4 Photo CheckUnit 4 Photo Check
Unit 4 Photo CheckMrLawler
 

Más de MrLawler (20)

Final project (pbl)
Final project (pbl)Final project (pbl)
Final project (pbl)
 
Hum 201 microlesson mod 2
Hum 201 microlesson mod 2Hum 201 microlesson mod 2
Hum 201 microlesson mod 2
 
Hum 201 microlesson mod 1
Hum 201 microlesson mod 1Hum 201 microlesson mod 1
Hum 201 microlesson mod 1
 
History of Animation
History of AnimationHistory of Animation
History of Animation
 
Final Review
Final ReviewFinal Review
Final Review
 
Cultural study
Cultural studyCultural study
Cultural study
 
Tips on taking good photos
Tips on taking good photosTips on taking good photos
Tips on taking good photos
 
Alyson Martinez
Alyson MartinezAlyson Martinez
Alyson Martinez
 
DID/COMM: URBAN TOY
DID/COMM: URBAN TOYDID/COMM: URBAN TOY
DID/COMM: URBAN TOY
 
DID/COMM: URBAN TOY
DID/COMM: URBAN TOYDID/COMM: URBAN TOY
DID/COMM: URBAN TOY
 
You Pick-Three Part 2
You Pick-Three Part 2You Pick-Three Part 2
You Pick-Three Part 2
 
YOU PICK THREE
YOU PICK THREEYOU PICK THREE
YOU PICK THREE
 
DPI 1 and DPI 2 Texture Mapping
DPI 1 and DPI 2 Texture MappingDPI 1 and DPI 2 Texture Mapping
DPI 1 and DPI 2 Texture Mapping
 
DID Children's Book
DID Children's BookDID Children's Book
DID Children's Book
 
Origins of photography
Origins of photographyOrigins of photography
Origins of photography
 
DPI 2: Final
DPI 2: FinalDPI 2: Final
DPI 2: Final
 
DPI Final Instructions
DPI Final InstructionsDPI Final Instructions
DPI Final Instructions
 
Digital illustration final
Digital illustration finalDigital illustration final
Digital illustration final
 
Masters search requirements
Masters search requirementsMasters search requirements
Masters search requirements
 
Unit 4 Photo Check
Unit 4 Photo CheckUnit 4 Photo Check
Unit 4 Photo Check
 

Último

A Deep Dive on Passkeys: FIDO Paris Seminar.pptx
A Deep Dive on Passkeys: FIDO Paris Seminar.pptxA Deep Dive on Passkeys: FIDO Paris Seminar.pptx
A Deep Dive on Passkeys: FIDO Paris Seminar.pptxLoriGlavin3
 
What is DBT - The Ultimate Data Build Tool.pdf
What is DBT - The Ultimate Data Build Tool.pdfWhat is DBT - The Ultimate Data Build Tool.pdf
What is DBT - The Ultimate Data Build Tool.pdfMounikaPolabathina
 
(How to Program) Paul Deitel, Harvey Deitel-Java How to Program, Early Object...
(How to Program) Paul Deitel, Harvey Deitel-Java How to Program, Early Object...(How to Program) Paul Deitel, Harvey Deitel-Java How to Program, Early Object...
(How to Program) Paul Deitel, Harvey Deitel-Java How to Program, Early Object...AliaaTarek5
 
Sample pptx for embedding into website for demo
Sample pptx for embedding into website for demoSample pptx for embedding into website for demo
Sample pptx for embedding into website for demoHarshalMandlekar2
 
Generative AI for Technical Writer or Information Developers
Generative AI for Technical Writer or Information DevelopersGenerative AI for Technical Writer or Information Developers
Generative AI for Technical Writer or Information DevelopersRaghuram Pandurangan
 
The Role of FIDO in a Cyber Secure Netherlands: FIDO Paris Seminar.pptx
The Role of FIDO in a Cyber Secure Netherlands: FIDO Paris Seminar.pptxThe Role of FIDO in a Cyber Secure Netherlands: FIDO Paris Seminar.pptx
The Role of FIDO in a Cyber Secure Netherlands: FIDO Paris Seminar.pptxLoriGlavin3
 
Emixa Mendix Meetup 11 April 2024 about Mendix Native development
Emixa Mendix Meetup 11 April 2024 about Mendix Native developmentEmixa Mendix Meetup 11 April 2024 about Mendix Native development
Emixa Mendix Meetup 11 April 2024 about Mendix Native developmentPim van der Noll
 
The State of Passkeys with FIDO Alliance.pptx
The State of Passkeys with FIDO Alliance.pptxThe State of Passkeys with FIDO Alliance.pptx
The State of Passkeys with FIDO Alliance.pptxLoriGlavin3
 
Time Series Foundation Models - current state and future directions
Time Series Foundation Models - current state and future directionsTime Series Foundation Models - current state and future directions
Time Series Foundation Models - current state and future directionsNathaniel Shimoni
 
Moving Beyond Passwords: FIDO Paris Seminar.pdf
Moving Beyond Passwords: FIDO Paris Seminar.pdfMoving Beyond Passwords: FIDO Paris Seminar.pdf
Moving Beyond Passwords: FIDO Paris Seminar.pdfLoriGlavin3
 
Arizona Broadband Policy Past, Present, and Future Presentation 3/25/24
Arizona Broadband Policy Past, Present, and Future Presentation 3/25/24Arizona Broadband Policy Past, Present, and Future Presentation 3/25/24
Arizona Broadband Policy Past, Present, and Future Presentation 3/25/24Mark Goldstein
 
Passkey Providers and Enabling Portability: FIDO Paris Seminar.pptx
Passkey Providers and Enabling Portability: FIDO Paris Seminar.pptxPasskey Providers and Enabling Portability: FIDO Paris Seminar.pptx
Passkey Providers and Enabling Portability: FIDO Paris Seminar.pptxLoriGlavin3
 
Connecting the Dots for Information Discovery.pdf
Connecting the Dots for Information Discovery.pdfConnecting the Dots for Information Discovery.pdf
Connecting the Dots for Information Discovery.pdfNeo4j
 
Unleashing Real-time Insights with ClickHouse_ Navigating the Landscape in 20...
Unleashing Real-time Insights with ClickHouse_ Navigating the Landscape in 20...Unleashing Real-time Insights with ClickHouse_ Navigating the Landscape in 20...
Unleashing Real-time Insights with ClickHouse_ Navigating the Landscape in 20...Alkin Tezuysal
 
Scale your database traffic with Read & Write split using MySQL Router
Scale your database traffic with Read & Write split using MySQL RouterScale your database traffic with Read & Write split using MySQL Router
Scale your database traffic with Read & Write split using MySQL RouterMydbops
 
Genislab builds better products and faster go-to-market with Lean project man...
Genislab builds better products and faster go-to-market with Lean project man...Genislab builds better products and faster go-to-market with Lean project man...
Genislab builds better products and faster go-to-market with Lean project man...Farhan Tariq
 
So einfach geht modernes Roaming fuer Notes und Nomad.pdf
So einfach geht modernes Roaming fuer Notes und Nomad.pdfSo einfach geht modernes Roaming fuer Notes und Nomad.pdf
So einfach geht modernes Roaming fuer Notes und Nomad.pdfpanagenda
 
Generative Artificial Intelligence: How generative AI works.pdf
Generative Artificial Intelligence: How generative AI works.pdfGenerative Artificial Intelligence: How generative AI works.pdf
Generative Artificial Intelligence: How generative AI works.pdfIngrid Airi González
 
Transcript: New from BookNet Canada for 2024: Loan Stars - Tech Forum 2024
Transcript: New from BookNet Canada for 2024: Loan Stars - Tech Forum 2024Transcript: New from BookNet Canada for 2024: Loan Stars - Tech Forum 2024
Transcript: New from BookNet Canada for 2024: Loan Stars - Tech Forum 2024BookNet Canada
 
[Webinar] SpiraTest - Setting New Standards in Quality Assurance
[Webinar] SpiraTest - Setting New Standards in Quality Assurance[Webinar] SpiraTest - Setting New Standards in Quality Assurance
[Webinar] SpiraTest - Setting New Standards in Quality AssuranceInflectra
 

Último (20)

A Deep Dive on Passkeys: FIDO Paris Seminar.pptx
A Deep Dive on Passkeys: FIDO Paris Seminar.pptxA Deep Dive on Passkeys: FIDO Paris Seminar.pptx
A Deep Dive on Passkeys: FIDO Paris Seminar.pptx
 
What is DBT - The Ultimate Data Build Tool.pdf
What is DBT - The Ultimate Data Build Tool.pdfWhat is DBT - The Ultimate Data Build Tool.pdf
What is DBT - The Ultimate Data Build Tool.pdf
 
(How to Program) Paul Deitel, Harvey Deitel-Java How to Program, Early Object...
(How to Program) Paul Deitel, Harvey Deitel-Java How to Program, Early Object...(How to Program) Paul Deitel, Harvey Deitel-Java How to Program, Early Object...
(How to Program) Paul Deitel, Harvey Deitel-Java How to Program, Early Object...
 
Sample pptx for embedding into website for demo
Sample pptx for embedding into website for demoSample pptx for embedding into website for demo
Sample pptx for embedding into website for demo
 
Generative AI for Technical Writer or Information Developers
Generative AI for Technical Writer or Information DevelopersGenerative AI for Technical Writer or Information Developers
Generative AI for Technical Writer or Information Developers
 
The Role of FIDO in a Cyber Secure Netherlands: FIDO Paris Seminar.pptx
The Role of FIDO in a Cyber Secure Netherlands: FIDO Paris Seminar.pptxThe Role of FIDO in a Cyber Secure Netherlands: FIDO Paris Seminar.pptx
The Role of FIDO in a Cyber Secure Netherlands: FIDO Paris Seminar.pptx
 
Emixa Mendix Meetup 11 April 2024 about Mendix Native development
Emixa Mendix Meetup 11 April 2024 about Mendix Native developmentEmixa Mendix Meetup 11 April 2024 about Mendix Native development
Emixa Mendix Meetup 11 April 2024 about Mendix Native development
 
The State of Passkeys with FIDO Alliance.pptx
The State of Passkeys with FIDO Alliance.pptxThe State of Passkeys with FIDO Alliance.pptx
The State of Passkeys with FIDO Alliance.pptx
 
Time Series Foundation Models - current state and future directions
Time Series Foundation Models - current state and future directionsTime Series Foundation Models - current state and future directions
Time Series Foundation Models - current state and future directions
 
Moving Beyond Passwords: FIDO Paris Seminar.pdf
Moving Beyond Passwords: FIDO Paris Seminar.pdfMoving Beyond Passwords: FIDO Paris Seminar.pdf
Moving Beyond Passwords: FIDO Paris Seminar.pdf
 
Arizona Broadband Policy Past, Present, and Future Presentation 3/25/24
Arizona Broadband Policy Past, Present, and Future Presentation 3/25/24Arizona Broadband Policy Past, Present, and Future Presentation 3/25/24
Arizona Broadband Policy Past, Present, and Future Presentation 3/25/24
 
Passkey Providers and Enabling Portability: FIDO Paris Seminar.pptx
Passkey Providers and Enabling Portability: FIDO Paris Seminar.pptxPasskey Providers and Enabling Portability: FIDO Paris Seminar.pptx
Passkey Providers and Enabling Portability: FIDO Paris Seminar.pptx
 
Connecting the Dots for Information Discovery.pdf
Connecting the Dots for Information Discovery.pdfConnecting the Dots for Information Discovery.pdf
Connecting the Dots for Information Discovery.pdf
 
Unleashing Real-time Insights with ClickHouse_ Navigating the Landscape in 20...
Unleashing Real-time Insights with ClickHouse_ Navigating the Landscape in 20...Unleashing Real-time Insights with ClickHouse_ Navigating the Landscape in 20...
Unleashing Real-time Insights with ClickHouse_ Navigating the Landscape in 20...
 
Scale your database traffic with Read & Write split using MySQL Router
Scale your database traffic with Read & Write split using MySQL RouterScale your database traffic with Read & Write split using MySQL Router
Scale your database traffic with Read & Write split using MySQL Router
 
Genislab builds better products and faster go-to-market with Lean project man...
Genislab builds better products and faster go-to-market with Lean project man...Genislab builds better products and faster go-to-market with Lean project man...
Genislab builds better products and faster go-to-market with Lean project man...
 
So einfach geht modernes Roaming fuer Notes und Nomad.pdf
So einfach geht modernes Roaming fuer Notes und Nomad.pdfSo einfach geht modernes Roaming fuer Notes und Nomad.pdf
So einfach geht modernes Roaming fuer Notes und Nomad.pdf
 
Generative Artificial Intelligence: How generative AI works.pdf
Generative Artificial Intelligence: How generative AI works.pdfGenerative Artificial Intelligence: How generative AI works.pdf
Generative Artificial Intelligence: How generative AI works.pdf
 
Transcript: New from BookNet Canada for 2024: Loan Stars - Tech Forum 2024
Transcript: New from BookNet Canada for 2024: Loan Stars - Tech Forum 2024Transcript: New from BookNet Canada for 2024: Loan Stars - Tech Forum 2024
Transcript: New from BookNet Canada for 2024: Loan Stars - Tech Forum 2024
 
[Webinar] SpiraTest - Setting New Standards in Quality Assurance
[Webinar] SpiraTest - Setting New Standards in Quality Assurance[Webinar] SpiraTest - Setting New Standards in Quality Assurance
[Webinar] SpiraTest - Setting New Standards in Quality Assurance
 

Principles of Design - Photoshopping Basics

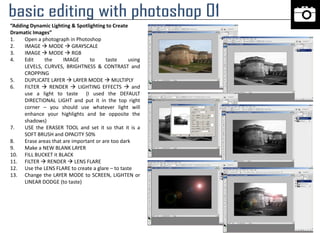
  • 1. “Adding Dynamic Lighting & Spotlighting to Create Dramatic Images” 1. Open a photograph in Photoshop 2. IMAGE  MODE  GRAYSCALE 3. IMAGE  MODE  RGB 4. Edit the IMAGE to taste using LEVELS, CURVES, BRIGHTNESS & CONTRAST and CROPPING 5. DUPLICATE LAYER  LAYER MODE  MULTIPLY 6. FILTER  RENDER  LIGHTING EFFECTS  and use a light to taste (I used the DEFAULT DIRECTIONAL LIGHT and put it in the top right corner – you should use whatever light will enhance your highlights and be opposite the shadows) 7. USE the ERASER TOOL and set it so that it is a SOFT BRUSH and OPACITY 50% 8. Erase areas that are important or are too dark 9. Make a NEW BLANK LAYER 10. FILL BUCKET it BLACK 11. FILTER  RENDER  LENS FLARE 12. Use the LENS FLARE to create a glare – to taste 13. Change the LAYER MODE to SCREEN, LIGHTEN or LINEAR DODGE (to taste)
  • 2. “Edge Enhancement & Clarity” 1. Open a photograph that has a little camera shake in Photoshop (only photos with a small amount of camera shake will benefits from this tutorial) 2. IMAGE  MODE  GRAYSCALE 3. IMAGE  MODE  RGB 4. DUPLICATE LAYER 5. FILTER  STYLIZE  EMBOSS  set HEIGHT and AMOUNT so that a fine black and white edge outlines the image and everything else is gray 6. Change LAYER MODE to OVERLAY 7. LAYER  FLATTEN IMAGE 8. Edit the IMAGE to taste using LEVELS, CURVES, BRIGHTNESS & CONTRAST and CROPPING 9. DUPLICATE LAYER  LAYER MODE  MULTIPLY
  • 3. “Isolating Color in a B&W Photo” 1. Open a color image in Photoshop 2. SELECT ALL  EDIT COPY 3. CTRL D (deselect) 4. IMAGE  MODE  GRAYSCALE 5. IMAGE  MODE  RGB 6. IMAGE  ADJUST  LEVELS, CURVES, and BRIGHTNESS/CONTRAST to taste 7. EDIT PASTE (you should now have two layers – one is B&W and one should be color) 8. Use the ERASER TOOL and select a SOFT BRUSH 9. ERASE areas that you want to be B&W, do not ERASE areas that you want to keep colored 10. Experiment with LAYER BLENDING MODES and see how this adjusts the color
  • 4. “Photochrome and Hand-Colored Prints” 1. Open a color image in Photoshop 2. Use the EYEDROPPER to select one of the colors on the image 3. IMAGE  MODE  GRAYSCALE 4. IMAGE  MODE  RGB 5. IMAGE  ADJUST  LEVELS, CURVES, and BRIGHTNESS/CONTRAST to taste 6. Make a NEW BLANK LAYER – set OPACITY to 65% 7. Use the BRUSH TOOL set to a SOFT BRUSH 8. Paint over some of the objects or areas of the image 9. Use the ERASER TOOL with SOFT BRUSH setting and clean up the “edges” 10. Make a NEW BLANK LAYER – set OPACITY to 65% 11. Try using a different color and paint over a different area following STEPS 7 – 9 12. Experiment with LAYER BLENDING MODES A Photochrome is a color photo lithograph, produced from a black-and-white image. Hand-coloring is a watercolor applied to a black-and-white print. Below you can see traditional hand- colored and photochrome prints.
  • 5. “Extending the Background” 1. Open an image in Photoshop 2. DO NOT CROP IMAGE 3. Edit image using standard editing tools: B&W EDITS: • Grayscale, Channel Mixer or Black And White • Levels and/or Curves • Brightness/Contrast • Burn & Dodge 4. CROP TOOL  crop this image but before hitting enter, click on the anchor point to the top left or top right corner. Then drag the anchor point up and out to increase the area of the photo. (See the image to the right) 5. Hit ENTER to apply the CROP. When you do, you should see your image has a white area extending the picture size. 6. WINDOW  CLONE SOURCE 7. Select the CLONE TOOL 8. We will use the CLONE TOOL to cover up the white area and fill in the background. In the CLONE SOURCE MENU change the SIZE W/H to 125% to 200% depending on the image. Change the OPACITY to 75%. 9. ALT-CLICK a portion of blank background 10. CLONE the background to fill it in 11. Try different settings to complete the clone: • Change BRUSH SIZE • Change BRUSH TYPE • Change CLONE SOURCE SIZE • Change CLONE SOURCE OPACITY
  • 6. “Color Replacement” 1. Open an image in Photoshop 2. Edit image using STANDARD PHOTOSHOP EDITS from the LAYERS ADJUSTMENT WINDOW  keep the image COLOR 3. From the BRUSH TOOL select the COLOR REPLACEMENT TOOL (they share the same pull-down in the TOOLBAR) 4. This tool works similar to the CLONE in that you SAMPLE a COLOR (the SOURCE) and replace that with a NEW COLOR SAMPLE. 5. The easiest SAMPLING is CONTINUOUS (the first of the options after the MODE). This looks like a pair of eyedroppers over a line (the first eyedropper is transparent). Click this option. 6. Choose the BRUSH OPTION in the top left. Change the HARDNESS to 50% or so. Then click somewhere on the background to close this menu. 7. Change your FOREGROUND COLOR. You may want to use the EYEDROPPER and pick a color from the image. If you hold down ALT the EYEDROPPER appears. 8. Whatever you paint will now COLOR TINT the image. 9. You can continually change your FOREGROUND COLOR by holding ALT and eyedropping colors in the image.
  • 7. “Using the GRID to CROP” 1. Open an image in Photoshop 2. DO NOT CROP IMAGE 3. Edit image using standard editing tools: B&W EDITS: • Grayscale, Channel Mixer or Black And White • Levels and/or Curves • Brightness/Contrast COLOR EDITS: • Color Balance • Hue/Saturation • Channel Mixer • Photo Filter 4. Make a BLANK NEW LAYER 5. Select the CUSTOM SHAPE TOOL and choose the RULE OF THIRDS GRID (make sure to select FILL PIXELS in the STATUS BAR) 6. Draw a GRID shape while holding SHIFT 7. Draw this shape so that: • The subject matter is NOT bull’s-eyed • The subject matter fills in the left or right side of the grid • The focal point(s) fall on horizontal and vertical axes 8. Use the CROP TOOL (without any size restrictions) and then CROP your image matching the grid 9. Delete the GRID LAYER 10. Now go to the HISTORY window and backup to the CUSTOM SHAPE TOOL STEP 11. CROP the image using standard crop sizes: 11x14, 11x17, 16x20 or 8x10 (you will not be able to crop exactly but use the grid as a guideline) 12. DELETE the GRID LAYER
  • 8. “Faking Differential Focus/ Depth of Field” 1. Open an image with at least 2 defined subject matters, preferably one in the foreground and one in the background – both need to be in focus! 2. CROP and EDIT photo using standard editing tools 3. At the bottom of the TOOL BAR you will find the QUICK MASK TOOL (it looks like a “circle in a square button” as picture to the right) 4. Click it to ENTER QUICK MASK MODE 5. Make sure your FOREGROUND COLOR is BLACK and BACKGROUND COLOR is WHITE (hit D on the keyboard) 6. Select the GRADIENT TOOL and make sure your gradient is a BLACK to WHITE, LINEAR, NORMAL 100% Gradient 7. Draw a gradient by clicking, drawing a line by dragging and then letting go (use the crosshairs to line this up) • This will create a RED shadowy area which is the MASK (a protected area of the image) • To make this work draw a gradient so that one of the subject matters is masked and the other is not • If you need to try again, use: SELECT ALL  DELETE KEY  CTRL D 8. Exit QUICK MASK by clicking the button again 9. The UNMASKED portion will be a SELECTION 10. FILTER  BLUR  GAUSSIAN BLUR  to taste 11. Repeat steps until DIFFERENTIAL FOCUS is created NOTE: on the next page you can find more examples of differential/focus and depth of field
  • 9. “Faking Differential Focus/ Depth of Field” 1. Open an image with at least 2 defined subject matters, preferably one in the foreground and one in the background – both need to be in focus! 2. CROP and EDIT photo using standard editing tools 3. We will use the QUICK MASK tool to create DEPTH OF FIELD/DIFFERENTIAL FOCUS again 4. ENTER QUICK MASK 5. Make sure your FOREGROUND/BACKGROUND colors are correct (again, hit D on the keyboard to reset these) 6. Instead of using the gradient, we are going to use the PAINTBRUSH  choose a SOFT BLURR BRUSH of medium size and 100% opacity 7. Paint over the subject matter that you want to keep in focus – you do not have to be accurate, just cover that subject matter in RED 8. EXIT QUICK MASK 9. FILTER  BLUR  GAUSSIAN BLUR  to taste 10. Repeat until satisfied greaterdepthoffield shallowdepthoffield
  • 10. “Removing Object from an Image” 1. Open an image with an object that you want to remove from the photograph 2. CROP and EDIT photo using standard editing tools 3. Select the CLONE STAMP TOOL  it looks like a stamp press (as pictured to the right) 4. To use this tool you have to follow these steps: • Find the object that you want to remove • Then move your mouse away from the object over a part of the background • hold down ALT and click • Then click over the object • Wherever you ALT clicked this will be the copied area that will be cloned • Wherever you click this will be the area covered up by the clone • See the diagram below 5. The CLONE TOOL will block out areas of an image using the “pickup point” 6. Use the RECTANGULAR MARQUEE TOOL 7. SELECT an area of the BACKGROUND 8. COPY & PASTE (a new layer should appear) 9. Use a SOFT BLURRY ERASER and erase the background Alt before after