SlideShare una empresa de Scribd logo
1 de 4
Michael E. Stern                       Photography/Education/Consulting


In the world of pixel-based imaging the color, contrast and brightness of a
particular image can vary greatly. The following tutorial is designed to
demonstrate ten different outcomes for converting a file from color to grayscale
(B&W). You will discover the many ways an image can change just by varying the
method used for the conversion.

The end results will provide you with information on how to change a color
image into a black and white image.

                          How Do I Get Thee To Grayscale?
                            Let Me Count The Ways...
Begin by selecting an image for converting.

      1)     Go to: Image--Adjust--Grayscale Mode
             a)      Creates a single channel grayscale image by averaging the three
                     channels in the RGB file.
             b)      You’re left with limited pixel information.
             c)      This quality compromise can show up in the output(s).
             d)      One benefit: small file size without compression.

      2)     Go to: Image--Adjust--Lab Mode
             a)      Pick the lightness channel, throw out the “a” and “b”
                     channels and convert to grayscale.
             b)      Same problems as above but you might be working with a
                     more pleasing tonal quality.

      3)     Go to: Image--Adjust--Channel Mixer/RGB mode
             a) Select the channel mixer adjustment layer button first.
             b)      Select the monochrome button at the bottom before moving the
                     sliders.
             c)       The idea is to have the three adjustments total 100%, but you don’t
                     have too!
             d)      Stay away from that constant slider unless you’re the adventurous
                     type.

      4)     Go to: Image--Adjust--Gradient Map/RGB mode
             a)      Pick black to white.
                     Simple and mostly ineffective but hey you gave it a shot.
5)   Select an Alpha Channel from your RGB file
     a)   Pick the best tonal quality from the three channels.
     b)   Throw out the other two channels and convert the
          remaining channel to grayscale.
     c)   Same problems as number 1, but you might be working with a
          more pleasing tonal quality.

6)   Create a Hue & Saturation Adjustment Layer/RGB mode
     a)   Drop the saturation to 0%.
     b)   Being in RGB mode, you still have access to all of the
          functions, features and power of Photoshop.


7)   Use a Blend Mode
     a)   Create a new layer above the target layer or background.
     b)   Fill with black.
     c)   Set the blend mode to saturation, color or hue.
     d)   Paint away on the new layer.
     e)   Adjust the opacity setting to hold some of the original color.
     f)   This technique is editable, fun, quick and controllable.


8)   Image--Calculations/RGB mode
     a)   Target the layer or background that you want to convert.
     b)   target the channels that you want to use as your source for the
          conversion.
     c)   You have your choice of blending modes and opacity. Oh my there
          are too many choices again.
     d)   Select the “add” blend mode at 100% opacity.
     e)   The offset and scale options allow you to fine tune the math that
          Photoshop uses to mix the color numbers of the pixels in the selected
          channels. This in turn gives you incredible control over how the gray
          values are created.
          Offset adds or subtracts brightness values to the pixels, it ranges from
          –255 to 255. Scale divides the combined numbers created by the
          target channels. Selecting “2” divides the combined numbers in half,
          while choosing “1” as the divider leaves the combined numbers alone.

          NOTE: While choosing “1” leaves the combined numbers undivided,
          the maximum luminance values of the combined numbers can not be
          greater than 255 or less than 0.
     f)   This technique generates the optimum mixing of pixel information to
          achieve a quality grayscale image.
It takes a lot of practice to master this particular technique. Can you
              say no social life?

         g)   Go ahead, don’t be afraid of this diabolical dialog box, it’s only scary
              the first 27 times you try it.

9)   Double Hue & Saturation Adjustment Layers
         a)   This method is so much fun you’ll forget about eating and go straight
              to drinking.
         b)   With the file of choice open, make a Hue & Saturation Adjustment
              Layer.
         c)   Drag its’ saturation slider all the way to the left.
         c)   Make another H&S Adjustment Layer. Change its’ Blend Mode to
              “Color.”
         d)   In the Layers Palette you now have two adjustment layers. The top
              most one has a “Normal” Blend Mode and it’s Saturation slider is all
              the way to the left.
         e)   The lower adjustment layer is set to the “Color” Blend Mode.
         f)   Now just move the Hue slider in the lower adjustment layer to taste.
              For additional fun also move the Saturation slider.

10) CS4 Black & White Adjustment Layer
         a)   In CS4 the newest tool is the Black & White Adjustment Layer.
         b)   With this adjustment layer open and set above the file of choice, it is
              simply a matter of moving the sliders, selecting a preset or clicking on
              any part of the file and dragging left or right. This is fun and endless
              so get plenty of rest and bring lots of water, you may not come out for
              days.
Good luck!

Michael


626-298-6747   michael@cyberstern.com

Más contenido relacionado

Destacado

Principles of Doppler ultrasound
Principles of Doppler ultrasoundPrinciples of Doppler ultrasound
Principles of Doppler ultrasound
Samir Haffar
 
Presentation on adobe photoshop® tools
Presentation on adobe photoshop® toolsPresentation on adobe photoshop® tools
Presentation on adobe photoshop® tools
Harshit Dave
 
Digital image processing img smoothning
Digital image processing img smoothningDigital image processing img smoothning
Digital image processing img smoothning
Vinay Gupta
 

Destacado (13)

digital image processing, image processing
digital image processing, image processingdigital image processing, image processing
digital image processing, image processing
 
Color image processing Presentation
Color image processing PresentationColor image processing Presentation
Color image processing Presentation
 
10 color image processing
10 color image processing10 color image processing
10 color image processing
 
Digital Image Processing - Image Enhancement
Digital Image Processing  - Image EnhancementDigital Image Processing  - Image Enhancement
Digital Image Processing - Image Enhancement
 
Principles of Doppler ultrasound
Principles of Doppler ultrasoundPrinciples of Doppler ultrasound
Principles of Doppler ultrasound
 
Digital Image Processing Fundamental
Digital Image Processing FundamentalDigital Image Processing Fundamental
Digital Image Processing Fundamental
 
image compression ppt
image compression pptimage compression ppt
image compression ppt
 
Image processing
Image processingImage processing
Image processing
 
Presentation on adobe photoshop® tools
Presentation on adobe photoshop® toolsPresentation on adobe photoshop® tools
Presentation on adobe photoshop® tools
 
ULTRASOUND IMAGING PRINCIPLES
ULTRASOUND IMAGING PRINCIPLESULTRASOUND IMAGING PRINCIPLES
ULTRASOUND IMAGING PRINCIPLES
 
Digital Image Processing
Digital Image ProcessingDigital Image Processing
Digital Image Processing
 
Image processing ppt
Image processing pptImage processing ppt
Image processing ppt
 
Digital image processing img smoothning
Digital image processing img smoothningDigital image processing img smoothning
Digital image processing img smoothning
 

Más de Michael e. Stern Photography

Más de Michael e. Stern Photography (20)

Camera Controls and the Study of Light
Camera Controls and the Study of LightCamera Controls and the Study of Light
Camera Controls and the Study of Light
 
Depth of Field
Depth of Field Depth of Field
Depth of Field
 
Intro to Lens Choice
Intro to Lens ChoiceIntro to Lens Choice
Intro to Lens Choice
 
Intro exposure
Intro exposureIntro exposure
Intro exposure
 
Intro metering
Intro meteringIntro metering
Intro metering
 
Slideshare page
Slideshare pageSlideshare page
Slideshare page
 
Slideshare page
Slideshare pageSlideshare page
Slideshare page
 
A method to mask out a subject from a background
A method to mask out a subject from a backgroundA method to mask out a subject from a background
A method to mask out a subject from a background
 
Correct sunburns and other skintone discolorations with Photoshop!
Correct sunburns and other skintone discolorations with Photoshop!Correct sunburns and other skintone discolorations with Photoshop!
Correct sunburns and other skintone discolorations with Photoshop!
 
Color Correction Primer
Color Correction PrimerColor Correction Primer
Color Correction Primer
 
Filter facts09
Filter facts09Filter facts09
Filter facts09
 
03 pwr ratios
03 pwr ratios03 pwr ratios
03 pwr ratios
 
02 gn review
02 gn review02 gn review
02 gn review
 
01 gn test
01 gn test01 gn test
01 gn test
 
The Qualities of Light
The Qualities of LightThe Qualities of Light
The Qualities of Light
 
Intro exposure
Intro exposureIntro exposure
Intro exposure
 
Reflective Metering Primer
Reflective Metering PrimerReflective Metering Primer
Reflective Metering Primer
 
Build A Better Photograph
Build A Better PhotographBuild A Better Photograph
Build A Better Photograph
 
Best Practices To Improve Your Digital Photographs
Best Practices To Improve Your Digital PhotographsBest Practices To Improve Your Digital Photographs
Best Practices To Improve Your Digital Photographs
 
Photoshop Selections
Photoshop SelectionsPhotoshop Selections
Photoshop Selections
 

Último

Activity 01 - Artificial Culture (1).pdf
Activity 01 - Artificial Culture (1).pdfActivity 01 - Artificial Culture (1).pdf
Activity 01 - Artificial Culture (1).pdf
ciinovamais
 
Salient Features of India constitution especially power and functions
Salient Features of India constitution especially power and functionsSalient Features of India constitution especially power and functions
Salient Features of India constitution especially power and functions
KarakKing
 
Jual Obat Aborsi Hongkong ( Asli No.1 ) 085657271886 Obat Penggugur Kandungan...
Jual Obat Aborsi Hongkong ( Asli No.1 ) 085657271886 Obat Penggugur Kandungan...Jual Obat Aborsi Hongkong ( Asli No.1 ) 085657271886 Obat Penggugur Kandungan...
Jual Obat Aborsi Hongkong ( Asli No.1 ) 085657271886 Obat Penggugur Kandungan...
ZurliaSoop
 
1029-Danh muc Sach Giao Khoa khoi 6.pdf
1029-Danh muc Sach Giao Khoa khoi  6.pdf1029-Danh muc Sach Giao Khoa khoi  6.pdf
1029-Danh muc Sach Giao Khoa khoi 6.pdf
QucHHunhnh
 

Último (20)

Explore beautiful and ugly buildings. Mathematics helps us create beautiful d...
Explore beautiful and ugly buildings. Mathematics helps us create beautiful d...Explore beautiful and ugly buildings. Mathematics helps us create beautiful d...
Explore beautiful and ugly buildings. Mathematics helps us create beautiful d...
 
General Principles of Intellectual Property: Concepts of Intellectual Proper...
General Principles of Intellectual Property: Concepts of Intellectual  Proper...General Principles of Intellectual Property: Concepts of Intellectual  Proper...
General Principles of Intellectual Property: Concepts of Intellectual Proper...
 
ComPTIA Overview | Comptia Security+ Book SY0-701
ComPTIA Overview | Comptia Security+ Book SY0-701ComPTIA Overview | Comptia Security+ Book SY0-701
ComPTIA Overview | Comptia Security+ Book SY0-701
 
Activity 01 - Artificial Culture (1).pdf
Activity 01 - Artificial Culture (1).pdfActivity 01 - Artificial Culture (1).pdf
Activity 01 - Artificial Culture (1).pdf
 
Salient Features of India constitution especially power and functions
Salient Features of India constitution especially power and functionsSalient Features of India constitution especially power and functions
Salient Features of India constitution especially power and functions
 
Basic Civil Engineering first year Notes- Chapter 4 Building.pptx
Basic Civil Engineering first year Notes- Chapter 4 Building.pptxBasic Civil Engineering first year Notes- Chapter 4 Building.pptx
Basic Civil Engineering first year Notes- Chapter 4 Building.pptx
 
How to Create and Manage Wizard in Odoo 17
How to Create and Manage Wizard in Odoo 17How to Create and Manage Wizard in Odoo 17
How to Create and Manage Wizard in Odoo 17
 
Sociology 101 Demonstration of Learning Exhibit
Sociology 101 Demonstration of Learning ExhibitSociology 101 Demonstration of Learning Exhibit
Sociology 101 Demonstration of Learning Exhibit
 
Jual Obat Aborsi Hongkong ( Asli No.1 ) 085657271886 Obat Penggugur Kandungan...
Jual Obat Aborsi Hongkong ( Asli No.1 ) 085657271886 Obat Penggugur Kandungan...Jual Obat Aborsi Hongkong ( Asli No.1 ) 085657271886 Obat Penggugur Kandungan...
Jual Obat Aborsi Hongkong ( Asli No.1 ) 085657271886 Obat Penggugur Kandungan...
 
Understanding Accommodations and Modifications
Understanding  Accommodations and ModificationsUnderstanding  Accommodations and Modifications
Understanding Accommodations and Modifications
 
Holdier Curriculum Vitae (April 2024).pdf
Holdier Curriculum Vitae (April 2024).pdfHoldier Curriculum Vitae (April 2024).pdf
Holdier Curriculum Vitae (April 2024).pdf
 
2024-NATIONAL-LEARNING-CAMP-AND-OTHER.pptx
2024-NATIONAL-LEARNING-CAMP-AND-OTHER.pptx2024-NATIONAL-LEARNING-CAMP-AND-OTHER.pptx
2024-NATIONAL-LEARNING-CAMP-AND-OTHER.pptx
 
Mehran University Newsletter Vol-X, Issue-I, 2024
Mehran University Newsletter Vol-X, Issue-I, 2024Mehran University Newsletter Vol-X, Issue-I, 2024
Mehran University Newsletter Vol-X, Issue-I, 2024
 
Key note speaker Neum_Admir Softic_ENG.pdf
Key note speaker Neum_Admir Softic_ENG.pdfKey note speaker Neum_Admir Softic_ENG.pdf
Key note speaker Neum_Admir Softic_ENG.pdf
 
ICT role in 21st century education and it's challenges.
ICT role in 21st century education and it's challenges.ICT role in 21st century education and it's challenges.
ICT role in 21st century education and it's challenges.
 
Food safety_Challenges food safety laboratories_.pdf
Food safety_Challenges food safety laboratories_.pdfFood safety_Challenges food safety laboratories_.pdf
Food safety_Challenges food safety laboratories_.pdf
 
Mixin Classes in Odoo 17 How to Extend Models Using Mixin Classes
Mixin Classes in Odoo 17  How to Extend Models Using Mixin ClassesMixin Classes in Odoo 17  How to Extend Models Using Mixin Classes
Mixin Classes in Odoo 17 How to Extend Models Using Mixin Classes
 
1029-Danh muc Sach Giao Khoa khoi 6.pdf
1029-Danh muc Sach Giao Khoa khoi  6.pdf1029-Danh muc Sach Giao Khoa khoi  6.pdf
1029-Danh muc Sach Giao Khoa khoi 6.pdf
 
Graduate Outcomes Presentation Slides - English
Graduate Outcomes Presentation Slides - EnglishGraduate Outcomes Presentation Slides - English
Graduate Outcomes Presentation Slides - English
 
ICT Role in 21st Century Education & its Challenges.pptx
ICT Role in 21st Century Education & its Challenges.pptxICT Role in 21st Century Education & its Challenges.pptx
ICT Role in 21st Century Education & its Challenges.pptx
 

How Do I Get Thee To Gray

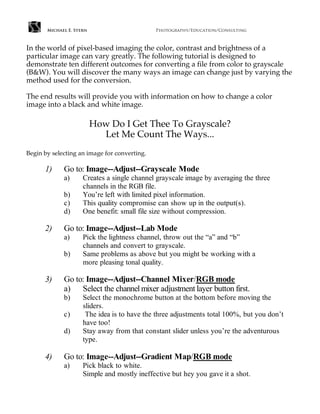
  • 1. Michael E. Stern Photography/Education/Consulting In the world of pixel-based imaging the color, contrast and brightness of a particular image can vary greatly. The following tutorial is designed to demonstrate ten different outcomes for converting a file from color to grayscale (B&W). You will discover the many ways an image can change just by varying the method used for the conversion. The end results will provide you with information on how to change a color image into a black and white image. How Do I Get Thee To Grayscale? Let Me Count The Ways... Begin by selecting an image for converting. 1) Go to: Image--Adjust--Grayscale Mode a) Creates a single channel grayscale image by averaging the three channels in the RGB file. b) You’re left with limited pixel information. c) This quality compromise can show up in the output(s). d) One benefit: small file size without compression. 2) Go to: Image--Adjust--Lab Mode a) Pick the lightness channel, throw out the “a” and “b” channels and convert to grayscale. b) Same problems as above but you might be working with a more pleasing tonal quality. 3) Go to: Image--Adjust--Channel Mixer/RGB mode a) Select the channel mixer adjustment layer button first. b) Select the monochrome button at the bottom before moving the sliders. c) The idea is to have the three adjustments total 100%, but you don’t have too! d) Stay away from that constant slider unless you’re the adventurous type. 4) Go to: Image--Adjust--Gradient Map/RGB mode a) Pick black to white. Simple and mostly ineffective but hey you gave it a shot.
  • 2. 5) Select an Alpha Channel from your RGB file a) Pick the best tonal quality from the three channels. b) Throw out the other two channels and convert the remaining channel to grayscale. c) Same problems as number 1, but you might be working with a more pleasing tonal quality. 6) Create a Hue & Saturation Adjustment Layer/RGB mode a) Drop the saturation to 0%. b) Being in RGB mode, you still have access to all of the functions, features and power of Photoshop. 7) Use a Blend Mode a) Create a new layer above the target layer or background. b) Fill with black. c) Set the blend mode to saturation, color or hue. d) Paint away on the new layer. e) Adjust the opacity setting to hold some of the original color. f) This technique is editable, fun, quick and controllable. 8) Image--Calculations/RGB mode a) Target the layer or background that you want to convert. b) target the channels that you want to use as your source for the conversion. c) You have your choice of blending modes and opacity. Oh my there are too many choices again. d) Select the “add” blend mode at 100% opacity. e) The offset and scale options allow you to fine tune the math that Photoshop uses to mix the color numbers of the pixels in the selected channels. This in turn gives you incredible control over how the gray values are created. Offset adds or subtracts brightness values to the pixels, it ranges from –255 to 255. Scale divides the combined numbers created by the target channels. Selecting “2” divides the combined numbers in half, while choosing “1” as the divider leaves the combined numbers alone. NOTE: While choosing “1” leaves the combined numbers undivided, the maximum luminance values of the combined numbers can not be greater than 255 or less than 0. f) This technique generates the optimum mixing of pixel information to achieve a quality grayscale image.
  • 3. It takes a lot of practice to master this particular technique. Can you say no social life? g) Go ahead, don’t be afraid of this diabolical dialog box, it’s only scary the first 27 times you try it. 9) Double Hue & Saturation Adjustment Layers a) This method is so much fun you’ll forget about eating and go straight to drinking. b) With the file of choice open, make a Hue & Saturation Adjustment Layer. c) Drag its’ saturation slider all the way to the left. c) Make another H&S Adjustment Layer. Change its’ Blend Mode to “Color.” d) In the Layers Palette you now have two adjustment layers. The top most one has a “Normal” Blend Mode and it’s Saturation slider is all the way to the left. e) The lower adjustment layer is set to the “Color” Blend Mode. f) Now just move the Hue slider in the lower adjustment layer to taste. For additional fun also move the Saturation slider. 10) CS4 Black & White Adjustment Layer a) In CS4 the newest tool is the Black & White Adjustment Layer. b) With this adjustment layer open and set above the file of choice, it is simply a matter of moving the sliders, selecting a preset or clicking on any part of the file and dragging left or right. This is fun and endless so get plenty of rest and bring lots of water, you may not come out for days.
  • 4. Good luck! Michael 626-298-6747 michael@cyberstern.com