SlideShare una empresa de Scribd logo
1 de 4
Descargar para leer sin conexión
8600 SERIES HC - INCOMING POWER WIRING

For high current models an additional terminal block has been provided. 4-Wire 240V service
must be provided to the circuit board terminal block as well as 3-Wire 240V service provided for
the High-Current terminal block. Refer to illustrations below:


High-Current                        L1
240-Volt electrical service
requires:

Line 1, Lin 2 and Ground.
                                   GR

                                    L2


Circuit Board Connection            L1
240-Volt electrical service         N
requires:

Line 1, Line 2, Neutral and        GR
                                    L2
Ground.


IMPORTANT: Always refer to the product data label (located on top of control box) for
specific electrical information.

   http://www.MyPoolSpas.com         Wholesale Pool and Spa Parts                  920-925-3094
8600 SERIES HC - DELUXE LOW LEVEL PROGRAMMING

It is possible to change the parameters of the system from the spaside control. All circuit presets have
been programmed at the factory. The only settings to be adjusted will be Current Limiting and/or Fiber
Optic settings. Follow the procedures described below to adjust these settings.


                                                           PROGRAM MODE ICON


                            PROGRAM KEY


                        UP/DOWN ARROWS


! Press and hold the Program key for approximately 20-seconds. The Program Icon will appear in the
  upper display window (the Program & Up/Down Arrow keys will be the only active keys during
  programming).
! Once the Program Icon appears, “P1 X” (X representing the current setting value) will be displayed in
  the lower display window.
! Press the Program key repeatedly until “P3 X” appears in the lower display window. Use the
  Up/Down Arrow keys to adjust the setting value (see parameter setting below).
! Continue to press the Program key until “AU X” appears in the lower display window. Use the
  Up/Down Arrow keys to adjust the setting value (see parameter setting below).
! Continue to press the Program key until “Cu X” appears in the lower display window. Use the
  Up/Down Arrow keys to adjust the setting value (see parameter setting below).
! Press the Program one last time to exit the programming mode and reset the spaside control and save
  the new program settings. The display will revert back to the standard time/temperature mode.


  P3                   Pump 3                             C                      Current Limiting

Display:    P3 X                                       Display:      Cu X

Value of X: 0 = Not Installed                          Value of X: 0 = Low Current (Heater Off w/High
            1 = Single Speed                                           Speed Pump or Blower)
                                                                   1 = High Current (No Limitations)


  AU                   Fiber Optic
                                                           LI                    Light Circuit
                                                                                (120V Light utilizes Circ. Pump circuit)
Display:    AU X
                                                       Display:          LI X
Value of X: 0 = Not Installed
            1 = EXM5 Fiber Optic Interface installed   Value of X:       0 = Not Installed
                                                                         1 = One 12V, On - Off
                                                                         2 = One 12V, Three Intensities
                                                                         3 = Two 12V Lights (1 Three Intensity, 1
                                                                         One On - Off)
                                                                         4 = 120V Light, 2-hour timeout
                                                                         5 = 120V Light, 4-hour timeout
                                                                         6 = 120V Light, 6-hour timeout
http://www.MyPoolSpas.com                 Wholesale Pool and Spa Parts                                    920-925-3094
8600 SERIES HC - BASIC OPERATION
                      LIGHT/ENTER KEY             PUMP 2 ICON                     PANEL LOCK
                       AIR BLOWER KEY          HEATER ON ICON                     AIR BLOWER ICON
                            PUMP 2 KEY            PUMP 1 ICON                     PROGRAM MODE ICON
                            PUMP 1 KEY                                            LIGHT ON ICON


                           PROGRAM KEY                    LCD WINDOWS
                       ECONOMY/NORMAL                    FILTERING ICON
                              MODE KEY            TEMPERATURE SET ICON
                       UP/DOWN ARROWS               ECONOMY MODE ICON


            Pump 1 Key: Press this key once to turn Pump 1 on. A second press will turn it off. For dual speed pump operation;
            Press this key once to turn Pump 1 onto Low speed, press this key a second time to turn Pump 1 onto High speed, a
            third press will turn the pump off. A built-in timer will shut the pump off after 20 minutes of operation unless done so
            manually. The Pump 1 Icon will appear on the LCD while the pump is running in High speed and flash while it is in
            Low speed. If the filter icon appears, a filtration cycle has begun and you will not be able to turn the pump off.

            Pump 2 Key: Press this key once to turn Pump 2 on. A second press will turn it off. For dual speed pump operation;
            Press this key once to turn Pump 2 onto Low speed, press this key a second time to turn Pump 2 onto High speed, a
            third press will turn the pump off. If equipped this key will also control Pump 3 as follows: Press this key once to
            turn Pump 2 on, second press will turn Pump 3 on, third press will turn off Pump 2 while Pump 3 remains on and a
            fourth press will turn Pump 3 off. For dual speed pump operation; Press this key once to turn Pump 2 low speed on,
            second press will turn Pump 2 onto high speed and Pump 3 on, third press will turn off Pump 2 while Pump 3
            remains on and a fourth press will turn Pump 3 off. A built-in timer will shut the pump(s) off after 20 minutes of
            operation unless done so manually. The Pump 2 Icon will appear while the pump is running in High speed and flash
            while it is in Low speed.

            Air Blower Key: Press this key once to turn blower onto High speed, a second press will turn the blower onto Low
            speed and a third press will turn the blower off. A built-in timer will shut the pump off after 20 minutes of operation
            unless done so manually. The Accessory Icon will appear while the blower is running in High speed and flash while
            it is in Low speed.

            Light/Enter Key: Press this key to turn the light onto its highest intensity, a second press will turn the light onto low
            and a third press will turn it off. If equipped with Fiber Optic: Press this key once to show “L1”. Use the Up arrow key
            to turn the light onto High, Low and Off. Press the light key a second time, “F1” will appear. Use the Up arrow key to
            turn the Fiber Optic wheel and light on, Fiber Optic wheel off with light on and both Off. The light will automatically
            shut off after 2 hours. The Light Icon will appear while the light is on.


            Temperature Set Keys: Press the Up arrow key to increase the desired temperature. Press the Down arrow key
            to decrease the temperature. The temperature can be adjusted in 1F increments from 59F to 104F (5C to 40C).
            The new setting will remain on the display for 5 seconds as a confirmation. During this time the Set Point icon will be
            appear to let you know this is the desired and not the actual temperature. After 5 seconds the display will return to
            the current temperature reading. When the temperature drops to 1F below the set temperature, the heater will be
            turned on until the temperature is 1F above the set temperature. The heater icon will appear while the heater is on
            and flash when there is a call for heat and the heater has not yet been activated.

            Programming Parameters: Press this key, the first parameter “CL” will appear in the display. To adjust the time,
            press the Light/Enter key. Use the Up/Down Arrow keys to adjust the time. Press the Program key to save the
            change and move tho the next parameter. Follow this same procedure to adjust these parameters: Filter Cycle 1
            start time “Fon1” 00:00 to 11:59, Filter Cycle 1 duration “Fdu1” OFF to 12, Filter Cycle 2 start time “Fon2” 00:00
            to 11:59, Filter Cycle 2 duration “Fdu2” OFF to 12, Economy start time #1 “Eon1” 00:00 to 23:00, Economy
            duration #1 “Edu1” OFF to 24, Economy start time #2 “Eon2” 00:00 to 23:00, Economy duration #2 “Edu2” OFF
            to 24, Economy start time #3 “Eon3” 00:00 to 23:00, Economy duration #3 “Edu3” OFF to 24. A final press will
            save all changes and the display will revert back to the standard time/temperature mode.

            Power Loss: Any interruption of power will cause the unit to reset and revert to the default programming of
            95BF set point temperature and 2, 2-hour filtration cycles.

http://www.MyPoolSpas.com                        Wholesale Pool and Spa Parts                                         920-925-3094
8600 SERIES - ERROR MESSAGES

                                 Three Flashing Dots with Pump Off: To prevent damage to your equipment,
                                 Hydro-Quip installs a pressure or flow switch. If 3 flashing dots appear below
                                 the temperature display while there is no pump(s) operating, turn the pump(s)
                                 on. If the 3 flashing dots went away this indicates that the pressure or flow
                ...              switch was activated although there was no water flow.
                                 Contact your local dealer


                                 Three Flashing Dots with Pump On: If 3 flashing dots appear below the
                                 temperature display while the pump(s) is operating, turn the pump(s) off. If the 3
                                 flashing dots went away this indicates that the pressure or flow switch was not
                                 activated although there was water flow. Note: A dirty filter limiting the water
                ...              flow will also cause this error message to appear. (When the pump is turned on,
                                 there is a 7-second delay before the system will start to auto check the pressure
                                 or flow switch.)
                                 Contact your local dealer


                                 Temperature Sensor: If the display shows a constant 32F or 134BF and this is not
                                 the actual temperature or the displayed temperature greatly differs from the actual
                                 spa water temperature, a problem with the water temperature sensor has
                  32
                ...              occurred.
                                 Contact your local dealer


                                 High Temperature: If the water temperature exceeds 119F, the Hi-Limit protection
                                 will be turned on and the heater will be deactivated until the water has cooled to
                                 110F. 3 flashing dots will appear below the elevated temperature. Power to the
                                 system must be cycled off then on to reset the system.
                ...2
                                 Contact your local dealer

                                 Freeze Protection & Winterizing: When freezing weather and/or power losses
                                 are expected, contact your local spa dealer for freeze protection or winterizing
                                 recommendations for both the spa and the equipment system. Freeze related
                                 damage is not covered by the Hydro-Quip warranty.


85-0067-B5                                         Rev.0                                                     07.03
http://www.MyPoolSpas.com               Wholesale Pool and Spa Parts                                  920-925-3094

Más contenido relacionado

La actualidad más candente

Micro dimmer module qubino manual
Micro dimmer module qubino manualMicro dimmer module qubino manual
Micro dimmer module qubino manual
Domotica daVinci
 
Micro double switch module qubino manual
Micro double switch module qubino manualMicro double switch module qubino manual
Micro double switch module qubino manual
Domotica daVinci
 
Micro switch module qubino manual
Micro switch module qubino manualMicro switch module qubino manual
Micro switch module qubino manual
Domotica daVinci
 
Single On Off Relay Everspring Manual
Single On Off Relay Everspring ManualSingle On Off Relay Everspring Manual
Single On Off Relay Everspring Manual
Domotica daVinci
 

La actualidad más candente (20)

Micro dimmer module qubino manual
Micro dimmer module qubino manualMicro dimmer module qubino manual
Micro dimmer module qubino manual
 
Qubino flush heat__cool_thermostat_user-manual_v1.2_eng
Qubino flush heat__cool_thermostat_user-manual_v1.2_engQubino flush heat__cool_thermostat_user-manual_v1.2_eng
Qubino flush heat__cool_thermostat_user-manual_v1.2_eng
 
Philio_pan04_User manual
Philio_pan04_User manualPhilio_pan04_User manual
Philio_pan04_User manual
 
In k200 for xe quick reference card
In k200 for xe quick reference cardIn k200 for xe quick reference card
In k200 for xe quick reference card
 
Micro double switch module qubino manual
Micro double switch module qubino manualMicro double switch module qubino manual
Micro double switch module qubino manual
 
Mh8 fc um
Mh8 fc umMh8 fc um
Mh8 fc um
 
In-wall dimmer module Z-Wave Plus Smart Home Europe manual english
In-wall dimmer module Z-Wave Plus Smart Home Europe manual englishIn-wall dimmer module Z-Wave Plus Smart Home Europe manual english
In-wall dimmer module Z-Wave Plus Smart Home Europe manual english
 
Micro switch module qubino manual
Micro switch module qubino manualMicro switch module qubino manual
Micro switch module qubino manual
 
Mini price on off z wave plus everspring
Mini price on  off z wave plus everspringMini price on  off z wave plus everspring
Mini price on off z wave plus everspring
 
Benext BE_DIMMERPLUG_manual_us
Benext BE_DIMMERPLUG_manual_usBenext BE_DIMMERPLUG_manual_us
Benext BE_DIMMERPLUG_manual_us
 
Mh7 eu um v.02
Mh7 eu um v.02Mh7 eu um v.02
Mh7 eu um v.02
 
Single On Off Relay Everspring Manual
Single On Off Relay Everspring ManualSingle On Off Relay Everspring Manual
Single On Off Relay Everspring Manual
 
Instructions aeon labs wall plug smart dimmer 6
Instructions   aeon labs wall plug smart dimmer 6Instructions   aeon labs wall plug smart dimmer 6
Instructions aeon labs wall plug smart dimmer 6
 
Qubino flush 1 relay plus user manual v1.0 eng1
Qubino flush 1 relay plus user manual v1.0 eng1Qubino flush 1 relay plus user manual v1.0 eng1
Qubino flush 1 relay plus user manual v1.0 eng1
 
Smart switch 6 manual
Smart switch 6 manualSmart switch 6 manual
Smart switch 6 manual
 
manual SECURE programmer heating thermostat
manual SECURE programmer heating thermostatmanual SECURE programmer heating thermostat
manual SECURE programmer heating thermostat
 
Manual of Thermostat Fan Coil 4Pipes MH8 series - MCO HOME
Manual of Thermostat Fan Coil 4Pipes MH8 series - MCO HOME Manual of Thermostat Fan Coil 4Pipes MH8 series - MCO HOME
Manual of Thermostat Fan Coil 4Pipes MH8 series - MCO HOME
 
4 in 1 multi sensor Philio PSM02 (motion, door/window, temperature, lightness)
4 in 1 multi sensor Philio PSM02 (motion, door/window, temperature, lightness)4 in 1 multi sensor Philio PSM02 (motion, door/window, temperature, lightness)
4 in 1 multi sensor Philio PSM02 (motion, door/window, temperature, lightness)
 
Manual dimmer benext us
Manual dimmer benext usManual dimmer benext us
Manual dimmer benext us
 
Neo coolcam - smart-plug user guide v2 - Zwave
Neo coolcam  - smart-plug user guide v2 - ZwaveNeo coolcam  - smart-plug user guide v2 - Zwave
Neo coolcam - smart-plug user guide v2 - Zwave
 

Similar a 85 0067-b5 outdoor-installation insert_web

Instruction-Manual-ICT India.pdf
Instruction-Manual-ICT India.pdfInstruction-Manual-ICT India.pdf
Instruction-Manual-ICT India.pdf
Trumen Technologies Pvt. Ltd. India
 

Similar a 85 0067-b5 outdoor-installation insert_web (20)

85 0062-i eco-1-installation insert_web
85 0062-i eco-1-installation insert_web85 0062-i eco-1-installation insert_web
85 0062-i eco-1-installation insert_web
 
Standard spaside instruction sheet
Standard spaside instruction sheetStandard spaside instruction sheet
Standard spaside instruction sheet
 
In k450 for xm quick reference card
In k450 for xm quick reference cardIn k450 for xm quick reference card
In k450 for xm quick reference card
 
In k450 for xe quick reference card
In k450 for xe quick reference cardIn k450 for xe quick reference card
In k450 for xe quick reference card
 
9400 9600 programming
9400 9600 programming9400 9600 programming
9400 9600 programming
 
Cn101 a
Cn101 aCn101 a
Cn101 a
 
85 0066-d rev 1 hq ultimate dealer guide
85 0066-d rev 1 hq ultimate dealer guide85 0066-d rev 1 hq ultimate dealer guide
85 0066-d rev 1 hq ultimate dealer guide
 
Aeotec Multisensor 7 Manual
Aeotec Multisensor 7 ManualAeotec Multisensor 7 Manual
Aeotec Multisensor 7 Manual
 
Manual epack
Manual epackManual epack
Manual epack
 
Variomat2 training
Variomat2 trainingVariomat2 training
Variomat2 training
 
Deluxe spaside instruction sheet
Deluxe spaside instruction sheetDeluxe spaside instruction sheet
Deluxe spaside instruction sheet
 
Eco 3 spaside instruction sheet
Eco 3 spaside instruction sheetEco 3 spaside instruction sheet
Eco 3 spaside instruction sheet
 
Display saune-finlandese-eng
Display saune-finlandese-engDisplay saune-finlandese-eng
Display saune-finlandese-eng
 
Instruction-Manual-ICT India.pdf
Instruction-Manual-ICT India.pdfInstruction-Manual-ICT India.pdf
Instruction-Manual-ICT India.pdf
 
Erbe icc-80-50-icc-service-manual
Erbe icc-80-50-icc-service-manualErbe icc-80-50-icc-service-manual
Erbe icc-80-50-icc-service-manual
 
Ultimate spaside instruction sheet
Ultimate spaside instruction sheetUltimate spaside instruction sheet
Ultimate spaside instruction sheet
 
Bl 40 troubleshooting guide
Bl 40 troubleshooting guideBl 40 troubleshooting guide
Bl 40 troubleshooting guide
 
Catalog mikro mikro mk232a-user
Catalog mikro mikro mk232a-userCatalog mikro mikro mk232a-user
Catalog mikro mikro mk232a-user
 
Catalog mikro mikro mk232a-user
Catalog mikro mikro mk232a-userCatalog mikro mikro mk232a-user
Catalog mikro mikro mk232a-user
 
Catalog mikro mikro mk232a-user-dienhathe.vn
Catalog mikro mikro mk232a-user-dienhathe.vnCatalog mikro mikro mk232a-user-dienhathe.vn
Catalog mikro mikro mk232a-user-dienhathe.vn
 

Más de Accurate Pool & Spa Services, llc

Más de Accurate Pool & Spa Services, llc (20)

Ps 9704 manual-rev1_2
Ps 9704 manual-rev1_2Ps 9704 manual-rev1_2
Ps 9704 manual-rev1_2
 
Ps 7100 manual-rev1_2
Ps 7100 manual-rev1_2Ps 7100 manual-rev1_2
Ps 7100 manual-rev1_2
 
Ps 6500 manual-rev1_2
Ps 6500 manual-rev1_2Ps 6500 manual-rev1_2
Ps 6500 manual-rev1_2
 
Hq label wd highlight
Hq label wd highlightHq label wd highlight
Hq label wd highlight
 
Eco 2 spaside instruction sheet
Eco 2 spaside instruction sheetEco 2 spaside instruction sheet
Eco 2 spaside instruction sheet
 
Eco 1 spaside instruction sheet
Eco 1 spaside instruction sheetEco 1 spaside instruction sheet
Eco 1 spaside instruction sheet
 
Eco 2 pcb revisions
Eco 2 pcb revisionsEco 2 pcb revisions
Eco 2 pcb revisions
 
Eco 1 programming
Eco 1 programmingEco 1 programming
Eco 1 programming
 
Cs9700 software upgrade notice 3 07
Cs9700 software upgrade notice 3 07Cs9700 software upgrade notice 3 07
Cs9700 software upgrade notice 3 07
 
Cs9700 llp settings 3 07
Cs9700 llp settings 3 07Cs9700 llp settings 3 07
Cs9700 llp settings 3 07
 
Control cord colors
Control cord colorsControl cord colors
Control cord colors
 
850077 a outdoor operation
850077 a outdoor operation850077 a outdoor operation
850077 a outdoor operation
 
9300 programming
9300 programming9300 programming
9300 programming
 
85 0138 infrared remote-web
85 0138 infrared remote-web85 0138 infrared remote-web
85 0138 infrared remote-web
 
85 0137 rev 1-palm pilot programming_web
85 0137 rev 1-palm pilot programming_web85 0137 rev 1-palm pilot programming_web
85 0137 rev 1-palm pilot programming_web
 
85 0136 spaside cutout template
85 0136 spaside cutout template85 0136 spaside cutout template
85 0136 spaside cutout template
 
85 0135 b-installation manual_web
85 0135 b-installation manual_web85 0135 b-installation manual_web
85 0135 b-installation manual_web
 
85 0135 a-rev 1_installation manual
85 0135 a-rev 1_installation manual85 0135 a-rev 1_installation manual
85 0135 a-rev 1_installation manual
 
85 0079 vds insert
85 0079 vds insert85 0079 vds insert
85 0079 vds insert
 
85 0076-e eco-2 plus-installation insert_web
85 0076-e eco-2 plus-installation insert_web85 0076-e eco-2 plus-installation insert_web
85 0076-e eco-2 plus-installation insert_web
 

85 0067-b5 outdoor-installation insert_web

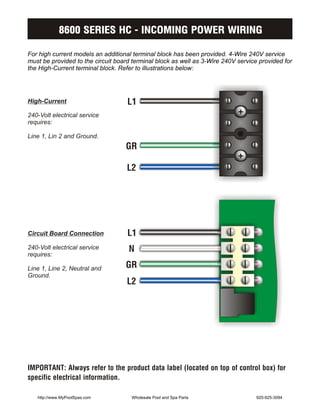
  • 1. 8600 SERIES HC - INCOMING POWER WIRING For high current models an additional terminal block has been provided. 4-Wire 240V service must be provided to the circuit board terminal block as well as 3-Wire 240V service provided for the High-Current terminal block. Refer to illustrations below: High-Current L1 240-Volt electrical service requires: Line 1, Lin 2 and Ground. GR L2 Circuit Board Connection L1 240-Volt electrical service N requires: Line 1, Line 2, Neutral and GR L2 Ground. IMPORTANT: Always refer to the product data label (located on top of control box) for specific electrical information. http://www.MyPoolSpas.com Wholesale Pool and Spa Parts 920-925-3094
  • 2. 8600 SERIES HC - DELUXE LOW LEVEL PROGRAMMING It is possible to change the parameters of the system from the spaside control. All circuit presets have been programmed at the factory. The only settings to be adjusted will be Current Limiting and/or Fiber Optic settings. Follow the procedures described below to adjust these settings. PROGRAM MODE ICON PROGRAM KEY UP/DOWN ARROWS ! Press and hold the Program key for approximately 20-seconds. The Program Icon will appear in the upper display window (the Program & Up/Down Arrow keys will be the only active keys during programming). ! Once the Program Icon appears, “P1 X” (X representing the current setting value) will be displayed in the lower display window. ! Press the Program key repeatedly until “P3 X” appears in the lower display window. Use the Up/Down Arrow keys to adjust the setting value (see parameter setting below). ! Continue to press the Program key until “AU X” appears in the lower display window. Use the Up/Down Arrow keys to adjust the setting value (see parameter setting below). ! Continue to press the Program key until “Cu X” appears in the lower display window. Use the Up/Down Arrow keys to adjust the setting value (see parameter setting below). ! Press the Program one last time to exit the programming mode and reset the spaside control and save the new program settings. The display will revert back to the standard time/temperature mode. P3 Pump 3 C Current Limiting Display: P3 X Display: Cu X Value of X: 0 = Not Installed Value of X: 0 = Low Current (Heater Off w/High 1 = Single Speed Speed Pump or Blower) 1 = High Current (No Limitations) AU Fiber Optic LI Light Circuit (120V Light utilizes Circ. Pump circuit) Display: AU X Display: LI X Value of X: 0 = Not Installed 1 = EXM5 Fiber Optic Interface installed Value of X: 0 = Not Installed 1 = One 12V, On - Off 2 = One 12V, Three Intensities 3 = Two 12V Lights (1 Three Intensity, 1 One On - Off) 4 = 120V Light, 2-hour timeout 5 = 120V Light, 4-hour timeout 6 = 120V Light, 6-hour timeout http://www.MyPoolSpas.com Wholesale Pool and Spa Parts 920-925-3094
  • 3. 8600 SERIES HC - BASIC OPERATION LIGHT/ENTER KEY PUMP 2 ICON PANEL LOCK AIR BLOWER KEY HEATER ON ICON AIR BLOWER ICON PUMP 2 KEY PUMP 1 ICON PROGRAM MODE ICON PUMP 1 KEY LIGHT ON ICON PROGRAM KEY LCD WINDOWS ECONOMY/NORMAL FILTERING ICON MODE KEY TEMPERATURE SET ICON UP/DOWN ARROWS ECONOMY MODE ICON Pump 1 Key: Press this key once to turn Pump 1 on. A second press will turn it off. For dual speed pump operation; Press this key once to turn Pump 1 onto Low speed, press this key a second time to turn Pump 1 onto High speed, a third press will turn the pump off. A built-in timer will shut the pump off after 20 minutes of operation unless done so manually. The Pump 1 Icon will appear on the LCD while the pump is running in High speed and flash while it is in Low speed. If the filter icon appears, a filtration cycle has begun and you will not be able to turn the pump off. Pump 2 Key: Press this key once to turn Pump 2 on. A second press will turn it off. For dual speed pump operation; Press this key once to turn Pump 2 onto Low speed, press this key a second time to turn Pump 2 onto High speed, a third press will turn the pump off. If equipped this key will also control Pump 3 as follows: Press this key once to turn Pump 2 on, second press will turn Pump 3 on, third press will turn off Pump 2 while Pump 3 remains on and a fourth press will turn Pump 3 off. For dual speed pump operation; Press this key once to turn Pump 2 low speed on, second press will turn Pump 2 onto high speed and Pump 3 on, third press will turn off Pump 2 while Pump 3 remains on and a fourth press will turn Pump 3 off. A built-in timer will shut the pump(s) off after 20 minutes of operation unless done so manually. The Pump 2 Icon will appear while the pump is running in High speed and flash while it is in Low speed. Air Blower Key: Press this key once to turn blower onto High speed, a second press will turn the blower onto Low speed and a third press will turn the blower off. A built-in timer will shut the pump off after 20 minutes of operation unless done so manually. The Accessory Icon will appear while the blower is running in High speed and flash while it is in Low speed. Light/Enter Key: Press this key to turn the light onto its highest intensity, a second press will turn the light onto low and a third press will turn it off. If equipped with Fiber Optic: Press this key once to show “L1”. Use the Up arrow key to turn the light onto High, Low and Off. Press the light key a second time, “F1” will appear. Use the Up arrow key to turn the Fiber Optic wheel and light on, Fiber Optic wheel off with light on and both Off. The light will automatically shut off after 2 hours. The Light Icon will appear while the light is on. Temperature Set Keys: Press the Up arrow key to increase the desired temperature. Press the Down arrow key to decrease the temperature. The temperature can be adjusted in 1F increments from 59F to 104F (5C to 40C). The new setting will remain on the display for 5 seconds as a confirmation. During this time the Set Point icon will be appear to let you know this is the desired and not the actual temperature. After 5 seconds the display will return to the current temperature reading. When the temperature drops to 1F below the set temperature, the heater will be turned on until the temperature is 1F above the set temperature. The heater icon will appear while the heater is on and flash when there is a call for heat and the heater has not yet been activated. Programming Parameters: Press this key, the first parameter “CL” will appear in the display. To adjust the time, press the Light/Enter key. Use the Up/Down Arrow keys to adjust the time. Press the Program key to save the change and move tho the next parameter. Follow this same procedure to adjust these parameters: Filter Cycle 1 start time “Fon1” 00:00 to 11:59, Filter Cycle 1 duration “Fdu1” OFF to 12, Filter Cycle 2 start time “Fon2” 00:00 to 11:59, Filter Cycle 2 duration “Fdu2” OFF to 12, Economy start time #1 “Eon1” 00:00 to 23:00, Economy duration #1 “Edu1” OFF to 24, Economy start time #2 “Eon2” 00:00 to 23:00, Economy duration #2 “Edu2” OFF to 24, Economy start time #3 “Eon3” 00:00 to 23:00, Economy duration #3 “Edu3” OFF to 24. A final press will save all changes and the display will revert back to the standard time/temperature mode. Power Loss: Any interruption of power will cause the unit to reset and revert to the default programming of 95BF set point temperature and 2, 2-hour filtration cycles. http://www.MyPoolSpas.com Wholesale Pool and Spa Parts 920-925-3094
  • 4. 8600 SERIES - ERROR MESSAGES Three Flashing Dots with Pump Off: To prevent damage to your equipment, Hydro-Quip installs a pressure or flow switch. If 3 flashing dots appear below the temperature display while there is no pump(s) operating, turn the pump(s) on. If the 3 flashing dots went away this indicates that the pressure or flow ... switch was activated although there was no water flow. Contact your local dealer Three Flashing Dots with Pump On: If 3 flashing dots appear below the temperature display while the pump(s) is operating, turn the pump(s) off. If the 3 flashing dots went away this indicates that the pressure or flow switch was not activated although there was water flow. Note: A dirty filter limiting the water ... flow will also cause this error message to appear. (When the pump is turned on, there is a 7-second delay before the system will start to auto check the pressure or flow switch.) Contact your local dealer Temperature Sensor: If the display shows a constant 32F or 134BF and this is not the actual temperature or the displayed temperature greatly differs from the actual spa water temperature, a problem with the water temperature sensor has 32 ... occurred. Contact your local dealer High Temperature: If the water temperature exceeds 119F, the Hi-Limit protection will be turned on and the heater will be deactivated until the water has cooled to 110F. 3 flashing dots will appear below the elevated temperature. Power to the system must be cycled off then on to reset the system. ...2 Contact your local dealer Freeze Protection & Winterizing: When freezing weather and/or power losses are expected, contact your local spa dealer for freeze protection or winterizing recommendations for both the spa and the equipment system. Freeze related damage is not covered by the Hydro-Quip warranty. 85-0067-B5 Rev.0 07.03 http://www.MyPoolSpas.com Wholesale Pool and Spa Parts 920-925-3094