Sharing Beach Moments and Lens Flares
•
1 recomendación•4,343 vistas

Another awesome issue of PicsArt Monthly here to inspire you to create and learn! This issue brings you a dazzling array of amazing insight, eye-popping art, and fascinating articles. Here is a bird’s eye view of what to expect in our latest issue.

Recomendados
Más contenido relacionado
Similar a Sharing Beach Moments and Lens Flares
Similar a Sharing Beach Moments and Lens Flares (20)
Último
Último (20)
Sharing Beach Moments and Lens Flares
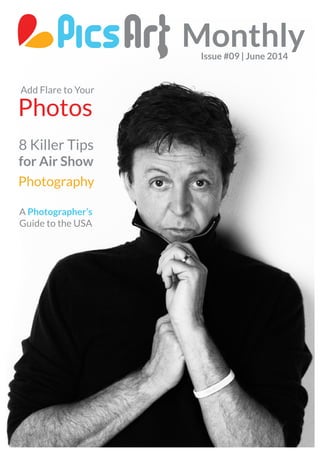
- 1. PicsArt Monthly | 1 MonthlyIssue #09 | June 2014 A Photographer’s Guide to the USA 8 Killer Tips for Air Show Photography Add Flare to Your Photos
- 3. PicsArt Monthly | 3
- 4. Pro Insight 08 | The Many Facets of Travel Light Inspiration 14 | Sharing Moments by the Shore 58 | PicsArtist Roxy’s Visceral Mobile Art PicsArt In Action 26 | Add Flare to Your Photos Tutorials 30 | 8 Killer Tips for Air Show Photography 40 | Creative Edits: A City on the Back of an Animal 48 | How to Draw Amazing Anime Using PicsArt 52 | Design a Summer Vacation Postcard What's New 68 | PicsArt's New & Exciting Features 74 | A Brief Introduction to Photo History Interview 82 | Celebrity Photographer Jason Bell Feature 102 | Bewitched by Blight 104 | A Photographer’s Guide to the USA 116 | DIY Wall Decorations for Kid's Room 118 | Daniel’s Twisted Animal Crime Lineup
- 6. 6| PicsArt Monthly Follow us... Meet our team... Editor-in-Chief | Arusiak Kanetsyan Art Editor | Cristina Gevorg Designer | Ina Sarko Copy Editor | Arto Vaun, Cameron Sheldon Editorial Contributors | Arto Vaun, Satenig Mirzoyan, Mark Gargarian, Heather Parry Special Contributors | Lou Jones, Chris Corradino In-House Photographer | ma_lina Address: PicsArt Inc., 800 West El Camino Real, Mountain View, CA 94040 Publisher: PicsArt Coverphoto:JasonBell @ma_lina
- 7. PicsArt Monthly | 7 Copyright of Socialln Inc. ( PicsArt Photo Studio ) 2013. All rights reserved. No part of this magazine may be re-used without the written permission of the publisher. The content of this magazine is for informational purposes only and is, to the best of our knowledge, correct at the time of publication. PicsArt Photo Studio does not claim any ownership right for the photos in the Magazine. All photos,if not mentioned otherwise, are the property of respective PicsArt users. The PicsArt username or photo owner is cited on each photo. PicsArt Photo Studio has a non-exclusive, royalty-free, worldwide, limited licence to use, modify, add to, publicly perform, publicly display, and reproduce PicsArt users’ photos, including without limitation distributing part or all of the Magazine in any media formats through any media channels. We’re turning the corner into summer’s full blast, which means sun, fun, and friends. That energy is reflected in the June issue of PicsArt Magazine. As you relax and enjoy the summer warmth, check out what we have in store in this issue… There are many talented, budding artists in the our community. In this issue we highlight the work of Roxy H.Art, who uses PicsArt to mix in photography and drawing, resulting in unique works of art. Her work is bold, honest, and well worth checking out. What’s the one image most people think of when they think of summer? The beach! We bring you a diverse collection of beach images from different perspectives and regions. From industrial ports and desolate beauty, to fun-filled party scenes, beaches are poetic spaces where the sea meets the land, and these photos capture that perfectly. Along with the warmth of summer come the unique shades of sunlight. Many photographers strive to capture and play with light. Often, even pros capture flares and twinkling light by accident. PicsArt offers some dazzlingly realistic lens flares that can be inserted during the editing process. We provide a helpful article to illustrate the uses of lens flares. Jason Bell is one of the best known portrait photographers working today. His work has appeared in magazines like Vanity Fair and Vogue, and he has photographed everyone from the royal family to movie stars. In this issue, Bell talks about his background, photos, and life as a high profile photographer. There’s much more in the June issue of PicsArt Magazine, so sit back, enjoy the sunshine, and check out all the useful, entertaining articles and photos! Welcome! As always, please give us your feedback at info@picsart.com.
- 8. 8| PicsArt Monthly The Many Facets of Travel Lights By Lou Jones Straphanging on an overcrowded Green Line subway, squeezed between a too young mother with baby stroller and a hipster with a too big backpack, I spotted someone carrying a tote bag with the most cryptic logo stenciled on the side: TRAVEL LIGHT THINK SMART. I was about to dismiss it until I realized how many ways that message might be interpreted. I still have no idea what they were advertising but my mind raced. 1. If you plan on venturing more than three zip codes away from home and don’t want the hassle, you can enlist travel services. By changing the spelling (Travel LITE), we derive another name for convenience-based travel. This often is to made-up locales like Disneyland or Six Flags or household destinations like Paris and Cancun: school vacation tours, package deals with groups of like-minded tourists and fun-filled resorts as opposed to hard places with names that have no vowels or are necessary to look up in a dictionary. In lieu of hardcore immersion into a new location, these excursions offer enjoyment from managed sightseeing where most of the amenities are provided. They also scream for “selfie” photographs to make your friends back home jealous.
- 9. PicsArt Monthly | 9 Travel Lite is intended to reduce stress, generate new experiences and maximize convenience. The terminus may be secondary to the service. 2. As an inveterate travel photographer, I often tote everything but the kitchen sink. Besides cameras and lenses (visas, Lomotil, GPS,...), the most obvious is lighting equipment for my assignments. Over the past few years I have reduced the size and weight of everything I carry. Using speedlights, which are small and portable, has lightened my burden substantially. I suppose you could call the speedlights (Nikon) and speedlites (Canon),TRAVEL LIGHTS.
- 10. 10| PicsArt Monthly On the other hand you might also need a nightlight that dangles from the end of your key chain to find the bathroom, outhouse or latrine in some one-star motel or campground in Albuquerque or Ayers Rock. 3. Abusing the privilege of moving unencumbered across the far reaches of our planet, tourists of all types scorch the earth with their expectations, culture, money, politics, etc. Their mere presence changes things. Tourists pollute, steal antiquities, burden the ecology, and stereotype the natives. We need to tread lightly or travel light in order to be responsible guests.
- 11. PicsArt Monthly | 11
- 12. 12| PicsArt Monthly There is a famous quote “Leave nothing but footprints, take nothing but pictures.” It should be the photographer’s mantra. 4. The most likely meaning for the above slogan is important too. As a general rule, people who only venture out once in a while carry too much stuff. They pack for every contingency--that fancy ball gown--just in case. The phrase “Pack Right Travel Light” advises to pack your bags paying attention only to what is absolutely necessary. There is nothing more unnecessary than being trapped by heavy luggage. It is expensive to get onto planes. Inertia. It slows you down. You can hurt yourself or others. I try to adhere to a rule: don’t carry it if you can’t run with it. I have spent years seeking better designed gear that shaves ounces off my kit. Camera bags that give you scoliosis really slow you down unless you are attempting an assignment that requires an inordinate amount of preparation. Catching a taxi, train or bus overloaded with too much stuff diminishes reasons for traveling in the first place. And they are the mark of the “ugly tourist”. 5. THINK SMART. Well that goes without saying. And I had to catch another subway anyway.
- 13. PicsArt Monthly | 13
- 14. 14| PicsArt Monthly Sharing Moments by the Shore PicsArtists Share Their Snapshots of the Sand, Sun & Waves Beaches are everywhere, yet no two beaches are the same. Similarly, PicsArtists are everywhere, yet no two have the same eye or photographic flair. When we look at these photos of the seaside collected from a community as large and diverse as PicsArt, we can't help but appreciate the experiences we share in common in addition to the idiosyncrasies that make us unique. These photos tell the story of where the water meets the land. The beach is a place where people come to do anything and everything - build sandcastles, surf, go for a swim, take a pensive stroll or just sit and enjoy the view. As enormous freightliners move in and out of harbors with loads of cargo, small groups of beachgoers paddle out in tiny kayaks. Birds circle overhead in search of fish or seek refuge ashore only to get chased away by small children. This collection of photos convey the experiences and memories as seen by PicsArtists on various shores scattered around the world. They are so vivid, you can almost taste the salt or a cool ocean breeze whipping across your face... @cathyhelix
- 15. PicsArt Monthly | 15 INSPIRATION : Photo
- 17. PicsArt Monthly | 17 @stu76 @nickon69 @priyankamukherjee
- 19. PicsArt Monthly | 19
- 21. PicsArt Monthly | 21 @conxies
- 23. PicsArt Monthly | 23
- 25. PicsArt Monthly | 25
- 26. 26| PicsArt Monthly Add Flare to Your Photos Many photographers spend years trying to capture a glimmering lens flare. They invest in expensive lenses and strain to catch the light at just the right angle. Historically, and for many photographers, lens flare is a vexing light that reflects off the glass of your lens, ruining an otherwise brilliant shot. However, the twinkling beauty of lens flare has transformed it from purely accidental into an artform of its own, with many pros spending months trying to perfect their lens flare technique. PicsArt eases this process for you by offering some dazzlingly realistic lens flares that can be inserted during the editing process. PicsArt lens flares are also fully customizable so you can integrate them seamlessly into your favorite shots. Here we demonstrate four of PicsArt’s lens flares in action over the same photo, each one offering it’s own mesmerizing effect. And the best part is all they require is one touch!
- 27. PicsArt Monthly | 27 PICSART IN ACTION
- 29. PicsArt Monthly | 29
- 30. 30| PicsArt Monthly 8 Killer Tips for Air Show Photography by Chris Corradino As temperatures warm up around most of the globe, it's time to once again welcome the return of Air Show season. If you've never attended one before, get ready for a thrilling event. No matter how many times I photograph these high flying performances, the power and precision of the pilots never fails to amaze me. While they are an astonishing sight, the raw speed of the passing jets can make for a challenging photo opportunity. This article includes eight essential tips to help you capture the big event in your area.
- 31. PicsArt Monthly | 31 TUTORIAL : Shooting
- 32. 32| PicsArt Monthly Beat the Crowds Since much of the 2013 flying season was cancelled due to budget cuts, this year's shows are expected to smash previous attendance records. With more than 150,000 people jockeying for a good vantage point, it's essential you arrive 1-2 hours before the show starts. This allows you to set up your gear in a prime location with unobstructed views of the action. Before settling on a spot, scan the horizon for any distractions that could block your lens. The performers usually enter from the left and right with their stunts done at show center.
- 33. PicsArt Monthly | 33 Lens Options Air shows are usually several hours in duration and longer lenses can get quite heavy. Image stabilization is a nice feature, but a tripod will give your arms a break and allow you to create sharp images consistently. While the majority of my aviation work is shot with longer lenses, I find that wide angle lenses are also useful for performance teams that are spread out in wide formations. By utilizing a few different options, you can capture more of the action and come home with a diverse collection of images. Camera Settings In order to freeze the flight of an aircraft travelling over 500 miles per hour, you'll need a very fast shutter speed. For the best results, I recommend at least 1/1000th of a second. This is quick enough to stop even the fastest of aircrafts while also preventing camera shaking. My exposure is typically around 1/1000, ISO 400, and f5.6. These settings are not meant to be exact, but merely a starting point. Depending on the weather conditions that day, adjustments may be necessary.
- 34. 34| PicsArt Monthly Autofocus Techniques Most DSLR cameras feature continuous focusing, also known as AI Servo. This mode will allow you to track moving subjects. Keep your center focusing point over the aircraft with your shutter held halfway down. As you follow the plane through your viewfinder, the camera will automatically adjust the focus as the aircraft gets closer. When you are ready to make an image, simply press the shutter all the way down. Air Show organizers often arrange photo passes where the pilot flies at a reduced speed. Don’t get too comfortable though, they return to full speed after just a few slow turns.
- 35. PicsArt Monthly | 35 The Peak of Action Smoke trails and afterburner effects are great additions to an aviation image. Be ready for them, as they happen quickly. The trails of white smoke are actually created by pumping oil into the exhaust pipe. This is particularly interesting when used by an entire formation of planes. The patterns of smoke can be used to make for a more artistic composition. In addition, it adds a bit of contrast to the otherwise plain blue sky. I also look to capture the interaction between two planes. When pilots are flying side by side with their wings nearly touching, a great deal of tension is introduced to the photo. By freezing this moment in time you are also showcasing the precision, and skill of the daring pilots. Enough Memory With all of this fast-paced action, you will likely burn through many memory cards rapidly. I used to bring a portable hard drive with me and download the contents of the card while continuing to shoot. This is no longer necessary as large capacity cards of 32GB are now very reasonably priced. I like to shoot in RAW format whenever possible. However, if you are short on memory cards, you may want to consider shooting in the Large/Fine JPEG format. This will allow you to fit more images on the card than RAW.
- 36. 36| PicsArt Monthly Capture The Local Color For an up close look at some of these aircrafts, check with your local airport or military base for "static displays". From the ground, you can get a much better look at details like the paint scheme, and propellers. Depending on the venue, you may even be able to climb inside the cockpit. Since you will be very close, a wide angle lens is the preferred choice here. Walk around the entire plane to search for the best angle and create a strong composition.
- 37. PicsArt Monthly | 37
- 38. 38| PicsArt Monthly Capture The Local Color During the brief pauses in action, turn your lens towards the people around you. Spectators can often yield some interesting images. Maybe it's time for a quick selfie as well. Pay special attention to any signs that may show the event's name. These can be used to start and end your gallery of images.
- 39. PicsArt Monthly | 39
- 40. Creative Edits: A City on a Back of an Animal The PicsArt editor makes really cool editing tricks easily available to anyone who has the will and imagination. You can create some really amazing surreal images with PicsArt and, to show you what we mean, we have created a tutorial on how to raise an entire city on the back of an animal by combining photos and applying effects. This tutorial also introduces users to our recently added feature for Android devices, which lets users create their own custom clipart! Follow these simple steps to become a photo wizard with PicsArt.
- 41. TUTORIAL : Editing Step 1: Open Your Photo Upload an animal photo from the Photo section of the main menu. Make sure that your photo features a brightly lit animal in front of a dark background.
- 42. Step 2: Apply the Cinerama Effect to the Main Photo Select the Effects icon and choose the Cinerama effect from the Fx section of the Effects menu. Save and confirm with checkmark.
- 43. Step 3: Add a New Photo Select the Add Photo icon and add a photo of the city you want to place on the back of the animal.
- 44. 44| PicsArt Monthly Step 4: Apply the Cinerama Effect Select the top left icon (the Effect icon) from the menu that appears after you add a photo. Apply the Cinerama effect, just like you did with your main photo.
- 45. PicsArt Monthly | 45 Step 5: Cut and Create Clipart Select the Scissors icon from the top menu (i.e. the Free Crop option). Choose the Lasso option by clicking on the Brush icon. Use the lasso to cut out the skyline of your city from the background. Press the Save as Clipart button at the top of the screen to save your selection as a clipart image. This will save your selection in My Clipart section, allowing you to reuse it on any image whenever you need it.
- 46. 46| PicsArt Monthly Step 6: Place and Blend the Image Adjust the size of your city and place it on the back of the animal. Select and apply the Lighten blending mode from the menu below. Confirm the changes you have made.
- 47. PicsArt Monthly | 47 Step 7: Shape Masks Select the Shape Mask icon and choose a shape to frame your photo. Reduce the opacity to around 30% to go with your shot. Confirm and save your creation!
- 48. 48| PicsArt Monthly How to Draw Amazing Anime! Step by Step Tutorial Anime has a unique style that has garnered global popularity, even fanaticism. This tutorial demonstrates how to make your very own anime using PicsArt Drawing Tools and your smart device. See how PicsArt Drawing Tools make drawing fun and easy, and use this step by step tutorial to create your very own anime. Who knows? Maybe one day your anime will become the main character for your own cartoon or comics! TUTORIAL : Drawing
- 49. PicsArt Monthly | 49 Step 1: Draw the Basic Outline Draw a basic outline of your anime character using simple strokes in a light blue color so that you will be able to distinguish it from other outlines later on. Step 2: Refine your Outline Add a new layer and use your previous layer as a guide to draw a more precise outline. Delete the layer with the blue outline when finished.
- 50. 50| PicsArt Monthly Step 4: Add Color Use thick colorful brushes to add the basic first layer of colors to your drawing. Step 3: Final Outline Reduce the opacity, and add a new layer for your final outline. Trace a final outline using clean and deliberate strokes. Make sure you get all of your details exactly right and correct previous mistakes. Delete or hide previous outline layer when done.
- 51. PicsArt Monthly | 51 Step 5: Add Shading Add a new layer and outline the areas of your drawing you would like to shade. Color this outline in black when you are ready. Step 6: Background Color Reduce the opacity of your shade layer for a more subtle shade. Use brighter tones to add lighting and reflection in your drawing. Finish your drawing by using a translucent brush to add shading and texture to your background. This creates ambiance and gives your anime character that final touch of realism it needs!
- 52. 52| PicsArt Monthly Design a Postcard that Encapsulates Summer Vacation PicsArt has everything you need to create the perfect postcard using your summer photos. With the right combination of masks, texts, and clipart, you can create a professional card that perfectly captures the feelings and images of your fondest summer vacation memories. With this tutorial, we’ll show you an example of how to create a postcard step by step. You’ll be surprised at how easy it is to make something look so good in five easy steps!
- 53. PicsArt Monthly | 53 Step 1: Upload a Photo Upload a photo from the edit section of the main menu. TUTORIAL : Design
- 54. 54| PicsArt Monthly Step 2: Add Shape Mask Select the Shape Mask icon from the menu bar and choose a shape mask that fits your photo best. Customize the color, size, and opacity of the mask.
- 55. PicsArt Monthly | 55 Step 3: 2nd Shape Mask Add a second Shape Mask with the same color and opacity as your previous one. Reverse the mask by checking the box next to Inverse at the bottom right corner.
- 56. 56| PicsArt Monthly Step 4: Add Text Press the Text icon to add text to your postcard. Add your text line by line to experiment with different fonts, sizes, and colors.
- 57. PicsArt Monthly | 57 Step 5: Add Clipart Press the Clipart icon and choose clipart images to add that go with the theme of your postcard. Customize the size and color to complete your postcard!
- 59. PicsArt Monthly | 59 PicsArtist Roxy’s Visceral Mobile Art The series of abstract portraits created by PicsArtist Roxy H.Art (@roxyhart) are gripping. Not only is her artwork raw and emotionally charged, but it is rendered in a unique artistic fashion - all on her mobile phone! At times, Roxy mixes her drawings with photography, blending the two togehter with a variety of brush strokes and textures. Roxy does not hold back when she faces inner anguish as an artist, but rather injects this emotion into her work. Nevertheless, some of her portraits are less jarring, possessing a softer, more poetic touch. In these portraits, her frustration gives way to melancholy as she tones down stark reds and peppers her portraits with faded yellows, purples, and blues. Not long ago, terms like “mobile art” were easily dismissed by the fine art mainstream, but PicsArtists like Roxy prove that a tablet or smartphone can be just as powerful as a canvas and paintbrush. The following collection of portraits by Roxy illustrate that, even without the traditional tools, mobile artwork retains emotion and authenticity. INSPIRATION : Drawing
- 61. PicsArt Monthly | 61
- 63. PicsArt Monthly | 63
- 65. PicsArt Monthly | 65
- 67. PicsArt Monthly | 67
- 68. 68| PicsArt Monthly WHAT'S NEW PicsArt’s Exciting New Features for iOS and Android Devices PicsArt recently released some exciting updates for Android and iOS. Most of the new features were available for both platforms, but they had their slight differences. The update included two new effects, Dodger and Vintage Ivory. The former softens your photo with pale colors and ambient lighting, while the latter is inspired by vintage color palettes and resolutions, but with a new whiter and brighter twist. PicsArt also gave users the ability to customize the colors of PicsArt Masks with a new Hue slider. Shape masks offer the opportunity to choose from a variety of shapes to overlay on your photos, and they have been made even better recently - by adding the option to customize them by texture, in addition to the previously available color and opacity. For a quick fix and speedy share of an image we introduced the Auto Enhance tool, which automatically brings you the basic best version of your image, while still allowing you to customize in small ways. In addition to these commonly shared updates, the two platforms have some differences as well. iOS users can now customize their collages by adjusting the inner borders, and can choose from a whole new variety of pre-made grids. iOS users will also be excited about our updates in the Social Network, as written tags and usernames written out in comments or photo descriptions now automatically become links to what they are referencing. This will make it easier for users to discover each other as well as trending tags. Don’t worry Android users, you have some cool stuff too! We know that photo stealing has become an issue in our network, so we have removed the save option for photos. Now only photos that have #freetoedit tag can be saved and reused by others. If you do not tag your miages with that tag, no one will be able to save them. We hope that this will help prevent photo theft and preserve the artistic rights of our creative userbase.
- 69. PicsArt Monthly | 69
- 71. PicsArt Monthly | 71
- 73. PicsArt Monthly | 73
- 74. 74| PicsArt Monthly A Brief Introduction to Photo History Although photography as we know it is among the youngest of the major art forms, its history can be traced back to ancient times. Chinese philosopher Mo- Zi discussed the principles of a camera obscura in the 4th or 5th century BCE. For two thousand years it was known as a small dark room (or box) with a tiny hole in one wall, through which light shone and projected an inverted image. During the late 1500s, Giambattista della Portia perfected its design by adding a convex lens to the hole, making a sharper, more detailed image. Camera obscuras allowed artists to trace a scene in ink for a more faithful reproduction. The Early Days of Image Processing The 18th and 19th centuries saw a multitude of methods for image processing and creation. In 1727, Johann Schulze mixed chalk, silver, and nitric acid - a very early photosensitive compound - noting that one side of the flask darkened when exposed to sunlight. In 1816, Joseph Nicéphore Niépce created the world's first photograph by coating a metal plate in a silver chloride solution and exposing it to light for 8 hours. However, he did not discover a way of permanently fixing the image for another decade. William Henry Fox Talbot applied Niépce's recipe to paper in 1834, fixing the images with a salt solution and eventually patenting the first paper negative as the “Calotype” in 1841. Meanwhile, Louis Daguerre was creating the Daguerrotype by coating copper sheets in silver iodide, creating a metal negative which he developed in a solution of mercury. These two inventions lead to the creation of photography. To that end, on August 19, 1839 the French government publicly acknowledged the invention of photography. The first glass negative was made by Frederick Scott Archer in 1851 using a wet plate collodion process. During the 1850s, the tintype photograph emerged; this made the negative image appear positive by exposing it onto a dark-coloured metal sheet coated with collodion, which made the shadows appear light and the highlights dark. In 1861, James Clerk-Maxwell realized that he could photograph a scene three times, through a red, blue, and green filter, and project the images on top of each other to create a full-colour image. Finally, in 1871, Richard Leach Maddox suspended the silver solution in gelatin, creating the dry emulsion which sent photography skyrocketing. It was applied first to glass negatives, but would later find its way onto the thin plastic film that made photography possible for the public at large.
- 75. PicsArt Monthly | 75 The Photographic Boom By 1878, glass plate negatives were being manufactured commercially and, in 1880, George Eastman opened what would become the Eastman- Kodak company. Within ten years he was producing roll film, and in 1900 released the first personal camera, the Kodak Brownie. In 1907, the Lumière Brothers released the first commercial colour film. Oscar Barnack, working for Leitz microscopes, pushed camera invention forward in 1914 with the first 35mm camera, which was improved upon and released in 1924 as the first Leica camera. 1936 saw the introduction of the modern SLR (single-lens reflex camera), as well as the legendary Kodachrome film which finally made colour photography popular. Polaroid would release instant black-and-white film in 1948, followed by the colour version in 1963. Students from the Emerson School for Girls Southworth and Hawes (American, active 1843–1863) Medium: Daguerreotype CopyrightofallimagesinthisarticlebelongstoTheMetropolitanMuseumofArt
- 76. 76| PicsArt Monthly Unidentified Woman in Nine Oval Views Southworth and Hawes (American, active 1843–1863) Medium: Daguerreotype
- 77. PicsArt Monthly | 77 The Digital Takeover The first digital camera was invented in 1975 by Steve Sasson of Kodak, using CCD sensor technology invented by Willard Boyle and George Smith in 1969. The birth of auto focus came with Minolta's Maxxum in 1985, paving the way for the world's first commercially- available digital SLR – Kodak's 1.3 megapixel DCS-100, which sold in 1991 for $30,000 USD. Eight years later, Nikon would wrestle away Kodak's dominance of the photo industry with the release of the D1, a 2.7MP model which went for a comparatively modest $6000. In 2003, Canon released the Digital Rebel, the first consumer-level DSLR with a price tag under $1000, followed two years later by the first full-frame digital camera, the 5D. Adobe hopped on the digital wave with the creation of Photoshop in 1990. A decade later, the first camera phone was developed by Sharp in the early years of the new millennium. Kodak ceased all production of film cameras in 2004 and, even though the variety has been pared down, they continue to produce film for the die-hard analog market. In the past ten years the major camera companies have focused their research and development almost entirely on improving their digital technology, which has now begun to plateau. The possibilities for future ingenuity now lay wide open, with endless photographic possibilities waiting just over the horizon. The Reading Establishment Attributed to William Henry Fox Talbot (British, 1800–1877) Medium: Salted paper prints from paper negatives
- 78. 78| PicsArt Monthly Lola Montez Southworth and Hawes (American, active 1843–1863) Medium: Daguerreotype
- 79. PicsArt Monthly | 79 Lemuel Shaw Southworth and Hawes (American, active 1843–1863) Medium: Daguerreotype
- 80. 80| PicsArt Monthly Louis-Jacques-Mandé Daguerre John Jabez Edwin Mayall (British, Oldham, Lancashire 1813–1901 West Sussex) Medium: Albumen silver print from glass negative
- 81. PicsArt Monthly | 81 View Down Brattle Street from the Southworth & Hawes Studio at 5 1/2 Tremont Row, Boston Southworth and Hawes (American, active 1843–1863) Medium: Daguerreotype
- 82. 82| PicsArt Monthly Interview with Celebrity Photographer Jason Bell Having shot for publications like Vanity Fair, Vogue, photographed royals, and had some of his work submitted into Britain’s National Portrait Gallery, Jason Bell has cemented his place as one of the foremost portrait photographers of his generation. He has published four books and received more accolades than we have room to mention. In any case, Jason’s work is the gold-standard when it comes to peering past the face and into the soul of subject, model, or celebrity. His work has fascinated us for some time, so we interviewed him to learn more about his work and career.
- 83. PicsArt Monthly | 83 INERVIEW All images by and copyright of Jason Bell
- 85. PicsArt Monthly | 85
- 86. 86| PicsArt Monthly How did you become a photographer? I just always was. I took pictures a lot as a child and then when I was at school I was given the keys to the school dark room, which I remember finding a magical place. It just carried on from there. You actually studied Politics, Philosophy, and Economics at Oxford, and as of today you have photographed some of the most powerful individuals on earth, from presidents to royals. Is there a correlation there? I am a strong believer in researching the people I photograph, so I think it helps that my education has given me an understanding of what some of them do.
- 87. PicsArt Monthly | 87 What was it like to take the official christening photographs of Prince George? It was an honour to be asked. Everyone kept telling me beforehand how nervous I would be and that I must be so stressed. But I actually felt very relaxed throughout. They gave me all the time I needed to prepare and were very friendly and relaxed. I enjoyed it.
- 89. PicsArt Monthly | 89
- 90. 90| PicsArt Monthly Many of your photos are part of the permanent collection of the National Portrait Gallery, the United Kingdom’s official gallery for portraits of historical British people. Your work is national history. How does this feel? I try not to think of it in those terms, but more about what I want to say about the person I’m photographing, or what I can encourage them to reveal. Are there any portraits of yours in the National Portrait Gallery that stand out as favourites? My favourites tend to be favourites because they are people I have felt a particular connection with or even become friends with. I try to do that with everyone I photograph but obviously it happens with some people more than others.
- 91. PicsArt Monthly | 91 You’ve captured a lot of artists and entertainers as well. What is it like photographing celebrities? I am lucky in that I photographed some famous people very early on in my career so I got used to it very quickly, and it is not something that I find difficult to deal with at all now. They are just people like everybody else and usually enjoy being treated as such. You did the movie posters for modern British classic like Billy Elliot and Love Actually. How is shooting a movie poster different from capturing a portrait? It tends to be much more art directed so I have less freedom to just do what I want and have to follow a brief more carefully. In those instances I try to follow that brief and then give them something in addition, that they maybe didn’t know they wanted.
- 93. PicsArt Monthly | 93
- 94. 94| PicsArt Monthly Have you ever photographed someone who had maybe been a role model of some kind for you, or maybe just admired greatly? Yes - very early on in my career I was sent to Iceland to photograph Bjork. I had been listening to that first album of hers all summer and so was a bit of a fan. It actually kind of got in the way initially, me being a fan, and I had to get past that as quickly as possible to find the person I wanted to photograph. What was the most surreal moment you ever experienced during a photography shoot? I was shooting a campaign for the Royal Opera House of a Chinese opera singer called Liping Zhang, in a beautiful area near the Mongolian border. We were assured the weather would be OK since it was late spring but a freak snowstorm came through, so we were all freezing and inappropriately dressed and we had to bundle her up in Chinese army coats to keep her warm, and at the last moment there was so much snow we couldn’t even drive her to the spot where I wanted to photograph her, so in order to get her there we had to rent a camel to put her on.
- 95. PicsArt Monthly | 95
- 97. PicsArt Monthly | 97
- 98. 98| PicsArt Monthly What advice would you give to amatuer photographers? Many of the students and amateurs who come to see me show me a little bit of everything. That is unlikely to get you commissioned when you are starting out. So I think it’s better to concentrate on one thing and do it very well at the beginning and then when that goes well you can branch out.
- 99. PicsArt Monthly | 99
- 100. 100| PicsArt Monthly
- 101. PicsArt Monthly | 101
- 102. 102| PicsArt Monthly Bewitched by Blight A building in ruins hangs together by what seems like threads. One of the upper floors sags precariously, just inches above the head of a young woman who strolls absent- mindedly with a teddy-bear in hand. It seems possible that, at any moment, the whole structure could come crashing down. Lady Luck we presume? Danny Aguirre (@danny-aguirre-142) is the PicsArtist responsible for this Photo of the Month, entitled "Lady Luck." Aguirre edited this image to perfection, transplanting a young, lively and vibrant woman into a world of decay. In this manner, the photo speaks to us through contrast. Darkly lit ruins, once full of life, now sit forgotten, surrounded by sick yellow skies. The deteriorating building bears down on an unwary and carefree youth (Lady Luck), ambling at the mercy of its behemonth broken structure. In this peculiar and eerie scene, Aguirre captivates his audience while conveying the promise of the unexpected. In an ever-changing world, Aguirre has captured the aesthetic beauty of a building that has passed its prime. However, in it's old age, the building has become something else entirely: a peculiar and curious space open to imaginative interpretation. This is, perhaps, the luck that the young lady pictured in the image and Aguirre's audience have stumbled upon: an unexpected opportunity to reflect on the present in light of the past. Through his creative vision, Aguirre allows us to study ourselves and the physical structures we leave behind for future generations. @danny-aguirre-142
- 103. PicsArt Monthly | 103
- 104. 104| PicsArt Monthly A Photographer’s Guide to the US The most unique shots in America and where to get them Kelso San Dunes, Mojave Desert If you’re looking for a unique photography opportunity, head for the Kelso Sand Dunes - mountainous piles of sand that seem to spring up from nowhere in the middle of the Mojave Desert. The tallest dunes can rise up to 650 feet above the surrounding terrain. In this setting, a well-timed hike might allow you photograph the sunset from a phenomenal vantage point. A couple words of caution: be sure to take a flashlight in order to get back to your car and never go alone. If you don’t make it to the sand dunes, don't despair. The spectacular darkness of the Mojave desert translates into spectacular nighttime photography. With almost no ambient light (apart from the stars and the vague glow over the horizon coming from Las Vegas), the Mojave is the perfect place to experiment with time lapse night shots and double exposures. This is a surefire way to snap some fantastic shots. @hp1986
- 105. PicsArt Monthly | 105 @hp1986 FEATURE : Destination
- 107. PicsArt Monthly | 107
- 108. 108| PicsArt Monthly The Redwood Forests, California If you drive down the west coast of California on Route 1, you’ll suddenly find yourself in a magical landscape of trees so tall that you feel like a tiny critter. The redwood forests in California are truly a sight to behold, and the deep ochre of the tree barks is spectacular to see. Driving through this area is fantastic, but make sure that you park up and go exploring with your camera. This is one of the best places for nature photography. The way the light streams through the canopy in the late afternoon is nothing short of breathtaking: a must see for every photographer. @bobbyle
- 109. PicsArt Monthly | 109
- 111. PicsArt Monthly | 111 @hp1986
- 113. PicsArt Monthly | 113 Tucson, Arizona Tucson may not seem like a photographer’s haven; and, if you visit in July, when the temperatures soar to over 100 degrees Fahrenheit, it certainly won’t feel like it either! However, the landscape of this often-forgotten city makes for some truly breathtaking sunsets and sunrises where flat land gives way to gorgeous mountains ensconced by sunlight. If you visit Tucson, you'll also find that it is an unlikely hotbed of culture and art. With a history that goes back much further than many of its neighbors in the south west, Tucson boasts remarkable architecture, historic neighborhoods, and museums, not to mention the Mission San Xavier del Bac, an 18th-century mission that is still functioning. What's more, the city has a distinctly Western flavor in light of pervasive Native American and Mexican influences. After the sun goes down, you’ll also find art events and bars alive with music and bonding in a comfy college-town atmosphere, which means that you can capture some great shots of people simply being themselves. @nasir61980
- 115. PicsArt Monthly | 115
- 116. DIY Wall Decorations for Kid's Room Artists start young, so here we want to show how you can nurture art into a child by decorating his room, so he starts seeing and valuing creativity from his early days. This DIY tutorial is so easy to do, that if you have elder children you can involve them in the process of making these awsome wall hangings. Make a collage in minutes that will be an impressive surprise for everyone, and give you a proud piece of original artwork to hang on the wall in your kid's room. For this project, you’ll need a color printer, markers, scissors, glue, 2 pieces of ordinary cardboard and 4 equal-sized colorfull cardboards or canvas. Step 1: Print Find some awesome characters online by either browsing clipart in the PicsArt Shop, or googling cartoon images. Also, print out some basic colors or patterns to cut into shapes. If you don't like the color of your background cardboards or canvases, you can either color them with paint or print out patterns to make your backgrounds more colorful. Step 2: Cut Cut out your characters carefully and glue them on cardboard. Now cut out the cardboard in the shape of your characters. Be sure to cut out shapes for the scenery of your collage, like clouds and trees. There is no need to glue them on an additional cardboard if you do not want to make them look 3D. Step 3: Create 3D Elements Identify some parts of the animals you want to highlight: like tails, eyes, or ears. Cut out two of those parts from cardboard and glue one over the other, so that the one with patterns stays on top. Step 4: Glue Glue your shapes onto 4 pieces of cardboard. Start with the scenery (trees and clouds), then glue on your characters, then glue on their cool colored double-layered body parts to make them stand out. As a result, you will have 3D-like animals or any other items you want. Step 6: Draw Parts and Write Messages You can draw some fine elements into your collage using ordinary colorful markers. You can also write a message on your collage with a marker. Your creations are now ready to make your child smile!
- 118. 118| PicsArt Monthly Daniel’s Twisted Animal Crime Lineup Great artists know how to turn heads with their art, and that is certainly the case with PicsArtist of the Month, Daniel (@n3cr0n0m1c0n). However, when he turns heads, he turns them into something else. Daniel has recently unveiled a series of photos that replace the head of a human body with various animal heads - the only exception being an awesome Star Wars stormtrooper helmet. In each photo of the series, Daniel's body dons a different head. Nevertheless, he is shown wearing the same clothes - a leather jacket with a zipper that runs diagonally across his torso into the side of his collar. The thing about Daniel’s photos is that the details of their construction work really well together to create a dark artistic vision with grungy undertones. Despite this odd synergy, each photo is posed with a nonchalance that seems to undermine the strangeness of it all, every shot displaying the emotional expression of a criminal lineup or mugshot. The body takes on a neutral stance and the animal heads stare with vacant expressions, as if silently counting the seconds for the camera shutter to click so they can walk off and do something else. The overall emotional effect is weird, uneasy, slightly comic, and extremely captivating.
- 119. PicsArt Monthly | 119 FEATURE : Artist
- 120. 120| PicsArt Monthly
- 121. PicsArt Monthly | 121
- 122. 122| PicsArt Monthly
- 123. PicsArt Monthly | 123
- 124. 124| PicsArt Monthly