SlideShare una empresa de Scribd logo
1 de 12
Descargar para leer sin conexión
54 13 055 Replacing seal for slide/tilt sunroof frame
Necessary preliminary tasks:
• Remove glass slide/tilt sunroof lid at rear
• Lower (open) glass slide/tilt sunroof lid at front
Note:
Follow repair instructions for bonded seals on glass slide/tilt
sunroof.
Pull off seal of sunroof cut-out at contact edge starting from body.
(Peel off)
Installation:
Clean bonding surface with adhesive remover (sourcing
reference: BMW Parts Service).
Press seal without stretching (squashing).
Stick on seal in sections.
Establish seal joint.
Important!
Do not touch bonding surface.
Surface temperature ≥20 °C
Incorrect bonding of the seal will result in leakage.
RA Replacing seal for slide/tilt sunroof frame BMW AG - TIS 29.04.2009 09:06
Issue status (12/2007) Valid only until next DVD is issued Copyright Page - 1 -
54 10 175 Removing and installing rear glass slide/tilt
sunroof cover
Note:
The following steps can be carried out inside the vehicle with the
glass roof panel fully closed.
Open floating roofliner fully.
Make sure that grease at the ends of the rail do not come into
contact with the roofliner.
Not necessary for replacement:
Before removing the Torx screws, make a mark around the
washers in order to ensure correct alignment during installation.
Remove and dispose of the Torx screws (1) securing the glass
panel to the mechanism.
Installation:
Insert new Torx screws with Loctite and align washers to
markings.
Tightening torque 54 12 01AZ .
Important!
A second person is required to help in removing and installing
the glass slide/tilt sunroof lid!
Lift out glass slide/tilt sunroof cover (1).
Installation:
Tape off complete edge area at roof aperture with fabric adhesive
tape (risk of damage).
Install glass slide/tilt sunroof cover carefully (twist in) as seal can
be damaged during installation.
Check glass slide/tilt sunroof cover for correct alignment and
adjust if necessary.
RA Removing and installing rear glass slide/tilt sunroof cover BMW AG - TIS 29.04.2009 09:07
Issue status (12/2007) Valid only until next DVD is issued Copyright Page - 1 -
54 12 Mechanical components, panorama sunroof
Type Thread Tightening specification Measure
1AZ Glass lid to gate E53 / E61 /
E70 / E83 /
E91
Always use new nuts and
bolts.
4 ± 0.5
Nm
2AZ Cassette to body E53 / E61 /
E70 / E83 /
E91
M6 Self-tapping screw 5.4 ± 0.5
Nm
3AZ Cover, cross-member E91 2 ± 0.5
Nm
E53 / E61 /
E70 / E83
3.5 ± 0.5
Nm
4AZ Front floating roofliner to detent
element
E53 / E61 /
E70 / E83 /
E91
1.5 ±0.2
Nm
5AZ Rear floating roofliner to detent
element
E53 / E61 /
E70 / E83 /
E91
1 ± 0.2
Nm
AZD Mechanical components, panorama sunroof BMW AG - TIS 29.04.2009 09:07
Issue status (12/2007) Valid only until next DVD is issued Copyright Page - 1 -
54 0 ... Repair instructions for bonded seals
1. General information on handling rubber seal profiles:
- If seals reveal partly detached protective film on delivery, they must not be bonded.
- Store seals at 15 °C to 25 °C.
- If, during the handling, the protective film has come off before bonding, it can still be bonded.
- Bonding at room and object temperature >20 °C. Temperatures between 40 and 50 °C significantly
increase initial adhesion.
- Seals, which are subjected to temperatures above 80 °C after gluing, will be very difficult to remove.
2. Damage pattern and repair
2.1 Partially detached bond (rubber-adhesive tape or adhesive tape-paint)
- Up to 120 mm for retouching without auxiliary resources
- Up to 200 mm repaired with pressing-on tools on straight surfaces
a) Cleaning damaged areas: - Degrease bonded area with adhesive cleaner (refer to BMW
Parts Service) and remove other residues.
Note:
Use necessary cotton- or fluff-free paper towel once only.
When using solvent:
expose repair area to air for at least 2 minutes.
b) Applying adhesive: - With a fine nozzle, apply a wafer-thin bead to adhesive tape.
Note:
Use contact adhesive (e.g. Terokal 2444)
Caution!
Avoid contact to skin!
Do not apply adhesive to visible painted surfaces.
c) Pressing on rubber seal: - Press down seal using contact pressure (forced pressure not
necessary) for at least 1 minute.
Caution!
Load can only be applied to the bond after a period of
2 minutes. This waiting time is absolutely essential.
2.2 Larger defects (mechanical damage and larger separations of seal)
- Complete replacement of rubber seal necessary
a) Peeling off damaged rubber seal:
RA Repair instructions for bonded seals BMW AG - TIS 29.04.2009 09:08
Issue status (12/2007) Valid only until next DVD is issued Copyright Page - 1 -
- Pull off rubber seal slowly at an angle up to 20° under uniformly
strong tension.
Note:
Make sure the connection between adhesive tape and seal
is retained.
If the connection between adhesive tape and seal is
detached: Carefully and slowly detach adhesive tape at an
angle of 20° from roof opening or lid.
When existing seals are being peeled off with a hot air
blower: Do not damage paintwork.
Do not detach rubber-adhesive tape connection if at all
possible.
b) Cleaning bonded area: - Degrease bonded area with adhesive cleaner (refer to BMW
Parts Service) and remove other residues.
Note:
Use necessary cotton- or fluff-free paper towel once only.
When using solvent:
expose repair area to air for at least 2 minutes.
c) Detaching protective film from bonded
area:
- Detach protective film from rubber seal in sections.
Caution!
Once the protective film has been removed, do not under
any circumstances touch the exposed bonded area.
d) Applying rubber seal: - Apply rubber seal on roof opening edge beginning at rear centre.
Use upper lip as application edge. Press on seal continuously by
hand. Carefully unwrap seal at radii without tension and press
down (critical area).
Note:
If positioned incorrectly, the seal can still be pulled off,
repositioned and pressed on again.
e) Establishing seal joint: - Mark contact point at joint by pressing down loose end on seal of
already bonded end. Then cut and press down loose end at
same height.
Note:
Small areas of seal can remain stuck to adhesive tape of
loose end.
RA Repair instructions for bonded seals BMW AG - TIS 29.04.2009 09:08
Issue status (12/2007) Valid only until next DVD is issued Copyright Page - 2 -
f) Pressing on seal: - Press on seal using a roller
- Adhesive tape width up to 5 mm Application pressure approx.
5 N
- Adhesive tape width up to 10 mm Application pressure approx.
10 N
Sliding sunroof seal only: - Press against seal strongly with a roller. Application pressure
approx. 70 N.
E36 sliding sunroof seal only: - Application pressure approx. 30 N.
- Tear off tear-off lip at rear and side in area of narrower flange.
Note:
Firm thumb pressure has approx. 35 N/cm
2
3. Checking rubber seal
- Check the bonded seals for correct positioning and perfect adhesion. The bonding can be checked by
pressing back the sealing lip.
- The force required to peel off the seal immediately after gluing must be greater than 10 N/cm.
RA Repair instructions for bonded seals BMW AG - TIS 29.04.2009 09:08
Issue status (12/2007) Valid only until next DVD is issued Copyright Page - 3 -
54 13 003 Adjusting glass slide/tilt sunroof lid
Special tools required:
• 00 9 315
• 00 9 340
Necessary preliminary tasks:
• Remove gaiter on left and right
• Close glass slide/tilt sunroof completely
If the glass slide/tilt sunroof is outside the adjustment tolerances,
adjust as follows:
Adjusting glass slide/tilt sunroof unit:
Carry out the following step on one side first and then the other
(first left, then right or vice versa):
• Insert Torx screws (1) on left/right so that glass roof panel
can still just be adjusted
• Move glass slide/tilt sunroof lid as required
• Make sure all screws are tightened down.
• Tightening torque 54 12 01AZ .
• Repeat procedure on other side.
Distance setting:
Distance A between body and glass lid (without seal):
A= 5.8 ± 0.3 mm all round
Check same gap of glass lid and body with special tool
00 9 340 .
Slide special tool 00 9 340 or similar between seal and insert. It
must be possible to slide the card against the same level of
resistance.
Slide glass lid towards front or rear until ideal position is reached.
RA Adjusting glass slide/tilt sunroof lid BMW AG - TIS 29.04.2009 09:04
Issue status (12/2007) Valid only until next DVD is issued Copyright Page - 1 -
Height adjustment:
Note:
Front glass lid must be adjusted first.
Check height of glass lid (1) in relation to body (2) with special
tool 00 9 315 .
Press glass lid (1) at front and rear towards top or bottom until
ideal position is reached.
Height:
• Front edge of glass lid at front 0 to 1 mm under roof edge
• Rear edge of glass lid at front 0 to 0.5 mm over glass lid at
rear
• Rear edge of glass lid at rear 0 to 1 mm over roof edge
Check function and adjustment.
RA Adjusting glass slide/tilt sunroof lid BMW AG - TIS 29.04.2009 09:04
Issue status (12/2007) Valid only until next DVD is issued Copyright Page - 2 -
00 9 310 Assembly wedges (set in plastic case)
Minimum set: Mechanical tools
Note: For straightening and assembly jobs on
vehicle bodies, e.g. fitting trim panels,
removing window weatherstrips, repairing
small-scale dents, removing residual
adhesive materials, measuring gap widths,
levering out trim panel parts
Series: E12, E21, E23, E24, E28, E30, E30/C,
E30tou, E31, E32, E32/3, E34, E34tou, E36,
E36/2, E36/3, E36/5, E36/7, E36/C, E36tou,
E38, E38/3, E39, E39PL, E39tou, E46,
E46/16, E46/2, E46/3, E46/5, E46/C, E52,
E53, E60, E61, E63, E64, E65, E66, E67,
E68, E70, E71, E81, E82, E83, E85, E86,
E87, E88, E90, E91, E92, E93, R50, R52,
R53, R55, R56, RR1, RR2
SI number: 1 25 05 230
Order number: 00 9 310
Assembly wedges (set in plastic case)
Consisting of:
1 = 00 9 311 Trim remover
2 = 00 9 312 Striking wedge, square
3 = 00 9 313 Striking wedge, large
4 = 00 9 314 Adjusting wedges (2 x)
5 = 00 9 315 Gap wedge
6 = 00 9 316 Sealing lip wedge
7 = 00 9 317 Trim panel wedge
8 = 00 9 318 Universal wedge
9 = 00 9 319 Striking wedge, small
10 = 00 9 321 Fishbone
11 = 00 9 322 Plastic wedge
12 = 00 9 323 Cleaning wedge (scraper)
13 = 00 9 324 Trim remover (metal plate)
Note: For removing stem trims from E60
14 = 00 9 329 Case with inlay for assembly wedges
In conjunction with: 009310
SWZ Assembly wedges (set in plastic case) BMW AG - TIS 29.04.2009 09:05
Issue status (12/2007) Valid only until next DVD is issued Copyright Page - 1 -
00 9 340 Disassembly aid (2)
Minimum set: Mechanical tools
Note: For levering out switch block on driver's
door.
Series: E12, E21, E23, E24, E28, E30, E30/C,
E30tou, E31, E32, E32/3, E34, E34tou, E36,
E36/2, E36/3, E36/5, E36/7, E36/C, E36tou,
E38, E38/3, E39, E39PL, E39tou, E46,
E46/16, E46/2, E46/3, E46/5, E46/C, E52,
E53, E60, E61, E63, E64, E65, E66, E67,
E68, E70, E71, E81, E82, E83, E85, E86,
E87, E88, E90, E91, E92, E93, R50, R52,
R53, R55, R56, RR1, RR2
SI number: 1 15 99 (483)
Order number: 00 9 340
Disassembly aid (2)
Consisting of:
1 = 00 9 341 Removal aid
Note: Only available as a set (2 pieces) on
00 9 340.
SWZ Disassembly aid (2) BMW AG - TIS 29.04.2009 09:05
Issue status (12/2007) Valid only until next DVD is issued Copyright Page - 1 -
54 10 160 Replacing left or right gaiter for glass slide/tilt
sunroof
Necessary preliminary tasks:
• Close glass slide/tilt sunroof
Detach gaiter (1) from guide.
Installation:
Gaiter cannot be removed without incurring damage.
Replace gaiter.
Check that aluminium section inlay is firmly seated on guide.
RA Replacing left or right gaiter for glass slide/tilt sunroof BMW AG - TIS 29.04.2009 09:05
Issue status (12/2007) Valid only until next DVD is issued Copyright Page - 1 -
54 12 Mechanical components, panorama sunroof
Type Thread Tightening specification Measure
1AZ Glass lid to gate E53 / E61 /
E70 / E83 /
E91
Always use new nuts and
bolts.
4 ± 0.5
Nm
2AZ Cassette to body E53 / E61 /
E70 / E83 /
E91
M6 Self-tapping screw 5.4 ± 0.5
Nm
3AZ Cover, cross-member E91 2 ± 0.5
Nm
E53 / E61 /
E70 / E83
3.5 ± 0.5
Nm
4AZ Front floating roofliner to detent
element
E53 / E61 /
E70 / E83 /
E91
1.5 ±0.2
Nm
5AZ Rear floating roofliner to detent
element
E53 / E61 /
E70 / E83 /
E91
1 ± 0.2
Nm
AZD Mechanical components, panorama sunroof BMW AG - TIS 29.04.2009 09:06
Issue status (12/2007) Valid only until next DVD is issued Copyright Page - 1 -

Más contenido relacionado

La actualidad más candente

Design review of a car seat for ergonomics
Design review of a car seat for ergonomicsDesign review of a car seat for ergonomics
Design review of a car seat for ergonomicsSamiksha Rajput
 
Developing Commercial Vehicles Inspired by Nature
Developing Commercial Vehicles Inspired by NatureDeveloping Commercial Vehicles Inspired by Nature
Developing Commercial Vehicles Inspired by NatureAltair
 
Introduction to Automobile
Introduction to AutomobileIntroduction to Automobile
Introduction to Automobileakkivrm2002
 
FORCE CALCULATION IN UPRIGHT OF A FSAE RACE CAR
FORCE CALCULATION IN UPRIGHT OF A FSAE RACE CARFORCE CALCULATION IN UPRIGHT OF A FSAE RACE CAR
FORCE CALCULATION IN UPRIGHT OF A FSAE RACE CARIAEME Publication
 
Sae -j744-1996
Sae -j744-1996Sae -j744-1996
Sae -j744-1996punekumar
 
Fabrication of composite leaf spring
Fabrication of composite  leaf springFabrication of composite  leaf spring
Fabrication of composite leaf springPratik Gandhi
 
Study and Analysis of Automotive Seating System Riser Design & Development fo...
Study and Analysis of Automotive Seating System Riser Design & Development fo...Study and Analysis of Automotive Seating System Riser Design & Development fo...
Study and Analysis of Automotive Seating System Riser Design & Development fo...ijsrd.com
 
Baja sae india suspension design
Baja sae india suspension designBaja sae india suspension design
Baja sae india suspension designUpender Rawat
 
Virtual BAJA 2015_(16190)_(Team Prayog)_PRESENTATION
Virtual BAJA 2015_(16190)_(Team Prayog)_PRESENTATION Virtual BAJA 2015_(16190)_(Team Prayog)_PRESENTATION
Virtual BAJA 2015_(16190)_(Team Prayog)_PRESENTATION Anubhav Maheshwari
 
Trucks/Buses Chassis Static Structural Analysis with respect to different mat...
Trucks/Buses Chassis Static Structural Analysis with respect to different mat...Trucks/Buses Chassis Static Structural Analysis with respect to different mat...
Trucks/Buses Chassis Static Structural Analysis with respect to different mat...Vinay Tiwari
 
Design, Analysis and Optimization of Automobile Wheel Hub
Design, Analysis and Optimization of Automobile Wheel HubDesign, Analysis and Optimization of Automobile Wheel Hub
Design, Analysis and Optimization of Automobile Wheel HubKrishna Khandelwal
 
Static analysis of alloy wheel using ansys15.0
Static analysis of alloy wheel using ansys15.0Static analysis of alloy wheel using ansys15.0
Static analysis of alloy wheel using ansys15.0eSAT Journals
 
(Ximb)sustainability tyre industry
(Ximb)sustainability tyre industry(Ximb)sustainability tyre industry
(Ximb)sustainability tyre industrySustainabilityXIMB
 
Sphinx manufacturing engg presentation december 2016 compressed1
Sphinx manufacturing engg presentation december 2016 compressed1Sphinx manufacturing engg presentation december 2016 compressed1
Sphinx manufacturing engg presentation december 2016 compressed1Avishkar Surana
 
Roof Crush Analysis using Test Protocols of FMVSS 216
Roof Crush Analysis using Test Protocols of FMVSS 216Roof Crush Analysis using Test Protocols of FMVSS 216
Roof Crush Analysis using Test Protocols of FMVSS 216Vaibhav porwal
 

La actualidad más candente (20)

Car seat design for driver satisfaction
Car seat design for driver satisfactionCar seat design for driver satisfaction
Car seat design for driver satisfaction
 
BAJA SAE INDIA 2015
BAJA SAE INDIA 2015BAJA SAE INDIA 2015
BAJA SAE INDIA 2015
 
Design review of a car seat for ergonomics
Design review of a car seat for ergonomicsDesign review of a car seat for ergonomics
Design review of a car seat for ergonomics
 
Developing Commercial Vehicles Inspired by Nature
Developing Commercial Vehicles Inspired by NatureDeveloping Commercial Vehicles Inspired by Nature
Developing Commercial Vehicles Inspired by Nature
 
Introduction to Automobile
Introduction to AutomobileIntroduction to Automobile
Introduction to Automobile
 
FORCE CALCULATION IN UPRIGHT OF A FSAE RACE CAR
FORCE CALCULATION IN UPRIGHT OF A FSAE RACE CARFORCE CALCULATION IN UPRIGHT OF A FSAE RACE CAR
FORCE CALCULATION IN UPRIGHT OF A FSAE RACE CAR
 
Sae -j744-1996
Sae -j744-1996Sae -j744-1996
Sae -j744-1996
 
Fabrication of composite leaf spring
Fabrication of composite  leaf springFabrication of composite  leaf spring
Fabrication of composite leaf spring
 
Study and Analysis of Automotive Seating System Riser Design & Development fo...
Study and Analysis of Automotive Seating System Riser Design & Development fo...Study and Analysis of Automotive Seating System Riser Design & Development fo...
Study and Analysis of Automotive Seating System Riser Design & Development fo...
 
Baja sae india suspension design
Baja sae india suspension designBaja sae india suspension design
Baja sae india suspension design
 
Virtual BAJA 2015_(16190)_(Team Prayog)_PRESENTATION
Virtual BAJA 2015_(16190)_(Team Prayog)_PRESENTATION Virtual BAJA 2015_(16190)_(Team Prayog)_PRESENTATION
Virtual BAJA 2015_(16190)_(Team Prayog)_PRESENTATION
 
Trucks/Buses Chassis Static Structural Analysis with respect to different mat...
Trucks/Buses Chassis Static Structural Analysis with respect to different mat...Trucks/Buses Chassis Static Structural Analysis with respect to different mat...
Trucks/Buses Chassis Static Structural Analysis with respect to different mat...
 
Design, Analysis and Optimization of Automobile Wheel Hub
Design, Analysis and Optimization of Automobile Wheel HubDesign, Analysis and Optimization of Automobile Wheel Hub
Design, Analysis and Optimization of Automobile Wheel Hub
 
Static analysis of alloy wheel using ansys15.0
Static analysis of alloy wheel using ansys15.0Static analysis of alloy wheel using ansys15.0
Static analysis of alloy wheel using ansys15.0
 
SAE Baja Presentation
SAE Baja PresentationSAE Baja Presentation
SAE Baja Presentation
 
Brochure_BIW
Brochure_BIWBrochure_BIW
Brochure_BIW
 
(Ximb)sustainability tyre industry
(Ximb)sustainability tyre industry(Ximb)sustainability tyre industry
(Ximb)sustainability tyre industry
 
Biw with definitions
Biw with definitionsBiw with definitions
Biw with definitions
 
Sphinx manufacturing engg presentation december 2016 compressed1
Sphinx manufacturing engg presentation december 2016 compressed1Sphinx manufacturing engg presentation december 2016 compressed1
Sphinx manufacturing engg presentation december 2016 compressed1
 
Roof Crush Analysis using Test Protocols of FMVSS 216
Roof Crush Analysis using Test Protocols of FMVSS 216Roof Crush Analysis using Test Protocols of FMVSS 216
Roof Crush Analysis using Test Protocols of FMVSS 216
 

Similar a 251925966 master-ra-replacing-seal-for-slide-tilt-sunroof-frame

Tech'l service bulletin brake servicing
Tech'l service bulletin   brake servicingTech'l service bulletin   brake servicing
Tech'l service bulletin brake servicingc_kokiks_2
 
AUDI A4 B5 1.8L 1996 BADY INTERIOR 70 98 trm avant
AUDI A4 B5 1.8L 1996 BADY INTERIOR 70 98 trm avantAUDI A4 B5 1.8L 1996 BADY INTERIOR 70 98 trm avant
AUDI A4 B5 1.8L 1996 BADY INTERIOR 70 98 trm avantGherghescu Gabriel
 
AUDI A4 B5 1.8L 1996 BADY 66 22 rocker panel
AUDI A4 B5 1.8L 1996 BADY 66 22 rocker panelAUDI A4 B5 1.8L 1996 BADY 66 22 rocker panel
AUDI A4 B5 1.8L 1996 BADY 66 22 rocker panelGherghescu Gabriel
 
Tech'l service bulletin brake servicing (noisy rear disc)
Tech'l service bulletin   brake servicing (noisy rear disc)Tech'l service bulletin   brake servicing (noisy rear disc)
Tech'l service bulletin brake servicing (noisy rear disc)c_kokiks_2
 
AUDI A4 B5 1.8L 1996 BADY 63 1 front bumper
AUDI A4 B5 1.8L 1996 BADY 63 1 front bumperAUDI A4 B5 1.8L 1996 BADY 63 1 front bumper
AUDI A4 B5 1.8L 1996 BADY 63 1 front bumperGherghescu Gabriel
 
AUDI A4 B5 1.8L 1996 BADY 55 12 rear lid vin 8 d xa 200 000
AUDI A4 B5 1.8L 1996 BADY 55 12 rear lid vin 8 d xa 200 000AUDI A4 B5 1.8L 1996 BADY 55 12 rear lid vin 8 d xa 200 000
AUDI A4 B5 1.8L 1996 BADY 55 12 rear lid vin 8 d xa 200 000Gherghescu Gabriel
 
2007 chevrolet rezzo service repair manual
2007 chevrolet rezzo service repair manual2007 chevrolet rezzo service repair manual
2007 chevrolet rezzo service repair manualjknsedks
 
2006 chevrolet rezzo service repair manual
2006 chevrolet rezzo service repair manual2006 chevrolet rezzo service repair manual
2006 chevrolet rezzo service repair manualjknhdjskm
 
AUDI A4 B5 1.8L 1996 BADY 50 1 front end
AUDI A4 B5 1.8L 1996 BADY 50 1 front endAUDI A4 B5 1.8L 1996 BADY 50 1 front end
AUDI A4 B5 1.8L 1996 BADY 50 1 front endGherghescu Gabriel
 
AUDI A4 B5 1.8L 1996 BADY INTERIOR 72 1 front seats
AUDI A4 B5 1.8L 1996 BADY INTERIOR 72 1 front seatsAUDI A4 B5 1.8L 1996 BADY INTERIOR 72 1 front seats
AUDI A4 B5 1.8L 1996 BADY INTERIOR 72 1 front seatsGherghescu Gabriel
 
2008 chevrolet rezzo service repair manual
2008 chevrolet rezzo service repair manual2008 chevrolet rezzo service repair manual
2008 chevrolet rezzo service repair manualfjskkmemem
 
2006 chevrolet rezzo service repair manual
2006 chevrolet rezzo service repair manual2006 chevrolet rezzo service repair manual
2006 chevrolet rezzo service repair manualfjjksekksemm
 
AUDI A4 B5 1.8L 1996 BADY 55 1 hood
AUDI A4 B5 1.8L 1996 BADY 55 1 hoodAUDI A4 B5 1.8L 1996 BADY 55 1 hood
AUDI A4 B5 1.8L 1996 BADY 55 1 hoodGherghescu Gabriel
 
AUDI A4 B5 1.8L 1996 BADY 55 32 tailgate avant vin 8 d xa 200 000
AUDI A4 B5 1.8L 1996 BADY 55 32 tailgate avant vin 8 d xa 200 000AUDI A4 B5 1.8L 1996 BADY 55 32 tailgate avant vin 8 d xa 200 000
AUDI A4 B5 1.8L 1996 BADY 55 32 tailgate avant vin 8 d xa 200 000Gherghescu Gabriel
 
2010 toyota tundra service repair manual
2010 toyota tundra service repair manual2010 toyota tundra service repair manual
2010 toyota tundra service repair manualfjjskekdmnsme
 
Example_Prorack HD iLoad Track Kit Instructions
Example_Prorack HD iLoad Track Kit InstructionsExample_Prorack HD iLoad Track Kit Instructions
Example_Prorack HD iLoad Track Kit InstructionsJessica Smith
 
Hitachi EX40U Mini Excavator Service Repair Manual.pdf
Hitachi EX40U Mini Excavator Service Repair Manual.pdfHitachi EX40U Mini Excavator Service Repair Manual.pdf
Hitachi EX40U Mini Excavator Service Repair Manual.pdf7fuseidjkdmd
 
Hitachi EX50U Mini Excavator Service Repair Manual.pdf
Hitachi EX50U Mini Excavator Service Repair Manual.pdfHitachi EX50U Mini Excavator Service Repair Manual.pdf
Hitachi EX50U Mini Excavator Service Repair Manual.pdf7fuseidjkdmd
 

Similar a 251925966 master-ra-replacing-seal-for-slide-tilt-sunroof-frame (20)

Tech'l service bulletin brake servicing
Tech'l service bulletin   brake servicingTech'l service bulletin   brake servicing
Tech'l service bulletin brake servicing
 
AUDI A4 B5 1.8L 1996 BADY INTERIOR 70 98 trm avant
AUDI A4 B5 1.8L 1996 BADY INTERIOR 70 98 trm avantAUDI A4 B5 1.8L 1996 BADY INTERIOR 70 98 trm avant
AUDI A4 B5 1.8L 1996 BADY INTERIOR 70 98 trm avant
 
AUDI A4 B5 1.8L 1996 BADY 66 22 rocker panel
AUDI A4 B5 1.8L 1996 BADY 66 22 rocker panelAUDI A4 B5 1.8L 1996 BADY 66 22 rocker panel
AUDI A4 B5 1.8L 1996 BADY 66 22 rocker panel
 
Tech'l service bulletin brake servicing (noisy rear disc)
Tech'l service bulletin   brake servicing (noisy rear disc)Tech'l service bulletin   brake servicing (noisy rear disc)
Tech'l service bulletin brake servicing (noisy rear disc)
 
AUDI A4 B5 1.8L 1996 BADY 63 1 front bumper
AUDI A4 B5 1.8L 1996 BADY 63 1 front bumperAUDI A4 B5 1.8L 1996 BADY 63 1 front bumper
AUDI A4 B5 1.8L 1996 BADY 63 1 front bumper
 
Fmintlfs instructions
Fmintlfs instructionsFmintlfs instructions
Fmintlfs instructions
 
AUDI A4 B5 1.8L 1996 BADY 55 12 rear lid vin 8 d xa 200 000
AUDI A4 B5 1.8L 1996 BADY 55 12 rear lid vin 8 d xa 200 000AUDI A4 B5 1.8L 1996 BADY 55 12 rear lid vin 8 d xa 200 000
AUDI A4 B5 1.8L 1996 BADY 55 12 rear lid vin 8 d xa 200 000
 
2007 chevrolet rezzo service repair manual
2007 chevrolet rezzo service repair manual2007 chevrolet rezzo service repair manual
2007 chevrolet rezzo service repair manual
 
2006 chevrolet rezzo service repair manual
2006 chevrolet rezzo service repair manual2006 chevrolet rezzo service repair manual
2006 chevrolet rezzo service repair manual
 
AUDI A4 B5 1.8L 1996 BADY 50 1 front end
AUDI A4 B5 1.8L 1996 BADY 50 1 front endAUDI A4 B5 1.8L 1996 BADY 50 1 front end
AUDI A4 B5 1.8L 1996 BADY 50 1 front end
 
AUDI A4 B5 1.8L 1996 BADY INTERIOR 72 1 front seats
AUDI A4 B5 1.8L 1996 BADY INTERIOR 72 1 front seatsAUDI A4 B5 1.8L 1996 BADY INTERIOR 72 1 front seats
AUDI A4 B5 1.8L 1996 BADY INTERIOR 72 1 front seats
 
2008 chevrolet rezzo service repair manual
2008 chevrolet rezzo service repair manual2008 chevrolet rezzo service repair manual
2008 chevrolet rezzo service repair manual
 
2006 chevrolet rezzo service repair manual
2006 chevrolet rezzo service repair manual2006 chevrolet rezzo service repair manual
2006 chevrolet rezzo service repair manual
 
AUDI A4 B5 1.8L 1996 BADY 55 1 hood
AUDI A4 B5 1.8L 1996 BADY 55 1 hoodAUDI A4 B5 1.8L 1996 BADY 55 1 hood
AUDI A4 B5 1.8L 1996 BADY 55 1 hood
 
2016 addition
2016 addition2016 addition
2016 addition
 
AUDI A4 B5 1.8L 1996 BADY 55 32 tailgate avant vin 8 d xa 200 000
AUDI A4 B5 1.8L 1996 BADY 55 32 tailgate avant vin 8 d xa 200 000AUDI A4 B5 1.8L 1996 BADY 55 32 tailgate avant vin 8 d xa 200 000
AUDI A4 B5 1.8L 1996 BADY 55 32 tailgate avant vin 8 d xa 200 000
 
2010 toyota tundra service repair manual
2010 toyota tundra service repair manual2010 toyota tundra service repair manual
2010 toyota tundra service repair manual
 
Example_Prorack HD iLoad Track Kit Instructions
Example_Prorack HD iLoad Track Kit InstructionsExample_Prorack HD iLoad Track Kit Instructions
Example_Prorack HD iLoad Track Kit Instructions
 
Hitachi EX40U Mini Excavator Service Repair Manual.pdf
Hitachi EX40U Mini Excavator Service Repair Manual.pdfHitachi EX40U Mini Excavator Service Repair Manual.pdf
Hitachi EX40U Mini Excavator Service Repair Manual.pdf
 
Hitachi EX50U Mini Excavator Service Repair Manual.pdf
Hitachi EX50U Mini Excavator Service Repair Manual.pdfHitachi EX50U Mini Excavator Service Repair Manual.pdf
Hitachi EX50U Mini Excavator Service Repair Manual.pdf
 

Último

Alia +91-9537192988-Experience the Unmatchable Pleasure with Model Ahmedabad ...
Alia +91-9537192988-Experience the Unmatchable Pleasure with Model Ahmedabad ...Alia +91-9537192988-Experience the Unmatchable Pleasure with Model Ahmedabad ...
Alia +91-9537192988-Experience the Unmatchable Pleasure with Model Ahmedabad ...Niya Khan
 
Beautiful Vip Call Girls Punjabi Bagh 9711199012 Call /Whatsapps
Beautiful Vip  Call Girls Punjabi Bagh 9711199012 Call /WhatsappsBeautiful Vip  Call Girls Punjabi Bagh 9711199012 Call /Whatsapps
Beautiful Vip Call Girls Punjabi Bagh 9711199012 Call /Whatsappssapnasaifi408
 
Delhi Call Girls Saket 9711199171 ☎✔👌✔ Whatsapp Hard And Sexy Vip Call
Delhi Call Girls Saket 9711199171 ☎✔👌✔ Whatsapp Hard And Sexy Vip CallDelhi Call Girls Saket 9711199171 ☎✔👌✔ Whatsapp Hard And Sexy Vip Call
Delhi Call Girls Saket 9711199171 ☎✔👌✔ Whatsapp Hard And Sexy Vip Callshivangimorya083
 
VIP Kolkata Call Girl Kasba 👉 8250192130 Available With Room
VIP Kolkata Call Girl Kasba 👉 8250192130  Available With RoomVIP Kolkata Call Girl Kasba 👉 8250192130  Available With Room
VIP Kolkata Call Girl Kasba 👉 8250192130 Available With Roomdivyansh0kumar0
 
Delhi Call Girls East Of Kailash 9711199171 ☎✔👌✔ Whatsapp Hard And Sexy Vip Call
Delhi Call Girls East Of Kailash 9711199171 ☎✔👌✔ Whatsapp Hard And Sexy Vip CallDelhi Call Girls East Of Kailash 9711199171 ☎✔👌✔ Whatsapp Hard And Sexy Vip Call
Delhi Call Girls East Of Kailash 9711199171 ☎✔👌✔ Whatsapp Hard And Sexy Vip Callshivangimorya083
 
Russian Call Girls Delhi Indirapuram {9711199171} Aarvi Gupta ✌️Independent ...
Russian  Call Girls Delhi Indirapuram {9711199171} Aarvi Gupta ✌️Independent ...Russian  Call Girls Delhi Indirapuram {9711199171} Aarvi Gupta ✌️Independent ...
Russian Call Girls Delhi Indirapuram {9711199171} Aarvi Gupta ✌️Independent ...shivangimorya083
 
Rockwell Automation 2711R PanelView 800 HMI
Rockwell Automation 2711R PanelView 800 HMIRockwell Automation 2711R PanelView 800 HMI
Rockwell Automation 2711R PanelView 800 HMIAsteam Techno
 
UNIT-1-VEHICLE STRUCTURE AND ENGINES.ppt
UNIT-1-VEHICLE STRUCTURE AND ENGINES.pptUNIT-1-VEHICLE STRUCTURE AND ENGINES.ppt
UNIT-1-VEHICLE STRUCTURE AND ENGINES.pptDineshKumar4165
 
BLUE VEHICLES the kids picture show 2024
BLUE VEHICLES the kids picture show 2024BLUE VEHICLES the kids picture show 2024
BLUE VEHICLES the kids picture show 2024AHOhOops1
 
FULL ENJOY - 9953040155 Call Girls in Sector 61 | Noida
FULL ENJOY - 9953040155 Call Girls in Sector 61 | NoidaFULL ENJOY - 9953040155 Call Girls in Sector 61 | Noida
FULL ENJOY - 9953040155 Call Girls in Sector 61 | NoidaMalviyaNagarCallGirl
 
UNOSAFE ELEVATOR PRIVATE LTD BANGALORE BROUCHER
UNOSAFE ELEVATOR PRIVATE LTD BANGALORE BROUCHERUNOSAFE ELEVATOR PRIVATE LTD BANGALORE BROUCHER
UNOSAFE ELEVATOR PRIVATE LTD BANGALORE BROUCHERunosafeads
 
The 10th anniversary, Hyundai World Rally Team's amazing journey
The 10th anniversary, Hyundai World Rally Team's amazing journeyThe 10th anniversary, Hyundai World Rally Team's amazing journey
The 10th anniversary, Hyundai World Rally Team's amazing journeyHyundai Motor Group
 
John Deere Tractors 5515 Diagnostic Repair Manual
John Deere Tractors 5515 Diagnostic Repair ManualJohn Deere Tractors 5515 Diagnostic Repair Manual
John Deere Tractors 5515 Diagnostic Repair ManualExcavator
 
Electronic Vehicle (EV) Industry Challenges
Electronic Vehicle (EV) Industry ChallengesElectronic Vehicle (EV) Industry Challenges
Electronic Vehicle (EV) Industry Challengesmarketingmangosemi
 
Vip Hot Call Girls 🫤 Mahipalpur ➡️ 9711199171 ➡️ Delhi 🫦 Whatsapp Number
Vip Hot Call Girls 🫤 Mahipalpur ➡️ 9711199171 ➡️ Delhi 🫦 Whatsapp NumberVip Hot Call Girls 🫤 Mahipalpur ➡️ 9711199171 ➡️ Delhi 🫦 Whatsapp Number
Vip Hot Call Girls 🫤 Mahipalpur ➡️ 9711199171 ➡️ Delhi 🫦 Whatsapp Numberkumarajju5765
 
VIP Mumbai Call Girls Thakur village Just Call 9920874524 with A/C Room Cash ...
VIP Mumbai Call Girls Thakur village Just Call 9920874524 with A/C Room Cash ...VIP Mumbai Call Girls Thakur village Just Call 9920874524 with A/C Room Cash ...
VIP Mumbai Call Girls Thakur village Just Call 9920874524 with A/C Room Cash ...Garima Khatri
 
Vip Hot🥵 Call Girls Delhi Delhi {9711199012} Avni Thakur 🧡😘 High Profile Girls
Vip Hot🥵 Call Girls Delhi Delhi {9711199012} Avni Thakur 🧡😘 High Profile GirlsVip Hot🥵 Call Girls Delhi Delhi {9711199012} Avni Thakur 🧡😘 High Profile Girls
Vip Hot🥵 Call Girls Delhi Delhi {9711199012} Avni Thakur 🧡😘 High Profile Girlsshivangimorya083
 
ENJOY Call Girls In Okhla Vihar Delhi Call 9654467111
ENJOY Call Girls In Okhla Vihar Delhi Call 9654467111ENJOY Call Girls In Okhla Vihar Delhi Call 9654467111
ENJOY Call Girls In Okhla Vihar Delhi Call 9654467111Sapana Sha
 

Último (20)

Alia +91-9537192988-Experience the Unmatchable Pleasure with Model Ahmedabad ...
Alia +91-9537192988-Experience the Unmatchable Pleasure with Model Ahmedabad ...Alia +91-9537192988-Experience the Unmatchable Pleasure with Model Ahmedabad ...
Alia +91-9537192988-Experience the Unmatchable Pleasure with Model Ahmedabad ...
 
Beautiful Vip Call Girls Punjabi Bagh 9711199012 Call /Whatsapps
Beautiful Vip  Call Girls Punjabi Bagh 9711199012 Call /WhatsappsBeautiful Vip  Call Girls Punjabi Bagh 9711199012 Call /Whatsapps
Beautiful Vip Call Girls Punjabi Bagh 9711199012 Call /Whatsapps
 
Delhi Call Girls Saket 9711199171 ☎✔👌✔ Whatsapp Hard And Sexy Vip Call
Delhi Call Girls Saket 9711199171 ☎✔👌✔ Whatsapp Hard And Sexy Vip CallDelhi Call Girls Saket 9711199171 ☎✔👌✔ Whatsapp Hard And Sexy Vip Call
Delhi Call Girls Saket 9711199171 ☎✔👌✔ Whatsapp Hard And Sexy Vip Call
 
VIP Kolkata Call Girl Kasba 👉 8250192130 Available With Room
VIP Kolkata Call Girl Kasba 👉 8250192130  Available With RoomVIP Kolkata Call Girl Kasba 👉 8250192130  Available With Room
VIP Kolkata Call Girl Kasba 👉 8250192130 Available With Room
 
Delhi Call Girls East Of Kailash 9711199171 ☎✔👌✔ Whatsapp Hard And Sexy Vip Call
Delhi Call Girls East Of Kailash 9711199171 ☎✔👌✔ Whatsapp Hard And Sexy Vip CallDelhi Call Girls East Of Kailash 9711199171 ☎✔👌✔ Whatsapp Hard And Sexy Vip Call
Delhi Call Girls East Of Kailash 9711199171 ☎✔👌✔ Whatsapp Hard And Sexy Vip Call
 
Russian Call Girls Delhi Indirapuram {9711199171} Aarvi Gupta ✌️Independent ...
Russian  Call Girls Delhi Indirapuram {9711199171} Aarvi Gupta ✌️Independent ...Russian  Call Girls Delhi Indirapuram {9711199171} Aarvi Gupta ✌️Independent ...
Russian Call Girls Delhi Indirapuram {9711199171} Aarvi Gupta ✌️Independent ...
 
Rockwell Automation 2711R PanelView 800 HMI
Rockwell Automation 2711R PanelView 800 HMIRockwell Automation 2711R PanelView 800 HMI
Rockwell Automation 2711R PanelView 800 HMI
 
UNIT-1-VEHICLE STRUCTURE AND ENGINES.ppt
UNIT-1-VEHICLE STRUCTURE AND ENGINES.pptUNIT-1-VEHICLE STRUCTURE AND ENGINES.ppt
UNIT-1-VEHICLE STRUCTURE AND ENGINES.ppt
 
BLUE VEHICLES the kids picture show 2024
BLUE VEHICLES the kids picture show 2024BLUE VEHICLES the kids picture show 2024
BLUE VEHICLES the kids picture show 2024
 
FULL ENJOY - 9953040155 Call Girls in Sector 61 | Noida
FULL ENJOY - 9953040155 Call Girls in Sector 61 | NoidaFULL ENJOY - 9953040155 Call Girls in Sector 61 | Noida
FULL ENJOY - 9953040155 Call Girls in Sector 61 | Noida
 
UNOSAFE ELEVATOR PRIVATE LTD BANGALORE BROUCHER
UNOSAFE ELEVATOR PRIVATE LTD BANGALORE BROUCHERUNOSAFE ELEVATOR PRIVATE LTD BANGALORE BROUCHER
UNOSAFE ELEVATOR PRIVATE LTD BANGALORE BROUCHER
 
The 10th anniversary, Hyundai World Rally Team's amazing journey
The 10th anniversary, Hyundai World Rally Team's amazing journeyThe 10th anniversary, Hyundai World Rally Team's amazing journey
The 10th anniversary, Hyundai World Rally Team's amazing journey
 
John Deere Tractors 5515 Diagnostic Repair Manual
John Deere Tractors 5515 Diagnostic Repair ManualJohn Deere Tractors 5515 Diagnostic Repair Manual
John Deere Tractors 5515 Diagnostic Repair Manual
 
Electronic Vehicle (EV) Industry Challenges
Electronic Vehicle (EV) Industry ChallengesElectronic Vehicle (EV) Industry Challenges
Electronic Vehicle (EV) Industry Challenges
 
Hotel Escorts Sushant Golf City - 9548273370 Call Girls Service in Lucknow, c...
Hotel Escorts Sushant Golf City - 9548273370 Call Girls Service in Lucknow, c...Hotel Escorts Sushant Golf City - 9548273370 Call Girls Service in Lucknow, c...
Hotel Escorts Sushant Golf City - 9548273370 Call Girls Service in Lucknow, c...
 
Vip Hot Call Girls 🫤 Mahipalpur ➡️ 9711199171 ➡️ Delhi 🫦 Whatsapp Number
Vip Hot Call Girls 🫤 Mahipalpur ➡️ 9711199171 ➡️ Delhi 🫦 Whatsapp NumberVip Hot Call Girls 🫤 Mahipalpur ➡️ 9711199171 ➡️ Delhi 🫦 Whatsapp Number
Vip Hot Call Girls 🫤 Mahipalpur ➡️ 9711199171 ➡️ Delhi 🫦 Whatsapp Number
 
VIP Mumbai Call Girls Thakur village Just Call 9920874524 with A/C Room Cash ...
VIP Mumbai Call Girls Thakur village Just Call 9920874524 with A/C Room Cash ...VIP Mumbai Call Girls Thakur village Just Call 9920874524 with A/C Room Cash ...
VIP Mumbai Call Girls Thakur village Just Call 9920874524 with A/C Room Cash ...
 
Vip Hot🥵 Call Girls Delhi Delhi {9711199012} Avni Thakur 🧡😘 High Profile Girls
Vip Hot🥵 Call Girls Delhi Delhi {9711199012} Avni Thakur 🧡😘 High Profile GirlsVip Hot🥵 Call Girls Delhi Delhi {9711199012} Avni Thakur 🧡😘 High Profile Girls
Vip Hot🥵 Call Girls Delhi Delhi {9711199012} Avni Thakur 🧡😘 High Profile Girls
 
ENJOY Call Girls In Okhla Vihar Delhi Call 9654467111
ENJOY Call Girls In Okhla Vihar Delhi Call 9654467111ENJOY Call Girls In Okhla Vihar Delhi Call 9654467111
ENJOY Call Girls In Okhla Vihar Delhi Call 9654467111
 
Indian Downtown Call Girls # 00971528903066 # Indian Call Girls In Downtown D...
Indian Downtown Call Girls # 00971528903066 # Indian Call Girls In Downtown D...Indian Downtown Call Girls # 00971528903066 # Indian Call Girls In Downtown D...
Indian Downtown Call Girls # 00971528903066 # Indian Call Girls In Downtown D...
 

251925966 master-ra-replacing-seal-for-slide-tilt-sunroof-frame

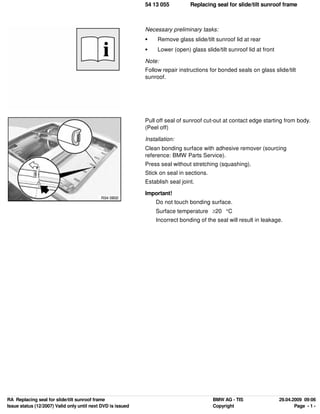
  • 1. 54 13 055 Replacing seal for slide/tilt sunroof frame Necessary preliminary tasks: • Remove glass slide/tilt sunroof lid at rear • Lower (open) glass slide/tilt sunroof lid at front Note: Follow repair instructions for bonded seals on glass slide/tilt sunroof. Pull off seal of sunroof cut-out at contact edge starting from body. (Peel off) Installation: Clean bonding surface with adhesive remover (sourcing reference: BMW Parts Service). Press seal without stretching (squashing). Stick on seal in sections. Establish seal joint. Important! Do not touch bonding surface. Surface temperature ≥20 °C Incorrect bonding of the seal will result in leakage. RA Replacing seal for slide/tilt sunroof frame BMW AG - TIS 29.04.2009 09:06 Issue status (12/2007) Valid only until next DVD is issued Copyright Page - 1 -
  • 2. 54 10 175 Removing and installing rear glass slide/tilt sunroof cover Note: The following steps can be carried out inside the vehicle with the glass roof panel fully closed. Open floating roofliner fully. Make sure that grease at the ends of the rail do not come into contact with the roofliner. Not necessary for replacement: Before removing the Torx screws, make a mark around the washers in order to ensure correct alignment during installation. Remove and dispose of the Torx screws (1) securing the glass panel to the mechanism. Installation: Insert new Torx screws with Loctite and align washers to markings. Tightening torque 54 12 01AZ . Important! A second person is required to help in removing and installing the glass slide/tilt sunroof lid! Lift out glass slide/tilt sunroof cover (1). Installation: Tape off complete edge area at roof aperture with fabric adhesive tape (risk of damage). Install glass slide/tilt sunroof cover carefully (twist in) as seal can be damaged during installation. Check glass slide/tilt sunroof cover for correct alignment and adjust if necessary. RA Removing and installing rear glass slide/tilt sunroof cover BMW AG - TIS 29.04.2009 09:07 Issue status (12/2007) Valid only until next DVD is issued Copyright Page - 1 -
  • 3. 54 12 Mechanical components, panorama sunroof Type Thread Tightening specification Measure 1AZ Glass lid to gate E53 / E61 / E70 / E83 / E91 Always use new nuts and bolts. 4 ± 0.5 Nm 2AZ Cassette to body E53 / E61 / E70 / E83 / E91 M6 Self-tapping screw 5.4 ± 0.5 Nm 3AZ Cover, cross-member E91 2 ± 0.5 Nm E53 / E61 / E70 / E83 3.5 ± 0.5 Nm 4AZ Front floating roofliner to detent element E53 / E61 / E70 / E83 / E91 1.5 ±0.2 Nm 5AZ Rear floating roofliner to detent element E53 / E61 / E70 / E83 / E91 1 ± 0.2 Nm AZD Mechanical components, panorama sunroof BMW AG - TIS 29.04.2009 09:07 Issue status (12/2007) Valid only until next DVD is issued Copyright Page - 1 -
  • 4. 54 0 ... Repair instructions for bonded seals 1. General information on handling rubber seal profiles: - If seals reveal partly detached protective film on delivery, they must not be bonded. - Store seals at 15 °C to 25 °C. - If, during the handling, the protective film has come off before bonding, it can still be bonded. - Bonding at room and object temperature >20 °C. Temperatures between 40 and 50 °C significantly increase initial adhesion. - Seals, which are subjected to temperatures above 80 °C after gluing, will be very difficult to remove. 2. Damage pattern and repair 2.1 Partially detached bond (rubber-adhesive tape or adhesive tape-paint) - Up to 120 mm for retouching without auxiliary resources - Up to 200 mm repaired with pressing-on tools on straight surfaces a) Cleaning damaged areas: - Degrease bonded area with adhesive cleaner (refer to BMW Parts Service) and remove other residues. Note: Use necessary cotton- or fluff-free paper towel once only. When using solvent: expose repair area to air for at least 2 minutes. b) Applying adhesive: - With a fine nozzle, apply a wafer-thin bead to adhesive tape. Note: Use contact adhesive (e.g. Terokal 2444) Caution! Avoid contact to skin! Do not apply adhesive to visible painted surfaces. c) Pressing on rubber seal: - Press down seal using contact pressure (forced pressure not necessary) for at least 1 minute. Caution! Load can only be applied to the bond after a period of 2 minutes. This waiting time is absolutely essential. 2.2 Larger defects (mechanical damage and larger separations of seal) - Complete replacement of rubber seal necessary a) Peeling off damaged rubber seal: RA Repair instructions for bonded seals BMW AG - TIS 29.04.2009 09:08 Issue status (12/2007) Valid only until next DVD is issued Copyright Page - 1 -
  • 5. - Pull off rubber seal slowly at an angle up to 20° under uniformly strong tension. Note: Make sure the connection between adhesive tape and seal is retained. If the connection between adhesive tape and seal is detached: Carefully and slowly detach adhesive tape at an angle of 20° from roof opening or lid. When existing seals are being peeled off with a hot air blower: Do not damage paintwork. Do not detach rubber-adhesive tape connection if at all possible. b) Cleaning bonded area: - Degrease bonded area with adhesive cleaner (refer to BMW Parts Service) and remove other residues. Note: Use necessary cotton- or fluff-free paper towel once only. When using solvent: expose repair area to air for at least 2 minutes. c) Detaching protective film from bonded area: - Detach protective film from rubber seal in sections. Caution! Once the protective film has been removed, do not under any circumstances touch the exposed bonded area. d) Applying rubber seal: - Apply rubber seal on roof opening edge beginning at rear centre. Use upper lip as application edge. Press on seal continuously by hand. Carefully unwrap seal at radii without tension and press down (critical area). Note: If positioned incorrectly, the seal can still be pulled off, repositioned and pressed on again. e) Establishing seal joint: - Mark contact point at joint by pressing down loose end on seal of already bonded end. Then cut and press down loose end at same height. Note: Small areas of seal can remain stuck to adhesive tape of loose end. RA Repair instructions for bonded seals BMW AG - TIS 29.04.2009 09:08 Issue status (12/2007) Valid only until next DVD is issued Copyright Page - 2 -
  • 6. f) Pressing on seal: - Press on seal using a roller - Adhesive tape width up to 5 mm Application pressure approx. 5 N - Adhesive tape width up to 10 mm Application pressure approx. 10 N Sliding sunroof seal only: - Press against seal strongly with a roller. Application pressure approx. 70 N. E36 sliding sunroof seal only: - Application pressure approx. 30 N. - Tear off tear-off lip at rear and side in area of narrower flange. Note: Firm thumb pressure has approx. 35 N/cm 2 3. Checking rubber seal - Check the bonded seals for correct positioning and perfect adhesion. The bonding can be checked by pressing back the sealing lip. - The force required to peel off the seal immediately after gluing must be greater than 10 N/cm. RA Repair instructions for bonded seals BMW AG - TIS 29.04.2009 09:08 Issue status (12/2007) Valid only until next DVD is issued Copyright Page - 3 -
  • 7. 54 13 003 Adjusting glass slide/tilt sunroof lid Special tools required: • 00 9 315 • 00 9 340 Necessary preliminary tasks: • Remove gaiter on left and right • Close glass slide/tilt sunroof completely If the glass slide/tilt sunroof is outside the adjustment tolerances, adjust as follows: Adjusting glass slide/tilt sunroof unit: Carry out the following step on one side first and then the other (first left, then right or vice versa): • Insert Torx screws (1) on left/right so that glass roof panel can still just be adjusted • Move glass slide/tilt sunroof lid as required • Make sure all screws are tightened down. • Tightening torque 54 12 01AZ . • Repeat procedure on other side. Distance setting: Distance A between body and glass lid (without seal): A= 5.8 ± 0.3 mm all round Check same gap of glass lid and body with special tool 00 9 340 . Slide special tool 00 9 340 or similar between seal and insert. It must be possible to slide the card against the same level of resistance. Slide glass lid towards front or rear until ideal position is reached. RA Adjusting glass slide/tilt sunroof lid BMW AG - TIS 29.04.2009 09:04 Issue status (12/2007) Valid only until next DVD is issued Copyright Page - 1 -
  • 8. Height adjustment: Note: Front glass lid must be adjusted first. Check height of glass lid (1) in relation to body (2) with special tool 00 9 315 . Press glass lid (1) at front and rear towards top or bottom until ideal position is reached. Height: • Front edge of glass lid at front 0 to 1 mm under roof edge • Rear edge of glass lid at front 0 to 0.5 mm over glass lid at rear • Rear edge of glass lid at rear 0 to 1 mm over roof edge Check function and adjustment. RA Adjusting glass slide/tilt sunroof lid BMW AG - TIS 29.04.2009 09:04 Issue status (12/2007) Valid only until next DVD is issued Copyright Page - 2 -
  • 9. 00 9 310 Assembly wedges (set in plastic case) Minimum set: Mechanical tools Note: For straightening and assembly jobs on vehicle bodies, e.g. fitting trim panels, removing window weatherstrips, repairing small-scale dents, removing residual adhesive materials, measuring gap widths, levering out trim panel parts Series: E12, E21, E23, E24, E28, E30, E30/C, E30tou, E31, E32, E32/3, E34, E34tou, E36, E36/2, E36/3, E36/5, E36/7, E36/C, E36tou, E38, E38/3, E39, E39PL, E39tou, E46, E46/16, E46/2, E46/3, E46/5, E46/C, E52, E53, E60, E61, E63, E64, E65, E66, E67, E68, E70, E71, E81, E82, E83, E85, E86, E87, E88, E90, E91, E92, E93, R50, R52, R53, R55, R56, RR1, RR2 SI number: 1 25 05 230 Order number: 00 9 310 Assembly wedges (set in plastic case) Consisting of: 1 = 00 9 311 Trim remover 2 = 00 9 312 Striking wedge, square 3 = 00 9 313 Striking wedge, large 4 = 00 9 314 Adjusting wedges (2 x) 5 = 00 9 315 Gap wedge 6 = 00 9 316 Sealing lip wedge 7 = 00 9 317 Trim panel wedge 8 = 00 9 318 Universal wedge 9 = 00 9 319 Striking wedge, small 10 = 00 9 321 Fishbone 11 = 00 9 322 Plastic wedge 12 = 00 9 323 Cleaning wedge (scraper) 13 = 00 9 324 Trim remover (metal plate) Note: For removing stem trims from E60 14 = 00 9 329 Case with inlay for assembly wedges In conjunction with: 009310 SWZ Assembly wedges (set in plastic case) BMW AG - TIS 29.04.2009 09:05 Issue status (12/2007) Valid only until next DVD is issued Copyright Page - 1 -
  • 10. 00 9 340 Disassembly aid (2) Minimum set: Mechanical tools Note: For levering out switch block on driver's door. Series: E12, E21, E23, E24, E28, E30, E30/C, E30tou, E31, E32, E32/3, E34, E34tou, E36, E36/2, E36/3, E36/5, E36/7, E36/C, E36tou, E38, E38/3, E39, E39PL, E39tou, E46, E46/16, E46/2, E46/3, E46/5, E46/C, E52, E53, E60, E61, E63, E64, E65, E66, E67, E68, E70, E71, E81, E82, E83, E85, E86, E87, E88, E90, E91, E92, E93, R50, R52, R53, R55, R56, RR1, RR2 SI number: 1 15 99 (483) Order number: 00 9 340 Disassembly aid (2) Consisting of: 1 = 00 9 341 Removal aid Note: Only available as a set (2 pieces) on 00 9 340. SWZ Disassembly aid (2) BMW AG - TIS 29.04.2009 09:05 Issue status (12/2007) Valid only until next DVD is issued Copyright Page - 1 -
  • 11. 54 10 160 Replacing left or right gaiter for glass slide/tilt sunroof Necessary preliminary tasks: • Close glass slide/tilt sunroof Detach gaiter (1) from guide. Installation: Gaiter cannot be removed without incurring damage. Replace gaiter. Check that aluminium section inlay is firmly seated on guide. RA Replacing left or right gaiter for glass slide/tilt sunroof BMW AG - TIS 29.04.2009 09:05 Issue status (12/2007) Valid only until next DVD is issued Copyright Page - 1 -
  • 12. 54 12 Mechanical components, panorama sunroof Type Thread Tightening specification Measure 1AZ Glass lid to gate E53 / E61 / E70 / E83 / E91 Always use new nuts and bolts. 4 ± 0.5 Nm 2AZ Cassette to body E53 / E61 / E70 / E83 / E91 M6 Self-tapping screw 5.4 ± 0.5 Nm 3AZ Cover, cross-member E91 2 ± 0.5 Nm E53 / E61 / E70 / E83 3.5 ± 0.5 Nm 4AZ Front floating roofliner to detent element E53 / E61 / E70 / E83 / E91 1.5 ±0.2 Nm 5AZ Rear floating roofliner to detent element E53 / E61 / E70 / E83 / E91 1 ± 0.2 Nm AZD Mechanical components, panorama sunroof BMW AG - TIS 29.04.2009 09:06 Issue status (12/2007) Valid only until next DVD is issued Copyright Page - 1 -