1. Vegetables • HO-32-W
Department of Horticulture
Purdue University Cooperative Extension Service • West Lafayette, IN
Home Gardener’s Guide
B. Rosie Lerner and Michael N. Dana
This publication is designed for the home gardener, Avoid planting vegetables near trees and shrubs. In these
whether a beginner or an old hand. We hope new gar- locations, vegetables must compete with the other plants
deners will !nd it basic enough and that experienced for light, nutrients, and water. Walnut trees pose a prob-
gardeners will !nd new ideas and solutions to some of lem because they produce a substance called "juglone",
their old problems. which is toxic to some plants, particularly tomatoes.
Juglone-sensitive plants may eventually wilt and die.
Included is information on the planning, planting, and Because the roots may remain active for several years
care of vegetables. In addition, there is a garden plan and even after the tree is cut down, a minimum distance of 50
planting guide showing the distance between rows, when feet is recommended between walnut trees and sensitive
to plant, how much to plant, etc. plants.
Planning a Vegetable Garden Early Planning
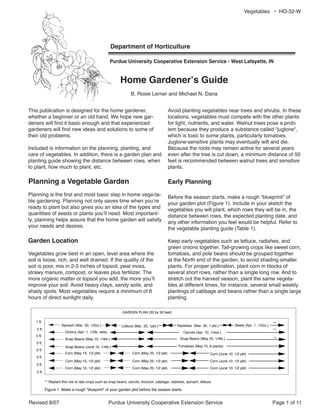
Planning is the !rst and most basic step in home vege-ta- Before the season starts, make a rough “blueprint” of
ble gardening. Planning not only saves time when you’re your garden plot (Figure 1). Include in your sketch the
ready to plant but also gives you an idea of the types and vegetables you will plant, which rows they will be in, the
quantities of seeds or plants you’ll need. Most important- distance between rows, the expected planting date, and
ly, planning helps assure that the home garden will satisfy any other information you feel would be helpful. Refer to
your needs and desires. the vegetable planting guide (Table 1).
Garden Location Keep early vegetables such as lettuce, radishes, and
green onions together. Tall-growing crops like sweet corn,
Vegetables grow best in an open, level area where the tomatoes, and pole beans should be grouped together
soil is loose, rich, and well drained. If the quality of the at the North end of the garden, to avoid shading smaller
soil is poor, mix in 2-3 inches of topsoil, peat moss, plants. For proper pollination, plant corn in blocks of
strawy manure, compost, or leaves plus fertilizer. The several short rows, rather than a single long row. And to
more organic matter or topsoil you add, the more you’ll stretch out the harvest season, plant the same vegeta-
improve your soil. Avoid heavy clays, sandy soils, and bles at different times, for instance, several small weekly
shady spots. Most vegetables require a minimum of 6 plantings of cabbage and beans rather than a single large
hours of direct sunlight daily. planting.
GARDEN PLAN (20 by 50 feet)
1 ft. **
Spinach (Mar. 20, 1/2oz.) Lettuce (Mar. 20, 1pkt.) Radishes (Mar. 30, 1 pkt.) Beets (Apr. 1, 1/2oz.)
2 ft. **
Onions (Apr. 1, 1/2lb. sets) Carrots (Apr. 10, 1/4oz.)
3 ft.
Snap Beans (May 10, 1/4lb.) Snap Beans (May 25, 1/4lb.) **
3 ft.
Snap Beans (June 10, 1/4lb.) Tomatoes (May 15, 8 plants)
3 ft.
Corn (May 10, 1/2 pkt) Corn (May 25, 1/2 pkt) Corn (June 10, 1/2 pkt)
3 ft.
Corn (May 10, 1/2 pkt) Corn (May 25, 1/2 pkt) Corn (June 10, 1/2 pkt)
3 ft.
Corn (May 10, 1/2 pkt) Corn (May 25, 1/2 pkt) Corn (June 10, 1/2 pkt)
2 ft.
!
** Replant this row to late crops such as snap beans, carrots, broccoli, cabbage, radishes, spinach, lettuce.!
!
Figure 1. Make a rough "blueprint" of your garden plot before the season starts.
Revised 8/07 Purdue University Cooperative Extension Service Page 1 of 11
2. Table 1. Vegetable planting guide.
_____________________________________________________________________________________________________
Page 2 of 11
Space Space Depth
between between Yield Amt. seed or to When Days ‘til
rows1 plants per no. plants plant to !rst
Vegetables (ft.) (in.) 50 ft. per 50 ft. (in.) plant2 harvest
Vegetables • HO-32-W
_____________________________________________________________________________________________________
Beets 1 3 1 bushel 1 ounce 1/2-1 Apr 1-June 25 55-65
Broccoli (plants) 3 18 36 heads 36 plants — Apr 15-June 15 40-55
Cabbage (plants) 3 18 36 heads 36 plants — Apr 5-June 5 55
Carrots 1 2 1 bushel 1/2 ounce 1/2 Apr 10-June 20 70-75
Cauli"ower (plants) 3 18 36 heads 36 plants — Apr 15-June 25 50-60
Cucumber 4 18 3/4 bushel 1 packet 1 May 15-July 1 55-70
Eggplant (plants) 2 24 60 fruit 24 plants — May 15-June 15 55-70
Irish potato (pieces) 3 10 1 bushel 60 pieces 4 Apr 20-June 1 90-130
Leaf lettuce 1 4 150 plants 2 packets 1/2 Mar 20-June 153 40-50
Lima beans (bush) 2 6 1 bushel 1/2 pound 1-2 May 15-June 15 65-75
Onion (sets or plants) 1 2 1 bushel 1 pound sets 1-4 Apr 1-May 1 90-120 (dry)
60 (green)
Muskmelon 4 18 25 melons 1 packet 1 May 15-June 1 85-90
Peas 1 1 1 bushel 1/2 pound 2 Mar 20-May l 60-75
Peppers (plants) 2 18 2 bushels 36 plants — May 15-July 1 55-70
Radishes 1 1 500 roots 1/2 ounce 1/2 Mar 20-June 153 25-30
Snap beans (bush) 2 2 1 bushel 1/2 pound 1-2 May 10-July 20 55 -60
Spinach 1 3 25 pounds 1 ounce 1-2 Mar 20-June 153 40-45
Summer squash 4 48 100 squash 1 packet 1/2 May 15-June 15 50-60
Winter squash
& pumpkins 6 72 25 -50 squash 1 packet 1 May 15-June 15 85-110
Sweet corn 3 12 50 ears 1 packet 1-2 May 10-July 10 65-85
Sweet potato (plants) 3 12 1 bushel 50 plants — May 20-June 10 130-140
Tomato (plants) 4 24 100 pounds 25 plants — May 15-June 20 40-70
Turnips 1 4 1 bushel 1 packet 1/2 Apr 1-June 15 60-90
Purdue University Cooperative Extension Service
Watermelons 6 48 15 melons 1 packet 1 May 15-May 25 75 -90
_____________________________________________________________________________________________________
1
In large gardens, distance should be adjusted for cultivating equipment.
2
Early date is for Indianapolis. Plant 20 days earlier in extreme southwestern part and 10 days later for northeastern part of
state. Late date is about the same for entire state.
3
For a late crop, plant spinach and lettuce from Aug. 15 to Sept. 1; plant radishes from Aug. 15 to Sept. 15.
Revised 8/07
3. Vegetables • HO-32-W
As you plan, remember that besides planting and har- Remember that this basic application is a fertility-building
vesting, you will have to take the time to weed, water, step and will not be needed every year. After the basic
cultivate, and thin seedlings. Don’t plan for more than you fertility level has been established, it can be maintained
can take care of! by following steps 2, 3, and 4.
Equipment The best method for making the basic application is !rst
to put on half of the recommended fertilizer and follow
Hoe, rake, shovel, trowel, garden hose, and sprinkler are up by deep plowing or spading. Then apply the other half
standard gardening equipment. You may also need a and disc or rake it in lightly. This distributes the fertilizer
good duster or sprayer for pest control. Don’t forget fertil- throughout the upper 7 inches of the soil.
izer, mulch, short stakes, and string to mark rows, and
7-8-foot stakes for tomatoes or pole beans. Important: Your soil test may recommend “no basic appli-
cation.” This means that the fertility level of your garden
Plowing is the preferred method for soil preparation, is adequate. If the report shows that you have too much
but deep rototilling is more practical for today’s garden. of an element, leave it out of fertilizer applications. Plow-
Rototillers can be rented in most communities. Small soil ing just a little deeper for a year or two and sowing green
areas can be hand-turned using a spade or shovel. A manure crops will also help reduce the effects of the ele-
long-handled, wheeled cultivator can be used for weed ment that is in excess.
control during the season.
Step 2"Apply fertilizer to maintain the basic fertility
level. Each year after the basic fertility level has been
Seeds and Plants established, it is important to apply fertilizer to the soil to
maintain the basic level. Fertilizer is usually applied in the
Order seed of recommended vegetable cultivars (culti- spring, before the soil is worked into a seedbed. It need
vated varieties) early, especially if you plan to start plants not be worked deeply into the soil"the upper 3-5 inches
indoors, and buy seed from a reputable company. It’s will do. The purpose of this maintenance application is to
also best not to depend on old seed or seed saved from replace the fertility you have removed in the form of crops
last year’s garden, since many vegetable cultivars are and that which is lost to leaching.
hybrids. Seed saved from hybrid plants may not come
“true,” that is, may not produce the intended cultivar the Again the question comes up: “How much of what kind
second growing season. of fertilizer should I use?” A balanced fertilizer is used for
this maintenance application. A balanced fertilizer con-
Some vegetables, including tomatoes, broccoli, cab- tains three plant nutrients: nitrogen (N), phosphorus (P),
bage, cauli"ower, eggplant, and peppers, are dif!cult to and potassium (K).
start directly in the garden from seed. Also, plants grown
from direct seedings will take longer to reach harvest A fertilizer bag will be labeled with a combination of
than those from transplants. Therefore, it is better to buy numbers such as 8-24-8, 12-12-12, or 6-24-24, indicat-
transplants from your local garden center or start your ing the analysis or composition of nutrients. The !rst
own transplants indoors. number always refers to the percent by weight of nitrogen
contained in that bag. The middle number always refers
Fertilization to the percent of the oxide of phosphorus (P2O5), which
is 44 percent P by weight, and the last number refers to
The fertilizer requirements for your garden should be the percent of the oxide of potassium (K2O), which is 83
established during the planning stage, so establishing percent K by weight. For example, for every 100 pounds
needs and applying fertilizer will be discussed together of 8-24-8 fertilizer you buy, you get 8 pounds of N, 24
here. pounds of P2O5, and 8 pounds of K2O.
Step 1"Establish basic fertility level. Establish the basic Four of the mixed fertilizers most commonly sold are
fertility level simply by applying fertilizer"the right kind listed in Figure 2. Check the analysis on your bag of fertil-
and the right amount"to your garden soil. A soil test will izer, and !nd the corresponding analysis in Figure 2. The
indicate the kind and amount of fertilizer to apply. Testing second column indicates the amount to use per 1,000
in autumn will give you plenty of time to receive the re- square feet of garden area. If the analysis on your bag
sults and have the appropriate materials ready for spring. is different from that listed, choose the one in the table
Contact your local county Extension of!ce for details on which is nearest to yours, and use the rate indicated.
soil testing.
Revised 8/07 Purdue University Cooperative Extension Service Page 3 of 11
4. Vegetables • HO-32-W
The following are the most commonly available water-
soluble fertilizers: 5-10-5, 10-52-17, 8-32-16, 12-24-14,
15-30-15, and 13-26-13. Use any of these at the rate
of 1-2 level tablespoons per gallon of water. Apply 1-2
cups of this solution around the roots of each newly set
transplant.
Step 4"Side-dress with nitrogen. Vegetables and "ow-
ers vary in the amounts of nitrogen they need. Usually,
vegetable crops require most of their nitrogen after they
have made considerable growth or have begun to fruit.
Too much nitrogen before this time delays maturity and
reduces "owering and yields.
The major portion of the nitrogen your plants use comes
from three sources: (1) the breakdown of organic matter,
(2) yearly maintenance applications of fertilizer, and (3)
nitrogen side-dressings.
Until the plant starts fruiting or makes considerable
growth, it will receive enough nitrogen from the !rst
Step 3"Use starter fertilizer. As de!ned here, a starter two sources. But afterward, the demand of the plant for
fertilizer is a water-soluble fertilizer supplied when water- nitrogen often exceeds that supplied by the !rst two, and
ing in a transplant. a nitrogen side-dressing is needed. Because vegetable
crops vary so greatly in both the amount of nitrogen side-
Phosphorus is the most important element needed in get- dressing required and times of application, Table 2 was
ting your transplants off to a good start. Therefore, select developed for handy reference. Fertilizer requirements for
a water-soluble fertilizer that has a high phosphorus annual "owers do not vary as much, and a single treat-
content in relation to the nitrogen and potassium. ment may be made for the entire season.
Table 2. Recommended nitrogen side-dressings.
Amount side-dressing Time of application (Sprinkle nitrogen
(lb. per 100 ft. row)* fertilizer in row middles, and water
Crop Ammonium nitrate** 33-0-0 if rain is not likely.)
Annual flowers 1 4-6 weeks after planting
Asparagus 2 Before growth begins in spring
Cabbage, cauliflower, broccoli 1 3 weeks after field transplanting
Cucumber, muskmelon 1 1) 1 week after blossoming begins
2) 3 weeks later
Onions (mature) 1 1-2 weeks after bulb formation starts
Peas and beans 1 After heavy bloom and set of pods
Peppers, eggplants 1 After first fruit sets
Spinach, kale, mustard & 1 When plants are about one-third grown
turnip greens
Sweet corn 1 1) When plants are 8-10 inches tall
2) 1 week after tassels appear
Sweet potatoes, watermelons, None Excessive amounts of nitrogen will red
carrots, beets, turnips, parsnips, yields, or lower quality, or both. Side
lettuce dressings of nitrogen not needed
Tomato 1 1) 2 weeks after first fruit sets
2) 2 weeks after picking first tomato
3) 1 month later
* A pint of ammonium nitrate weighs approximately 1 pound.
** Other forms of nitrogen, such as ammonium sulfate, may be used on an equivalent nitrogen basis.
Page 4 of 11 Purdue University Cooperative Extension Service Revised 8/07
5. Vegetables • HO-32-W
Table 3. Adjusting soil pH.
Pounds of sulfur required per 100 sq. ft. to lower pH
To Lower the pH Soil Type
From To Sandy Loamy Clay
8.5 6.5 4 5 6
7.5 6.5 1 1.5 2
8.5 5.5 5 6.5 8
7.5 5.5 2 3 4
6.5 5.5 1 1.5 2
Pounds of limestone required per 100 sq. ft. to bring soil pH to 6.5 from initial pH shown
Initial Sands and Loams and
soil pH sandy loams silty loams Clays
4.5 28 46 46
4.8 24 37 42
5.2 17 25 34
5.6 8 16 25
6.0 5 10 15
Note: These rates are based on a 9-inch plow depth and limestone with a 100% calcium carbonate
equivalent.
Soil pH
Peat moss, compost, or animal manure should be applied
Although the optimum soil pH (measure of acidity) varies about 2 inches below the soil surface and then worked in
with the speci!c crop, most vegetables perform best in thoroughly.
a slightly acidic soil (pH 6.0-6.8). Most Indiana soils are
in this range or perhaps more alkaline. Lime, a mate- Green manures are legumes or small grain crops that are
rial which increases pH to make soils more alkaline, is plowed under while still in the green stage. Winter green
rarely needed for Indiana gardens. In fact, the addition of manure crops include rye, wheat, barley, and winter
lime to your garden may adversely affect the nutrition of vetch. Summer green manure crops include Sudangrass,
garden plants. Some plants, such as potatoes, require a soy-beans, and cowpeas.
more acidic soil. Agricultural sulphur can be used to lower
pH, making soil more acidic. See Table 3 for application A highly satisfactory way to handle organic matter is to
rates of sulphur and lime to adjust soil pH. plant half of the garden to a winter green manure crop in
September or early October. Then put some well-rotted
animal manure on the other half, fall-plow it, and plant
Maintaining Organic Matter spring vegetables in this part. The following spring, turn
under the green manure crop and plant your summer
Two major factors contribute to physical properties of vegetables. Rotate these areas each year. After turning
your soil: size of inorganic particles (sand, silt or clay) under a green manure crop, wait about 3 weeks before
and organic matter. You cannot alter soil particle size or planting to allow the green manure a chance to dry down
type much, but you can control organic matter. and begin decomposition.
Sandy soils should contain 2 to 3 percent organic matter;
clay type soils need 4 to 5 percent. Annual applications of Planting a Vegetable Garden
organic matter are required to reach these levels and to
maintain them. The second major step in successful vegetable gardening
is proper planting at the proper time. Certain preparation,
Peat moss makes an excellent source of organic material planting procedures, and timing should be followed to
for the small garden. Coarse types will provide the best insure an abundant, healthy crop. Follow the recommen-
soil conditioning. Compost not only adds organic matter, dations in the vegetable planting guide in Table 1.
but it reuses your plant materials as well. Animal manures
are excellent. They should be well-rotted, applied in the Preparing the Soil
fall, and plowed under. Weed seeds are the chief objec-
tion to animal manures. When the !rst warm spring days appear, everyone is anx-
ious to begin gardening. First, allow time for the sunshine
Revised 8/07 Purdue University Cooperative Extension Service Page 5 of 11
6. Vegetables • HO-32-W
and warm spring breezes to dry out the soil before you try If you have a large garden, consider using a mechanized
to work it. If you can crumble a soil ball with your !ngers, seed planter. Push-type planters will sow seed at the right
it’s ready to plant. If it clings together, it’s still too wet. If depth and rate, cover the seed, and !rm the soil"all in
you work soil that’s too wet, it will remain hard and cloddy one operation. Other hand planters, which distribute the
for weeks. seed in the opened row without the operator having to
bend too much, are available.
Prepare the soil about 6 inches deep, making sure all sod
is turned under. Do this with a garden spade, a plow, or Setting Out Plants
a rototiller. If you spade by hand, shatter and slice each
shovelful so the soil is crumbly. Finish by leveling and Buy only sturdy, green transplants of known cultivars.
smoothing with a rake or harrow. Those in individual peat or plastic pots are easy to work
with. When planting a peat pot, be sure to tear off the rim
Planting Seed and bottom of the peat pot before planting. The edges,
when exposed to the air, act as a wick and draw moisture
Make a furrow for the seed, using the hoe handle if plant- away from the root area. Removing the bottom of the
ing !ne seeds or the hoe blade for larger seeds (Figure peat pot will allow easier root penetration. Also, be sure
3). Barely cover small seed, and place only 1 inch of the peat pot is moist at planting time. In sandy soil, care-
soil over large seed. One of the most common errors in fully remove the entire peat pot. All plastic pots should be
gardening is planting too deep. Seeds planted too deep removed before planting.
often do not come up.
To avoid wilting and possible death of plants, set them
When planting in rows, mark the rows to be planted by out during the late afternoon or early evening, when the
stretching a heavy cord between short stakes at either sun’s intensity and the wind have died down. Transplants
end of the garden. Alternatively, vegetables can be can be “hardened off” by gradually exposing them to the
grouped into bands or blocks using the recommended cooler, brighter, and windier outdoors 1-2 weeks before
within row spacing between all plants. !nal planting. However, hardening off should not be a
substitute for producing or buying stocky, vigorous plants
Distance between the rows varies with the kind of veg- rather than tall, spindly ones. First, mark the rows as you
etable, so check Table 1 for proper spacing. Sow seed would for seed. Then dig a hole for each plant roughly
evenly and a little thicker than the plants will !nally stand; twice as wide and twice as deep as the soil ball, keeping
then gently cover and !rm the soil with a rake. If the soil in mind proper planting distance as noted in Table 1.
is dry, a thorough but gentle watering will hasten seed
germination. Try moistening the furrow just before lay- Next, set each plant at the same level it grew before;
ing the seed. Some seeds may have trouble breaking place soil around the roots; and water with starter solu-
through the hard crust which sometimes forms over the tion. If the next 2-3 days call for sunshine, shade the new
seed row. Applying a light mulch over the seeds helps transplants to prevent wilting. Newspaper tents (Figure
prevent soil crusting and adds some protection from hard 4), coffee cans, or similar materials can be used. Water
spring rains. Use a thin layer of chopped straw, grass as needed, but water thoroughly each time.
clippings, compost, vermiculite, or similar materials.
3a. 3b.
Figure 3. Make a furrow for seeds using the handle end for small seeds (3a) or the blade for large seeds (3b).
Page 6 of 11 Purdue University Cooperative Extension Service Revised 8/07
7. Vegetables • HO-32-W
Frost Danger For large plantings of speci!c vegetables, an herbicide
may be applied; but always follow label directions and
Cover tender crops such as tomatoes, peppers, and egg- restrictions. No one herbicide can be used to control all
plants when frosty nights are forecast. Cardboard boxes, weeds in all crops, and proper application is critical for ef-
blankets, hot caps, fabric row covers, or newspaper tents fective control. Therefore, herbicides are not feasible for
will do. Do not allow the coverings to touch the plants, most home vegetable growers.
for they could injure the plants. Remove the covers in
the morning. Don't use metal or plastic sheets to protect Mulches control weeds and offer other advantages as
plants from frost damage. They actually conduct cold to well. A 2-4-inch layer of organic matter will control most of
the plants. the weeds.
Care of a Vegetable Garden Mulching
Care after planting is the third important step in good veg- Mulching encourages growth by conserving moisture,
etable gardening. Proper care is what makes the differ- controlling weeds, and moderating soil temperature.
ence between “just” vegetables and those that have that Black plastic mulch tends to increase soil temperature
really fresh, home garden goodness. and is ideal for warm season crops such as tomatoes,
eggplants, peppers, and vine crops. Plastic mulch is ap-
plied before planting the crop.
Weed Control
Organic mulches tend to keep soil cooler and are ideal
Weed control is a must. Nothing is more disheartening for moderating hot summer temperatures. Straw, crushed
than a well-prepared garden overrun by weeds. The best corn cobs, bark chips, shredded bark, sawdust, and com-
time to control weeds is when they’re small. If allowed post are all good mulching materials. Apply these materi-
to grow, weeds compete with the vegetable plants for als in late May or early June, after you clean up weeds
water, fertilizer, and sunlight while harboring insects and and the soil has warmed. Place the material around the
diseases. plants and between the rows. Use 4 inches of mulch; if
coarse material like straw is used, or 2 inches for !ne ma-
Weed with a sharp hoe, using a shallow shaving stroke, terial like grass clippings.
not a chop. Cultivate no deeper than 1/4-1/2 inch. Deeper
cultivation may bring weed seeds to the surface where Caution. During rainy seasons or in wet areas, any mulch
they can sprout, and it may also damage plant roots. For may keep the soil too damp.
large garden plots, a wheel hoe with knives or power
equipment is well worthwhile. Don’t cultivate too closely
to plants; prevent stem and root injury by hand pulling Watering
close weeds while they’re still very small.
Vegetable plants need plenty of water throughout the
entire growing season. Apply 1-1 1/2 inches per week in
a single watering, unless rain does it for you. Light sprin-
klings may do more harm than good because roots tend
to form near the surface of the ground if water doesn’t
penetrate deeper. Shallowly rooted plants are more sus-
ceptible to drought damage.
Sandy soil requires more frequent watering than heavy
clay. However, always apply water slowly so it can soak
in. Check the amount applied by catching it in straight-
sided tin cans placed throughout the garden, or by
digging down to see if the moisture has penetrated at
least 6 inches. Inexpensive plastic rain gauges are also
available.
Thinning
Vegetables need room to grow (Figure 5). Proper spac-
ing between plants in the row as well as between rows
promotes faster growth and a larger, better quality crop.
Figure 4. If the next 2- 3 days call for sunshine, cover the Vegetables started from plants should have been spaced
new transplants with newspaper "tents" to prevent wilting.
Revised 8/07 Purdue University Cooperative Extension Service Page 7 of 11
8. Vegetables • HO-32-W
properly when planted; however, those started from seed they exhibit the following characteristics, and store at the
will have to be thinned. See Table 1 for recommended temperatures and humidities listed.
spacing between plants.
Cold, Moist
Thin plants while they are small and when the soil is (32-40!F, 90-95% relative humidity)
moist to minimize injury to the remaining plants. Grasp
plants to be removed right at the soil line, and pull them Root Crops
out gently. If you are damaging other plants, don’t re-
move plants by pulling; rather, cut them off at the soil line. Beets"Begin harvest when beet is 1 inch in diameter.
Leave the strong plants, and !rm the soil after you’ve Beet tops at this time make excellent tender greens. Main
!nished. Watering after thinning is helpful in resettling the harvest when beets are 2-3 inches. Harvest spring-plant-
soil around the roots of remaining plants. ed beets before hot weather (July). Harvest fall beets
before the !rst moderate freeze. For storage, wash roots,
Insect and Disease Control trim tops to 1/2 inch, place in perforated plastic bags, and
store in refrigerator, cold moist cellar, or pit. Storage life:
The very !rst step in controlling diseases and insect 2 to 4 months.
pests is to identify the cause of the problem. Then
choose an appropriate control strategy. Commercially Carrots"Harvest spring carrots before hot weather
available garden sprays or dusts applied throughout the (July). Fall-planted carrots should be harvested before
growing season will control many vegetable insects and the !rst moderate freeze. For storage, wash roots, trim
diseases. Spray or dust regularly as directed on the label. tops to 1/2 inch, place in perforated plastic bags, and
Be sure to cover the underside of the leaves as well as store in refrigerator, cold moist cellar, or pit. Storage life:
the tops. Controls may need to be reapplied after a rain. 2 to 4 months.
To reduce dependence on pesticides, use the following Horseradish"Harvest after several severe freezes.
techniques: (1) plant only disease-resistant cultivars, Store in the ground all winter, mulch with straw or leaves,
(2) plant crops in a different location from year to year, and dig when needed. Horseradish can also be stored
(3) practice good garden sanitation, such as removing much like carrots.
plant debris from the garden and keeping the edges and
fence rows free of trash and weeds, and (4) hand-pick Parsnips"Harvest in late fall after several moderate
insect pests when possible. freezes. Exposure to cold develops the sweet "avor.
Same storage requirements as for carrots.
Harvest and Storage
Potato, Irish"Harvest when the tops have yellowed
To insure high-quality, nutritious vegetables from your and/or died. Do not leave in ground because high soil
home garden and to prevent waste, proper harvesting temperatures will accelerate over-ripening. Cure for
at the right stage is essential. Harvest vegetables when about a week in a shaded, well-ventilated place (open
Figure 5a. Unthinned carrots. Figure 5b. Properly thinned carrots.
Page 8 of 11 Purdue University Cooperative Extension Service Revised 8/07
9. Vegetables • HO-32-W
barn, shed, garage). Remove excess soil from potatoes Greens
and discard those diseased or damaged. Avoid expos-
ing tubers to light. They will turn green with even small Chard, Swiss"This green may be harvested continu-
amounts of light. Store in as cool a place as possible ously. Merely break off the outer leaves. Swiss chard is a
above 40!F. Ideal storage conditions are hard to !nd beet developed for its top. A spring planting will provide
in late summer. Cool basements are probably the best greens from early summer to the !rst moderate freeze.
storage available. Keep humidity high and provide good May be stored up to 2 weeks in refrigerator.
ventilation. Storage time: 2 to 4 months.
Collards, Kale, Mustard, and Spinach"Harvest the
Radish"Harvest when 1/2 to 1 inch in diameter. Wash leaves of greens when they reach suitable size. Either
roots, trim both tap root and tops, and store in plastic harvest the whole plant or the outer, larger leaves. Wash
bags in refrigerator for up to 1 month. Winter or black rad- and trim. Greens do not store well, but may be kept in
ishes are stored the same as carrots. plastic bags in the refrigerator for up to 2 weeks. Freeze
any surplus.
Salsify"Same harvest and storage as for parsnips.
Endive (Escarole""Harvest the whole plant. Wash thor-
Turnip"Turnips can be harvested from the time they are oughly to remove soil and sand. Gather leaves together,
1 inch in diameter. They are best as a fall crop and can and tie with rubber band. Store in plastic bags in refrig-
withstand several light freezes. Store same as carrots. erator for up to 3 weeks.
Cole Crops (Cabbage Group) Lettuce"Head, semi-head, and leaf lettuce can be
stored for up to 2 weeks in perforated plastic bags in the
Broccoli"Harvest terminal head while "orets are still refrigerator.
tight and of good green-blue color. Smaller size heads
will develop from side shoots. Store in perforated plas- Parsley"Successive harvests can be made during the
tic bags for up to 1 week in the refrigerator. Freeze any growing season by snipping stems close to the ground.
surplus. Do not cut more than half of the plant at once. Parsley
will over-winter if planted in a protected place such as a
Brussels Sprouts"Harvest the sprouts (small heads) cold frame. If planted in the open, it can be lifted carefully
when they are !rm. Beginning from the bottom of the with a ball of soil just before the soil freezes, potted, and
plant, cut or break sprouts from the leaf axil (where it taken into the house to a cool, sunny room, and harvest-
meets the stem). Sprouts can stand several moder- ed for several weeks. Parsley will keep in plastic bags in
ate freezes. Harvest all sprouts prior to the !rst severe the refrigerator for 1 or more weeks.
freeze, and store in the refrigerator in perforated bags for
up to 3 weeks. Freeze any surplus. Best grown for a fall Legumes
harvest.
Lima Beans"Harvest when pods have !lled. For tender
Cabbage"Harvest when heads are solid. Store cabbage limas, harvest when a bit immature; for “meaty” limas,
in refrigerator or cold cellar in plastic bags or in outdoor harvest when dry and mature. Shelled limas can be
pit for up to 2 months. stored in perforated plastic bags in the refrigerator for
about a week. Surplus can be canned, frozen, or dried.
Cauli!ower"To keep heads white, tie outer leaves
above the head when curds are about 1-2 inches in Garden Peas"Harvest when pods have !lled. For ten-
diameter (except purple types). Heads will be ready for der peas, harvest when a bit immature; for “meaty” peas,
harvest in about 2 weeks. Cauli"ower may be stored harvest when mature. Unshelled peas can be kept in a
in perforated plastic bags in the refrigerator for up to 2 perforated plastic bag in the refrigerator for about a week.
weeks. Freeze any surplus. Freeze or can surplus. Snow peas should be harvested
when pods are fully elongated, but still "at-sided. Snap
Chinese Cabbage"Best grown in the fall. Harvest after peas should be left on the plant until the peas reach full
the !rst moderate frost in the fall, and store in perforated size and pod is cylindrical.
plastic bags in the refrigerator, cold cellar, or outdoor pit.
Will keep for up to 2 months. Southern Peas (Black-eyed peas, Crowder, Purple
Hull, etc.)"For fresh use, freezing, or canning, har-
Kohlrabi"Harvest when the swollen stems are 2-3 vest when seeds are large and plump, but moist. Either
inches in diameter. Stems become woody if left too long shelled or unshelled peas may be stored in the refrigera-
before harvest or if grown under poor conditions. Cut off tor for several days. For dry storage, harvest after pods
root and leaf stalks, and store in plastic bags as indicated and seeds have dried.
for carrots. Storage life: 2 to 4 weeks.
Revised 8/07 Purdue University Cooperative Extension Service Page 9 of 11
10. Vegetables • HO-32-W
Vine Crops Beans, Green"Bean pods will be the most tender when
the small seed inside is one-fourth mature size. From this
(Although melons are used as a fruit, because they are stage the pods become more !brous as the beans ma-
annual plants they are usually grown along with vegeta- ture. Store green beans up to 1 week in perforated plastic
bles in home gardens. Thus, melons are included.) bags in the warmer part of the refrigerator. Can or freeze
surplus. Cool cellar storage is also possible.
Muskmelon (Cantaloupe)"Harvest when the stem
slips easily from the fruit. Lift the melon; if ripe it should Okra"Harvest okra pods when they are 2 to 3 inches
separate easily. Store ripe melons in the refrigerator in a long. Over-mature pods are woody. Store in plastic bags
plastic bag for up to 10 days. Try freezing a few boxes of in the warmer part of the refrigerator for about 1 week.
melon balls. Freeze surplus.
Squash, Summer"Harvest when fruit is small (6-8 Pepper, Sweet"Harvest when fruits are !rm and full
inches long, or 3-4 inches across for round types), young, size. If red fruits are desired, leave on plant until red color
and tender. Skin should be easily penetrated with the develops. Sweet peppers can be stored for 2 to 3 weeks
thumbnail. Can be stored for up to a week in a perforated in the warmer part of the refrigerator in plastic bags. Cool
plastic bag in the refrigerator. cellar storage is also possible.
Other Vegetables Tomato"Ripe tomatoes will keep for a week in the
refrigerator or at 45-50$F. Green, mature tomatoes,
Asparagus"Harvest by snapping or cutting 6- to 8-inch harvested before frost, should be kept at a temperature
spears off at ground level. Store in plastic bags in refrig- between 55 and 70$F. For faster ripening, raise tem-
erator for up to 1 week. Freeze or can any surplus. perature to 65-70$F. Mature green tomatoes are about
normal size and have a whitish green skin color. Mature
Onions, Green"Harvest green onions when they attain green tomatoes can be kept 3-5 weeks by wrapping each
suf!cient size. Wash and cut off roots; remove part of top, tomato in newspaper and inspecting for ripeness each
leaving an inch or more of green. Place in plastic bags week. A cellar where temperatures are about 55-58$F is
and store in refrigerator for up to 2 weeks. satisfactory for holding mature green tomatoes.
Rhubarb"Harvest leaf stalks when 1/2 to 1 inch in diam- Watermelon"Harvest when underside of fruit turns from
eter. DO NOT USE LEAFY BLADES. Rhubarb can be whitish to yellowish. The tendril at the juncture of the fruit
stored in perforated plastic bags for up to 3 weeks in the stem and the vine usually dies when the fruit is mature.
refrigerator. Surplus rhubarb can be frozen. Thumping an immature melon gives a ringing, metallic
sound, while a mature melon gives a dull thud. Water-
Sweet Corn"Harvest sweet corn when kernels are melons will store at room temperature for about a week
plump and tender. Silks will be dry and kernels !lled. or at temperatures of 45 to 50$F for 2 or 3 weeks.
Check a few ears for maturity by opening top of ear
and pressing a few kernels with thumbnail. If milky juice Cool, Dry
exudes, it is ready for harvest. Harvest at peak of quality, (45-55oF, 50-60% relative humidity)
husk to conserve space, and store in plastic bags in the
refrigerator. Freeze or can surplus corn. Onions, Dry"Harvest onions when 2/3 to 3/4 of the tops
have fallen over and the necks have shriveled. Remove
Cool, Moist tops, place in shallow boxes or mesh bags, and cure
(45-50oF, 80-90% relative humidity) in open garage or barn for 3 to 4 weeks. Store in mesh
bags in as cool a place as can be found at harvest time.
Cucumber"Harvest cucumbers before seeds become During humid (muggy) weather, keep ventilated.
half-size. This will vary with cultivar. Most cultivars will be
1 1/2 to 2 1/2 inches in diameter and 5 to 8 inches long. Peppers, Hot"Pull plants late in the season or string
Pickling cucumbers will be a bit more blocky and not as peppers together and hang to dry in a warm place. Store
long as slicers. Store slicing cucumbers in the warmest in a dry, cool place (usually a basement).
part of the refrigerator. Place in plastic bags. Storage life
is about 1 week. Pickling cucumbers should be cooled Warm, Dry
quickly in ice water and can be kept up to 2 days in a (55-60oF, 60-70% relative humidity)
plastic bag in the refrigerator.
Pumpkins and Winter Squash"Harvest pumpkins
Eggplant"Harvest when fruits are nearly full grown, but and winter squash when the skin is hard and the colors
color is still bright. Eggplants are not adapted to long stor- darken. Both should be harvested before frost. Remove
age. Keep in warmer part of refrigerator for about a week.
Page 10 of 11 Purdue University Cooperative Extension Service Revised 8/07
11. Vegetables • HO-32-W
the fruit from the vine with a portion of the stem attached.
Store on shelves in single layers so air can circulate
around them.
Warm, Moist
(55-60oF, 80-85% relative humidity)
Sweet Potatoes"Harvest in fall before frost and freez-
ing temperatures. Handle carefully in the digging pro-
cess. Cure for 1 week at a temperature of 80-85$F. Ideal
storage is at 55$F and 85 percent relative humidity. (This
might be accomplished in a basement with ventilated
boxes covered with periodically moistened burlap sacks.)
Finishing the Job
Don’t forget to clean, repair, and sharpen your garden
tools, and store them in a dry place for the winter. This
makes for a longer, useful life for your tools, and saves
time next spring. Wiping cleaned metal blades with an
oily rag will help prevent rusting. Be sure to drain fuel and
oil from power tools. Store leftover pesticides where they
will be protected from extreme cold or heat and moisture,
out of the reach of children and pets.
For more information on the subject discussed in this
publication, consult your local of!ce of the Purdue University
Cooperative Extension Service.
It is the policy of the Purdue University Cooperative Extension Service, David D. Petritz, Director, that all persons shall have equal opportunity and access to programs and facilities
without regard to race, color, sex, religion, national origin, age, marital status, parental status, sexual orientation, or disability. Purdue University is an Af!rmative Action employer.
This material may be available in alternative formats. http://www.agcom.purdue.edu/AgCom/Pubs/menu.htm
Revised 8/07 Purdue University Cooperative Extension Service Page 11 of 11