

Recomendados
Más contenido relacionado
La actualidad más candente
La actualidad más candente (20)
Destacado
Destacado (20)
Similar a Blood Bank
Similar a Blood Bank (20)
Más de Tshering Namgyal Wangdi
Más de Tshering Namgyal Wangdi (19)
Blood Bank
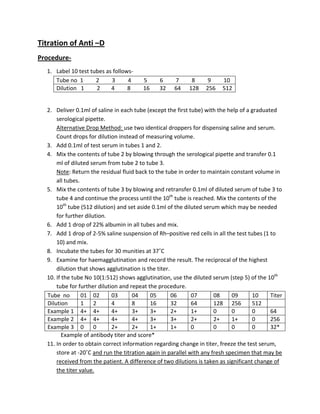
- 1. Titration of Anti –D Procedure‐ 1. Label 10 test tubes as follows‐ Tube no 1 2 3 4 5 6 7 8 9 10 Dilution 1 2 4 8 16 32 64 128 256 512 2. Deliver 0.1ml of saline in each tube (except the first tube) with the help of a graduated serological pipette. Alternative Drop Method: use two identical droppers for dispensing saline and serum. Count drops for dilution instead of measuring volume. 3. Add 0.1ml of test serum in tubes 1 and 2. 4. Mix the contents of tube 2 by blowing through the serological pipette and transfer 0.1 ml of diluted serum from tube 2 to tube 3. Note: Return the residual fluid back to the tube in order to maintain constant volume in all tubes. 5. Mix the contents of tube 3 by blowing and retransfer 0.1ml of diluted serum of tube 3 to tube 4 and continue the process until the 10th tube is reached. Mix the contents of the 10th tube (512 dilution) and set aside 0.1ml of the diluted serum which may be needed for further dilution. 6. Add 1 drop of 22% albumin in all tubes and mix. 7. Add 1 drop of 2‐5% saline suspension of Rh–positive red cells in all the test tubes (1 to 10) and mix. 8. Incubate the tubes for 30 munities at 37˚С 9. Examine for haemagglutination and record the result. The reciprocal of the highest dilution that shows agglutination is the titer. 10. If the tube No 10(1:512) shows agglutination, use the diluted serum (step 5) of the 10th tube for further dilution and repeat the procedure. Tube no 01 02 03 04 05 06 07 08 09 10 Titer Dilution 1 2 4 8 16 32 64 128 256 512 Example 1 4+ 4+ 4+ 3+ 3+ 2+ 1+ 0 0 0 64 Example 2 4+ 4+ 4+ 4+ 3+ 3+ 2+ 2+ 1+ 0 256 Example 3 0 0 2+ 2+ 1+ 1+ 0 0 0 0 32* Example of antibody titer and score* 11. In order to obtain correct information regarding change in titer, freeze the test serum, store at ‐20˚С and run the titration again in parallel with any fresh specimen that may be received from the patient. A difference of two dilutions is taken as significant change of the titer value.
- 2. Du Testing : An anti D reagent suitable for indirect antiglobulin test is used for Du testing i.e. o IgG monoclonal anti D o Polyclonal IgG anti D o Blend IgG monoclonal & IgM monoclonal anti D o Blend monoclonal IgM & Polyclonal IgG anti D Materials o 75X10 mm tubes o Suitable anti D reagent ( as above) o test red cells o Antiglobulin ( AHG) reagent o Control IgG coated red cells Methods i. One drop of 2‐4% suspension of test red cells, add 2 drops of anti D ii. Mixed and incubate at 37˚С for 45 minutes iii. Look for agglutination iv. If positive test record the sample at D positive v. If negative i.e. no agglutination, wash the cells 3 – 4 times with saline and decant the last wash completely. vi. Add two drops of AHG and mixed gently vii. Centrifuge at 1000 rpm for 1 minute viii. Re – suspend the cells bottom gently look for agglutination and record the result. ix. All negative reactions should be confirmed by adding known IgG sensitized control cells re‐centrifuged and look for agglutination. The presence of agglutination confirms the test result and no agglutination indicates invalid tests.
- 3. Cross Matching 1. Albumin Method • The RBC of both the donor (blood bag) and the patient is washed with normal saline 3 – 4 times. • 2 ‐ 5 % red cells suspension of the donor (blood bag) and the patient is prepared. • 19 drops of saline is added in the cells one drops for preparation of 5% cells. • Two tests tube clean and dry is taken and labeled as Major and Minor • In the Major tube Patient’s serum is taken 4 drops and then 2 drops of donors 5% red cell is taken. • In the Minor tube Donor’s serum is taken 4 drops and then 2 drops of patient’s 5% red cells is taken. • 2 drops of Albumin is added in both the Major and Minor tube. • Incubate for 15 min at 37˚С. After incubation centrifuge the tube and look for agglutination. 2. Saline Cross – Matching • Wash the RBCs of patient and donor 3‐4 times with normal saline. • Prepare 2‐5% cell suspensions of patients and donor with normal saline. • Label two test tubes as MAJOR & MINOR. • In the MAJOR tube, add 4 drops of patient’s serum and 2 drops of 5% saline suspension of donor cells. • In the MINOR tube add 4 drops of donor’s serum and 2 drops of 5% saline suspension of patient cells. • Mix and incubate both the tubes at room temperature for 45‐60min. • After incubation centrifuge both the tubes at 1000rpm for 1min. • Slightly dislodge the button and look for agglutination macroscopically as well as microscopically. • If agglutination is not seen in any of the tubes, donor’s and patient’s bloods are considered to be compatible. Preparation of 5% red cell suspension • Take 2 drops of whole blood and wash with normal saline 3‐4 times • Take 1 drop of washed red cells in a clean tube and then add 19 drops of Saline
- 4. Preparation of Pooled O Positive Cells • Select 2‐3 O Positive cells .Take pooled cells in a clean test tube and wash 3‐4 times with normal saline. • Make 2‐5% saline suspension I e 1 drop of cell and 19 drops of normal saline. Preparation of Sensitized O Positive cells • Dilute anti D ( IgG) 1: 50 with normal saline. • Prepare 5% O positive cell suspension. • Mix equal volume of diluted anti D and 5% O positive cell suspension. • Incubate at 37˚С for 30 min. • Look for agglutination. if there is no agglutination • Wash the cells 3 times. • Make 5% cell suspension ( Sensitized O positive Cells ) • Do the DCT. There should be 2 + agglutination. • 3. COOMB’s Method: • Wash the RBCs (both the patient’s & donors) 3‐4 times with normal saline. • Prepare 2‐5% red cell suspension. • Label two test tubes as MAJOR & MINOR. • In the MAJOR tube add 4 drops patient’s serum and 2 drops of donor’s 5% cells. • In the MINOR tube add 4 drops donor’s serum and 2 drops of patient’s 55 cells. • Mix and incubate both the tubes at 37˚С for 30‐60 minutes. • Centrifuge the tubes at 1000 rpm for 1 minute and look for agglutination. • If there is no agglutination wash the cells of both the tubes 3‐4 times with normal saline. • Add 2‐3 drops of AHG serum to both the tubes. • Incubate both the tubes at room temperature for 5 minutes. • Centrifuge the tubes at 1000 rpm for 1 min and look for agglutination. • If there is agglutination in any tube the cross matching is reported as incompatible. • If there is no agglutination (crosshatching is compatible) add 2 drops of 5% sensitized O+ (ve) cells to both the tubes. Mix and centrifuge. There should be 2+ agglutination. Otherwise the test is invalid and the whole procedure is to be repeated.
- 5. Direct Coombs Test‐ • The red cell to be tested will be tested will be washed with normal saline at least 3‐4 times. • 2‐5% red cell suspension will be prepared. • A drop of this cell suspension will be put in a clean dry test tube. • A drop of Coombs reagent (Anti –Human Globulin) will be added to it. • The mixture will be incubated at room temperature for 5 minute. • The mixture will be centrifuged at 1000 rpm for 1 minute. • The cell button formed will be gently dislodged and observed for agglutination. Indirect Coombs Test Procedure 1. Positive Control Negative Test control Diluted anti D 1:50 4 drops ‐ ‐ Normal Saline ‐ 4 drops ‐ Serum Patients ‐ ‐ 4 drops 5% pooled O Positive 2 drops 2 drops 2drops cells 2. Mix and incubate at 37˚С for 60 min. 3. Centrifuge hook for agglutination. If there is no agglutination wash the cells 3 times with normal saline. 4. Add 2 drops of AHG serum to all the tubes. 5. Incubate at room tem for 5 min 6. Centrifuge for 1 min at 1000 rpm 7. Look for agglutination.
- 8. Selection of ABO group blood for exchange transfusion Baby’s blood group Mother’s blood group Blood selected for E.T A A , AB A or O O , B O B B , AB B or O O , A O O A ,O, B O AB A A or B B B or O AB AB , A , B or O If the mother’s antibody is reactive against a high frequency antigen and no compatible blood is available: a) The mother’s sibling can be tested for compatible blood. b) A unit of blood can be cancelled from the mother, if the obstetrician agrees then it is safe. Mother’s red cell is constituted in AB plasma. c) If no compatible blood is available and the clinical situation is urgent ,exchange transfusion with incompatible blood (for the high frequency antigens) is preferred to no transfusion at all as it helps to remove antibodies and bilirubin .with holding of blood may result in death of the infant.
- 9. SOP For Hemoglobin Estimation by Copper Sulphate Method Dispense 30ml of copper sulphate solution in a clean dry transparent container. Select the middle figure or ring finger and clean the figure tip with antiseptic solution and allow it to dry. Using a disposable lancet, make a puncture, so that there should be free flow of blood. Wipe the first drop of blood Collect the blood in the capillary tube and allow it to fall freely from the height of about 1 cm in the Cuso4 solution. If the drop of blood remains at the surface or it rises from the bottom of the solution, then the drop is lighter than the copper sulphate solution and the Hb is less than 12.5gm%. If the blood sinks within 12‐15 seconds, then the Hb value is more than 12.5gm%.
- 10. SICKLE CELL TEST STEP 1 Making Sodium Meta bisulfate. 1. Na2S2O5___________________ 0.5gm 2. ______________25ml STEP 2 1. Place a small drop of blood (20µl) 2. ‘’ ‘’ of Na2S2O5 3. Mix Carefully 4. Put a cover slip 5. Put DPX to create an airtight enclosure around the cover slip 6. Wait for 15min 7. See under microscope 40x 8. Wait for 24 hours put it in a Petri dish with moist filter paper 9. See under microscope
- 11. ERYBANK ANTI‐ A1 LECTIN TEST PROCEDURE 1. Slide Test i. Prepare a 10% Suspension of the red blood cells to be tested in isotonic saline. ii. Place 1drop of Erybank Anti‐ A1 Lectin on a clean glass slide. iii. Pipette 2 drop of the cell Suspension on the slide. iv. Mix well with a mixing stick uniformly over the area v. Rock the slide gently back and forth. vi. Observe for agglutination macroscopically at one minute. 2. Tube Test i. Prepare a 5% cell suspension to be tested in isotonic saline. ii. Place 1 drops of Erybank Anti‐ A1 Lectin into a labeled test tube. iii. Pipette 1 drop of the test red cell suspension into the test tube iv. Centrifuge for 1 minute at 1000 rpm or 20 seconds at 3400 rpm. v. Gently resuspend the cell button, observing for agglutination macroscopically. INTERPRETATION OF RESULTS Slide and Tube Tests Agglutination is a positive test result and indicates the presence of A1 antigen. Don’t interpret peripheral drying or fibrin strands as agglutination. No agglutination is a negative test result and indicates the absence of A1 antigen.
- 12. ERYBANK ANTI‐ H LECTIN 1. TEST PROCEDURE : i. Place 1 drop of Erybank Anti – H Lectin on a clean glass slide. ii. Pipette 50µl of whole blood to be tested on the slide and mix well with a mixing stick uniformly over the area. iii. Rock the slide gently back and forth. iv. Observe for agglutination macroscopically at two minutes. 2. TUBE TEST : i. Place a 5% suspension of the red cells to be tested in isotonic saline. ii. Place 1 drop of Erybank Anti‐ H Lectin into a test tube and mix well. iii. Pipette 50µl of the test red cell suspension into the test and mix well. iv. Centrifuge for 1 minute at 1000 rpm or 20 seconds at 3400 rpm. v. Gently resuspend the cell button, observing for agglutination macroscopically. Interpretation of results Slide and tube Tests Agglutination is a positive test and indicates the presence of H antigen. No agglutination is a negative test result and indicates the absence of H antigen and the red cells being of Bombay phenotype (Oh).
- 13. ERBALISA HIV 1+2 Test Procedure:‐ 1. Bring all the reagents and test specimens at room temperature use. 2. Except the blank, add 100µl of sample dilute to each well. In each run, there will be one blank, three negative controls and one positive control. 3. Add 10µl of control and test specimens to the respective wells. Mix properly with pipette. Cover the plate with black cover and incubate for 15 minutes at 20‐30° . 4. Wash the plate as per microplate washing procedure. 5. Add 50µl of conjugate to each well (except blank well) cover the plate with cover and incubate for 15 minutes at 20‐30 . 6. Repeat step no 3. 7. Add 50µl of color reagent to each well. Cover the plate with black cover and incubate for 15 minutes in dark at 20‐30 . 8. Add 100µl of stopping buffer to each well. 9. Read absorbency at 450nm (using 620/630/650nm as reference wavelength). Deduct blank absorbency from the control and test wells. Micro plate Washing Procedure:‐ Dilute washing solution (1+19) in distilled or deionised water. Washing solution may be crystallized at cool storage condition. If so, use it after thawing at 37 water bath. Total 6 cycles with at least 350µl wash buffer per well per wash to be done and a soak time of 30secs. Invert the plate and tap it on absorbent pad to remove the remaining washing solution. Cut – off Value formula: ‐ NCX+0.20
- 14. ERBALISA HEPATITIS B TEST PROCEDURE 1) Bring all the reagents and test specimens at room temperature before use. 2) Add 50µl of sample diluents to each well. In each run there will be one blank (100 µl sample diluent plus 50µl conjugate), three negative controls and one positive control. Add 50µl of control and test specimens to the respective wells. Add 50µl of conjugate to each well. Cover the plate with black cover and incubate for 60 minutes at 20‐37°C. 3) Wash the plate as per Microplate washing procedure. 4) Add 50µl of color reagent .Cover the plate with black cover and incubate for 15 minutes in dark at 20‐30°C. 5) Add 100µl of stopping buffer to each well. 6) Read absorbency at 450nm (using 620/630/650nm as reference wavelength) Deduct blank absorbency from the control and test wells. MICROPLATE WASING PROCEDURE Dilute washing solution (1+19) in distilled or deionised water. Washing solution may be crystallized at cool storage condition. If so, use it after thawing at 37ºC water bath. We suggest that 6 cycles with at least 0. 35ml wash buffer per well per wash and a soak time of 30seconds. Invert the plate and tap it on absorbent pad to remove the remaining washing solution. CUT‐ OFF VALUE FORMULA: 0.1 + NCX
- 15. ERBALISA SEN HBsAG Test Procedure: 1. Bring all the reagents and test specimens at room temperature before use. 2. Add 25µl of sample diluents to each well. In each run, there will be one blank (100 µl) conjugate), three negative controls and one positive control. Add 75 µl of control and test specimen to the respective wells. Add 50 µl of conjugate to each well. Cover the plate with black cover and incubate for 60 minutes at room temperature(20‐25 ) 3. Wash the plate as per micro plate washing procedure. 4. Add 50µl of color reagent. Cover the plate with black cover and incubate for 15 minutes in dark at 20‐30 . 5. Add 100µl of stopping buffer to each well. 6. Read absorbency at 450nm (using 620/630/650nm as reference wavelength). Deduct blank absorbency from the control and test wells. Micro plate washing procedure: Dilute washing solution (1+19) in distilled or demonized water. Washing solution may be crystallized at cool storage condition. If so, use it after thawing at 37 water bath. Total 6 cycle with at least 350µl wash buffer per well per wash to be don with a soak time of 30 seconds. Invert the plate and top it on absorbent pad to remove the remaining washing solution. Cut – off value formula: NCX+0.15
- 16. ERBALISA HEPATITIS C Test Procedure: 1. Bring all the reagents and test specimens at room temperature before use. 2. Except the Blank, add 100µl of sample diluent to each well. In each run, there will be one blank, three negative controls and one positive control. Add 10µl of control and test specimen to the respective wells. Mix properly with pipette. Cover the plate with blank cover and incubate for 45 minutes at 20‐30 . 3. Wash the plate as per micro plate washing procedure. 4. Add 50µl conjugate to each well (except blank well). Cover the plate with black cover and incubate for 15 minutes at 20‐30 . 5. Repeat step no 3. 6. Add 50µl of color reagent to each well. Cover the plate with black cover and incubate for 15 minutes in dark at 20‐30 . 7. Add 100µl stopping buffer to each well. 8. Read absorbency at 450nm (using 620/630/650nm as reference wavelength). Deduct blank absorbency from the control and test wells. Micro plate washing procedure:‐ Dilute washing solution (1+19) in distilled or demonized water. Washing solution may be crystallized at cool storage conditions. If so, use it after thawing at 37 water bath. Total 6 cycles with at least 350µl wash buffer per well per wash to be done with a soak time of 30 seconds. Invert the plate and tap it on absorbent pad to remove the remaining washing solution. Cut – off value Formula:‐ NCX+ 0.30
- 17. GRADING OF AGGLUTINATION /CLUMPING REACTIONS: ++++ = Single clump of agglutination with no free cells. +++ = 3-4 individual clumps with few free cells. ++ = Many fairly large clumps with many free cell. + = Fine granular appearance visually, but definite small clumps (10-15 cells) per low power field. W = 2 to 3 cells sticking together per low power field, with uneven distribution - = ALL the cells are free. NOTE: Haemolysis (Partial or Complete) will be interpreted as POSITIVE and marked ‘H’.
- 18. In areas where sickle cell anemia is prevalent the donor’s blood should be screened for sickle cell trait before the blood is used for exchange transfusion. Volume and haematocrit of blood for exchange transfusion Ideally an exchange transfusion equal to twice the newborn infant’s blood volume is recommended. The blood volume of a full term newborn is approx 85 ml/kg. Exchange transfusion with partially concentrated red cells having haematocrit of 50- 55% is preferable to whole blood. Special considerations in compatibility testing for E.T.: (1)If ABO group of mother and infant are compatible it is convenient to obtain the serum from mother than from the infant for compatible or the ABO (2)If mother’s blood is not available or the ABO group of the mother is not known, or the ABO group of the mother and infant are incompatible, the baby’s serum or the elute from the cord cell is used for cross-matching. (3) Blood should be cross-matched against mother’s serum by IAT and enzyme method.
- 19. FIRST AID ACCIDENTS CAUSED DUE TO ACIDS a. BODY BURNS Wash with plenty of water first and then with sodium bicarbonate solution. After the wash, apply a paste sodium bicarbonate –petroleum jelly mixture on the burnt part for 10-15 minutes.Again wash with plenty of water and apply Carron oil (An equal quantity of lime water and linseed oil.) b. SPILLAGE IN THE EYES Wash with plenty of water first and then with 2 %sodium bicarbonate solution followed by water again. Wipe out the water from your eyes and then put 2-3drops of Olive oil. c. SPILLAGE ON CLOTHES Use dilute Ammonia solution to neutralize the acid. Then wash with plenty of water. d. ORAL INTAKE Gargle with water first and then drink at least 1 liter of milk or water followed by lime juice. ACCIDENTS CAUSED DUE TO ALKALI a. BODY BURNS Wash with plenty of water first and then with boric acid solution .Make a paste of Boric acid, apply on the burnt part and after 10-15 minutes wash it off. b. SPILLAGE IN THE EYES Keep open the eyelids and wash with plenty of water first and then with dilute boric acid solution (0.5%).Again clean your eyes with water .Wipe out the water and put 2-3 drops of Olive oil. c. SPILLAGE ON THE CLOTHES Neutralize the alkali with dilute Acetic acid solution (3%).Then wash with plenty of water.
- 20. d. ORAL INTAKE Gargle with water first and then drink atleast 1 liter of milk or water.Eat oranges. BURNS CAUSED BY BROMINE Wash the burnt part with either Alcohol or petrol and then apply Olive oil. BURNS CAUSED DUE TO FIRE Apply either Petroleum jelly or Burnol on the burnt part. WOUNDS First remove any foreign particle (like glass pieces, etc) from the wound. Clean well with water and apply Tincture Iodine, put a bandage and seek medical attention. GENERAL ADVICE • For severe burns caused due to acid , keep the burnt part in Sodium bicarbonate-Petroleum jelly mixture and for those burns caused due to alkali, keep in Boric Acid solution for at least half an hour. • While packing compounds of Cobalt, Chromium, Cadmium, Bismuth, Barium, Lead, Tin etc.., it is necessary to wear the respective safety equipments /guards (like gloves, goggles, face mask etc.). In case these chemicals are accidently consumed try to spit it out even by vomiting. • While packing Formaldehyde or hydrogen Peroxide, if it falls on the body or clothes, wash with plenty of water. • If Copper Sulphate is consumed accidently, drink a cup of warm water containing a spoon of Sodium Chloride or Zinc Sulphate. • It is the duty of everyone to ensure that chemicals do not come in contact with the body through their mouth, eyes, ears and nose. Also ensure that the necessary safety equipments are used. • After providing First Aid, seek medical attention, if necessary.
- 21. FIRE • Do not use water to extinguish an electric fire as it could give you a shock. Use dry powder fire extinguishers. • If solvents lighter than water (like Benzene, Acetone, I.P.A., methanol, Petroleum ether, Diethyl ether, etc.) catch fire use a wet blanket to cover the fire or use a suitable fire extinguisher. Splashing water on such fires could spread the flame. Be familiar with the usage of various types of fire extinguishers.
- 22. DONATH LANDSTEINER ANTIBODY Step 1 Collect 4ml blood Step 2 put 2ml in put 2ml in test tube Tube marked marked 4 ºC which 37 ºC is kept in beaker with ICE ↓ ↓ Step 3 bring to lab and keep in fridge put in 37ºC incubator Not in freezer ↓ ↓ Step 4 Wait for 11/2 hour wait for 1 hour ↓ ↓ Step 5 put it in 37⁰C incubator for 20 minutes ↓ ↓ Step 6 Centrifuge Centrifuge ↓ ↓ Check hemolysis Check hemolysis in supernatant in supernatant.
- 23. AGTROL STARTER PACK FOR PREPARING COOMBS CONTROL CELLS SUMMARY Anti‐human globulin reagent is used in blood group serology for performing compatibility testing, antibody screening, antibody detection and detection of D’ red cell type. Usage of Coombs control cells is advocated for functional validation of anti‐human globulin reagent. REAGENT AGTROL starter pack for preparing Coombs control cells contains: 1.Ready to use, standardized pre‐diluted Anti‐D (IgG) monoclonal antibody reagent 2. Red blood cell preserving solution for serological applications. Each batch of reagents undergoes rigorous quality control at various stages of manufacture for its performance characteristics. REAGENT STORAGE AND STABILITY Store the reagent at 2‐8⁰C DO NOT FREEZE. The shelf life of the reagent is as per the expiry date mentioned on the reagent vial label. PRINCIPLE Human ‘O’ Rho (D) positive cells in presence of AGTROL pre‐diluted monoclonal do not agglutinate but are sensitized with IgG antibodies. After processing, these sensitized red blood cells are resuspended in red blood cell preserving solution for long term storage and use .When anti‐ human globulin reagent is added to these sensitized cells the incomplete Anti‐D (IgG) antibodies are agglutinated by the anti‐ human IgG component. The agglutination reaction validates the serological activity of the anti‐ human globulin reagent and confirms that the anti‐human globulin reagent was added in the test procedure. NOTE 1. In vitro diagnostic reagent for laboratory and professional use only Not for medicinal use. 2. AGTROL Anti‐D (IgG) reagent is not from human source, hence contamination due to HBsAg and HIV is practically excluded. 3. AGTROL Anti‐D (IgG) reagent contains 0.1% sodium azide as preservative. Avoid contact with skin and mucosa .On disposal flush with large quantities of water. 4. Extreme turbidity in both AGTROL Anti‐D (IgG) and red blood cell preserving solution reagent may indicate microbial contamination .Such reagents must be discarded.
- 24. SAMPLE COLLECTION AND STORAGE No special preparation is required prior to sample collection by approved techniques .Samples should be stored at 2‐8⁰C if not tested immediately. Do not use hemolysed samples. Anticoagulated blood using various anticoagulants should be tested within the below mentioned time period: EDTA or Heparin ‐ 2days, Sodium citrate or sodium oxalate ‐ 14 days, ACD or CPD ‐28 days. ADDITIONAL MATERIAL REQUIRED Test tubes (12x75mm), Pasteur pipettes, isotonic saline/ isotonic buffered saline, Anti‐ human globulin reagent(Available from TULIP: ERYCLONE® Anti‐ human globulin reagent, (Cat.No:10180002,10180005), Rho (D) positive red blood cells, Incubator at 37⁰C, laboratory centrifuge, optical aid. PROCEDURE Bring all the reagents to room temperature (25‐30⁰C) before testing. Preparation and validation of Coombs control cells Preparation of 5% Coombs control cell suspension 1 Collect fresh O Rho (D) positive red blood cells preferably with citrate as an anticoagulant. 2 Wash 1ml of freshly collected O Rho (D) positive red blood cells with isotonic saline at least three times. 3 After the third wash, thoroughly decant the supernatant .To the cell button add 5ml of AGTROL Anti‐D (IgG) reagent and gently resuspend the red blood cells. 4 Incubate the mixture at 37ºC for 15minutes. 5 After incubation wash the sensitized red blood cells thoroughly at least 4 to 5 times with isotonic saline. 6 Decant the supernatant thoroughly after the last wash. Resuspend the cell button gently with about 1‐2 ml of AGTROL red blood cell preserving solution. The complete resuspended red cells should be added back to the balance AGTROL red blood cell preserving solution in the dropper vial .A stabilized suspension of 5% Coombs control cells is thus obtained .Label appropriately with the date of preparation. 7 Store the Coombs cells at 2‐8ºC. Use within 4 weeks of preparation. Validation of prepared 5% Coombs control cell suspension. 1. Add one drop of Coombs control cells into a test tube. 2. Add two drops of Anti‐human globulin reagent and mix well. 3. Centrifuge for 1 minute at 1000 rpm or 20 seconds at 3400rpm. 4. Very gently resuspend the cell button and observe for agglutination macroscopically.
- 25. Confirmation of negative Antiglobulin test reactions 1. Add one drop of Coombs control cells to the samples negative during Direct or Indirect Antiglobulin test. 2. Centrifuge for 1 minute at 1000 rpm or 20 seconds at 3400 rpm. 3. Very gently resuspend the cell button and observe for agglutination macroscopically. . I NTERPETATION OF RESUTS: Agglutination reaction indicates that the anti‐human globulin reagent is functional and the test is valid. No agglutination indicates that the anti‐human globulin reagent does not have sufficient activity and the test is invalid. REMARKS: 1. As under‐centrifugation or over‐centrifugation could lead to erroneous results, it is recommended that each laboratory calibrate its own equipment and the time required for achieving the desired results. 2. Erroneous results may also occur due to improper red blood cell concentration, improper temperature while performing the test. 3. Store the Coombs control cells at 2‐8⁰C with cap tightly closed. 4. Do not contaminate the prepared Coombs control cell suspension as it may subsequently effect the stability. 5. Glassware used to retrieve the AGTROL reagents and Coombs control cell suspension should be scrupulously clean and sterile.
- 26. CARBOGEN RAPID PLASMA REAGIN (RPR) CARD TEST /CARBON ANTIGEN FOR SYPHILIS TESTING SUMMARY Syphilis is a sexually transmitted (venereal) disease caused by the spirochete Treponema pallidum. After infection the host from Treponema pallidum, in addition, the host also from Non‐Treponemal anti‐lipoidal antibodies in response to the lipoidal material released from the damaged host cell. These antibodies are traditionally referred to as ‘Reagins’. The Rapid Plasma Reagin (RPR)/ CARBON Antigen test is a macroscopic non‐Treponemal flocculation test for the detection and quantitation of antilipoidal antibodies. Non‐Treponemal test like CARBOGEN® are of great value when used for screening and follow up of therapy. PRINCIPLE During the test procedure, the specimen, serum or plasma is mixed with CARBOGEN® reagent forming visible black floccules. If anti‐lipoidal antibodies are not present in the specimen, there will be no flocculation. SAMPLE COLLECTION AND STORAGE 1. No special preparation of the patient is required prior to sample collection by approved techniques. Hemolysed or lipemic samples are not suitable for testing. 2. Fresh serum or plasma should be used for testing. 3. Samples not tested immediately may be stored at 2‐8°C for up to 48 hours. 4. Hazy samples should be centrifuged. Use the clear supernatant for testing. TEST PROCEDURE Bring reagent and samples to room temperature before testing. Thoroughly mix the CARBOGEN® reagent suspension by gentle agitation before testing. Qualitative Method 1. Pipette one drop (50µl) of the test specimen, positive control and negative control onto separate reaction circles using a sample dispensing pipette. 2. Add one drop of well mixed CARBOGEN® reagent next to the test specimen, positive control and negative control by using the reagent dropper provided with the kit. Do not let the dropper tip touch the liquid on the slide. 3. Using a mixing stick, mix the test specimen and the CARBOGEN® reagent thoroughly spreading uniformly over the entire reaction circle. 4. Immediately start a stopwatch. Rotate the slide gently and continuously either manually or on a mechanical rotor at 180 rpm. 5. Observe for flocculation macroscopically at 8 minutes.
- 27. Quantitative Method 1. Using isotonic saline prepare serial dilutions of the test specimen positive in the qualitative method 1:2, 1:4, 1:8, 1:16, 1:32, 1:64, 1:128 and so on. 2. Perform the qualitative procedure using each dilution as a test specimen. 3. The titre is reported as the reciprocal of the highest dilution which shows a positive result. INTERPRETATION OF TEST RESULTS Qualitative Method 1. Large and medium black floccules against white background : Reactive 2. Small black floccules against white background : Weakly Reactive 3. No floccules, even grey background : Non Reactive Quantitative Method The titre of anti‐lipoidal antibodies is the highest dilution of the test specimen giving a positive result.
- 28. ERYBANK BOVINE SERUM ALBUMIN 22% SOLUTION FOR SEROLOGICAL APPLICATIONS SUMMARY Bovine Serum Albumin is mainly used to enhance the reactivity of blood grouping and typing antibodies in direct agglutination tests. Bovine Albumin also enhances the reactivity and sensitivity of indirect Antiglobulin test which is used for compatibility testing, antibody screening, identification and titration. REAGENT ERYBANK® BOVINE SERUM Albumin is manufactured from selected raw Bovine serum, its protein concentration and pH adjusted to 22% and 7.1(±0.2)respectively Its conductivity is controlled specifically for serological application. REAGENT STORAGE AND STABILITY 1. STORE THE REAGENT AT 2‐8°C. DO NOT FREEZE 2. The shelf of the reagent is as per the expiry date mentioned on the reagent vial label. PRINCIPLE Agglutination of antibody coated red cells depends upon the class and type of the antibody involved and the characteristics of the reaction medium such as ionic strength and pH. Incomplete antibodies of IgG class, especially those with Rh specificity, agglutinate red cells if the zeta potential between the red cells is adjusted by addition of salts and colloids such as Bovine Serum Albumin. Addition of BSA enhances such immunological reactions and increases test sensitivity. NOTE (1) In vitro diagnostic reagent for laboratory and professional use only. Not for medicinal use. (2) The reagent contains sodium azide 0.1/% as preservative. Avoid contact with skin and mucosa. On disposal flush with large quantities of water. (3) Extreme turbidity may indicate microbial contamination or denaturation of protein due to thermal damage. Such reagents should be discarded.
- 30. Antiglobulin phase 1. Only the albumin tubes (A) are tested in the anti globulin phase. 2. Wash the mixture of red blood cells and serum thoroughly with isotonic saline for a minimum of three times. Decant completely after the last wash. 3. Place two drops of ERYCLONE® Anti HUMAN globulin into the test tube containing the sedimented cells and mix well. 4. Centrifuge for one minute at 1000 rpm (125 g) or 20 seconds at 3400 rpm (1000 g) 5. Very gently, resuspend the cells and observe for agglutination macroscopically. Antibody Titration Test 1. a) Prepare a 5% suspension of red blood cells with specific antigen reacting with antibody to be titrated, in ERYBANK® Bovine Serum Albumin reagent. b) Also prepare a 5% suspension of patients red cells in ERYBANK® Bovine Serum Albumin reagent 2. Label ten test tubes (1 to 10) and make progressive dilutions of the patient serum as indicated below: a) Pipette 0. 1ml of AB neutral serum into each test tube except the first tube. b) Pipette 0. 1ml of the patient serum into first two tubes only. c) After mixing the contents of the second tube thoroughly, transfer 0.1ml of the mixture to the third tube. Continue the serial dilution by transfer up to tube No. Ten. Discard 0.1ml of the mixture from the last tube. 3. To tubes No. One through Nine, add one of Albumin suspended selected red blood cells, (as prepared in point No. 1 (a) above) and mix well. 4. To tube No. Ten add one drop of patient red cells suspended in albumin (as prepared in point No. 1 (b) above) and mix well. 5. Incubate all the tubes 37°C for a minimum of fifteen minutes. 6. Centrifuge all the tubes for one minute at 1000 rpm or 20 seconds at 3400 rpm (1000 g). 7. Very gently, resuspend the cell buttons and observe for agglutination macroscopically. 8. Antiglobulin test should be performed on all tubes which do not show a very strong agglutination.
- 32. ANTI‐D(RhO) (IgM) MONOCLONAL BLOOD TYPING ANTIBODIES FOR SLIDE AND TUBE TEST SUMMARY Monoclonal antibodies are derived from hybridoma cell lines , created by fussing mouse antibody producing B lymphocytes with mouse myeloma cells or are derived from a human B cell line through EBV transformation. Each hybridoma cell line produces homogenous antibodies OF only one immunoglobulin class, which are identical in their chemical structure and immunological activity. Human red blood cells are classified as Rho (D ) Positive depending upon the presence or absence of (Rho) antigen on then. Approximately 85% of the Caucasia population are Rho (D) positive. The D” Phenotype is a variant of D (Rho) About 60% of the D” s, now classified as weak or partial D’s, may react with Anti‐D (IgM) in slide tests and about 90% may be detected by the tube technique. REAGENT Anti‐D (Rho) (IgM) is ready to use reagent, prepared from supernatants of cell cultures with antibody producing B lymphocytes obtained through EBV transformation and is blend of monoclonal antibodies of immunoglobulin class IgM. These antibodies are a mixture of several monoclonal antibodies of the same specificity but having the capability of recognizing different epitopes of the human red blood cell antigen D (Rho). Anti‐ D (Rho) (IgM)does not detect all weak and prepared D’s For the confirmation of negative reactions with Anti‐D (Rho) (IgM) further testing with an incomplete Anti D‐ (Rho) of IgG class is strongly recommended to confirm the presence or absence of weak/ partial D’s. Each batch of reagent undergoes rigorous quality control at various stages of manufacture for its specificity, avidity and performance. REAGENT STORAGE AND STABILITY 1.Store the reagent at 2‐8°C.do not freeze. 2. The shelf life of the reagent is as per the expiry date mentioned on the reagent vial label.
- 33. PRINCIPLE Human red blood cells possessing the D(Rho) antigen will agglutinate in the presence of antibody directed towards the antigen Agglutination of red blood cells with Anti‐ D(Rho) (IgM) reagent is a positive test result and indicates the presence of D (Rho) antigen .No should be further tested for D” (Presence of weak/ partial D’s) by performing the D” test procedure using incomplete Anti‐D (Rho) of IgG class, as described later. NOTE 1. In vitro diagnostic reagent for laboratory and professional use only .Not for medicinal use. 2. Anti‐ D (Rho)(IgM) reagent is not from human source, hence contamination due to HBsAg and HIV IS practically excluded. 3. The reagent contains sodium azide 0.1% as preservative. Avoid contact with skin and mucosa On disposal flush with large quantities of water. 4. Extreme turbidity may indicate microbial contamination or denaturation of protein due to thermal damage. Such reagent should be discarded. SAMPLE COLLECTION AND PREPARATION No special preparation of the patient is required prior to sample collection by approved techniques. Samples should be stored at 2‐8°Cif not tested immediately. Do not use heamolysed sample. Anticoagulated blood using various anticoagulants should be tested within the below mentioned time period: EDTA or Heparin ‐2 days Sodium citrate or sodium oxalate ‐14 days ACD or CPD ‐28 days ADDITIONAL MATERIAL REQUIRED FOR SLIDE AND TUBE TESTS Glass slides (60x85mm),test tubes (12x75mm), Pasteur pipettes, isotonic saline, Centrifuge, Timer, Mixing sticks, ERYCLONE® Anti Human Globulin (Coombs) reagent, ERYCLONE® Anti‐D(IgG)or RHOFINAL® Anti‐D (IgM+ IgG).
- 36. ANTI‐ A, ANTI‐B. ANTI –A, B MONOCLONAL BLOOD GROUPING ANTIBODIES FOR SLIDE AND TUBE TESTS SUMMARY Monoclonal antibodies are derived from hybridoma cell lines, created by fusing mouse antibody producing B lymphocytes with mouse myeloma cells. Each hybridoma cell line produces homogenous antibodies of only one immunoglobulin class, which are identical in their chemical structure and immunological activity. Human red blood cell antigen can be divided into four group A, B,AB and O depending on the presence or absences of the corresponding antigens on the red blood cells. Approximately 41% of the Caucasian population have the A Antigen, 9% have the B Antigen, 4% have both A and B antigens, while the remaining have neither the A nor the B antigen. REAGENT Anti‐A, Anti‐B, and Anti‐A,B are ready to use reagents prepared from supernatants of mouse hybridoma cell cultures. These antibodies of immunoglobulin class IgM are mixture of several monoclonal antibodies of the same specificity but having the capability of recognizing different epitomes of the human red blood cell antigens A and B. Each batch of reagent undergoes rigorous quality control at various stages of manufacture for its specificity, avidity and performance. REAGENT STORAGE AND STABILITY 1. Store the reagent at 2‐8°C. DO NOT FREEZE. 2. The shelf life of the reagent is as per the expiry date mentioned on the reagent vial label. PRINCIPLE Human red blood cells possessing A and/or B antigen will agglutinate in the presence of antibody directed towards the antigen. Agglutination of red blood cells with Anti‐ Anti‐B, Anti‐ A,B reagents is a positive test result and indicates the presence of the corresponding antigen.
- 37. NOTE 1. In vitro diagnostic reagent for laboratory reagent for laboratory and professional use only. Not for medicinal use. 2. The reagent contains sodium azide 0.1% as preservative .Avoid contact with skin and mucosa. On disposal flush with large quantities of water . 3. Extreme turbidity may indicate microbial contamination or denaturation of protein due to thermal damage. Such reagents should be discarded. 4. Reagents are not from human sources, hence contamination due to HBsAg, and HIV IS practically excluded. SAMPLE COLLECTION AND PREPARATION No special preparation of the patient is required prior to sample collection by approved techniques. Samples should be stored at 2‐8°C if not tested immediately. Do not use hemolysed samples. Anticoagulated blood using various anticoagulants should be tested within the below mentioned time period: EDTA or HEPARIN : 2 days Sodium citrate or sodium oxalate : 14 days ACD or CPD : 28 days ADDITIONAL MATERIAL REQUIRED FOR SLIDE AND TUBE TESTS Glass slides (60 x 85 mm), Test tube (12 x75 mm), Pasteur pipettes , Isotonic saline, Centrifuge, Timer, Mixing sticks. TEST PROCEDURE Bring reagents and samples to room temperature testing. Slide Test 1. Place one drop of Anti‐A or‐B or Anti‐A,B reagent on a clean glass slide. 2. To each reagent drop, add one small drop if whole blood 3 Mix well with a mixing stick uniformly over an area of approximately 2. 5cm². 4. Rock the slide gently, back and forth. 5. Observe for agglutination macroscopically at two minutes.