Pedia stainless steel crown
•
38 recomendaciones•20,071 vistas

Pediatric Dentistry I Forth Year

Recomendados
Más contenido relacionado
La actualidad más candente
La actualidad más candente (20)
Destacado
Destacado (20)
Similar a Pedia stainless steel crown
Similar a Pedia stainless steel crown (20)
Más de IAU Dent
Más de IAU Dent (20)
Último
Último (20)
Pedia stainless steel crown
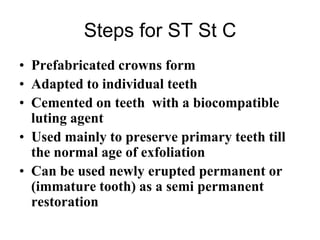
- 1. Steps for ST St C • Prefabricated crowns form • Adapted to individual teeth • Cemented on teeth with a biocompatible luting agent • Used mainly to preserve primary teeth till the normal age of exfoliation • Can be used newly erupted permanent or (immature tooth) as a semi permanent restoration
- 2. Use of Stainless Steel Crowns u Introduced to pediatric dentistry by Dr. William Humphrey in 1950 – prior to that orthodontic bands filled with amalgam were a last resort – “necessity is the mother of invention” u Considered superior to large multisurface amalgam restorations and have a longer clinical lifespan than two or three surface amalgams (Dawson et al., 1981)
- 3. Success of the stainless steel crown • The quality of the tooth preparation • Selection and adjustment of the of an appropriate crown • The luting cement
- 4. Indications u Extensive caries u Pulpotomy/pulpectomy u Malformed teeth u Fractured teeth u Severe attrition of primary teeth u Mesial lesions on first primary molars u Semi-permanent restorations on young permanent molars
- 5. Contraindications u Esthetics u Teeth that are nearing exfoliation u Mechanical problems – space loss – caries beneath the level of the bone u Permanent restoration in the permanent dentition
- 6. Types of SSC • 1- Non contoured untrimmed crown They has straight sides They are longer than the length of the teeth They require trimming and contouring
- 7. • 2- Pretrimmed ( prefestonned ) crown Has straight sides straight longer than the teeth already trimmed to follow the gingival contour trimming is minimal but contouring is required
- 8. • 3- Pre contoured crown It is trimmed and also contoured its margins curved inward it is in the right length for the average tooth in many cases it fits accurately with out alteration
- 9. What you will need u Burs and stones – #169 – heatless stone u Pliers and instruments – contouring plier – crimping plier u Polishing
- 10. Steps for St St C • Local anesthesia administration • Rubber dam isolation • Wooden wedge placement or T band to avoid damaging the adjacent tooth structure
- 11. Overview u Occlusal reduction u Proximal reduction u Buccal and lingual reduction u Beveling u Round all sharp line angles and corners
- 12. Step by Step u Caries removal u Complete pulp therapy if necessary Proceed with crown preparation u Occlusal Reduction - 1.0-1.5mm Connect the Depth Cuts Check reduction with opposing arch
- 13. Proximal Reduction u Contact with adjacent teeth must be broken gingivally and buccolingually u proximal slices converge slightly toward the occlusal and lingual – DO NOT OVER TAPER u The gingival margins should have a feather- edge finish line u Adjacent tooth structure must not be damaged
- 14. Angulation of Slices Proper slice Improper slice
- 15. Ledging u Proximal slice must be extended below tissue to avoid leaving a ledge
- 16. Preserving the Outline u Remember: crown preparation if a significant part of the crown’s retentive potential
- 17. Buccal-Lingual Reduction u Reduction is optional and is undertaken only if the buccal or lingual bulges are so prominent that the constricted margin of the crown will not go over he height of contour – when required, no more than .5-1mm should be removed – reductions must end in a feather edge
- 18. Beveling u A bevel at an angle of 30-45 degrees removes the sharp cusp tips and creates a gentle slope in the occlusal third of the lingual and buccal surfaces
- 19. Round Sharp Line Angles u The buccal and lingual proximal line angles are rounded by holding the bur parallel to the tooth’s long axis and blending the surfaces togetherThe finished contour should conform to the internal contour of the stainless steel crown
- 20. Crown Adaptation u Mark gingival line with a scaler & trim 1mm beneath the mark using C&B scissors Margins should be trimmed to lie parallel with the contour of the gingival tissue and consist of a series of curves without sharp angles
- 21. Guidelines u Resistance in seating without tissue blanching. Check for – high spots on occlusal surface – ledges u Resistance in seating with tissue blanching. Check for – crown too wide (preliminary contouring) – crown too long – tissue caught in margin
- 22. Gingival Contours Buccal gingival contour of first primary molar-- stretched-out S Proximal gingival contour of primary molars -- frown Buccal gingival contour of second primary molar-- smile
- 23. Contour the Crown u Use contouring pliers, bend the gingival third of the crown’s margins inward to restore anatomic margins and to reduce the marginal circumference ensuring a good fit u Crimp the crown u With the crown-crimping plier (#118) crimp the margin Replace crown on tooth and check margins with an explorer
- 24. Crown Adaptation Poor marginal seal may allow micro leakage of bacteria and their toxic products leading to recurrent decay or pulp inflammation. • It may be necessary to remove the rubber dam at this stage. • Try the crown on the tooth. • Seating the crown is from the less to more bulging surface, • e.g. from buccal to palatal in maxillary teeth, and from lingual to buccal in mandibular teeth • Evaluate the opposite arch for proper cusp and occlusal interdigitaion.
- 25. • Marginal ridge are level with those of adjacent teeth. • Contacts are restored. • No extensive blanching of the gingiva to avoid trauma to the gingival tissue.
- 26. Finishing and Polishing u Use heatless stone to smooth jagged edges u Then use a rubber wheel to remove small scratches and smooth u Polish surface of crown to a high shine with tripoli and rouge
- 27. The crown margins should have • Smooth edges • Edges free of burs • Knife edge margins • Smooth curved margins • No riples or bend • No scratches
- 28. Cementation u Clean crown and tooth u Fill crown with zinc phosphate cement u Seat crown, expressing cement form all margins and press into occlusion u Remove excess cement when partially set
- 29. Crown cementation • The following cements can be used Polycarboxylate cement advantages: *minimal irritation effect on the pulp *there is some adhesion between tooth substance and st, st, alloys Disadvantages: *Require precise preparation and manipulation *need clean and uncontaminated tooth surface
- 30. Glassionomer cement • Advantages: *Have the potential to adhere to tooth structure *Fluoride release • Disadvantages: *Moisture sensitivity * Initial slow set. * Some pulp irritation. Crown cementation
- 31. • Zinc phosphate cements: • Because of its low pH • lack of antibacterial properties. • solubility in oral fluids • lack of adhesion, they are not recommended for cementation of Stainless steel crown in primary molar. Crown cementation
- 32. • Adhesive cements • Advantage Improve the retention Reduce micro-leakage • Disadvantages They are more difficult to manipulate, More technique sensitive and more expensive than conventional cements. Crown cementation
- 33. • Before cementation, a cavity varnish must be applied on a vital tooth. • Clean and dry the crown and the tooth (partial isolation until setting of the cement). • Fill the crown with the cement while the mix is glossy. • Seat the crown firmly into occlusion, • instruct the patient to bite on the seater to ensure complete seating. Crown cementation
- 34. • Remove excess cement with explorer on labial and lingual and with loss • Excess cement can produce gingival inflammation and discomfort. • Make a final check and follow-up. Crown cementation
- 35. Post-op instructions ? u Although a well-adapted and cemented crown should not come off under these circumstances, patients and parents should be warned of the possibility
- 36. Some problems and their solutions 1-Crowns does not seat properly • This usually means that there is a ledge. It is removed using a tapered fissure bur. u May need to increase the buccal and lingual reductions u May need to compress crown form on mesial and distal with Howe pliers •
- 37. Clinical Variations u “Back-to-back” chrome crowns Second primary molars
- 38. Possible solutions to this problem: 1-The crown is rotated slightly mesio-buccally so that it is rotated slightly out of the arch. 2- The closest fitting crown is held in the beaks of Adams pliers and squeezed mesio-distally to reduce this dimension. This is an effective way of flattening the contact points. 3- If difficulty is still encountered, additional tooth reduction of the buccal and lingual surfaces and selection of another smaller crown.
- 39. Placement of the adjacent crowns • Tooth preparation and crown selection for placing multiple crowns are similar to the technique previously described for single crowns, but with a few additional factors
- 40. • Prepare the occlusal reduction of one tooth completely before beginning the occlusal reduction of the other tooth. When reduction of the two teeth is performed simultaneously, the tendency is to under-reduce both. • Insufficient proximal reduction is a common problem. Contact between adjacent proximal surfaces should be broken producing approximately 1.5 mm space at the gingival level. Placement of the adjacent crowns
- 41. • Crowns should be trimmed, contoured and prepared for cementation • It is generally best to begin placement and cementation of the more distal crown first. • The sequence of placement of crowns for cementation should follow the same sequence as that used when the crowns are placed for the final fitting. Placement of the adjacent crowns
- 42. Restoration of Class IV Caries in Primary Anterior Teeth u Esthetic Resin Restoration u Stainless Steel Crown u Open-Face Steel Crowns u Composite Crowns Composite Crowns
- 43. Anterior Stainless Steel Crowns u Esthetics - poor u Durability - very good u Time for placement - fastest u Selection criteria - severely decayed, esthetics of minimal importance, gingival hemorrhage not controlled, inadequate patient cooperation
- 44. Open Faced Stainless Steel Crown u Esthetics - okay u Durability - good, although facing may be dislodgedTime for placement - takes longest to place due to two-step procedureSelection criteria - severely decayed teeth, durabilty needed, esthetics are a concern
- 45. Crown Form Selection u Select the appropriate crown form size from the mesio-distal measurement (mm) of the tooth’s incisal edge, or by direct comparison
- 46. Tooth Preparation u Incisal reduction – 1-1.25 mm u Proximal reduction - parallel mesial and distal slices to break contact with the adjacent tooth and to allow enough bulk to give strength to the final restoration – .5-1 mm
- 47. Tooth Preparation u Buccal reduction - to allow the placement of the restoration within the normal buccal lingual width of the tooth restored – .5-1 mm u Lingual reduction - to allow for the necessary bulk for the strength of the crown and to prevent for any occlusal interferences
- 48. Circumfrential Undercut Shoulder u Terminates at the crest of the gingiva u Shoulder depth should be .75-1 mm u Use inverted cone
- 49. Variation Cervical undercut on facial only Removal of caries may also provide undercuts
- 50. Crown Adaptation u Carefully trim off the cervical collar with curved festooning scissorsTrim crown form so that when seated, it covers the shoulder but extends no more than 1 mm past tge shoulder
- 51. Trial Fitting of Crown Form u Try on trimmed crown formIncisal edges should line upPlace hole in incisal edge of crown with an explorer to allow vent for composite to flow through during crown placement
- 52. Crown Placement u Etch tooth with phosphoric acid for 30 seconds u Thoroughly wash and dry etched surface u Apply bonding agent according to specifications u Carefully pack the crown form resin to avoid entrapment of air bubbles u Position the filled crown form over the prepared tooth so it extends 1mm over the gingival margin u Remove excess resin from margins with an explorer before polymerizing u Slice crown form
- 53. Minimal Finishing and Polishing u Peel it away from composite crown u Finish margins u Adjust occlusion u DO NOT FINISH the labial surface – polymerization of the resin against the plastic provides the smoothest and most stain resistant surface