
Recomendados
Más contenido relacionado
La actualidad más candente
Similar a Using Canvas: Log in, Set Up Notifications & Save Files
Similar a Using Canvas: Log in, Set Up Notifications & Save Files (20)
Último
Último (20)
Using Canvas: Log in, Set Up Notifications & Save Files
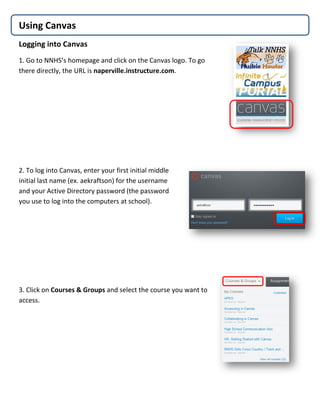
- 1. Using Canvas Logging into Canvas 1. Go to NNHS’s homepage and click on the Canvas logo. To go there directly, the URL is naperville.instructure.com. 2. To log into Canvas, enter your first initial middle initial last name (ex. aekraftson) for the username and your Active Directory password (the password you use to log into the computers at school). 3. Click on Courses & Groups and select the course you want to access.
- 2. 4. You can customize what classes you want to see by clicking on Customize and selecting which classes you want to see or de-selecting the classes you do not want to see. Add Ways to Contact You 1. Click on your name. 2. You can add your personal email address and/or your cell phone by clicking on Add Email Address and/or Add Contact Method. 3. Enter your Cell Number and select your Carrier from the dropdown menu. Click Register SMS. 4. After you enter your Register SMS, Canvas will send your four-character confirmation code. Enter it, and then click Confirm.
- 3. Setting-up your Notifications 1. Click on your name>Notifications. For each type of notification, you can select the following: notify me right away, send daily summary, send weekly summary, or do not send me anything. Based on your selections, you will be notified for all classes. For example, if you select ASAP for Due Dates, you will receive a notification for all due dates in all classes. Saving Files to Your Canvas Account 1. Instead of a flashdrive or your H-drive, you can save files in Canvas. To do so, click on your name and select Files from the navigation bar located on the left-hand side. 2. Depending on what you are trying to save, you have the option of upload a single file, multiple files, or an entire folder. Click on Add Files or Add Folder to do so. Submitting an Assignment 1. To submit an Assignment, click on Assignments and then the title of the Assignment. In the upper right-hand corner, click on the Submit Assignment icon.
- 4. 2. You will be given the option to upload or choose a file from your Canvas account. Once you have made your selection, click Submit Assignment. Viewing Comments for a Graded or Peer Reviewed Assignment 1. To view in-text comments for an assignment, click on Submission Details located in the upper right-hand corner.
- 5. 2. Your assignment will appear in the main body of your screen. Click on the magnifying glass to view your in-text comments. 3. If you would like to download your assignment with the comments, click on the download icon. You can download the assignment at a Word file (without the comments) or as a PDF (with the comments).