
Recomendados
Más contenido relacionado
La actualidad más candente
La actualidad más candente (15)
Destacado
Similar a The making of how front panel of digipak
Similar a The making of how front panel of digipak (20)
Más de amydinsey
Más de amydinsey (12)
Último
Último (20)
The making of how front panel of digipak
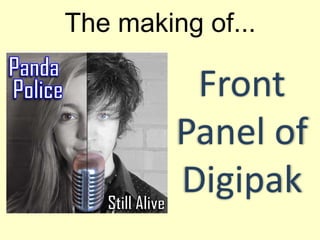
- 1. The making of... Front Panel of Digipak
- 2. Firstly I had to enlarge the image to make sure that the image was the right size, as well as framing exactly what was needed in the image.
- 3. I then had to do the same thing with the image of Kieran. After this I had to split the picture in the middle to give the two halves of their face effect, as well as making sure their features lined up as well as possible.
- 4. To make both images black and white, I had to use the ‘Image Adjustments’ option, and decrease the saturation level to -100 to get rid of all colour.
- 5. To make the microphone be in full colour whilst the rest of the image was black and white, I first had to crop all around the whole of the mic. Then, I cropped it into two sections down the centre line of the page so that there was a mic placed in front of Ellies face as well as Kieran. After this I changed the colour saturation to 0 to balance the colours.
- 6. After this I lined up both halves of the mic and grouped them together. I then brought back the image of Ellie, and lay the colour mic in front of the split image of both Ellie and Kieran’s faces.
- 7. Next I did a similar thing with the eyes of both Ellie and Kieran. I cropped around the eye, and put the saturation level to 0 making it in colour, and different to the rest of the face. I did this to both eyes on the cover.
- 8. I added the text next, typing the artist name and album title in separately, and changing the effects on both, giving it a drop shadow, white fill and black outline. I did this for both the ‘Panda Police’ text, as well as the name of the album ‘Still Alive’.
- 9. After adding in both pieces of text, I thought that the band name needed to be more bold, as well as the cover needing another house colour. So I changed the Panda Police line of the text to blue, as well as making it bigger and moving ‘Police’ slightly to the right to give it a more edgy feel.