Build and Manage Online Business with ePowerHost SiteBuilder
•
0 likes•343 views

The document provides step-by-step instructions for using ePowerHost SiteBuilder to create a new website. It outlines the 7 key steps: 1) Create New Web Site, 2) Select Template Style, 3) Select Your Web Site Style, 4) Page Structure, 5) Site Content, 6) Extras, and 7) Publish. The instructions describe the options and settings available at each step to design all aspects of the new website before publishing it online.

Recommended
More Related Content
What's hot
What's hot (17)
Viewers also liked
Similar to Build and Manage Online Business with ePowerHost SiteBuilder
Similar to Build and Manage Online Business with ePowerHost SiteBuilder (20)
Recently uploaded
Recently uploaded (20)
Build and Manage Online Business with ePowerHost SiteBuilder
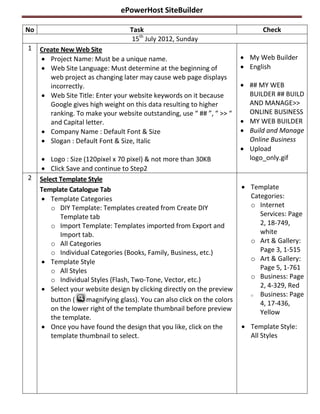
- 1. ePowerHost SiteBuilder No Task Check 15th July 2012, Sunday 1 Create New Web Site Project Name: Must be a unique name. My Web Builder Web Site Language: Must determine at the beginning of English web project as changing later may cause web page displays incorrectly. ## MY WEB Web Site Title: Enter your website keywords on it because BUILDER ## BUILD Google gives high weight on this data resulting to higher AND MANAGE>> ranking. To make your website outstanding, use “ ## ”, “ >> “ ONLINE BUSINESS and Capital letter. MY WEB BUILDER Company Name : Default Font & Size Build and Manage Slogan : Default Font & Size, Italic Online Business Upload Logo : Size (120pixel x 70 pixel) & not more than 30KB logo_only.gif Click Save and continue to Step2 2 Select Template Style Template Catalogue Tab Template Template Categories Categories: o DIY Template: Templates created from Create DIY o Internet Template tab Services: Page o Import Template: Templates imported from Export and 2, 18-749, Import tab. white o All Categories o Art & Gallery: o Individual Categories (Books, Family, Business, etc.) Page 3, 1-515 Template Style o Art & Gallery: o All Styles Page 5, 1-761 o Individual Styles (Flash, Two-Tone, Vector, etc.) o Business: Page 2, 4-329, Red Select your website design by clicking directly on the preview o Business: Page button ( magnifying glass). You can also click on the colors 4, 17-436, on the lower right of the template thumbnail before preview Yellow the template. Once you have found the design that you like, click on the Template Style: template thumbnail to select. All Styles
- 2. ePowerHost SiteBuilder Export and Import Tab Browsing for templates to download is similar in Template Template Catalogue tab. Categories: Please note the download button beside the o Beauty and magnifying glass button. Fashion: Page 1, 2-463 Click on the download button to download the template. Please Download Template window will appear o Click on the Preview button to view which template Select: to download. o Picture name: o Click on Download button of the template you want to Girl download. o Color: Yellow o You can close the Please Download Template window after you have downloaded the template. gold_Girl_2.tar.gz will be downloaded. Right-click on gold_Girl_2.tar.gz file and click Extract Here. You will see a folder named gold_Girl_2 Next, look for the image file that you want to change or edit. Note: Please do not rename the file and image size. When you are done with image editing, right-click on the folder gold_Girl_2 and click on Send to > Compressed (zipped) folder . gold_Girl_2 zip file will appear. To import the template that you have edited, click on the Choose File button. Select the gold_Girl_2 zipped file and click Open to import your edited template. Now you will notice the zip file of gold_Girl_2.zip is beside the Choose File button. Next, click on Import and go to template catalogue button. The imported If your import is successful, you will see the message template will be “Template has been successfully imported. Please click here assigned a to edit or create new project. In step2, you should find your Template ID. imported template.” E.g.: # 23-167101 You can Preview, Re-upload or Delete the template that you have imported.
- 3. ePowerHost SiteBuilder 3 Select Your Web Site Style You can change the color scheme, picture style, navigator style, navigator color, and default font family. Color: Click to change available colors Picture: Options of Click or Off Position and Resolution Font Navigator: Choose the type design that you like Move: Click and drag to move the Logo, Company Name & Slogan. You can also Auto Positions. Site Wide: Edit top, Edit bottom, Edit side1, Edit Side2. Here, Section 1: Picture you can embed code for example Add Picture, insert Youtube Section 2: Insert movie, Google Adsense code, insert flash banner & etc. Media/Video >> Note: When you have edited any of the Site Wide section, it In Youtube, will turn into green. search gratitude When you are done, click “Save” to proceed to Step 4. dance - http://www.youtube.c om/watch?v=QeLbrGs pigg Then, click Share, click Embed & copy the iframe code. Section 3: HitCounter code- http://freehitcou ntercode.com/ Section 4: Flash Banner 4 Page Structure Select suggested page structure & click the Move button. Move: About Us, Then arrange your page structure by clicking on the Move Products, Order Up or Move Down button. (set as sub- menu), Portfolio, You can add extra Components. Extra components have a Contact Us pre-built script for its own specific task. Component: Click Save and proceed to Step 5. Photo Album Note: If you see Warning message in Step 5, please follow the on screen instructions.
- 4. ePowerHost SiteBuilder 5 Site Content Click "WYSIWYG Editor" to add or edit the content on your Photo Album: web page. o Upload In Page List Navigator, you will see your created pages. Image>Create Directory: Click to edit the page. Showcase Click "Delete" to delete the web page. Be careful, the o Click Choose deleted page cannot be restored. File to upload Click "Manage" to manage the extra component. Photos Manage Image: o Click on Showcase folder o Change Image Description o Click Save Header & Footer: o Header> Web Builder Header o Footer> Web Builder Footer 6 Extras – Custom Web Page Title Click "Edit" to edit web page title or click "Reset" to get a Meta Keyword: default value. Web Builder, Meta Tags: Enter keywords and description Website Builder, Easy Web Builder Meta Description: Easy 7 steps website builder Page Effect: It can only perform in IE browser. Page Name
- 5. ePowerHost SiteBuilder 7 Publish Every time you edit the web pages, you need to publish Text box: them. The actual web site will not reflect the change until sitebuilder you do this step. Leave blank if this site is to appear when you visit YourDomainName.com If you want to publish to YourDomainName.com/test/ enter test on the text box When you are done, click Publish Button to publish your site. Note: Please wait for few minutes until the whole process of building your website is done. http://epowerhost.net/sitebuilder/tryout/users/rvstryoutant honywee19/sitebuilder/index.php http://bit.ly/MyWebBuilder