How to block print with a wood block stamp (wood print block) like a traditional indian artisan
•Descargar como KEY, PDF•
5 recomendaciones•9,434 vistas

Block Print on Fabric using traditional

Recomendados
Más contenido relacionado
La actualidad más candente
La actualidad más candente (19)
Destacado
Similar a How to block print with a wood block stamp (wood print block) like a traditional indian artisan
Similar a How to block print with a wood block stamp (wood print block) like a traditional indian artisan (20)
How to block print with a wood block stamp (wood print block) like a traditional indian artisan
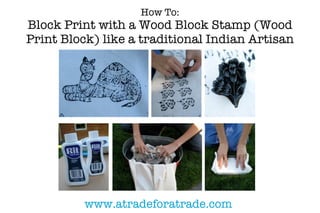
- 1. How To: Block Print with a Wood Block Stamp (Wood Print Block) like a traditional Indian Artisan www.atradeforatrade.com
- 2. Introduction Materials Adapt traditional Indian block printing Wood Block Stamp (also called a “wood techniques with modern supplies stocked in print block”) your own cupboard. Make the process eco- friendly by conserving water, using organic Fabric to be printed cotton, sourcing fair trade wood block stamps, and using the sun to dry your unique prints. Fabric Dye (such as RIT liquid dye) All materials can be sourced locally or online A piece of cardboard as wide as your from US retailers, minimizing your carbon fabric footprint. Best of all, it decreases the use of toxic dye and sweat shop labor practices in Small plastic container to hold the dye many Indian factories. Paper Towels A bucket Vinegar (to set the dye) www.atradeforatrade.com
- 3. Prep the Fabric 1. Iron your fabric to remove all the wrinkles. 2. Tape the fabric edges to the piece of cardboard. This has a couple of purposes: it keeps the fabric from flapping in the wind if you print outside. It ensures there are no wrinkles in your printing surface. And it gives a slight “cushion” for the stamp which makes a better print. www.atradeforatrade.com
- 4. Make A Custom “Ink Pad” 3. Measure about 4 tablespoons of fabric dye into your plastic container (or tupperware). 4. Take 3 paper towels and fold them in half so they’re doubly thick. Press them into the dye. When they’ve soaked up most of the dye, grab the ends and flip it over. This is your ink pad. www.atradeforatrade.com
- 5. Print Your Fabric 5. Press your wood block stamp into the ink pad. Rock the stamp back and forth to make sure dye gets on all parts of the stamp. This is especially important for large stamps with a lot of detail - otherwise the peacock’s wings will be light and feathery while its tail and head will be dark black. (You may wish to wear a pair of rubber gloves.) 6. Place the stamp where you want it on the fabric. To get the best impression, give it a sharp whack with the heel of your hand (Indian technique), tap it with a hammer (Montana-style) or lean on it with your whole body (kids’ version). This helps complicated designs print evenly, and is very important for large stamps. www.atradeforatrade.com
- 6. Tips & Technique 7. Traditional prints repeat over the entire length of the fabric. For larger, complicated stamps, the patterns might even overlap. Traditional Wood Block Stamps have “markers” (such as the peacock’s tail or flower’s stem) which are used to repeat the pattern. Indian print masters use these marketers to create symmetrical patterns. 8. Re-apply ink after each print. Your ink pad will last for about 20-30 prints of the large stamps, and twice that many for the small stamps. When your print starts to get a little faint, flip the pad over. When you run out of dye on both sides, pour 1-2 tablespoons of dye directly onto the paper towels to “refresh” your pad. www.atradeforatrade.com
- 7. Finish It Up 9. After you’ve finished printing, spread your fabric in the sun to let the dye dry. Do NOT put it in the dryer - the dye is not yet set and may leave a stain. 10. To clean up, wash the stamps in a bucket of cold water. Rub them with your hand (or a brush) to get off the excess dye. Keep rinsing until the water you pour over them runs clear. They will be permanently “antiqued” the color of the dye, however don’t worry - you can use a different color dye next time. Make sure they are completely dry before you put them away - otherwise they will develop mold. Stored dry they should last for years. www.atradeforatrade.com
- 8. Set The Print 11. After the dye on your fabric dries, wring your fabric in cold water to wash out any excess dye. The water will turn the color of the dye, so don’t let the fabric soak! Pour out the dyed water and repeat the process until the water is clear. 12. To set the print permanently, pour about 2 cups of vinegar into a fresh bucket of cold water. The water should be completely clear. Let the fabric soak for 15-20 minutes. 13. Finally, hang your fabric up to dry. Make sure to wash your new fabric once or twice by itself before combining it with your clothes - you don’t want to accidentally tie-dye your white undies. After that, wash and dry normally. www.atradeforatrade.com
- 9. Resources Buy Wood Block Stamps online at A Trade For A Trade.com For more tutorials and tips, join the monthly newsletter list. For further questions, email info@atradeforatrade.com