
Recomendados
Más contenido relacionado
La actualidad más candente
La actualidad más candente (19)
Destacado
Destacado (16)
Similar a Thermal photo effect
Similar a Thermal photo effect (20)
Más de baljaadsg
Último
Último (20)
Thermal photo effect
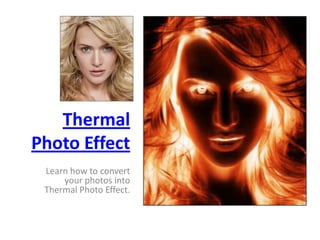
- 1. Thermal Photo Effect Learn how to convert your photos into Thermal Photo Effect.
- 2. Step 1: • First open any image.
- 3. Step 2: • First we apply Hue/Saturation, go to Image> Adjustments> Hue/Saturation or press Ctrl+U and apply these following setting:
- 4. Step 3: • Duplicate the layer by pressing Ctrl+J and go to Filter> Blur> Gaussian Blur and apply these settings:
- 5. Step 4: • Set the layer blending mode to ‘Overlay’.
- 6. Step 5: • Merge the layers together by pressing Ctrl+E. Again duplicate the layer and go to Filter> Blur> Motion Blur and apply these following setting:
- 7. Step 6: • Set the layer blending mode to ‘Overlay’ and merge the layer together. After this your Image looks like this:
- 8. Step 7: • Create a new layer and fill with white using Paint Bucket Tool. Set this layer mode to ‘Overlay’ and do not merge.
- 9. Step 8: • Press ‘D’ to reset your color palette. Set your foreground color to #000099 and background to white. Create a new layer and fill with this color (#000099).
- 10. Step 9: • Go to Filter> Render> Clouds. Set the layer blending mode to ‘Overlay’ and Opacity on this layer to 57%.
- 11. Step 10: • In this step create a new layer again and fill it with white. Set the layer blending mode on this layer to ‘Difference’.
- 12. Step 11: • In the Final step duplicate your background layer. Move this layer to 2nd from the top under white layer and set the layer blending mode to ‘Darken’.