
Recomendados
Más contenido relacionado
Similar a My Lounge Chr Design
Similar a My Lounge Chr Design (20)
Más de bereketnesh
Último
Último (20)
My Lounge Chr Design
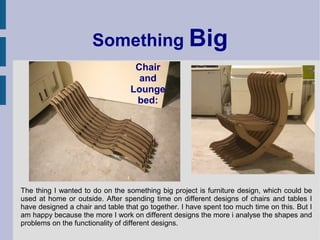
- 1. Something Big Chair and Lounge bed: The thing I wanted to do on the something big project is furniture design, which could be used at home or outside. After spending time on different designs of chairs and tables I have designed a chair and table that go together. I have spent too much time on this. But I am happy because the more I work on different designs the more i analyse the shapes and problems on the functionality of different designs.
- 2. Something Big Tests: The second was a chair design which was so aesthetical and within few lines I make compositions but I left this one because in this project I want to make a very a very good design not only interms of shape but also function and safety. I want to make a design which have the quality of multi purpose, press fitting method and simplicity. After making the model both in 3D,2D and model finally I shifted to the design I thought that is nice.
- 3. Design Process: When I started to make this tremendous design which is deprived from the Ethiopian traditional design and made it to be the first one. The first design is good visually and also portable but for using the machines and materials here in FabLab I needed to come up with new idea besides Ineeded to develop it inorder to make it have minimum parts without lacking the good strucure. The first idea is to make it have two xy direction but next i was inspired by Benitos idea of finger construction, thats how the idea developed and made this final design.
- 4. Development: Making this chair design is interesting for me because I needed to deal with the press fitting method, mechanism, functionality and its appearance as well. On the design process Tomas was saying I should make it dual purpose and portable. So after defining the shape I have made a rough drawing on illustrator and then exported it with jpeg and desplayed it in view port background on the left window, then traced it, give the precise measurments on modeling After modeling I animate it by pivot point to see how it could work/fits for construction method. I needed and adjustment inorder to make it fit will. After making the 3D model with 3D studio I saved it as jpeg/F9 and make a drawing and scaled it for the small model and the big one.
- 5. Construction
- 6. CAD -Material Utilisation Tomas suggests me to make the pieces fit on one 1220x 2440mm Mdf. It took me hours to see which one is the best position and finally did it. Now it is time to produce it. I have designed a chair before but never produced it/especially by myself and using CAM, After saving this file with dxf. I opened it on the enroute.
- 7. Model Test then Big one: Before I make the big one I make a model in small scaled size with a small laser because I was worried its not going to work.The opened file in enroute has been reviewed, select the material size/the longer size for the width and the shorter for length. On the right tool. With the help of fellow students I printed it. Astrid has made a very good tutorial of how to use it. It was so helpful. After setting the drawing on 0,0 position of the bed I put my mdf on the multiCAM Laser machine. Next I opened the layer manager tool and select the cut and engrave layers. From go to machining upper toolbar I select output. Then pressed to file and send the print/cut job to the machine. I am glad to know this because I compared it with Ethiopia. How much time ,labour it will take to make one chair,and wondered the technology. If it wouldn't have any side effects how good will it be. Anyway I would like to thank the person who invented this laser cutting techno. Within few buttons I Saved it/Sent it to the multiCAM laser machine.
- 8. Fabrication Process: On the CAM controller I opened my file I sent from the computer. Since the material I select is mdf, 19mm thickness and select it and used the speed and power from itself. Then pressed cut/action. First the power was 75 percent so I thought it didn't cut through to some parts, for this reason I resent it again inorder to make me able take it out easily.
- 9. Assembling Process: Step 1 Step 2 Step 3 Step 4 After taking out the pieces the 1st step is to put the metal rod on the top,On 2nd step join the back leg on the middle. The third step will be putting the seat parts on the tip of the back front part. *put small pieces between each part.
- 10. Chair or -? Step by Step changing the lounge bed to chair, which could be used for beach or recreation.
- 11. Something Big: I am glad I made something big which is big enough for me to sit and sleep on. The material I used is wood, but would be better made with lighter materials like foam or others. The mechanism works well and aesthetically it is good because all the forms on it are curves to give comfort and support of a human body. The chair part angle needed some adjustment because I shifted the backlegs turning point to the lower part which makes it a bit straight. If it is going to be a little bit higher it would be perfect. I made everyone try to sleep on this as a lounge bed and it is really comfortable!