
Recomendados
Más contenido relacionado
Destacado
Similar a Rm contoh (mei 2012)
Similar a Rm contoh (mei 2012) (14)
Más de buletinkualitijkmpsas
Último
Último (20)
Rm contoh (mei 2012)
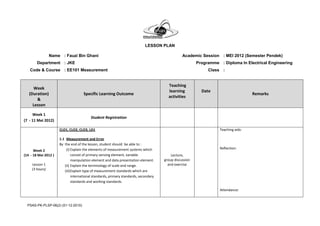
- 1. LESSON PLAN Name : Fauzi Bin Ghani Academic Session : MEI 2012 (Semester Pendek) Department : JKE Programme : Diploma In Electrical Engineering Code & Course : EE101 Measurement Class : Teaching Week learning Date (Duration) Specific Learning Outcome Remarks activities & Lesson Week 1 Student Registration (7 - 11 Mei 2012) CLO1, CLO2, CLO3, LD1 Teaching aids: 1.1 Measurement and Error By the end of the lesson, student should be able to : (i) Explain the elements of measurement systems which Reflection: Week 2 (14 - 18 Mei 2012 ) consist of primary sensing element, variable Lecture, manipulation element and data presentation element. group discussion Lesson 1 (ii) Explain the terminology of scale and range. and exercise (3 hours) (iii) Explain type of measurement standards which are international standards, primary standards, secondary standards and working standards. Attendance: PSAS-PK-PLSP-06(2) (01-12-2010)
- 2. Teaching Week learning Date (Duration) Specific Learning Outcome Remarks activities & Lesson CLO1, CLO2, CLO3, LD1 Teaching aids: By the end of the lesson, student should be able to : Week 2 Lesson 2 (i) Differentiate between gross error, systematic error, Lecture , Reflection: (3 hour) discussion and random error absolute error and relative error exercise (ii) Explain the characteristics of measurement which are accuracy, precision, resolution and significant figure. Quiz-1 Attendance: Teaching aids: CLO1, CLO2, CLO3, LD1, LD2 By the end of this lab, student should be able to : Week 2 Reflection: Lesson 3 (i) Explain the calibration process of analog multimeter. Group work (2 hour) (ii) Demonstrate the calibration process of analog (Time replacement for multimeter. practical class) (iii) Explain the different function of analog multimeter. (iv) Demonstrate scale reading of analog multimeter. Experiment - 1 Attendance: PSAS-PK-PLSP-06(2) (01-12-2010)
- 3. Teaching Week learning Date (Duration) Specific Learning Outcome Remarks activities & Lesson CLO1, CLO2, CLO3, LD1 Teaching aids: 2.1 Basic principle of analog meter Week 2 By the end of the lesson, student should be able to : Reflection: Lesson 4 (2 hour) (i) Explain the principle operation of Permanent Magnet Moving coil (PMMC) by referring to the construction of Lecture, (PMMC). group discussion (ii) Calculate the value of deflection torque by applying and exercise equation F = N.A.B.I (iii) Explain damping curve; critical damping, over damping and under damping and their relationship to the moving coil needle of PMMC. (iv) Compare air friction damping, liquid damping and eddy current damping in indicating instrument precisely. Attendance Week 3 CLO1, CLO2, CLO3, LD1, LD2 Teaching aids: (21- 25 Mei 2012) By the end of this lab, student should be able to : Reflection: Lesson 1 (i) Explain the process of resistance measurement by (3 hours) using analog and digital multimeter. (Time replacement for Group work (ii) Demonstrate resistance measurement by using analog practical class) and digital multimeter. (iii) Calculate the value of absolute error and relative error. Experiment– 2 Attendance: PSAS-PK-PLSP-06(2) (01-12-2010)
- 4. Teaching Week learning Date (Duration) Specific Learning Outcome Remarks activities & Lesson CLO1, CLO2, CLO3, LD1 2.2 DC voltmeter Teaching aids: By the end of the lesson, student should be able to : (i) Draw basic single range DC voltmeter. Week 3 (ii) Derive equation for multiplier resistance value in Reflection: Lesson 2 single range DC voltmeter. (3 hour) (iii) Calculate the value of multiplier resistance in single range DC voltmeter within 2 decimal points. (iv) Draw a two range DC voltmeter. Lecture, (v) Derive equation for multiplier resistances value in two group discussion range DC voltmeter. and group (vi) Calculate the value of multiplier resistances in two presentation range DC voltmeter within 2 decimal points. (vii) Demonstrate voltage measurement in a simple circuit by using two range DC voltmeter. (viii) Analyze loading effect in voltage measurement by connecting DC voltmeter to different load. Quiz 2 Attendance: 2.3 DC ammeter By the end of the lesson, student should be able to : Teaching aids: (i) Draw basic single range DC ammeter. Week 3 (ii) Derive equation for shunt resistor value in single range Reflection: Lesson 3 DC ammeter. Lecture, (2 hour) (iii) Calculate shunt resistor value in single range DC group discussion ammeter. and exercise (iv) Design basic circuit of two range DC ammeter Assignment 1 Attendance: PSAS-PK-PLSP-06(2) (01-12-2010)
- 5. Teaching Week learning Date (Duration) Specific Learning Outcome Remarks activities & Lesson CLO1, CLO2, CLO3, LD1 Teaching aids: 2.4 Ohmmeter By the end of the lesson, student should be able to : (i) Draw basic series type ohmmeter circuit. Reflection: (ii) Explain the operation of the series type ohmmeter circuit. Week 3 (iii) Draw basic shunt type ohmmeter circuit. Lecture, Lesson 4 (iv) Explain the operation of the shunt type ohmmeter group discussion (2 hour) circuit. and exercise (v) Differentiate typical scale in series and shunt type ohmmeter. (vi) Design basic series type ohmmeter for resistance measurement. (vii) Design basic shunt type ohmmeter for resistance measurement. Attendance: Assignment 2 CLO1, CLO2, CLO3, LD1, LD2 Teaching aids: Week 4 By the end of this lab, student should be able to : (28 Mei - 1Jun 12) i. Explain the process of measuring the voltage and Reflection: current by using analogue multimeter and digital Lesson1 multimeter. Group work (3 hours) ii. Demonstrate the process of measuring the voltage and (Time replacement for current by using analogue multimeter and digital practical class) multimeter. iii. Calculate the value of absolute error and relative error. Attendance: Experiment–3 PSAS-PK-PLSP-06(2) (01-12-2010)
- 6. Teaching Week learning Date (Duration) Specific Learning Outcome Remarks activities & Lesson CLO1, CLO2, CLO3, LD1 Teaching aids: 2.5 Analogue multimeter By the end of the lesson, student should be able to : Reflection: Week 4 Lecture, (i) Explain the structure of analogue multimeter which group discussion Lesson 2 consists of ammeter, voltmeter and ohmmeter circuit and exercise (3 hours) diagram. (ii) Explain significance of sensitivity of meter to the analogue meter resistance. (iii) Explain the safety precautions of analogue multimeter. Quiz 3 Attendance: Teaching aids: Week 4 Lesson 3 CLO1, CLO2, CLO3, LD1 Reflection: (2 hours) 2.6 Digitalmultimeter By the end of the lesson, student should be able to : (i) Explain the function of digital multimeter by referring to the block diagram of the meter. (ii) Differentiate between analogue and digital multimeter in term of its advantages and disadvantages. Lecture, Practical Test 1 group discussion Attendance: and exercise PSAS-PK-PLSP-06(2) (01-12-2010)
- 7. Teaching Week learning Date (Duration) Specific Learning Outcome Remarks activities & Lesson Teaching aids: Week 4 CLO1, CLO2, CLO3, LD1 Lesson 4 (2 hours) 3.1 Oscilloscope Reflection: By the end of the lesson, student should be able to : (i) Draw the block diagram of analogue oscilloscope and digital oscilloscope. (ii) Explain the function of analogue oscilloscope by Lecture, referring to its block diagram. group discussion (iii) Explain the function of digital oscilloscope by referring and exercise to its block diagram. (iv) Explain the advantages and disadvantages of analogue oscilloscope and digital oscilloscope in term of accuracy. Assignment 2 Attendance: PSAS-PK-PLSP-06(2) (01-12-2010)
- 8. Teaching Week learning Date (Duration) Specific Learning Outcome Remarks activities & Lesson 5 CLO1, CLO2, CLO3, LD1, LD2 ( 4 Jun - 8Jun 12) Teaching aids: By the end of this lab, student should be able to : Group work Lesson 1 (3 hours) (i) Draw and label the front panel of an oscilloscope. (Time replacement for Reflection: practical class) (ii) Explain the function of display controls, vertical controls, and horizontal controls and trigger controls. (iii) Demonstrate the calibration process of an oscilloscope. (iv) Draw and label the front panel of a signal generator. (v) Explain the function of frequency selection group, sweep group, amplitude modulation group, DC offset group, waveform group and output group. (vi) Demonstrate connection between signal generator and oscilloscope for signal measurements. Experiment - 4 Attendance: Teaching aids: Week 5 Lesson 2 CLO1, CLO2, CLO3, LD1 Reflection: (3 hour) By the end of the lesson, student should be able to : Lecture, group discussion (i) Differentiate types of oscilloscope probes and exercise (ii) Explain the specification of analogue oscilloscope. Attendance: PSAS-PK-PLSP-06(2) (01-12-2010)
- 9. Teaching Week learning Date (Duration) Specific Learning Outcome Remarks activities & Lesson Teaching aids: CLO1, CLO2, CLO3, LD1 Reflection: Week 5 3.2 Signal generator Lesson 3 Lecture, (2 hours) By the end of the lesson, student should be able to : group discussion (i) Differentiate types of signal generators. and exercise (ii) Explain standard signal generators. (iii) Explain function generators. Attendance: Practical Test 2 Teaching aids: Week 5 CLO1, CLO2, CLO3, LD1 Reflection: Lesson 4 4.1 DC bridges (2 hours) By the end of the lesson, student should be able to : Lecture, (i) Explain the concept of bridge circuit by referring to the group discussion schematic diagram of standard bridge circuit. and exercise (ii) Explain bridges in null condition. (iii) Draw Wheatstone bridge schematic diagram Attendance: PSAS-PK-PLSP-06(2) (01-12-2010)
- 10. Teaching Week learning Date (Duration) Specific Learning Outcome Remarks activities & Lesson 6 CLO1, CLO2, CLO3, LD1, LD2 Teaching aids: ( 11 Jun- 15 Jun 12) By the end of this lab, student should be able to : Reflection: Lesson 1 (3 hours) (i) Demonstrate a simple circuit with signal generator (Time replacement for practical class) used as a signal source to the circuit. Group work (ii) Measure voltage, frequency and time in sinusoidal waveform. Experiment–5 Teaching aids: CLO1, CLO2, CLO3, LD1 By the end of the lesson, student should be able to : Reflection: Week 6 Lecture and group (i) Derive bridge balance equation for Wheatstone discussion Lesson 2 bridge. (3 hours) (ii) Calculate unknown resistance in bridge balance Attendance: ] CLO1, CLO2, CLO3, LD1 Teaching aids: Week 6 By the end of the lesson, student should be able to : Reflection: Lesson 3 (i) Draw Kelvin bridge schematic diagram. (2 hour) Derive bridge balance equation for kelvin bridge Lecture and group discussion Attendance: PSAS-PK-PLSP-06(2) (01-12-2010)
- 11. Teaching Week learning Date (Duration) Specific Learning Outcome Remarks activities & Lesson CLO1, CLO2, CLO3, LD1 Teaching aids: Week 6 Lecture and group Reflection: Lesson 4 By the end of the lesson, student should be able to : discussion (2 hours) (i) Calculate unknown resistance in bridge balance. Attendance: Week 7 CLO1, CLO2, CLO3, LD1, LD2 ( 18 - 22 Jun 12) Group work Teaching aids: By the end of this lab, student should be able to : Lesson 1 (i) Demonstrate resistance measurement by using Reflection: (3 hours) wheatstone bridge circuit. (Time replacement for practical class) (ii) Explain the process of resistance measurement by using wheatstone bridge circuit. Experiment - 6 Attendance: CLO1, CLO2, CLO3, LD1 Teaching aids: Week 7 5.1 Power meters Reflection: Lecture and Lesson 2 By the end of the lesson, student should be able to : group discussion (3 hours) (i) Draw the symbol of analogue wattmeter. (ii) Explain the basic principle of analogue wattmeter. Attendance: (iii) Construct wattmeter connection for power measurement Assignment 3 PSAS-PK-PLSP-06(2) (01-12-2010)
- 12. Teaching Week learning Date (Duration) Specific Learning Outcome Remarks activities & Lesson Week 7 CLO1, CLO2, CLO3, LD1 Lecture and Lesson 3 Teaching aids: group discussion (2 hour) By the end of the lesson, student should be able to : Reflection: (i) Draw the construction of KWH meter. (ii) Explain basic principle of analogue KWH meter. (iii) Construct KWH connection for electrical energy measurement. Attendance: Quiz 4 Week 7 Teaching aids: CLO1, CLO2, CLO3, LD1 Lecture and Lesson 4 group discussion (2 hour) Reflection: By the end of the lesson, student should be able to : (i) Explain basic principle of analogue clamp meter. (ii)Construct clamp meter connection for high alternating current measurement. Attendance: PSAS-PK-PLSP-06(2) (01-12-2010)
- 13. Teaching Week learning Date (Duration) Specific Learning Outcome Remarks activities & Lesson Week 8 (25 – 29 Jun 2012) FINAL EXAMINATION Prepared by, Approved by, …………………………….. …………………………………………… Lecturer Deputy Director (Academic)/Head of Department/Head of Programme (Signature and Stamp) (Signature and Stamp) Date: Date: Initial Check by: Final Check by: ……………………………………… …………………………………………… Deputy Director (Academic)/Head of Department/Head of Programme Deputy Director (Academic)/Head of Department/Head of Programme (Signature and Stamp) (Signature and Stamp) Date: Date: PSAS-PK-PLSP-06(2) (01-12-2010)