SlideShare a Scribd company logo
1 of 4
.1.

VBS805       COMMERCIAL PHOTOGRAPHY

HAND IN STUDIO: WITH/WITH OUT PRODUCT (VIC DEAF A/REPORT?)

                               HAND WITH PRODUCT

Image 1.          PIVOT – Hand with seedling image.


Considerations:

Talent:           Paid “Hand” talent. Even though limited depth of field, choice of
                  appropriate hand talent really important. Hand/Nail manicure a MUST!

Lighting:         Lighting on hand and product, electronic Flash - 1 grid from back RHS
                  plus reflector positioned on LHS- no gels. Note use of “Back / side
                  lighting”. There was no soft fill light above camera, as “Dramatic feel”
                  was requested. Also shadow area underside of hand a MUST for
                  aesthetic reasons, (narrows hand). A light with a grid was then directed
                  into a strategically placed small mirror to light soil at base of seedling
                  stem.

                  Background lighting – Blue gelled light “Mottled” through tree leaves /
                  branches to create “Mottled background”. “Warm / amber” gel on spot
                  positioned appropriately for hand. Note spot with “warm” gel for “glow”
                  around stem.

Camera:           Sinar 5x4, 150mm lens. ‘Movements’ used to attain limited focus and to
                  accentuate “narrow depth of field effect”. A process that required
                  patience and a critical approach to composition and lighting.

                  81A + Sinar soft, (OD3 from memory) filter on lens.

Technique:        Talent’s arm / elbow set up on support to enable stability and to control
                  composition.

                  Set this shot up the night before actual shoot and used Lindsay’s hand
                  for practice. Exposed some sheets to ascertain exposure and lighting
                  relationships.

                  Client requested an “Arty”/ “Rustic - Earthy” feel to the image.
                  Definitely did not want a “slick” result. (Consider market for product!)
                  When final result on 5 x 4 sheet film was achieved, we then had it
                  printed onto a textured stock and then rephotographed it to
                  “degenerate” the “quality”.

                  This image required somewhere between 10 - 15 sheets of 5 x 4in film
                  to be shot to obtain final image.
.2.


Image 2.          UEComm Prospectus front cover


Considerations:

Talent:           Used Lindsay’s hand for this image. We often use his hands, as they are
                  quite good! Shot on location. Ensured he had had manicure before
                  shoot!

                  Once again, even though limited depth of field. Hand manicure a MUST!

Lighting:         Lighting on hand and product; electronic Flash - 1 grid spot from top,
                  back LHS plus reflector positioned on RHS- Amber gel. Note use again
                  of “Back / side lighting”. One grid spot from side LHS – Amber gel also,
                  (allowed this to spill onto background also – RHS, to de-saturate blue in
                  that area)

                  Background lighting – Blue gelled spot, top RHS.

Camera:           Mamiya RB, 50mm lens with extension tube #1. Shot this image
                  stopped down considerably. CROPPED! As hand quite ugly and over
                  prominent on bottom LHS if not done so. Often find that cropping when
                  working in close will facilitate nicer shapes and add to the aesthetic.
                  Need a medium to large format or large file size to work with though!
                  (6x6, 6x7)

                  No filters on lens.

Technique:        Talent’s arm / elbow set up on support to enable stability and to control
                  composition.

                  Client requested an “Edgy”/ “Electronic feel” to the image. They also
                  wanted a sense of immediacy also. They actually requested “Cross
                  process as a means of creating an almost posterised effect. This image
                  was shot using Kodak 100D and then processing it C41.

                  A single colour print (Pegasus) from CPL was supplied to client.
.3.


HAND / HANDS ON OWN (Similar concept to “VicDEAF Annual report)

Image 3.          TOLL Annual Report front cover.


Considerations:

Talent:           Used Lindsay’s hands for this image. Hand / Nail manicure again a MUST!

Lighting:         All references to Left or Right refer to “Camera Left or Right”.

                  Lighting on hands; electronic Flash - 1 grid “Square” from top, “Side” RHS (1/4
                  Amber gel), plus reflectors positioned on either side of camera. Note use again
                  of “Back / side lighting”.

                  Cutter positioned to keep this lighting off suit! (background).

                  Background lighting, (suit) – Electronic flash. 1/4 amber gelled spot grid, top
                  RHS. Very carefully positioned! to rake across suit and tie. Cutter positioned to
                  put shadow on area where type would later be placed.

Camera:           Mamiya RB, 127mm lens. Shot this image around f8 to allow suit to drop out of
                  focus so type, when positioned, would stand out.

                  81EF filter on lens.

Technique:        Talent’s arm / elbow set up on support to enable stability and to control
                  composition, (Camera right).

                  Lower hand had elbow resting on purchased bench top that was set up in
                  studio to simulate Jarra, (perceived as expensive timber) boardroom table. -
                  CRUCIAL THAT GAP BE LEFT FOR TYPE TO BE DROPPED IN, (in a dark area of
                  suit).

                  Initially client, (Design company), requested CEO of TOLL, Paul Little to act as
                  Hand talent, (not a good idea!) We had to comply with this request, (having
                  pointed out the problems associated with this before initial shoot, - broken
                  fingers from previous car racing accident, manicures etc!) He decided very
                  quickly he did not want to do it and then in our own time we manufactured &
                  engineered a successful image.

                  This image required 3 attempts, (including 1st with Paul Little), to create
                  image where type fitted exactly where it needed to. Although 1st attempt with
                  Lindsay was really to nail down lighting and composition with the 2nd version a
                  “Polished” result of this.
.4.

Image 4.          RMIT “TRAINING” Brochure.


Considerations:

Talent:           Booked professional hand talent for this job. Had casting with Designer
                  client to establish who was suitable! Hand / Nail manicures again a
                  MUST!

Lighting:         All references to Left or Right refer to “Camera Left or Right”.

                  Lighting on hands; electronic Flash “Tungsten Modelling Lights +
                  controlled available light!”

                  Used available light as “base lighting” near a window and then
                  accentuated , (Rimmed / side lit) hands / grey shirt with lighting
                  provided from 3 strategically positioned tungsten modelling lights from
                  3 Elinchrom 3000 pack heads, (grid spots attached). Used these as
                  against using conventional tungsten lights due to ease of grid spot
                  capability and that they would be positioned reasonably close.

                  This was done to produce a natural, “un-studio like feel” even though it
                  was shot in the studio. Positioned large hinged flats either side of
                  camera to produce soft fill.

Camera:           Mamiya RB, 250mm lens. Shot this image, (and all from brochure),
                  aperture wide open to allow backgrounds to drop out of focus.

                  Orange filter on lens to lighten skin tones on hands and to slightly
                  increase contrast.

Technique:        On this front cover image, LHS talent’s arms / elbows positioned on “X”
                  marked spots on table to facilitate him being able to move them for a
                  rest if necessary.

                  Deliberately sought to use dominant / strong diagonal lines of
                  composition to create image(s) that were graphic and structured. Often,
                  the camera was “Dutch tilted” to facilitate and accentuate this. This, to
                  support a “Feeling” of “Energy” and “Movement”.

More Related Content

What's hot (11)

Camera and types
Camera and typesCamera and types
Camera and types
 
Paranormal activity 4 trailer
Paranormal activity 4 trailerParanormal activity 4 trailer
Paranormal activity 4 trailer
 
Photography General Session 30
Photography General Session 30Photography General Session 30
Photography General Session 30
 
Film production workshop
Film production workshopFilm production workshop
Film production workshop
 
Unit 18 powerpoint
Unit 18 powerpoint   Unit 18 powerpoint
Unit 18 powerpoint
 
Floor plan
Floor planFloor plan
Floor plan
 
Introduction to Photography
Introduction to PhotographyIntroduction to Photography
Introduction to Photography
 
Practical skills week 1
Practical skills week 1Practical skills week 1
Practical skills week 1
 
Ppt3
Ppt3Ppt3
Ppt3
 
10 tips for developing your commercial real estate photography
10 tips for developing your commercial real estate photography10 tips for developing your commercial real estate photography
10 tips for developing your commercial real estate photography
 
What camera should I buy
What camera should I buyWhat camera should I buy
What camera should I buy
 

Viewers also liked

Analytics for Digital PR
Analytics for Digital PRAnalytics for Digital PR
Analytics for Digital PR
Abhishek Rout
 
Commercial Photography - thoughts on how to approach your profession
Commercial Photography - thoughts on how to approach your professionCommercial Photography - thoughts on how to approach your profession
Commercial Photography - thoughts on how to approach your profession
Mark Adrian Langtry
 
Virgin Australia - Pit Crew Leader Shadowing exercise
Virgin Australia - Pit Crew Leader Shadowing exercise Virgin Australia - Pit Crew Leader Shadowing exercise
Virgin Australia - Pit Crew Leader Shadowing exercise
Mark Adrian Langtry
 

Viewers also liked (7)

Analytics for Digital PR
Analytics for Digital PRAnalytics for Digital PR
Analytics for Digital PR
 
REFLECTIONS THROUGH A WINDOW OF TRANSITION - Images
REFLECTIONS THROUGH A WINDOW OF TRANSITION - ImagesREFLECTIONS THROUGH A WINDOW OF TRANSITION - Images
REFLECTIONS THROUGH A WINDOW OF TRANSITION - Images
 
Commercial Photography - thoughts on how to approach your profession
Commercial Photography - thoughts on how to approach your professionCommercial Photography - thoughts on how to approach your profession
Commercial Photography - thoughts on how to approach your profession
 
Virgin Australia - Engineer Shadowing Exercise
Virgin Australia - Engineer Shadowing Exercise Virgin Australia - Engineer Shadowing Exercise
Virgin Australia - Engineer Shadowing Exercise
 
Pratt Design Logos - Guest Lecture - Elaine Pratt
Pratt Design Logos - Guest Lecture - Elaine PrattPratt Design Logos - Guest Lecture - Elaine Pratt
Pratt Design Logos - Guest Lecture - Elaine Pratt
 
Pratt Design
Pratt DesignPratt Design
Pratt Design
 
Virgin Australia - Pit Crew Leader Shadowing exercise
Virgin Australia - Pit Crew Leader Shadowing exercise Virgin Australia - Pit Crew Leader Shadowing exercise
Virgin Australia - Pit Crew Leader Shadowing exercise
 

Similar to Mark Adrian Langtry - Photography: Hand / Product

Picture-Hounds-Guide-small1
Picture-Hounds-Guide-small1Picture-Hounds-Guide-small1
Picture-Hounds-Guide-small1
Anne Chan
 
Case study 05
Case study 05Case study 05
Case study 05
MrLawler
 
Basics of composition
Basics of compositionBasics of composition
Basics of composition
Amber Bhaumik
 
Photography for the Beginner
Photography for the BeginnerPhotography for the Beginner
Photography for the Beginner
bpennphoto
 
Photographic and design principale
Photographic and design principalePhotographic and design principale
Photographic and design principale
rutawavey
 
Photographic and design principale
Photographic and design principalePhotographic and design principale
Photographic and design principale
rutawavey
 
Night photography brief
Night photography briefNight photography brief
Night photography brief
christimothy12
 

Similar to Mark Adrian Langtry - Photography: Hand / Product (20)

Basic DSLR
Basic DSLRBasic DSLR
Basic DSLR
 
Camera angles and photography
Camera angles and photographyCamera angles and photography
Camera angles and photography
 
Picture-Hounds-Guide-small1
Picture-Hounds-Guide-small1Picture-Hounds-Guide-small1
Picture-Hounds-Guide-small1
 
Studio lighting
Studio lightingStudio lighting
Studio lighting
 
Slcc11 buscaylet
Slcc11 buscayletSlcc11 buscaylet
Slcc11 buscaylet
 
Case study 05
Case study 05Case study 05
Case study 05
 
Photography Merit Badge Powerpoint
Photography Merit Badge PowerpointPhotography Merit Badge Powerpoint
Photography Merit Badge Powerpoint
 
Basics of composition
Basics of compositionBasics of composition
Basics of composition
 
Photography for the Beginner
Photography for the BeginnerPhotography for the Beginner
Photography for the Beginner
 
Photographic and design principale
Photographic and design principalePhotographic and design principale
Photographic and design principale
 
Photographic and design principale
Photographic and design principalePhotographic and design principale
Photographic and design principale
 
Night photography brief
Night photography briefNight photography brief
Night photography brief
 
Resources and equipment
Resources and equipmentResources and equipment
Resources and equipment
 
Composition in film
Composition in filmComposition in film
Composition in film
 
Shoot better!
Shoot better!Shoot better!
Shoot better!
 
Cinematic lighting .pdf
Cinematic lighting .pdfCinematic lighting .pdf
Cinematic lighting .pdf
 
Lighting instruments
Lighting instrumentsLighting instruments
Lighting instruments
 
Digital Photography Basics
Digital Photography BasicsDigital Photography Basics
Digital Photography Basics
 
Tia key concepts
Tia   key conceptsTia   key concepts
Tia key concepts
 
Photo talk 1
Photo talk 1Photo talk 1
Photo talk 1
 

Mark Adrian Langtry - Photography: Hand / Product

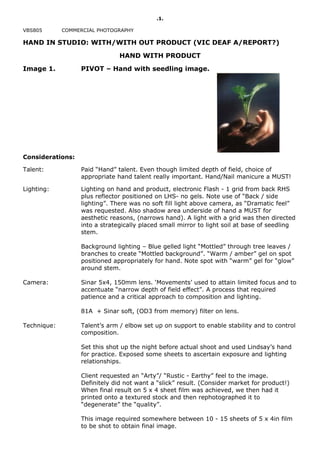
  • 1. .1. VBS805 COMMERCIAL PHOTOGRAPHY HAND IN STUDIO: WITH/WITH OUT PRODUCT (VIC DEAF A/REPORT?) HAND WITH PRODUCT Image 1. PIVOT – Hand with seedling image. Considerations: Talent: Paid “Hand” talent. Even though limited depth of field, choice of appropriate hand talent really important. Hand/Nail manicure a MUST! Lighting: Lighting on hand and product, electronic Flash - 1 grid from back RHS plus reflector positioned on LHS- no gels. Note use of “Back / side lighting”. There was no soft fill light above camera, as “Dramatic feel” was requested. Also shadow area underside of hand a MUST for aesthetic reasons, (narrows hand). A light with a grid was then directed into a strategically placed small mirror to light soil at base of seedling stem. Background lighting – Blue gelled light “Mottled” through tree leaves / branches to create “Mottled background”. “Warm / amber” gel on spot positioned appropriately for hand. Note spot with “warm” gel for “glow” around stem. Camera: Sinar 5x4, 150mm lens. ‘Movements’ used to attain limited focus and to accentuate “narrow depth of field effect”. A process that required patience and a critical approach to composition and lighting. 81A + Sinar soft, (OD3 from memory) filter on lens. Technique: Talent’s arm / elbow set up on support to enable stability and to control composition. Set this shot up the night before actual shoot and used Lindsay’s hand for practice. Exposed some sheets to ascertain exposure and lighting relationships. Client requested an “Arty”/ “Rustic - Earthy” feel to the image. Definitely did not want a “slick” result. (Consider market for product!) When final result on 5 x 4 sheet film was achieved, we then had it printed onto a textured stock and then rephotographed it to “degenerate” the “quality”. This image required somewhere between 10 - 15 sheets of 5 x 4in film to be shot to obtain final image.
  • 2. .2. Image 2. UEComm Prospectus front cover Considerations: Talent: Used Lindsay’s hand for this image. We often use his hands, as they are quite good! Shot on location. Ensured he had had manicure before shoot! Once again, even though limited depth of field. Hand manicure a MUST! Lighting: Lighting on hand and product; electronic Flash - 1 grid spot from top, back LHS plus reflector positioned on RHS- Amber gel. Note use again of “Back / side lighting”. One grid spot from side LHS – Amber gel also, (allowed this to spill onto background also – RHS, to de-saturate blue in that area) Background lighting – Blue gelled spot, top RHS. Camera: Mamiya RB, 50mm lens with extension tube #1. Shot this image stopped down considerably. CROPPED! As hand quite ugly and over prominent on bottom LHS if not done so. Often find that cropping when working in close will facilitate nicer shapes and add to the aesthetic. Need a medium to large format or large file size to work with though! (6x6, 6x7) No filters on lens. Technique: Talent’s arm / elbow set up on support to enable stability and to control composition. Client requested an “Edgy”/ “Electronic feel” to the image. They also wanted a sense of immediacy also. They actually requested “Cross process as a means of creating an almost posterised effect. This image was shot using Kodak 100D and then processing it C41. A single colour print (Pegasus) from CPL was supplied to client.
  • 3. .3. HAND / HANDS ON OWN (Similar concept to “VicDEAF Annual report) Image 3. TOLL Annual Report front cover. Considerations: Talent: Used Lindsay’s hands for this image. Hand / Nail manicure again a MUST! Lighting: All references to Left or Right refer to “Camera Left or Right”. Lighting on hands; electronic Flash - 1 grid “Square” from top, “Side” RHS (1/4 Amber gel), plus reflectors positioned on either side of camera. Note use again of “Back / side lighting”. Cutter positioned to keep this lighting off suit! (background). Background lighting, (suit) – Electronic flash. 1/4 amber gelled spot grid, top RHS. Very carefully positioned! to rake across suit and tie. Cutter positioned to put shadow on area where type would later be placed. Camera: Mamiya RB, 127mm lens. Shot this image around f8 to allow suit to drop out of focus so type, when positioned, would stand out. 81EF filter on lens. Technique: Talent’s arm / elbow set up on support to enable stability and to control composition, (Camera right). Lower hand had elbow resting on purchased bench top that was set up in studio to simulate Jarra, (perceived as expensive timber) boardroom table. - CRUCIAL THAT GAP BE LEFT FOR TYPE TO BE DROPPED IN, (in a dark area of suit). Initially client, (Design company), requested CEO of TOLL, Paul Little to act as Hand talent, (not a good idea!) We had to comply with this request, (having pointed out the problems associated with this before initial shoot, - broken fingers from previous car racing accident, manicures etc!) He decided very quickly he did not want to do it and then in our own time we manufactured & engineered a successful image. This image required 3 attempts, (including 1st with Paul Little), to create image where type fitted exactly where it needed to. Although 1st attempt with Lindsay was really to nail down lighting and composition with the 2nd version a “Polished” result of this.
  • 4. .4. Image 4. RMIT “TRAINING” Brochure. Considerations: Talent: Booked professional hand talent for this job. Had casting with Designer client to establish who was suitable! Hand / Nail manicures again a MUST! Lighting: All references to Left or Right refer to “Camera Left or Right”. Lighting on hands; electronic Flash “Tungsten Modelling Lights + controlled available light!” Used available light as “base lighting” near a window and then accentuated , (Rimmed / side lit) hands / grey shirt with lighting provided from 3 strategically positioned tungsten modelling lights from 3 Elinchrom 3000 pack heads, (grid spots attached). Used these as against using conventional tungsten lights due to ease of grid spot capability and that they would be positioned reasonably close. This was done to produce a natural, “un-studio like feel” even though it was shot in the studio. Positioned large hinged flats either side of camera to produce soft fill. Camera: Mamiya RB, 250mm lens. Shot this image, (and all from brochure), aperture wide open to allow backgrounds to drop out of focus. Orange filter on lens to lighten skin tones on hands and to slightly increase contrast. Technique: On this front cover image, LHS talent’s arms / elbows positioned on “X” marked spots on table to facilitate him being able to move them for a rest if necessary. Deliberately sought to use dominant / strong diagonal lines of composition to create image(s) that were graphic and structured. Often, the camera was “Dutch tilted” to facilitate and accentuate this. This, to support a “Feeling” of “Energy” and “Movement”.