SlideShare una empresa de Scribd logo
1 de 18
Descargar para leer sin conexión
Project:Biplane   Page 1 of 18

                            Biplane kids toy plan
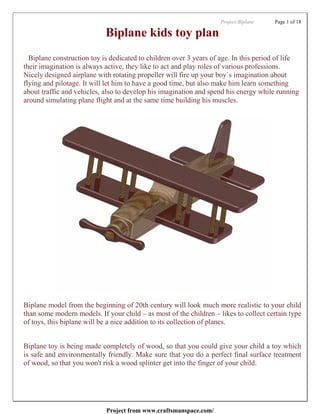
  Biplane construction toy is dedicated to children over 3 years of age. In this period of life
their imagination is always active, they like to act and play roles of various professions.
Nicely designed airplane with rotating propeller will fire up your boy`s imagination about
flying and pilotage. It will let him to have a good time, but also make him learn something
about traffic and vehicles, also to develop his imagination and spend his energy while running
around simulating plane flight and at the same time building his muscles.


Biplane model from the beginning of 20th century will look much more realistic to your child
than some modern models. If your child – as most of the children – likes to collect certain type
of toys, this biplane will be a nice addition to its collection of planes.


Biplane toy is being made completely of wood, so that you could give your child a toy which
is safe and environmentally friendly. Make sure that you do a perfect final surface treatment
of wood, so that you won't risk a wood splinter get into the finger of your child.


                            Project from www.craftsmanspace.com/
Project:Biplane     Page 2 of 18


For making wooden biplane construction toy you won't need much material – you can use
wood remains that usually can be always found in the workshop. And you won't need many
tools. This model is quite simple to make, it won't take much of your time, and you will make
a toy that can remain undamaged after many fallings and stay in the family waiting for the
next generations of little pilots. As you can see in the plan, we recommend not to paint wood,
but leave it in its natural colour. It is enough to protect it with some kids-safe natural oils (for
example linseed or walnut oil) and you will make a perfect toy in just a few hours. Use
different types of wood, so you would get the right wood colour of plane fuselage and wings.


Carefully make the parts of the biplane by the measurements given on particular pictures. The
measurements are given in millimeters, while the measurements given in inches are in brakes
(1 inch = 25, 4 mm).

After making all the parts of the plane, you should join them with glue. Be careful with dosage
of glue, because it could come out from the holes and smear the surface of an object.


                             Project from www.craftsmanspace.com/
Project:Biplane   Page 3 of 18


PARTS LIST


             Project from www.craftsmanspace.com/
Project:Biplane   Page 4 of 18


2D Documentation


                   Project from www.craftsmanspace.com/
Project:Biplane   Page 5 of 18


Project from www.craftsmanspace.com/
Project:Biplane   Page 6 of 18


Project from www.craftsmanspace.com/
Project:Biplane   Page 7 of 18


Project from www.craftsmanspace.com/
Project:Biplane   Page 8 of 18


Project from www.craftsmanspace.com/
Project:Biplane   Page 9 of 18


Project from www.craftsmanspace.com/
Project:Biplane   Page 10 of 18


Project from www.craftsmanspace.com/
Project:Biplane   Page 11 of 18


Project from www.craftsmanspace.com/
Project:Biplane   Page 12 of 18


Project from www.craftsmanspace.com/
Project:Biplane       Page 13 of 18


ASSEMBLAGE INSTRUCTIONS

 1. Horizontal tail (Item 2) and Vertical tail (Item 3) attach with glue to the Fuselage (Item 1) and
    leave it to dry out.


 2. Spread the glue through the middle of Lower wing (Item 6) and push it slowly into the hole on the
    lower side of a Fuselage (Item 1). Be sure to have some clean cloth, to wipe off the glue if it come
    out to surface.


                           Project from www.craftsmanspace.com/
Project:Biplane      Page 14 of 18


If you think that the wing is not well firmed to the Fuselage, you should drill a hole (25 mm depth;
D8mm diameter) and put the pin with the same dimensions (Length 25 mm, Diameter D8mm) into it.
Previously bedaub the pin with glue.


                         Project from www.craftsmanspace.com/
Project:Biplane      Page 15 of 18


3.     Put the glue into the holes on the upper surface of Lower wing (Item 6), then stick the Vertical
     support (Item 8) into it.


                           Project from www.craftsmanspace.com/
Project:Biplane       Page 16 of 18


4.    Also put the glue into the holes on the lower side of the Upper wing (Item 7) and stick the Vertical
     support (Items 8) into it.


                           Project from www.craftsmanspace.com/
Project:Biplane       Page 17 of 18


5. Pull the Axle (Item 4) through the Propeller (Item 5), and if the Propeller is spinning with
   difficulty, widen the hole on the Propeller with a rasp.


                          Project from www.craftsmanspace.com/
Project:Biplane        Page 18 of 18


If you have performed the previous step properly, all that is left is to attach the Axle (Item 4) and Propeller
(Item5) with glue to the Fuselage (Item 1). Pull the Axle (Item 4) through a hole on the Propeller (Item5)
and attach with glue onto front hole on the Fuselage (Item 1) (previously put some glue into the hole). Be
careful, not to put any glue on the Propeller (Item5), because it should spin freely.


                              Project from www.craftsmanspace.com/

Más contenido relacionado

Destacado

Lego Toys Project Slide share ppt
Lego Toys Project Slide share pptLego Toys Project Slide share ppt
Lego Toys Project Slide share pptRohan Naik
 
toy industry trends 2016
toy industry trends 2016toy industry trends 2016
toy industry trends 2016Satyajit Dash
 
Toys "R" Us Marketing Plan
Toys "R" Us Marketing PlanToys "R" Us Marketing Plan
Toys "R" Us Marketing PlanAri Ratner
 
TOOBEEZ Product Guide
TOOBEEZ Product GuideTOOBEEZ Product Guide
TOOBEEZ Product GuideChris Stummer
 

Destacado (7)

toy market segments
toy market segments toy market segments
toy market segments
 
Lego Toys Project Slide share ppt
Lego Toys Project Slide share pptLego Toys Project Slide share ppt
Lego Toys Project Slide share ppt
 
toy industry trends 2016
toy industry trends 2016toy industry trends 2016
toy industry trends 2016
 
Toys "R" Us Marketing Plan
Toys "R" Us Marketing PlanToys "R" Us Marketing Plan
Toys "R" Us Marketing Plan
 
TOOBEEZ Product Guide
TOOBEEZ Product GuideTOOBEEZ Product Guide
TOOBEEZ Product Guide
 
Toys r us
Toys r usToys r us
Toys r us
 
Presentation on Walmart
Presentation on WalmartPresentation on Walmart
Presentation on Walmart
 

Último

南新罕布什尔大学毕业证学位证成绩单-学历认证
南新罕布什尔大学毕业证学位证成绩单-学历认证南新罕布什尔大学毕业证学位证成绩单-学历认证
南新罕布什尔大学毕业证学位证成绩单-学历认证kbdhl05e
 
Authentic No 1 Amil Baba In Pakistan Amil Baba In Faisalabad Amil Baba In Kar...
Authentic No 1 Amil Baba In Pakistan Amil Baba In Faisalabad Amil Baba In Kar...Authentic No 1 Amil Baba In Pakistan Amil Baba In Faisalabad Amil Baba In Kar...
Authentic No 1 Amil Baba In Pakistan Amil Baba In Faisalabad Amil Baba In Kar...Authentic No 1 Amil Baba In Pakistan
 
(南达科他州立大学毕业证学位证成绩单-永久存档)
(南达科他州立大学毕业证学位证成绩单-永久存档)(南达科他州立大学毕业证学位证成绩单-永久存档)
(南达科他州立大学毕业证学位证成绩单-永久存档)oannq
 
Inspiring Through Words Power of Inspiration.pptx
Inspiring Through Words Power of Inspiration.pptxInspiring Through Words Power of Inspiration.pptx
Inspiring Through Words Power of Inspiration.pptxShubham Rawat
 
E J Waggoner against Kellogg's Pantheism 8.pptx
E J Waggoner against Kellogg's Pantheism 8.pptxE J Waggoner against Kellogg's Pantheism 8.pptx
E J Waggoner against Kellogg's Pantheism 8.pptxJackieSparrow3
 
Module-2-Lesson-2-COMMUNICATION-AIDS-AND-STRATEGIES-USING-TOOLS-OF-TECHNOLOGY...
Module-2-Lesson-2-COMMUNICATION-AIDS-AND-STRATEGIES-USING-TOOLS-OF-TECHNOLOGY...Module-2-Lesson-2-COMMUNICATION-AIDS-AND-STRATEGIES-USING-TOOLS-OF-TECHNOLOGY...
Module-2-Lesson-2-COMMUNICATION-AIDS-AND-STRATEGIES-USING-TOOLS-OF-TECHNOLOGY...JeylaisaManabat1
 

Último (6)

南新罕布什尔大学毕业证学位证成绩单-学历认证
南新罕布什尔大学毕业证学位证成绩单-学历认证南新罕布什尔大学毕业证学位证成绩单-学历认证
南新罕布什尔大学毕业证学位证成绩单-学历认证
 
Authentic No 1 Amil Baba In Pakistan Amil Baba In Faisalabad Amil Baba In Kar...
Authentic No 1 Amil Baba In Pakistan Amil Baba In Faisalabad Amil Baba In Kar...Authentic No 1 Amil Baba In Pakistan Amil Baba In Faisalabad Amil Baba In Kar...
Authentic No 1 Amil Baba In Pakistan Amil Baba In Faisalabad Amil Baba In Kar...
 
(南达科他州立大学毕业证学位证成绩单-永久存档)
(南达科他州立大学毕业证学位证成绩单-永久存档)(南达科他州立大学毕业证学位证成绩单-永久存档)
(南达科他州立大学毕业证学位证成绩单-永久存档)
 
Inspiring Through Words Power of Inspiration.pptx
Inspiring Through Words Power of Inspiration.pptxInspiring Through Words Power of Inspiration.pptx
Inspiring Through Words Power of Inspiration.pptx
 
E J Waggoner against Kellogg's Pantheism 8.pptx
E J Waggoner against Kellogg's Pantheism 8.pptxE J Waggoner against Kellogg's Pantheism 8.pptx
E J Waggoner against Kellogg's Pantheism 8.pptx
 
Module-2-Lesson-2-COMMUNICATION-AIDS-AND-STRATEGIES-USING-TOOLS-OF-TECHNOLOGY...
Module-2-Lesson-2-COMMUNICATION-AIDS-AND-STRATEGIES-USING-TOOLS-OF-TECHNOLOGY...Module-2-Lesson-2-COMMUNICATION-AIDS-AND-STRATEGIES-USING-TOOLS-OF-TECHNOLOGY...
Module-2-Lesson-2-COMMUNICATION-AIDS-AND-STRATEGIES-USING-TOOLS-OF-TECHNOLOGY...
 

Biplane Toy Plan

  • 1. Project:Biplane Page 1 of 18 Biplane kids toy plan Biplane construction toy is dedicated to children over 3 years of age. In this period of life their imagination is always active, they like to act and play roles of various professions. Nicely designed airplane with rotating propeller will fire up your boy`s imagination about flying and pilotage. It will let him to have a good time, but also make him learn something about traffic and vehicles, also to develop his imagination and spend his energy while running around simulating plane flight and at the same time building his muscles. Biplane model from the beginning of 20th century will look much more realistic to your child than some modern models. If your child – as most of the children – likes to collect certain type of toys, this biplane will be a nice addition to its collection of planes. Biplane toy is being made completely of wood, so that you could give your child a toy which is safe and environmentally friendly. Make sure that you do a perfect final surface treatment of wood, so that you won't risk a wood splinter get into the finger of your child. Project from www.craftsmanspace.com/
  • 2. Project:Biplane Page 2 of 18 For making wooden biplane construction toy you won't need much material – you can use wood remains that usually can be always found in the workshop. And you won't need many tools. This model is quite simple to make, it won't take much of your time, and you will make a toy that can remain undamaged after many fallings and stay in the family waiting for the next generations of little pilots. As you can see in the plan, we recommend not to paint wood, but leave it in its natural colour. It is enough to protect it with some kids-safe natural oils (for example linseed or walnut oil) and you will make a perfect toy in just a few hours. Use different types of wood, so you would get the right wood colour of plane fuselage and wings. Carefully make the parts of the biplane by the measurements given on particular pictures. The measurements are given in millimeters, while the measurements given in inches are in brakes (1 inch = 25, 4 mm). After making all the parts of the plane, you should join them with glue. Be careful with dosage of glue, because it could come out from the holes and smear the surface of an object. Project from www.craftsmanspace.com/
  • 3. Project:Biplane Page 3 of 18 PARTS LIST Project from www.craftsmanspace.com/
  • 4. Project:Biplane Page 4 of 18 2D Documentation Project from www.craftsmanspace.com/
  • 5. Project:Biplane Page 5 of 18 Project from www.craftsmanspace.com/
  • 6. Project:Biplane Page 6 of 18 Project from www.craftsmanspace.com/
  • 7. Project:Biplane Page 7 of 18 Project from www.craftsmanspace.com/
  • 8. Project:Biplane Page 8 of 18 Project from www.craftsmanspace.com/
  • 9. Project:Biplane Page 9 of 18 Project from www.craftsmanspace.com/
  • 10. Project:Biplane Page 10 of 18 Project from www.craftsmanspace.com/
  • 11. Project:Biplane Page 11 of 18 Project from www.craftsmanspace.com/
  • 12. Project:Biplane Page 12 of 18 Project from www.craftsmanspace.com/
  • 13. Project:Biplane Page 13 of 18 ASSEMBLAGE INSTRUCTIONS 1. Horizontal tail (Item 2) and Vertical tail (Item 3) attach with glue to the Fuselage (Item 1) and leave it to dry out. 2. Spread the glue through the middle of Lower wing (Item 6) and push it slowly into the hole on the lower side of a Fuselage (Item 1). Be sure to have some clean cloth, to wipe off the glue if it come out to surface. Project from www.craftsmanspace.com/
  • 14. Project:Biplane Page 14 of 18 If you think that the wing is not well firmed to the Fuselage, you should drill a hole (25 mm depth; D8mm diameter) and put the pin with the same dimensions (Length 25 mm, Diameter D8mm) into it. Previously bedaub the pin with glue. Project from www.craftsmanspace.com/
  • 15. Project:Biplane Page 15 of 18 3. Put the glue into the holes on the upper surface of Lower wing (Item 6), then stick the Vertical support (Item 8) into it. Project from www.craftsmanspace.com/
  • 16. Project:Biplane Page 16 of 18 4. Also put the glue into the holes on the lower side of the Upper wing (Item 7) and stick the Vertical support (Items 8) into it. Project from www.craftsmanspace.com/
  • 17. Project:Biplane Page 17 of 18 5. Pull the Axle (Item 4) through the Propeller (Item 5), and if the Propeller is spinning with difficulty, widen the hole on the Propeller with a rasp. Project from www.craftsmanspace.com/
  • 18. Project:Biplane Page 18 of 18 If you have performed the previous step properly, all that is left is to attach the Axle (Item 4) and Propeller (Item5) with glue to the Fuselage (Item 1). Pull the Axle (Item 4) through a hole on the Propeller (Item5) and attach with glue onto front hole on the Fuselage (Item 1) (previously put some glue into the hole). Be careful, not to put any glue on the Propeller (Item5), because it should spin freely. Project from www.craftsmanspace.com/