
Recomendados
Más contenido relacionado
La actualidad más candente
La actualidad más candente (19)
Similar a Adding A Course Link
Similar a Adding A Course Link (20)
Último
Último (20)
Adding A Course Link
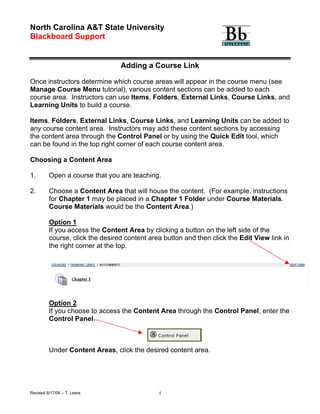
- 1. North Carolina A&T State University Blackboard Support Revised 8/17/06 – T. Lewis 1 Adding a Course Link Once instructors determine which course areas will appear in the course menu (see Manage Course Menu tutorial), various content sections can be added to each course area. Instructors can use Items, Folders, External Links, Course Links, and Learning Units to build a course. Items, Folders, External Links, Course Links, and Learning Units can be added to any course content area. Instructors may add these content sections by accessing the content area through the Control Panel or by using the Quick Edit tool, which can be found in the top right corner of each course content area. Choosing a Content Area 1. Open a course that you are teaching. 2. Choose a Content Area that will house the content. (For example, instructions for Chapter 1 may be placed in a Chapter 1 Folder under Course Materials. Course Materials would be the Content Area.) Option 1 If you access the Content Area by clicking a button on the left side of the course, click the desired content area button and then click the Edit View link in the right corner at the top. Option 2 If you choose to access the Content Area through the Control Panel, enter the Control Panel. Under Content Areas, click the desired content area.
- 2. 3. If you have accessed the Content Area using the Edit View link, you will continue to see buttons on the left, editing options in the center, and a Display View Revised 8/17/06 – T. Lewis 2 link on the right side. The Edit View and Display View links allow you to switch between the “editing view” and the “students’ view”. You can also click the content area button to switch to the “students’ view” of the course material. If you have accessed the Content Area using the Control Panel, you will only see the editing options at the top. Adding a Course Link A Course Link will link the student to a content item within the course. (For example, if the assignment directs the students to participate in a discussion thread, instructors can add a link directly to the discussion board.) Students can be linked to any content area within the course. The content must be created before you can create the course link. Course Links can be added to any content area and can stand alone or be placed inside folders or learning units. Once the content area has been selected (see the Choosing a Content Area section above), a menu bar will be provided.
- 3. 1. To add a Course Link to a folder or learning unit, the folder or learning unit must be opened first. To open a folder or learning unit, click the name of the folder or learning unit. Revised 8/17/06 – T. Lewis 3 Once the folder has been opened, the name of the folder or learning unit will appear at the top. (This will be an indication that the course link will appear inside the folder or learning unit). Course links can also stand alone. They can be placed directly in a content area, outside a folder or learning unit. 2. To add a Course Link (outside a folder or learning unit), select the Course Link icon from the menu bar.
- 4. 3. The Add Item page will appear for the Course Link. 4. Under Section 1, you will add the Course Link Information. 5. Under Name, you will determine the name of the Course Link. You can (1) choose a name from the drop-down menu OR (2) enter the name that you desire. If you choose to select a name from the drop-down menu, click the down error to see a list of the preset names for the course link. Select a name. Revised 8/17/06 – T. Lewis 4
- 5. If you choose to enter a customized name for the course link (Example: Unit I Lecture Notes), type the information in the text box. Revised 8/17/06 – T. Lewis 5 Information in the text box will override any name selected from the drop-down menu. 6. You can customize the color of the Name by clicking the Pick button. The default color is Black. 7. After you click the Pick button, a Color Picker window will appear. (This window may not appear if your pop-up blocker is on. Set your computer to temporarily allow pop-ups.) To select a color for the course link name, click the square of the desired color. 8. The selected color will now appear in the color square beside the Pick button. 9. Text can be included with this course link. For example, if your Course Link is to a set of notes, you can add a description of the notes for the students. Instructions or directions for these notes could also be provided in the text area. Information can be cut and pasted from a Microsoft Word document.
- 6. Revised 8/17/06 – T. Lewis 6 Helpful Tip To expand the options for editing text, click the down arrows to display additional options for the text editor. Helpful Tip Instructors can format text and attach images, video clips, sound files, hyperlinks, tables, and mathematical equations to the course link by clicking the icons in the text editor. 10. Under Section 2, click the Browse button to determine the destination for the link.
- 7. 11. After Browse has been clicked, a Course Map that lists all of the Content Areas within the course will be displayed. Click the Expand All link to display any additional content located within each content area button/folder. To link to a Content Area, select an item by double-clicking the item. Content Areas The location of the Course Link will appear in the Location field. Revised 8/17/06 – T. Lewis 7
- 8. 12. Under Section 3, additional options can be added to the course link. Make the content available: Once Yes is selected, students will have access to the course link. The Default option is Yes. If No is selected, the course link will be available to the instructor, but not the students. Track number of views: Tracks the number of times users access the course link. Statistics can be found under Course Statistics (under the Control Panel). The Default option is No. Choose date restrictions: Instructors may add date restrictions if a course link is expected to appear on a specific date and disappear on a specific date. (This section is optional. If no restrictions are applied, the course link will follow the selection made under Make the course link available.) To apply date restrictions, click the Display After box and the Display Until box. Select a date and time for each item. 13. After the details for the Course Link have been added, click Submit. Click OK to acknowledge receipt of the course link. 14. The Course Link will now appear in the content area. To modify, copy, or remove this item, choose the appropriate option. Revised 8/17/06 – T. Lewis 8 Helpful Tip The Course Link will be visible to students only if the instructor makes it available to the students. Under the course link Options section, if the instructor chooses No under Make the course link available, the course link will not be available to students. Setting date restrictions will also determine whether the course link is available to students.