SlideShare una empresa de Scribd logo
1 de 4
-Development Diary for My Digipak-

   I began by downloading a Digipak
 format, which allowed me to create a
  template for the Digipak, which will
   help me in the composition of my
   complete product. I then began by
 going through the photographs from
  my photo-shoot, whichI took whilst
  filming which allowed me to create
photographs that linked directly to my
  main product. I opened up the front
cover picture and changed the size so
   that it will fit in the template. I then changed the
curve and the levels to maximize the colouring in the
           photograph, which helps to draw attention
                 to the photograph. I then saved the
             photograph and opened up my template.
            Next I opened file < place and selected the
                 picture, which I then placed on my
            template. I then went to edit < transform <
               scale that allowed me to position the
             picture correctly within the guidelines to
              ensure that my Digipak opens and closes
             correctly. I did this with both of my model
               photographs placing them in a similar
                 layout to my mock up. I chose these
             photographs as they follow the Male Gaze
                  Theory from Laura Mulvey, which will
                 attract the audience to the product, and
                 by using both a male and female model
                  I am able to extend my audience. I have also use the rule of thirds
                     in my photographs as it allows the setting and the model to be
                  shown whilst also being more ascetically pleasing to the audience.
                  I decided to use the blue tones in the picture as a basis for the rest
                   of my Digipak as it creates a familiar theme through out it, which
                   allows the audience to identify it as one unit of work. I decided to
                 use the blue colouring as it accentuates the environment as well as
                   the calm nature of the music, which I think you are able to grasp
                                     through the use of this theme.

  I them began editing the photograph that I want to
  use on the text pages within my Digipak. I selected
   an image that I had taken of the pier by the beach
     which I thought would link with my theme so I
 decided to use that photograph. I then opened it up
in Photoshop and began by changing the image size.
I then opened Image < Adjustments < Levels, Curves,
Channel Mixer and Exposure to create the colouring
I wanted for the image which
     allowed me to match the
colouring to the colouring of the
 models clothing which helps to
    create a theme within the
   products. I then placed and
 transformed the image to fit in
   the template. I changed the
    orientation of some of the
picture to make sure that when
printed and placed together that
   will come out in the correct
               place.

                            I then began placing the text within my Digipak but first
                                I have to create a box for the text so that the text is
                              visible making it easier to read for the audience. I did
                                this by clicking on the shape tool and selecting the
                               rectangular tool, which allowed me to draw a shape
                             that would surround the text. After drawing the shape
                                                         in the selected place, I then
                                                    lowered the opacity, which allows
                                                       the background to be partially
                                                    seen through the rectangle which I
                                                        think creates a gentle feeling
                                                       instead of a harsh regimented
                                                      style which I think works better
                                                          with the genre to create a
                                                     complete package style. By doing
                                                      this you are also able to read the
                                                        text more clearly whilst also
  maintaining a design technique within the Digipak. I decided to place the text
through with the black font as it helps to stand out ensuring that the audience is
able to read it whilst also creating a theme through out the design. The use of the
       black text also works well with the light
    background helping the design to stand out.
   After doing this in the selected places I began
  placing the text on the package, I decided to use Times
    New Roman as my chosen font as I think it fits the
 package style as well as it’s simplistic nature it is easy to
    read which I hope will entice the audience into the
 product. I added the text by using the text button which
allowed me to draw a box in which I could place my text.
Here is an example of what a final piece of text would look
 like. I decided to place lyrics in my Digipak as it allowed
   the audience to connect with the songs on a stronger
 level, which I think comes through in this piece. I changed the size of the boxes
   and the text size dependent of the design of the page so that the text helps to
                 accentuate the page not hinder it’s ascetical design.
I then decided to create the title on the front of the
                                 Digipak that I thought reflected the nature of the
                                    music; I once again used the text tool, which
                                 allowed me to create a suitably sized text where I
                                   wrote the bands name and the albums name. I
                                 decided to use Times New Roman again to create
                                      a unity and design style through my work
                                 however I decided to place the text in bold which
                                allowed the text to stand out more than in the rest
                                 of the Digipak, which will draw the audience into
                                 the text. By placing the text in the selected place I
                                 was able to I increase the noticeability of the text,
                                  which is exactly what this piece of text needs to
  be. I then used the text tool once again to create the track listing for the back
                                  page. I decided to use the diamonds to separate
                                 the titles which I think helps to make it clearer. I
                                decided to use the diamonds as I think they have a
                                unique style that I haven’t seen used before. I also
                                  used them because they create juxtaposition, as
                                 they are bold compared to the text. I created the
                                   diamond through the shapes tool, which I then
                                     placed in the selected place. I then used the
                                 Duplicate Layer tool to ensure that the diamonds
                                are all the same size so that the pages flows better
                                            and the eye line of the audience is not
                                                   distracted or dismissed.

                                           I then had to place in my barcode for the
                                              use of sales. I placed the barcode by
                                          selecting a barcode off the
                                           Internet and saving it to
                                           my files. I placed it on the
 Digipak by going to File < Place and selecting the barcode from
  my files. I placed it on the back of my Digipak at the bottom of
the page, as this is the conventional place for the barcode to go. I
    also placed it here so it doesn’t distract the eye line of the
    audience from another more important object within the
   Digipak. I then placed the title of the name and the album on
both spines of the Digipak so it was clear that who the artist was
which will help capture the audience’s attention as well as giving
   them an insight into what the album may be like. I used the
  diamond tool once again to create a break between the text as well as a theme
 throughout the Digipak. The use of the diamond may also draw in the attention
          of the audience, which may increase the interest in the project.
I then had to fill in the background
              of the CD page which I did by using
              the Paint Bucket Tool which. I then
                decided to create a pattern on my
                   CD, which helped to create a
  correlation and theme through the Digipak. I
 decided to use quite a simple pattern that I had
 used on other pieces of the Digipak, as it would
   be easier to read the text on it. I did this by
placing the pattern on the square by duplicating
the layer and moving it across then lowering the
opacity so I was able to see the outline of the CD
and the template, which I then proceeded to rub
   out so that the shape of the CD was clear in
 contrast with the colour. I then placed the title
 on CD but I decided to change the shape of the
text so that it fitted the CD better. I used the Arc
 tool, which allowed me to shape the text to fit
   the CD which I think creates an interesting
  perspective for the CD whilst also creating a
   definition between the Digipak and the CD.

Más contenido relacionado

La actualidad más candente

Evaluation
EvaluationEvaluation
Evaluationkm0463
 
Evaluation
EvaluationEvaluation
Evaluationkm0463
 
Question 1 powerpoint#2
Question 1 powerpoint#2Question 1 powerpoint#2
Question 1 powerpoint#2RobynHuntx
 
Digital graphics evaluation pro forma
Digital graphics evaluation pro formaDigital graphics evaluation pro forma
Digital graphics evaluation pro formaKiran Crampton
 
CD/DVD Cover Construction
CD/DVD Cover ConstructionCD/DVD Cover Construction
CD/DVD Cover ConstructionFazBegum
 
Resaearch
ResaearchResaearch
ResaearchEvo11
 
The development of my horror poster
The development of my horror posterThe development of my horror poster
The development of my horror postertaurnknapp
 
The development of my horror poster
The development of my horror posterThe development of my horror poster
The development of my horror postertaurnknapp
 
Contents page production log
Contents page production log Contents page production log
Contents page production log tessfizzy
 
Front cover step by step
Front cover step by stepFront cover step by step
Front cover step by stepasmediaf12
 
Constuction diary for contents page
Constuction diary for contents pageConstuction diary for contents page
Constuction diary for contents pagealicesophie
 
Critical creative reflection
Critical creative reflectionCritical creative reflection
Critical creative reflectionbaninadeem
 
Preliminary evaluation
Preliminary evaluationPreliminary evaluation
Preliminary evaluationasmediag12
 
4. Production Experiments fmp
4. Production Experiments fmp4. Production Experiments fmp
4. Production Experiments fmpLibby Whitehorn
 

La actualidad más candente (19)

Evaluation
EvaluationEvaluation
Evaluation
 
Evaluation
EvaluationEvaluation
Evaluation
 
Skills dev'
Skills dev'Skills dev'
Skills dev'
 
Question 1 powerpoint#2
Question 1 powerpoint#2Question 1 powerpoint#2
Question 1 powerpoint#2
 
Digital graphics evaluation pro forma
Digital graphics evaluation pro formaDigital graphics evaluation pro forma
Digital graphics evaluation pro forma
 
CD/DVD Cover Construction
CD/DVD Cover ConstructionCD/DVD Cover Construction
CD/DVD Cover Construction
 
Skills dev'
Skills dev'Skills dev'
Skills dev'
 
Resaearch
ResaearchResaearch
Resaearch
 
The development of my horror poster
The development of my horror posterThe development of my horror poster
The development of my horror poster
 
The development of my horror poster
The development of my horror posterThe development of my horror poster
The development of my horror poster
 
Evaluation part2
Evaluation part2Evaluation part2
Evaluation part2
 
Contents page production log
Contents page production log Contents page production log
Contents page production log
 
Front cover step by step
Front cover step by stepFront cover step by step
Front cover step by step
 
Constuction diary for contents page
Constuction diary for contents pageConstuction diary for contents page
Constuction diary for contents page
 
Critical creative reflection
Critical creative reflectionCritical creative reflection
Critical creative reflection
 
Skills dev'
Skills dev'Skills dev'
Skills dev'
 
Skills dev'
Skills dev'Skills dev'
Skills dev'
 
Preliminary evaluation
Preliminary evaluationPreliminary evaluation
Preliminary evaluation
 
4. Production Experiments fmp
4. Production Experiments fmp4. Production Experiments fmp
4. Production Experiments fmp
 

Destacado

Destacado (9)

Questionaire result
Questionaire resultQuestionaire result
Questionaire result
 
Final selection
Final selectionFinal selection
Final selection
 
Photography Presentation
Photography Presentation Photography Presentation
Photography Presentation
 
Questionaire (1)
Questionaire (1)Questionaire (1)
Questionaire (1)
 
Media timeline
Media timelineMedia timeline
Media timeline
 
Initial ideas
Initial ideasInitial ideas
Initial ideas
 
Presentation1
Presentation1Presentation1
Presentation1
 
Presentation1
Presentation1Presentation1
Presentation1
 
Presentation1
Presentation1Presentation1
Presentation1
 

Similar a Development diary for my digipak

Print Production Reflection
Print Production ReflectionPrint Production Reflection
Print Production Reflectionharrydocwra
 
Fmp2 production reflection
Fmp2 production reflectionFmp2 production reflection
Fmp2 production reflectionbronparsons
 
Construction
ConstructionConstruction
Constructionsalaffina
 
Construction
ConstructionConstruction
Constructionsalaffina
 
Fmp2 production reflection
Fmp2 production reflectionFmp2 production reflection
Fmp2 production reflectionbronparsons
 
Fmp2 production reflectionss
Fmp2 production reflectionssFmp2 production reflectionss
Fmp2 production reflectionssbronparsons
 
Fmp2 production reflection
Fmp2 production reflectionFmp2 production reflection
Fmp2 production reflectionbronparsons
 
Constructing my Front Cover
Constructing my Front CoverConstructing my Front Cover
Constructing my Front Coverhobleycar
 
Magazine cover evaluation
Magazine cover evaluationMagazine cover evaluation
Magazine cover evaluationjemsjems61
 
Evaluation Q1
Evaluation Q1Evaluation Q1
Evaluation Q1joedeer
 
Digi-Pack Development Diary
Digi-Pack Development DiaryDigi-Pack Development Diary
Digi-Pack Development Diaryellierawl
 
Q6 of evaluation
Q6 of evaluationQ6 of evaluation
Q6 of evaluationAbbieSimm
 
Evaluation Pro - Forma
Evaluation Pro - FormaEvaluation Pro - Forma
Evaluation Pro - Formaniamhdarby
 
Construction of media
Construction of mediaConstruction of media
Construction of mediaezreen_b
 
6. production reflection(1) (1) (1)
6. production reflection(1) (1) (1)6. production reflection(1) (1) (1)
6. production reflection(1) (1) (1)amy foster
 
Front cover production log 1
Front cover production log 1Front cover production log 1
Front cover production log 1kianna1
 
6. production reflection [comp]
6. production reflection [comp]6. production reflection [comp]
6. production reflection [comp]Allison Hewitt
 

Similar a Development diary for my digipak (20)

Print Production Reflection
Print Production ReflectionPrint Production Reflection
Print Production Reflection
 
Fmp2 production reflection
Fmp2 production reflectionFmp2 production reflection
Fmp2 production reflection
 
Construction
ConstructionConstruction
Construction
 
Front cover
Front coverFront cover
Front cover
 
Construction
ConstructionConstruction
Construction
 
Fmp2 production reflection
Fmp2 production reflectionFmp2 production reflection
Fmp2 production reflection
 
Fmp2 production reflectionss
Fmp2 production reflectionssFmp2 production reflectionss
Fmp2 production reflectionss
 
Fmp2 production reflection
Fmp2 production reflectionFmp2 production reflection
Fmp2 production reflection
 
Constructing my Front Cover
Constructing my Front CoverConstructing my Front Cover
Constructing my Front Cover
 
Magazine cover evaluation
Magazine cover evaluationMagazine cover evaluation
Magazine cover evaluation
 
Evaluation Q1
Evaluation Q1Evaluation Q1
Evaluation Q1
 
Digi-Pack Development Diary
Digi-Pack Development DiaryDigi-Pack Development Diary
Digi-Pack Development Diary
 
Development diary
Development diaryDevelopment diary
Development diary
 
Poster step by step
Poster step by stepPoster step by step
Poster step by step
 
Q6 of evaluation
Q6 of evaluationQ6 of evaluation
Q6 of evaluation
 
Evaluation Pro - Forma
Evaluation Pro - FormaEvaluation Pro - Forma
Evaluation Pro - Forma
 
Construction of media
Construction of mediaConstruction of media
Construction of media
 
6. production reflection(1) (1) (1)
6. production reflection(1) (1) (1)6. production reflection(1) (1) (1)
6. production reflection(1) (1) (1)
 
Front cover production log 1
Front cover production log 1Front cover production log 1
Front cover production log 1
 
6. production reflection [comp]
6. production reflection [comp]6. production reflection [comp]
6. production reflection [comp]
 

Más de ellebrooking

Questionaire results presentation. (2)
Questionaire results presentation.  (2)Questionaire results presentation.  (2)
Questionaire results presentation. (2)ellebrooking
 
Questionaire results presentation. (2)
Questionaire results presentation.  (2)Questionaire results presentation.  (2)
Questionaire results presentation. (2)ellebrooking
 
Textual analysis snow patrol & kings of leon
Textual analysis   snow patrol & kings of leonTextual analysis   snow patrol & kings of leon
Textual analysis snow patrol & kings of leonellebrooking
 
Production schedule (1)
Production schedule (1)Production schedule (1)
Production schedule (1)ellebrooking
 
Post production questionnaire
Post production questionnairePost production questionnaire
Post production questionnaireellebrooking
 
Edit decision list
Edit decision listEdit decision list
Edit decision listellebrooking
 
Treatment music video
Treatment   music videoTreatment   music video
Treatment music videoellebrooking
 
Personal project powerpoint
Personal project powerpointPersonal project powerpoint
Personal project powerpointellebrooking
 

Más de ellebrooking (19)

Final selection
Final selectionFinal selection
Final selection
 
Presentation1
Presentation1Presentation1
Presentation1
 
Presentation1
Presentation1Presentation1
Presentation1
 
Presentation1
Presentation1Presentation1
Presentation1
 
Presentation1
Presentation1Presentation1
Presentation1
 
Questionaire results presentation. (2)
Questionaire results presentation.  (2)Questionaire results presentation.  (2)
Questionaire results presentation. (2)
 
Questionaire results presentation. (2)
Questionaire results presentation.  (2)Questionaire results presentation.  (2)
Questionaire results presentation. (2)
 
Textual analysis snow patrol & kings of leon
Textual analysis   snow patrol & kings of leonTextual analysis   snow patrol & kings of leon
Textual analysis snow patrol & kings of leon
 
Production schedule (1)
Production schedule (1)Production schedule (1)
Production schedule (1)
 
Presentation1
Presentation1Presentation1
Presentation1
 
Post production questionnaire
Post production questionnairePost production questionnaire
Post production questionnaire
 
Media eval yr 2
Media eval yr 2Media eval yr 2
Media eval yr 2
 
Development diary
Development diaryDevelopment diary
Development diary
 
Edit decision list
Edit decision listEdit decision list
Edit decision list
 
Final Selection
Final SelectionFinal Selection
Final Selection
 
Treatment music video
Treatment   music videoTreatment   music video
Treatment music video
 
Budget
BudgetBudget
Budget
 
Final selection
Final selectionFinal selection
Final selection
 
Personal project powerpoint
Personal project powerpointPersonal project powerpoint
Personal project powerpoint
 

Development diary for my digipak

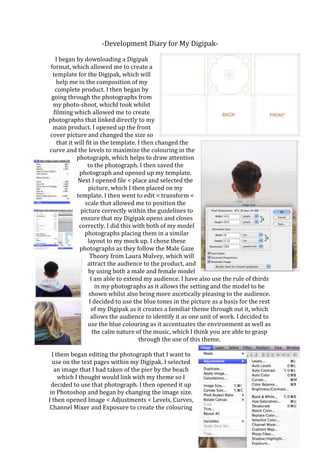
  • 1. -Development Diary for My Digipak- I began by downloading a Digipak format, which allowed me to create a template for the Digipak, which will help me in the composition of my complete product. I then began by going through the photographs from my photo-shoot, whichI took whilst filming which allowed me to create photographs that linked directly to my main product. I opened up the front cover picture and changed the size so that it will fit in the template. I then changed the curve and the levels to maximize the colouring in the photograph, which helps to draw attention to the photograph. I then saved the photograph and opened up my template. Next I opened file < place and selected the picture, which I then placed on my template. I then went to edit < transform < scale that allowed me to position the picture correctly within the guidelines to ensure that my Digipak opens and closes correctly. I did this with both of my model photographs placing them in a similar layout to my mock up. I chose these photographs as they follow the Male Gaze Theory from Laura Mulvey, which will attract the audience to the product, and by using both a male and female model I am able to extend my audience. I have also use the rule of thirds in my photographs as it allows the setting and the model to be shown whilst also being more ascetically pleasing to the audience. I decided to use the blue tones in the picture as a basis for the rest of my Digipak as it creates a familiar theme through out it, which allows the audience to identify it as one unit of work. I decided to use the blue colouring as it accentuates the environment as well as the calm nature of the music, which I think you are able to grasp through the use of this theme. I them began editing the photograph that I want to use on the text pages within my Digipak. I selected an image that I had taken of the pier by the beach which I thought would link with my theme so I decided to use that photograph. I then opened it up in Photoshop and began by changing the image size. I then opened Image < Adjustments < Levels, Curves, Channel Mixer and Exposure to create the colouring
  • 2. I wanted for the image which allowed me to match the colouring to the colouring of the models clothing which helps to create a theme within the products. I then placed and transformed the image to fit in the template. I changed the orientation of some of the picture to make sure that when printed and placed together that will come out in the correct place. I then began placing the text within my Digipak but first I have to create a box for the text so that the text is visible making it easier to read for the audience. I did this by clicking on the shape tool and selecting the rectangular tool, which allowed me to draw a shape that would surround the text. After drawing the shape in the selected place, I then lowered the opacity, which allows the background to be partially seen through the rectangle which I think creates a gentle feeling instead of a harsh regimented style which I think works better with the genre to create a complete package style. By doing this you are also able to read the text more clearly whilst also maintaining a design technique within the Digipak. I decided to place the text through with the black font as it helps to stand out ensuring that the audience is able to read it whilst also creating a theme through out the design. The use of the black text also works well with the light background helping the design to stand out. After doing this in the selected places I began placing the text on the package, I decided to use Times New Roman as my chosen font as I think it fits the package style as well as it’s simplistic nature it is easy to read which I hope will entice the audience into the product. I added the text by using the text button which allowed me to draw a box in which I could place my text. Here is an example of what a final piece of text would look like. I decided to place lyrics in my Digipak as it allowed the audience to connect with the songs on a stronger level, which I think comes through in this piece. I changed the size of the boxes and the text size dependent of the design of the page so that the text helps to accentuate the page not hinder it’s ascetical design.
  • 3. I then decided to create the title on the front of the Digipak that I thought reflected the nature of the music; I once again used the text tool, which allowed me to create a suitably sized text where I wrote the bands name and the albums name. I decided to use Times New Roman again to create a unity and design style through my work however I decided to place the text in bold which allowed the text to stand out more than in the rest of the Digipak, which will draw the audience into the text. By placing the text in the selected place I was able to I increase the noticeability of the text, which is exactly what this piece of text needs to be. I then used the text tool once again to create the track listing for the back page. I decided to use the diamonds to separate the titles which I think helps to make it clearer. I decided to use the diamonds as I think they have a unique style that I haven’t seen used before. I also used them because they create juxtaposition, as they are bold compared to the text. I created the diamond through the shapes tool, which I then placed in the selected place. I then used the Duplicate Layer tool to ensure that the diamonds are all the same size so that the pages flows better and the eye line of the audience is not distracted or dismissed. I then had to place in my barcode for the use of sales. I placed the barcode by selecting a barcode off the Internet and saving it to my files. I placed it on the Digipak by going to File < Place and selecting the barcode from my files. I placed it on the back of my Digipak at the bottom of the page, as this is the conventional place for the barcode to go. I also placed it here so it doesn’t distract the eye line of the audience from another more important object within the Digipak. I then placed the title of the name and the album on both spines of the Digipak so it was clear that who the artist was which will help capture the audience’s attention as well as giving them an insight into what the album may be like. I used the diamond tool once again to create a break between the text as well as a theme throughout the Digipak. The use of the diamond may also draw in the attention of the audience, which may increase the interest in the project.
  • 4. I then had to fill in the background of the CD page which I did by using the Paint Bucket Tool which. I then decided to create a pattern on my CD, which helped to create a correlation and theme through the Digipak. I decided to use quite a simple pattern that I had used on other pieces of the Digipak, as it would be easier to read the text on it. I did this by placing the pattern on the square by duplicating the layer and moving it across then lowering the opacity so I was able to see the outline of the CD and the template, which I then proceeded to rub out so that the shape of the CD was clear in contrast with the colour. I then placed the title on CD but I decided to change the shape of the text so that it fitted the CD better. I used the Arc tool, which allowed me to shape the text to fit the CD which I think creates an interesting perspective for the CD whilst also creating a definition between the Digipak and the CD.