SlideShare una empresa de Scribd logo
1 de 11
Descargar para leer sin conexión
This tutorial will show you the steps to create this simple Flyer using Inkscape.
              Steps
              01: Document Setup
              02: Colored Background
              03: Fill and Stroke
              04: Color Palette
              05: Draw Other Rectangles
              06: Color Rectangle 1
              07: Color Other Rectangles
              08: Rectangles with No Stroke
              09: Rounded Rectangle
              10: Rounded Rectangle BG
              11: Add Text
              12: Edit Font
              13: Add New Text
              14: Add Images
              15: Import Images
              16: Resize / Duplicate Image
              17: Align Images
              18: Filter Effects
              19: Rename Filter
              20: Add Effects
              21: Gaussian Blur Connection
              22: Offset Connection
              23: Merge Connection
              24: Gaussian Blur - S D
              25: Offset - Delta X and Y
              26: Apply Drop Shadow
              27: Save File                                 For a larger image click the link below
                                                                Flower Flyer (400px by 566px)


                          If there is anything that is unclear to you, or you spot any mistakes,
                  please send email to feedback@flyertutor.com Suggestions are always welcome.

                                                      Page 1 of 11
Inkscape Tutorial – Florist Flyer                                                             www.flyertutor.com
Step 01: Document Setup


            Upon opening Inkscape, locate the Menu Bar.

            Select File > New > Letter. This will determine the Page
            Size. Letter is 8.5 by 11 inches.


            Step 02: Colored Background
            We will construct the colored background with 3 shapes. Go to the Tool Box.


            (Flipped horizontally for the purpose of the Tutorial)

            Select the Rectangle Tool       . Draw Rectangle 1 on the page.


                                                      Page 2 of 11
Inkscape Tutorial – Florist Flyer                                                         www.flyertutor.com
Step 03: Fill and Stroke
            To the bottom left of the screen is the Fill and Stroke
            Box. If you double click on it, the Fill and Stroke
            Window will appear.

            However, if you right click the Fill Color in this Fill and Stroke Box, a menu to edit the Fill
            will pop up. Vice versa, if you right click the Stroke Color, a menu to edit the Stroke will
            pop up.

            Step 04: Color Palette
                               On this Edit Fill menu select "White". Then repeat the step for the
                               Stroke and select "Black". Just above the Fill and Stroke Box is the
                               Color Palette. It should show the Default Inkscape Colors.


                                    To verify, click on the Arrow      to the bottom right of the screen.


           Step 05: Draw Other Rectangles
           A Color Menu will pop up. If you wanted to change the colors that you
           see, you could select one of the other options on the menu, such as
           "Gold".

           Draw 3 more Rectangles, setting the Fill to "White" and the Stroke to
           "Black".

           Draw the Rectangles on the page so that they look like this:


                                                        Page 3 of 11
Inkscape Tutorial – Florist Flyer                                                                  www.flyertutor.com
Step 06: Color Rectangle 1

            Using the Select Tool   , select Rectangle 1 in the upper left corner. Open the Fill and
            Stroke Window by double clicking on the Fill and Stroke Box.

                                                              Select the Fill Tab, then the Flat
                                                              Color Button .

                                                              Select the RGB Tab, then put in these
                                                              numbers.

                                                              R = 170, G = 212, B = 0, A = 255.


                                                              At the bottom of the window set the
                                                              Opacity to "100%".

                                                              Do this for the other Rectangles as well.


            Step 07: Color Other Rectangles
            Repeat the steps to do the same thing for the other Rectangles.

            Rectangle 2: Set R to "218", G to "236" and B to "143". Click OK.

            Rectangle 3: Set R to "239", G to "255" and B to "177". Click OK.

            Rectangle 4: Set R to "209", G to "236" and B to "99". Click OK.

            Step 08: Rectangles with No Stroke
            Make sure that each Rectangle has No Stroke. Click on the Stroke Paint Tab while each
            Rectangle is selected.
            Click on the No Stroke Button        .
            The result will look like this:


                                                     Page 4 of 11
Inkscape Tutorial – Florist Flyer                                                             www.flyertutor.com
Step 09: Rounded Rectangle
            Select the
            Rectangle
            Tool, then go up to the Tools Control Bar and enter "266.761" in the Ry: Box.

            Draw the Rectangle on the canvas.

            Step 10: Rounded Rectangle Background
                         Change the Fill Color to "White" and the Stroke to a "Dark Green". Then
                         place this "White" Rectangle on top of the "Green" Background.

                            It should look like this:


            Step 11: Add Text
                   Select the Text Tool on the Tool Box and click anywhere on the canvas and start
                   typing your blocks of Text. In this case we will start with the Title which is "Amaya's
            Flower
            Garden".

            Go to the Command Bar and select the Text Properties Icon.


            Step 12: Edit Font
                                                                                This will open the Text
                                                                                and Font Window. Here
                                                                                you can change the Font
                                                                                Family, Style, Size,
                                                                                Layout and Line
                                                                                Spacing. You will also be
                                                                                able to see a Preview of
                                                                                your modifications.


            In this case the Font Family is "Harlow Solid", Font Size is
            "56", Italic and Centered. Click Apply. Click Close. Using the
            Select Tool, drag Text to desired spot on flyer.

            This is what the Flyer would look like:


                                                        Page 5 of 11
Inkscape Tutorial – Florist Flyer                                                            www.flyertutor.com
Step 13: Add New Text
                                     Next add the Company Address -
                                     "89 Adrienne Lane,
                                     Alyssatown, Fl 34332,
                                     Tel. 555.111.2323
                                     Fax 555.111.4434".

                                     Use the Font Family "Segoe Print" which is a free Font that was
                                     downloaded at www.FontFreak.com.

                                     Style is Normal, Size is "24" and Layout is Centered. Some of
                                     the Text is made larger and Bold for emphasis.


            Step 14: Add Images
            Here I downloaded the Images of 3 Flowers from www.Clker.com, which is a site where you
            can download Royalty Free Clipart. Check out www.Public-Domain-Image.com, and
            OpenClipArt.org as well.


            Step 15: Import Images
            Go to File > Import.

            You can then select the File Location and Click Open.


                                                    Page 6 of 11
Inkscape Tutorial – Florist Flyer                                                        www.flyertutor.com
Step 16: Resize / Duplicate Image
            Using the Select Tool, Resize the Images as needed. Then make a Copy or Clone of the Pink
            Flower.
            Select it and click on the Duplicate Icon         on the Command Bar.


            Step 17: Align Images
                            Line the "2 Pink Flowers" up next to each other, then place the "Red
                            Flower" on top of them.

                             It should look like this:


            Step 18: Filter Effects
            Next to compensate for the "Yellow Flower" already having a
            Drop Shadow that is quite visible, we will add a Drop Shadow of
            our own to these 3 Flowers.

            To do this, go to the Objects Menu > Filter Effects. This will open
            the Filter Effects Window.


            Step 19: Rename Filter
                                                           To create the Fill Effect, click on New. In the
                                                           Filter Column, you will see Filter1.

                                                           To change this Text to Drop Shadow, right click
                                                           on Filter1 and select Rename.

                                                                        Type in "Drop Shadow".


                                                         Page 7 of 11
Inkscape Tutorial – Florist Flyer                                                               www.flyertutor.com
Step 20: Add Effects
                                                                             Then move over to the
                                                                             Add Effect Button, select
                                                                             the down arrow and select
                                                                             3 Effects, Gaussian Blur,
                                                                             Offset and Merge, clicking
                                                                             Add Effect after each one.


            Step 21: Gaussian Blur Connection
            Click on the Little Gray Triangle on the
            right side of Gaussian Blur, while holding
            the left mouse button down, drag a line to
            Source Alpha.


            Step 22 : Offset Connection
            Click on the Offset Triangle and drag to Gaussian Blur if this one is not already done for
            you.


                                                    Page 8 of 11
Inkscape Tutorial – Florist Flyer                                                          www.flyertutor.com
Step 23: Merge Connection
            Connect the First Merge Triangle to Offset
            and the Second Triangle to Source Graphic.


            Step 24: Gaussian Blur - Standard Deviation
                                                                Then select the Gaussian Blur
                                                                Effect and set the Standard
                                                                Deviation to "10.5" in the Effect
                                                                Parameters Tab.


            Step 25: Offset - Delta X and Y
            Then select the Offset Effect
            and set Delta X to "6.0" and
            Delta Y to "6.0".


                                                 Page 9 of 11
Inkscape Tutorial – Florist Flyer                                                    www.flyertutor.com
Step 26: Apply Drop Shadow
                               Click on the Select Tool, click on the Image you want to add the
                               Shadow to, then go back to the Filter Effects Window and select the
                               Check Box for Drop Shadow in the Filter
                               Column.

                                    The Images when put together should look like this:


            Step 27: Save File
                                                              Using the Select Tool, place all flowers in
                                                              desired spots. Resize if necessary.

                                                              The result:

                                                              Go to File > Save.

                                                              It will be saved as a Scalable Vector
                                                              Graphic (svg) file by default.


                                                      Page 10 of 11
Inkscape Tutorial – Florist Flyer                                                             www.flyertutor.com
Page 11 of 11
Inkscape Tutorial – Florist Flyer                   www.flyertutor.com

Más contenido relacionado

La actualidad más candente

Layers, Colors, Linetypes and Properties
Layers, Colors, Linetypes and PropertiesLayers, Colors, Linetypes and Properties
Layers, Colors, Linetypes and PropertiesSevar Dilkhaz
 
Inkscape for Beginners Bootcamp
Inkscape for Beginners Bootcamp Inkscape for Beginners Bootcamp
Inkscape for Beginners Bootcamp Máirín Duffy
 
Illustrator Crash Course
Illustrator Crash CourseIllustrator Crash Course
Illustrator Crash CourseStephen Kennedy
 
Microsoft Word 2007 Tutorial: Digital Photography Flyer
Microsoft Word 2007 Tutorial: Digital Photography FlyerMicrosoft Word 2007 Tutorial: Digital Photography Flyer
Microsoft Word 2007 Tutorial: Digital Photography FlyerFlyer Tutor
 
Ill Cs Cib 01[1]
Ill Cs Cib 01[1]Ill Cs Cib 01[1]
Ill Cs Cib 01[1]alebdaa
 
Designing UI Mockups in Inkscape
Designing UI Mockups in InkscapeDesigning UI Mockups in Inkscape
Designing UI Mockups in InkscapeMáirín Duffy
 
InDesign CS5 Tutorial
InDesign CS5 TutorialInDesign CS5 Tutorial
InDesign CS5 TutorialZaxapias
 
Photoshop CS5 Tutorial
Photoshop CS5 TutorialPhotoshop CS5 Tutorial
Photoshop CS5 TutorialZaxapias
 
Adobe After Effects
Adobe After EffectsAdobe After Effects
Adobe After EffectsKat350
 
Tutorial for PowerPoint 2007
Tutorial for PowerPoint 2007Tutorial for PowerPoint 2007
Tutorial for PowerPoint 2007davidmedvegy
 
Plan601 e session 1 demo 2016
Plan601 e session 1 demo 2016Plan601 e session 1 demo 2016
Plan601 e session 1 demo 2016rkottam
 
Plan601 e session 4 demo
Plan601 e session 4 demoPlan601 e session 4 demo
Plan601 e session 4 demorkottam
 
Plan601 e session 1 demo 20151005
Plan601 e session 1 demo 20151005Plan601 e session 1 demo 20151005
Plan601 e session 1 demo 20151005rkottam
 
Corel Draw Beginner Tutorial: How to Make a New Product Flyer
Corel Draw Beginner Tutorial: How to Make a New Product FlyerCorel Draw Beginner Tutorial: How to Make a New Product Flyer
Corel Draw Beginner Tutorial: How to Make a New Product FlyerFlyer Tutor
 
Adobe Illustrator CS5 Part 1 : Introduction to Illustrator
Adobe Illustrator CS5 Part 1 : Introduction to IllustratorAdobe Illustrator CS5 Part 1 : Introduction to Illustrator
Adobe Illustrator CS5 Part 1 : Introduction to Illustratorcsula its training
 

La actualidad más candente (19)

Layers, Colors, Linetypes and Properties
Layers, Colors, Linetypes and PropertiesLayers, Colors, Linetypes and Properties
Layers, Colors, Linetypes and Properties
 
Inkscape for Beginners Bootcamp
Inkscape for Beginners Bootcamp Inkscape for Beginners Bootcamp
Inkscape for Beginners Bootcamp
 
InDesign Crash Course
InDesign Crash CourseInDesign Crash Course
InDesign Crash Course
 
Illustrator Crash Course
Illustrator Crash CourseIllustrator Crash Course
Illustrator Crash Course
 
Microsoft Word 2007 Tutorial: Digital Photography Flyer
Microsoft Word 2007 Tutorial: Digital Photography FlyerMicrosoft Word 2007 Tutorial: Digital Photography Flyer
Microsoft Word 2007 Tutorial: Digital Photography Flyer
 
Ill Cs Cib 01[1]
Ill Cs Cib 01[1]Ill Cs Cib 01[1]
Ill Cs Cib 01[1]
 
Designing UI Mockups in Inkscape
Designing UI Mockups in InkscapeDesigning UI Mockups in Inkscape
Designing UI Mockups in Inkscape
 
Plan601E Session 2 Demo
Plan601E Session 2 DemoPlan601E Session 2 Demo
Plan601E Session 2 Demo
 
InDesign CS5 Tutorial
InDesign CS5 TutorialInDesign CS5 Tutorial
InDesign CS5 Tutorial
 
Photoshop CS5 Tutorial
Photoshop CS5 TutorialPhotoshop CS5 Tutorial
Photoshop CS5 Tutorial
 
Adobe After Effects
Adobe After EffectsAdobe After Effects
Adobe After Effects
 
Tutorial
TutorialTutorial
Tutorial
 
AlignDistribute
AlignDistributeAlignDistribute
AlignDistribute
 
Tutorial for PowerPoint 2007
Tutorial for PowerPoint 2007Tutorial for PowerPoint 2007
Tutorial for PowerPoint 2007
 
Plan601 e session 1 demo 2016
Plan601 e session 1 demo 2016Plan601 e session 1 demo 2016
Plan601 e session 1 demo 2016
 
Plan601 e session 4 demo
Plan601 e session 4 demoPlan601 e session 4 demo
Plan601 e session 4 demo
 
Plan601 e session 1 demo 20151005
Plan601 e session 1 demo 20151005Plan601 e session 1 demo 20151005
Plan601 e session 1 demo 20151005
 
Corel Draw Beginner Tutorial: How to Make a New Product Flyer
Corel Draw Beginner Tutorial: How to Make a New Product FlyerCorel Draw Beginner Tutorial: How to Make a New Product Flyer
Corel Draw Beginner Tutorial: How to Make a New Product Flyer
 
Adobe Illustrator CS5 Part 1 : Introduction to Illustrator
Adobe Illustrator CS5 Part 1 : Introduction to IllustratorAdobe Illustrator CS5 Part 1 : Introduction to Illustrator
Adobe Illustrator CS5 Part 1 : Introduction to Illustrator
 

Similar a Inkscape Tutorials: Florist Flyer

OpenOffice Draw Tutorials: Florist Flyer
OpenOffice Draw Tutorials: Florist FlyerOpenOffice Draw Tutorials: Florist Flyer
OpenOffice Draw Tutorials: Florist FlyerFlyer Tutor
 
Inkscape Tutorials: Digital Photography Flyer
Inkscape Tutorials: Digital Photography FlyerInkscape Tutorials: Digital Photography Flyer
Inkscape Tutorials: Digital Photography FlyerFlyer Tutor
 
Corel Draw Tutorial: Florist Flyer
Corel Draw Tutorial: Florist FlyerCorel Draw Tutorial: Florist Flyer
Corel Draw Tutorial: Florist FlyerFlyer Tutor
 
Inkscape Fall Fest Flyer Tutorial
Inkscape Fall Fest Flyer TutorialInkscape Fall Fest Flyer Tutorial
Inkscape Fall Fest Flyer TutorialFlyer Tutor
 
Adobe Illustrator Tutorials: Easter Egg Hunt Flyer
Adobe Illustrator Tutorials: Easter Egg Hunt FlyerAdobe Illustrator Tutorials: Easter Egg Hunt Flyer
Adobe Illustrator Tutorials: Easter Egg Hunt FlyerFlyer Tutor
 
OpenOffice Draw Tutorials: Easter Egg Hunt Flyer
OpenOffice Draw Tutorials: Easter Egg Hunt FlyerOpenOffice Draw Tutorials: Easter Egg Hunt Flyer
OpenOffice Draw Tutorials: Easter Egg Hunt FlyerFlyer Tutor
 
Microsoft Word 2007 Tutorials: Florist Flyer
Microsoft Word 2007 Tutorials: Florist FlyerMicrosoft Word 2007 Tutorials: Florist Flyer
Microsoft Word 2007 Tutorials: Florist FlyerFlyer Tutor
 
Inkscape Tutorials: Easter Egg Hunt Flyer
Inkscape Tutorials: Easter Egg Hunt FlyerInkscape Tutorials: Easter Egg Hunt Flyer
Inkscape Tutorials: Easter Egg Hunt FlyerFlyer Tutor
 
Microsoft Word Tutorial: Bridal Pageant Boutique Flyer
Microsoft Word Tutorial: Bridal Pageant Boutique FlyerMicrosoft Word Tutorial: Bridal Pageant Boutique Flyer
Microsoft Word Tutorial: Bridal Pageant Boutique FlyerFlyer Tutor
 
production diary
production diary production diary
production diary A_Melodie
 
Microsoft Publisher 2007 Tutorial: Easter Egg Hunt Flyer
Microsoft Publisher 2007 Tutorial: Easter Egg Hunt FlyerMicrosoft Publisher 2007 Tutorial: Easter Egg Hunt Flyer
Microsoft Publisher 2007 Tutorial: Easter Egg Hunt FlyerFlyer Tutor
 
Inkscape Beginner Tutorial: How to Make a Yoga Class Flyer
Inkscape Beginner Tutorial: How to Make a Yoga Class FlyerInkscape Beginner Tutorial: How to Make a Yoga Class Flyer
Inkscape Beginner Tutorial: How to Make a Yoga Class FlyerFlyer Tutor
 
How to make gold in photoshop
How to make gold in photoshopHow to make gold in photoshop
How to make gold in photoshopjaguarpauw
 
Unit 5 Task 4 Tutorial
Unit 5 Task 4 TutorialUnit 5 Task 4 Tutorial
Unit 5 Task 4 Tutorialilyaboj
 
Unit 5 Task 4 Create an Ad
Unit 5 Task 4 Create an AdUnit 5 Task 4 Create an Ad
Unit 5 Task 4 Create an Adilyaboj
 
MEMBUAT LOGO THE COFFEE SHOP
MEMBUAT LOGO THE COFFEE SHOPMEMBUAT LOGO THE COFFEE SHOP
MEMBUAT LOGO THE COFFEE SHOPDIANTO IRAWAN
 
Morgan Campbell Advanced Dtp Notes
Morgan Campbell Advanced Dtp NotesMorgan Campbell Advanced Dtp Notes
Morgan Campbell Advanced Dtp NotesIBAT College
 
Microsoft Word Tutorial: Easter Egg Hunt Flyer
Microsoft Word Tutorial: Easter Egg Hunt FlyerMicrosoft Word Tutorial: Easter Egg Hunt Flyer
Microsoft Word Tutorial: Easter Egg Hunt FlyerFlyer Tutor
 

Similar a Inkscape Tutorials: Florist Flyer (20)

OpenOffice Draw Tutorials: Florist Flyer
OpenOffice Draw Tutorials: Florist FlyerOpenOffice Draw Tutorials: Florist Flyer
OpenOffice Draw Tutorials: Florist Flyer
 
Inkscape Tutorials: Digital Photography Flyer
Inkscape Tutorials: Digital Photography FlyerInkscape Tutorials: Digital Photography Flyer
Inkscape Tutorials: Digital Photography Flyer
 
Corel Draw Tutorial: Florist Flyer
Corel Draw Tutorial: Florist FlyerCorel Draw Tutorial: Florist Flyer
Corel Draw Tutorial: Florist Flyer
 
Inkscape Fall Fest Flyer Tutorial
Inkscape Fall Fest Flyer TutorialInkscape Fall Fest Flyer Tutorial
Inkscape Fall Fest Flyer Tutorial
 
Adobe Illustrator Tutorials: Easter Egg Hunt Flyer
Adobe Illustrator Tutorials: Easter Egg Hunt FlyerAdobe Illustrator Tutorials: Easter Egg Hunt Flyer
Adobe Illustrator Tutorials: Easter Egg Hunt Flyer
 
OpenOffice Draw Tutorials: Easter Egg Hunt Flyer
OpenOffice Draw Tutorials: Easter Egg Hunt FlyerOpenOffice Draw Tutorials: Easter Egg Hunt Flyer
OpenOffice Draw Tutorials: Easter Egg Hunt Flyer
 
Microsoft Word 2007 Tutorials: Florist Flyer
Microsoft Word 2007 Tutorials: Florist FlyerMicrosoft Word 2007 Tutorials: Florist Flyer
Microsoft Word 2007 Tutorials: Florist Flyer
 
Inkscape Tutorials: Easter Egg Hunt Flyer
Inkscape Tutorials: Easter Egg Hunt FlyerInkscape Tutorials: Easter Egg Hunt Flyer
Inkscape Tutorials: Easter Egg Hunt Flyer
 
Microsoft Word Tutorial: Bridal Pageant Boutique Flyer
Microsoft Word Tutorial: Bridal Pageant Boutique FlyerMicrosoft Word Tutorial: Bridal Pageant Boutique Flyer
Microsoft Word Tutorial: Bridal Pageant Boutique Flyer
 
production diary
production diary production diary
production diary
 
Microsoft Publisher 2007 Tutorial: Easter Egg Hunt Flyer
Microsoft Publisher 2007 Tutorial: Easter Egg Hunt FlyerMicrosoft Publisher 2007 Tutorial: Easter Egg Hunt Flyer
Microsoft Publisher 2007 Tutorial: Easter Egg Hunt Flyer
 
Inkscape Beginner Tutorial: How to Make a Yoga Class Flyer
Inkscape Beginner Tutorial: How to Make a Yoga Class FlyerInkscape Beginner Tutorial: How to Make a Yoga Class Flyer
Inkscape Beginner Tutorial: How to Make a Yoga Class Flyer
 
How to make gold in photoshop
How to make gold in photoshopHow to make gold in photoshop
How to make gold in photoshop
 
Unit 5 Task 4 Tutorial
Unit 5 Task 4 TutorialUnit 5 Task 4 Tutorial
Unit 5 Task 4 Tutorial
 
Unit 5 Task 4 Create an Ad
Unit 5 Task 4 Create an AdUnit 5 Task 4 Create an Ad
Unit 5 Task 4 Create an Ad
 
MEMBUAT LOGO THE COFFEE SHOP
MEMBUAT LOGO THE COFFEE SHOPMEMBUAT LOGO THE COFFEE SHOP
MEMBUAT LOGO THE COFFEE SHOP
 
Morgan Campbell Advanced Dtp Notes
Morgan Campbell Advanced Dtp NotesMorgan Campbell Advanced Dtp Notes
Morgan Campbell Advanced Dtp Notes
 
Microsoft Word Tutorial: Easter Egg Hunt Flyer
Microsoft Word Tutorial: Easter Egg Hunt FlyerMicrosoft Word Tutorial: Easter Egg Hunt Flyer
Microsoft Word Tutorial: Easter Egg Hunt Flyer
 
dr_1
dr_1dr_1
dr_1
 
dr_1
dr_1dr_1
dr_1
 

Último

Pokemon Go... Unraveling the Conspiracy Theory
Pokemon Go... Unraveling the Conspiracy TheoryPokemon Go... Unraveling the Conspiracy Theory
Pokemon Go... Unraveling the Conspiracy Theorydrae5
 
$ Love Spells^ 💎 (310) 882-6330 in West Virginia, WV | Psychic Reading Best B...
$ Love Spells^ 💎 (310) 882-6330 in West Virginia, WV | Psychic Reading Best B...$ Love Spells^ 💎 (310) 882-6330 in West Virginia, WV | Psychic Reading Best B...
$ Love Spells^ 💎 (310) 882-6330 in West Virginia, WV | Psychic Reading Best B...PsychicRuben LoveSpells
 
2k Shots ≽ 9205541914 ≼ Call Girls In Jasola (Delhi)
2k Shots ≽ 9205541914 ≼ Call Girls In Jasola (Delhi)2k Shots ≽ 9205541914 ≼ Call Girls In Jasola (Delhi)
2k Shots ≽ 9205541914 ≼ Call Girls In Jasola (Delhi)Delhi Call girls
 
2k Shots ≽ 9205541914 ≼ Call Girls In Mukherjee Nagar (Delhi)
2k Shots ≽ 9205541914 ≼ Call Girls In Mukherjee Nagar (Delhi)2k Shots ≽ 9205541914 ≼ Call Girls In Mukherjee Nagar (Delhi)
2k Shots ≽ 9205541914 ≼ Call Girls In Mukherjee Nagar (Delhi)Delhi Call girls
 
LC_YouSaidYes_NewBelieverBookletDone.pdf
LC_YouSaidYes_NewBelieverBookletDone.pdfLC_YouSaidYes_NewBelieverBookletDone.pdf
LC_YouSaidYes_NewBelieverBookletDone.pdfpastor83
 
KLINIK BATA Jual obat penggugur kandungan 087776558899 ABORSI JANIN KEHAMILAN...
KLINIK BATA Jual obat penggugur kandungan 087776558899 ABORSI JANIN KEHAMILAN...KLINIK BATA Jual obat penggugur kandungan 087776558899 ABORSI JANIN KEHAMILAN...
KLINIK BATA Jual obat penggugur kandungan 087776558899 ABORSI JANIN KEHAMILAN...Cara Menggugurkan Kandungan 087776558899
 
2k Shots ≽ 9205541914 ≼ Call Girls In Dashrath Puri (Delhi)
2k Shots ≽ 9205541914 ≼ Call Girls In Dashrath Puri (Delhi)2k Shots ≽ 9205541914 ≼ Call Girls In Dashrath Puri (Delhi)
2k Shots ≽ 9205541914 ≼ Call Girls In Dashrath Puri (Delhi)Delhi Call girls
 
Top Rated Pune Call Girls Tingre Nagar ⟟ 6297143586 ⟟ Call Me For Genuine Se...
Top Rated  Pune Call Girls Tingre Nagar ⟟ 6297143586 ⟟ Call Me For Genuine Se...Top Rated  Pune Call Girls Tingre Nagar ⟟ 6297143586 ⟟ Call Me For Genuine Se...
Top Rated Pune Call Girls Tingre Nagar ⟟ 6297143586 ⟟ Call Me For Genuine Se...Call Girls in Nagpur High Profile
 
the Husband rolesBrown Aesthetic Cute Group Project Presentation
the Husband rolesBrown Aesthetic Cute Group Project Presentationthe Husband rolesBrown Aesthetic Cute Group Project Presentation
the Husband rolesBrown Aesthetic Cute Group Project Presentationbrynpueblos04
 
2k Shots ≽ 9205541914 ≼ Call Girls In Palam (Delhi)
2k Shots ≽ 9205541914 ≼ Call Girls In Palam (Delhi)2k Shots ≽ 9205541914 ≼ Call Girls In Palam (Delhi)
2k Shots ≽ 9205541914 ≼ Call Girls In Palam (Delhi)Delhi Call girls
 
call Now 9811711561 Cash Payment乂 Call Girls in Dwarka Mor
call Now 9811711561 Cash Payment乂 Call Girls in Dwarka Morcall Now 9811711561 Cash Payment乂 Call Girls in Dwarka Mor
call Now 9811711561 Cash Payment乂 Call Girls in Dwarka Morvikas rana
 
WOMEN EMPOWERMENT women empowerment.pptx
WOMEN EMPOWERMENT women empowerment.pptxWOMEN EMPOWERMENT women empowerment.pptx
WOMEN EMPOWERMENT women empowerment.pptxpadhand000
 

Último (14)

(Anamika) VIP Call Girls Navi Mumbai Call Now 8250077686 Navi Mumbai Escorts ...
(Anamika) VIP Call Girls Navi Mumbai Call Now 8250077686 Navi Mumbai Escorts ...(Anamika) VIP Call Girls Navi Mumbai Call Now 8250077686 Navi Mumbai Escorts ...
(Anamika) VIP Call Girls Navi Mumbai Call Now 8250077686 Navi Mumbai Escorts ...
 
Pokemon Go... Unraveling the Conspiracy Theory
Pokemon Go... Unraveling the Conspiracy TheoryPokemon Go... Unraveling the Conspiracy Theory
Pokemon Go... Unraveling the Conspiracy Theory
 
$ Love Spells^ 💎 (310) 882-6330 in West Virginia, WV | Psychic Reading Best B...
$ Love Spells^ 💎 (310) 882-6330 in West Virginia, WV | Psychic Reading Best B...$ Love Spells^ 💎 (310) 882-6330 in West Virginia, WV | Psychic Reading Best B...
$ Love Spells^ 💎 (310) 882-6330 in West Virginia, WV | Psychic Reading Best B...
 
(Aarini) Russian Call Girls Surat Call Now 8250077686 Surat Escorts 24x7
(Aarini) Russian Call Girls Surat Call Now 8250077686 Surat Escorts 24x7(Aarini) Russian Call Girls Surat Call Now 8250077686 Surat Escorts 24x7
(Aarini) Russian Call Girls Surat Call Now 8250077686 Surat Escorts 24x7
 
2k Shots ≽ 9205541914 ≼ Call Girls In Jasola (Delhi)
2k Shots ≽ 9205541914 ≼ Call Girls In Jasola (Delhi)2k Shots ≽ 9205541914 ≼ Call Girls In Jasola (Delhi)
2k Shots ≽ 9205541914 ≼ Call Girls In Jasola (Delhi)
 
2k Shots ≽ 9205541914 ≼ Call Girls In Mukherjee Nagar (Delhi)
2k Shots ≽ 9205541914 ≼ Call Girls In Mukherjee Nagar (Delhi)2k Shots ≽ 9205541914 ≼ Call Girls In Mukherjee Nagar (Delhi)
2k Shots ≽ 9205541914 ≼ Call Girls In Mukherjee Nagar (Delhi)
 
LC_YouSaidYes_NewBelieverBookletDone.pdf
LC_YouSaidYes_NewBelieverBookletDone.pdfLC_YouSaidYes_NewBelieverBookletDone.pdf
LC_YouSaidYes_NewBelieverBookletDone.pdf
 
KLINIK BATA Jual obat penggugur kandungan 087776558899 ABORSI JANIN KEHAMILAN...
KLINIK BATA Jual obat penggugur kandungan 087776558899 ABORSI JANIN KEHAMILAN...KLINIK BATA Jual obat penggugur kandungan 087776558899 ABORSI JANIN KEHAMILAN...
KLINIK BATA Jual obat penggugur kandungan 087776558899 ABORSI JANIN KEHAMILAN...
 
2k Shots ≽ 9205541914 ≼ Call Girls In Dashrath Puri (Delhi)
2k Shots ≽ 9205541914 ≼ Call Girls In Dashrath Puri (Delhi)2k Shots ≽ 9205541914 ≼ Call Girls In Dashrath Puri (Delhi)
2k Shots ≽ 9205541914 ≼ Call Girls In Dashrath Puri (Delhi)
 
Top Rated Pune Call Girls Tingre Nagar ⟟ 6297143586 ⟟ Call Me For Genuine Se...
Top Rated  Pune Call Girls Tingre Nagar ⟟ 6297143586 ⟟ Call Me For Genuine Se...Top Rated  Pune Call Girls Tingre Nagar ⟟ 6297143586 ⟟ Call Me For Genuine Se...
Top Rated Pune Call Girls Tingre Nagar ⟟ 6297143586 ⟟ Call Me For Genuine Se...
 
the Husband rolesBrown Aesthetic Cute Group Project Presentation
the Husband rolesBrown Aesthetic Cute Group Project Presentationthe Husband rolesBrown Aesthetic Cute Group Project Presentation
the Husband rolesBrown Aesthetic Cute Group Project Presentation
 
2k Shots ≽ 9205541914 ≼ Call Girls In Palam (Delhi)
2k Shots ≽ 9205541914 ≼ Call Girls In Palam (Delhi)2k Shots ≽ 9205541914 ≼ Call Girls In Palam (Delhi)
2k Shots ≽ 9205541914 ≼ Call Girls In Palam (Delhi)
 
call Now 9811711561 Cash Payment乂 Call Girls in Dwarka Mor
call Now 9811711561 Cash Payment乂 Call Girls in Dwarka Morcall Now 9811711561 Cash Payment乂 Call Girls in Dwarka Mor
call Now 9811711561 Cash Payment乂 Call Girls in Dwarka Mor
 
WOMEN EMPOWERMENT women empowerment.pptx
WOMEN EMPOWERMENT women empowerment.pptxWOMEN EMPOWERMENT women empowerment.pptx
WOMEN EMPOWERMENT women empowerment.pptx
 

Inkscape Tutorials: Florist Flyer

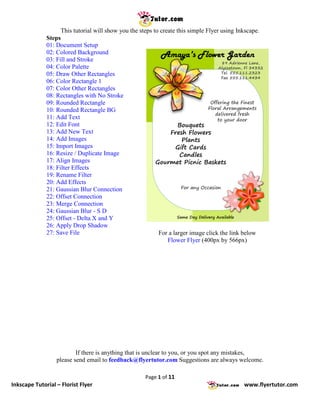
  • 1. This tutorial will show you the steps to create this simple Flyer using Inkscape. Steps 01: Document Setup 02: Colored Background 03: Fill and Stroke 04: Color Palette 05: Draw Other Rectangles 06: Color Rectangle 1 07: Color Other Rectangles 08: Rectangles with No Stroke 09: Rounded Rectangle 10: Rounded Rectangle BG 11: Add Text 12: Edit Font 13: Add New Text 14: Add Images 15: Import Images 16: Resize / Duplicate Image 17: Align Images 18: Filter Effects 19: Rename Filter 20: Add Effects 21: Gaussian Blur Connection 22: Offset Connection 23: Merge Connection 24: Gaussian Blur - S D 25: Offset - Delta X and Y 26: Apply Drop Shadow 27: Save File For a larger image click the link below Flower Flyer (400px by 566px) If there is anything that is unclear to you, or you spot any mistakes, please send email to feedback@flyertutor.com Suggestions are always welcome. Page 1 of 11 Inkscape Tutorial – Florist Flyer www.flyertutor.com
  • 2. Step 01: Document Setup Upon opening Inkscape, locate the Menu Bar. Select File > New > Letter. This will determine the Page Size. Letter is 8.5 by 11 inches. Step 02: Colored Background We will construct the colored background with 3 shapes. Go to the Tool Box. (Flipped horizontally for the purpose of the Tutorial) Select the Rectangle Tool . Draw Rectangle 1 on the page. Page 2 of 11 Inkscape Tutorial – Florist Flyer www.flyertutor.com
  • 3. Step 03: Fill and Stroke To the bottom left of the screen is the Fill and Stroke Box. If you double click on it, the Fill and Stroke Window will appear. However, if you right click the Fill Color in this Fill and Stroke Box, a menu to edit the Fill will pop up. Vice versa, if you right click the Stroke Color, a menu to edit the Stroke will pop up. Step 04: Color Palette On this Edit Fill menu select "White". Then repeat the step for the Stroke and select "Black". Just above the Fill and Stroke Box is the Color Palette. It should show the Default Inkscape Colors. To verify, click on the Arrow to the bottom right of the screen. Step 05: Draw Other Rectangles A Color Menu will pop up. If you wanted to change the colors that you see, you could select one of the other options on the menu, such as "Gold". Draw 3 more Rectangles, setting the Fill to "White" and the Stroke to "Black". Draw the Rectangles on the page so that they look like this: Page 3 of 11 Inkscape Tutorial – Florist Flyer www.flyertutor.com
  • 4. Step 06: Color Rectangle 1 Using the Select Tool , select Rectangle 1 in the upper left corner. Open the Fill and Stroke Window by double clicking on the Fill and Stroke Box. Select the Fill Tab, then the Flat Color Button . Select the RGB Tab, then put in these numbers. R = 170, G = 212, B = 0, A = 255. At the bottom of the window set the Opacity to "100%". Do this for the other Rectangles as well. Step 07: Color Other Rectangles Repeat the steps to do the same thing for the other Rectangles. Rectangle 2: Set R to "218", G to "236" and B to "143". Click OK. Rectangle 3: Set R to "239", G to "255" and B to "177". Click OK. Rectangle 4: Set R to "209", G to "236" and B to "99". Click OK. Step 08: Rectangles with No Stroke Make sure that each Rectangle has No Stroke. Click on the Stroke Paint Tab while each Rectangle is selected. Click on the No Stroke Button . The result will look like this: Page 4 of 11 Inkscape Tutorial – Florist Flyer www.flyertutor.com
  • 5. Step 09: Rounded Rectangle Select the Rectangle Tool, then go up to the Tools Control Bar and enter "266.761" in the Ry: Box. Draw the Rectangle on the canvas. Step 10: Rounded Rectangle Background Change the Fill Color to "White" and the Stroke to a "Dark Green". Then place this "White" Rectangle on top of the "Green" Background. It should look like this: Step 11: Add Text Select the Text Tool on the Tool Box and click anywhere on the canvas and start typing your blocks of Text. In this case we will start with the Title which is "Amaya's Flower Garden". Go to the Command Bar and select the Text Properties Icon. Step 12: Edit Font This will open the Text and Font Window. Here you can change the Font Family, Style, Size, Layout and Line Spacing. You will also be able to see a Preview of your modifications. In this case the Font Family is "Harlow Solid", Font Size is "56", Italic and Centered. Click Apply. Click Close. Using the Select Tool, drag Text to desired spot on flyer. This is what the Flyer would look like: Page 5 of 11 Inkscape Tutorial – Florist Flyer www.flyertutor.com
  • 6. Step 13: Add New Text Next add the Company Address - "89 Adrienne Lane, Alyssatown, Fl 34332, Tel. 555.111.2323 Fax 555.111.4434". Use the Font Family "Segoe Print" which is a free Font that was downloaded at www.FontFreak.com. Style is Normal, Size is "24" and Layout is Centered. Some of the Text is made larger and Bold for emphasis. Step 14: Add Images Here I downloaded the Images of 3 Flowers from www.Clker.com, which is a site where you can download Royalty Free Clipart. Check out www.Public-Domain-Image.com, and OpenClipArt.org as well. Step 15: Import Images Go to File > Import. You can then select the File Location and Click Open. Page 6 of 11 Inkscape Tutorial – Florist Flyer www.flyertutor.com
  • 7. Step 16: Resize / Duplicate Image Using the Select Tool, Resize the Images as needed. Then make a Copy or Clone of the Pink Flower. Select it and click on the Duplicate Icon on the Command Bar. Step 17: Align Images Line the "2 Pink Flowers" up next to each other, then place the "Red Flower" on top of them. It should look like this: Step 18: Filter Effects Next to compensate for the "Yellow Flower" already having a Drop Shadow that is quite visible, we will add a Drop Shadow of our own to these 3 Flowers. To do this, go to the Objects Menu > Filter Effects. This will open the Filter Effects Window. Step 19: Rename Filter To create the Fill Effect, click on New. In the Filter Column, you will see Filter1. To change this Text to Drop Shadow, right click on Filter1 and select Rename. Type in "Drop Shadow". Page 7 of 11 Inkscape Tutorial – Florist Flyer www.flyertutor.com
  • 8. Step 20: Add Effects Then move over to the Add Effect Button, select the down arrow and select 3 Effects, Gaussian Blur, Offset and Merge, clicking Add Effect after each one. Step 21: Gaussian Blur Connection Click on the Little Gray Triangle on the right side of Gaussian Blur, while holding the left mouse button down, drag a line to Source Alpha. Step 22 : Offset Connection Click on the Offset Triangle and drag to Gaussian Blur if this one is not already done for you. Page 8 of 11 Inkscape Tutorial – Florist Flyer www.flyertutor.com
  • 9. Step 23: Merge Connection Connect the First Merge Triangle to Offset and the Second Triangle to Source Graphic. Step 24: Gaussian Blur - Standard Deviation Then select the Gaussian Blur Effect and set the Standard Deviation to "10.5" in the Effect Parameters Tab. Step 25: Offset - Delta X and Y Then select the Offset Effect and set Delta X to "6.0" and Delta Y to "6.0". Page 9 of 11 Inkscape Tutorial – Florist Flyer www.flyertutor.com
  • 10. Step 26: Apply Drop Shadow Click on the Select Tool, click on the Image you want to add the Shadow to, then go back to the Filter Effects Window and select the Check Box for Drop Shadow in the Filter Column. The Images when put together should look like this: Step 27: Save File Using the Select Tool, place all flowers in desired spots. Resize if necessary. The result: Go to File > Save. It will be saved as a Scalable Vector Graphic (svg) file by default. Page 10 of 11 Inkscape Tutorial – Florist Flyer www.flyertutor.com
  • 11. Page 11 of 11 Inkscape Tutorial – Florist Flyer www.flyertutor.com