SlideShare una empresa de Scribd logo
1 de 280
Balaji
Balajisun2008@gmail.com
Oracle Inventory
Inventory
Oracle Inventory is one of Oracle‘s enterprise applications products. Oracle Inventory enables companies to satisfy
business needs such as these:
• Defining part numbers
• Modeling organization structures
• Tracking perpetual inventory
• Maintaining accurate on-hand balances
• Planning material replenishments
• Forecasting anticipated demand
Implemenation of Inventory
Submitted by Anonymous on Sat, 03/28/2009 - 16:55
Tag:
Inventory
/
The first step in ventroy implemenation is to design the flex field structures.
Of all the key flexfield system items is the most important. Its used to store the item information.
Oracle Inventory Flexfields
Submitted by Anonymous on Fri, 04/17/2009 - 20:04
Tag:
Inventory
/
Oracle Inventory provides the following flexfields:
1. System Items
2. Item Catalogs
3. Item Categories
4. Stock Locators
5. Account Aliases
6. Sales Orders
Depending on your system's setup, Inventory may also use some or all of the following
flexfields provided by other Oracle products:
Accounting (Oracle General Ledger)
Sales Tax Location (Oracle Receivables)
Territory (Oracle Receivables)
1. System Items
You can use the System Items Flexfield (also called the Item Flexfield) for recording and reporting your item
information. You must design and configure your Item Flexfield before you can start defining items.
All Oracle Applications products that reference items share the Item Flexfield and support multiple-segment
implementations. However, this flexfield supports only one structure.
You must set up your OE: Item Flexfield profile option to specify the Item Flexfield structure that you will use for your
Oracle applications.
Users can also set up the OE: Item Flexfield Entry Method profile option to specify your preferred method of entry
for this flexfield.
You can optionally use the item flexfield to default item information for invoice, debit memo, and credit memo lines or
you can enter your own line information.
2. Item Catalogs
This key flexfield supports only one structure.
3. Item Categories
You must design and configure your Item Categories Flexfield before you can start defining items since all items must
be assigned to categories. You can define multiple structures for your Item Categories Flexfield, each structure
corresponding to a different category grouping scheme. You can then associate these structures with the categories
and category sets you define.
4. Stock Locators
You can use the Stock Locators Flexfield to capture more information about stock locators in inventory. If you do not
have Oracle Inventory installed, or none of your items have locator control, it is not necessary to set up this flexfield.
If you keep track of specific locators such as aisle, row, bin indicators for your items, you need to configure your
Stock Locators Flexfield and implement locator control in your organization.
This key flexfield supports only one structure.
5. Account Aliases
This key flexfield supports only one structure.
6. Sales Order
The Sales Order Flexfield is a key flexfield used by Oracle Inventory to uniquely identify sales order transactions
Oracle Order Management interfaces to Oracle Inventory.
Your Sales Order Flexfield should be defined as Order Number, Order Type, and Order Source. This combination
guarantees each transaction to Inventory is unique. You must define this flexfield before placing demand or making
reservations in Oracle Order Management.
You must set up the OM: Source Code profile option to determine the source code you will use in for the third
segment of this flexfield to guarantee that each transaction is unique. (Oracle Inventory defaults the value of the OM:
Source Code profile option to 'ORDER MANAGEMENT'.)
For your value sets, you must use Dynamic Inserts. The Validation Type should be None. Value Required should be
Yes to improve performance of concurrent programs. The value set must be alphanumeric. The value set maximum
size must be 40.
You should set the Required field to Yes in the Validation Information region when enabling the flexfield segments.
Setting this field to Yes, improves performance when updating existing demand or reservations by guaranteeing that
Oracle Order Management always supplies a value.
Set Right-justify Zero-fill Numbers to No so sales order numbers are not padded with zeros.
Oracle Inventory defines a unique ID for each order in MTL_SALES_ORDERS based on this flexfield. The Inventory
unique ID, as opposed to the Order Management unique ID, is used throughout Oracle Manufacturing applications.
Item Categories
Submitted by oracleug on Mon, 01/19/2009 - 18:03
Tag:
Inventory
/
Categories are logical groupings of items that have similar characteristics. A category set is a distinct category
grouping scheme and consists of categories.
Each category grouping scheme can use different terminology for its categories, as well as different naming
structures based on number of segments. You can define multiple structures for your Item Categories flexfield. You
can configure each flexfield structure by using as many segments and any level of value set validation that you need.
When inventory is installed, a default category must be assigned to each of the following functional areas: Inventory,
Purchasing, Order Entry, Costing, Engineering, and Planning. When an item is enabled for a functional area, it is
assigned the default category set. You cannot delete the items default category set assignment. Default categories
are required so that each functional area has at least one category set that contains all items in that functional area.
For the functional areas, optionally, you can have a unique category set; for example, you may set up a unique
category set for Purchasing. It is also possible to have one category set defined to be the default category set for all
functional areas.
The complete set up of item categories is done in below 5 steps in sequence.
Item Category Flexfield Structures
Submitted by Anonymous on Tue, 01/20/2009 - 11:31
Tag:
Inventory
/
You can define multiple segment structures for the Item Categories Flexfield. Each segment structure may have its
own display prompts and fields.
When you install or upgrade Oracle Inventory or Oracle Purchasing, Oracle provides two category flexfield structures
by default: Item Categories and PO Item Category.
Each segment structure can display prompts and fields that apply specifically to a particular naming convention. For
example, you might want one of your category sets to use two segments for the names of categories. Another item
grouping scheme might use just one segment for the names of categories. You choose a flexfield structure for every
category set and category that you define.
1. Lets create an item category as Procut Information with three segment: Product Line - Product Name - Brand
Name
Product Line - Electronics, Machine, FMG
Product Name - Mobile, TV, Bus Engine, Soap, Biscuit
Brand Name - LG, Samsung, Cummins, Britania
2. Define all the value sets as shown below.
3. Define the item category flex field.
4. Filling up the value set of the stucture product information
Defining Item Categories
Submitted by Anonymous on Tue, 01/20/2009 - 11:53
Tag:
Inventory
/
Enter a flexfield Structure Name, a unique Category (value) for each structure segment, and a unique description for
the new category. If you want to make a category inactive, enter a date you want the category to be inactive on.
Save your work.
If you choose a multi–segment flexfield structure you can assign a specific meaning to each segment. For example in
our case the category "Electronics.Mobile.Samsung" means an item assinged to this category is a samusng brand
mobile device of elcetroincs product group.
Category Sets
Submitted by Anonymous on Tue, 01/20/2009 - 12:03
Tag:
Inventory
/
Category sets may be used as a means to develop custom lists of items on which to report and sort. You can also
create other category sets such as John‘s Priority or Jane‘s Priority, with categories like high, medium, and low.
The category set Inventory is seeded when you install Oracle Inventory.
The category set Purchasing is seeded when you install Oracle Purchasing.
If you plan to use Order Management‘s group pricing functionality with item categories, you must add the categories
to the Order Entry category set.
Attention:
1. You must use this window to define valid categories for each purchasing category set before you can use Oracle
Purchasing.
2. For the Controlled At level, if the item defining attribute of the functional area (e.g. Inventory‘s is Inventory Item) is
controlled at the Organization level, then the new default Category Set should also be controlled at the Organization
level.
Enter a unique category set Name and Description. In the Flex Structure section, enter which flexfield structure is to
be used. The categories assigned to the category set must have the same flexfield structure as the set itself. Select
a control level and a default category.
You will then need to select Enforce List of Valid Categories if you want validation of the categories at the time of
input. You will then enter in or select the valid categories for the category set.
Assigning Items to Categories
Submitted by Anonymous on Tue, 01/20/2009 - 12:34
Tag:
Inventory
/
When you enable an item in a functional area, the item is assigned to the default (mandatory) category set and
default category of the functional area. You can override the category set‘s default category. In addition, you can
manually assign your item to an unlimited number of category sets. You may optionally assign an item to more than
one category within a category set based on the category set definition.
When you assign your item to another organization Oracle Inventory copies Master level category sets, Organization
level default category sets, and the associated categories assigned in the Item Master organization. This means that
if you manually assign an Organization level category set to the item in the Master organization, Inventory does not
copy over that Organization level category set when you assign that item to another organization.
After assigning an item to another organization you can disable the item for one or more functional areas in the new
organization. However, Inventory does not remove the corresponding functional area‘s default category set. For
example, you may have set the value of the Purchased attribute to ‖Yes‖ when you defined the item in the item
master organization. When you assign this item to another organization Inventory copies over the ‖Yes‖ value of the
Purchased attribute and
therefore assigns the default category set of the purchasing functional area. In the new organization you may decide
to set the value of the Purchased attribute to ‖No.‖ After you disable the item for the purchasing functional area in the
new organization, the item still retains the purchasing default category set. You may manually delete the purchasing
category set in the new organization.
If you copy an item from another item with category sets defined at the Organization level, Inventory assigns the new
item the default categories of the mandatory category sets, even if the original item did not have the default
categories. This is because Inventory copies the values of the item defining attributes and not the category sets and
categories themselves.
Default Category Sets
Submitted by Anonymous on Tue, 01/20/2009 - 12:26
Tag:
Inventory
/
set to each of the following functional areas: Inventory, Purchasing, Order Management, Costing, Engineering, and
Planning. Product Line Accounting is seeded with the Inventory category set. Inventory makes the default category
set mandatory for all items defined for use by a functional area. If your item is enabled for a particular functional area
you cannot delete the item‘s corresponding default category set assignment. Default category sets are required so
that each functional area has at least one category set that contains all items in that functional area.
You can enable an item for each functional area by using that functional area‘s item defining attribute. An item
defining attribute identifies the nature of an item. For example, what designates an item as an ―engineering item‖ is
the attribute Engineering Item. If a functional area‘s item defining attribute is controlled at the Organization level, then
that functional area may only have an Organization level default category set.
When you enable an item for a certain functional area, Oracle Inventory automatically assigns the item to the default
category set of that functional area and the default category of that set. For example, if you set Inventory Item to Yes,
then Inventory automatically assigns the item to the Inventory functional area‘s default category set and default
category.
You may change a functional area‘s default category set under certain conditions. You should ensure that every item
within the functional area belongs to the new default category set (which replaces the existing default category set). If
the item defining attribute of the functional area is controlled at the Organization level then the new default category
set should also be controlled at the Organization level.
Item Catalog
Submitted by Anonymous on Wed, 01/21/2009 - 10:13
Tag:
Inventory
/
An item catalog group is a standard set of descriptive elements to which you assign items. Examples of catalog
descriptive elements are color, shape, length, and so on. For example, a textile manufacturer might define pattern
attributes such as color, size, texture, and style.
Usage: An electronics company (say Samsung) can use the
catalog to incorporate length, breadth and height of each
mobile it produces. As the company Samsung also produces
other electronics products such as TV, Refrigerator and etc.
We should first create an item category as mobile and then
create a catalog group as mobile-catalog with three catalogs
length-breadth and height.
Defining and Using Item Catalogs
Follow these steps to define and use item catalogs:
1 Define the item catalog group.
2 Define descriptive elements within each catalog group.
3 Enter categories for the catalog groups.
Items belonging to the above category are attached with the descriptive element of the catalog.
4 Enter descriptive element values for each item.
5 Update item descriptions with catalog group and descriptive element values.
6 Search for items using descriptive elements as the search criteria.
Searching all the items with bredth 20.
Stock Locators
Submitted by oracleug on Thu, 01/22/2009 - 14:41
Tag:
Inventory
/
You use locators to identify physical areas where you store inventory items. Item quantities can be tracked by locator.
Items can also be restricted to specific locators.
1. Add the segment values of the KFF stock locator.
Navigation : GL -> Financials -> Flexfields -> Key -> Values
2. Enter the new locator in locator form which can be accessed from below navigation or on subinventory form.
Navigation : Inventory -> Set up -> Stock Locator
1. Locator Type: Indicate the locator type available choices are as follows: Dock Door, Receiving, Inspection
Station, Storage Locator, Consolidation Locator, Staging Lane, Packing Station. Dock doors are used in
Oracle Warehouse Management environments only.
2. Indicate the material status of this locator, which controls the enabled transactions for all material in this locator.
The status is not overridden by the status of any ubinventory, lot or serial, within this locator. The statuses of those
objects will be considered when
determining transactions that are not enabled. This field is used if you have Oracle Warehouse Management
installed.
3. Enter the subinventory where the locator resides.
4. Enter a picking order value indicating the priority for picking items from this locator relative to another locator. This
value is used by Oracle Warehouse Managment to sequence picking tasks. A picking order of 1 means that order
management functions pick items from this locator before other locators with a higher number (2, 3, and so on). If you
have Oracle Warehouse Management installed, this field determines the picking path through the warehouse and not
the order in which material is allocated for a sales order.
5. Enter a dropping order to indicate the priority for dropping items in this locator relative to another locator. Oracle
warehouse management uses this value to sequence tasks.
6. Enter the inactive date for the locator. This is the date the locator becomes inactive.
Defining Account Aliases
Submitted by Anonymous on Thu, 01/29/2009 - 11:10
Tag:
Account Receivables
/
An account alias is an easily recognized name or label representing a general ledger account number. You can view,
report, and reserve against an account alias. During a transaction, you can use the account alias instead of an
account number to refer to the account.
Inventory Period Close
Submitted by Anonymous on Fri, 12/25/2009 - 14:18
Tag:
Inventory
/
The period close process for perpetual costing enables you to
1. Summarize costs related to inventory and manufacturing activities for a given accounting period.
2. Distribute those costs to the general ledger.
3. Calculates ending period subinventory values.
4. Closes the open period for Inventory and Work in Process.
Generally, you should open and close periods for each separate inventory organization independently. By
keeping only one period open, you can ensure that your transactions are dated correctly and posted to the
correct accounting period. (For month–end adjustment purposes, you can temporarily hold multiple open
periods.)
The accounting periods and the period close process in Cost Management use the same periods, fiscal
calendar, and other financial information found in General Ledger.
Inventory and work in process transactions automatically create accounting entries. All accounting entries
have transaction dates that belong in one accounting period. You can report and reconcile your transaction
activity to an accounting period and General Ledger. You can transfer summary or detail transactions to
General Ledger. You can transfer these entries to General Ledger when you close the period or perform
interim transfers.
When you transfer to General Ledger, a general ledger (GL) batch ID and organization code are sent with
the transferred entries. You can review and report the GL batch number in General Ledger and request
Inventory and Work in Process reports by the same batch number. You can also view general ledger
transfers in Inventory and drill down by GL batch ID into the inventory and WIP accounting distributions.
Note: Purchasing holds the accounting entries for receipts into receiving inspection and for deliveries into expense
destinations. This includes any perpetual receipt accruals.Purchasing also has a separate period open and close, and
uses
separate processes to load the general ledger interface.
Closes Open Period
The period close process permanently closes an open period. You can no longer charge transactions to a closed
period. Once you close a period, it cannot be reopened. As a precaution, you can do a GL transfer without closing the
period.
Transfers Accounting Entries to the General Ledger
If your inventory organization‘s parameter for Transfer to GL is None, perpetual accounting entries are not transferred
to the General Ledger. The other choices for the Transfer to GL parameter are Summary and Detail, indicating
whether the period close process creates summary or detail transactions for posting to the general ledger. The period
close
process transfers the following information:
• work in process transactions
• job costs and variances
• period costs for expense non–standard jobs
• depending on the selected options, the remaining balances for
repetitive schedules
Note: If you have chosen the new Periodic Costing feature, Cost Management warns you of the possibility of
inadvertently
posting both Periodic and perpetual costed transactions to the General Ledger. The warning displays if there is at
least one
legal entity–cost type combination that has the Periodic Cost Post Entries to GL option checked, where the
organization
under that legal entity also has the perpetual cost GL transfer enabled.
Calculates Ending Period Subinventory Values
For each subinventory, the period close adds the net transaction value for the current period to the prior period‘s
ending value. This, along with values intransit, creates the ending value for the current period.
Transfer Transactions to General Ledger
Submitted by Anonymous on Fri, 12/25/2009 - 16:00
Tag:
Inventory
/
You can perform the general ledger transfer at any time during an open period—not just at period close. Interim
transfers allow you to reconcile and transfer information weekly, making the month–end period close process much
simpler and
faster.
The general ledger transfer loads summary or detail accounting activity for any open period into the general ledger
interface, including both inventory and work in process entries. When more than one period is open, the transfer
selects transactions from the first open period, up to the entered transfer date, and passes the correct accounting
date and financial information into the general ledger interface.
For example, when you transfer detail entries, the transaction date is the accounting date with a line for line transfer.
When you transfer summary entries with two periods open and enter a transfer date in the second period, the transfer
process assigns the period one end date for all the summarized transactions in period one and assigns the entered
transfer date for the summarized transactions in period two.
For each inventory organization, Cost Management transfers transactions to the general ledger interface table, line
for line. If you transfer summary information, Cost Management groups transactions by GL batch, by journal
category, by currency code, and by account.
Attention: Transfer in detail only if you have low transaction volumes. Transferring large amounts of detail
transactions can
adversely affect General Ledger performance.
For both detail and summary transfers, Cost Management passes the organization code, GL batch number, batch
description, and batch date. When you transfer in detail, you also pass the material or work in process transaction
number. In General Ledger, you can see the transferred information, as follows:
Cost Management uses the journal source Inventory for both inventory and work in process transactions.
The journal categories Inventory and Work in Process distinguish between inventory and work in process
transactions.
Using Journal Import and Post Journals processes in General Ledger, you can then post this information to the
general ledger.
Period Summarization Process
Summarization of transaction records for the open period is the last step in period close. You have the option to
perform this process automatically or manually using the profile option, CST:Period Summary. If the profile option is
set to Automatic, the period is closed and summarized when you change the period status from Open to Closed.
If the profile option is set to Manual, you can delay summarization – but you must summarize these delayed periods
in accounting period order. For example, if you delay summarization for a given period, the following period cannot be
summarized until the previous period is summarized. In situations where summarization is delayed, the longer the
delay – the larger the number of transaction records needed for reconciliation purposes. This situation can cause
summarization to take
more time to complete.
If you do not choose to summarize periods, set the period status to Closed not Summarized.
The Period Close Reconciliation report is used to compare account balances with inventory value at period end. You
can run the report in simulation mode by generating it for an open period. The report can be generated at any time
during the period.
Inventory Pending Transaction
Submitted by Anonymous on Fri, 03/27/2009 - 14:40
Tag:
Inventory
/
Users can see the number of pending transactions by navigating to the Inventory Accounting Periods Form.
Navigate > Cost > Accounting Close Cycle > Inventory Accounting Periods
Place cursor on the appropriate open accounting period and click on the [Pending] Button. There are three zones
titled ―Resolution Required‖, ―Resolution Recommended‖ and ―Unprocessed Shipping Transactions‖.
Unprocessed material transactions exist for this period
This message indicates you have unprocessed material transactions in the
MTL_MATERIAL_TRANSACTIONS_TEMP table. You are unable to close the period with this condition. Please see
your system administrator. Inventory considers entries in this table as part of the quantity movement.
Closing the period in this situation is not allowed because the resultant accounting entries would have a transaction
date for a closed period, and never be picked up by the period close or general ledger transfer process.
Uncosted material transactions exist for this period
This message indicates you have material transactions in the MTL_MATERIAL_TRANSACTIONS table with no
accounting entries (Standard Costing) and no accounting entries and no costs (Average Costing). You are unable to
close the period with this condition. These transactions are part of your inventory value.
Closing the period in this situation is not allowed because the resultant accounting entries would have a transaction
date for a closed period, and never be picked up by the period close or general ledger transfer process.
Pending WIP costing transactions exist in this period
This message indicates you have unprocessed resource and overhead accounting transactions in the
WIP_COST_TXN_INTERFACE table. You are unable to close the period with this condition. These transactions are
in your work in process value, and awaiting further processing.
Closing the period in this situation is not allowed because the resultant accounting entries would have a transaction
date for a closed period, and never be picked up by the period close or general ledger transfer process.
Unprocessed Shipping Transactions
―Pending Transactions‖ in the Unprocessed Shipping Transactions zone indicate there are transactions in the
WSH_DELIVERY_DETAILS table in a status of shipped.
Pending receiving transactions for this period
When you use Purchasing, this message indicates you have unprocessed purchasing transactions in the
RCV_TRANSACTIONS_ INTERFACE table. These transactions include purchase order receipts and returns for
inventory. If this condition exists, you will receive a warning but will be able to close the accounting period. These
transactions are not in your receiving value. However, after you close the period, these transactions cannot be
processed because they have a transaction date for a closed period.
Pending material transactions for this period
This message indicates you have unprocessed material transactions in the MTL_TRANSACTIONS_INTERFACE
table. If this condition exists, you will receive a warning but will be able to close the accounting period. These
transactions are not in your inventory value. However, after you close the period, these transactions cannot be
processed because they have a transaction date for a closed period.
Pending move transactions for this period
This message indicates you have unprocessed shop floor move transactions in the WIP_MOVE_TXN_INTERFACE
table. If this condition exists, you will receive a warning but will be able to close the accounting period. These
transactions are not in your work in process value. However, after you close the period, these transactions cannot be
processed because they have a transaction date for a closed period.
Closing a Period
Submitted by Anonymous on Sat, 12/26/2009 - 00:27
Tag:
Inventory
/
1. Enter all transactions.
Be sure you enter all transactions for the period. Perform all issues,receipts, and adjustments. Verify that no hard
copy records exist or are waiting for data entry, such as packing slips in receiving.
2. Check Inventory and Work in Process transaction interfaces.You can set up the material and move
transaction managers to execute transactions immediately, then submit an immediate concurrent request to execute,
or submit a concurrent request periodically at a time interval you specify. If you do not use immediate processing, or
interface external transactions, check the Inventory material transaction manager and the Work in Process move
transaction manager before closing the period.
3. Check Cost Management cost interfaces.
Cost Management processes your inventory and work in process accounting transactions as a concurrent request,
using a specified time interval. Before you close the period, you should check that the Cost Manager is active.
4. Check Order Management transaction processes. If you use Order Management, ensure that all sales order
transaction processes complete and transfer successfully to Inventory.
5. Review Inventory transactions.
Before you close a period, review all of the transactions using the Material Account Distribution Report for the period
with a high dollar value and/or a high transaction quantity. Check that you charged the proper accounts. Correcting
improper account charges before you close a period is easier than creating manual journalentries.
6. Balance perpetual inventory.
Check that your ending perpetual inventory value for the period being closed matches the value you report in the
general ledger. Perpetual inventory value normally balances automatically with the general ledger. However, one of
the following sources can create a discrepancy:
– Other inventory journal entries. Journal entries from products other than Inventory that affect the inventory
accounts.
– Charges to improper accounts: For example, you issued material from a subinventory to a miscellaneous account,
but used one of the subinventory accounts as that miscellaneous account.
– Issue to miscellaneous account: For example, the following miscellaneous transaction issue would cause an out of
balance situation: debit account specified at transaction 123, credit subinventory valuation account 123. The debit
and credit net to zero with no financial charge, but since the inventory quantity decreased, the month–end inventory
valuation reports will not equal the general ledger account balance.
– Transactions after period end reports. This occurs when you run the end of month inventory valuation reports
before you complete all transactions for the period.
If you do not run the inventory reports at period end, you can also run these Reports:
– Inventory Value Report
– Material Account Distribution Detail Report
– Material Account Distribution Summary Report
– Period Close Summary Report
– Period Close Reconciliation report
– Inventory Subledger Report (Average Costing Only)
In a organization using Project Manufacturing Average Costing, if there is more than one cost group, the following
valuation reports should not be used for reconciliation purposes because these reports list the average value across
cost groups.
– Transaction historical Summary Report
– Receiving Value Report
– All Inventories Value Report
– Elemental Inventory Value Report
– Subinventory Account Value Report
– Item Cost Report
7. Validate Work in Process inventory.
If you use Work in Process, check work in process inventory balances against transactions with the WIP Account
Distribution Report.
8. Transfer transactions in advance of closing period (optional).
If time permits, run the general ledger transfer process up to the period end date before closing the period.
Closing a period executes the general ledger transfer automatically. However, you can also run this process without
closing a period using Transfer Transactions to General Ledger. Since you cannot reopen a closed period, running
this process before period close allows you to proof the interfaced transactions and make adjustments to the period
via new inventory transactions as necessary.
9. Close Oracle Payables and Oracle Purchasing.
If you use Payables and Purchasing, you need to close the accounting periods in the following order:
– Payables
– Purchasing
– Inventory
If you only use Purchasing and Inventory, you need to close Purchasing first. Close Payables before Purchasing, in
preparation for accruing expenses on uninvoiced receipts. Doing so ensures that all new payables activity is for the
new month and you do not inadvertently match a prior month invoice in payables to a new month receipt. When you
close Purchasing or Inventory, you cannot enter a receipt for that period. However, as a manual procedure, close
Purchasing before Inventory. This still allows miscellaneous transaction corrections in Inventory.
10. Run the Period Close Reconciliation report.
This report automatically runs in simulation mode for the open period. It is used to match account balances with
inventory value at period end.
11. Close the accounting period and automatically transfer transactions to the general ledger.
This sets your Inventory Accounting Period status to Closed not Summarized. If the CST: Period Summary profile
option is set to Automatic, no other steps are necessary. The period status is set to Closed when the summarization
process has completed.
12. If the CST: Period Summary profile option is set to Manual, create period summarization transactions by
generating the Period Close Reconciliation report.
The concurrent program creates summarized transaction records, and displays the differences between account
balances and inventory value.
Units of Measure
Submitted by oracleug on Mon, 04/20/2009 - 10:11
Tag:
Inventory
/
Oracle Inventory provides you with powerful methods for defining and manipulating units of measure. You can easily
convert between the units of measure you define. This enables you to manufacture, order, or receive items in any unit
of measure. With units of measure you can:
1. Define unit of measure classes,
2. Define units of measure,
3. Define unit of measure conversions,
4. Define lot-specific unit of measure conversions
Defining Unit of Measure Classes
Unit of measure classes represent groups of units of measure with similar characteristics.
Creating unit of measure classes is the first step in unit of measure management. Each unit of measure you
define must belong to a unit of measure class.
Each class has a base unit of measure. The base unit of measure is used to perform conversions between
units of measure in the class. For this reason, the base unit of measure should be representative of the
other units of measure in the class, and generally one of the smaller units. For example, you could use CU
(cubic feet) as the base unit of a class called Volume.
Unit of measure classes are not organization-specific. Default unit of measure classes are not provided.
1. Enter a unique name for the unit of measure class.
2. Define the base unit of measure for this class.
3. Define a unique abbreviation for the base unit of measure.
Defining Units of Measure
Submitted by Anonymous on Mon, 04/20/2009 - 12:24
Tag:
Purchasing
/
Units of measure are used by a variety of functions and transactions to express the quantity of items.
Defining units of measure is the second step in unit of measure management.
The values defined in the Units of Measure window provide the list of values available in unit of measure
fields in other windows.
Units of measure are not organization-specific.
Primary Unit of Measure
Theprimary unit of measure is the stocking unit of measure for an item in a particular organization. The primary unit of
measure is an item attribute that you specify when defining each item.
Prerequisites
You must define at least one unit of measure class.
Enter UOM from UOM Class FORM
After defining the UOM class click on Uint of measure button to enter a new UOM.
Enter the UOM namd and short name. Save the form
Define a UOM in UOM form
Navigate to the Units of Measure window.
1. Enter a unique name for the unit of measure.
2. Enter a unique abbreviation for the unit of measure with a maximum length of three characters.
For example, EA for each or HRS for hours.
3. Enter a unit of measure class.
4. Indicate if this is the base unit of measure for the unit of measure class.
To delete a unit of measure:
1. You can delete existing units of measure that are not base units of measure if no standard or item specific
conversions are defined.
To make a unit of measure inactive:
1. Enter the date on which the unit of measure becomes inactive. As of this date, you can no longer assign standard
or item-specific conversions to the unit of measure.
To change Base UOM:
It‘s not possible to change the base UOM from one UOM to another UOM.
Defining Unit of Measure Conversions
Submitted by Anonymous on Mon, 04/20/2009 - 12:37
Tag:
Inventory
/
Unit of measure conversions are numerical factors that enable you to perform transactions in units other than the
primary unit of the item being transacted. You can define:
A conversion common to any item (Standard)
A conversion for a specific item within a unit of measure class (Intra-class)
A conversion for a specific item between unit of measure classes (Inter-class)
Unit of measure conversions are not organization-specific.
You must define a conversion between a non-base unit of measure and the base unit of measure before you
can assign the non-base unit of measure to an item
Specifying Which Conversion to Use
When you define an item you decide which type of unit of measure conversion to use:
1. Itemspecific: Only uses unit of measure conversions unique to this item. If none exist, you can only transact
this item in its primary unit of measure.
2. Standard: Uses standard unit of measure conversions for this item if an item-specific conversion is not
available.
3. Both: Uses both item-specific and standard unit of measure conversions. If both exist for the same unit of
measure and item combination, the item-specific conversion is used.
Unit of Measure Conversions During Transactions
Whenever you enter an item's quantity, the default is the primary unit of measure for the item. The list of values for
the unit of measure field displays all units of measure for which you have defined standard and/or item-specific
conversions from the primary unit of measure.
Transactions are performed in the unit of measure you specify. The conversion happens automatically and item
quantities are updated in the primary unit of measure of the item.
Important: Inventory transactions and on hand balance supports decimal precision to 5 digits after the decimal point.
Oracle Work in Process supports decimal precision to 6 digits. Other Oracle Applications support different decimal
precision. As a result of the decimal precision mismatch, transactions another Oracle Application passes may be
rounded when processed by Inventory. If the transaction quantity is rounded to zero, Inventory does not process the
transaction.
It is therefore suggested that the base unit of measure for an item is set up such that transaction quantities in the
base unit of measure not require greater than 5 digits of decimal precision.
Define a Standard conversion for any item
In standrad conversion you specify how one unit of mesaure is related to the primary unit of measure in the
same class.
In standrad conversion you cant do the following
You cant specify any sort of intra class conversion
Relationship between two UOMs not invloving primary UOM
Navigate to the Unit of Measure Conversions window & Select the Standard tabbed region.
1 Enter a unit of measure.
2 Enter the conversion factor by which the unit of measure is equivalent to the base unit of measure established for
this class.
For example, if one DZ (this unit of measure) is equivalent to 12 EA (base unit), the conversion factor is 12. Or, if EA
is equal to one-twelfth of a DZ, the conversion factor is 0.08333.
Define a conversion for a specific item within a unit of measure class (Intra-class)
We have seen in standard conversion we can only do convesrion from one UOM to primary UOM.
Suppose we have defined a UOM convsrion rule for a unit of measure UOM_XYZ as UOM_XYZ = 6 x Primary UOM
but for a particular item the vonvsrion rate is not 6 in that case we define a intra class convesrion for a particular item
and when ever that item is transacted system 'll pick the convesrion rate from either intra class or standrad
convesrion depending upon ITEM master set up.
Notes
We can do intra class conversion between two UOMs for a particular item only for a single class which is the UOM
class of the primary UOM of the item.
For exampe Suppose ITEM001 has a primary UOM as Ea and UOM Ea belongs to class Quantity then we can define
intra class conversion for the item ITEM001 between two UOMs in the class Quantity.
we cant define intra class convesrion between any other UOMs belonging to a differnt UOM class.
Navigate to the Unit of Measure Conversions window.
1. Select the Intra-class tabbed region.
2. Enter an item.
3. Enter a unit of measure.
4. Enter the conversion factor by which the unit of measure is equivalent to the base unit of measure established for
this class.
For example, if one LB (this unit of measure) is equivalent to 16 OZ (base unit), the conversion factor is 16.
Define a conversion for a specific item between unit of measure classes (Inter-class)
Inter class conversion is used to convert an item from one primary UOM in one class to another primary UOM in a
differnt class for a particular item.
Navigate to the Unit of Measure Conversions window and Select the Inter-class tabbed region.
1. Select an item.
2. Select the destination base unit of measure of the class to which you are converting a unit of measure.
3. Enter the conversion factor by which the source base unit is equivalent to the destination base unit.
For example, if one ML (source base unit) is equivalent to one GR (destination base unit), the conversion factor is
one.
Lot-Specific Unit of Measure Conversions
Lot specific conversions enable you to perform a specific inter-class conversion for a given lot. This enables you to
establish more granular control over the transactional quantities of a lot. For example, the standard inter-class
conversion for a lot controlled item is one gallon equals 15 pounds; however, when you receive a particular lot of the
item, 1 gallon equals 16 pounds. You can create a lot specific unit of measure for this instance.
You can create lot-specific unit of measure conversions for on-hand lots or lots with a zero balance. If you create a
lot-specific conversion for a lot with on-hand quantities, you can automatically update the quantities in the system to
more accurately reflect the on-hand quantity.
You can also view the history of changes made to the lot unit of measure conversion, and the corresponding quantity
changes.
1. Enter the item number in the Item field.
2. Enter the lot number in the Lot Number field.
3. Select the destination base unit of measure of the class to which you are converting the unit of measure.
4. Enter the conversion factor by which the source base unit is equivalent to the destination base unit.
For example, if 16 pounds (source base unit) is equivalent to 1 Gallon (destination base unit), the conversion factor is
16.
5. Optionally, enter an inactive date for the conversion. This is the date when the unit of measure conversion for the
lot reverts back to the standard inter-class conversion.
6. Optionally, enter a transaction reason for the conversion.
Rules
Picking Rules
When you define an item you choose a picking rule to determine the order in which revisions, lots, subinventories,
and locators are picked for sales order. Oracle Shipping Execution submits requests to Oracle Inventory, which uses
the information you enter in the Picking Rules window to generate pick lists for sales orders.
If you choose None for any of the criteria fields, Inventory ignores that criterion. For example, if you choose None for
Revision, Inventory picks units of an item without regard to revision levels.
Oracle Inventory looks at the picking criteria in the order in which they appear in the Picking Rules window. Then,
Inventory looks at the options (except for None options) for each criterion in the order in which they appear beneath
each criterion.
To define a picking rule
1. Navigate to the Picking Rules window.
2. Enter a unique name for the rule.
3. Select an option for revision order:
Revision: Pick most recent revision.
Effective Date: Pick earliest revision effective date.
None: Do not consider revision levels in the picking process.
4. Select an option for lot order:
Expiration Date: Pick earliest lot expiration date.
Receipt Date: Pick earliest lot receipt date, the date you received items into their current location.
Lot Number: Pick lowest lot number.
None: Do not consider lot numbers in the picking process.
5. Select an option for subinventory order:
Subinventory: Pick by order defined for each subinventory.
Receipt Date: Pick earliest subinventory receipt date.
None: Do not consider subinventories in the picking process.
6. Select an option for locator order:
Locator: Pick items according to the picking order defined for each locator.
Receipt Date: Pick items according to the earliest locator receipt date.
None: Do not consider locators in the picking process.
To delete a picking rule
You can delete a picking rule if there are no references to it.
Transaction Flow
Submitted by Anonymous on Fri, 12/25/2009 - 17:37
Tag:
Inventory
/
MTL_TRANSACTIONS_INTERFACE table is the Interface between non-Inventory applications and the Inventory
Transactions module. In other words any other module other than Inventory that wants to update Inventory has to
come through this table. Modules such as WIP (Work In Progress) and OE (Order Entry) first pass their records to
the MTL_TRANSACTIONS_INTERFACE (MTI)for validation.
There is an Interface Manager called the Transactions Manager (INCTCM) which reads records from this table,
validates them and moves the successful transactions onto MTL_MATERIAL_TRANSACTIONS_TEMP, and submits
Transaction workers (sub-processes - INCTCW) which then processes these records through inventory. This process
consists of data derivation, validation, and transfer of records from MTL_TRANSCTIONS_INTERFACE,
MTL_TRANSACTIONS_LOTS_INTERFACE and MTL_SERIAL_NUMBERS_INTERFACE into their respective
TEMP (temporary) tables from where the transactions processor processes them.
Both the Lots and Serial number tables above are used when items being updated are under 'Lot' or 'Serial' number
control. Example :- In the case of an Sales Order, the item is being shipped to a client so the lot and serial number if
being used, this needs to be updated to show that it is no longer available in Inventory stock.
It is important to note that in general the processors will not move the transactions from this table if the following fields
are not set as follows.
LOCK_FLAG = 2
PROCESS_FLAG = 1
transaction_mode = 3
Once the transactions have been passed to this table after initial validation by the Transactions Manager (INCTCM)
from the MTL_TRANSACTIONS_INTERFACE a job id is attached and a Transactions Worker (INCTCW) is
submitted by the INCTCM process in order to the get the records processed and moved to the
MTL_MATERIAL_TRANSACTONS table.
This table is also used by Inventory Module and Purchasing module which writes directly onto this table for any
transactions entered within itself and each transaction in turn through a process of strict validation.
Inventory Module Forms like Miscellaneous transactions writes directly into this table. The transactions which are
done through these form are on-line processing. It is from here that the inventory quantities finally get
updated,serial/lot numbers get marked as being used.
Enterprise Structure
Inventory
/
You must plan how Oracle Inventory represents your company‘s inventory sites and business units. This includes
defining organizations, locations, subinventories, and locators depending on your company structure. You also must
plan how to implement certain parameters and what level of the structure controls them.
Multi-org often refers to an Oracle Applications setup used to enable multiple business units in a single install. With
multi-org, a business enterprise may set up multiple business units with differing sets of books, operating units, and
legal entities all within a single instance. With multi-org, goods my be sold out of one operating unit or legal entity
and shipped out of another, and the system will process an intercompany sale to properly account for it.
Multi-org, however, should not be mistaken for installs with multiple inventory organizations. You do not have to use
Oracle Applications multi-org to support multiple inventory organizations if all the inventory organizations share the
same set of books, operating unit, and legal entity.
Location: A location is simply a name and address, and is assigned to an organization or used to indicate delivery
information on a purchase order. You may define as many locations as you like, but only one location may be
assigned to an inventory organization.
Business group is a group of companies that does business in different markets under common administrative or
financial control whose members are linked by relations of interpersonal trust on the bases of similar personal ethnic
or commercial background a business group.
Set of Books (SOB): The financial entity that represents the chart of accounts, fiscal calendar, and base currency.
The SOB is set up in the General Ledger.
Legal Entity Organization: An entity used to represent a legal company. Fiscal and tax reporting are done at the
Legal Entity level.
A legal employer is a legal entity that is responsible for employing people in a particular country. Therefore, if you
employ people in a country, then you must have at least one organization classified as a legal entity and a legal
employer.
The Configuration Workbench classifies an organization as a GRE/Legal Entity where your enterprise operates in a
country, and classifies it as an Employer if you employ people in that country also. For example, you can have a legal
entity in a country where you do business, but do not employ people in that country.
Operating Unit Organization: A business unit that shares a common Purchasing, Accounts Payable, Order Entry
and Accounts Receivable setup. An operating unit may consist of multiple inventory organizations, with multiple
manufacturing sites, distribution centers, and sales offices, but they share a common sales order and purchase order
system. For example, a sales order may have lines shipping from different inventory organizations or a purchase
order may have lines destined for different inventory organizations.
Inventory Organization: An entity used to represent a manufacturing or distribution site. Inventory organizations
are where a user tracks on-hand balances, manufactures goods, and transacts the daily ins and outs of material
movement. An inventory organization is the lowest level entity for costing goods, planning material requirements, and
securing system access. Only a single address may be assigned to an Inventory Organization. An inventory
organization is assigned a Set of Books which determines the chart of accounts, fiscal calendar, and base currency
for all financial and value added activities that occur within the organization.
Inventory Organizations are also assigned to a Legal Entity Organization and an Operating Unit Organization.
A variation on the inventory organization is the master item organization. Generally, with Oracle Applications a single
inventory organization is created and designated at the master organization. Items are defined first in the master
organization, then enabled in other inventory organizations as necessary. Some of the item attributes are set as
controlled at the master organization and therefore the attribute values cannot be updated within individual inventory
organizations. Category sets may also be designated as master organization level. Cross-references are also
master level only or master level optional as well.
Subinventory: Physical or logical locations for storing inventory. Subinventories are generally defined to represent
the main stores area as well as stocking points on the production floor. Additional subinventories may be used to
specify supply closets or cabinets and the cage area for discrepant material. Subinventories are flagged as to
availability for planning (nettable), reservations, and available to promise checks, thereby determining the availability
of the material stored in the subinventory. Subinventories are assigned material asset account numbers. As goods
move in and out of a subinventory a transaction posts to the asset account.
Stock Locator: A physical area within a stockroom. The stock locator is a key flexfield that is often defined as a
multiple segment flexfield with the segments representing the physical layout of a stockroom. For example, a
stockroom may be laid out in rows of shelves with bins on the shelves, each numbered so that a row/shelf/bin
combination would direct someone to a particular material storage compartment. Such an implementation would
define a locator flexfield as a 3 segment flexfield with segments for row, shelf, and bin.
Attachment of LE/OU/INV with BG
We never attach any LE/OU/INV with BG in front end...but its available in HR_ALL_ORGANIZATION_UNITS in
column Business_Group_ID..so the question is from where it comes?
First we create a Business Group. When ever we create a business group the system creates an organization with
type businessgroup and attach a business group ID 'N' which is same as the organization ID for that Business group.
After that we attach the business group to a responsibility through the profile option HR : Business Group.
Next we create whenever we create a new LE/OU/Inv with one responsibility the system 'll attach the Business Group
which is attached with the HR : Business group for that particular responsibility.
Defining Planners
Submitted by Anonymous on Mon, 04/27/2009 - 01:14
Tag:
Inventory
/
You can define and update material planners or planning entities for the current organization and assign them to
inventory items at the organization level.
To define and update material planners or planning entities:
1. Navigate to the Planners window.
2. Enter a unique planner name. A planner can be a person or an entity, such as a department or a division.
3. Enter the electronic mail address of the planner.
4. Optionally, enter a date on which the planner becomes inactive. From this date on, you cannot assign this planner
to an inventory item.
Defining Locations
Submitted by Anonymous on Wed, 01/21/2009 - 12:24
Tag:
Inventory
/
Use the Locations window to define ship–to, bill-to, receiving, office site, internal site & other location information for
Purchasing documents.
Locations are shared across Business Groups in HRMS and with two other Oracle
applications: Inventory andPurchasing. HRMS does not use some of the fields in the Location window. These fields
are disabled for HRMS users. For example, the Legal Address check box is read-only and supports future
functionality in Oracle Financials.
Header
Uncheck the Global check box if you want the location to only be available within the default Business Group of your
current responsibility. Accept the default if you want the location to be a global location and therefore available to all
Business Groups. If you are setting up a global location, the location name must be unique across all Business
Groups. If you are setting up a location for one Business Group, the location name must be unique within that
Business Group and all global locations, but does not have to be unique across all Business Groups.
Note: You cannot amend the Global check box once you have set up your location.
Address Details Tab
Select a national address style from the list. If a local address style exists for your country, it is displayed as the
default. Otherwise, the international style is displayed.
Shipping Details
Selecting the check boxes means that you are making the location Name a valid location in the list of values on a
Purchasing
document. For example, selecting Ship–To Site makes the location Name a valid choice in the list of values for the
Ship–To field on a purchase order header. Note that if you define a default Ship–To or Bill–To Location in the
Supplier–Purchasing region of the Financials Options window for your organization, that is the location that defaults
onto your purchase orders. But if you wanted to change that default, the location Name that you define here and
enable as a Ship–To or Bill–To site is available in the list of values for you to choose from in the Ship–To or Bill–To
fields.
Contact: Optional contact name for the location Name.
Ship–To Location : Its the receving dock. Usually the same as the location Name. You could select a separate,
previously defined Ship–To Location—for example, if you wanted to create a location Name, Office A, and specify
Receiving Dock A as its Ship–To Location. Note, however, that once you specify a separate Ship–To Location, you
can no longer enable the location Name as a Ship–To Site. In this example, Receiving Dock A is the ship–to site for
Office A; therefore, Office A itself cannot also be the ship–to site.
Ship–To Site: Is this location is a receving dock. Select this option to make the location Name a valid ship–to
organization on a purchase order or requisition.
Bill–To Site: Select this option to make the location Name a valid bill–to site. The Bill–To Site, which is used by
Payables, is specified on a purchase order header.
Receiving Site: Select this option to make the location a valid receiving Location when creating a receipt or receiving
transaction.
Office Site: Select this option to indicate that this location Name is an office site, such as a field office.
Internal Site: Select this option to make the location a valid internal ship–to location when creating an internal
requisition.
Other Details
Inventory Organization: Select an inventory organization within which this location will be available in the list of values
on a Purchasing document. By selecting no inventory organization, this location becomes available on Purchasing
documents
in all organizations.
EDI Location: If you use Electronic Data Interchange (EDI) to receive Advance Shipment Notices (ASNs) or ASNs
with billing information (ASBNs), enter a defined location. This location should match the ship-to location specified on
an ASN or ASBN
Organization
Submitted by Anonymous on Wed, 01/21/2009 - 13:03
Tag:
Inventory
/
Define the following organizaions as per the requirement of business
i. Business group
ii. Legal Entity
iii. Operating Units
iv. Organization
External organizations (for example, tax offices, insurance carriers, disability organizations, benefit carriers, or
recruitment agencies)
Internal organizations (for example, departments, sections or cost centers)
Creating an Organization
1. Enter a name for your organization in the Name field. A check is performed to see if organizations with the same
name already exist.
All Oracle applications you install share the information entered in the Organization window. Therefore organization
names must be unique within a business group, and business group names must be unique across your applications
network.
You can create two organizations with the same name in different business groups but this can cause confusion later,
if the HR: Cross business group profile option is set to Yes and you decide to share certain information across all
business groups. If you decide to create two organizations with the same name, be sure that this will not cause you
problems in the future.
2. Optionally, select an organization type in the Type field.
Organization types do not classify your organization, you use them for reporting purposes only. The type may identify
the function an organization performs, such as Administration or Service, or the level of each organization in your
enterprise, such as Division, Department or Cost Center.
3. Enter a start date in the From field. This should be early enough to include any historical information you need to
enter.
Note: You cannot assign an employee to an organization before the start date of the organization.
4. Enter a location, if one exists. You can also enter an internal address to add more details such as floor or office
number.
If you are using Oracle Payroll in the US, every organization to which employees can have assignments, including
business groups, must have on record a location with a complete address. This is because the system uses the
location of the organization of the employee's primary assignment to determine employee work locations for tax
purposes. This does not apply to GREs, because the assignment to a GRE exists in addition to the assignment to an
organization.
For Dutch users only, if you are setting up external organizations for a tax office, a social insurance provider or a
private health insurance provider, you must enter the postal address and contact details using the
NL_POSTAL_ADDRESS Location EIT.
Note: If you are an Oracle Inventory user, then you must not assign a location to more than one organization
classified as an Inventory Organization.
5. Enter internal or external in the Internal or External field. You cannot assign people to an external organization.
Examples of external organizations that may require entry are disability organizations, benefits carriers, insurance
carriers, organizations that employees name as beneficiaries of certain employee benefits, and organizations that are
recipients of third party payments from employees' pay.
Inventory : Setup -> Organizations -> Organization
Enter Organization Classifications & Additional Information
1. Business Group
Business Group Information.
Budget Value Defaults.
Work Day Information.
Benefits Defaults.
PTO Balance Type.
Recruitment Information.
Payslip Information.
Self Service Preference Information.
2. Attaching Set of Books to Legal Entity
3. Attaching Set of Books & Legal Entity to Operating Unit
4. Attaching Operating Unit to organization
Subinventories
Submitted by Anonymous on Thu, 01/22/2009 - 12:24
Tag:
Inventory
/
Subinventories are unique physical or logical separations of material inventory, such as raw inventory, finished
goods, or defective material. All material within an organization resides in a subinventory. There are two types of
subinventories within Warehouse Management, storage and receiving.
Storage subinventories are intermediate or final put away locations for material. Material that resides in a storage
subinventory appears in on hand quantity, and is tracked by the system. The system can book orders against, and
use manufacturing processes on material that resides in a storage subinventory. You must define at least one
storage subinventory for your implementation.
Optionally, you can create receiving subinventories to track material in the receiving area. You use receiving
subinventories when you want to track the material as soon as it enters the warehouse before an operator puts it
away. Receiving subinventories enable managers to see where the material resides as soon as it enters the
warehouse. Material located in a receiving subinventory does not appear in on hand quantity, and the system cannot
reserve the material.
An operator can also only specify a receiving subinventory if they are using a mobile device to receive the material.
Note: Operators cannot transfer material from a storage subinventory to a receiving subinventory.
All material within an organization is held in a subinventory therefore, you must define at least one subinventory.
When you create a new subinventory the subinventory is only available to the inventory org(M1 in above pic)
where you are creating it.
Table : MTL_SECONDARY_INVENTORIES
Define new Subinventory
Submitted by Anonymous on Thu, 01/22/2009 - 13:03
Tag:
Inventory
/
Select a source type for item replenishment.
Header
1. Enter a unique alphanumeric name.
2. Indicate the material status of this subinventory, which controls the enabled transactions for all material in this
subinventory. The status is not overridden by the status of any locator, lot or serial, within this subinventory. The
statuses of those objects will be considered when determining transactions that are not enabled. This field is
used if you have Oracle Warehouse Management installed.
3. Indicate the default cost group for this subinventory. If the cost group assignment rules fail to identify a cost group
for newly received material, this cost group will be assigned. This cost group will remain with the material, even
through subinventory transfers, until you perform a cost group change transaction. This feature is available if you
have Oracle Warehouse Management installed, and you are working with a WMS enabled organization.
4. Select the subinventory type from the drop down list. The available choices are as follows:
Storage: Designates the subinventory as a Storage subinventory.
Receiving: Designates the subinventory as a receiving subinventory, and links it to a receiving location. This
subinventory type is used only for receiving material. Material in this type of subinventory cannot be on–hand, or
reserved.
Null: No subinventory designation
Parameters
Following are the important parameters that we must define
1. Quantity tracked Indicate whether each transaction for this subinventory updates the quantity on hand for the
subinventory (Quantity Tracked).
If you leave this option unchecked, on–hand balances are not maintained and you cannot check or update the Asset
Inventory, Include in ATP, Reservable, or Nettable options. You can update this value only if there is no on–hand
quantity, no pending transaction, or no uncosted transaction for the subinventory.
2. Asset Subinventory: Indicate whether to maintain the value of this subinventory on the balance sheet (Asset
Subinventory). You can update this value only if there is no on–hand quantity for the subinventory.
3. Include in ATP: Indicate whether to include items in this subinventory in ATP calculations.
4. Depreciable: Indicate whether to designate items in this subinventory as depreciable.
This data is needed to support depreciable and location information in the Subinventory Setup from the Oracle
Network Logistics product.
5. Allow Reservation: Indicate whether to include this subinventory when you perform available–to–reserve
calculations.
6 Nettable: Indicate whether the planning process uses the on–hand balance of these subinventory items as
available inventory (Nettable).
7. LPN Controlled: Indicate if material may be packed into an LPN in the subinventory. If this is unchecked, all LPNs
transacted into this subinventory will be automatically unpacked, and LPNs cannot be packed into this subinventory.
This feature is available if you have Oracle Warehouse Management installed, and you are working with a WMS
enabled organization
8. Select a type of locator control.
You can select an option only if you selected locator control as Determined at subinventory level in the Locator
Control field in the Organization Parameters window. You can only update this option if there is no on–hand quantity
for the subinventory.
None: Inventory transactions within this subinventory do not require locator information.
Prespecified: Inventory transactions within this subinventory require you to enter a valid predefined locator for each
item.
Dynamic entry: Inventory transactions within this subinventory require you to enter a locator for each item. You may
choose a valid predefined locator, or define a locator dynamically at the time of transaction.
Item level: Inventory transactions use locator control information that you define at the item level.
9. Optionally, enter an inactive date for the subinventory.
10. Enter a location for the subinventory. If the Subinventory type is Receiving, this field is mandatory.
Lead times
Optionally, enter pre–processing, processing, and post–processing lead times for items in this subinventory.
These lead times are used when you use min–max planning at the subinventory level.
Sourcing
Inventory: Replenish items internally, from another organization.
Supplier: Replenish items externally, from a supplier you specify in Oracle Purchasing.
Subinventory: Replenish items internally, from another subinventory in the same inventory organization.Navigate to
the Subinventories Summary folder window. Choose New. The Subinventories window appears.
subinventory account information
Enter the general ledger accounts.The default accounts are those defined for the organization in the Organization
Parameters window. If you are using average costing, you may enter the valuation accounts, but they are not used.
Average costing uses only the Expense and Encumbrance accounts. If you use standard costing, and Oracle Bills of
Material is installed, all asset accounts are required. If you use standard costing, and Oracle Bills of Material is not
installed, you are only required to enter the Material and Material Overhead accounts.
Receiving Sub Inventory
Submitted by Anonymous on Tue, 01/18/2011 - 16:52
Tag:
Inventory
/
Designates the subinventory as a receiving subinventory, and links it to a receiving location. This subinventory type is
used only for receiving material. Material in this type of subinventory cannot be on-hand, or reserved.
You can not enable status attributes (Include in ATP, Allow Reservation, Nettable).
Quantity tracked, Asset Subinventory and Depreciable fields are also not applicable for receiving sub inventory.
Organization Access
Submitted by Anonymous on Thu, 01/22/2009 - 15:16
Tag:
Inventory
/
You can specify which organizations a responsibility can access by mapping responsibilities to organizations. Once
this mapping is set up, a user logging into an Oracle Manufacturing product is restricted to the organizations mapped
to the responsibility chosen. The Change Organization window is restricted as well.
Attention: Until you assign an organization to a responsibility in this window, all responsibilities have access to all
organizations. Once you have restricted any responsibility to an organization, you must then explicitly define the
organizations which all responsibilities can access.
Attention: This feature does not restrict access once the user is in the product. Users with access to functions that
cross multiple organizations (such as ATP, Inter–organization Transfers, Item Search, Multi–organization Quantity
Report, and so on) can still specify any valid organization when running these functions.
Organization Parameters
Submitted by Anonymous on Wed, 01/21/2009 - 17:06
Tag:
Inventory
/
You can define and update default inventory and costing parameters for your current organization in the following
areas:
1. Inventory Parameters
2. Costing Information
3. Other Account Parameters
4. Revision, Lot, Serial, LPN Parameters
5. ATP, Pick, Item–Sourcing Parameters
6. Defining Inter–Organization Information
7. Defining Warehouse Parameters
1. Enter an organization code for which you want to set up the organization parameter.
2. Select an Item Master organization. Oracle Inventory only defines items in the Item Master organization
of the organization from which you enter the Items window.
3. Select a workday calendar. This is required when Oracle Master Scheduling/MRP and Oracle Supply
Chain Planning is installed.
4. Optionally, select a demand class. Demand classes segregate scheduled demand and production into
groups, allowing you to track and consume those groups independently. Oracle Master Scheduling/MRP
and Oracle Supply Chain Planning uses this demand class during forecast consumption, and shipment and
production relief.
5. In the Move Order Timeout Period field, enter the number of days a move order requisition can wait for
approval.
The workflow approval process sends a notification to the item planner when a move order requisition
requires approval. After the first timeout period, if the recipient has not approved or rejected the order, a
reminder notice is sent. After the second timeout period, the order is automatically approved or rejected,
depending on whether you select Approve automatically or Reject automatically in the Move Order Timeout
Action field. If you want to bypass the move order approval process and automatically approve move order
requisitions, enter 0 days in the Move Order Timeout Period field and select Approve automatically in the
Move Order Timeout Action field.
6. Select a move order timeout action
Approve automatically: After the second timeout period, move order requisitions are automatically approved.
Select this option and set the Move Order Timeout Period to 0 if you want to bypass the move order
approval process and automatically approve move order requisitions.
Reject automatically: After the second timeout period, move order requisitions are automatically rejected.
7. Select a locator control option:
None: Inventory transactions within this organization do not require locator information.
Prespecified only: Inventory transactions within this organization require a valid, predefined locator for each
item.
Dynamic entry allowed: Inventory transactions within this organization require a locator for each item. You
can choose a valid, predefined locator, or define a locator dynamically at the time of transaction.
Determined at subinventory level: Inventory transactions use locator control information that you define at
the subinventory level.
Indicate whether to allow negative balances. Determines whether inventory transactions can drive the
inventory balance of an item negative.
Attention: If insufficient quantity on hand exists in a supply subinventory to satisfy backflush demand,
Oracle Work in Process forces the supply subinventory balance negative, ignoring this option setting.
Auto delete allocation at Move Order cancellation
Indicate whether this organization is an Oracle Warehouse Management enabled organization. You can
use WMS features such as LPNs, task management, warehouse execution rules and cost
groups in this organization. Locator control must be enabled in order to enable WMS. Once this has been
enabled and transactions have been entered in this organization, this box cannot be unchecked.
Indicate whether this organization is enabled for Quality inspection.
Indicate whether this organization is an Oracle Enterprise Asset Management enabled Organization.
Enter a total load weight and unit of measure for this organization.
Enter a total volume and unit of measure for this organization.
New Features in R12
1. Select a Default On-hand Material Status tracking option. This step is optional.
Attention: You cannot update this field for existing organizations. To enable this field, you must submit the Activate
Onhand Level Material Status Tracking concurrent program.
2. Indicate whether locator aliases must be unique across the organization.
Defining Costing Information
Submitted by Anonymous on Wed, 01/21/2009 - 17:40
Tag:
Inventory
/
The costing organization that controls the costs in your current organization and the costing method are displayed.
You cannot make changes to these fields.
1. Costing Organization
2. Costing Method
3. Transfer to GL Indicate whether all transactions are posted in detail to the general ledger.
Caution: Transferring detail transaction distributions to the general ledger increases general ledger posting times due
to the number of records created.
4. Reverse Encumbrance Indicate whether to reverse encumbrance entry upon receipt in inventory.
You normally select this option if you use encumbrances with Oracle Purchasing.
5. Optionally, enter a Cost Cutoff Date
If you leave this field blank, all available transactions will be costed,as usual. If you enter a date, all transactions prior
to this date will be costed. All transactions on or later than this date will not be costed.
For inter–organization transfers, a standard costing, receiving organization will not cost a receipt if the sending
organization did not already cost the transaction.
The default time is the first instant of the date. You can optionally choose another time.
The standard cost update process can be performed on the cost cutoff date. You can restart cost processing by
changing the cutoff date to blank, or a future date.
6. Default Material Sub element
For standard costing, select a material sub–element that this organization uses as a default when you define item
costs. For average costing, the default material sub–element you select can be used for cost collection when Project
Cost Collection Enabled is set.
7. Material Over head Sub element
Optionally, select a Default Material Overhead Sub–Element from the list of values. During the Supply Chain Rollup
process, when costs are merged from another organization, markup and shipping costs will use this value.
The supply chain cost rollup will complete successfully, regardless of whether this field is populated. If the Cost
Rollup identifies an organization with a default material overhead sub–element not set up, a corresponding warning
message will be printed in the log file.
8. Default Cost Group
Indicate the default cost group for the organization. This will default into the Default Cost Group field for each
subinventory. If the WMS cost group rules engine fails to find a cost group, this cost group will be used.
9. Valuation Accounts
You choose a default valuation account when you define organization parameters. Under standard costing, these
accounts are defaulted when you define subinventories and can be overridden. Under average costing, these
accounts (except for Expense) are used for subinventory transactions and cannot be updated. For a detailed
discussion of cost
elements.
Material An asset account that tracks material cost. For average costing, this account holds your inventory
and intransit values. Once you perform transactions, you cannot change this account.
Material Overhead An asset account that tracks material overhead cost.
Resource An asset account that tracks resource cost.
Overhead An asset account that tracks resource and outside processing overheads.
Outside processing An asset account that tracks outside processing cost.
Expense The expense account used when tracking a non–asset item.
Other Accounts
Submitted by Anonymous on Thu, 01/22/2009 - 10:07
Tag:
Inventory
/
Encumbrance: An expense account used to recognize the reservation of funds when a purchase order is approved.
Inventory A/P Accrual : The liability account that represents all inventory purchase order receipts not matched in
Accounts Payable, such as the uninvoiced receipts account.
Purchase Price Variance : The variance account used to record differences between purchase order price and
standard cost. This account is not used with the average cost method.
Invoice Price Variance : The variance account used to record differences between purchase order price and invoice
price. This account is used by Accounts Payable to record invoice price variance.
Cost of Goods Sold: The profit and loss (income statement) account that tracks the default cost of goods sold
account.
Sales: The profit and loss (income statement) account that tracks the default revenue account.
Project Clearance Account: When performing miscellaneous issues to capital projects, the project clearance
account is used to post the distributions.
Average Cost Variance: Under average costing with negative quantity balances, this account represents the
inventory valuation error caused by issuing your inventory before your receipts.
Note: For standard costing, only the Purchase Price Variance, Inventory A/P Accrual, Invoice Price Variance,
Expense, Sales and Cost of Goods Sold accounts are required. The other accounts are used as defaults to speed
your set up.
Note: For average costing, only the Material, Average Cost Variance, Inventory A/P Accrual, Invoice Price Variance,
Expense, Sales and Cost of Goods Sold accounts are required. The other accounts are used as defaults or are not
required.
Revision, Lot, Serial, LPN Parameters
Submitted by Anonymous on Thu, 01/22/2009 - 10:56
Tag:
Inventory
/
Enter a starting revision to be the default for each new item.
Lot Number
1. Select an option for lot number uniqueness.
Across items: Enforce unique lot numbers for items across all organizations.
None: Unique lot numbers are not required.
2. Select an option for lot number generation.
User–defined: Enter user–defined lot numbers when you receive items.
At organization level: Define the starting prefix and lot number information for items using the values you enter in the
Prefix, Zero Pad Suffix, and Total Length fields. When you receive items, this information is used to automatically
generate lot numbers for your items.
At item level: Define the starting lot number prefix and the starting lot number when you define the item. This
information is used to generate a lot number for the item when it is received.
3. Indicate whether to add zeroes to right–justify the numeric portion of lot numbers (Zero Pad Suffix).
4. Optionally, select an alphanumeric lot number prefix to use for system–generated lot numbers when generation is
at the organization level.
5. Optionally, define the maximum length for lot numbers. If you use Oracle Work in Process and you set the WIP
parameter to default the lot number based on inventory rules, then WIP validates the length of the lot number against
the length you define in this field.
Serial Number
1. Select an option for serial number uniqueness.
Within inventory items: Enforce unique serial numbers for inventory items.
Within organization: Enforce unique serial numbers within the current organization.
Across organizations: Enforce unique serial numbers throughout all organizations.
2. Select an option for serial number generation.
At organization level: Define the starting prefix and serial number information for items using the information you
enter in the following fields of this window.
At item level: Define the starting serial number prefix and the starting serial number when you define the item.
3. Optionally, select an alphanumeric serial number prefix to use for system–generated serial numbers when
generation is at the organization level.
4. Optionally, enter a starting serial number to use for system–generated serial numbers.
If serial number generation is at the organization level you must enter a starting serial number.
5. Indicate whether the system will suggest serial numbers as part of the move order line allocating process. If you do
not select this option, you must manually enter the serial numbers in order to transact the move order.
ATP, Pick, Item–Sourcing Parameters
Submitted by Anonymous on Fri, 03/27/2009 - 13:28
Tag:
Inventory
/
Select a default ATP rule.
ATP rules define the options used to calculate the available to promise quantity of an item. If you are using Oracle
Order
Management, the default is the ATP rule for the Master organization.
Picking Defaults
Select a default picking rule.
Picking rules define the priority that order management functions use to pick items.
Notes: This rule will not be employed in a WMS enabled organization. The WMS picking rules will be used.
Enter a default subinventory picking order.
This value indicates the priority with which you pick items from a subinventory, relative to another subinventory, in
which a given item resides. The value you enter here displays as the default when you define a subinventory.
Enter a default locator picking order.
This value indicates the priority with which you pick items from a locator, relative to another locator, where a given
item resides. The value you enter here displays as the default when you define a locator.
Check the Pick Confirmation Required box if you want your pickers to manually pick confirm. If you do not check
the box, pick confirmation will occur automatically.
Item-Sourcing Default
Select a source type for item replenishment.
Inventory: Replenish items internally from another subinventory in the same organization or another organization.
Supplier: Replenish items externally, from a supplier you specify in Oracle Purchasing.
None: No default source for item replenishment.
Select the organization used to replenish items.
You must enter a value in this field if you selected Inventory in the Type field.
Select the subinventory used to replenish items.
You must enter a value in this field if you selected your current organization in the Organization field. You cannot
enter a value in this field if you selected Supplier in the Type field.
Dynamic entry for Locators
Submitted by Anonymous on Fri, 04/17/2009 - 20:17
Tag:
Inventory
/
If we select the dynamic entry for locators then we can directly create the locators while do any transactions. To allow
dynamic entery allowed for locators we need to do following two setups.
1. Make the stock locator as dynamic entery either at oraganization parameter or subinventory or at item level.
2. Allow dynamic insert should be enabled for the stock locator structure.
Now when we do a transaction we can put a predefined stock locator or can a new combination if required.
Inter–Organization Information
Submitted by Anonymous on Fri, 03/27/2009 - 13:34
Tag:
Inventory
/
Select an Inter–Organization Transfer Charge option.
None: Do not add transfer charges to a material transfer between organizations.
Predefined percent: Automatically add a predefined percent of the transaction value when you perform the inter–
organization transfer.
Requested value: Enter the discrete value to add when you perform the inter–organization transfer.
Requested percent: Enter the discrete percentage of the transfer value to add when you perform the inter–
organization transfer.
Inter–organization cost accounts
Enter default inter–organization cost accounts. These accounts are defaulted when you set up shipping information in
the
Inter–Organization Shipping Networks window
Inter–Organization Shipping Network
Submitted by Anonymous on Thu, 01/29/2009 - 11:50
Tag:
Inventory
/
Use the Inter–Organization Shipping Network window to define accounting information and the relationships that exist
between shipping and destination organizations. You can specify whether an organization is a shipping organization,
a destination organization, or both.
1. From-TO organization
Determine if the organization displayed is the To Organization, From Organization, or the From or To Organization.
Item is transfered from the 'From' organization to the 'To' Organization.
2. Transfer Type: (Intransit/Direct)
For each organization relationship you create, you must indicate what type of shipment is used. If you choose to use
intransit inventory, Oracle Inventory moves material to intransit inventory before it reaches the destination
organization when you perform an inter–organization transfer. Typically, you transfer material through intransit
inventory when transportation time is significant. If you do not choose intransit inventory, Oracle Inventory moves
your material directly to the destination organization when you perform an inter–organization transfer.
For direct transfer type the FOB & receipt routing is disabled.
3. FOB (Shipment/Receipt)
Determines the ownership of the materail. If it is shipment then the owner ship goes to 'To(receving)' organization at
the point of shipping. If it is receipt then the ownership is transfered from the 'From(Sending)' organization to the
'To(receving)' organization when the materail is received at the receving organization.
4. Receiving routing
If you selected Intransit in the Transfer Type field, select a receipt routing option:
Standard: Receive this item first, then deliver without inspection.
Direct: At receipt, deliver this item directly to its location.
Inspection: Receive this item first, inspect it, then deliver.
5. Interanl orders enabled
You must also specify whether internal orders are required from the destination organization to perform inter–
organization
transfers. Oracle Inventory does not allow you to perform inter–organization transfers using the Transfer Between
Organizations window to an organization that requires internal requisitions.
6. inter–organization transfer charge
Select the inter–organization transfer charge type for calculating transfer charges:
None: Do not add transfer charges.
Predefined Percent: Automatically add a predefined percent of the transaction value.
Requested Value: Enter a discrete value to add.
Requested Percent: Enter a discrete percentage of the transfer value to add.
The default value is the value you defined in the Organization Parameters window for the shipping organization.
7. Define account information
Also, you must provide general ledger accounts to record debits and credits involved in an inter–organization
transfer.
1. Enter the general ledger transfer credit account used to collect transfer charges for the shipping organization
The default value is the value you defined in the Organization Parameters window for the shipping
organization.
2. Enter the general ledger account used to collect the purchase price variance for inter–organization receipts
into standard cost organizations. You must enter an account if your receiving organization is using standard
costing.
3. Enter the general ledger receivables account used as an inter–organization clearing account for the shipping
organization.
4. The inter–organization receivable account for the shipping organization should equal the inter–organization
payables account for the receiving organization.
Oracle Inventory Category Setup Guide

Más contenido relacionado

La actualidad más candente

128224154 oracle-inventory-ppt
128224154 oracle-inventory-ppt128224154 oracle-inventory-ppt
128224154 oracle-inventory-pptRamthilak R
 
Oracle inventory R12 Setup Guide
Oracle inventory R12 Setup GuideOracle inventory R12 Setup Guide
Oracle inventory R12 Setup GuideAhmed Elshayeb
 
Oracle R12.1.3 Costing Overview
Oracle R12.1.3 Costing OverviewOracle R12.1.3 Costing Overview
Oracle R12.1.3 Costing OverviewPritesh Mogane
 
Oracle Inventory Complete Implementation Setups.
Oracle Inventory Complete Implementation Setups.Oracle Inventory Complete Implementation Setups.
Oracle Inventory Complete Implementation Setups.Muhammad Mansoor Ali
 
Oracle R12 inventory Table name details with description
Oracle R12 inventory Table name details with descriptionOracle R12 inventory Table name details with description
Oracle R12 inventory Table name details with descriptionBoopathy CS
 
Oracle Process Manufacturing Setup EBS12.2
Oracle Process Manufacturing Setup EBS12.2Oracle Process Manufacturing Setup EBS12.2
Oracle Process Manufacturing Setup EBS12.2Mina Lotfy
 
R12 inventory features
R12 inventory featuresR12 inventory features
R12 inventory featuresSuresh Mishra
 
Oracle Concurrent Program Setup document
Oracle Concurrent Program Setup  documentOracle Concurrent Program Setup  document
Oracle Concurrent Program Setup documentvenkatesh gurusamy
 
Oracle Purchasing Internal Requisition
Oracle Purchasing Internal RequisitionOracle Purchasing Internal Requisition
Oracle Purchasing Internal RequisitionAhmed Elshayeb
 
105322956 advance-pricing-total-oracle-apps
105322956 advance-pricing-total-oracle-apps105322956 advance-pricing-total-oracle-apps
105322956 advance-pricing-total-oracle-appsShivakumar Karajagi
 
1.overview of advanced pricing
1.overview of advanced pricing1.overview of advanced pricing
1.overview of advanced pricingNazmul Alam
 
Oracle R12 SCM Functional Interview Questions - Order Management
Oracle R12 SCM Functional Interview Questions - Order ManagementOracle R12 SCM Functional Interview Questions - Order Management
Oracle R12 SCM Functional Interview Questions - Order ManagementBoopathy CS
 
Oracle SCM Functional Interview Questions & Answers - Inventory Module - Part...
Oracle SCM Functional Interview Questions & Answers - Inventory Module - Part...Oracle SCM Functional Interview Questions & Answers - Inventory Module - Part...
Oracle SCM Functional Interview Questions & Answers - Inventory Module - Part...Boopathy CS
 
Oracle Inventory – Inventory Controls
Oracle Inventory – Inventory ControlsOracle Inventory – Inventory Controls
Oracle Inventory – Inventory ControlsBoopathy CS
 
Oracle Order Management (Assign freight cost on shipping transaction)
Oracle Order Management (Assign freight cost on shipping transaction)Oracle Order Management (Assign freight cost on shipping transaction)
Oracle Order Management (Assign freight cost on shipping transaction)Ahmed Elshayeb
 
Oracle R12 Apps – SCM Functional Interview Questions & Answers – Purchasing M...
Oracle R12 Apps – SCM Functional Interview Questions & Answers – Purchasing M...Oracle R12 Apps – SCM Functional Interview Questions & Answers – Purchasing M...
Oracle R12 Apps – SCM Functional Interview Questions & Answers – Purchasing M...Boopathy CS
 

La actualidad más candente (20)

128224154 oracle-inventory-ppt
128224154 oracle-inventory-ppt128224154 oracle-inventory-ppt
128224154 oracle-inventory-ppt
 
Oracle inventory R12 Setup Guide
Oracle inventory R12 Setup GuideOracle inventory R12 Setup Guide
Oracle inventory R12 Setup Guide
 
Oracle R12.1.3 Costing Overview
Oracle R12.1.3 Costing OverviewOracle R12.1.3 Costing Overview
Oracle R12.1.3 Costing Overview
 
Basics of Oracle Order Management
Basics of Oracle Order ManagementBasics of Oracle Order Management
Basics of Oracle Order Management
 
Oracle Inventory Complete Implementation Setups.
Oracle Inventory Complete Implementation Setups.Oracle Inventory Complete Implementation Setups.
Oracle Inventory Complete Implementation Setups.
 
Oracle R12 inventory Table name details with description
Oracle R12 inventory Table name details with descriptionOracle R12 inventory Table name details with description
Oracle R12 inventory Table name details with description
 
Oracle Process Manufacturing Setup EBS12.2
Oracle Process Manufacturing Setup EBS12.2Oracle Process Manufacturing Setup EBS12.2
Oracle Process Manufacturing Setup EBS12.2
 
R12 inventory features
R12 inventory featuresR12 inventory features
R12 inventory features
 
Oracle Concurrent Program Setup document
Oracle Concurrent Program Setup  documentOracle Concurrent Program Setup  document
Oracle Concurrent Program Setup document
 
Oracle Purchasing Internal Requisition
Oracle Purchasing Internal RequisitionOracle Purchasing Internal Requisition
Oracle Purchasing Internal Requisition
 
105322956 advance-pricing-total-oracle-apps
105322956 advance-pricing-total-oracle-apps105322956 advance-pricing-total-oracle-apps
105322956 advance-pricing-total-oracle-apps
 
Move order types
Move order typesMove order types
Move order types
 
Order Line Sets in Oracle Order Management
Order Line Sets in Oracle Order ManagementOrder Line Sets in Oracle Order Management
Order Line Sets in Oracle Order Management
 
1.overview of advanced pricing
1.overview of advanced pricing1.overview of advanced pricing
1.overview of advanced pricing
 
Oracle R12 SCM Functional Interview Questions - Order Management
Oracle R12 SCM Functional Interview Questions - Order ManagementOracle R12 SCM Functional Interview Questions - Order Management
Oracle R12 SCM Functional Interview Questions - Order Management
 
Oracle SCM Functional Interview Questions & Answers - Inventory Module - Part...
Oracle SCM Functional Interview Questions & Answers - Inventory Module - Part...Oracle SCM Functional Interview Questions & Answers - Inventory Module - Part...
Oracle SCM Functional Interview Questions & Answers - Inventory Module - Part...
 
How to create PO with ASN
How to create PO with ASNHow to create PO with ASN
How to create PO with ASN
 
Oracle Inventory – Inventory Controls
Oracle Inventory – Inventory ControlsOracle Inventory – Inventory Controls
Oracle Inventory – Inventory Controls
 
Oracle Order Management (Assign freight cost on shipping transaction)
Oracle Order Management (Assign freight cost on shipping transaction)Oracle Order Management (Assign freight cost on shipping transaction)
Oracle Order Management (Assign freight cost on shipping transaction)
 
Oracle R12 Apps – SCM Functional Interview Questions & Answers – Purchasing M...
Oracle R12 Apps – SCM Functional Interview Questions & Answers – Purchasing M...Oracle R12 Apps – SCM Functional Interview Questions & Answers – Purchasing M...
Oracle R12 Apps – SCM Functional Interview Questions & Answers – Purchasing M...
 

Similar a Oracle Inventory Category Setup Guide

Details and Set-up of Other FlexFields in Oracle E-Business Suite
Details and Set-up of Other FlexFields in Oracle E-Business SuiteDetails and Set-up of Other FlexFields in Oracle E-Business Suite
Details and Set-up of Other FlexFields in Oracle E-Business Suiteeprentise
 
Compiere Warehouse Management System Documentation
Compiere Warehouse Management System DocumentationCompiere Warehouse Management System Documentation
Compiere Warehouse Management System DocumentationMehmet Demirel
 
Sap Sd Sample Questions
Sap Sd Sample QuestionsSap Sd Sample Questions
Sap Sd Sample Questionsraheemkhan4u
 
purchasing-setups-in-oracle-r12_compress.pdf
purchasing-setups-in-oracle-r12_compress.pdfpurchasing-setups-in-oracle-r12_compress.pdf
purchasing-setups-in-oracle-r12_compress.pdfHesham Mahdy
 
ITECH 2100 Programming 2 School of Science, Information Te.docx
ITECH 2100 Programming 2 School of Science, Information Te.docxITECH 2100 Programming 2 School of Science, Information Te.docx
ITECH 2100 Programming 2 School of Science, Information Te.docxchristiandean12115
 
Oracle General ledger ivas
Oracle General ledger ivasOracle General ledger ivas
Oracle General ledger ivasAli Ibrahim
 
Understanding Flex Fields with Accounting Flexfields(Chart of Accounts) in O...
Understanding Flex Fields with  Accounting Flexfields(Chart of Accounts) in O...Understanding Flex Fields with  Accounting Flexfields(Chart of Accounts) in O...
Understanding Flex Fields with Accounting Flexfields(Chart of Accounts) in O...Gurpreet singh
 
Preview of Custom Search Admin Tools
Preview of Custom Search Admin ToolsPreview of Custom Search Admin Tools
Preview of Custom Search Admin ToolsAxiell ALM
 
Oracle Inventory r12 lot and serial control.ppt
Oracle Inventory r12 lot and serial control.pptOracle Inventory r12 lot and serial control.ppt
Oracle Inventory r12 lot and serial control.pptahosainy
 
Defining key flexfields
Defining key flexfieldsDefining key flexfields
Defining key flexfieldsrunjithrocking
 

Similar a Oracle Inventory Category Setup Guide (20)

Details and Set-up of Other FlexFields in Oracle E-Business Suite
Details and Set-up of Other FlexFields in Oracle E-Business SuiteDetails and Set-up of Other FlexFields in Oracle E-Business Suite
Details and Set-up of Other FlexFields in Oracle E-Business Suite
 
58528447 oracle-e am
58528447 oracle-e am58528447 oracle-e am
58528447 oracle-e am
 
Flexfields.ppt
Flexfields.pptFlexfields.ppt
Flexfields.ppt
 
Compiere Warehouse Management System Documentation
Compiere Warehouse Management System DocumentationCompiere Warehouse Management System Documentation
Compiere Warehouse Management System Documentation
 
54188703 i proc-catalog
54188703 i proc-catalog54188703 i proc-catalog
54188703 i proc-catalog
 
Sap Sd Sample Questions
Sap Sd Sample QuestionsSap Sd Sample Questions
Sap Sd Sample Questions
 
purchasing-setups-in-oracle-r12_compress.pdf
purchasing-setups-in-oracle-r12_compress.pdfpurchasing-setups-in-oracle-r12_compress.pdf
purchasing-setups-in-oracle-r12_compress.pdf
 
ITECH 2100 Programming 2 School of Science, Information Te.docx
ITECH 2100 Programming 2 School of Science, Information Te.docxITECH 2100 Programming 2 School of Science, Information Te.docx
ITECH 2100 Programming 2 School of Science, Information Te.docx
 
Oracle General ledger ivas
Oracle General ledger ivasOracle General ledger ivas
Oracle General ledger ivas
 
Understanding Flex Fields with Accounting Flexfields(Chart of Accounts) in O...
Understanding Flex Fields with  Accounting Flexfields(Chart of Accounts) in O...Understanding Flex Fields with  Accounting Flexfields(Chart of Accounts) in O...
Understanding Flex Fields with Accounting Flexfields(Chart of Accounts) in O...
 
Preview of Custom Search Admin Tools
Preview of Custom Search Admin ToolsPreview of Custom Search Admin Tools
Preview of Custom Search Admin Tools
 
Tally
TallyTally
Tally
 
Oracle Inventory r12 lot and serial control.ppt
Oracle Inventory r12 lot and serial control.pptOracle Inventory r12 lot and serial control.ppt
Oracle Inventory r12 lot and serial control.ppt
 
Glosarium
GlosariumGlosarium
Glosarium
 
Oracle i procurement
Oracle i procurementOracle i procurement
Oracle i procurement
 
Sap enhanced functions
Sap enhanced functionsSap enhanced functions
Sap enhanced functions
 
WMS_RULE.PDF
WMS_RULE.PDFWMS_RULE.PDF
WMS_RULE.PDF
 
Otc
OtcOtc
Otc
 
SAP Material master general document
SAP Material master   general documentSAP Material master   general document
SAP Material master general document
 
Defining key flexfields
Defining key flexfieldsDefining key flexfields
Defining key flexfields
 

Último

Transcript: New from BookNet Canada for 2024: BNC CataList - Tech Forum 2024
Transcript: New from BookNet Canada for 2024: BNC CataList - Tech Forum 2024Transcript: New from BookNet Canada for 2024: BNC CataList - Tech Forum 2024
Transcript: New from BookNet Canada for 2024: BNC CataList - Tech Forum 2024BookNet Canada
 
Commit 2024 - Secret Management made easy
Commit 2024 - Secret Management made easyCommit 2024 - Secret Management made easy
Commit 2024 - Secret Management made easyAlfredo García Lavilla
 
Nell’iperspazio con Rocket: il Framework Web di Rust!
Nell’iperspazio con Rocket: il Framework Web di Rust!Nell’iperspazio con Rocket: il Framework Web di Rust!
Nell’iperspazio con Rocket: il Framework Web di Rust!Commit University
 
Anypoint Exchange: It’s Not Just a Repo!
Anypoint Exchange: It’s Not Just a Repo!Anypoint Exchange: It’s Not Just a Repo!
Anypoint Exchange: It’s Not Just a Repo!Manik S Magar
 
Scanning the Internet for External Cloud Exposures via SSL Certs
Scanning the Internet for External Cloud Exposures via SSL CertsScanning the Internet for External Cloud Exposures via SSL Certs
Scanning the Internet for External Cloud Exposures via SSL CertsRizwan Syed
 
Streamlining Python Development: A Guide to a Modern Project Setup
Streamlining Python Development: A Guide to a Modern Project SetupStreamlining Python Development: A Guide to a Modern Project Setup
Streamlining Python Development: A Guide to a Modern Project SetupFlorian Wilhelm
 
SIP trunking in Janus @ Kamailio World 2024
SIP trunking in Janus @ Kamailio World 2024SIP trunking in Janus @ Kamailio World 2024
SIP trunking in Janus @ Kamailio World 2024Lorenzo Miniero
 
The Future of Software Development - Devin AI Innovative Approach.pdf
The Future of Software Development - Devin AI Innovative Approach.pdfThe Future of Software Development - Devin AI Innovative Approach.pdf
The Future of Software Development - Devin AI Innovative Approach.pdfSeasiaInfotech2
 
AI as an Interface for Commercial Buildings
AI as an Interface for Commercial BuildingsAI as an Interface for Commercial Buildings
AI as an Interface for Commercial BuildingsMemoori
 
Unleash Your Potential - Namagunga Girls Coding Club
Unleash Your Potential - Namagunga Girls Coding ClubUnleash Your Potential - Namagunga Girls Coding Club
Unleash Your Potential - Namagunga Girls Coding ClubKalema Edgar
 
Training state-of-the-art general text embedding
Training state-of-the-art general text embeddingTraining state-of-the-art general text embedding
Training state-of-the-art general text embeddingZilliz
 
"Debugging python applications inside k8s environment", Andrii Soldatenko
"Debugging python applications inside k8s environment", Andrii Soldatenko"Debugging python applications inside k8s environment", Andrii Soldatenko
"Debugging python applications inside k8s environment", Andrii SoldatenkoFwdays
 
Designing IA for AI - Information Architecture Conference 2024
Designing IA for AI - Information Architecture Conference 2024Designing IA for AI - Information Architecture Conference 2024
Designing IA for AI - Information Architecture Conference 2024Enterprise Knowledge
 
"Federated learning: out of reach no matter how close",Oleksandr Lapshyn
"Federated learning: out of reach no matter how close",Oleksandr Lapshyn"Federated learning: out of reach no matter how close",Oleksandr Lapshyn
"Federated learning: out of reach no matter how close",Oleksandr LapshynFwdays
 
Dev Dives: Streamline document processing with UiPath Studio Web
Dev Dives: Streamline document processing with UiPath Studio WebDev Dives: Streamline document processing with UiPath Studio Web
Dev Dives: Streamline document processing with UiPath Studio WebUiPathCommunity
 
Ensuring Technical Readiness For Copilot in Microsoft 365
Ensuring Technical Readiness For Copilot in Microsoft 365Ensuring Technical Readiness For Copilot in Microsoft 365
Ensuring Technical Readiness For Copilot in Microsoft 3652toLead Limited
 
Vector Databases 101 - An introduction to the world of Vector Databases
Vector Databases 101 - An introduction to the world of Vector DatabasesVector Databases 101 - An introduction to the world of Vector Databases
Vector Databases 101 - An introduction to the world of Vector DatabasesZilliz
 
"Subclassing and Composition – A Pythonic Tour of Trade-Offs", Hynek Schlawack
"Subclassing and Composition – A Pythonic Tour of Trade-Offs", Hynek Schlawack"Subclassing and Composition – A Pythonic Tour of Trade-Offs", Hynek Schlawack
"Subclassing and Composition – A Pythonic Tour of Trade-Offs", Hynek SchlawackFwdays
 
Bun (KitWorks Team Study 노별마루 발표 2024.4.22)
Bun (KitWorks Team Study 노별마루 발표 2024.4.22)Bun (KitWorks Team Study 노별마루 발표 2024.4.22)
Bun (KitWorks Team Study 노별마루 발표 2024.4.22)Wonjun Hwang
 

Último (20)

Transcript: New from BookNet Canada for 2024: BNC CataList - Tech Forum 2024
Transcript: New from BookNet Canada for 2024: BNC CataList - Tech Forum 2024Transcript: New from BookNet Canada for 2024: BNC CataList - Tech Forum 2024
Transcript: New from BookNet Canada for 2024: BNC CataList - Tech Forum 2024
 
Commit 2024 - Secret Management made easy
Commit 2024 - Secret Management made easyCommit 2024 - Secret Management made easy
Commit 2024 - Secret Management made easy
 
Nell’iperspazio con Rocket: il Framework Web di Rust!
Nell’iperspazio con Rocket: il Framework Web di Rust!Nell’iperspazio con Rocket: il Framework Web di Rust!
Nell’iperspazio con Rocket: il Framework Web di Rust!
 
Anypoint Exchange: It’s Not Just a Repo!
Anypoint Exchange: It’s Not Just a Repo!Anypoint Exchange: It’s Not Just a Repo!
Anypoint Exchange: It’s Not Just a Repo!
 
Scanning the Internet for External Cloud Exposures via SSL Certs
Scanning the Internet for External Cloud Exposures via SSL CertsScanning the Internet for External Cloud Exposures via SSL Certs
Scanning the Internet for External Cloud Exposures via SSL Certs
 
Streamlining Python Development: A Guide to a Modern Project Setup
Streamlining Python Development: A Guide to a Modern Project SetupStreamlining Python Development: A Guide to a Modern Project Setup
Streamlining Python Development: A Guide to a Modern Project Setup
 
SIP trunking in Janus @ Kamailio World 2024
SIP trunking in Janus @ Kamailio World 2024SIP trunking in Janus @ Kamailio World 2024
SIP trunking in Janus @ Kamailio World 2024
 
The Future of Software Development - Devin AI Innovative Approach.pdf
The Future of Software Development - Devin AI Innovative Approach.pdfThe Future of Software Development - Devin AI Innovative Approach.pdf
The Future of Software Development - Devin AI Innovative Approach.pdf
 
AI as an Interface for Commercial Buildings
AI as an Interface for Commercial BuildingsAI as an Interface for Commercial Buildings
AI as an Interface for Commercial Buildings
 
Unleash Your Potential - Namagunga Girls Coding Club
Unleash Your Potential - Namagunga Girls Coding ClubUnleash Your Potential - Namagunga Girls Coding Club
Unleash Your Potential - Namagunga Girls Coding Club
 
Training state-of-the-art general text embedding
Training state-of-the-art general text embeddingTraining state-of-the-art general text embedding
Training state-of-the-art general text embedding
 
"Debugging python applications inside k8s environment", Andrii Soldatenko
"Debugging python applications inside k8s environment", Andrii Soldatenko"Debugging python applications inside k8s environment", Andrii Soldatenko
"Debugging python applications inside k8s environment", Andrii Soldatenko
 
Designing IA for AI - Information Architecture Conference 2024
Designing IA for AI - Information Architecture Conference 2024Designing IA for AI - Information Architecture Conference 2024
Designing IA for AI - Information Architecture Conference 2024
 
"Federated learning: out of reach no matter how close",Oleksandr Lapshyn
"Federated learning: out of reach no matter how close",Oleksandr Lapshyn"Federated learning: out of reach no matter how close",Oleksandr Lapshyn
"Federated learning: out of reach no matter how close",Oleksandr Lapshyn
 
Dev Dives: Streamline document processing with UiPath Studio Web
Dev Dives: Streamline document processing with UiPath Studio WebDev Dives: Streamline document processing with UiPath Studio Web
Dev Dives: Streamline document processing with UiPath Studio Web
 
Ensuring Technical Readiness For Copilot in Microsoft 365
Ensuring Technical Readiness For Copilot in Microsoft 365Ensuring Technical Readiness For Copilot in Microsoft 365
Ensuring Technical Readiness For Copilot in Microsoft 365
 
Vector Databases 101 - An introduction to the world of Vector Databases
Vector Databases 101 - An introduction to the world of Vector DatabasesVector Databases 101 - An introduction to the world of Vector Databases
Vector Databases 101 - An introduction to the world of Vector Databases
 
DMCC Future of Trade Web3 - Special Edition
DMCC Future of Trade Web3 - Special EditionDMCC Future of Trade Web3 - Special Edition
DMCC Future of Trade Web3 - Special Edition
 
"Subclassing and Composition – A Pythonic Tour of Trade-Offs", Hynek Schlawack
"Subclassing and Composition – A Pythonic Tour of Trade-Offs", Hynek Schlawack"Subclassing and Composition – A Pythonic Tour of Trade-Offs", Hynek Schlawack
"Subclassing and Composition – A Pythonic Tour of Trade-Offs", Hynek Schlawack
 
Bun (KitWorks Team Study 노별마루 발표 2024.4.22)
Bun (KitWorks Team Study 노별마루 발표 2024.4.22)Bun (KitWorks Team Study 노별마루 발표 2024.4.22)
Bun (KitWorks Team Study 노별마루 발표 2024.4.22)
 

Oracle Inventory Category Setup Guide

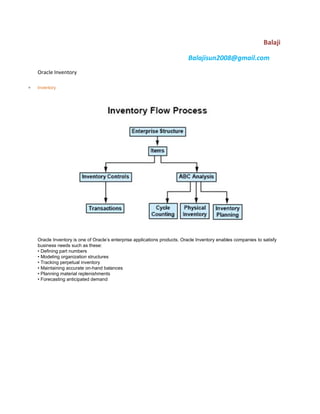
  • 1. Balaji Balajisun2008@gmail.com Oracle Inventory Inventory Oracle Inventory is one of Oracle‘s enterprise applications products. Oracle Inventory enables companies to satisfy business needs such as these: • Defining part numbers • Modeling organization structures • Tracking perpetual inventory • Maintaining accurate on-hand balances • Planning material replenishments • Forecasting anticipated demand
  • 2. Implemenation of Inventory Submitted by Anonymous on Sat, 03/28/2009 - 16:55 Tag: Inventory / The first step in ventroy implemenation is to design the flex field structures.
  • 3. Of all the key flexfield system items is the most important. Its used to store the item information. Oracle Inventory Flexfields Submitted by Anonymous on Fri, 04/17/2009 - 20:04 Tag: Inventory / Oracle Inventory provides the following flexfields: 1. System Items 2. Item Catalogs 3. Item Categories 4. Stock Locators 5. Account Aliases 6. Sales Orders Depending on your system's setup, Inventory may also use some or all of the following flexfields provided by other Oracle products: Accounting (Oracle General Ledger) Sales Tax Location (Oracle Receivables) Territory (Oracle Receivables) 1. System Items You can use the System Items Flexfield (also called the Item Flexfield) for recording and reporting your item information. You must design and configure your Item Flexfield before you can start defining items.
  • 4. All Oracle Applications products that reference items share the Item Flexfield and support multiple-segment implementations. However, this flexfield supports only one structure. You must set up your OE: Item Flexfield profile option to specify the Item Flexfield structure that you will use for your Oracle applications. Users can also set up the OE: Item Flexfield Entry Method profile option to specify your preferred method of entry for this flexfield. You can optionally use the item flexfield to default item information for invoice, debit memo, and credit memo lines or you can enter your own line information. 2. Item Catalogs This key flexfield supports only one structure.
  • 5. 3. Item Categories You must design and configure your Item Categories Flexfield before you can start defining items since all items must be assigned to categories. You can define multiple structures for your Item Categories Flexfield, each structure corresponding to a different category grouping scheme. You can then associate these structures with the categories and category sets you define. 4. Stock Locators You can use the Stock Locators Flexfield to capture more information about stock locators in inventory. If you do not
  • 6. have Oracle Inventory installed, or none of your items have locator control, it is not necessary to set up this flexfield. If you keep track of specific locators such as aisle, row, bin indicators for your items, you need to configure your Stock Locators Flexfield and implement locator control in your organization. This key flexfield supports only one structure. 5. Account Aliases This key flexfield supports only one structure.
  • 7. 6. Sales Order The Sales Order Flexfield is a key flexfield used by Oracle Inventory to uniquely identify sales order transactions Oracle Order Management interfaces to Oracle Inventory. Your Sales Order Flexfield should be defined as Order Number, Order Type, and Order Source. This combination guarantees each transaction to Inventory is unique. You must define this flexfield before placing demand or making reservations in Oracle Order Management. You must set up the OM: Source Code profile option to determine the source code you will use in for the third segment of this flexfield to guarantee that each transaction is unique. (Oracle Inventory defaults the value of the OM: Source Code profile option to 'ORDER MANAGEMENT'.) For your value sets, you must use Dynamic Inserts. The Validation Type should be None. Value Required should be Yes to improve performance of concurrent programs. The value set must be alphanumeric. The value set maximum size must be 40. You should set the Required field to Yes in the Validation Information region when enabling the flexfield segments. Setting this field to Yes, improves performance when updating existing demand or reservations by guaranteeing that Oracle Order Management always supplies a value. Set Right-justify Zero-fill Numbers to No so sales order numbers are not padded with zeros. Oracle Inventory defines a unique ID for each order in MTL_SALES_ORDERS based on this flexfield. The Inventory unique ID, as opposed to the Order Management unique ID, is used throughout Oracle Manufacturing applications. Item Categories Submitted by oracleug on Mon, 01/19/2009 - 18:03 Tag: Inventory /
  • 8. Categories are logical groupings of items that have similar characteristics. A category set is a distinct category grouping scheme and consists of categories. Each category grouping scheme can use different terminology for its categories, as well as different naming structures based on number of segments. You can define multiple structures for your Item Categories flexfield. You can configure each flexfield structure by using as many segments and any level of value set validation that you need. When inventory is installed, a default category must be assigned to each of the following functional areas: Inventory, Purchasing, Order Entry, Costing, Engineering, and Planning. When an item is enabled for a functional area, it is assigned the default category set. You cannot delete the items default category set assignment. Default categories are required so that each functional area has at least one category set that contains all items in that functional area. For the functional areas, optionally, you can have a unique category set; for example, you may set up a unique category set for Purchasing. It is also possible to have one category set defined to be the default category set for all functional areas. The complete set up of item categories is done in below 5 steps in sequence.
  • 9. Item Category Flexfield Structures Submitted by Anonymous on Tue, 01/20/2009 - 11:31 Tag: Inventory / You can define multiple segment structures for the Item Categories Flexfield. Each segment structure may have its own display prompts and fields. When you install or upgrade Oracle Inventory or Oracle Purchasing, Oracle provides two category flexfield structures by default: Item Categories and PO Item Category. Each segment structure can display prompts and fields that apply specifically to a particular naming convention. For example, you might want one of your category sets to use two segments for the names of categories. Another item grouping scheme might use just one segment for the names of categories. You choose a flexfield structure for every category set and category that you define.
  • 10. 1. Lets create an item category as Procut Information with three segment: Product Line - Product Name - Brand Name Product Line - Electronics, Machine, FMG Product Name - Mobile, TV, Bus Engine, Soap, Biscuit Brand Name - LG, Samsung, Cummins, Britania 2. Define all the value sets as shown below. 3. Define the item category flex field.
  • 11. 4. Filling up the value set of the stucture product information
  • 12.
  • 13. Defining Item Categories Submitted by Anonymous on Tue, 01/20/2009 - 11:53 Tag: Inventory / Enter a flexfield Structure Name, a unique Category (value) for each structure segment, and a unique description for the new category. If you want to make a category inactive, enter a date you want the category to be inactive on. Save your work. If you choose a multi–segment flexfield structure you can assign a specific meaning to each segment. For example in our case the category "Electronics.Mobile.Samsung" means an item assinged to this category is a samusng brand mobile device of elcetroincs product group.
  • 14.
  • 15. Category Sets Submitted by Anonymous on Tue, 01/20/2009 - 12:03 Tag: Inventory / Category sets may be used as a means to develop custom lists of items on which to report and sort. You can also create other category sets such as John‘s Priority or Jane‘s Priority, with categories like high, medium, and low. The category set Inventory is seeded when you install Oracle Inventory. The category set Purchasing is seeded when you install Oracle Purchasing. If you plan to use Order Management‘s group pricing functionality with item categories, you must add the categories to the Order Entry category set. Attention: 1. You must use this window to define valid categories for each purchasing category set before you can use Oracle Purchasing. 2. For the Controlled At level, if the item defining attribute of the functional area (e.g. Inventory‘s is Inventory Item) is controlled at the Organization level, then the new default Category Set should also be controlled at the Organization level.
  • 16. Enter a unique category set Name and Description. In the Flex Structure section, enter which flexfield structure is to be used. The categories assigned to the category set must have the same flexfield structure as the set itself. Select a control level and a default category. You will then need to select Enforce List of Valid Categories if you want validation of the categories at the time of input. You will then enter in or select the valid categories for the category set. Assigning Items to Categories Submitted by Anonymous on Tue, 01/20/2009 - 12:34 Tag: Inventory / When you enable an item in a functional area, the item is assigned to the default (mandatory) category set and default category of the functional area. You can override the category set‘s default category. In addition, you can manually assign your item to an unlimited number of category sets. You may optionally assign an item to more than one category within a category set based on the category set definition.
  • 17. When you assign your item to another organization Oracle Inventory copies Master level category sets, Organization level default category sets, and the associated categories assigned in the Item Master organization. This means that if you manually assign an Organization level category set to the item in the Master organization, Inventory does not copy over that Organization level category set when you assign that item to another organization. After assigning an item to another organization you can disable the item for one or more functional areas in the new organization. However, Inventory does not remove the corresponding functional area‘s default category set. For example, you may have set the value of the Purchased attribute to ‖Yes‖ when you defined the item in the item master organization. When you assign this item to another organization Inventory copies over the ‖Yes‖ value of the Purchased attribute and therefore assigns the default category set of the purchasing functional area. In the new organization you may decide to set the value of the Purchased attribute to ‖No.‖ After you disable the item for the purchasing functional area in the new organization, the item still retains the purchasing default category set. You may manually delete the purchasing category set in the new organization. If you copy an item from another item with category sets defined at the Organization level, Inventory assigns the new item the default categories of the mandatory category sets, even if the original item did not have the default categories. This is because Inventory copies the values of the item defining attributes and not the category sets and categories themselves. Default Category Sets Submitted by Anonymous on Tue, 01/20/2009 - 12:26 Tag: Inventory /
  • 18. set to each of the following functional areas: Inventory, Purchasing, Order Management, Costing, Engineering, and Planning. Product Line Accounting is seeded with the Inventory category set. Inventory makes the default category set mandatory for all items defined for use by a functional area. If your item is enabled for a particular functional area you cannot delete the item‘s corresponding default category set assignment. Default category sets are required so that each functional area has at least one category set that contains all items in that functional area. You can enable an item for each functional area by using that functional area‘s item defining attribute. An item defining attribute identifies the nature of an item. For example, what designates an item as an ―engineering item‖ is the attribute Engineering Item. If a functional area‘s item defining attribute is controlled at the Organization level, then that functional area may only have an Organization level default category set. When you enable an item for a certain functional area, Oracle Inventory automatically assigns the item to the default category set of that functional area and the default category of that set. For example, if you set Inventory Item to Yes, then Inventory automatically assigns the item to the Inventory functional area‘s default category set and default category. You may change a functional area‘s default category set under certain conditions. You should ensure that every item within the functional area belongs to the new default category set (which replaces the existing default category set). If the item defining attribute of the functional area is controlled at the Organization level then the new default category set should also be controlled at the Organization level.
  • 19. Item Catalog Submitted by Anonymous on Wed, 01/21/2009 - 10:13 Tag: Inventory / An item catalog group is a standard set of descriptive elements to which you assign items. Examples of catalog descriptive elements are color, shape, length, and so on. For example, a textile manufacturer might define pattern attributes such as color, size, texture, and style. Usage: An electronics company (say Samsung) can use the catalog to incorporate length, breadth and height of each mobile it produces. As the company Samsung also produces other electronics products such as TV, Refrigerator and etc. We should first create an item category as mobile and then create a catalog group as mobile-catalog with three catalogs length-breadth and height. Defining and Using Item Catalogs Follow these steps to define and use item catalogs: 1 Define the item catalog group.
  • 20. 2 Define descriptive elements within each catalog group. 3 Enter categories for the catalog groups. Items belonging to the above category are attached with the descriptive element of the catalog.
  • 21. 4 Enter descriptive element values for each item. 5 Update item descriptions with catalog group and descriptive element values.
  • 22. 6 Search for items using descriptive elements as the search criteria.
  • 23. Searching all the items with bredth 20. Stock Locators Submitted by oracleug on Thu, 01/22/2009 - 14:41 Tag: Inventory /
  • 24. You use locators to identify physical areas where you store inventory items. Item quantities can be tracked by locator. Items can also be restricted to specific locators. 1. Add the segment values of the KFF stock locator. Navigation : GL -> Financials -> Flexfields -> Key -> Values
  • 25. 2. Enter the new locator in locator form which can be accessed from below navigation or on subinventory form. Navigation : Inventory -> Set up -> Stock Locator
  • 26. 1. Locator Type: Indicate the locator type available choices are as follows: Dock Door, Receiving, Inspection Station, Storage Locator, Consolidation Locator, Staging Lane, Packing Station. Dock doors are used in Oracle Warehouse Management environments only. 2. Indicate the material status of this locator, which controls the enabled transactions for all material in this locator. The status is not overridden by the status of any ubinventory, lot or serial, within this locator. The statuses of those objects will be considered when determining transactions that are not enabled. This field is used if you have Oracle Warehouse Management installed. 3. Enter the subinventory where the locator resides. 4. Enter a picking order value indicating the priority for picking items from this locator relative to another locator. This value is used by Oracle Warehouse Managment to sequence picking tasks. A picking order of 1 means that order management functions pick items from this locator before other locators with a higher number (2, 3, and so on). If you have Oracle Warehouse Management installed, this field determines the picking path through the warehouse and not the order in which material is allocated for a sales order. 5. Enter a dropping order to indicate the priority for dropping items in this locator relative to another locator. Oracle warehouse management uses this value to sequence tasks. 6. Enter the inactive date for the locator. This is the date the locator becomes inactive. Defining Account Aliases Submitted by Anonymous on Thu, 01/29/2009 - 11:10 Tag: Account Receivables
  • 27. / An account alias is an easily recognized name or label representing a general ledger account number. You can view, report, and reserve against an account alias. During a transaction, you can use the account alias instead of an account number to refer to the account. Inventory Period Close Submitted by Anonymous on Fri, 12/25/2009 - 14:18 Tag: Inventory / The period close process for perpetual costing enables you to 1. Summarize costs related to inventory and manufacturing activities for a given accounting period. 2. Distribute those costs to the general ledger. 3. Calculates ending period subinventory values. 4. Closes the open period for Inventory and Work in Process. Generally, you should open and close periods for each separate inventory organization independently. By keeping only one period open, you can ensure that your transactions are dated correctly and posted to the
  • 28. correct accounting period. (For month–end adjustment purposes, you can temporarily hold multiple open periods.) The accounting periods and the period close process in Cost Management use the same periods, fiscal calendar, and other financial information found in General Ledger. Inventory and work in process transactions automatically create accounting entries. All accounting entries have transaction dates that belong in one accounting period. You can report and reconcile your transaction activity to an accounting period and General Ledger. You can transfer summary or detail transactions to General Ledger. You can transfer these entries to General Ledger when you close the period or perform interim transfers. When you transfer to General Ledger, a general ledger (GL) batch ID and organization code are sent with the transferred entries. You can review and report the GL batch number in General Ledger and request Inventory and Work in Process reports by the same batch number. You can also view general ledger transfers in Inventory and drill down by GL batch ID into the inventory and WIP accounting distributions. Note: Purchasing holds the accounting entries for receipts into receiving inspection and for deliveries into expense destinations. This includes any perpetual receipt accruals.Purchasing also has a separate period open and close, and uses separate processes to load the general ledger interface. Closes Open Period The period close process permanently closes an open period. You can no longer charge transactions to a closed period. Once you close a period, it cannot be reopened. As a precaution, you can do a GL transfer without closing the period. Transfers Accounting Entries to the General Ledger If your inventory organization‘s parameter for Transfer to GL is None, perpetual accounting entries are not transferred to the General Ledger. The other choices for the Transfer to GL parameter are Summary and Detail, indicating whether the period close process creates summary or detail transactions for posting to the general ledger. The period close process transfers the following information: • work in process transactions • job costs and variances • period costs for expense non–standard jobs • depending on the selected options, the remaining balances for repetitive schedules Note: If you have chosen the new Periodic Costing feature, Cost Management warns you of the possibility of inadvertently posting both Periodic and perpetual costed transactions to the General Ledger. The warning displays if there is at least one legal entity–cost type combination that has the Periodic Cost Post Entries to GL option checked, where the organization under that legal entity also has the perpetual cost GL transfer enabled. Calculates Ending Period Subinventory Values For each subinventory, the period close adds the net transaction value for the current period to the prior period‘s ending value. This, along with values intransit, creates the ending value for the current period. Inventory Period Close Submitted by Anonymous on Fri, 12/25/2009 - 14:18 Tag: Inventory / The period close process for perpetual costing enables you to
  • 29. 1. Summarize costs related to inventory and manufacturing activities for a given accounting period. 2. Distribute those costs to the general ledger. 3. Calculates ending period subinventory values. 4. Closes the open period for Inventory and Work in Process. Generally, you should open and close periods for each separate inventory organization independently. By keeping only one period open, you can ensure that your transactions are dated correctly and posted to the correct accounting period. (For month–end adjustment purposes, you can temporarily hold multiple open periods.) The accounting periods and the period close process in Cost Management use the same periods, fiscal calendar, and other financial information found in General Ledger. Inventory and work in process transactions automatically create accounting entries. All accounting entries have transaction dates that belong in one accounting period. You can report and reconcile your transaction activity to an accounting period and General Ledger. You can transfer summary or detail transactions to General Ledger. You can transfer these entries to General Ledger when you close the period or perform interim transfers. When you transfer to General Ledger, a general ledger (GL) batch ID and organization code are sent with the transferred entries. You can review and report the GL batch number in General Ledger and request Inventory and Work in Process reports by the same batch number. You can also view general ledger transfers in Inventory and drill down by GL batch ID into the inventory and WIP accounting distributions. Note: Purchasing holds the accounting entries for receipts into receiving inspection and for deliveries into expense destinations. This includes any perpetual receipt accruals.Purchasing also has a separate period open and close, and uses separate processes to load the general ledger interface. Closes Open Period The period close process permanently closes an open period. You can no longer charge transactions to a closed period. Once you close a period, it cannot be reopened. As a precaution, you can do a GL transfer without closing the period. Transfers Accounting Entries to the General Ledger If your inventory organization‘s parameter for Transfer to GL is None, perpetual accounting entries are not transferred to the General Ledger. The other choices for the Transfer to GL parameter are Summary and Detail, indicating whether the period close process creates summary or detail transactions for posting to the general ledger. The period close process transfers the following information: • work in process transactions • job costs and variances • period costs for expense non–standard jobs • depending on the selected options, the remaining balances for repetitive schedules Note: If you have chosen the new Periodic Costing feature, Cost Management warns you of the possibility of inadvertently posting both Periodic and perpetual costed transactions to the General Ledger. The warning displays if there is at least one legal entity–cost type combination that has the Periodic Cost Post Entries to GL option checked, where the organization under that legal entity also has the perpetual cost GL transfer enabled. Calculates Ending Period Subinventory Values For each subinventory, the period close adds the net transaction value for the current period to the prior period‘s ending value. This, along with values intransit, creates the ending value for the current period. Transfer Transactions to General Ledger Submitted by Anonymous on Fri, 12/25/2009 - 16:00 Tag:
  • 30. Inventory / You can perform the general ledger transfer at any time during an open period—not just at period close. Interim transfers allow you to reconcile and transfer information weekly, making the month–end period close process much simpler and faster. The general ledger transfer loads summary or detail accounting activity for any open period into the general ledger interface, including both inventory and work in process entries. When more than one period is open, the transfer selects transactions from the first open period, up to the entered transfer date, and passes the correct accounting date and financial information into the general ledger interface. For example, when you transfer detail entries, the transaction date is the accounting date with a line for line transfer. When you transfer summary entries with two periods open and enter a transfer date in the second period, the transfer process assigns the period one end date for all the summarized transactions in period one and assigns the entered transfer date for the summarized transactions in period two. For each inventory organization, Cost Management transfers transactions to the general ledger interface table, line for line. If you transfer summary information, Cost Management groups transactions by GL batch, by journal category, by currency code, and by account. Attention: Transfer in detail only if you have low transaction volumes. Transferring large amounts of detail transactions can adversely affect General Ledger performance. For both detail and summary transfers, Cost Management passes the organization code, GL batch number, batch description, and batch date. When you transfer in detail, you also pass the material or work in process transaction number. In General Ledger, you can see the transferred information, as follows:
  • 31. Cost Management uses the journal source Inventory for both inventory and work in process transactions. The journal categories Inventory and Work in Process distinguish between inventory and work in process transactions. Using Journal Import and Post Journals processes in General Ledger, you can then post this information to the general ledger. Period Summarization Process Summarization of transaction records for the open period is the last step in period close. You have the option to perform this process automatically or manually using the profile option, CST:Period Summary. If the profile option is set to Automatic, the period is closed and summarized when you change the period status from Open to Closed. If the profile option is set to Manual, you can delay summarization – but you must summarize these delayed periods in accounting period order. For example, if you delay summarization for a given period, the following period cannot be summarized until the previous period is summarized. In situations where summarization is delayed, the longer the delay – the larger the number of transaction records needed for reconciliation purposes. This situation can cause summarization to take more time to complete. If you do not choose to summarize periods, set the period status to Closed not Summarized. The Period Close Reconciliation report is used to compare account balances with inventory value at period end. You can run the report in simulation mode by generating it for an open period. The report can be generated at any time during the period. Inventory Pending Transaction Submitted by Anonymous on Fri, 03/27/2009 - 14:40
  • 32. Tag: Inventory / Users can see the number of pending transactions by navigating to the Inventory Accounting Periods Form. Navigate > Cost > Accounting Close Cycle > Inventory Accounting Periods Place cursor on the appropriate open accounting period and click on the [Pending] Button. There are three zones titled ―Resolution Required‖, ―Resolution Recommended‖ and ―Unprocessed Shipping Transactions‖. Unprocessed material transactions exist for this period This message indicates you have unprocessed material transactions in the MTL_MATERIAL_TRANSACTIONS_TEMP table. You are unable to close the period with this condition. Please see your system administrator. Inventory considers entries in this table as part of the quantity movement. Closing the period in this situation is not allowed because the resultant accounting entries would have a transaction date for a closed period, and never be picked up by the period close or general ledger transfer process. Uncosted material transactions exist for this period This message indicates you have material transactions in the MTL_MATERIAL_TRANSACTIONS table with no accounting entries (Standard Costing) and no accounting entries and no costs (Average Costing). You are unable to close the period with this condition. These transactions are part of your inventory value. Closing the period in this situation is not allowed because the resultant accounting entries would have a transaction date for a closed period, and never be picked up by the period close or general ledger transfer process. Pending WIP costing transactions exist in this period This message indicates you have unprocessed resource and overhead accounting transactions in the WIP_COST_TXN_INTERFACE table. You are unable to close the period with this condition. These transactions are in your work in process value, and awaiting further processing. Closing the period in this situation is not allowed because the resultant accounting entries would have a transaction date for a closed period, and never be picked up by the period close or general ledger transfer process.
  • 33. Unprocessed Shipping Transactions ―Pending Transactions‖ in the Unprocessed Shipping Transactions zone indicate there are transactions in the WSH_DELIVERY_DETAILS table in a status of shipped. Pending receiving transactions for this period When you use Purchasing, this message indicates you have unprocessed purchasing transactions in the RCV_TRANSACTIONS_ INTERFACE table. These transactions include purchase order receipts and returns for inventory. If this condition exists, you will receive a warning but will be able to close the accounting period. These transactions are not in your receiving value. However, after you close the period, these transactions cannot be processed because they have a transaction date for a closed period. Pending material transactions for this period This message indicates you have unprocessed material transactions in the MTL_TRANSACTIONS_INTERFACE table. If this condition exists, you will receive a warning but will be able to close the accounting period. These transactions are not in your inventory value. However, after you close the period, these transactions cannot be processed because they have a transaction date for a closed period. Pending move transactions for this period This message indicates you have unprocessed shop floor move transactions in the WIP_MOVE_TXN_INTERFACE table. If this condition exists, you will receive a warning but will be able to close the accounting period. These transactions are not in your work in process value. However, after you close the period, these transactions cannot be processed because they have a transaction date for a closed period. Closing a Period Submitted by Anonymous on Sat, 12/26/2009 - 00:27 Tag: Inventory /
  • 34. 1. Enter all transactions. Be sure you enter all transactions for the period. Perform all issues,receipts, and adjustments. Verify that no hard copy records exist or are waiting for data entry, such as packing slips in receiving. 2. Check Inventory and Work in Process transaction interfaces.You can set up the material and move transaction managers to execute transactions immediately, then submit an immediate concurrent request to execute, or submit a concurrent request periodically at a time interval you specify. If you do not use immediate processing, or interface external transactions, check the Inventory material transaction manager and the Work in Process move transaction manager before closing the period. 3. Check Cost Management cost interfaces. Cost Management processes your inventory and work in process accounting transactions as a concurrent request, using a specified time interval. Before you close the period, you should check that the Cost Manager is active. 4. Check Order Management transaction processes. If you use Order Management, ensure that all sales order transaction processes complete and transfer successfully to Inventory. 5. Review Inventory transactions. Before you close a period, review all of the transactions using the Material Account Distribution Report for the period with a high dollar value and/or a high transaction quantity. Check that you charged the proper accounts. Correcting improper account charges before you close a period is easier than creating manual journalentries. 6. Balance perpetual inventory. Check that your ending perpetual inventory value for the period being closed matches the value you report in the general ledger. Perpetual inventory value normally balances automatically with the general ledger. However, one of the following sources can create a discrepancy: – Other inventory journal entries. Journal entries from products other than Inventory that affect the inventory accounts. – Charges to improper accounts: For example, you issued material from a subinventory to a miscellaneous account, but used one of the subinventory accounts as that miscellaneous account. – Issue to miscellaneous account: For example, the following miscellaneous transaction issue would cause an out of balance situation: debit account specified at transaction 123, credit subinventory valuation account 123. The debit and credit net to zero with no financial charge, but since the inventory quantity decreased, the month–end inventory valuation reports will not equal the general ledger account balance. – Transactions after period end reports. This occurs when you run the end of month inventory valuation reports before you complete all transactions for the period. If you do not run the inventory reports at period end, you can also run these Reports: – Inventory Value Report – Material Account Distribution Detail Report – Material Account Distribution Summary Report – Period Close Summary Report – Period Close Reconciliation report – Inventory Subledger Report (Average Costing Only) In a organization using Project Manufacturing Average Costing, if there is more than one cost group, the following valuation reports should not be used for reconciliation purposes because these reports list the average value across cost groups. – Transaction historical Summary Report – Receiving Value Report – All Inventories Value Report – Elemental Inventory Value Report – Subinventory Account Value Report – Item Cost Report 7. Validate Work in Process inventory. If you use Work in Process, check work in process inventory balances against transactions with the WIP Account Distribution Report.
  • 35. 8. Transfer transactions in advance of closing period (optional). If time permits, run the general ledger transfer process up to the period end date before closing the period. Closing a period executes the general ledger transfer automatically. However, you can also run this process without closing a period using Transfer Transactions to General Ledger. Since you cannot reopen a closed period, running this process before period close allows you to proof the interfaced transactions and make adjustments to the period via new inventory transactions as necessary. 9. Close Oracle Payables and Oracle Purchasing. If you use Payables and Purchasing, you need to close the accounting periods in the following order: – Payables – Purchasing – Inventory If you only use Purchasing and Inventory, you need to close Purchasing first. Close Payables before Purchasing, in preparation for accruing expenses on uninvoiced receipts. Doing so ensures that all new payables activity is for the new month and you do not inadvertently match a prior month invoice in payables to a new month receipt. When you close Purchasing or Inventory, you cannot enter a receipt for that period. However, as a manual procedure, close Purchasing before Inventory. This still allows miscellaneous transaction corrections in Inventory. 10. Run the Period Close Reconciliation report. This report automatically runs in simulation mode for the open period. It is used to match account balances with inventory value at period end. 11. Close the accounting period and automatically transfer transactions to the general ledger. This sets your Inventory Accounting Period status to Closed not Summarized. If the CST: Period Summary profile option is set to Automatic, no other steps are necessary. The period status is set to Closed when the summarization process has completed. 12. If the CST: Period Summary profile option is set to Manual, create period summarization transactions by generating the Period Close Reconciliation report. The concurrent program creates summarized transaction records, and displays the differences between account balances and inventory value. Units of Measure Submitted by oracleug on Mon, 04/20/2009 - 10:11 Tag: Inventory / Oracle Inventory provides you with powerful methods for defining and manipulating units of measure. You can easily convert between the units of measure you define. This enables you to manufacture, order, or receive items in any unit of measure. With units of measure you can: 1. Define unit of measure classes, 2. Define units of measure, 3. Define unit of measure conversions, 4. Define lot-specific unit of measure conversions Defining Unit of Measure Classes Unit of measure classes represent groups of units of measure with similar characteristics. Creating unit of measure classes is the first step in unit of measure management. Each unit of measure you define must belong to a unit of measure class.
  • 36. Each class has a base unit of measure. The base unit of measure is used to perform conversions between units of measure in the class. For this reason, the base unit of measure should be representative of the other units of measure in the class, and generally one of the smaller units. For example, you could use CU (cubic feet) as the base unit of a class called Volume. Unit of measure classes are not organization-specific. Default unit of measure classes are not provided. 1. Enter a unique name for the unit of measure class. 2. Define the base unit of measure for this class. 3. Define a unique abbreviation for the base unit of measure. Defining Units of Measure Submitted by Anonymous on Mon, 04/20/2009 - 12:24 Tag:
  • 37. Purchasing / Units of measure are used by a variety of functions and transactions to express the quantity of items. Defining units of measure is the second step in unit of measure management. The values defined in the Units of Measure window provide the list of values available in unit of measure fields in other windows. Units of measure are not organization-specific. Primary Unit of Measure Theprimary unit of measure is the stocking unit of measure for an item in a particular organization. The primary unit of measure is an item attribute that you specify when defining each item. Prerequisites You must define at least one unit of measure class. Enter UOM from UOM Class FORM After defining the UOM class click on Uint of measure button to enter a new UOM. Enter the UOM namd and short name. Save the form Define a UOM in UOM form Navigate to the Units of Measure window.
  • 38. 1. Enter a unique name for the unit of measure. 2. Enter a unique abbreviation for the unit of measure with a maximum length of three characters. For example, EA for each or HRS for hours. 3. Enter a unit of measure class. 4. Indicate if this is the base unit of measure for the unit of measure class. To delete a unit of measure: 1. You can delete existing units of measure that are not base units of measure if no standard or item specific conversions are defined. To make a unit of measure inactive: 1. Enter the date on which the unit of measure becomes inactive. As of this date, you can no longer assign standard or item-specific conversions to the unit of measure. To change Base UOM: It‘s not possible to change the base UOM from one UOM to another UOM. Defining Unit of Measure Conversions Submitted by Anonymous on Mon, 04/20/2009 - 12:37 Tag: Inventory / Unit of measure conversions are numerical factors that enable you to perform transactions in units other than the primary unit of the item being transacted. You can define:
  • 39. A conversion common to any item (Standard) A conversion for a specific item within a unit of measure class (Intra-class) A conversion for a specific item between unit of measure classes (Inter-class) Unit of measure conversions are not organization-specific. You must define a conversion between a non-base unit of measure and the base unit of measure before you can assign the non-base unit of measure to an item Specifying Which Conversion to Use When you define an item you decide which type of unit of measure conversion to use: 1. Itemspecific: Only uses unit of measure conversions unique to this item. If none exist, you can only transact this item in its primary unit of measure. 2. Standard: Uses standard unit of measure conversions for this item if an item-specific conversion is not available. 3. Both: Uses both item-specific and standard unit of measure conversions. If both exist for the same unit of measure and item combination, the item-specific conversion is used. Unit of Measure Conversions During Transactions Whenever you enter an item's quantity, the default is the primary unit of measure for the item. The list of values for the unit of measure field displays all units of measure for which you have defined standard and/or item-specific conversions from the primary unit of measure. Transactions are performed in the unit of measure you specify. The conversion happens automatically and item quantities are updated in the primary unit of measure of the item. Important: Inventory transactions and on hand balance supports decimal precision to 5 digits after the decimal point. Oracle Work in Process supports decimal precision to 6 digits. Other Oracle Applications support different decimal precision. As a result of the decimal precision mismatch, transactions another Oracle Application passes may be rounded when processed by Inventory. If the transaction quantity is rounded to zero, Inventory does not process the transaction. It is therefore suggested that the base unit of measure for an item is set up such that transaction quantities in the base unit of measure not require greater than 5 digits of decimal precision.
  • 40. Define a Standard conversion for any item In standrad conversion you specify how one unit of mesaure is related to the primary unit of measure in the same class. In standrad conversion you cant do the following You cant specify any sort of intra class conversion Relationship between two UOMs not invloving primary UOM Navigate to the Unit of Measure Conversions window & Select the Standard tabbed region. 1 Enter a unit of measure. 2 Enter the conversion factor by which the unit of measure is equivalent to the base unit of measure established for this class. For example, if one DZ (this unit of measure) is equivalent to 12 EA (base unit), the conversion factor is 12. Or, if EA is equal to one-twelfth of a DZ, the conversion factor is 0.08333. Define a conversion for a specific item within a unit of measure class (Intra-class) We have seen in standard conversion we can only do convesrion from one UOM to primary UOM. Suppose we have defined a UOM convsrion rule for a unit of measure UOM_XYZ as UOM_XYZ = 6 x Primary UOM but for a particular item the vonvsrion rate is not 6 in that case we define a intra class convesrion for a particular item and when ever that item is transacted system 'll pick the convesrion rate from either intra class or standrad convesrion depending upon ITEM master set up. Notes We can do intra class conversion between two UOMs for a particular item only for a single class which is the UOM class of the primary UOM of the item. For exampe Suppose ITEM001 has a primary UOM as Ea and UOM Ea belongs to class Quantity then we can define intra class conversion for the item ITEM001 between two UOMs in the class Quantity. we cant define intra class convesrion between any other UOMs belonging to a differnt UOM class.
  • 41. Navigate to the Unit of Measure Conversions window. 1. Select the Intra-class tabbed region. 2. Enter an item.
  • 42. 3. Enter a unit of measure. 4. Enter the conversion factor by which the unit of measure is equivalent to the base unit of measure established for this class. For example, if one LB (this unit of measure) is equivalent to 16 OZ (base unit), the conversion factor is 16. Define a conversion for a specific item between unit of measure classes (Inter-class) Inter class conversion is used to convert an item from one primary UOM in one class to another primary UOM in a differnt class for a particular item. Navigate to the Unit of Measure Conversions window and Select the Inter-class tabbed region. 1. Select an item. 2. Select the destination base unit of measure of the class to which you are converting a unit of measure. 3. Enter the conversion factor by which the source base unit is equivalent to the destination base unit. For example, if one ML (source base unit) is equivalent to one GR (destination base unit), the conversion factor is one.
  • 43. Defining Unit of Measure Conversions Submitted by Anonymous on Mon, 04/20/2009 - 12:37 Tag: Inventory / Unit of measure conversions are numerical factors that enable you to perform transactions in units other than the primary unit of the item being transacted. You can define: A conversion common to any item (Standard) A conversion for a specific item within a unit of measure class (Intra-class) A conversion for a specific item between unit of measure classes (Inter-class) Unit of measure conversions are not organization-specific. You must define a conversion between a non-base unit of measure and the base unit of measure before you can assign the non-base unit of measure to an item Specifying Which Conversion to Use When you define an item you decide which type of unit of measure conversion to use: 1. Itemspecific: Only uses unit of measure conversions unique to this item. If none exist, you can only transact this item in its primary unit of measure. 2. Standard: Uses standard unit of measure conversions for this item if an item-specific conversion is not available. 3. Both: Uses both item-specific and standard unit of measure conversions. If both exist for the same unit of measure and item combination, the item-specific conversion is used.
  • 44. Unit of Measure Conversions During Transactions Whenever you enter an item's quantity, the default is the primary unit of measure for the item. The list of values for the unit of measure field displays all units of measure for which you have defined standard and/or item-specific conversions from the primary unit of measure. Transactions are performed in the unit of measure you specify. The conversion happens automatically and item quantities are updated in the primary unit of measure of the item. Important: Inventory transactions and on hand balance supports decimal precision to 5 digits after the decimal point. Oracle Work in Process supports decimal precision to 6 digits. Other Oracle Applications support different decimal precision. As a result of the decimal precision mismatch, transactions another Oracle Application passes may be rounded when processed by Inventory. If the transaction quantity is rounded to zero, Inventory does not process the transaction. It is therefore suggested that the base unit of measure for an item is set up such that transaction quantities in the base unit of measure not require greater than 5 digits of decimal precision. Define a Standard conversion for any item In standrad conversion you specify how one unit of mesaure is related to the primary unit of measure in the same class. In standrad conversion you cant do the following You cant specify any sort of intra class conversion Relationship between two UOMs not invloving primary UOM Navigate to the Unit of Measure Conversions window & Select the Standard tabbed region.
  • 45. 1 Enter a unit of measure. 2 Enter the conversion factor by which the unit of measure is equivalent to the base unit of measure established for this class. For example, if one DZ (this unit of measure) is equivalent to 12 EA (base unit), the conversion factor is 12. Or, if EA is equal to one-twelfth of a DZ, the conversion factor is 0.08333. Define a conversion for a specific item within a unit of measure class (Intra-class) We have seen in standard conversion we can only do convesrion from one UOM to primary UOM. Suppose we have defined a UOM convsrion rule for a unit of measure UOM_XYZ as UOM_XYZ = 6 x Primary UOM but for a particular item the vonvsrion rate is not 6 in that case we define a intra class convesrion for a particular item and when ever that item is transacted system 'll pick the convesrion rate from either intra class or standrad convesrion depending upon ITEM master set up. Notes We can do intra class conversion between two UOMs for a particular item only for a single class which is the UOM class of the primary UOM of the item. For exampe Suppose ITEM001 has a primary UOM as Ea and UOM Ea belongs to class Quantity then we can define intra class conversion for the item ITEM001 between two UOMs in the class Quantity. we cant define intra class convesrion between any other UOMs belonging to a differnt UOM class.
  • 46. Navigate to the Unit of Measure Conversions window. 1. Select the Intra-class tabbed region. 2. Enter an item.
  • 47. 3. Enter a unit of measure. 4. Enter the conversion factor by which the unit of measure is equivalent to the base unit of measure established for this class. For example, if one LB (this unit of measure) is equivalent to 16 OZ (base unit), the conversion factor is 16. Define a conversion for a specific item between unit of measure classes (Inter-class) Inter class conversion is used to convert an item from one primary UOM in one class to another primary UOM in a differnt class for a particular item. Navigate to the Unit of Measure Conversions window and Select the Inter-class tabbed region. 1. Select an item. 2. Select the destination base unit of measure of the class to which you are converting a unit of measure. 3. Enter the conversion factor by which the source base unit is equivalent to the destination base unit. For example, if one ML (source base unit) is equivalent to one GR (destination base unit), the conversion factor is one. Lot-Specific Unit of Measure Conversions Lot specific conversions enable you to perform a specific inter-class conversion for a given lot. This enables you to establish more granular control over the transactional quantities of a lot. For example, the standard inter-class conversion for a lot controlled item is one gallon equals 15 pounds; however, when you receive a particular lot of the item, 1 gallon equals 16 pounds. You can create a lot specific unit of measure for this instance. You can create lot-specific unit of measure conversions for on-hand lots or lots with a zero balance. If you create a lot-specific conversion for a lot with on-hand quantities, you can automatically update the quantities in the system to more accurately reflect the on-hand quantity. You can also view the history of changes made to the lot unit of measure conversion, and the corresponding quantity changes.
  • 48. 1. Enter the item number in the Item field. 2. Enter the lot number in the Lot Number field. 3. Select the destination base unit of measure of the class to which you are converting the unit of measure. 4. Enter the conversion factor by which the source base unit is equivalent to the destination base unit. For example, if 16 pounds (source base unit) is equivalent to 1 Gallon (destination base unit), the conversion factor is 16. 5. Optionally, enter an inactive date for the conversion. This is the date when the unit of measure conversion for the lot reverts back to the standard inter-class conversion. 6. Optionally, enter a transaction reason for the conversion. Rules Picking Rules When you define an item you choose a picking rule to determine the order in which revisions, lots, subinventories, and locators are picked for sales order. Oracle Shipping Execution submits requests to Oracle Inventory, which uses the information you enter in the Picking Rules window to generate pick lists for sales orders. If you choose None for any of the criteria fields, Inventory ignores that criterion. For example, if you choose None for Revision, Inventory picks units of an item without regard to revision levels. Oracle Inventory looks at the picking criteria in the order in which they appear in the Picking Rules window. Then, Inventory looks at the options (except for None options) for each criterion in the order in which they appear beneath each criterion. To define a picking rule
  • 49. 1. Navigate to the Picking Rules window. 2. Enter a unique name for the rule. 3. Select an option for revision order: Revision: Pick most recent revision. Effective Date: Pick earliest revision effective date. None: Do not consider revision levels in the picking process. 4. Select an option for lot order: Expiration Date: Pick earliest lot expiration date. Receipt Date: Pick earliest lot receipt date, the date you received items into their current location. Lot Number: Pick lowest lot number. None: Do not consider lot numbers in the picking process. 5. Select an option for subinventory order: Subinventory: Pick by order defined for each subinventory. Receipt Date: Pick earliest subinventory receipt date. None: Do not consider subinventories in the picking process. 6. Select an option for locator order: Locator: Pick items according to the picking order defined for each locator. Receipt Date: Pick items according to the earliest locator receipt date. None: Do not consider locators in the picking process. To delete a picking rule You can delete a picking rule if there are no references to it. Transaction Flow Submitted by Anonymous on Fri, 12/25/2009 - 17:37 Tag:
  • 50. Inventory / MTL_TRANSACTIONS_INTERFACE table is the Interface between non-Inventory applications and the Inventory Transactions module. In other words any other module other than Inventory that wants to update Inventory has to come through this table. Modules such as WIP (Work In Progress) and OE (Order Entry) first pass their records to the MTL_TRANSACTIONS_INTERFACE (MTI)for validation. There is an Interface Manager called the Transactions Manager (INCTCM) which reads records from this table, validates them and moves the successful transactions onto MTL_MATERIAL_TRANSACTIONS_TEMP, and submits Transaction workers (sub-processes - INCTCW) which then processes these records through inventory. This process consists of data derivation, validation, and transfer of records from MTL_TRANSCTIONS_INTERFACE, MTL_TRANSACTIONS_LOTS_INTERFACE and MTL_SERIAL_NUMBERS_INTERFACE into their respective TEMP (temporary) tables from where the transactions processor processes them. Both the Lots and Serial number tables above are used when items being updated are under 'Lot' or 'Serial' number control. Example :- In the case of an Sales Order, the item is being shipped to a client so the lot and serial number if being used, this needs to be updated to show that it is no longer available in Inventory stock. It is important to note that in general the processors will not move the transactions from this table if the following fields are not set as follows. LOCK_FLAG = 2 PROCESS_FLAG = 1 transaction_mode = 3 Once the transactions have been passed to this table after initial validation by the Transactions Manager (INCTCM) from the MTL_TRANSACTIONS_INTERFACE a job id is attached and a Transactions Worker (INCTCW) is submitted by the INCTCM process in order to the get the records processed and moved to the MTL_MATERIAL_TRANSACTONS table. This table is also used by Inventory Module and Purchasing module which writes directly onto this table for any transactions entered within itself and each transaction in turn through a process of strict validation. Inventory Module Forms like Miscellaneous transactions writes directly into this table. The transactions which are done through these form are on-line processing. It is from here that the inventory quantities finally get updated,serial/lot numbers get marked as being used. Enterprise Structure Inventory
  • 51. / You must plan how Oracle Inventory represents your company‘s inventory sites and business units. This includes defining organizations, locations, subinventories, and locators depending on your company structure. You also must plan how to implement certain parameters and what level of the structure controls them. Multi-org often refers to an Oracle Applications setup used to enable multiple business units in a single install. With multi-org, a business enterprise may set up multiple business units with differing sets of books, operating units, and legal entities all within a single instance. With multi-org, goods my be sold out of one operating unit or legal entity and shipped out of another, and the system will process an intercompany sale to properly account for it. Multi-org, however, should not be mistaken for installs with multiple inventory organizations. You do not have to use Oracle Applications multi-org to support multiple inventory organizations if all the inventory organizations share the same set of books, operating unit, and legal entity. Location: A location is simply a name and address, and is assigned to an organization or used to indicate delivery information on a purchase order. You may define as many locations as you like, but only one location may be assigned to an inventory organization. Business group is a group of companies that does business in different markets under common administrative or financial control whose members are linked by relations of interpersonal trust on the bases of similar personal ethnic or commercial background a business group.
  • 52. Set of Books (SOB): The financial entity that represents the chart of accounts, fiscal calendar, and base currency. The SOB is set up in the General Ledger. Legal Entity Organization: An entity used to represent a legal company. Fiscal and tax reporting are done at the Legal Entity level. A legal employer is a legal entity that is responsible for employing people in a particular country. Therefore, if you employ people in a country, then you must have at least one organization classified as a legal entity and a legal employer. The Configuration Workbench classifies an organization as a GRE/Legal Entity where your enterprise operates in a country, and classifies it as an Employer if you employ people in that country also. For example, you can have a legal entity in a country where you do business, but do not employ people in that country. Operating Unit Organization: A business unit that shares a common Purchasing, Accounts Payable, Order Entry and Accounts Receivable setup. An operating unit may consist of multiple inventory organizations, with multiple manufacturing sites, distribution centers, and sales offices, but they share a common sales order and purchase order system. For example, a sales order may have lines shipping from different inventory organizations or a purchase order may have lines destined for different inventory organizations. Inventory Organization: An entity used to represent a manufacturing or distribution site. Inventory organizations are where a user tracks on-hand balances, manufactures goods, and transacts the daily ins and outs of material movement. An inventory organization is the lowest level entity for costing goods, planning material requirements, and securing system access. Only a single address may be assigned to an Inventory Organization. An inventory organization is assigned a Set of Books which determines the chart of accounts, fiscal calendar, and base currency for all financial and value added activities that occur within the organization. Inventory Organizations are also assigned to a Legal Entity Organization and an Operating Unit Organization. A variation on the inventory organization is the master item organization. Generally, with Oracle Applications a single inventory organization is created and designated at the master organization. Items are defined first in the master organization, then enabled in other inventory organizations as necessary. Some of the item attributes are set as controlled at the master organization and therefore the attribute values cannot be updated within individual inventory organizations. Category sets may also be designated as master organization level. Cross-references are also master level only or master level optional as well. Subinventory: Physical or logical locations for storing inventory. Subinventories are generally defined to represent the main stores area as well as stocking points on the production floor. Additional subinventories may be used to specify supply closets or cabinets and the cage area for discrepant material. Subinventories are flagged as to availability for planning (nettable), reservations, and available to promise checks, thereby determining the availability of the material stored in the subinventory. Subinventories are assigned material asset account numbers. As goods move in and out of a subinventory a transaction posts to the asset account. Stock Locator: A physical area within a stockroom. The stock locator is a key flexfield that is often defined as a multiple segment flexfield with the segments representing the physical layout of a stockroom. For example, a stockroom may be laid out in rows of shelves with bins on the shelves, each numbered so that a row/shelf/bin combination would direct someone to a particular material storage compartment. Such an implementation would define a locator flexfield as a 3 segment flexfield with segments for row, shelf, and bin. Attachment of LE/OU/INV with BG We never attach any LE/OU/INV with BG in front end...but its available in HR_ALL_ORGANIZATION_UNITS in column Business_Group_ID..so the question is from where it comes? First we create a Business Group. When ever we create a business group the system creates an organization with type businessgroup and attach a business group ID 'N' which is same as the organization ID for that Business group. After that we attach the business group to a responsibility through the profile option HR : Business Group. Next we create whenever we create a new LE/OU/Inv with one responsibility the system 'll attach the Business Group which is attached with the HR : Business group for that particular responsibility.
  • 53. Defining Planners Submitted by Anonymous on Mon, 04/27/2009 - 01:14 Tag: Inventory / You can define and update material planners or planning entities for the current organization and assign them to inventory items at the organization level. To define and update material planners or planning entities: 1. Navigate to the Planners window. 2. Enter a unique planner name. A planner can be a person or an entity, such as a department or a division. 3. Enter the electronic mail address of the planner. 4. Optionally, enter a date on which the planner becomes inactive. From this date on, you cannot assign this planner to an inventory item.
  • 54. Defining Locations Submitted by Anonymous on Wed, 01/21/2009 - 12:24 Tag: Inventory / Use the Locations window to define ship–to, bill-to, receiving, office site, internal site & other location information for Purchasing documents.
  • 55. Locations are shared across Business Groups in HRMS and with two other Oracle applications: Inventory andPurchasing. HRMS does not use some of the fields in the Location window. These fields are disabled for HRMS users. For example, the Legal Address check box is read-only and supports future functionality in Oracle Financials. Header Uncheck the Global check box if you want the location to only be available within the default Business Group of your current responsibility. Accept the default if you want the location to be a global location and therefore available to all Business Groups. If you are setting up a global location, the location name must be unique across all Business Groups. If you are setting up a location for one Business Group, the location name must be unique within that Business Group and all global locations, but does not have to be unique across all Business Groups. Note: You cannot amend the Global check box once you have set up your location. Address Details Tab Select a national address style from the list. If a local address style exists for your country, it is displayed as the default. Otherwise, the international style is displayed. Shipping Details Selecting the check boxes means that you are making the location Name a valid location in the list of values on a Purchasing document. For example, selecting Ship–To Site makes the location Name a valid choice in the list of values for the Ship–To field on a purchase order header. Note that if you define a default Ship–To or Bill–To Location in the Supplier–Purchasing region of the Financials Options window for your organization, that is the location that defaults onto your purchase orders. But if you wanted to change that default, the location Name that you define here and enable as a Ship–To or Bill–To site is available in the list of values for you to choose from in the Ship–To or Bill–To fields.
  • 56. Contact: Optional contact name for the location Name. Ship–To Location : Its the receving dock. Usually the same as the location Name. You could select a separate, previously defined Ship–To Location—for example, if you wanted to create a location Name, Office A, and specify Receiving Dock A as its Ship–To Location. Note, however, that once you specify a separate Ship–To Location, you can no longer enable the location Name as a Ship–To Site. In this example, Receiving Dock A is the ship–to site for Office A; therefore, Office A itself cannot also be the ship–to site. Ship–To Site: Is this location is a receving dock. Select this option to make the location Name a valid ship–to organization on a purchase order or requisition. Bill–To Site: Select this option to make the location Name a valid bill–to site. The Bill–To Site, which is used by Payables, is specified on a purchase order header. Receiving Site: Select this option to make the location a valid receiving Location when creating a receipt or receiving transaction. Office Site: Select this option to indicate that this location Name is an office site, such as a field office. Internal Site: Select this option to make the location a valid internal ship–to location when creating an internal requisition. Other Details Inventory Organization: Select an inventory organization within which this location will be available in the list of values on a Purchasing document. By selecting no inventory organization, this location becomes available on Purchasing documents in all organizations.
  • 57. EDI Location: If you use Electronic Data Interchange (EDI) to receive Advance Shipment Notices (ASNs) or ASNs with billing information (ASBNs), enter a defined location. This location should match the ship-to location specified on an ASN or ASBN Organization Submitted by Anonymous on Wed, 01/21/2009 - 13:03 Tag: Inventory / Define the following organizaions as per the requirement of business i. Business group ii. Legal Entity iii. Operating Units iv. Organization External organizations (for example, tax offices, insurance carriers, disability organizations, benefit carriers, or recruitment agencies) Internal organizations (for example, departments, sections or cost centers) Creating an Organization 1. Enter a name for your organization in the Name field. A check is performed to see if organizations with the same name already exist. All Oracle applications you install share the information entered in the Organization window. Therefore organization names must be unique within a business group, and business group names must be unique across your applications network. You can create two organizations with the same name in different business groups but this can cause confusion later, if the HR: Cross business group profile option is set to Yes and you decide to share certain information across all business groups. If you decide to create two organizations with the same name, be sure that this will not cause you problems in the future. 2. Optionally, select an organization type in the Type field. Organization types do not classify your organization, you use them for reporting purposes only. The type may identify the function an organization performs, such as Administration or Service, or the level of each organization in your enterprise, such as Division, Department or Cost Center. 3. Enter a start date in the From field. This should be early enough to include any historical information you need to enter. Note: You cannot assign an employee to an organization before the start date of the organization. 4. Enter a location, if one exists. You can also enter an internal address to add more details such as floor or office number. If you are using Oracle Payroll in the US, every organization to which employees can have assignments, including business groups, must have on record a location with a complete address. This is because the system uses the location of the organization of the employee's primary assignment to determine employee work locations for tax purposes. This does not apply to GREs, because the assignment to a GRE exists in addition to the assignment to an organization. For Dutch users only, if you are setting up external organizations for a tax office, a social insurance provider or a private health insurance provider, you must enter the postal address and contact details using the NL_POSTAL_ADDRESS Location EIT. Note: If you are an Oracle Inventory user, then you must not assign a location to more than one organization classified as an Inventory Organization.
  • 58. 5. Enter internal or external in the Internal or External field. You cannot assign people to an external organization. Examples of external organizations that may require entry are disability organizations, benefits carriers, insurance carriers, organizations that employees name as beneficiaries of certain employee benefits, and organizations that are recipients of third party payments from employees' pay. Inventory : Setup -> Organizations -> Organization Enter Organization Classifications & Additional Information 1. Business Group
  • 59. Business Group Information. Budget Value Defaults. Work Day Information. Benefits Defaults. PTO Balance Type. Recruitment Information. Payslip Information. Self Service Preference Information. 2. Attaching Set of Books to Legal Entity
  • 60. 3. Attaching Set of Books & Legal Entity to Operating Unit
  • 61. 4. Attaching Operating Unit to organization
  • 62. Subinventories Submitted by Anonymous on Thu, 01/22/2009 - 12:24 Tag: Inventory / Subinventories are unique physical or logical separations of material inventory, such as raw inventory, finished goods, or defective material. All material within an organization resides in a subinventory. There are two types of subinventories within Warehouse Management, storage and receiving. Storage subinventories are intermediate or final put away locations for material. Material that resides in a storage subinventory appears in on hand quantity, and is tracked by the system. The system can book orders against, and use manufacturing processes on material that resides in a storage subinventory. You must define at least one storage subinventory for your implementation. Optionally, you can create receiving subinventories to track material in the receiving area. You use receiving subinventories when you want to track the material as soon as it enters the warehouse before an operator puts it away. Receiving subinventories enable managers to see where the material resides as soon as it enters the warehouse. Material located in a receiving subinventory does not appear in on hand quantity, and the system cannot reserve the material.
  • 63. An operator can also only specify a receiving subinventory if they are using a mobile device to receive the material. Note: Operators cannot transfer material from a storage subinventory to a receiving subinventory. All material within an organization is held in a subinventory therefore, you must define at least one subinventory.
  • 64. When you create a new subinventory the subinventory is only available to the inventory org(M1 in above pic) where you are creating it. Table : MTL_SECONDARY_INVENTORIES Define new Subinventory Submitted by Anonymous on Thu, 01/22/2009 - 13:03 Tag: Inventory / Select a source type for item replenishment. Header 1. Enter a unique alphanumeric name. 2. Indicate the material status of this subinventory, which controls the enabled transactions for all material in this subinventory. The status is not overridden by the status of any locator, lot or serial, within this subinventory. The
  • 65. statuses of those objects will be considered when determining transactions that are not enabled. This field is used if you have Oracle Warehouse Management installed. 3. Indicate the default cost group for this subinventory. If the cost group assignment rules fail to identify a cost group for newly received material, this cost group will be assigned. This cost group will remain with the material, even through subinventory transfers, until you perform a cost group change transaction. This feature is available if you have Oracle Warehouse Management installed, and you are working with a WMS enabled organization. 4. Select the subinventory type from the drop down list. The available choices are as follows: Storage: Designates the subinventory as a Storage subinventory. Receiving: Designates the subinventory as a receiving subinventory, and links it to a receiving location. This subinventory type is used only for receiving material. Material in this type of subinventory cannot be on–hand, or reserved. Null: No subinventory designation Parameters Following are the important parameters that we must define 1. Quantity tracked Indicate whether each transaction for this subinventory updates the quantity on hand for the subinventory (Quantity Tracked). If you leave this option unchecked, on–hand balances are not maintained and you cannot check or update the Asset Inventory, Include in ATP, Reservable, or Nettable options. You can update this value only if there is no on–hand quantity, no pending transaction, or no uncosted transaction for the subinventory. 2. Asset Subinventory: Indicate whether to maintain the value of this subinventory on the balance sheet (Asset Subinventory). You can update this value only if there is no on–hand quantity for the subinventory. 3. Include in ATP: Indicate whether to include items in this subinventory in ATP calculations. 4. Depreciable: Indicate whether to designate items in this subinventory as depreciable. This data is needed to support depreciable and location information in the Subinventory Setup from the Oracle Network Logistics product. 5. Allow Reservation: Indicate whether to include this subinventory when you perform available–to–reserve calculations. 6 Nettable: Indicate whether the planning process uses the on–hand balance of these subinventory items as available inventory (Nettable). 7. LPN Controlled: Indicate if material may be packed into an LPN in the subinventory. If this is unchecked, all LPNs transacted into this subinventory will be automatically unpacked, and LPNs cannot be packed into this subinventory. This feature is available if you have Oracle Warehouse Management installed, and you are working with a WMS enabled organization 8. Select a type of locator control. You can select an option only if you selected locator control as Determined at subinventory level in the Locator Control field in the Organization Parameters window. You can only update this option if there is no on–hand quantity for the subinventory. None: Inventory transactions within this subinventory do not require locator information. Prespecified: Inventory transactions within this subinventory require you to enter a valid predefined locator for each item. Dynamic entry: Inventory transactions within this subinventory require you to enter a locator for each item. You may choose a valid predefined locator, or define a locator dynamically at the time of transaction. Item level: Inventory transactions use locator control information that you define at the item level. 9. Optionally, enter an inactive date for the subinventory.
  • 66. 10. Enter a location for the subinventory. If the Subinventory type is Receiving, this field is mandatory. Lead times Optionally, enter pre–processing, processing, and post–processing lead times for items in this subinventory. These lead times are used when you use min–max planning at the subinventory level. Sourcing Inventory: Replenish items internally, from another organization. Supplier: Replenish items externally, from a supplier you specify in Oracle Purchasing. Subinventory: Replenish items internally, from another subinventory in the same inventory organization.Navigate to the Subinventories Summary folder window. Choose New. The Subinventories window appears. subinventory account information Enter the general ledger accounts.The default accounts are those defined for the organization in the Organization Parameters window. If you are using average costing, you may enter the valuation accounts, but they are not used. Average costing uses only the Expense and Encumbrance accounts. If you use standard costing, and Oracle Bills of Material is installed, all asset accounts are required. If you use standard costing, and Oracle Bills of Material is not installed, you are only required to enter the Material and Material Overhead accounts. Receiving Sub Inventory Submitted by Anonymous on Tue, 01/18/2011 - 16:52 Tag: Inventory /
  • 67. Designates the subinventory as a receiving subinventory, and links it to a receiving location. This subinventory type is used only for receiving material. Material in this type of subinventory cannot be on-hand, or reserved. You can not enable status attributes (Include in ATP, Allow Reservation, Nettable). Quantity tracked, Asset Subinventory and Depreciable fields are also not applicable for receiving sub inventory. Organization Access Submitted by Anonymous on Thu, 01/22/2009 - 15:16 Tag: Inventory / You can specify which organizations a responsibility can access by mapping responsibilities to organizations. Once this mapping is set up, a user logging into an Oracle Manufacturing product is restricted to the organizations mapped to the responsibility chosen. The Change Organization window is restricted as well. Attention: Until you assign an organization to a responsibility in this window, all responsibilities have access to all organizations. Once you have restricted any responsibility to an organization, you must then explicitly define the organizations which all responsibilities can access.
  • 68. Attention: This feature does not restrict access once the user is in the product. Users with access to functions that cross multiple organizations (such as ATP, Inter–organization Transfers, Item Search, Multi–organization Quantity Report, and so on) can still specify any valid organization when running these functions. Organization Parameters Submitted by Anonymous on Wed, 01/21/2009 - 17:06 Tag: Inventory / You can define and update default inventory and costing parameters for your current organization in the following areas: 1. Inventory Parameters 2. Costing Information 3. Other Account Parameters 4. Revision, Lot, Serial, LPN Parameters 5. ATP, Pick, Item–Sourcing Parameters 6. Defining Inter–Organization Information 7. Defining Warehouse Parameters
  • 69. 1. Enter an organization code for which you want to set up the organization parameter. 2. Select an Item Master organization. Oracle Inventory only defines items in the Item Master organization of the organization from which you enter the Items window. 3. Select a workday calendar. This is required when Oracle Master Scheduling/MRP and Oracle Supply Chain Planning is installed. 4. Optionally, select a demand class. Demand classes segregate scheduled demand and production into groups, allowing you to track and consume those groups independently. Oracle Master Scheduling/MRP and Oracle Supply Chain Planning uses this demand class during forecast consumption, and shipment and production relief. 5. In the Move Order Timeout Period field, enter the number of days a move order requisition can wait for approval. The workflow approval process sends a notification to the item planner when a move order requisition requires approval. After the first timeout period, if the recipient has not approved or rejected the order, a reminder notice is sent. After the second timeout period, the order is automatically approved or rejected, depending on whether you select Approve automatically or Reject automatically in the Move Order Timeout Action field. If you want to bypass the move order approval process and automatically approve move order requisitions, enter 0 days in the Move Order Timeout Period field and select Approve automatically in the Move Order Timeout Action field.
  • 70. 6. Select a move order timeout action Approve automatically: After the second timeout period, move order requisitions are automatically approved. Select this option and set the Move Order Timeout Period to 0 if you want to bypass the move order approval process and automatically approve move order requisitions. Reject automatically: After the second timeout period, move order requisitions are automatically rejected. 7. Select a locator control option: None: Inventory transactions within this organization do not require locator information. Prespecified only: Inventory transactions within this organization require a valid, predefined locator for each item. Dynamic entry allowed: Inventory transactions within this organization require a locator for each item. You can choose a valid, predefined locator, or define a locator dynamically at the time of transaction. Determined at subinventory level: Inventory transactions use locator control information that you define at the subinventory level. Indicate whether to allow negative balances. Determines whether inventory transactions can drive the inventory balance of an item negative. Attention: If insufficient quantity on hand exists in a supply subinventory to satisfy backflush demand, Oracle Work in Process forces the supply subinventory balance negative, ignoring this option setting. Auto delete allocation at Move Order cancellation Indicate whether this organization is an Oracle Warehouse Management enabled organization. You can use WMS features such as LPNs, task management, warehouse execution rules and cost groups in this organization. Locator control must be enabled in order to enable WMS. Once this has been enabled and transactions have been entered in this organization, this box cannot be unchecked. Indicate whether this organization is enabled for Quality inspection. Indicate whether this organization is an Oracle Enterprise Asset Management enabled Organization. Enter a total load weight and unit of measure for this organization. Enter a total volume and unit of measure for this organization. New Features in R12 1. Select a Default On-hand Material Status tracking option. This step is optional. Attention: You cannot update this field for existing organizations. To enable this field, you must submit the Activate Onhand Level Material Status Tracking concurrent program. 2. Indicate whether locator aliases must be unique across the organization.
  • 71. Defining Costing Information Submitted by Anonymous on Wed, 01/21/2009 - 17:40 Tag: Inventory / The costing organization that controls the costs in your current organization and the costing method are displayed. You cannot make changes to these fields.
  • 72. 1. Costing Organization 2. Costing Method 3. Transfer to GL Indicate whether all transactions are posted in detail to the general ledger. Caution: Transferring detail transaction distributions to the general ledger increases general ledger posting times due to the number of records created. 4. Reverse Encumbrance Indicate whether to reverse encumbrance entry upon receipt in inventory. You normally select this option if you use encumbrances with Oracle Purchasing. 5. Optionally, enter a Cost Cutoff Date If you leave this field blank, all available transactions will be costed,as usual. If you enter a date, all transactions prior to this date will be costed. All transactions on or later than this date will not be costed. For inter–organization transfers, a standard costing, receiving organization will not cost a receipt if the sending organization did not already cost the transaction. The default time is the first instant of the date. You can optionally choose another time.
  • 73. The standard cost update process can be performed on the cost cutoff date. You can restart cost processing by changing the cutoff date to blank, or a future date. 6. Default Material Sub element For standard costing, select a material sub–element that this organization uses as a default when you define item costs. For average costing, the default material sub–element you select can be used for cost collection when Project Cost Collection Enabled is set. 7. Material Over head Sub element Optionally, select a Default Material Overhead Sub–Element from the list of values. During the Supply Chain Rollup process, when costs are merged from another organization, markup and shipping costs will use this value. The supply chain cost rollup will complete successfully, regardless of whether this field is populated. If the Cost Rollup identifies an organization with a default material overhead sub–element not set up, a corresponding warning message will be printed in the log file. 8. Default Cost Group Indicate the default cost group for the organization. This will default into the Default Cost Group field for each subinventory. If the WMS cost group rules engine fails to find a cost group, this cost group will be used. 9. Valuation Accounts You choose a default valuation account when you define organization parameters. Under standard costing, these accounts are defaulted when you define subinventories and can be overridden. Under average costing, these accounts (except for Expense) are used for subinventory transactions and cannot be updated. For a detailed discussion of cost elements. Material An asset account that tracks material cost. For average costing, this account holds your inventory and intransit values. Once you perform transactions, you cannot change this account. Material Overhead An asset account that tracks material overhead cost. Resource An asset account that tracks resource cost. Overhead An asset account that tracks resource and outside processing overheads. Outside processing An asset account that tracks outside processing cost. Expense The expense account used when tracking a non–asset item. Other Accounts Submitted by Anonymous on Thu, 01/22/2009 - 10:07 Tag: Inventory /
  • 74. Encumbrance: An expense account used to recognize the reservation of funds when a purchase order is approved. Inventory A/P Accrual : The liability account that represents all inventory purchase order receipts not matched in Accounts Payable, such as the uninvoiced receipts account. Purchase Price Variance : The variance account used to record differences between purchase order price and standard cost. This account is not used with the average cost method. Invoice Price Variance : The variance account used to record differences between purchase order price and invoice price. This account is used by Accounts Payable to record invoice price variance. Cost of Goods Sold: The profit and loss (income statement) account that tracks the default cost of goods sold account. Sales: The profit and loss (income statement) account that tracks the default revenue account.
  • 75. Project Clearance Account: When performing miscellaneous issues to capital projects, the project clearance account is used to post the distributions. Average Cost Variance: Under average costing with negative quantity balances, this account represents the inventory valuation error caused by issuing your inventory before your receipts. Note: For standard costing, only the Purchase Price Variance, Inventory A/P Accrual, Invoice Price Variance, Expense, Sales and Cost of Goods Sold accounts are required. The other accounts are used as defaults to speed your set up. Note: For average costing, only the Material, Average Cost Variance, Inventory A/P Accrual, Invoice Price Variance, Expense, Sales and Cost of Goods Sold accounts are required. The other accounts are used as defaults or are not required. Revision, Lot, Serial, LPN Parameters Submitted by Anonymous on Thu, 01/22/2009 - 10:56 Tag: Inventory /
  • 76. Enter a starting revision to be the default for each new item. Lot Number 1. Select an option for lot number uniqueness. Across items: Enforce unique lot numbers for items across all organizations. None: Unique lot numbers are not required. 2. Select an option for lot number generation. User–defined: Enter user–defined lot numbers when you receive items. At organization level: Define the starting prefix and lot number information for items using the values you enter in the Prefix, Zero Pad Suffix, and Total Length fields. When you receive items, this information is used to automatically generate lot numbers for your items. At item level: Define the starting lot number prefix and the starting lot number when you define the item. This information is used to generate a lot number for the item when it is received. 3. Indicate whether to add zeroes to right–justify the numeric portion of lot numbers (Zero Pad Suffix). 4. Optionally, select an alphanumeric lot number prefix to use for system–generated lot numbers when generation is at the organization level.
  • 77. 5. Optionally, define the maximum length for lot numbers. If you use Oracle Work in Process and you set the WIP parameter to default the lot number based on inventory rules, then WIP validates the length of the lot number against the length you define in this field. Serial Number 1. Select an option for serial number uniqueness. Within inventory items: Enforce unique serial numbers for inventory items. Within organization: Enforce unique serial numbers within the current organization. Across organizations: Enforce unique serial numbers throughout all organizations. 2. Select an option for serial number generation. At organization level: Define the starting prefix and serial number information for items using the information you enter in the following fields of this window. At item level: Define the starting serial number prefix and the starting serial number when you define the item. 3. Optionally, select an alphanumeric serial number prefix to use for system–generated serial numbers when generation is at the organization level. 4. Optionally, enter a starting serial number to use for system–generated serial numbers. If serial number generation is at the organization level you must enter a starting serial number. 5. Indicate whether the system will suggest serial numbers as part of the move order line allocating process. If you do not select this option, you must manually enter the serial numbers in order to transact the move order. ATP, Pick, Item–Sourcing Parameters Submitted by Anonymous on Fri, 03/27/2009 - 13:28 Tag: Inventory /
  • 78. Select a default ATP rule. ATP rules define the options used to calculate the available to promise quantity of an item. If you are using Oracle Order Management, the default is the ATP rule for the Master organization. Picking Defaults Select a default picking rule. Picking rules define the priority that order management functions use to pick items. Notes: This rule will not be employed in a WMS enabled organization. The WMS picking rules will be used. Enter a default subinventory picking order. This value indicates the priority with which you pick items from a subinventory, relative to another subinventory, in which a given item resides. The value you enter here displays as the default when you define a subinventory. Enter a default locator picking order. This value indicates the priority with which you pick items from a locator, relative to another locator, where a given item resides. The value you enter here displays as the default when you define a locator. Check the Pick Confirmation Required box if you want your pickers to manually pick confirm. If you do not check the box, pick confirmation will occur automatically.
  • 79. Item-Sourcing Default Select a source type for item replenishment. Inventory: Replenish items internally from another subinventory in the same organization or another organization. Supplier: Replenish items externally, from a supplier you specify in Oracle Purchasing. None: No default source for item replenishment. Select the organization used to replenish items. You must enter a value in this field if you selected Inventory in the Type field. Select the subinventory used to replenish items. You must enter a value in this field if you selected your current organization in the Organization field. You cannot enter a value in this field if you selected Supplier in the Type field. Dynamic entry for Locators Submitted by Anonymous on Fri, 04/17/2009 - 20:17 Tag: Inventory / If we select the dynamic entry for locators then we can directly create the locators while do any transactions. To allow dynamic entery allowed for locators we need to do following two setups. 1. Make the stock locator as dynamic entery either at oraganization parameter or subinventory or at item level. 2. Allow dynamic insert should be enabled for the stock locator structure. Now when we do a transaction we can put a predefined stock locator or can a new combination if required.
  • 80. Inter–Organization Information Submitted by Anonymous on Fri, 03/27/2009 - 13:34 Tag: Inventory /
  • 81. Select an Inter–Organization Transfer Charge option. None: Do not add transfer charges to a material transfer between organizations. Predefined percent: Automatically add a predefined percent of the transaction value when you perform the inter– organization transfer. Requested value: Enter the discrete value to add when you perform the inter–organization transfer. Requested percent: Enter the discrete percentage of the transfer value to add when you perform the inter– organization transfer. Inter–organization cost accounts Enter default inter–organization cost accounts. These accounts are defaulted when you set up shipping information in the Inter–Organization Shipping Networks window Inter–Organization Shipping Network Submitted by Anonymous on Thu, 01/29/2009 - 11:50 Tag: Inventory /
  • 82. Use the Inter–Organization Shipping Network window to define accounting information and the relationships that exist between shipping and destination organizations. You can specify whether an organization is a shipping organization, a destination organization, or both. 1. From-TO organization Determine if the organization displayed is the To Organization, From Organization, or the From or To Organization. Item is transfered from the 'From' organization to the 'To' Organization. 2. Transfer Type: (Intransit/Direct) For each organization relationship you create, you must indicate what type of shipment is used. If you choose to use intransit inventory, Oracle Inventory moves material to intransit inventory before it reaches the destination organization when you perform an inter–organization transfer. Typically, you transfer material through intransit inventory when transportation time is significant. If you do not choose intransit inventory, Oracle Inventory moves your material directly to the destination organization when you perform an inter–organization transfer. For direct transfer type the FOB & receipt routing is disabled. 3. FOB (Shipment/Receipt) Determines the ownership of the materail. If it is shipment then the owner ship goes to 'To(receving)' organization at the point of shipping. If it is receipt then the ownership is transfered from the 'From(Sending)' organization to the 'To(receving)' organization when the materail is received at the receving organization. 4. Receiving routing If you selected Intransit in the Transfer Type field, select a receipt routing option: Standard: Receive this item first, then deliver without inspection. Direct: At receipt, deliver this item directly to its location. Inspection: Receive this item first, inspect it, then deliver.
  • 83. 5. Interanl orders enabled You must also specify whether internal orders are required from the destination organization to perform inter– organization transfers. Oracle Inventory does not allow you to perform inter–organization transfers using the Transfer Between Organizations window to an organization that requires internal requisitions. 6. inter–organization transfer charge Select the inter–organization transfer charge type for calculating transfer charges: None: Do not add transfer charges. Predefined Percent: Automatically add a predefined percent of the transaction value. Requested Value: Enter a discrete value to add. Requested Percent: Enter a discrete percentage of the transfer value to add. The default value is the value you defined in the Organization Parameters window for the shipping organization. 7. Define account information Also, you must provide general ledger accounts to record debits and credits involved in an inter–organization transfer. 1. Enter the general ledger transfer credit account used to collect transfer charges for the shipping organization The default value is the value you defined in the Organization Parameters window for the shipping organization. 2. Enter the general ledger account used to collect the purchase price variance for inter–organization receipts into standard cost organizations. You must enter an account if your receiving organization is using standard costing. 3. Enter the general ledger receivables account used as an inter–organization clearing account for the shipping organization. 4. The inter–organization receivable account for the shipping organization should equal the inter–organization payables account for the receiving organization.