What Are The Drone Anti-jamming Systems Technology?
Getting started with smart response
1. Getting Started with SMART Response (Senteos)
Naming the Receiver
1. Connect the blue receiver in the bag to the computer using one of the USB ports on the front of
the CPU.
2. Click the orange SMART Response icon in the system tray.
3. Under Teacher Tools, select CLICK HERE TO START A
CLASS. SMART Response Teacher Tools will launch.
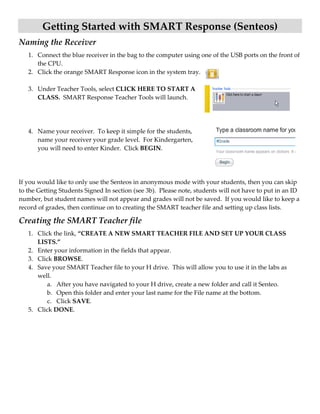
4. Name your receiver. To keep it simple for the students,
name your receiver your grade level. For Kindergarten,
you will need to enter Kinder. Click BEGIN.
If you would like to only use the Senteos in anonymous mode with your students, then you can skip
to the Getting Students Signed In section (see 3b). Please note, students will not have to put in an ID
number, but student names will not appear and grades will not be saved. If you would like to keep a
record of grades, then continue on to creating the SMART teacher file and setting up class lists.
Creating the SMART Teacher file
1. Click the link, “CREATE A NEW SMART TEACHER FILE AND SET UP YOUR CLASS
LISTS.”
2. Enter your information in the fields that appear.
3. Click BROWSE.
4. Save your SMART Teacher file to your H drive. This will allow you to use it in the labs as
well.
a. After you have navigated to your H drive, create a new folder and call it Senteo.
b. Open this folder and enter your last name for the File name at the bottom.
c. Click SAVE.
5. Click DONE.
3. Getting Students Signed In
1. Connect the blue receiver in the bag to the computer using one of the USB ports on the front of
the CPU.
2. Click the orange SMART Response icon in the system tray.
3. Under Teacher Tools, select CLICK HERE TO START A CLASS. SMART Response Teacher
Tools will launch.
4. Click the drop down arrow next to Start a Class. The number of
choices you will have depends on how many classes you have
set up.
a. If you would like to see student names and save the
grades from the assessment, select the appropriate class.
b. If you are a Kindergarten teacher, taking a poll, or do not want the grades saved, select
Anonymous Mode.
5. You will be alerted in the bottom right corner when the students can turn on their remotes.
Students will need to push and hold the power button in the top left corner until their remote
powers on.
You will want to pull up the remote simulator on the computer so you can
demonstrate and explain the remote to your students. The remote simulator
will work just like the remotes the students have. Click the orange SMART
Response icon in the system tray and select Simulator.
6. If this is your first time using the remotes with your students, they may
need to search for the receiver. Instruct them to push the yellow down
arrow one time so that the arrow on the screen is next to Find a class.
Push ENTER.
7. The screen will change as the remote searches for available receivers.
When it has finished searching, it should come up with your receiver name (your grade level).
Students should push Enter once the arrow is next to the correct choice.
8. Depending on your choice in step 3, your students will see one of two screens:
a. If you started anonymous mode, the screen will display, “Welcome to <grade level>!”
You are ready to start your assessment in SMART Notebook.
or, Class Mode with ID numbers
b. If you started a class, the screen display will ask for an ID number. Instruct your
students to key in their 3 digit ID number and push Enter. The screen will change and
ask them to confirm their name. If the students entered the right
number and they see their name, they should push Enter. If the
wrong name comes up, students should push the F/N key and
Enter. They will be returned to the ID screen so they can try
again. If students make a mistake typing, they can press the DEL
key to correct it. When the students have correctly signed in, the
screen will look like the one to the right.
You are now ready to begin running assessments.