Call Girls Pimpri Chinchwad Call Me 7737669865 Budget Friendly No Advance Boo...
Standard Penetration Test & Liquid Limit,Plasticity Limit
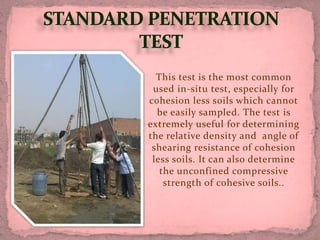
1. This test is the most common
used in-situ test, especially for
cohesion less soils which cannot
be easily sampled. The test is
extremely useful for determining
the relative density and angle of
shearing resistance of cohesion
less soils. It can also determine
the unconfined compressive
strength of cohesive soils..
2. 1) Tripod stand
2) Standard split-spoon sampler.
It consists of three parts:-
(a) Driving shoe, about 75mmlong.
(b) Steel tube about 450mm long, split longitudinally
in two halves having inner diameter as38mm& outer
diameter as 50mm.
(c) Coupling at the top of the tube about 150mmlong.
3) Guide pipe
4) Drill rod
5) Drop hammer weighing 63.5kg.
3. • The drop hammer is attached to the rope of tripod hoist.
By operating winch the weight is lifted.
TRIPOD HOIST
The drop hammer is attached to the rope of
tripod hoist. By operating winch the weight
is lifted.
5. Hammer with a weight of 63.5kg falling from a distance
of 750mm(30 in)
6. It is used to keep the bore hole of 150mm, 300mm, 450 mm
upto
desired depth at which sample is taken
7. It is screwed on sampler &
the hammer is fallen on it
to driven the sampler in
ground.
It is used to lift up the
sampler from the
ground after driven it to
30cm
8. The bore hole is to be drilled up to the desired depth.
The drilling tools are removed & sampler is lowered to the
bottom of the hole.
Three markings @ 15o mm are made on the rod of sampler.
The sampler is driven into the soil by drop hammer falling
through the height of 15o mm @ 30 blows/min.
The number of blows required to drive each 150mm of the sampler
is counted.
The number of blows recorded for the first 150mm is disregarded.
The number of blows recorded for the last two 150mm intervals are
added to give the standard penetration number(N)
Likewise, the another samples of soil are collected at the interval
of 1.67 m or where the soil profile or strata changes (IS 6403:1981).
9. DILATANCY CORRECTION:- Silty fine sands & fine
sands below the water table develop pore pressure
which is not easily dissipated. The pore pressure
increases the resistance of the soil & hence the
penetration. The following correction is applied when
the observed value of N exceeds 15. The corrected
penetration number, Nc = 15 + 0.5(Nr-15), where Nr is
the recorded value of N.
If Nr is less than or equal to 15, then Nc = Nr.
10.
11.
12.
13.
14. • Atterberg’s limits
• Grain size distribution
• Specific gravity
• Density
• Porosity
• Void ratio
• Unit weight
15. What are we talking about?
Fine-grained soil can behave as a liquid, plastic, semi-
solid or solid depending how much water is in it
The water contents at which behavior changes from
one state to the other are referred to as the Atterberg’s
limits
These limits are: liquid limit, plastic limit and
shrinkage limit
16. Laboratory determination of water (moisture) content
of soil and rock by mass
wc = Ww/Ws
Ww = Weight of water in the soil
Ws = Weight of solid particles in the soil
17. Clean and dry the water content container
Mark the container with an identification number and
weigh it (record it as W1)
Place some wet soil sample in the container and weigh
it (record this as W2)
Oven dry the sample at 110⁰C for 24 hours
Weigh the container with the dry soil sample (record
this as W3 ).
18. Calculate the water content ‘wc’ as the ratio of weight
of water to weight of dry soil
wc = Ww/Ws
Ws = (W3-W1)
Ww = (W2-W3)
19. Liquid limit: water content at which soil shifts from
plastic to liquid state or vice-versa .
LL is the water content at which the soil flows to close
a groove, of a standard width, when jarred in a
specified manner for 25 times
20. Casagrande’s Liquid limit device
grooving tool
Is sieve of size 425µm.
Water content containers
Balance
Spatula
Spray bottle
Evaporating dish
Drying oven set to 105⁰C
22. Thoroughly mix the soil sample with water using a
spatula
Place portion of the prepared soil in the cup of the LL
device
Spread the soil into the cup with about 10 mm
thickness at the deepest point of the cup
Make the soil surface horizontal with the spatula .
23. Remove air bubbles (if any) from the soil
Draw the grooving tool through the middle of the soil
pat maintaining the tool perpendicular to the soil
surface .
Turn the crank at a rate of 2 blows/second until the
groove closes for a distance of ½ inch and record the
number of blows .
Take a slice of soil from the cup and obtain its water
content
Return the remaining soil from the cup and remix the
entire soil sample adding water to increase the water
content
24. Perform at least 2 more trials
Make sure that in the trials, you have one blow count value
between 15-25 blows, one between 20-30 blows and one
between 25-35 blows
Determine the water content of the soil sample in each of
the trials.
Draw flow curve by plotting the obtained water content on
the Y-axis on linear scale and the associated number of
blows on the X-axis on a logarithmic scale (a semi-log
graph will be provided in labs)
Draw a best fit straight line along the points and determine
the corresponding water content for 25 blows
25. TEST NO, 1 2 3 4
MASS OF TARE(W1) 16.2 16.5 15.9 15.7
NO. OF BELOW 'N' 17 24 28 32
W1 + WET SOIL (W2) 25.2 25.6 24.9 25.3
W1 + DRY SOIL (W3) 21.5 22.7 22.3 22.7
MASS OF DRY SOIL(Ws) 5.3 6.2 6.4 7
MASS OF WET SOIL (Ww) 3.7 2.9 2.6 2.6
WATER CONTENT, Wc 69.8 46.8 40.6 37.1
26.
27. Plastic Limit is defined as the water content at which
soil shifts from plastic to semi-solid state or vice-versa
It is the water content at which the soil starts to
crumble when rolled into a thread of diameter of 3.2
mm
28. Take about 20 g of soil from the soil prepared for the
LL test and make an ellipsoidal mass
Roll the soil mass between palm or fingers and the
glass plate
Apply sufficient pressure to roll the soil mass into a
thread of uniform diameter
Roll the thread to a diameter of 3.2 mm within 2 min
(use the comparison rod for diameter reference
29. Break the thread into several pieces, squeeze them
together, re-form into ellipsoidal mass and re-roll into a
thread of 3.2 mm in diameter
Continue this re-rolling process until the soil starts to
crumble .
Determine the water content of the crumbled soil (make
sure you use more than 6 g of soil when you do the water
content estimation)
Repeat the test one more time .
Find plasticity index (PI) by subtracting PL(Plastic Limit)
from LL (Liquid Limit ).