SlideShare una empresa de Scribd logo
1 de 10
Descargar para leer sin conexión
Creating	
  Personal	
  Portfolios	
  on	
  Blackboard	


          Portfolios	
  are	
  your	
  own	
  personal	
  website	
  on	
  Blackboard.	
  	
  They	
  provide	
  the	
  student	
  a	
  
          way	
  to	
  display	
  a	
  collection	
  of	
  artifacts.	
  	
  Artifacts	
  are	
  materials	
  that	
  demonstrate	
  your	
  
          personal	
  skills	
  and	
  accomplishments.	


       1. Portfolios	
  are	
  created	
  in	
  the	
  Content	
  Collection	
  area	
  of	
  Blackboard.	
  	
  To	
  begin,	
  click	
  on	
  
          the	
  Content	
  Collection	
  tab.	


       2. Next,	
  click	
  the	
  action	
  button	
  next	
  to	
  Portfolios	
  in	
  the	
  Jump	
  To	
  area.	


       3. The	
  Portfolios	
  page	
  has	
  3	
  options.	
  	
  Note	
  the	
  text	
  below	
  each	
  link.	


4. Click	
  My	
  Portfolios.	
  	
  Note	
  that	
  there	
  are	
  two	
  types	
  of	
  portfolios,	
  Personal	
  and	
  Basic.	
  	
  You	
  
   will	
  be	
  creating	
  a	
  Personal	
  Portfolio.	
  	
  Click	
  on	
  the	
  garnet	
  Create	
  Portfolio	
  button.	


5. Once	
  you	
  click	
  Create	
  Personal	
  Portfolio,	
  you	
  will	
  be	
  taken	
  to	
  a	
  portfolio	
  creation	
  wizard.	
  	
  
   You	
  can	
  continue	
  with	
  the	
  wizard	
  by	
  clicking	
  Save	
  and	
  Continue.	
  	
  You	
  can	
  click	
  submit	
  if	
  
   you	
  want	
  to	
  leave	
  the	
  wizard	
  and	
  come	
  back	
  later	
  or	
  if	
  you	
  want	
  to	
  go	
  through	
  the	
  rest	
  
   of	
  the	
  steps	
  manually.	


6. You	
  will	
  be	
  using	
  a	
  template	
  for	
  the	
  USC	
  Connect	
  Portfolio.	
  	
  Click	
  Select	
  Existing	
  and	
  click	
  
   USC	
  Connect.	
  	
  Then	
  click	
  Save	
  and	
  Continue.	


7. Select	
  your	
  layout	
  theme.	
  	
  You	
  can	
  place	
  your	
  navigation	
  links	
  or	
  buttons	
  on	
  either	
  the	
  
   right	
  or	
  left	
  side,	
  or	
  along	
  the	
  top.	


8. Select	
  a	
  background	
  color	
  (you	
  can	
  leave	
  it	
  white	
  if	
  you	
  wish).	
  	
  You	
  can	
  also	
  use	
  a	
  
   background	
  image	
  if	
  you	
  have	
  one	
  that	
  will	
  work	
  well	
  with	
  a	
  webpage.	


9. You	
  can	
  change	
  the	
  default	
  font	
  and	
  default	
  font	
  color	
  for	
  the	
  portfolio	
  if	
  you	
  wish.	
  	
  If	
  
   you	
  want	
  to	
  change	
  the	
  font	
  settings	
  for	
  the	
  page	
  title	
  and	
  page	
  headings	
  by	
  clicking	
  the	
  
   +	
  icon	
  to	
  expand	
  the	
  sections.	


10. Select	
  your	
  navigation	
  menu	
  options.	
  	
  Select	
  either	
  buttons	
  or	
  text.	
  	
  Keep	
  in	
  mind	
  that	
  
    buttons	
  only	
  work	
  well	
  if	
  your	
  page	
  titles	
  are	
  18	
  characters	
  or	
  less.	
  	
  If	
  the	
  labels	
  are	
  
    going	
  to	
  be	
  longer	
  than	
  that,	
  you	
  should	
  use	
  text.	
  	
  Text	
  can	
  wrap	
  to	
  additional	
  lines	
  if	
  
necessary.	
  	
  You	
  can	
  pick	
  the	
  background	
  color	
  of	
  the	
  Navigation	
  Menu,	
  the	
  font	
  and	
  the	
  
     font	
  color.


11. You	
  can	
  mark	
  this	
  step	
  as	
  complete	
  or	
  leave	
  it	
  marked	
  in	
  progress	
  until	
  you	
  are	
  done	
  
    with	
  your	
  portfolio.	
  	
  Click	
  Save	
  and	
  Continue	
  to	
  move	
  to	
  the	
  next	
  step.	


12. 	
  The	
  next	
  page	
  allows	
  you	
  to	
  build	
  the	
  content	
  within	
  your	
  portfolio.	
  	
  Since	
  you	
  have	
  
    used	
  the	
  USC	
  Connect	
  template,	
  you	
  will	
  see	
  a	
  header,	
  a	
  footer,	
  an	
  About	
  page,	
  and	
  six	
  
different	
  area	
  pages.	
  	
  Click	
  the	
  action	
  button	
  next	
  to	
  Header	
  and	
  click	
  Edit.	


13. Replace	
  the	
  instructions	
  in	
  the	
  text	
  box	
  with	
  your	
  header	
  information.	
  	
  Note	
  that	
  the	
  
    text	
  box	
  editor	
  works	
  a	
  lot	
  like	
  a	
  word	
  processor.	
  	
  You	
  can	
  pick	
  fonts	
  and	
  colors,	
  add	
  
    images,	
  center,	
  italicize	
  and	
  bold.	
  	
  However,	
  this	
  is	
  just	
  a	
  header	
  for	
  each	
  page.	
  	
  It	
  will	
  
    display	
  at	
  the	
  top	
  of	
  every	
  page	
  in	
  your	
  portfolio.	
  	
  You	
  may	
  want	
  to	
  put	
  something	
  like	
  
    “Joe	
  Student’s	
  USC	
  Connect	
  Portfolio”	
  or	
  create	
  a	
  small,	
  graphically	
  pleasing	
  page	
  
    banner.	
  	
  When	
  you	
  have	
  finished	
  creating	
  your	
  header,	
  click	
  Submit.	


14. After	
  you	
  click	
  submit,	
  you	
  will	
  be	
  taken	
  back	
  to	
  the	
  Build	
  page.	
  	
  You	
  can	
  now	
  begin	
  
    working	
  on	
  the	
  main	
  content	
  for	
  your	
  portfolio.	
  	
  The	
  first	
  content	
  area	
  is	
  labeled	
  About.	
  	
  
    It	
  is	
  intended	
  to	
  be	
  a	
  welcome	
  page.	
  	
  It	
  will	
  be	
  the	
  first	
  page	
  visitors	
  will	
  see	
  when	
  they	
  
    access	
  your	
  portfolio.	
  	
  The	
  word	
  “About”	
  is	
  what	
  will	
  appear	
  in	
  the	
  navigation	
  menu.	
  	
  
    You	
  can	
  change	
  that	
  label	
  to	
  Welcome,	
  Introduction,	
  or	
  anything	
  else	
  that	
  would	
  be	
  
    appropriate	
  for	
  the	
  opening	
  page.	


    To	
  change	
  the	
  About	
  Label,	
  click	
  the	
  action	
  button	
  next	
  to	
  the	
  word	
  “About”,	
  then	
  click	
  
    Edit.	


15. Change	
  the	
  title,	
  then	
  add	
  content	
  for	
  the	
  page.	
  	
  You	
  can	
  click	
  Browse	
  to	
  add	
  an	
  existing	
  
    artifact	
  or	
  you	
  can	
  click	
  Create	
  New	
  Artifact	
  if	
  you	
  have	
  not	
  yet	
  created	
  the	
  artifact	
  you	
  
    need.	


16. 	
  	
  Click	
  Browse	
  to	
  add	
  an	
  existing	
  artifact.	


                      a. Type	
  a	
  keyword	
  to	
  search	
  for	
  your	
  artifact	
  either	
  by	
  name	
  or	
  description	
  	
  OR	
  
                      b. Leave	
  the	
  search	
  box	
  blank	
  
                      c. Click	
  Go	
  
                      d. You	
  will	
  see	
  a	
  list	
  of	
  the	
  existing	
  artifacts	
  
                      e. Select	
  the	
  artifact	
  you	
  want	
  to	
  use	
  by	
  clicking	
  the	
  check	
  box	
  to	
  the	
  left	
  of	
  the	
  
                             artifact	
  name	
  
                      f. Click	
  submit	


       17. 	
  See	
  section	
  ??	
  on	
  creating	
  artifacts	
  if	
  you	
  want	
  to	
  create	
  a	
  new	
  artifact.	
  
18. After	
  you	
  have	
  selected	
  your	
  artifact,	
  click	
  submit.	


       19. Repeat	
  steps	
  14-­‐18	
  for	
  each	
  of	
  the	
  desired	
  content	
  areas.	
  	
  If	
  you	
  want	
  to	
  remove	
  any	
  of	
  
           the	
  content	
  areas,	
  put	
  a	
  check	
  in	
  the	
  box	
  next	
  to	
  its	
  name,	
  then	
  click	
  Delete.	


20. 	
  If	
  you	
  want	
  to	
  add	
  additional	
  pages,	
  click	
  the	
  garnet	
  Create	
  Page	
  button.	


       21. 	
  Give	
  the	
  page	
  a	
  name	
  and	
  description.	
  	
  You	
  can	
  add	
  artifacts	
  now,	
  or	
  go	
  back	
  and	
  click	
  
           edit	
  to	
  add	
  the	
  artifacts	
  later.	
  	
  	
  Click	
  Submit.	
  	
  You	
  can	
  click	
  the	
  Submit	
  button	
  on	
  the	
  top	
  
           or	
  the	
  bottom	
  of	
  the	
  page.	
  	
  They	
  both	
  do	
  the	
  same	
  thing.	


       22. When	
  you	
  are	
  done	
  adding	
  content,	
  click	
  Save	
  and	
  Continue.	


23. 	
  Click	
  the	
  check	
  box	
  next	
  to	
  Complete	
  if	
  you	
  wish	
  to	
  mark	
  your	
  portfolio	
  as	
  completed.	


  Click	
  the	
  check	
  box	
  next	
  to	
  Available	
  if	
  you	
  wish	
  to	
  make	
  your	
  portfolio	
  available	
  to	
  
    share	
  with	
  others.	
  
    Click	
  the	
  check	
  box	
  next	
  to	
  Comments	
  are	
  Private	
  if	
  you	
  prefer	
  not	
  to	
  allow	
  others	
  to	
  
    comment	
  on	
  your	
  portfolio.	
  
    Click	
  Submit.	


24. On	
  the	
  next	
  page,	
  you	
  can	
  go	
  back	
  and	
  edit	
  any	
  of	
  the	
  portfolio	
  areas	
  if	
  you	
  choose.	


25. You	
  can	
  share	
  your	
  portfolio	
  or	
  download	
  your	
  portfolio.	
  	
  Those	
  topics	
  are	
  covered	
  in	
  
    separate	
  handouts.	
  

Más contenido relacionado

Similar a 01 portfolio create portfolio

Edison learning cms_manual
Edison learning cms_manualEdison learning cms_manual
Edison learning cms_manualJennifer Pricci
 
Using ICT in the classroom (in a funky way)
Using ICT in the classroom (in a funky way)Using ICT in the classroom (in a funky way)
Using ICT in the classroom (in a funky way)Simon Howells
 
Slide share
Slide shareSlide share
Slide shareKristina
 
Portfolio Jelilat Adesiyan
Portfolio Jelilat AdesiyanPortfolio Jelilat Adesiyan
Portfolio Jelilat AdesiyanJelilat Adesiyan
 
Final and Extra presentation.pdf
Final and Extra presentation.pdfFinal and Extra presentation.pdf
Final and Extra presentation.pdfArpitSharma429580
 
Isocentre Help Create Page
Isocentre Help   Create PageIsocentre Help   Create Page
Isocentre Help Create Pageisocentre
 
Isocentre How to Create a Page
Isocentre How to Create a PageIsocentre How to Create a Page
Isocentre How to Create a PageSantam Chakraborty
 
Chapter 2 start
Chapter 2   startChapter 2   start
Chapter 2 startIra Raji
 
EasyBib Media Center Handout
EasyBib Media Center HandoutEasyBib Media Center Handout
EasyBib Media Center Handoutevolvinglibrarian
 
Web2.0 tutorial blane
Web2.0 tutorial blaneWeb2.0 tutorial blane
Web2.0 tutorial blaneblanelewis
 
Student's portfolio's creation
Student's portfolio's creationStudent's portfolio's creation
Student's portfolio's creationThanavathi C
 

Similar a 01 portfolio create portfolio (20)

Edison learning cms_manual
Edison learning cms_manualEdison learning cms_manual
Edison learning cms_manual
 
Wix
WixWix
Wix
 
Weebly handout chestnut
Weebly handout chestnutWeebly handout chestnut
Weebly handout chestnut
 
Apps Builder Tutorial
Apps Builder TutorialApps Builder Tutorial
Apps Builder Tutorial
 
Introduction to prezi
Introduction to preziIntroduction to prezi
Introduction to prezi
 
Blog Instructions
Blog InstructionsBlog Instructions
Blog Instructions
 
Using ICT in the classroom (in a funky way)
Using ICT in the classroom (in a funky way)Using ICT in the classroom (in a funky way)
Using ICT in the classroom (in a funky way)
 
Slide share
Slide shareSlide share
Slide share
 
Portfolio Jelilat Adesiyan
Portfolio Jelilat AdesiyanPortfolio Jelilat Adesiyan
Portfolio Jelilat Adesiyan
 
Final and Extra presentation.pdf
Final and Extra presentation.pdfFinal and Extra presentation.pdf
Final and Extra presentation.pdf
 
Isocentre Help Create Page
Isocentre Help   Create PageIsocentre Help   Create Page
Isocentre Help Create Page
 
Isocentre How to Create a Page
Isocentre How to Create a PageIsocentre How to Create a Page
Isocentre How to Create a Page
 
Chapter 2 start
Chapter 2   startChapter 2   start
Chapter 2 start
 
EasyBib Media Center Handout
EasyBib Media Center HandoutEasyBib Media Center Handout
EasyBib Media Center Handout
 
2 MS Word PPT.pptx
2 MS Word PPT.pptx2 MS Word PPT.pptx
2 MS Word PPT.pptx
 
HANDOUT-WEBINAR-SESSION-1.pptx
HANDOUT-WEBINAR-SESSION-1.pptxHANDOUT-WEBINAR-SESSION-1.pptx
HANDOUT-WEBINAR-SESSION-1.pptx
 
Prezi Manual
Prezi ManualPrezi Manual
Prezi Manual
 
Prezi Manual
Prezi ManualPrezi Manual
Prezi Manual
 
Web2.0 tutorial blane
Web2.0 tutorial blaneWeb2.0 tutorial blane
Web2.0 tutorial blane
 
Student's portfolio's creation
Student's portfolio's creationStudent's portfolio's creation
Student's portfolio's creation
 

Último

Commit 2024 - Secret Management made easy
Commit 2024 - Secret Management made easyCommit 2024 - Secret Management made easy
Commit 2024 - Secret Management made easyAlfredo García Lavilla
 
The State of Passkeys with FIDO Alliance.pptx
The State of Passkeys with FIDO Alliance.pptxThe State of Passkeys with FIDO Alliance.pptx
The State of Passkeys with FIDO Alliance.pptxLoriGlavin3
 
Nell’iperspazio con Rocket: il Framework Web di Rust!
Nell’iperspazio con Rocket: il Framework Web di Rust!Nell’iperspazio con Rocket: il Framework Web di Rust!
Nell’iperspazio con Rocket: il Framework Web di Rust!Commit University
 
New from BookNet Canada for 2024: Loan Stars - Tech Forum 2024
New from BookNet Canada for 2024: Loan Stars - Tech Forum 2024New from BookNet Canada for 2024: Loan Stars - Tech Forum 2024
New from BookNet Canada for 2024: Loan Stars - Tech Forum 2024BookNet Canada
 
What's New in Teams Calling, Meetings and Devices March 2024
What's New in Teams Calling, Meetings and Devices March 2024What's New in Teams Calling, Meetings and Devices March 2024
What's New in Teams Calling, Meetings and Devices March 2024Stephanie Beckett
 
Developer Data Modeling Mistakes: From Postgres to NoSQL
Developer Data Modeling Mistakes: From Postgres to NoSQLDeveloper Data Modeling Mistakes: From Postgres to NoSQL
Developer Data Modeling Mistakes: From Postgres to NoSQLScyllaDB
 
How AI, OpenAI, and ChatGPT impact business and software.
How AI, OpenAI, and ChatGPT impact business and software.How AI, OpenAI, and ChatGPT impact business and software.
How AI, OpenAI, and ChatGPT impact business and software.Curtis Poe
 
SAP Build Work Zone - Overview L2-L3.pptx
SAP Build Work Zone - Overview L2-L3.pptxSAP Build Work Zone - Overview L2-L3.pptx
SAP Build Work Zone - Overview L2-L3.pptxNavinnSomaal
 
Merck Moving Beyond Passwords: FIDO Paris Seminar.pptx
Merck Moving Beyond Passwords: FIDO Paris Seminar.pptxMerck Moving Beyond Passwords: FIDO Paris Seminar.pptx
Merck Moving Beyond Passwords: FIDO Paris Seminar.pptxLoriGlavin3
 
DevoxxFR 2024 Reproducible Builds with Apache Maven
DevoxxFR 2024 Reproducible Builds with Apache MavenDevoxxFR 2024 Reproducible Builds with Apache Maven
DevoxxFR 2024 Reproducible Builds with Apache MavenHervé Boutemy
 
Are Multi-Cloud and Serverless Good or Bad?
Are Multi-Cloud and Serverless Good or Bad?Are Multi-Cloud and Serverless Good or Bad?
Are Multi-Cloud and Serverless Good or Bad?Mattias Andersson
 
The Fit for Passkeys for Employee and Consumer Sign-ins: FIDO Paris Seminar.pptx
The Fit for Passkeys for Employee and Consumer Sign-ins: FIDO Paris Seminar.pptxThe Fit for Passkeys for Employee and Consumer Sign-ins: FIDO Paris Seminar.pptx
The Fit for Passkeys for Employee and Consumer Sign-ins: FIDO Paris Seminar.pptxLoriGlavin3
 
Moving Beyond Passwords: FIDO Paris Seminar.pdf
Moving Beyond Passwords: FIDO Paris Seminar.pdfMoving Beyond Passwords: FIDO Paris Seminar.pdf
Moving Beyond Passwords: FIDO Paris Seminar.pdfLoriGlavin3
 
The Ultimate Guide to Choosing WordPress Pros and Cons
The Ultimate Guide to Choosing WordPress Pros and ConsThe Ultimate Guide to Choosing WordPress Pros and Cons
The Ultimate Guide to Choosing WordPress Pros and ConsPixlogix Infotech
 
"Debugging python applications inside k8s environment", Andrii Soldatenko
"Debugging python applications inside k8s environment", Andrii Soldatenko"Debugging python applications inside k8s environment", Andrii Soldatenko
"Debugging python applications inside k8s environment", Andrii SoldatenkoFwdays
 
SALESFORCE EDUCATION CLOUD | FEXLE SERVICES
SALESFORCE EDUCATION CLOUD | FEXLE SERVICESSALESFORCE EDUCATION CLOUD | FEXLE SERVICES
SALESFORCE EDUCATION CLOUD | FEXLE SERVICESmohitsingh558521
 
Passkey Providers and Enabling Portability: FIDO Paris Seminar.pptx
Passkey Providers and Enabling Portability: FIDO Paris Seminar.pptxPasskey Providers and Enabling Portability: FIDO Paris Seminar.pptx
Passkey Providers and Enabling Portability: FIDO Paris Seminar.pptxLoriGlavin3
 
Advanced Computer Architecture – An Introduction
Advanced Computer Architecture – An IntroductionAdvanced Computer Architecture – An Introduction
Advanced Computer Architecture – An IntroductionDilum Bandara
 
DevEX - reference for building teams, processes, and platforms
DevEX - reference for building teams, processes, and platformsDevEX - reference for building teams, processes, and platforms
DevEX - reference for building teams, processes, and platformsSergiu Bodiu
 
unit 4 immunoblotting technique complete.pptx
unit 4 immunoblotting technique complete.pptxunit 4 immunoblotting technique complete.pptx
unit 4 immunoblotting technique complete.pptxBkGupta21
 

Último (20)

Commit 2024 - Secret Management made easy
Commit 2024 - Secret Management made easyCommit 2024 - Secret Management made easy
Commit 2024 - Secret Management made easy
 
The State of Passkeys with FIDO Alliance.pptx
The State of Passkeys with FIDO Alliance.pptxThe State of Passkeys with FIDO Alliance.pptx
The State of Passkeys with FIDO Alliance.pptx
 
Nell’iperspazio con Rocket: il Framework Web di Rust!
Nell’iperspazio con Rocket: il Framework Web di Rust!Nell’iperspazio con Rocket: il Framework Web di Rust!
Nell’iperspazio con Rocket: il Framework Web di Rust!
 
New from BookNet Canada for 2024: Loan Stars - Tech Forum 2024
New from BookNet Canada for 2024: Loan Stars - Tech Forum 2024New from BookNet Canada for 2024: Loan Stars - Tech Forum 2024
New from BookNet Canada for 2024: Loan Stars - Tech Forum 2024
 
What's New in Teams Calling, Meetings and Devices March 2024
What's New in Teams Calling, Meetings and Devices March 2024What's New in Teams Calling, Meetings and Devices March 2024
What's New in Teams Calling, Meetings and Devices March 2024
 
Developer Data Modeling Mistakes: From Postgres to NoSQL
Developer Data Modeling Mistakes: From Postgres to NoSQLDeveloper Data Modeling Mistakes: From Postgres to NoSQL
Developer Data Modeling Mistakes: From Postgres to NoSQL
 
How AI, OpenAI, and ChatGPT impact business and software.
How AI, OpenAI, and ChatGPT impact business and software.How AI, OpenAI, and ChatGPT impact business and software.
How AI, OpenAI, and ChatGPT impact business and software.
 
SAP Build Work Zone - Overview L2-L3.pptx
SAP Build Work Zone - Overview L2-L3.pptxSAP Build Work Zone - Overview L2-L3.pptx
SAP Build Work Zone - Overview L2-L3.pptx
 
Merck Moving Beyond Passwords: FIDO Paris Seminar.pptx
Merck Moving Beyond Passwords: FIDO Paris Seminar.pptxMerck Moving Beyond Passwords: FIDO Paris Seminar.pptx
Merck Moving Beyond Passwords: FIDO Paris Seminar.pptx
 
DevoxxFR 2024 Reproducible Builds with Apache Maven
DevoxxFR 2024 Reproducible Builds with Apache MavenDevoxxFR 2024 Reproducible Builds with Apache Maven
DevoxxFR 2024 Reproducible Builds with Apache Maven
 
Are Multi-Cloud and Serverless Good or Bad?
Are Multi-Cloud and Serverless Good or Bad?Are Multi-Cloud and Serverless Good or Bad?
Are Multi-Cloud and Serverless Good or Bad?
 
The Fit for Passkeys for Employee and Consumer Sign-ins: FIDO Paris Seminar.pptx
The Fit for Passkeys for Employee and Consumer Sign-ins: FIDO Paris Seminar.pptxThe Fit for Passkeys for Employee and Consumer Sign-ins: FIDO Paris Seminar.pptx
The Fit for Passkeys for Employee and Consumer Sign-ins: FIDO Paris Seminar.pptx
 
Moving Beyond Passwords: FIDO Paris Seminar.pdf
Moving Beyond Passwords: FIDO Paris Seminar.pdfMoving Beyond Passwords: FIDO Paris Seminar.pdf
Moving Beyond Passwords: FIDO Paris Seminar.pdf
 
The Ultimate Guide to Choosing WordPress Pros and Cons
The Ultimate Guide to Choosing WordPress Pros and ConsThe Ultimate Guide to Choosing WordPress Pros and Cons
The Ultimate Guide to Choosing WordPress Pros and Cons
 
"Debugging python applications inside k8s environment", Andrii Soldatenko
"Debugging python applications inside k8s environment", Andrii Soldatenko"Debugging python applications inside k8s environment", Andrii Soldatenko
"Debugging python applications inside k8s environment", Andrii Soldatenko
 
SALESFORCE EDUCATION CLOUD | FEXLE SERVICES
SALESFORCE EDUCATION CLOUD | FEXLE SERVICESSALESFORCE EDUCATION CLOUD | FEXLE SERVICES
SALESFORCE EDUCATION CLOUD | FEXLE SERVICES
 
Passkey Providers and Enabling Portability: FIDO Paris Seminar.pptx
Passkey Providers and Enabling Portability: FIDO Paris Seminar.pptxPasskey Providers and Enabling Portability: FIDO Paris Seminar.pptx
Passkey Providers and Enabling Portability: FIDO Paris Seminar.pptx
 
Advanced Computer Architecture – An Introduction
Advanced Computer Architecture – An IntroductionAdvanced Computer Architecture – An Introduction
Advanced Computer Architecture – An Introduction
 
DevEX - reference for building teams, processes, and platforms
DevEX - reference for building teams, processes, and platformsDevEX - reference for building teams, processes, and platforms
DevEX - reference for building teams, processes, and platforms
 
unit 4 immunoblotting technique complete.pptx
unit 4 immunoblotting technique complete.pptxunit 4 immunoblotting technique complete.pptx
unit 4 immunoblotting technique complete.pptx
 

01 portfolio create portfolio

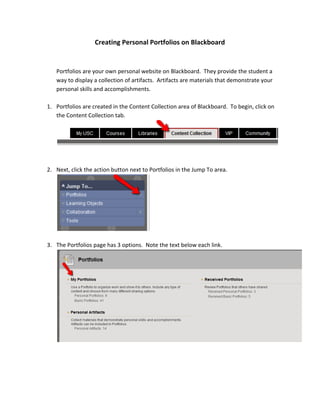
  • 1. Creating  Personal  Portfolios  on  Blackboard     Portfolios  are  your  own  personal  website  on  Blackboard.    They  provide  the  student  a   way  to  display  a  collection  of  artifacts.    Artifacts  are  materials  that  demonstrate  your   personal  skills  and  accomplishments.     1. Portfolios  are  created  in  the  Content  Collection  area  of  Blackboard.    To  begin,  click  on   the  Content  Collection  tab.         2. Next,  click  the  action  button  next  to  Portfolios  in  the  Jump  To  area.         3. The  Portfolios  page  has  3  options.    Note  the  text  below  each  link.        
  • 2. 4. Click  My  Portfolios.    Note  that  there  are  two  types  of  portfolios,  Personal  and  Basic.    You   will  be  creating  a  Personal  Portfolio.    Click  on  the  garnet  Create  Portfolio  button.       5. Once  you  click  Create  Personal  Portfolio,  you  will  be  taken  to  a  portfolio  creation  wizard.     You  can  continue  with  the  wizard  by  clicking  Save  and  Continue.    You  can  click  submit  if   you  want  to  leave  the  wizard  and  come  back  later  or  if  you  want  to  go  through  the  rest   of  the  steps  manually.             6. You  will  be  using  a  template  for  the  USC  Connect  Portfolio.    Click  Select  Existing  and  click   USC  Connect.    Then  click  Save  and  Continue.        
  • 3. 7. Select  your  layout  theme.    You  can  place  your  navigation  links  or  buttons  on  either  the   right  or  left  side,  or  along  the  top.         8. Select  a  background  color  (you  can  leave  it  white  if  you  wish).    You  can  also  use  a   background  image  if  you  have  one  that  will  work  well  with  a  webpage.         9. You  can  change  the  default  font  and  default  font  color  for  the  portfolio  if  you  wish.    If   you  want  to  change  the  font  settings  for  the  page  title  and  page  headings  by  clicking  the   +  icon  to  expand  the  sections.         10. Select  your  navigation  menu  options.    Select  either  buttons  or  text.    Keep  in  mind  that   buttons  only  work  well  if  your  page  titles  are  18  characters  or  less.    If  the  labels  are   going  to  be  longer  than  that,  you  should  use  text.    Text  can  wrap  to  additional  lines  if  
  • 4. necessary.    You  can  pick  the  background  color  of  the  Navigation  Menu,  the  font  and  the   font  color.     11. You  can  mark  this  step  as  complete  or  leave  it  marked  in  progress  until  you  are  done   with  your  portfolio.    Click  Save  and  Continue  to  move  to  the  next  step.         12.  The  next  page  allows  you  to  build  the  content  within  your  portfolio.    Since  you  have   used  the  USC  Connect  template,  you  will  see  a  header,  a  footer,  an  About  page,  and  six  
  • 5. different  area  pages.    Click  the  action  button  next  to  Header  and  click  Edit.         13. Replace  the  instructions  in  the  text  box  with  your  header  information.    Note  that  the   text  box  editor  works  a  lot  like  a  word  processor.    You  can  pick  fonts  and  colors,  add   images,  center,  italicize  and  bold.    However,  this  is  just  a  header  for  each  page.    It  will   display  at  the  top  of  every  page  in  your  portfolio.    You  may  want  to  put  something  like   “Joe  Student’s  USC  Connect  Portfolio”  or  create  a  small,  graphically  pleasing  page   banner.    When  you  have  finished  creating  your  header,  click  Submit.        
  • 6. 14. After  you  click  submit,  you  will  be  taken  back  to  the  Build  page.    You  can  now  begin   working  on  the  main  content  for  your  portfolio.    The  first  content  area  is  labeled  About.     It  is  intended  to  be  a  welcome  page.    It  will  be  the  first  page  visitors  will  see  when  they   access  your  portfolio.    The  word  “About”  is  what  will  appear  in  the  navigation  menu.     You  can  change  that  label  to  Welcome,  Introduction,  or  anything  else  that  would  be   appropriate  for  the  opening  page.       To  change  the  About  Label,  click  the  action  button  next  to  the  word  “About”,  then  click   Edit.         15. Change  the  title,  then  add  content  for  the  page.    You  can  click  Browse  to  add  an  existing   artifact  or  you  can  click  Create  New  Artifact  if  you  have  not  yet  created  the  artifact  you   need.                        
  • 7. 16.    Click  Browse  to  add  an  existing  artifact.       a. Type  a  keyword  to  search  for  your  artifact  either  by  name  or  description    OR   b. Leave  the  search  box  blank   c. Click  Go   d. You  will  see  a  list  of  the  existing  artifacts   e. Select  the  artifact  you  want  to  use  by  clicking  the  check  box  to  the  left  of  the   artifact  name   f. Click  submit                                       17.  See  section  ??  on  creating  artifacts  if  you  want  to  create  a  new  artifact.  
  • 8. 18. After  you  have  selected  your  artifact,  click  submit.       19. Repeat  steps  14-­‐18  for  each  of  the  desired  content  areas.    If  you  want  to  remove  any  of   the  content  areas,  put  a  check  in  the  box  next  to  its  name,  then  click  Delete.                            
  • 9. 20.  If  you  want  to  add  additional  pages,  click  the  garnet  Create  Page  button.                   21.  Give  the  page  a  name  and  description.    You  can  add  artifacts  now,  or  go  back  and  click   edit  to  add  the  artifacts  later.      Click  Submit.    You  can  click  the  Submit  button  on  the  top   or  the  bottom  of  the  page.    They  both  do  the  same  thing.       22. When  you  are  done  adding  content,  click  Save  and  Continue.      
  • 10. 23.  Click  the  check  box  next  to  Complete  if  you  wish  to  mark  your  portfolio  as  completed.        Click  the  check  box  next  to  Available  if  you  wish  to  make  your  portfolio  available  to   share  with  others.   Click  the  check  box  next  to  Comments  are  Private  if  you  prefer  not  to  allow  others  to   comment  on  your  portfolio.   Click  Submit.       24. On  the  next  page,  you  can  go  back  and  edit  any  of  the  portfolio  areas  if  you  choose.       25. You  can  share  your  portfolio  or  download  your  portfolio.    Those  topics  are  covered  in   separate  handouts.