Edwards Signaling CS2595-5 Installation Manual
•
1 recomendación•76 vistas

Buy the Edwards Signaling CS2595-5 at JMAC Supply. https://www.jmac.com/Edwards_Signaling_CS2595_5_p/edwards-signaling-cs2595-5.htm?=slideshare

Recomendados
Más contenido relacionado
Destacado
Destacado (15)
Más de JMAC Supply
Más de JMAC Supply (20)
Último
Último (20)
Edwards Signaling CS2595-5 Installation Manual
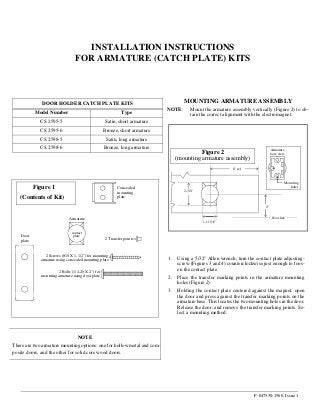
- 1. P-047550-1560, Issue 1 INSTALLATION INSTRUCTIONS FOR ARMATURE (CATCH PLATE) KITS DOOR HOLDER CATCH PLATE KITS Model Number Type CS 2595-5 Satin, short armature CS 2595-6 Bronze, short armature CS 2598-5 Satin, long armature CS 2598-6 Bronze, long armature MOUNTING ARMATURE ASSEMBLY NOTE: Mount the armature assembly vertically (Figure 2) to ob- tain the correct alignment with the electromagnet. 2-3/8” 2" 6" ref. 1-11/16” Figure 2 (mounting armature assembly) Mounting holes Armature base view floor line 2 Bolts (1/4-20 X 2") for mounting armature using door plate 2 Screws (#10 X 1-1/2") for mounting armature using concealed mounting plate 2 Transfer points Armature Concealed mounting plate Door plate (Contents of Kit) contact plate Figure 1 1. Using a 5/32" Allen wrench, turn the contact plate adjusting- screw (Figures 3 and 4) counterclockwise just enough to loos- en the contact plate. 2. Place the transfer marking points in the armature mounting holes (Figure 2). 3. Holding the contact plate centered against the magnet, open the door and press against the transfer marking points on the armature base. This locates the two mounting holes in the door. Release the door, and remove the transfer marking points. Se- lect a mounting method: NOTE There are two armature mounting options: one for hollow metal and com- posite doors, and the other for solid core wood doors.
- 2. Mounting holes Contact plate adjusting screw 2" from floor to center 1-5/8” Door plate 1-3/4” Contact plate Pull side of door DOOR FLOOR Figure 3 (thru-bolt mounting) Armature base view Two 1/4-20 X 2" long screws provided for a std. 1-3/4" door 1-3/4" Short armature shown for illustration purposes only. P-047550-1560 5. Secure the armature assembly to door, using Figure 3 or Fig- ure 4 as a guide. The contact plate adjusting screw should face upward. 6. Align the contact plate against the electromagnet (it must be centered and lie flat against the magnet to ensure sufficient holding force. Tighten the contact plate adjusting screw. Do not overtighten. The plate must be firm but not overly rigid. 7. Check alignment and adjust if necessary. 8. Adjust the door closer to exert 3 pounds of force when the door is open and the armature and magnet are in contact. 9. Energize the electromagnet and open the door. If the door shuts, check the alignment of the contact plate and electro- magnet. Also check that power is turned on to the unit and that the magnet is energized. 4a. Thru-bolt mounting (Figure 3). Recommended for standard 1-3/4" hollow metal, hollow core, or composite type wood doors. Center punch the two marked points and drill 5/16" di- ameter through the door. The distance between their center points should equal 1-3/4". If a 2" door is used, two (2) 2-1/4" long 1/4-20 bolts are recommended. (Figure 3) Set screw. Tighten with 6/32” Allen- wrench to secure armature onto mounting plate. 1/2” 2" from floor to center Contact plate adjusting screw Contact plate Concealed mounting plate DOOR FLOOR Figure 4 (surface concealed mounting) Armature base view Holes for concealed mounting plate 1/2” Two #10 X 1-1/2” screws provided Short armature shown for illustration purposes only. 4b. Surface concealed mounting (Figure 4). Not recommended for hollow metal, hollow core or composite type wood doors. Center punch the two marked points and drill 1/8" diameter X 1-1/4" deep. The distance between their center points should equal 1/2". Install the concealed mounting plate using the two #10 X 1-1/2" screws provided. (Figure 4)