SlideShare a Scribd company logo
1 of 5
Writing your first Sencha Touch application – Part1
The whole series Part1, Part2 and Part3 can be viewed in my Blog.


In this tutorial we will build a simple Sencha Touch application that will help you get started with this new Touch
Framework. Sencha Touch is all about developing mobile web applications that look like native in iPhone, Android
and Blackberry touch devices. It is a JavaScript library that complies to all the latest web standards like HTML5,
CSS3. To start with we will be developing a simple contact list that will store contact information. When a particular
contact item is clicked/tapped then an overlay will show more information about that person. This is how it will look at
the end.


                                                        Our application

Where do I get Sencha Touch library?
You can download it by going to the Sencha Touch home page http://www.sencha.com/products/touch/ and selecting
download. It is free to download. Read the licensing options though http://www.sencha.com/products/touch/license/.
Getting Started
After downloading the zip file extract it to your project folder. You can use a local web server to test your application. I
used WAMP as my local server and deployed all my code there. Using a local server will also help if you have Ajax
calls in your application which we will not discus in this tutorial. Keep this for later discussions. First things first, all
that you will need to get started is the JavaScript library file from Sencha. Copy the sencha-touch-debug.js file
from the extracted Sencha folder and put it in your library path where you can access it easily. Make a js folder under
your root folder to keep all the java script files there and paste the sencha-touch-debug.js file you copied. You will
note that inside the extracted Sencha folder there are two files to use, sencha-touch.js and sencha-touch-
debug.js, as the name suggests the sencha-touch-debug.js file is for debugging purpose. Use this while you are
developing your application locally while the sencha-touch.js file is for production purpose. Use this in your
production server. You can further minify the js files by G-zipping them. You can further copy the sencha-
touch.css file from the sencha ->resources ->css folder to you own folder. Ok, things are in place now. This is all
you need to get started. The rest is to write your code.
Supported browsers
Sencha Touch mobile applications run only in Web-kit browsers namely Google Chrome and Safari. So test your
application only in these browsers. Sencha Touch is for mobile devices and these are the browsers that you will
mostly find in them.
Writing your code
Till now I have made a js folder and copied the sencha-touch-debug.js file under it. Also, I made a css folder and
copied the sencha-touch.css file there. Now make a index.html file under your root folder. This is where we will
write our code. This is how it looks at this moment.


                                                       Folder structure

Open the index.html file and include references to the Sencha library files you copied in js and css folders. Refer the
                                             files inside your head section

<head>

     <title>My first Sencha Touch application</title>

     <meta http-equiv="Content-Type" content="text/html; charset=utf-8"/>

     <link href="css/sencha-touch.css" rel="Stylesheet"/>

     <script type="text/javascript" src="js/sencha-touch-debug.js"></script>

</head>


Now create another script block inside which we will write our code to develop the contact list.

<head>

     <title>My first Sencha Touch application</title>

     <meta http-equiv="Content-Type" content="text/html; charset=utf-8"/>

     <link href="css/sencha-touch.css" rel="Stylesheet"/>

     <script type="text/javascript" src="js/sencha-touch-debug.js"></script>

     <script type="text/javascript"></script> //your script block. Write code here

</head>
I am writing the java script code inline i.e inside the index.html file for now. You can create a separate .js file under js
folder and put your code there and reference the file in your index.html file.
Now, within the newly created script block we will start our Sencha code. To launch a Sencha application we use a
Ext.setup() method which takes a configuration object as parameter. This is the basic method to start with. It will set
up a page for the touch-enabled devices.

Ext.setup({

                 tabletStartupScreen: 'tablet_startup.png',

                 phoneStartupScreen: 'phone_startup.png',

                 icon: 'icon.png',

                 glossOnIcon: false,

                 onReady: function(){}

});


The properties that you see inside the curly braces {} are the configuration object’s parameter. Let’s see what each of
them means.
tabletStartupScreen: as seen it specifies the path of icon file to use as start up screen on tablet devices
phoneStartupScreen: it specifies the name of the icon file to use as start up screen on mobile devices
icon: it specifies the name of the default icon file. This appears in the title bar of the browser.
glossOnIcon: true to set a glossy effect on the default icon, false to not add the effect.
onReady: is a method and an all important one. This function is invoked when the browser’s DOM is ready and all
the files have been loaded. We will put all our Sencha components or the view within this method.

<head>

      <title>My first Sencha Touch application</title>

      <meta http-equiv="Content-Type" content="text/html; charset=utf-8"/>

      <link href="css/sencha-touch.css" rel="Stylesheet"/>

      <script type="text/javascript" src="js/sencha-touch-debug.js"></script>

      <script type="text/javascript">

           Ext.setup({

                            tabletStartupScreen: 'tablet_startup.png',

                            phoneStartupScreen: 'phone_startup.png',
icon: 'images/homeblue.png',

                            glossOnIcon: false,

                            onReady: function(){

                                  new Ext.Panel({

                                        fullscreen:true,

                                        layout:'fit',

                                        dockedItems:[{xtype:'toolbar', title:'Contact List'}],

                                        dock:'top',

                                        scroll:'vertical'

                                  });

                            }

                 });


     </script>

</head>


Now, I am creating a panel component inside the onReady() method. This will be our viewport and all our
components such as the list will be added to this viewport. Every Sencha Touch application must have a viewport that
will hold together other view elements. I am using a Panel as the parent container that will hold the contact list. To
create a Panel we use the Ext.Panel class (defined in Sencha API) and create a new instance of it. The Ext.Panel()
constructor takes as parameter a configuration object where we specify important properties such as fullscreen-
setting this to true ensures that the viewport will cover the entire screen of the touch device, you need not worry about
the resolution, dockedItems – this is another property which is actually an array of other Sencha components. I have
put a toolbar with a title of ‘Contact List’ within it and docked it to top by setting dock:true. What happens is that a
toolbar is docked at top of our application. You might be wandering what the xtype is all about. Well, its kind of a
shortcut used for component classes. Instead of writing new Ext.ToolBar() to create a new instance we use
the xtype to specify the same inside an object. Here I have used a few of the properties. To find all the properties and
methods you can use the Sencha Touch API docs http://dev.sencha.com/deploy/touch/docs/ and search for Panel
class in the search bar.
If you run the application now this is how it should look. You can test it in your machine’s browser also
Panel with docked Toolbar

This is getting long. Let’s take the rest of the tutorial to the next part which is here

More Related Content

Recently uploaded

CNv6 Instructor Chapter 6 Quality of Service
CNv6 Instructor Chapter 6 Quality of ServiceCNv6 Instructor Chapter 6 Quality of Service
CNv6 Instructor Chapter 6 Quality of Service
giselly40
 
EIS-Webinar-Prompt-Knowledge-Eng-2024-04-08.pptx
EIS-Webinar-Prompt-Knowledge-Eng-2024-04-08.pptxEIS-Webinar-Prompt-Knowledge-Eng-2024-04-08.pptx
EIS-Webinar-Prompt-Knowledge-Eng-2024-04-08.pptx
Earley Information Science
 
IAC 2024 - IA Fast Track to Search Focused AI Solutions
IAC 2024 - IA Fast Track to Search Focused AI SolutionsIAC 2024 - IA Fast Track to Search Focused AI Solutions
IAC 2024 - IA Fast Track to Search Focused AI Solutions
Enterprise Knowledge
 

Recently uploaded (20)

Tata AIG General Insurance Company - Insurer Innovation Award 2024
Tata AIG General Insurance Company - Insurer Innovation Award 2024Tata AIG General Insurance Company - Insurer Innovation Award 2024
Tata AIG General Insurance Company - Insurer Innovation Award 2024
 
CNv6 Instructor Chapter 6 Quality of Service
CNv6 Instructor Chapter 6 Quality of ServiceCNv6 Instructor Chapter 6 Quality of Service
CNv6 Instructor Chapter 6 Quality of Service
 
EIS-Webinar-Prompt-Knowledge-Eng-2024-04-08.pptx
EIS-Webinar-Prompt-Knowledge-Eng-2024-04-08.pptxEIS-Webinar-Prompt-Knowledge-Eng-2024-04-08.pptx
EIS-Webinar-Prompt-Knowledge-Eng-2024-04-08.pptx
 
04-2024-HHUG-Sales-and-Marketing-Alignment.pptx
04-2024-HHUG-Sales-and-Marketing-Alignment.pptx04-2024-HHUG-Sales-and-Marketing-Alignment.pptx
04-2024-HHUG-Sales-and-Marketing-Alignment.pptx
 
🐬 The future of MySQL is Postgres 🐘
🐬  The future of MySQL is Postgres   🐘🐬  The future of MySQL is Postgres   🐘
🐬 The future of MySQL is Postgres 🐘
 
Factors to Consider When Choosing Accounts Payable Services Providers.pptx
Factors to Consider When Choosing Accounts Payable Services Providers.pptxFactors to Consider When Choosing Accounts Payable Services Providers.pptx
Factors to Consider When Choosing Accounts Payable Services Providers.pptx
 
Strategies for Unlocking Knowledge Management in Microsoft 365 in the Copilot...
Strategies for Unlocking Knowledge Management in Microsoft 365 in the Copilot...Strategies for Unlocking Knowledge Management in Microsoft 365 in the Copilot...
Strategies for Unlocking Knowledge Management in Microsoft 365 in the Copilot...
 
Boost PC performance: How more available memory can improve productivity
Boost PC performance: How more available memory can improve productivityBoost PC performance: How more available memory can improve productivity
Boost PC performance: How more available memory can improve productivity
 
Advantages of Hiring UIUX Design Service Providers for Your Business
Advantages of Hiring UIUX Design Service Providers for Your BusinessAdvantages of Hiring UIUX Design Service Providers for Your Business
Advantages of Hiring UIUX Design Service Providers for Your Business
 
IAC 2024 - IA Fast Track to Search Focused AI Solutions
IAC 2024 - IA Fast Track to Search Focused AI SolutionsIAC 2024 - IA Fast Track to Search Focused AI Solutions
IAC 2024 - IA Fast Track to Search Focused AI Solutions
 
What Are The Drone Anti-jamming Systems Technology?
What Are The Drone Anti-jamming Systems Technology?What Are The Drone Anti-jamming Systems Technology?
What Are The Drone Anti-jamming Systems Technology?
 
Bajaj Allianz Life Insurance Company - Insurer Innovation Award 2024
Bajaj Allianz Life Insurance Company - Insurer Innovation Award 2024Bajaj Allianz Life Insurance Company - Insurer Innovation Award 2024
Bajaj Allianz Life Insurance Company - Insurer Innovation Award 2024
 
08448380779 Call Girls In Civil Lines Women Seeking Men
08448380779 Call Girls In Civil Lines Women Seeking Men08448380779 Call Girls In Civil Lines Women Seeking Men
08448380779 Call Girls In Civil Lines Women Seeking Men
 
Exploring the Future Potential of AI-Enabled Smartphone Processors
Exploring the Future Potential of AI-Enabled Smartphone ProcessorsExploring the Future Potential of AI-Enabled Smartphone Processors
Exploring the Future Potential of AI-Enabled Smartphone Processors
 
[2024]Digital Global Overview Report 2024 Meltwater.pdf
[2024]Digital Global Overview Report 2024 Meltwater.pdf[2024]Digital Global Overview Report 2024 Meltwater.pdf
[2024]Digital Global Overview Report 2024 Meltwater.pdf
 
Scaling API-first – The story of a global engineering organization
Scaling API-first – The story of a global engineering organizationScaling API-first – The story of a global engineering organization
Scaling API-first – The story of a global engineering organization
 
2024: Domino Containers - The Next Step. News from the Domino Container commu...
2024: Domino Containers - The Next Step. News from the Domino Container commu...2024: Domino Containers - The Next Step. News from the Domino Container commu...
2024: Domino Containers - The Next Step. News from the Domino Container commu...
 
TrustArc Webinar - Stay Ahead of US State Data Privacy Law Developments
TrustArc Webinar - Stay Ahead of US State Data Privacy Law DevelopmentsTrustArc Webinar - Stay Ahead of US State Data Privacy Law Developments
TrustArc Webinar - Stay Ahead of US State Data Privacy Law Developments
 
How to Troubleshoot Apps for the Modern Connected Worker
How to Troubleshoot Apps for the Modern Connected WorkerHow to Troubleshoot Apps for the Modern Connected Worker
How to Troubleshoot Apps for the Modern Connected Worker
 
Real Time Object Detection Using Open CV
Real Time Object Detection Using Open CVReal Time Object Detection Using Open CV
Real Time Object Detection Using Open CV
 

Featured

How Race, Age and Gender Shape Attitudes Towards Mental Health
How Race, Age and Gender Shape Attitudes Towards Mental HealthHow Race, Age and Gender Shape Attitudes Towards Mental Health
How Race, Age and Gender Shape Attitudes Towards Mental Health
ThinkNow
 
Social Media Marketing Trends 2024 // The Global Indie Insights
Social Media Marketing Trends 2024 // The Global Indie InsightsSocial Media Marketing Trends 2024 // The Global Indie Insights
Social Media Marketing Trends 2024 // The Global Indie Insights
Kurio // The Social Media Age(ncy)
 

Featured (20)

2024 State of Marketing Report – by Hubspot
2024 State of Marketing Report – by Hubspot2024 State of Marketing Report – by Hubspot
2024 State of Marketing Report – by Hubspot
 
Everything You Need To Know About ChatGPT
Everything You Need To Know About ChatGPTEverything You Need To Know About ChatGPT
Everything You Need To Know About ChatGPT
 
Product Design Trends in 2024 | Teenage Engineerings
Product Design Trends in 2024 | Teenage EngineeringsProduct Design Trends in 2024 | Teenage Engineerings
Product Design Trends in 2024 | Teenage Engineerings
 
How Race, Age and Gender Shape Attitudes Towards Mental Health
How Race, Age and Gender Shape Attitudes Towards Mental HealthHow Race, Age and Gender Shape Attitudes Towards Mental Health
How Race, Age and Gender Shape Attitudes Towards Mental Health
 
AI Trends in Creative Operations 2024 by Artwork Flow.pdf
AI Trends in Creative Operations 2024 by Artwork Flow.pdfAI Trends in Creative Operations 2024 by Artwork Flow.pdf
AI Trends in Creative Operations 2024 by Artwork Flow.pdf
 
Skeleton Culture Code
Skeleton Culture CodeSkeleton Culture Code
Skeleton Culture Code
 
PEPSICO Presentation to CAGNY Conference Feb 2024
PEPSICO Presentation to CAGNY Conference Feb 2024PEPSICO Presentation to CAGNY Conference Feb 2024
PEPSICO Presentation to CAGNY Conference Feb 2024
 
Content Methodology: A Best Practices Report (Webinar)
Content Methodology: A Best Practices Report (Webinar)Content Methodology: A Best Practices Report (Webinar)
Content Methodology: A Best Practices Report (Webinar)
 
How to Prepare For a Successful Job Search for 2024
How to Prepare For a Successful Job Search for 2024How to Prepare For a Successful Job Search for 2024
How to Prepare For a Successful Job Search for 2024
 
Social Media Marketing Trends 2024 // The Global Indie Insights
Social Media Marketing Trends 2024 // The Global Indie InsightsSocial Media Marketing Trends 2024 // The Global Indie Insights
Social Media Marketing Trends 2024 // The Global Indie Insights
 
Trends In Paid Search: Navigating The Digital Landscape In 2024
Trends In Paid Search: Navigating The Digital Landscape In 2024Trends In Paid Search: Navigating The Digital Landscape In 2024
Trends In Paid Search: Navigating The Digital Landscape In 2024
 
5 Public speaking tips from TED - Visualized summary
5 Public speaking tips from TED - Visualized summary5 Public speaking tips from TED - Visualized summary
5 Public speaking tips from TED - Visualized summary
 
ChatGPT and the Future of Work - Clark Boyd
ChatGPT and the Future of Work - Clark Boyd ChatGPT and the Future of Work - Clark Boyd
ChatGPT and the Future of Work - Clark Boyd
 
Getting into the tech field. what next
Getting into the tech field. what next Getting into the tech field. what next
Getting into the tech field. what next
 
Google's Just Not That Into You: Understanding Core Updates & Search Intent
Google's Just Not That Into You: Understanding Core Updates & Search IntentGoogle's Just Not That Into You: Understanding Core Updates & Search Intent
Google's Just Not That Into You: Understanding Core Updates & Search Intent
 
How to have difficult conversations
How to have difficult conversations How to have difficult conversations
How to have difficult conversations
 
Introduction to Data Science
Introduction to Data ScienceIntroduction to Data Science
Introduction to Data Science
 
Time Management & Productivity - Best Practices
Time Management & Productivity -  Best PracticesTime Management & Productivity -  Best Practices
Time Management & Productivity - Best Practices
 
The six step guide to practical project management
The six step guide to practical project managementThe six step guide to practical project management
The six step guide to practical project management
 
Beginners Guide to TikTok for Search - Rachel Pearson - We are Tilt __ Bright...
Beginners Guide to TikTok for Search - Rachel Pearson - We are Tilt __ Bright...Beginners Guide to TikTok for Search - Rachel Pearson - We are Tilt __ Bright...
Beginners Guide to TikTok for Search - Rachel Pearson - We are Tilt __ Bright...
 

Writing your first sencha touch application

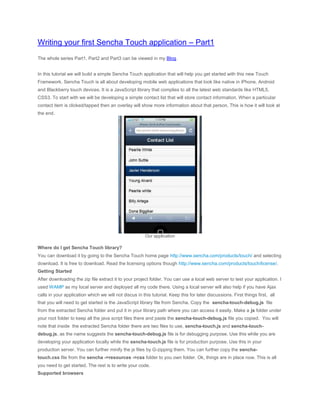
  • 1. Writing your first Sencha Touch application – Part1 The whole series Part1, Part2 and Part3 can be viewed in my Blog. In this tutorial we will build a simple Sencha Touch application that will help you get started with this new Touch Framework. Sencha Touch is all about developing mobile web applications that look like native in iPhone, Android and Blackberry touch devices. It is a JavaScript library that complies to all the latest web standards like HTML5, CSS3. To start with we will be developing a simple contact list that will store contact information. When a particular contact item is clicked/tapped then an overlay will show more information about that person. This is how it will look at the end. Our application Where do I get Sencha Touch library? You can download it by going to the Sencha Touch home page http://www.sencha.com/products/touch/ and selecting download. It is free to download. Read the licensing options though http://www.sencha.com/products/touch/license/. Getting Started After downloading the zip file extract it to your project folder. You can use a local web server to test your application. I used WAMP as my local server and deployed all my code there. Using a local server will also help if you have Ajax calls in your application which we will not discus in this tutorial. Keep this for later discussions. First things first, all that you will need to get started is the JavaScript library file from Sencha. Copy the sencha-touch-debug.js file from the extracted Sencha folder and put it in your library path where you can access it easily. Make a js folder under your root folder to keep all the java script files there and paste the sencha-touch-debug.js file you copied. You will note that inside the extracted Sencha folder there are two files to use, sencha-touch.js and sencha-touch- debug.js, as the name suggests the sencha-touch-debug.js file is for debugging purpose. Use this while you are developing your application locally while the sencha-touch.js file is for production purpose. Use this in your production server. You can further minify the js files by G-zipping them. You can further copy the sencha- touch.css file from the sencha ->resources ->css folder to you own folder. Ok, things are in place now. This is all you need to get started. The rest is to write your code. Supported browsers
  • 2. Sencha Touch mobile applications run only in Web-kit browsers namely Google Chrome and Safari. So test your application only in these browsers. Sencha Touch is for mobile devices and these are the browsers that you will mostly find in them. Writing your code Till now I have made a js folder and copied the sencha-touch-debug.js file under it. Also, I made a css folder and copied the sencha-touch.css file there. Now make a index.html file under your root folder. This is where we will write our code. This is how it looks at this moment. Folder structure Open the index.html file and include references to the Sencha library files you copied in js and css folders. Refer the files inside your head section <head> <title>My first Sencha Touch application</title> <meta http-equiv="Content-Type" content="text/html; charset=utf-8"/> <link href="css/sencha-touch.css" rel="Stylesheet"/> <script type="text/javascript" src="js/sencha-touch-debug.js"></script> </head> Now create another script block inside which we will write our code to develop the contact list. <head> <title>My first Sencha Touch application</title> <meta http-equiv="Content-Type" content="text/html; charset=utf-8"/> <link href="css/sencha-touch.css" rel="Stylesheet"/> <script type="text/javascript" src="js/sencha-touch-debug.js"></script> <script type="text/javascript"></script> //your script block. Write code here </head>
  • 3. I am writing the java script code inline i.e inside the index.html file for now. You can create a separate .js file under js folder and put your code there and reference the file in your index.html file. Now, within the newly created script block we will start our Sencha code. To launch a Sencha application we use a Ext.setup() method which takes a configuration object as parameter. This is the basic method to start with. It will set up a page for the touch-enabled devices. Ext.setup({ tabletStartupScreen: 'tablet_startup.png', phoneStartupScreen: 'phone_startup.png', icon: 'icon.png', glossOnIcon: false, onReady: function(){} }); The properties that you see inside the curly braces {} are the configuration object’s parameter. Let’s see what each of them means. tabletStartupScreen: as seen it specifies the path of icon file to use as start up screen on tablet devices phoneStartupScreen: it specifies the name of the icon file to use as start up screen on mobile devices icon: it specifies the name of the default icon file. This appears in the title bar of the browser. glossOnIcon: true to set a glossy effect on the default icon, false to not add the effect. onReady: is a method and an all important one. This function is invoked when the browser’s DOM is ready and all the files have been loaded. We will put all our Sencha components or the view within this method. <head> <title>My first Sencha Touch application</title> <meta http-equiv="Content-Type" content="text/html; charset=utf-8"/> <link href="css/sencha-touch.css" rel="Stylesheet"/> <script type="text/javascript" src="js/sencha-touch-debug.js"></script> <script type="text/javascript"> Ext.setup({ tabletStartupScreen: 'tablet_startup.png', phoneStartupScreen: 'phone_startup.png',
  • 4. icon: 'images/homeblue.png', glossOnIcon: false, onReady: function(){ new Ext.Panel({ fullscreen:true, layout:'fit', dockedItems:[{xtype:'toolbar', title:'Contact List'}], dock:'top', scroll:'vertical' }); } }); </script> </head> Now, I am creating a panel component inside the onReady() method. This will be our viewport and all our components such as the list will be added to this viewport. Every Sencha Touch application must have a viewport that will hold together other view elements. I am using a Panel as the parent container that will hold the contact list. To create a Panel we use the Ext.Panel class (defined in Sencha API) and create a new instance of it. The Ext.Panel() constructor takes as parameter a configuration object where we specify important properties such as fullscreen- setting this to true ensures that the viewport will cover the entire screen of the touch device, you need not worry about the resolution, dockedItems – this is another property which is actually an array of other Sencha components. I have put a toolbar with a title of ‘Contact List’ within it and docked it to top by setting dock:true. What happens is that a toolbar is docked at top of our application. You might be wandering what the xtype is all about. Well, its kind of a shortcut used for component classes. Instead of writing new Ext.ToolBar() to create a new instance we use the xtype to specify the same inside an object. Here I have used a few of the properties. To find all the properties and methods you can use the Sencha Touch API docs http://dev.sencha.com/deploy/touch/docs/ and search for Panel class in the search bar. If you run the application now this is how it should look. You can test it in your machine’s browser also
  • 5. Panel with docked Toolbar This is getting long. Let’s take the rest of the tutorial to the next part which is here