
Recomendados
Más contenido relacionado
La actualidad más candente
La actualidad más candente (20)
Similar a Premiere elements
Similar a Premiere elements (20)
Más de leeanne123
Más de leeanne123 (20)
Último
Último (20)
Premiere elements
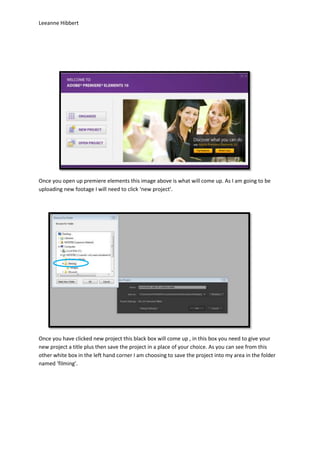
- 1. Leeanne Hibbert Once you open up premiere elements this image above is what will come up. As I am going to be uploading new footage I will need to click ‘new project’. Once you have clicked new project this black box will come up , in this box you need to give your new project a title plus then save the project in a place of your choice. As you can see from this other white box in the left hand corner I am choosing to save the project into my area in the folder named ‘filming’.
- 2. Leeanne Hibbert Once you have saved your new project this image above will be what you will see. I now need to add all of my media onto this. To do this I clicked file at the top left of the page then get media from, then click on ‘files and folders’. This box will come up when media is being added. Once this gets to 100% the media will have been imported onto premiere elements.
- 3. Leeanne Hibbert Here now from this image as you can see the three videos have been imported. I just need to now add images to this and the song track that I will also be using. I will do the same process as the above images to get the rest of my media. As you can see by this image I have also added all of the images as well. In now need to add the audio.
- 4. Leeanne Hibbert This image above you can now see that I have added the audio to it. Now all of my media has been inserted into premiere elements. As you can see I have now added some film to the scene and timeline.
- 5. Leeanne Hibbert As you can see the length of the movie clip is quite long. I want to also speed this up quite fast so that it looks like people are running inside the college. To speed up the clip I right clicked the clip on the timeline and clicked ‘time stretch’ this then brings up the box that you can see on this image. The original speed was ‘100%’ but I have changed it to ‘600%’.
- 6. Leeanne Hibbert As you can see from this image above the movie clip now looks a lot shorter, this is because it will now be super speedy. I have also added another short movie clip to the time line. This is called ‘zoom up of sign’ and this just literally is a quick full on zoom of the Cheadle and marple sixth form sign outside of the Cheadle college.
- 7. Leeanne Hibbert In this print screen above as you can see I have added a title to the beginning part of the movie. At the minute it just says ‘welcome to the Cheadle Campus’ I will be adding more to this. Underneath the ‘welcome to Cheadle Campus’ title I have added another title, this says ‘The creative media Course’ The first blue title does come on the screen before the second, then after a few seconds the other title appears. They stay on the screen together for a second or two and then the first title I added a ‘zoom’ transition to it so it zooms away, the second title I have added a ‘smear’ transition to it , so it smears of the screen, this is then when all of the text is not visible on screen.
- 8. Leeanne Hibbert This image is just showing what my time line looks like. The ‘Zoom up of sign’ piece of movie clip is what I added a few moments after adding my first piece of film, I have added this as it shows a nice close zoom up of the Cheadle campus sign which is just near the entrance gates of the college. The blocks that are circled on the image are the two titles which I spoke about previously and these start just before the ‘walk up to college’ clips and finish just before we enter the college grounds in the clip. I have now just uploaded to the media folder of premiere elements the last video clip that we filmed. This clip is of a present creative media student speaking about the course and its advantages that it brings.
- 9. Leeanne Hibbert As you can see from the timeline of the video now I have added the short clip of the student’s interview into it. I have also added a title which will be on the screen the same time as the interview clip but will be taken of the screen before the clip ends. This is the clip of a student speaking about the creative media course, as you can see I have now added a title in blue on the bottom left hand side.
- 10. Leeanne Hibbert As you can see I have also added a title page. This title has text which is about the different facilities that our college provides. As you can see from my timeline I have now added 5 images of places around college to my video. The gaps in between these images are also transitions that I have added. The transitions I have used for this is both the ‘swing in’ and the ‘swing out’ transitions.
- 11. Leeanne Hibbert After viewing how the video was up to I noticed that the clip of the current creative media student speaking was very quiet so we decided to film this clip again, this did mean I had to delete the clip that was in the video at the moment but this will be replaced with the new clip so it is not a problem. I have now filmed another clip of a student going on about the Cheadle College itself and just explaining a few of the advantages. It has now been uploaded to my premiere elements media folder.
- 12. Leeanne Hibbert I have now added titles to the images of places around college. This is showing one of the ICT rooms in Cheadle College. So I have added a title to tell the viewers this. This image is of the creative media book section in the library, again I have added a title to show this.
- 13. Leeanne Hibbert This image is showing the Hub which is a place to relax in between lessons. So I have added a title to say that this a place to chill out. This is an image of the library at Cheadle College. I have added a title to tell the viewers this.
- 14. Leeanne Hibbert This is an image of the refectory in Cheadle College. I have titled it as the refectory and also a place to hang out. I have also changed one of the titles that is at the very beginning of the video, this is because it just said originally ‘welcome to the Cheadle campus, creative media course’. I thought that it may sound better if it says ‘This video is all about the creative media course’ as it sounds more structured together.
- 15. Leeanne Hibbert I have now added a title page which explains a bit about the creative media course & what a student can achieve. This is placed at the start of the video just after the fast paced walk into college. I have now added the new movie clip into my time line. I have also added a title to this video and as you can see it is placed at the bottom left of the clip and it says ‘present creative media student’.
- 16. Leeanne Hibbert I have now added some more text to the title about the creative media course, this just says ‘Here is a present creative media student to tell you about the course’ this is just because after this title then follows the clip of a creative media student. The two rectangles squared are 2 new transitions that I have just added to the timeline. The first one is placed between the title page about the creative media course and the interview with a present creative media student. The second transition is placed between again the interview with a present creative media student and the title page about places for students to go around Cheadle College. The first transition used is named ‘curtain’ and the second transition used is named ‘tumble away’.
- 17. Leeanne Hibbert Now at the end of the video I have added a title which includes the Cheadle campus address so people know where to find us. I have now added an image of the official Cheadle and marple sixth form logo. This starts around 30 seconds into the video and then stays throughout. The logo is placed at the top left hand side of the page.
- 18. Leeanne Hibbert I have now added the audio in which is the metro station shake it instrumental, I have made it so that the song fades in at the beginning and then fades out at the end. I have cut a part of the song as it was too long and carried on when my video had ended, now it finishes at a few seconds after my video but it all works perfectly together. This is the clip of Lewis the present creative media student speaking about the course, As you can see I have changed the clip volume to the maximum, I also made the audio fade here and go quiet so that you can hear Lewis’s voice more, but once he stops speaking the music then plays louder again.
- 19. Leeanne Hibbert This print screen is showing me in the process just about to export my final video. It will be a PAL DVD Standard and it will be saved within my area in a folder named ‘Final Video’. I have named the video Final Promotional Video. This print screen is showing the video being saved and exported.
- 20. Leeanne Hibbert My video has now been exported and I can play it as an MPG file. My video is 1 minute and 47 seconds long.