SlideShare una empresa de Scribd logo
1 de 25
Descargar para leer sin conexión
1.       Scenario: Create a new delivery process by adding “process-significant”
         method content elements (e.g., roles, tasks, steps, work products) to an
         existing delivery process

     In this scenario, you will create a new delivery process by adding “process-significant” method
     content elements (e.g., roles, tasks, steps, work products) to an existing delivery process. Some
     elements will be new elements and others will be customizations of existing elements. “Process-
     significant” means that the method content elements directly affect in processes. This scenario is the
     “structured” plug-in scenario from Rational Process Workbench days.


     Context: In this scenario, you want to create a process that enhances the RUP’s “Classic RUP”
     delivery process around Services Oriented Architecture (SOA), specifically in the area of SOA
     implementation. You would like to add a new work product, service implementation, as well as add
     tasks to produce and consume this new work product, and a role that is responsible for the new work
     product.
     You take a look at the content provided by RUP and the new RUP plug-in for SOA (rup_soa_plug-
     in). As it turns out, there are several method content elements that you can use. Specifically, you
     decide to add a new work artifact, Service Implementation, and add responsibility for this artifact to
     the Role: Implementer. Rather than create a new task to produce the new artifact you decide to add
     the work product as an output to the existing Task: Implement Design Elements (internal name
     name: implement_components). To produce this work product, a new input artifact needs to be
     added to this task, Artifact: SOA Service Model. Thus, you add that work product as an input to the
     Task: Implement Component. Last but not least, you add a new Task: Test Service that will
     consume the Artifact: Service Implementation and produce the Work Product: Test Log. The
     following diagram summarizes the method content element changes you would like to make.


                                                                                               Page 1 of 25
Objectives: The following are the objectives of this scenario:
   •   To create new “process-significant” method content elements and to refine other “process-
       significant” elements using variability, and to add those elements to an existing delivery process.
   •   To create a customized view in the published Web site that shows the new elements
   When to use: This scenario is appropriate when there is an existing delivery process that is close to
   what you want, but you want to add some method content elements to the process.
   Results: The results of this scenario are:
       •   A plug-in containing the “process-significant” method content elements and the new delivery
           process that contains the new elements. The plug-in may also include contributing method
           content elements (for adding work products to tasks, roles to tasks, work products to roles,
           etc.), as well as custom categories for categorizing the content for reference or publishing
           (specifically custom categories that define navigation views). Depending on the number and
           complexity of the added method content elements, the plug-in may also include capability
           patterns that show how the new elements are included in a process.
       •   A configuration that includes the new plug-in and all other plug-ins that support the new
           delivery process.


We will complete this scenario in a series of exercises, where each exercise demonstrates a key method
authoring feature of RMC:
   •   Exercise 1: Creating and Categorizing Method Content Elements
   •   Exercise 2: Creating Processes Using Method Content Elements
   •   Exercise 3: Creating Navigation Views
   •   Exercise 4: Viewing Your Results


                                                                                              Page 2 of 25
1.1       Exercise 1: Creating and Categorizing Method Content Elements
In this exercise, we will create the desired method content elements, including their variability
relationships. We will also categorize the created method content elements to standard categories.

The results of this exercise will be used as input to the next exercise.

Approximate completion time: 45 minutes

Steps:
      1. Make sure you have the RMC tool opened and the Method Library loaded. Make also sure you
         are in the Authoring perspective.


      2. Create a new plug-in to contain the new elements.
              a. Select File >New->Method Plug-in.
              b. On the New Method Plug-in window, type rup_soa_implementation as the new plug-in
                 name, and in the Referenced Plug-ins section, select the plug-ins this depends on: rup
                 and rup_soa_plug-in.
              c. Click Finish. You can ignore the errors in the Configuration Error Log and close it.


      3. Create a new content package to contain the new elements.
              a. In Authoring perspective, Library view, expand the rup_soa_implementation plug-in,
                 then expand Method Content package until you reach Content Packages package.
              b. Right-click on Content Package, then select New > Content Package.
              c. In the new Content Package window, type its name: soa_implementation.
              d. Select File > Save All.
              e. Select File > Close All.


      Now we will create the new method content elements. Use the figure provided earlier in the scenario
      description as a guide to establish relationships between the method content elements to be added to
      the plug-in.
      4. Create the new work product, service_implementation.
              a. In the Authoring perspective, Library View, and in the soa_implemention package of
                 the new plug-in, right-click on the Work Products folder, and select New > Artifact.
              b. In the new artifact window, in the Description tab, type its Name:
                 service_implementation, and its Presentation name: Service Implementation.
              c. Enter some text into the Brief Description field. For example, for Brief Description you
                 could enter, “This work product represents the implementation of a service.
              d. Click on the Categories tab.
              e. Map the service_implementation work product to the Implementation domain by
                  clicking the          button in the Domain section and then selecting
                  rup>rup_domains > implementation. Click OK.
                  It is strongly recommended that all work products be mapped to a domain.

                                                                                              Page 3 of 25
f.   Map the service_implementation work product to the Solution work product kind by
             clicking the           button in the Work Product Kind section and then selecting
             rup>solution. Click OK.
             It is strongly recommended that all work products be mapped to at least one work product
             kind.
        g. Select File>Save All.


5. Add the responsibility for the new work product, service_implementation, to an existing role,
   rup_implementer. In RMC, to add responsibility for a work product to a role, you must create
   another role that contributes to the role you want to add to.
        a. Right-click on the Roles folder, and select New->Role.
        b. In the new role window, type its Name: rup_implementer_soa. Leave its Presentation
           Name blank since it will be a contributing role (delete the text New Role).
        c. Scroll down to the Content Variability section.
        d. As Variability type, select Contributes.

        e. To select a Base task, click          button. In the Select Dialog for Tasks window,
           expand or collapse sections for your convenience. Expand rup plug-in, Implementation
           package and select the rup_implementer role.
        f.   Click on the Work Products tab of the role editor.


        g. Click the            button and expand all (   )or collapse all (  ) sections for your
           convenience until the new work product, service_implementation, in the
           rup_soa_implementation plug-in is displayed.

        h. Select the work product, service_implementation, and click the                  button.
        i.   Click OK.


6. Add the new work product, service_implementation, as an output work product to the task,
   implement_component.
   In RMC to add a work product to a task, you must define a task that contributes to the task that
   you want to add the work product to, and then add the work product to the contributing task.
        a. Right-click on Tasks folder, and select New > Task.
        b. In the new Task window, type its name: implement_component_soa. Leave its
           Presentation name blank (delete the text New Task).
        c. Scroll down to the Content Variability section.
        d. As Variability type, select Contributes.

        e. To select a Base task, click          button. In the Select Dialog for Tasks window,
           expand or collapse sections for your convenience. Expand rup plug-in, Implementation
           package and select the implement_component task.
        f.   Click on the Work Products tab.


                                                                                         Page 4 of 25
g. In the Outputs section, click the            button and expand and elide the contents of
           the dialog box until the new work product, service_implementation, in the
           rup_soa_implementation plug-in is displayed.
        h. Select the work product, service_implementation, and click OK.
        i.   Click OK.
        j.   Click File>Save All.


7. Add an input work product to the implement_components task.
   In RMC to add a work product to a task, you must define a task that contributes to the task that
   you want to add the work product to, and then add the work product to the contributing task.
        a. If implement_component_soa task window is not open, double-click the respective task
           on the tree-browser.
        b. In the task editor window, go to Work Products tab and select the artifact that is used as

             input by this task, by clicking the         button, right beside Mandatory inputs field.
        c. On the Select Dialog for Work Products window, expand or collapse all sections for
           your convenience. Expand rup_soa_plugin, then Service-Oriented Architecture (SOA)
           package, then select soa_service_model artifact.

        d. Click                 .


8. Add a new step to the implement_component task.
   In RMC to add a step to a task, you must define a task that contributes to the task that you want
   to add the step to, and then add the step to the contributing task.
        a. If implement_component_sao task window is not open, double-click the respective task
           on the tree-browser.

        b. Select the Steps tab, click             button.
        c. Add an Implement Service step.
        d. Open the Rich-Text Editor (RTE) editor for the new step by clicking on the icon to the left

             of the Description field name.
        e. Enter the following text: “Implement the service as specified in the”.
        f.   Then add a hyperlink to the input work product, soa_service_model. You can do this by

             clicking on the insert link icon (     ) at the top of the RTE.
        g. Select Method Element with type prefix as the link type and then click the Browse
           button to select the soa_service_model work product from the rup_soa_plugin.
        h. Click OK. The link is added.
           Tip: An alternative way to add the hyperlink is to locate the element
           (soa_service_model) in the Library view (in rup_soa_plugin > Method Content >
           Content Packages > Service-Oriented Architecture (SOA) > Work Products, then
           drag and drop the element into the RTE. Rational Method Composer will automatically
           create a hyperlink on the dragged element.

                                                                                             Page 5 of 25
i.   Close the RTE by clicking on the icon again.
        j.   Select File>Save All.


9. Create a new task, test_service, that is performed by the new contributing role,
   rup_implementer_soa, and that takes the new work product, service_implementation, as an
   input work product and the existing RUP work product, rup_test_log, as an output work product.
        a. Right-click on Tasks folder, and select New > Task.
        b. In the new Task window, enter test_service as its Name and Test Service as its
           Presentation name. Enter the following as its Brief Description: “This task tests a
           service and records the results in the test log.”
        c. Click on the Roles tab.

        d. In the Primary Performer section, click the             button and expand and elide the
           contents of the dialog box until the new contributing role, rup_implementer_soa, in the
           rup_soa_implementation plug-in is displayed.
        e. Select the role, rup_implementer_soa, and click OK.
        f.   Click on the Work Products tab.

        g. In the Mandatory Inputs section, click the             button and expand and elide the
           contents of the dialog box until the new work product, service_implementation, in the
           rup_soa_implementation plug-in is displayed.
        h. Select the work product, service_implementation, and click OK.

        i.   In the Outputs section, click the            button and expand and elide the contents of
             the dialog box until the existing work product, rup_test_log, in the rup plug-in under
             Assessment>Test is displayed.
             Tip: Try using the Name patterns search here: Under Name patterns, start typing in
             “rup_test_log”. Notice the search immediately begins as you type in each character.
        j.   Select the work product, rup_test_log, and click OK.

        k. Select Steps tab, click         button.
        l.   Add 3 steps: Prepare Test Environment, Perform Test and Evaluate Results.
        m. (OPTIONAL, only if there is time) Click on Description for each step and type any simple
           text only for test purposes.
        n. Map the test_service task to the Implementation discipline
             •   Click on the Categories tab.

             •   Click the       button in the Domain section and then selecting rup >
                 rup_implementation_discipline.
             •   Click OK.
                 It is strongly recommended that all tasks be mapped to a domain.
        o. Click File>Save All.


                                                                                          Page 6 of 25
1.2 Exercise 2: Creating Processes Using Method Content Elements
In this exercise, we will create processes using the method content elements created in Exercise 1:
Creating and Categorizing Method Content Elements. As noted in the scenario description, the delivery
process to be created will be based on RUP’s “Classic RUP” delivery process.

The results of this exercise will be used as input to the next exercise.

Approximate completion time: 60 minutes

Steps:
Before creating a process, you need to define a configuration that will include the elements that will be
included in the process. That configuration will serve as the default configuration for the processes to be
created.
In this scenario, since we know what delivery process we would like to add the method content elements
to (“Classic RUP”), rather than creating a configuration from scratch, we can take a short-cut and copy the
default configuration for that delivery process as a starting point.
    1. Determine what the default configuration is for the “Classic RUP” delivery process (the delivery
       process that you want to refine)
            a. In the Authoring perspective, go to the Library tree-browser and expand rup plug-in,
               then expand Processes.
            b. Expand the Delivery Processes folder, then double-click on the classic_rup delivery
               process.
            c. On the process editor, go to the Description tab.
            d. Scroll down to the Configuration section. You should see the Classic RUP (for large
               projects) configuration listed as the default configuration, as shown in the following
               screen shot:


    2. Copy the Classic RUP (for large projects) configuration and name it.

            a. Make sure you are in the Authoring perspective.                  should be visible in the
               upper right corner
            b. In the Library view, expand the Configurations folder.
            c.   Right-click the Classic RUP (for large projects) configuration and select Copy.
            d. In the Library view, right-click the Configurations folder and select Paste. Enter
               Classic RUP with SOA Implementation. This will create a new configuration.


                                                                                               Page 7 of 25
e. Double-click the name of the new configuration. In the editor window of your new
           configuration, make sure you are in the Description tab (bottom left).
        f.   Go to the Brief Description box and replace the existing text with the following: “This
             configuration is designed for large projects. It recreates the RUP configuration that has
             been delivered over the years, with the addition of Service-Oriented Architecture
             implementation content.”

        g. Go to File->Save All or click on the        button


3. Add the new plug-in to the configuration.
        a. If you have browsed away from your configuration in the library, then double-click
           Classic RUP with SOA Implementation configuration in your library view.
        b. At the bottom of the editor window, click the Plug-in and Package Selection tab to open
           the Configuration Content dialog.
        c.   In the Content section, check the box next to the rup_soa_implementation plug-in to
             select its content.
             Note: A Configuration Error Log may appear. You can ignore it and close it.
        d. Select File->Save All.


4. Browse the configuration to make sure all changes are visible.
        a. Go to the configuration selection box in the top middle of the interface. In the drop-down
           window, select the Classic RUP with SOA Implementation configuration

             (                                           ).

        b. Select the                button on the upper-right of the interface. If the

                          button isn’t showing, click the Open Perspective (       ) button, then select
                          from the drop-down list.
        c.   Expand Roles Sets->Roles->Developers and click on Implementer Role. This will show
             Implementer role in the Content window.
        d. Note that Implementer role now has a new artifact called Service Implementation.
        e. Back to Implementer role; note that there are some changes in one of the tasks. Click on
           Implement Design Elements task (aka the Implement Component task) and note that
           this task has a new output (Service Implementation artifact).

        f.   Press the back ( ) button on upper right corner of the content window. Note that the
             Implementer role now has a new task called Test Service.


Now that we have a configuration that includes our new method content elements, we can turn our
attention to the creation of processes that contain the new elements. We start by creating process
patterns that we can then use to create delivery processes. While the creation of capability patterns
before creating delivery processes is not required, it is strongly recommended, as it makes it very
easy to see where your new method content elements fit into a process and makes it easier to
include those method content elements in delivery processes (remember, the same capability
patterns cab be used in multiple places in a delivery process – e.g., different iterations).

                                                                                             Page 8 of 25
One specific capability pattern that we recommend is a discipline workflow. When you add or change
a task, it is customary to create a new discipline capability pattern that includes the task changes and
then add that capability pattern as a reference workflow for the discipline (remember, tasks are
categorized into disciplines).


In this example, we added input and output work products to an existing task
(implement_component_soa) and added a new task (test_service) that was mapped to the RUP
Implementation discipline. Thus, we will create a new Implementation discipline capability pattern
that includes these task changes and then add the new capability pattern as a reference workflow to
the RUP Implementation discipline. Rather than start from scratch, we will create the new
Implementation discipline capability pattern by copying RUP’s Implementation capability pattern.
This is to just safe time because if we copy we won’t have to re-draw the entire activity diagram for
the capability pattern.
5. Create a new implementation_discipline_soa capability pattern by copying RUP’s
   Implementation capability pattern.
        a. In the Authoring perspective, go to the Library tree-browser and expand rup plug-in.
        b. Expand the Processes > Capability Patterns > Discipline Workflows folder.
        c. Right-click on the implementation_discipline capability pattern and select Copy.
        d. In the Authoring perspective, go to the Library tree-browser and expand the
           rup_soa_implementation plug-in and expand the Processes folder.
        e. Right-click the Capability Patterns folder and select Paste. The
           implementation_discipline capability pattern is copied into your plug-in.
        f.   Double-click the new capability pattern and it is displayed in the editor window, make
             sure you are in the Description tab (bottom left). In the Switch Configuration popup

             dialog, click            . You can also close the Properties (                       )
             view.
        g. Go to the Name box and type implementation_soa.
        h. Go to the Presentation Name box and type “Implementation with SOA”.
        i.   Go to the Brief Description box and type “This capability is the RUP Implementation
             discipline workflow with additional SOA implementation content.”

6. Change the default configuration of the new capability pattern to the new configuration (Classic
   RUP with SOA Implementation).
        a. Scroll down to the Configuration section. Change the default configuration of the new
           delivery process to the new configuration, Classic RUP with SOA Implementation.


             •   Click the              button and then select the new configuration from the list in
                 the dialog and click OK. The selected configuration is displayed in the list in the
                 editor window.

             •   Select the new configuration and click the               button.

        b. Go to File->Save All or click on the       button.
        c.   Close the Configuration Error Log if it is open.

                                                                                           Page 9 of 25
7. Add the new task (test_service) to the new discipline capability pattern
   (implementation_discipline_soa).
   Adding elements to processes can be done by dragging and dropping from the Authoring
   perspective, Configuration view. To do this, the process’s configuration must be displayed in the
   Configuration view.
           a. Make sure that the new configuration (Classic RUP with SOA Implementation) is
              displayed in the Configuration view by selecting the new configuration from the
              drop-down list at the top of the RMC window.

                (                                            ).
           b. If the new capability pattern is not open in the editor, open it by double-clicking on its
              name in the Library View.
           c.   Click on the Work Breakdown Structure tab at the bottom of the editor.
           d. In the Authoring perspective, Configuration view, expand Disciplines>RUP
              Disciplines>Implementation. You should see the new Test Service task, as shown
              in the following screen shot:


           e. Drag and drop the new task (Test Service) from the Authoring perspective >
              Configuration view to the Implement Components activity in the new
              Implementation discipline capability pattern. A descriptor for the test_service task is
              added to the Implement Components activity.


                                                                                           Page 10 of 25
f.   Move the added Test Service task descriptor up so it appears after the Execute
                Developer Tests task descriptor by right-licking the task descriptor and selecting
                Move Up. The result is shown in the following screen shot:


           Note: No process diagrams need to be created/refined as a result of these updates since
           we only changed task descriptors within an activity and the recommendation is to NOT
           create activity diagrams for activities that just contain tasks (i.e., there is not an activity
           diagram for the Implement Components activity). Instead, let RMC generate an Activity
           Detail Diagram (ADD) for you during publishing. Specifically, if you check the


                                                                                  option) on the
           publishing options dialog box, then RMC will automatically generate one during
           publishing if you have not explicitly created one (if you have created one, the one you
           created is published). This option can also be set in your RMC preferences (Windows >
           Preferences > Method Authoring > Diagram).


8. Refresh the new discipline capability pattern (implementation_discipline_soa) with the task
   changes included in the new plug-in (the new input and output work products for the Implement
   Components task.
           a. Open the new capability pattern by double-clicking on its name in the Library View.
           b. Click on the Work Breakdown Structure tab.
           c.   Right click on the Implement Components activity (this is the activity that contains
                the Implement Design Elements task descriptor, which is the task descriptor for the
                implement_components task, which we modified).
           d. Select Default Synchronization from Method Content as shown in the following
              screen shot:


                                                                                           Page 11 of 25
Click OK for all displayed dialog boxes.
All task descriptors in this activity that have been requested to be synchronized (the
default for all created task descriptors) will be updated with information about the source
element, based on the current configuration. For our example, this means the updates to
the Implement Design Elements task descriptor.
Now we will confirm that the Implement Design Elements task descriptor was
synchronized.
e. Right-click the Implement Design Elements task descriptor in the Implement
   Components activity in the implementation discipline capability pattern..
f.   Select Show Properties View.
g. Click on the Work Products section. You should see the new input and output work
   products as shown in the following screen shot


                                                                             Page 12 of 25
9. Browse the other process views to confirm that the new work products were added automatically
   as a result of updating the tasks.
       a. Click on the Consolidated View tab.


                                                                                    Page 13 of 25
b. Expand Implementation with SOA > Implement Components. You should see
   something similar to the following:


   Notice the appearance of the new input and output work products for the new and refined
   tasks.


                                                                             Page 14 of 25
10. Add the new capability pattern as a reference workflow to the contributing discipline standard
    category that was automatically created in the new plug-in when the new task was mapped to the
    Implementation discipline.
        a. In the Authoring perspective, go to the Library tree-browser and expand
           rup_soa_implementation plug-in until you see the contributing standard category in
           Method Content > Standard Categories > Disciplines, as shown in the following
           screen shot:


        b. Double-click the contributing implementation discipline standard category and the custom
           category editor window opens.
        c.   Click on the Reference Workflow tab.


        d. Click on the               button.
        e. Select the new discipline capability pattern you created (implementation_soa).
        f.   Click OK.
        g. Click File>Save All.


Now that we have capability patterns created that include the new method content elements, we can
turn our attention to creating the delivery process we need. As you may recall, we intend to refine the
Classic RUP delivery process to include the SOA implementation content. Thus, instead of starting
from scratch, we will create the new delivery process by copying the process to be refined (the
classic_rup delivery process), changing the default configuration for the new process to our new
configuration that includes the plug-in that includes the new content and then refining that process to
reuse content from the new implementation discipline capability pattern.
11. Create the new delivery process by copying the process to be refined (the classic_rup delivery
    process).
        a. In the Authoring perspective, go to the Library tree-browser and expand rup plug-in.
        b. Expand the Processes folder and then expand the Delivery Processes folder.
        c. Right-click on the classic_rup delivery process and select Copy.
        d. In the Authoring perspective, go to the Library tree-browser and expand the
           rup_soa_implementation plug-in and expand the Processes folder.
        e. Right-click the Delivery Processes folder and select Paste. The classic_rup delivery
           process is copied into your plug-in.
        f.   Double-click to new delivery process and in the displayed editor window, make sure you
             are in the Description tab (bottom left).


                                                                                         Page 15 of 25
g. Go to the Name box and type classic_rup_with_soa_implementation. Click OK in the
           Rename dialog prompt.
        h. Go to the Presentation Name box and type Classic RUP with SOA Implementation.
        i.   Go to the Brief Description box and type “This delivery process is the Classic RUP
             Delivery Process with additional SOA implementation content.”

        j.   Select File->Save All or click on the     button.


12. Change the default configuration of the new delivery process to the new configuration, Classic
    RUP with SOA Implementation.
        a. Scroll down to the Configuration section in the Description tab of the new delivery
           process (Classic RUP with SOA Implementation).


        b. Click the               button and then select the new configuration (Classic RUP with
           SOA Implementation) from the list in the dialog and click OK. The selected
           configuration is displayed in the list in the editor window.

        c.   Select the new configuration and click the               button.

        d. Select File->Save All or click on the       button.


13. Browse the new delivery process to see where you want to make changes.
    In this example, we made our changes to implementation tasks (specifically, we added a new
    task, test_service, and changed a task, implement_component. Thus, we need to find were
    those tasks appear in the delivery process we want to refine (classic_rup).
        e. Click on the Work Breakdown Structure tab of the new delivery process
           (classic_rup_with_soa_implementation).
        f.   Expand Classic RUP with SOA Implementation > Elaboration > Elaboration Iteration
             [n] > Develop Components [within Scope]. You should see an activity called
             Implement Components that looks a lot like the same-named activity in our updated
             discipline capability pattern. As it turns out, it is exactly the same (the activity in the
             original RUP delivery process extends the discipline activity
             (

             ) and we modified the discipline activity. Thus, for our delivery process, we just need to
             replace the RUP extending activity (Implement Components) with our own activity that
             extends the new discipline activity that includes the new method content elements.


14. Replace the Implement Components activity in the delivery process with the new Implement
    Components activity that we created in our new Implementation with SOA capability pattern.
    To replace an activity, the activity that contains that activity must be edit-able. Currently, the
    Develop Components [within Scope] activity is not editable (it is green), so before we can
    change the activity we have to make it editable.
        a. Right-click the Develop Components [within Scope] activity and select Local
           Contribution. The activity turns from green to black and is now editable.


                                                                                           Page 16 of 25
b. Expand Develop Components [within Scope] and suppress the current Implement
           Components activity by right-clicking it and selecting Suppress. The activity name
           should turn from green to grey.
        c.   Drag and drop the Implement Components activity from the new Implementation with
             SOA capability pattern we created earlier to the Classic RUP with SOA Implementation
             > Elaboration > Elaboration Iteration [n] > Develop Components [within Scope]
             activity                    and                       select                 Extend.

             Remember to drag and drop the activity from the Authoring perspective >
             Configuration view, where the configuration view contains the new configuration,
             Classic RUP with SOA Implementation. The activity to drag and drop is shown in the
             following screen shot:


             A new Implement Components activity is added to the Implement Components
             activity Develop Components [within Scope] activity.


15. Since we have changed the activities of the Develop Components [within Scope] activity, we
    need to refine its activity diagram. Specifically, we need to include the new activity in the right
    place in the diagram with the right links.
        a. Right-click the Develop Components [within Scope] activity and select Diagrams >
           Open Activity Diagram. An activity diagram is displayed that includes the new
           Implement Components activity at the top left corner, but it is not attached to anything.


                                                                                           Page 17 of 25
b. Using the Pallet to the right of the diagram workspace (                       ) to refine the
   activity diagram to include the new activity (if the palette is not displayed, click on the
   triangle near the word “Palette”). The result should look like the following screen shot:


                                                                                     Page 18 of 25
The above steps should be repeated for each occurrence of the Implement Components activity in the
delivery process. As it turns out, this activity appears in several places in the delivery process (in the
Construction iteration and the Transition iteration), as shown in the following screen shot.


Thus, this exercise is an excellent example of using a capability patter to build a process!


                                                                                               Page 19 of 25
1.3       Exercise 3: Creating Navigation Views
In this exercise, we will create a navigation view in the plug-in created in Exercise 1: Creating and
Categorizing Method Content Elements to provide access to the method content elements created in
Exercise 1: Creating and Categorizing Method Content Elements and the processes created in Exercise
2: Creating Processes Using Method Content Elements in a published web site.

In RMC, navigation views are created by creating a custom category that includes the content you would
like to be included in the name of the view. The Presentation Name of the custom category becomes
the name of the tab in the published Web site, and the contents of the custom category become the
contents of the view.
The results of this exercise will be used as input to the next exercise.

Approximate completion time: 15 minutes

Steps:
      1. Create the custom category that will represent the navigation view:
              a. In the Authoring perspective, go to the Library tree-browser and expand the
                 rup_soa_implementation plug-in.
              b. Go to the Method Content > Custom Categories and right-click select New > Custom
                 Category.
              c. For the Name field enter soa_implementation_view and for the Presentation Name
                 field enter SOA Implementation.


      2. Add the new method content elements and processes to the navigation view:
              a. Go to the Assign tab of the Custom Category editor.

              b. Use the           button to add the following elements (use the collapse and expand


                  buttons (              , as needed).

                  Tip: Press the Control key to multi-select.

                  Note: Base elements should be added to the navigation view, not contributing elements
                  (if you add contributing elements, they will not appear in the published Web site).
                  •   The new delivery process: rup_soa_implementation > Processes > Delivery
                      Processes > classic_rup_with_soa_implementation.
                  •   The new implementation discipline workflow: rup_soa_implementation >
                      Processes > Capability Patterns > implementation_discipline_soa.
                  •   The new work product: rup_soa_implementation > soa_implementation >
                      service_implementation.
                  •   The refined role: rup > Implementation > rup_implementer (the base element is
                      included in the custom category)
                  •   The refined task: rup > Implementation implement_component (the base element
                      is included in the custom category)


                                                                                            Page 20 of 25
•   The new task: rup_soa_implementation > soa_implementation > test_service

       c. Select and click on                or      to reorder, as necessary.

       d. Click               . You should now see your selection listed, as shown in the following
          screen shot:


       e. Select File->Save All.


3. Add the new view (the new soa_implementation_view custom category) to the new
   configuration (Classic RUP with SOA Implementation) and make it the default view for the
   configuration.
       a. Double-click on your Classic RUP with SOA Implementation under the Configurations
          folder in the Library view.
       b. Go to the Views tab.

       c.   Click the              button.
       d. Select soa_implementation_view from the Custom Categories folder.
          Tip: Click Collapse All first, then expand.

       e. Click               .
       f.   Make your soa_implementation_view the default view, by selecting it and clicking the

                         button.
       g. Select File > Save All.
       h. Select File > Close All.


                                                                                       Page 21 of 25
1.4       Exercise 4: Viewing Your Results
In this exercise, we will review the results of our method authoring activities.

In RMC, there are two primary ways to view method authoring results – browsing and publishing.
Browsing is a nice way to preview the results of publishing without having to wait for the publish operation
to complete (which can sometimes take a while). However, browsing does not show the navigation
views, so you will still need to publish to confirm those, but with browsing you can still validate the all
variability relationships are working as intended.

In this exercise, we will browse and publish the configuration initially created in Exercise 2: Creating
Processes Using Method Content Elements.


1.4.1     Browsing the Configuration
In this part of the exercise, we will browse the configuration and specifically look at the elements that we
created/customized in the earlier exercise.

Approximate completion time: 10 minutes

Steps:
      1. Make sure the configuration created in Exercise 2: Creating Processes Using Method Content
         Elements is selected in the drop down list at the top right of the user interface

          (                                         ).

      2. Switch to the Browsing perspective by clicking the Open Perspective (        ) button and then
          selecting            from the drop-down list. The contents of the Classic RUP with SOA
          Implementation configuration should be displayed in the Configuration view (remember, the
          Browsing perspective only contains the Configuration view).
      3. Confirm that the following results appear in the configuration:
              a. Capability Pattern: Implementation with SOA includes an activity called Implement
                 Components (Processes> Capability Patterns > Implementation with SOA >
                 Implement Components)that includes:
                      •   Task: Implement Design Elements that has a Work Product: Service Model
                          as a mandatory input work product and a Work Product: Service
                          Implementation as an output work product
                      •   Task: Test Service that has Work Product: Service Implementation as a
                          mandatory input work product and Work Product: Test Log as an output work
                          product
              b. Delivery Process: Classic RUP with SOA Implementation includes a phase called
                 Elaboration that includes an activity called Elaboration Iteration [n] that includes an
                 activity called Develop Components [within scope] that includes an activity called
                 Implement Components (Processes> Delivery Processes > Classic RUP with SOA
                 Implementation > Elaboration > Elaboration Iteration [n] > Develop Components
                 [within scope] > Implement Components) that includes:
                      •   Task: Implement Design Elements that has a Work Product: Service Model
                          as a mandatory input work product and a Work Product: Service
                          Implementation as an output work product


                                                                                                Page 22 of 25
•   Task: Test Service that has Work Product: Service Implementation as a
                          mandatory input work product and Work Product: Test Log as an output work
                          product
             c.   Artifact: Service Implementation is in the Implementation domain (Domains > RUP
                  Domains > Implementation > Service Implementation)
             d. Artifact: Service Implementation should be the responsibility of the Role: Implementer
                (look in the Responsible Role field of Domains > RUP Domains > Implementation >
                Service Implementation)
             e. Artifact: Service Implementation should be output from the Task: Implement Design
                Elements (look in the Output From field of Domains > RUP Domains >
                Implementation > Service Implementation)
             f.   Role: Implementer should be responsible for the Artifact: Service Implementation
                  (look in the Relationships section of Role Sets > Roles > Developers > Implementer).
             g. Role: Implementer should perform the Task: Implement Design Elements and the
                Task: Test Service (look in the Relationships section of Role Sets > Roles >
                Developers > Implementer)
             h. Task: Implement Design Elements should have Work Product: Service Model as a
                mandatory input work product (look at the Inputs field, Mandatory section of Disciplines
                > RUP Disciplines > Implementation > Implement Design Elements)
             i.   Task: Implement Design Elements should output Work Product: Service
                  Implementation (look at the Outputs field of Disciplines > RUP Disciplines >
                  Implementation > Implement Design Elements)
             j.   Task: Implement Design Elements should output Work Product: Service
                  Implementation (look at the Outputs field of Disciplines > RUP Disciplines >
                  Implementation > Implement Design Elements)
             k.   Task: Test Service should have Work Product: Service Implementation as a
                  mandatory input work product (look at the Inputs field, Mandatory section of Disciplines
                  > RUP Disciplines > Implementation > Test Service)
             l.   Task: Test Service should have Work Product: Test Log as an output work product
                  (look at the Outputs field of Disciplines > RUP Disciplines > Implementation > Test
                  Service)

1.4.2    Publishing the Configuration
In this part of the exercise, we will publish the configuration and review the published web site, specifically
look at the elements that we created/customized in the earlier exercise.

Approximate completion time: 20 minutes (9 minutes publish time plus confirmation)

Note for Users of VMware RMC Environment: A folder named
rup_soa_implementation_prepublished is available on your desktop containing the published pages.
You do not have to perform this publishing step.

Steps:
    1. Publish the new configuration.
             a. Go to your desktop and create a new folder called
                rup_soa_implementation_published.


                                                                                                Page 23 of 25
b. In RMC, click Configuration > Publish.
        c.   Select the Classic RUP with SOA Implementation configuration.
        d. Click Next.
        e. Uncheck the Use default path checkbox. Click the Browse button and browse and
           select the new rup_soa_implementation_published folder.
        f.   Change Title to Classic RUP with SOA Implementation.
        g. Check the option to have RMC create ADD diagrams (we want to see our new and
           refined tasks in the capability pattern).


        h.   Leave all other default selections.

        i.   Click               . The configuration is published and the resulting Web site will be
             displayed, along with a publishing report that links to the publish logs (the logs are placed
             in the publish directory in a logs subdirectory)


2. Confirm that the following results appear in the published web site:
        a. There is a navigation view called, SOA Implementation that contains the following
           elements:
                 •   Delivery Process: Classic RUP with SOA Implementation
                 •   Capability Pattern: Implementation with SOA
                 •   Work Product: Service Implementation
                 •   Role: Implementer
                 •   Task: Implement Design Elements
                 •   Task: Test Service
        b. Capability Pattern: Implementation with SOA includes an activity called Implement
           Components that includes:
                 •   Task: Implement Design Elements that has a Work Product: Service Model
                     as a mandatory input work product and a Work Product: Service
                     Implementation as an output work product
                 •   Task: Test Service that has Work Product: Service Implementation as a
                     mandatory input work product and Work Product: Test Log as an output work
        c.   Delivery Process: Classic RUP with SOA Implementation includes a phase called
             Elaboration that includes an activity called Elaboration Iteration [n] that includes an
             activity called Develop Components [within scope] that includes an activity called
             Implement Components that includes:
                 •   Task: Implement Design Elements that has a Work Product: Service Model
                     as a mandatory input work product and a Work Product: Service
                     Implementation as an output work product


                                                                                            Page 24 of 25
•   Task: Test Service that has Work Product: Service Implementation as a
             mandatory input work product and Work Product: Test Log as an output work
             product
d. Artifact: Service Implementation is the responsibility of the Role: Implementer (look in
   the Roles > Responsible field of the artifact page).
e. Artifact: Service Implementation should be output from the Task: Implement
   Component (look in the Tasks > Output From field of the artifact page).
f.   Role: Implementer should be responsible for the Artifact: Service Implementation
     (look in the Relationships section field of the role page)
g. Role: Implementer should perform the Task: Implement Design Elements and the
   Task: Test Service (look in the Relationships field of the role page).
h. Task: Implement Design Elements should have Work Product: SOA Service Model
   as a mandatory input work product (look at the Inputs > Mandatory field of the task
   page)
i.   Task: Implement Design Elements should output Work Product: Service
     Implementation (look at the Outputs field of the task page)
j.   Task: Test Service should have Work Product: Service Implementation as a
     mandatory input work product (look at the Inputs > Mandatory field of the task page)
k.   Task: Test Service should have Work Product: Test Log as an output work product
     (look at the Outputs field of the task page)


                                                                               Page 25 of 25

Más contenido relacionado

Destacado (13)

RUP
RUPRUP
RUP
 
Process
ProcessProcess
Process
 
Rup
RupRup
Rup
 
Rational unified processing
Rational unified processingRational unified processing
Rational unified processing
 
PM - RUP
PM - RUPPM - RUP
PM - RUP
 
An overview of software development methodologies.
An overview of software development methodologies.An overview of software development methodologies.
An overview of software development methodologies.
 
Rup
RupRup
Rup
 
RUP In A Nutshell Slide Share
RUP In A Nutshell Slide ShareRUP In A Nutshell Slide Share
RUP In A Nutshell Slide Share
 
Rational Unified Process(Rup)
Rational Unified Process(Rup)Rational Unified Process(Rup)
Rational Unified Process(Rup)
 
Agile Process Introduction
Agile Process IntroductionAgile Process Introduction
Agile Process Introduction
 
Presentation - Rational Unified Process
Presentation - Rational Unified ProcessPresentation - Rational Unified Process
Presentation - Rational Unified Process
 
Rational Unified Process
Rational Unified ProcessRational Unified Process
Rational Unified Process
 
RUP model
RUP modelRUP model
RUP model
 

Similar a RUP - aula prática 9 e 10

Dolibarr - What's new 3.9 and 4.0 (english)
Dolibarr - What's new 3.9 and 4.0 (english)Dolibarr - What's new 3.9 and 4.0 (english)
Dolibarr - What's new 3.9 and 4.0 (english)Laurent Destailleur
 
IMPACT/myGrid Hackathon - Introduction to Taverna
IMPACT/myGrid Hackathon - Introduction to TavernaIMPACT/myGrid Hackathon - Introduction to Taverna
IMPACT/myGrid Hackathon - Introduction to TavernaIMPACT Centre of Competence
 
Upgrading SLFE from 2007 to 2010
Upgrading SLFE from 2007 to 2010Upgrading SLFE from 2007 to 2010
Upgrading SLFE from 2007 to 2010KWizCom Team
 
Getting started with workflow
Getting started with workflowGetting started with workflow
Getting started with workflowseenu126
 
Ms project 2000 tutorial
Ms project 2000 tutorialMs project 2000 tutorial
Ms project 2000 tutorialpaolocollector
 
Qtp interview questions and answers
Qtp interview questions and answersQtp interview questions and answers
Qtp interview questions and answersRamu Palanki
 
Qtp interview questions and answers
Qtp interview questions and answersQtp interview questions and answers
Qtp interview questions and answersRamu Palanki
 
Comp 220 ilab 6 of 7
Comp 220 ilab 6 of 7Comp 220 ilab 6 of 7
Comp 220 ilab 6 of 7ashhadiqbal
 
What are the features in qtp
What are the features in qtpWhat are the features in qtp
What are the features in qtpRamu Palanki
 
Creating Repository & Project area and exploring the project area in Rational...
Creating Repository & Project area and exploring the project area in Rational...Creating Repository & Project area and exploring the project area in Rational...
Creating Repository & Project area and exploring the project area in Rational...Bharat Malge
 
Oracle User Productiviy Kit
Oracle User Productiviy KitOracle User Productiviy Kit
Oracle User Productiviy KitLarry Sherrod
 
Creating an nuget package for EPiServer
Creating an nuget package for EPiServerCreating an nuget package for EPiServer
Creating an nuget package for EPiServerPaul Graham
 
Bpc 10.0 NW Mass User Management tool
Bpc 10.0 NW Mass User Management toolBpc 10.0 NW Mass User Management tool
Bpc 10.0 NW Mass User Management toolShanmugam Veerichetty
 

Similar a RUP - aula prática 9 e 10 (20)

Dolibarr - What's new 3.9 and 4.0 (english)
Dolibarr - What's new 3.9 and 4.0 (english)Dolibarr - What's new 3.9 and 4.0 (english)
Dolibarr - What's new 3.9 and 4.0 (english)
 
IMPACT/myGrid Hackathon - Introduction to Taverna
IMPACT/myGrid Hackathon - Introduction to TavernaIMPACT/myGrid Hackathon - Introduction to Taverna
IMPACT/myGrid Hackathon - Introduction to Taverna
 
Upgrading SLFE from 2007 to 2010
Upgrading SLFE from 2007 to 2010Upgrading SLFE from 2007 to 2010
Upgrading SLFE from 2007 to 2010
 
Learning Robotic Process Automation-81-167
Learning Robotic Process Automation-81-167Learning Robotic Process Automation-81-167
Learning Robotic Process Automation-81-167
 
Getting started with workflow
Getting started with workflowGetting started with workflow
Getting started with workflow
 
Ms project 2000 tutorial
Ms project 2000 tutorialMs project 2000 tutorial
Ms project 2000 tutorial
 
RTC_Tutorial_Scrum
RTC_Tutorial_ScrumRTC_Tutorial_Scrum
RTC_Tutorial_Scrum
 
RTC (Rational Team Concert) with Scrum Framework
RTC (Rational Team Concert) with Scrum FrameworkRTC (Rational Team Concert) with Scrum Framework
RTC (Rational Team Concert) with Scrum Framework
 
MS Project Guide.pdf
MS Project Guide.pdfMS Project Guide.pdf
MS Project Guide.pdf
 
Qtp interview questions and answers
Qtp interview questions and answersQtp interview questions and answers
Qtp interview questions and answers
 
Qtp interview questions and answers
Qtp interview questions and answersQtp interview questions and answers
Qtp interview questions and answers
 
Mca 504 dotnet_unit5
Mca 504 dotnet_unit5Mca 504 dotnet_unit5
Mca 504 dotnet_unit5
 
Comp 220 ilab 6 of 7
Comp 220 ilab 6 of 7Comp 220 ilab 6 of 7
Comp 220 ilab 6 of 7
 
What are the features in qtp
What are the features in qtpWhat are the features in qtp
What are the features in qtp
 
Lab3 RTC Source Control
Lab3 RTC Source ControlLab3 RTC Source Control
Lab3 RTC Source Control
 
Creating Repository & Project area and exploring the project area in Rational...
Creating Repository & Project area and exploring the project area in Rational...Creating Repository & Project area and exploring the project area in Rational...
Creating Repository & Project area and exploring the project area in Rational...
 
Oracle User Productiviy Kit
Oracle User Productiviy KitOracle User Productiviy Kit
Oracle User Productiviy Kit
 
Login methodology for Primavera V8.3 (EPPM)
Login methodology for Primavera V8.3 (EPPM)Login methodology for Primavera V8.3 (EPPM)
Login methodology for Primavera V8.3 (EPPM)
 
Creating an nuget package for EPiServer
Creating an nuget package for EPiServerCreating an nuget package for EPiServer
Creating an nuget package for EPiServer
 
Bpc 10.0 NW Mass User Management tool
Bpc 10.0 NW Mass User Management toolBpc 10.0 NW Mass User Management tool
Bpc 10.0 NW Mass User Management tool
 

Más de Luís Fernando Richter (20)

Por que o projeto Cidade Interativa 3D?
Por que o projeto Cidade Interativa 3D?Por que o projeto Cidade Interativa 3D?
Por que o projeto Cidade Interativa 3D?
 
2012
20122012
2012
 
Desapego fantástico
Desapego fantásticoDesapego fantástico
Desapego fantástico
 
Codigos Arcturianos Crop Circles
Codigos Arcturianos Crop CirclesCodigos Arcturianos Crop Circles
Codigos Arcturianos Crop Circles
 
Qual é o seu tamanho
Qual é o seu tamanhoQual é o seu tamanho
Qual é o seu tamanho
 
Mutantes Deepak Chopra
Mutantes Deepak ChopraMutantes Deepak Chopra
Mutantes Deepak Chopra
 
Vidapassageira
VidapassageiraVidapassageira
Vidapassageira
 
Se não quiser adoecer
Se não quiser adoecerSe não quiser adoecer
Se não quiser adoecer
 
035 o nosso poder vem de dentro
035 o nosso poder vem de dentro035 o nosso poder vem de dentro
035 o nosso poder vem de dentro
 
O Efeito Isaias
O Efeito IsaiasO Efeito Isaias
O Efeito Isaias
 
Seja um idiota
Seja um idiotaSeja um idiota
Seja um idiota
 
As coisas boas da vida
As coisas boas da vidaAs coisas boas da vida
As coisas boas da vida
 
Bem Bolado
Bem BoladoBem Bolado
Bem Bolado
 
My way
My wayMy way
My way
 
Desempregado
DesempregadoDesempregado
Desempregado
 
Atritos
AtritosAtritos
Atritos
 
Israel e Palestina
Israel e PalestinaIsrael e Palestina
Israel e Palestina
 
Carne de Vitela
Carne de VitelaCarne de Vitela
Carne de Vitela
 
Codigo de ética
Codigo de éticaCodigo de ética
Codigo de ética
 
Sawabona Shikoba
Sawabona ShikobaSawabona Shikoba
Sawabona Shikoba
 

Último

Designing IA for AI - Information Architecture Conference 2024
Designing IA for AI - Information Architecture Conference 2024Designing IA for AI - Information Architecture Conference 2024
Designing IA for AI - Information Architecture Conference 2024Enterprise Knowledge
 
Gen AI in Business - Global Trends Report 2024.pdf
Gen AI in Business - Global Trends Report 2024.pdfGen AI in Business - Global Trends Report 2024.pdf
Gen AI in Business - Global Trends Report 2024.pdfAddepto
 
Commit 2024 - Secret Management made easy
Commit 2024 - Secret Management made easyCommit 2024 - Secret Management made easy
Commit 2024 - Secret Management made easyAlfredo García Lavilla
 
Advanced Test Driven-Development @ php[tek] 2024
Advanced Test Driven-Development @ php[tek] 2024Advanced Test Driven-Development @ php[tek] 2024
Advanced Test Driven-Development @ php[tek] 2024Scott Keck-Warren
 
Artificial intelligence in cctv survelliance.pptx
Artificial intelligence in cctv survelliance.pptxArtificial intelligence in cctv survelliance.pptx
Artificial intelligence in cctv survelliance.pptxhariprasad279825
 
"Debugging python applications inside k8s environment", Andrii Soldatenko
"Debugging python applications inside k8s environment", Andrii Soldatenko"Debugging python applications inside k8s environment", Andrii Soldatenko
"Debugging python applications inside k8s environment", Andrii SoldatenkoFwdays
 
Merck Moving Beyond Passwords: FIDO Paris Seminar.pptx
Merck Moving Beyond Passwords: FIDO Paris Seminar.pptxMerck Moving Beyond Passwords: FIDO Paris Seminar.pptx
Merck Moving Beyond Passwords: FIDO Paris Seminar.pptxLoriGlavin3
 
"ML in Production",Oleksandr Bagan
"ML in Production",Oleksandr Bagan"ML in Production",Oleksandr Bagan
"ML in Production",Oleksandr BaganFwdays
 
Unraveling Multimodality with Large Language Models.pdf
Unraveling Multimodality with Large Language Models.pdfUnraveling Multimodality with Large Language Models.pdf
Unraveling Multimodality with Large Language Models.pdfAlex Barbosa Coqueiro
 
What's New in Teams Calling, Meetings and Devices March 2024
What's New in Teams Calling, Meetings and Devices March 2024What's New in Teams Calling, Meetings and Devices March 2024
What's New in Teams Calling, Meetings and Devices March 2024Stephanie Beckett
 
Powerpoint exploring the locations used in television show Time Clash
Powerpoint exploring the locations used in television show Time ClashPowerpoint exploring the locations used in television show Time Clash
Powerpoint exploring the locations used in television show Time Clashcharlottematthew16
 
TrustArc Webinar - How to Build Consumer Trust Through Data Privacy
TrustArc Webinar - How to Build Consumer Trust Through Data PrivacyTrustArc Webinar - How to Build Consumer Trust Through Data Privacy
TrustArc Webinar - How to Build Consumer Trust Through Data PrivacyTrustArc
 
Human Factors of XR: Using Human Factors to Design XR Systems
Human Factors of XR: Using Human Factors to Design XR SystemsHuman Factors of XR: Using Human Factors to Design XR Systems
Human Factors of XR: Using Human Factors to Design XR SystemsMark Billinghurst
 
"Subclassing and Composition – A Pythonic Tour of Trade-Offs", Hynek Schlawack
"Subclassing and Composition – A Pythonic Tour of Trade-Offs", Hynek Schlawack"Subclassing and Composition – A Pythonic Tour of Trade-Offs", Hynek Schlawack
"Subclassing and Composition – A Pythonic Tour of Trade-Offs", Hynek SchlawackFwdays
 
Nell’iperspazio con Rocket: il Framework Web di Rust!
Nell’iperspazio con Rocket: il Framework Web di Rust!Nell’iperspazio con Rocket: il Framework Web di Rust!
Nell’iperspazio con Rocket: il Framework Web di Rust!Commit University
 
Ensuring Technical Readiness For Copilot in Microsoft 365
Ensuring Technical Readiness For Copilot in Microsoft 365Ensuring Technical Readiness For Copilot in Microsoft 365
Ensuring Technical Readiness For Copilot in Microsoft 3652toLead Limited
 
Connect Wave/ connectwave Pitch Deck Presentation
Connect Wave/ connectwave Pitch Deck PresentationConnect Wave/ connectwave Pitch Deck Presentation
Connect Wave/ connectwave Pitch Deck PresentationSlibray Presentation
 
Scanning the Internet for External Cloud Exposures via SSL Certs
Scanning the Internet for External Cloud Exposures via SSL CertsScanning the Internet for External Cloud Exposures via SSL Certs
Scanning the Internet for External Cloud Exposures via SSL CertsRizwan Syed
 
Vertex AI Gemini Prompt Engineering Tips
Vertex AI Gemini Prompt Engineering TipsVertex AI Gemini Prompt Engineering Tips
Vertex AI Gemini Prompt Engineering TipsMiki Katsuragi
 

Último (20)

Designing IA for AI - Information Architecture Conference 2024
Designing IA for AI - Information Architecture Conference 2024Designing IA for AI - Information Architecture Conference 2024
Designing IA for AI - Information Architecture Conference 2024
 
DMCC Future of Trade Web3 - Special Edition
DMCC Future of Trade Web3 - Special EditionDMCC Future of Trade Web3 - Special Edition
DMCC Future of Trade Web3 - Special Edition
 
Gen AI in Business - Global Trends Report 2024.pdf
Gen AI in Business - Global Trends Report 2024.pdfGen AI in Business - Global Trends Report 2024.pdf
Gen AI in Business - Global Trends Report 2024.pdf
 
Commit 2024 - Secret Management made easy
Commit 2024 - Secret Management made easyCommit 2024 - Secret Management made easy
Commit 2024 - Secret Management made easy
 
Advanced Test Driven-Development @ php[tek] 2024
Advanced Test Driven-Development @ php[tek] 2024Advanced Test Driven-Development @ php[tek] 2024
Advanced Test Driven-Development @ php[tek] 2024
 
Artificial intelligence in cctv survelliance.pptx
Artificial intelligence in cctv survelliance.pptxArtificial intelligence in cctv survelliance.pptx
Artificial intelligence in cctv survelliance.pptx
 
"Debugging python applications inside k8s environment", Andrii Soldatenko
"Debugging python applications inside k8s environment", Andrii Soldatenko"Debugging python applications inside k8s environment", Andrii Soldatenko
"Debugging python applications inside k8s environment", Andrii Soldatenko
 
Merck Moving Beyond Passwords: FIDO Paris Seminar.pptx
Merck Moving Beyond Passwords: FIDO Paris Seminar.pptxMerck Moving Beyond Passwords: FIDO Paris Seminar.pptx
Merck Moving Beyond Passwords: FIDO Paris Seminar.pptx
 
"ML in Production",Oleksandr Bagan
"ML in Production",Oleksandr Bagan"ML in Production",Oleksandr Bagan
"ML in Production",Oleksandr Bagan
 
Unraveling Multimodality with Large Language Models.pdf
Unraveling Multimodality with Large Language Models.pdfUnraveling Multimodality with Large Language Models.pdf
Unraveling Multimodality with Large Language Models.pdf
 
What's New in Teams Calling, Meetings and Devices March 2024
What's New in Teams Calling, Meetings and Devices March 2024What's New in Teams Calling, Meetings and Devices March 2024
What's New in Teams Calling, Meetings and Devices March 2024
 
Powerpoint exploring the locations used in television show Time Clash
Powerpoint exploring the locations used in television show Time ClashPowerpoint exploring the locations used in television show Time Clash
Powerpoint exploring the locations used in television show Time Clash
 
TrustArc Webinar - How to Build Consumer Trust Through Data Privacy
TrustArc Webinar - How to Build Consumer Trust Through Data PrivacyTrustArc Webinar - How to Build Consumer Trust Through Data Privacy
TrustArc Webinar - How to Build Consumer Trust Through Data Privacy
 
Human Factors of XR: Using Human Factors to Design XR Systems
Human Factors of XR: Using Human Factors to Design XR SystemsHuman Factors of XR: Using Human Factors to Design XR Systems
Human Factors of XR: Using Human Factors to Design XR Systems
 
"Subclassing and Composition – A Pythonic Tour of Trade-Offs", Hynek Schlawack
"Subclassing and Composition – A Pythonic Tour of Trade-Offs", Hynek Schlawack"Subclassing and Composition – A Pythonic Tour of Trade-Offs", Hynek Schlawack
"Subclassing and Composition – A Pythonic Tour of Trade-Offs", Hynek Schlawack
 
Nell’iperspazio con Rocket: il Framework Web di Rust!
Nell’iperspazio con Rocket: il Framework Web di Rust!Nell’iperspazio con Rocket: il Framework Web di Rust!
Nell’iperspazio con Rocket: il Framework Web di Rust!
 
Ensuring Technical Readiness For Copilot in Microsoft 365
Ensuring Technical Readiness For Copilot in Microsoft 365Ensuring Technical Readiness For Copilot in Microsoft 365
Ensuring Technical Readiness For Copilot in Microsoft 365
 
Connect Wave/ connectwave Pitch Deck Presentation
Connect Wave/ connectwave Pitch Deck PresentationConnect Wave/ connectwave Pitch Deck Presentation
Connect Wave/ connectwave Pitch Deck Presentation
 
Scanning the Internet for External Cloud Exposures via SSL Certs
Scanning the Internet for External Cloud Exposures via SSL CertsScanning the Internet for External Cloud Exposures via SSL Certs
Scanning the Internet for External Cloud Exposures via SSL Certs
 
Vertex AI Gemini Prompt Engineering Tips
Vertex AI Gemini Prompt Engineering TipsVertex AI Gemini Prompt Engineering Tips
Vertex AI Gemini Prompt Engineering Tips
 

RUP - aula prática 9 e 10

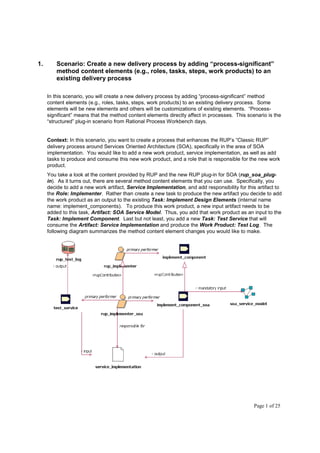
  • 1. 1. Scenario: Create a new delivery process by adding “process-significant” method content elements (e.g., roles, tasks, steps, work products) to an existing delivery process In this scenario, you will create a new delivery process by adding “process-significant” method content elements (e.g., roles, tasks, steps, work products) to an existing delivery process. Some elements will be new elements and others will be customizations of existing elements. “Process- significant” means that the method content elements directly affect in processes. This scenario is the “structured” plug-in scenario from Rational Process Workbench days. Context: In this scenario, you want to create a process that enhances the RUP’s “Classic RUP” delivery process around Services Oriented Architecture (SOA), specifically in the area of SOA implementation. You would like to add a new work product, service implementation, as well as add tasks to produce and consume this new work product, and a role that is responsible for the new work product. You take a look at the content provided by RUP and the new RUP plug-in for SOA (rup_soa_plug- in). As it turns out, there are several method content elements that you can use. Specifically, you decide to add a new work artifact, Service Implementation, and add responsibility for this artifact to the Role: Implementer. Rather than create a new task to produce the new artifact you decide to add the work product as an output to the existing Task: Implement Design Elements (internal name name: implement_components). To produce this work product, a new input artifact needs to be added to this task, Artifact: SOA Service Model. Thus, you add that work product as an input to the Task: Implement Component. Last but not least, you add a new Task: Test Service that will consume the Artifact: Service Implementation and produce the Work Product: Test Log. The following diagram summarizes the method content element changes you would like to make. Page 1 of 25
  • 2. Objectives: The following are the objectives of this scenario: • To create new “process-significant” method content elements and to refine other “process- significant” elements using variability, and to add those elements to an existing delivery process. • To create a customized view in the published Web site that shows the new elements When to use: This scenario is appropriate when there is an existing delivery process that is close to what you want, but you want to add some method content elements to the process. Results: The results of this scenario are: • A plug-in containing the “process-significant” method content elements and the new delivery process that contains the new elements. The plug-in may also include contributing method content elements (for adding work products to tasks, roles to tasks, work products to roles, etc.), as well as custom categories for categorizing the content for reference or publishing (specifically custom categories that define navigation views). Depending on the number and complexity of the added method content elements, the plug-in may also include capability patterns that show how the new elements are included in a process. • A configuration that includes the new plug-in and all other plug-ins that support the new delivery process. We will complete this scenario in a series of exercises, where each exercise demonstrates a key method authoring feature of RMC: • Exercise 1: Creating and Categorizing Method Content Elements • Exercise 2: Creating Processes Using Method Content Elements • Exercise 3: Creating Navigation Views • Exercise 4: Viewing Your Results Page 2 of 25
  • 3. 1.1 Exercise 1: Creating and Categorizing Method Content Elements In this exercise, we will create the desired method content elements, including their variability relationships. We will also categorize the created method content elements to standard categories. The results of this exercise will be used as input to the next exercise. Approximate completion time: 45 minutes Steps: 1. Make sure you have the RMC tool opened and the Method Library loaded. Make also sure you are in the Authoring perspective. 2. Create a new plug-in to contain the new elements. a. Select File >New->Method Plug-in. b. On the New Method Plug-in window, type rup_soa_implementation as the new plug-in name, and in the Referenced Plug-ins section, select the plug-ins this depends on: rup and rup_soa_plug-in. c. Click Finish. You can ignore the errors in the Configuration Error Log and close it. 3. Create a new content package to contain the new elements. a. In Authoring perspective, Library view, expand the rup_soa_implementation plug-in, then expand Method Content package until you reach Content Packages package. b. Right-click on Content Package, then select New > Content Package. c. In the new Content Package window, type its name: soa_implementation. d. Select File > Save All. e. Select File > Close All. Now we will create the new method content elements. Use the figure provided earlier in the scenario description as a guide to establish relationships between the method content elements to be added to the plug-in. 4. Create the new work product, service_implementation. a. In the Authoring perspective, Library View, and in the soa_implemention package of the new plug-in, right-click on the Work Products folder, and select New > Artifact. b. In the new artifact window, in the Description tab, type its Name: service_implementation, and its Presentation name: Service Implementation. c. Enter some text into the Brief Description field. For example, for Brief Description you could enter, “This work product represents the implementation of a service. d. Click on the Categories tab. e. Map the service_implementation work product to the Implementation domain by clicking the button in the Domain section and then selecting rup>rup_domains > implementation. Click OK. It is strongly recommended that all work products be mapped to a domain. Page 3 of 25
  • 4. f. Map the service_implementation work product to the Solution work product kind by clicking the button in the Work Product Kind section and then selecting rup>solution. Click OK. It is strongly recommended that all work products be mapped to at least one work product kind. g. Select File>Save All. 5. Add the responsibility for the new work product, service_implementation, to an existing role, rup_implementer. In RMC, to add responsibility for a work product to a role, you must create another role that contributes to the role you want to add to. a. Right-click on the Roles folder, and select New->Role. b. In the new role window, type its Name: rup_implementer_soa. Leave its Presentation Name blank since it will be a contributing role (delete the text New Role). c. Scroll down to the Content Variability section. d. As Variability type, select Contributes. e. To select a Base task, click button. In the Select Dialog for Tasks window, expand or collapse sections for your convenience. Expand rup plug-in, Implementation package and select the rup_implementer role. f. Click on the Work Products tab of the role editor. g. Click the button and expand all ( )or collapse all ( ) sections for your convenience until the new work product, service_implementation, in the rup_soa_implementation plug-in is displayed. h. Select the work product, service_implementation, and click the button. i. Click OK. 6. Add the new work product, service_implementation, as an output work product to the task, implement_component. In RMC to add a work product to a task, you must define a task that contributes to the task that you want to add the work product to, and then add the work product to the contributing task. a. Right-click on Tasks folder, and select New > Task. b. In the new Task window, type its name: implement_component_soa. Leave its Presentation name blank (delete the text New Task). c. Scroll down to the Content Variability section. d. As Variability type, select Contributes. e. To select a Base task, click button. In the Select Dialog for Tasks window, expand or collapse sections for your convenience. Expand rup plug-in, Implementation package and select the implement_component task. f. Click on the Work Products tab. Page 4 of 25
  • 5. g. In the Outputs section, click the button and expand and elide the contents of the dialog box until the new work product, service_implementation, in the rup_soa_implementation plug-in is displayed. h. Select the work product, service_implementation, and click OK. i. Click OK. j. Click File>Save All. 7. Add an input work product to the implement_components task. In RMC to add a work product to a task, you must define a task that contributes to the task that you want to add the work product to, and then add the work product to the contributing task. a. If implement_component_soa task window is not open, double-click the respective task on the tree-browser. b. In the task editor window, go to Work Products tab and select the artifact that is used as input by this task, by clicking the button, right beside Mandatory inputs field. c. On the Select Dialog for Work Products window, expand or collapse all sections for your convenience. Expand rup_soa_plugin, then Service-Oriented Architecture (SOA) package, then select soa_service_model artifact. d. Click . 8. Add a new step to the implement_component task. In RMC to add a step to a task, you must define a task that contributes to the task that you want to add the step to, and then add the step to the contributing task. a. If implement_component_sao task window is not open, double-click the respective task on the tree-browser. b. Select the Steps tab, click button. c. Add an Implement Service step. d. Open the Rich-Text Editor (RTE) editor for the new step by clicking on the icon to the left of the Description field name. e. Enter the following text: “Implement the service as specified in the”. f. Then add a hyperlink to the input work product, soa_service_model. You can do this by clicking on the insert link icon ( ) at the top of the RTE. g. Select Method Element with type prefix as the link type and then click the Browse button to select the soa_service_model work product from the rup_soa_plugin. h. Click OK. The link is added. Tip: An alternative way to add the hyperlink is to locate the element (soa_service_model) in the Library view (in rup_soa_plugin > Method Content > Content Packages > Service-Oriented Architecture (SOA) > Work Products, then drag and drop the element into the RTE. Rational Method Composer will automatically create a hyperlink on the dragged element. Page 5 of 25
  • 6. i. Close the RTE by clicking on the icon again. j. Select File>Save All. 9. Create a new task, test_service, that is performed by the new contributing role, rup_implementer_soa, and that takes the new work product, service_implementation, as an input work product and the existing RUP work product, rup_test_log, as an output work product. a. Right-click on Tasks folder, and select New > Task. b. In the new Task window, enter test_service as its Name and Test Service as its Presentation name. Enter the following as its Brief Description: “This task tests a service and records the results in the test log.” c. Click on the Roles tab. d. In the Primary Performer section, click the button and expand and elide the contents of the dialog box until the new contributing role, rup_implementer_soa, in the rup_soa_implementation plug-in is displayed. e. Select the role, rup_implementer_soa, and click OK. f. Click on the Work Products tab. g. In the Mandatory Inputs section, click the button and expand and elide the contents of the dialog box until the new work product, service_implementation, in the rup_soa_implementation plug-in is displayed. h. Select the work product, service_implementation, and click OK. i. In the Outputs section, click the button and expand and elide the contents of the dialog box until the existing work product, rup_test_log, in the rup plug-in under Assessment>Test is displayed. Tip: Try using the Name patterns search here: Under Name patterns, start typing in “rup_test_log”. Notice the search immediately begins as you type in each character. j. Select the work product, rup_test_log, and click OK. k. Select Steps tab, click button. l. Add 3 steps: Prepare Test Environment, Perform Test and Evaluate Results. m. (OPTIONAL, only if there is time) Click on Description for each step and type any simple text only for test purposes. n. Map the test_service task to the Implementation discipline • Click on the Categories tab. • Click the button in the Domain section and then selecting rup > rup_implementation_discipline. • Click OK. It is strongly recommended that all tasks be mapped to a domain. o. Click File>Save All. Page 6 of 25
  • 7. 1.2 Exercise 2: Creating Processes Using Method Content Elements In this exercise, we will create processes using the method content elements created in Exercise 1: Creating and Categorizing Method Content Elements. As noted in the scenario description, the delivery process to be created will be based on RUP’s “Classic RUP” delivery process. The results of this exercise will be used as input to the next exercise. Approximate completion time: 60 minutes Steps: Before creating a process, you need to define a configuration that will include the elements that will be included in the process. That configuration will serve as the default configuration for the processes to be created. In this scenario, since we know what delivery process we would like to add the method content elements to (“Classic RUP”), rather than creating a configuration from scratch, we can take a short-cut and copy the default configuration for that delivery process as a starting point. 1. Determine what the default configuration is for the “Classic RUP” delivery process (the delivery process that you want to refine) a. In the Authoring perspective, go to the Library tree-browser and expand rup plug-in, then expand Processes. b. Expand the Delivery Processes folder, then double-click on the classic_rup delivery process. c. On the process editor, go to the Description tab. d. Scroll down to the Configuration section. You should see the Classic RUP (for large projects) configuration listed as the default configuration, as shown in the following screen shot: 2. Copy the Classic RUP (for large projects) configuration and name it. a. Make sure you are in the Authoring perspective. should be visible in the upper right corner b. In the Library view, expand the Configurations folder. c. Right-click the Classic RUP (for large projects) configuration and select Copy. d. In the Library view, right-click the Configurations folder and select Paste. Enter Classic RUP with SOA Implementation. This will create a new configuration. Page 7 of 25
  • 8. e. Double-click the name of the new configuration. In the editor window of your new configuration, make sure you are in the Description tab (bottom left). f. Go to the Brief Description box and replace the existing text with the following: “This configuration is designed for large projects. It recreates the RUP configuration that has been delivered over the years, with the addition of Service-Oriented Architecture implementation content.” g. Go to File->Save All or click on the button 3. Add the new plug-in to the configuration. a. If you have browsed away from your configuration in the library, then double-click Classic RUP with SOA Implementation configuration in your library view. b. At the bottom of the editor window, click the Plug-in and Package Selection tab to open the Configuration Content dialog. c. In the Content section, check the box next to the rup_soa_implementation plug-in to select its content. Note: A Configuration Error Log may appear. You can ignore it and close it. d. Select File->Save All. 4. Browse the configuration to make sure all changes are visible. a. Go to the configuration selection box in the top middle of the interface. In the drop-down window, select the Classic RUP with SOA Implementation configuration ( ). b. Select the button on the upper-right of the interface. If the button isn’t showing, click the Open Perspective ( ) button, then select from the drop-down list. c. Expand Roles Sets->Roles->Developers and click on Implementer Role. This will show Implementer role in the Content window. d. Note that Implementer role now has a new artifact called Service Implementation. e. Back to Implementer role; note that there are some changes in one of the tasks. Click on Implement Design Elements task (aka the Implement Component task) and note that this task has a new output (Service Implementation artifact). f. Press the back ( ) button on upper right corner of the content window. Note that the Implementer role now has a new task called Test Service. Now that we have a configuration that includes our new method content elements, we can turn our attention to the creation of processes that contain the new elements. We start by creating process patterns that we can then use to create delivery processes. While the creation of capability patterns before creating delivery processes is not required, it is strongly recommended, as it makes it very easy to see where your new method content elements fit into a process and makes it easier to include those method content elements in delivery processes (remember, the same capability patterns cab be used in multiple places in a delivery process – e.g., different iterations). Page 8 of 25
  • 9. One specific capability pattern that we recommend is a discipline workflow. When you add or change a task, it is customary to create a new discipline capability pattern that includes the task changes and then add that capability pattern as a reference workflow for the discipline (remember, tasks are categorized into disciplines). In this example, we added input and output work products to an existing task (implement_component_soa) and added a new task (test_service) that was mapped to the RUP Implementation discipline. Thus, we will create a new Implementation discipline capability pattern that includes these task changes and then add the new capability pattern as a reference workflow to the RUP Implementation discipline. Rather than start from scratch, we will create the new Implementation discipline capability pattern by copying RUP’s Implementation capability pattern. This is to just safe time because if we copy we won’t have to re-draw the entire activity diagram for the capability pattern. 5. Create a new implementation_discipline_soa capability pattern by copying RUP’s Implementation capability pattern. a. In the Authoring perspective, go to the Library tree-browser and expand rup plug-in. b. Expand the Processes > Capability Patterns > Discipline Workflows folder. c. Right-click on the implementation_discipline capability pattern and select Copy. d. In the Authoring perspective, go to the Library tree-browser and expand the rup_soa_implementation plug-in and expand the Processes folder. e. Right-click the Capability Patterns folder and select Paste. The implementation_discipline capability pattern is copied into your plug-in. f. Double-click the new capability pattern and it is displayed in the editor window, make sure you are in the Description tab (bottom left). In the Switch Configuration popup dialog, click . You can also close the Properties ( ) view. g. Go to the Name box and type implementation_soa. h. Go to the Presentation Name box and type “Implementation with SOA”. i. Go to the Brief Description box and type “This capability is the RUP Implementation discipline workflow with additional SOA implementation content.” 6. Change the default configuration of the new capability pattern to the new configuration (Classic RUP with SOA Implementation). a. Scroll down to the Configuration section. Change the default configuration of the new delivery process to the new configuration, Classic RUP with SOA Implementation. • Click the button and then select the new configuration from the list in the dialog and click OK. The selected configuration is displayed in the list in the editor window. • Select the new configuration and click the button. b. Go to File->Save All or click on the button. c. Close the Configuration Error Log if it is open. Page 9 of 25
  • 10. 7. Add the new task (test_service) to the new discipline capability pattern (implementation_discipline_soa). Adding elements to processes can be done by dragging and dropping from the Authoring perspective, Configuration view. To do this, the process’s configuration must be displayed in the Configuration view. a. Make sure that the new configuration (Classic RUP with SOA Implementation) is displayed in the Configuration view by selecting the new configuration from the drop-down list at the top of the RMC window. ( ). b. If the new capability pattern is not open in the editor, open it by double-clicking on its name in the Library View. c. Click on the Work Breakdown Structure tab at the bottom of the editor. d. In the Authoring perspective, Configuration view, expand Disciplines>RUP Disciplines>Implementation. You should see the new Test Service task, as shown in the following screen shot: e. Drag and drop the new task (Test Service) from the Authoring perspective > Configuration view to the Implement Components activity in the new Implementation discipline capability pattern. A descriptor for the test_service task is added to the Implement Components activity. Page 10 of 25
  • 11. f. Move the added Test Service task descriptor up so it appears after the Execute Developer Tests task descriptor by right-licking the task descriptor and selecting Move Up. The result is shown in the following screen shot: Note: No process diagrams need to be created/refined as a result of these updates since we only changed task descriptors within an activity and the recommendation is to NOT create activity diagrams for activities that just contain tasks (i.e., there is not an activity diagram for the Implement Components activity). Instead, let RMC generate an Activity Detail Diagram (ADD) for you during publishing. Specifically, if you check the option) on the publishing options dialog box, then RMC will automatically generate one during publishing if you have not explicitly created one (if you have created one, the one you created is published). This option can also be set in your RMC preferences (Windows > Preferences > Method Authoring > Diagram). 8. Refresh the new discipline capability pattern (implementation_discipline_soa) with the task changes included in the new plug-in (the new input and output work products for the Implement Components task. a. Open the new capability pattern by double-clicking on its name in the Library View. b. Click on the Work Breakdown Structure tab. c. Right click on the Implement Components activity (this is the activity that contains the Implement Design Elements task descriptor, which is the task descriptor for the implement_components task, which we modified). d. Select Default Synchronization from Method Content as shown in the following screen shot: Page 11 of 25
  • 12. Click OK for all displayed dialog boxes. All task descriptors in this activity that have been requested to be synchronized (the default for all created task descriptors) will be updated with information about the source element, based on the current configuration. For our example, this means the updates to the Implement Design Elements task descriptor. Now we will confirm that the Implement Design Elements task descriptor was synchronized. e. Right-click the Implement Design Elements task descriptor in the Implement Components activity in the implementation discipline capability pattern.. f. Select Show Properties View. g. Click on the Work Products section. You should see the new input and output work products as shown in the following screen shot Page 12 of 25
  • 13. 9. Browse the other process views to confirm that the new work products were added automatically as a result of updating the tasks. a. Click on the Consolidated View tab. Page 13 of 25
  • 14. b. Expand Implementation with SOA > Implement Components. You should see something similar to the following: Notice the appearance of the new input and output work products for the new and refined tasks. Page 14 of 25
  • 15. 10. Add the new capability pattern as a reference workflow to the contributing discipline standard category that was automatically created in the new plug-in when the new task was mapped to the Implementation discipline. a. In the Authoring perspective, go to the Library tree-browser and expand rup_soa_implementation plug-in until you see the contributing standard category in Method Content > Standard Categories > Disciplines, as shown in the following screen shot: b. Double-click the contributing implementation discipline standard category and the custom category editor window opens. c. Click on the Reference Workflow tab. d. Click on the button. e. Select the new discipline capability pattern you created (implementation_soa). f. Click OK. g. Click File>Save All. Now that we have capability patterns created that include the new method content elements, we can turn our attention to creating the delivery process we need. As you may recall, we intend to refine the Classic RUP delivery process to include the SOA implementation content. Thus, instead of starting from scratch, we will create the new delivery process by copying the process to be refined (the classic_rup delivery process), changing the default configuration for the new process to our new configuration that includes the plug-in that includes the new content and then refining that process to reuse content from the new implementation discipline capability pattern. 11. Create the new delivery process by copying the process to be refined (the classic_rup delivery process). a. In the Authoring perspective, go to the Library tree-browser and expand rup plug-in. b. Expand the Processes folder and then expand the Delivery Processes folder. c. Right-click on the classic_rup delivery process and select Copy. d. In the Authoring perspective, go to the Library tree-browser and expand the rup_soa_implementation plug-in and expand the Processes folder. e. Right-click the Delivery Processes folder and select Paste. The classic_rup delivery process is copied into your plug-in. f. Double-click to new delivery process and in the displayed editor window, make sure you are in the Description tab (bottom left). Page 15 of 25
  • 16. g. Go to the Name box and type classic_rup_with_soa_implementation. Click OK in the Rename dialog prompt. h. Go to the Presentation Name box and type Classic RUP with SOA Implementation. i. Go to the Brief Description box and type “This delivery process is the Classic RUP Delivery Process with additional SOA implementation content.” j. Select File->Save All or click on the button. 12. Change the default configuration of the new delivery process to the new configuration, Classic RUP with SOA Implementation. a. Scroll down to the Configuration section in the Description tab of the new delivery process (Classic RUP with SOA Implementation). b. Click the button and then select the new configuration (Classic RUP with SOA Implementation) from the list in the dialog and click OK. The selected configuration is displayed in the list in the editor window. c. Select the new configuration and click the button. d. Select File->Save All or click on the button. 13. Browse the new delivery process to see where you want to make changes. In this example, we made our changes to implementation tasks (specifically, we added a new task, test_service, and changed a task, implement_component. Thus, we need to find were those tasks appear in the delivery process we want to refine (classic_rup). e. Click on the Work Breakdown Structure tab of the new delivery process (classic_rup_with_soa_implementation). f. Expand Classic RUP with SOA Implementation > Elaboration > Elaboration Iteration [n] > Develop Components [within Scope]. You should see an activity called Implement Components that looks a lot like the same-named activity in our updated discipline capability pattern. As it turns out, it is exactly the same (the activity in the original RUP delivery process extends the discipline activity ( ) and we modified the discipline activity. Thus, for our delivery process, we just need to replace the RUP extending activity (Implement Components) with our own activity that extends the new discipline activity that includes the new method content elements. 14. Replace the Implement Components activity in the delivery process with the new Implement Components activity that we created in our new Implementation with SOA capability pattern. To replace an activity, the activity that contains that activity must be edit-able. Currently, the Develop Components [within Scope] activity is not editable (it is green), so before we can change the activity we have to make it editable. a. Right-click the Develop Components [within Scope] activity and select Local Contribution. The activity turns from green to black and is now editable. Page 16 of 25
  • 17. b. Expand Develop Components [within Scope] and suppress the current Implement Components activity by right-clicking it and selecting Suppress. The activity name should turn from green to grey. c. Drag and drop the Implement Components activity from the new Implementation with SOA capability pattern we created earlier to the Classic RUP with SOA Implementation > Elaboration > Elaboration Iteration [n] > Develop Components [within Scope] activity and select Extend. Remember to drag and drop the activity from the Authoring perspective > Configuration view, where the configuration view contains the new configuration, Classic RUP with SOA Implementation. The activity to drag and drop is shown in the following screen shot: A new Implement Components activity is added to the Implement Components activity Develop Components [within Scope] activity. 15. Since we have changed the activities of the Develop Components [within Scope] activity, we need to refine its activity diagram. Specifically, we need to include the new activity in the right place in the diagram with the right links. a. Right-click the Develop Components [within Scope] activity and select Diagrams > Open Activity Diagram. An activity diagram is displayed that includes the new Implement Components activity at the top left corner, but it is not attached to anything. Page 17 of 25
  • 18. b. Using the Pallet to the right of the diagram workspace ( ) to refine the activity diagram to include the new activity (if the palette is not displayed, click on the triangle near the word “Palette”). The result should look like the following screen shot: Page 18 of 25
  • 19. The above steps should be repeated for each occurrence of the Implement Components activity in the delivery process. As it turns out, this activity appears in several places in the delivery process (in the Construction iteration and the Transition iteration), as shown in the following screen shot. Thus, this exercise is an excellent example of using a capability patter to build a process! Page 19 of 25
  • 20. 1.3 Exercise 3: Creating Navigation Views In this exercise, we will create a navigation view in the plug-in created in Exercise 1: Creating and Categorizing Method Content Elements to provide access to the method content elements created in Exercise 1: Creating and Categorizing Method Content Elements and the processes created in Exercise 2: Creating Processes Using Method Content Elements in a published web site. In RMC, navigation views are created by creating a custom category that includes the content you would like to be included in the name of the view. The Presentation Name of the custom category becomes the name of the tab in the published Web site, and the contents of the custom category become the contents of the view. The results of this exercise will be used as input to the next exercise. Approximate completion time: 15 minutes Steps: 1. Create the custom category that will represent the navigation view: a. In the Authoring perspective, go to the Library tree-browser and expand the rup_soa_implementation plug-in. b. Go to the Method Content > Custom Categories and right-click select New > Custom Category. c. For the Name field enter soa_implementation_view and for the Presentation Name field enter SOA Implementation. 2. Add the new method content elements and processes to the navigation view: a. Go to the Assign tab of the Custom Category editor. b. Use the button to add the following elements (use the collapse and expand buttons ( , as needed). Tip: Press the Control key to multi-select. Note: Base elements should be added to the navigation view, not contributing elements (if you add contributing elements, they will not appear in the published Web site). • The new delivery process: rup_soa_implementation > Processes > Delivery Processes > classic_rup_with_soa_implementation. • The new implementation discipline workflow: rup_soa_implementation > Processes > Capability Patterns > implementation_discipline_soa. • The new work product: rup_soa_implementation > soa_implementation > service_implementation. • The refined role: rup > Implementation > rup_implementer (the base element is included in the custom category) • The refined task: rup > Implementation implement_component (the base element is included in the custom category) Page 20 of 25
  • 21. The new task: rup_soa_implementation > soa_implementation > test_service c. Select and click on or to reorder, as necessary. d. Click . You should now see your selection listed, as shown in the following screen shot: e. Select File->Save All. 3. Add the new view (the new soa_implementation_view custom category) to the new configuration (Classic RUP with SOA Implementation) and make it the default view for the configuration. a. Double-click on your Classic RUP with SOA Implementation under the Configurations folder in the Library view. b. Go to the Views tab. c. Click the button. d. Select soa_implementation_view from the Custom Categories folder. Tip: Click Collapse All first, then expand. e. Click . f. Make your soa_implementation_view the default view, by selecting it and clicking the button. g. Select File > Save All. h. Select File > Close All. Page 21 of 25
  • 22. 1.4 Exercise 4: Viewing Your Results In this exercise, we will review the results of our method authoring activities. In RMC, there are two primary ways to view method authoring results – browsing and publishing. Browsing is a nice way to preview the results of publishing without having to wait for the publish operation to complete (which can sometimes take a while). However, browsing does not show the navigation views, so you will still need to publish to confirm those, but with browsing you can still validate the all variability relationships are working as intended. In this exercise, we will browse and publish the configuration initially created in Exercise 2: Creating Processes Using Method Content Elements. 1.4.1 Browsing the Configuration In this part of the exercise, we will browse the configuration and specifically look at the elements that we created/customized in the earlier exercise. Approximate completion time: 10 minutes Steps: 1. Make sure the configuration created in Exercise 2: Creating Processes Using Method Content Elements is selected in the drop down list at the top right of the user interface ( ). 2. Switch to the Browsing perspective by clicking the Open Perspective ( ) button and then selecting from the drop-down list. The contents of the Classic RUP with SOA Implementation configuration should be displayed in the Configuration view (remember, the Browsing perspective only contains the Configuration view). 3. Confirm that the following results appear in the configuration: a. Capability Pattern: Implementation with SOA includes an activity called Implement Components (Processes> Capability Patterns > Implementation with SOA > Implement Components)that includes: • Task: Implement Design Elements that has a Work Product: Service Model as a mandatory input work product and a Work Product: Service Implementation as an output work product • Task: Test Service that has Work Product: Service Implementation as a mandatory input work product and Work Product: Test Log as an output work product b. Delivery Process: Classic RUP with SOA Implementation includes a phase called Elaboration that includes an activity called Elaboration Iteration [n] that includes an activity called Develop Components [within scope] that includes an activity called Implement Components (Processes> Delivery Processes > Classic RUP with SOA Implementation > Elaboration > Elaboration Iteration [n] > Develop Components [within scope] > Implement Components) that includes: • Task: Implement Design Elements that has a Work Product: Service Model as a mandatory input work product and a Work Product: Service Implementation as an output work product Page 22 of 25
  • 23. Task: Test Service that has Work Product: Service Implementation as a mandatory input work product and Work Product: Test Log as an output work product c. Artifact: Service Implementation is in the Implementation domain (Domains > RUP Domains > Implementation > Service Implementation) d. Artifact: Service Implementation should be the responsibility of the Role: Implementer (look in the Responsible Role field of Domains > RUP Domains > Implementation > Service Implementation) e. Artifact: Service Implementation should be output from the Task: Implement Design Elements (look in the Output From field of Domains > RUP Domains > Implementation > Service Implementation) f. Role: Implementer should be responsible for the Artifact: Service Implementation (look in the Relationships section of Role Sets > Roles > Developers > Implementer). g. Role: Implementer should perform the Task: Implement Design Elements and the Task: Test Service (look in the Relationships section of Role Sets > Roles > Developers > Implementer) h. Task: Implement Design Elements should have Work Product: Service Model as a mandatory input work product (look at the Inputs field, Mandatory section of Disciplines > RUP Disciplines > Implementation > Implement Design Elements) i. Task: Implement Design Elements should output Work Product: Service Implementation (look at the Outputs field of Disciplines > RUP Disciplines > Implementation > Implement Design Elements) j. Task: Implement Design Elements should output Work Product: Service Implementation (look at the Outputs field of Disciplines > RUP Disciplines > Implementation > Implement Design Elements) k. Task: Test Service should have Work Product: Service Implementation as a mandatory input work product (look at the Inputs field, Mandatory section of Disciplines > RUP Disciplines > Implementation > Test Service) l. Task: Test Service should have Work Product: Test Log as an output work product (look at the Outputs field of Disciplines > RUP Disciplines > Implementation > Test Service) 1.4.2 Publishing the Configuration In this part of the exercise, we will publish the configuration and review the published web site, specifically look at the elements that we created/customized in the earlier exercise. Approximate completion time: 20 minutes (9 minutes publish time plus confirmation) Note for Users of VMware RMC Environment: A folder named rup_soa_implementation_prepublished is available on your desktop containing the published pages. You do not have to perform this publishing step. Steps: 1. Publish the new configuration. a. Go to your desktop and create a new folder called rup_soa_implementation_published. Page 23 of 25
  • 24. b. In RMC, click Configuration > Publish. c. Select the Classic RUP with SOA Implementation configuration. d. Click Next. e. Uncheck the Use default path checkbox. Click the Browse button and browse and select the new rup_soa_implementation_published folder. f. Change Title to Classic RUP with SOA Implementation. g. Check the option to have RMC create ADD diagrams (we want to see our new and refined tasks in the capability pattern). h. Leave all other default selections. i. Click . The configuration is published and the resulting Web site will be displayed, along with a publishing report that links to the publish logs (the logs are placed in the publish directory in a logs subdirectory) 2. Confirm that the following results appear in the published web site: a. There is a navigation view called, SOA Implementation that contains the following elements: • Delivery Process: Classic RUP with SOA Implementation • Capability Pattern: Implementation with SOA • Work Product: Service Implementation • Role: Implementer • Task: Implement Design Elements • Task: Test Service b. Capability Pattern: Implementation with SOA includes an activity called Implement Components that includes: • Task: Implement Design Elements that has a Work Product: Service Model as a mandatory input work product and a Work Product: Service Implementation as an output work product • Task: Test Service that has Work Product: Service Implementation as a mandatory input work product and Work Product: Test Log as an output work c. Delivery Process: Classic RUP with SOA Implementation includes a phase called Elaboration that includes an activity called Elaboration Iteration [n] that includes an activity called Develop Components [within scope] that includes an activity called Implement Components that includes: • Task: Implement Design Elements that has a Work Product: Service Model as a mandatory input work product and a Work Product: Service Implementation as an output work product Page 24 of 25
  • 25. Task: Test Service that has Work Product: Service Implementation as a mandatory input work product and Work Product: Test Log as an output work product d. Artifact: Service Implementation is the responsibility of the Role: Implementer (look in the Roles > Responsible field of the artifact page). e. Artifact: Service Implementation should be output from the Task: Implement Component (look in the Tasks > Output From field of the artifact page). f. Role: Implementer should be responsible for the Artifact: Service Implementation (look in the Relationships section field of the role page) g. Role: Implementer should perform the Task: Implement Design Elements and the Task: Test Service (look in the Relationships field of the role page). h. Task: Implement Design Elements should have Work Product: SOA Service Model as a mandatory input work product (look at the Inputs > Mandatory field of the task page) i. Task: Implement Design Elements should output Work Product: Service Implementation (look at the Outputs field of the task page) j. Task: Test Service should have Work Product: Service Implementation as a mandatory input work product (look at the Inputs > Mandatory field of the task page) k. Task: Test Service should have Work Product: Test Log as an output work product (look at the Outputs field of the task page) Page 25 of 25