How To Edit Video Files With Wondershare Video Editor
•Descargar como DOCX, PDF•
5 recomendaciones•19,511 vistas

Wondershare Video Editor is a powerful yet easy-to-use video editing tool which helps you easily edit and make out excellent video creations in a few clicks. Now we would like to introduce how to edit video using Wondershare Video Editor step by step. Check more about this software at: http://www.wondershare.com/video-editor/

Recomendados
Recomendados
Más contenido relacionado
Último
Último (7)
Destacado
Destacado (20)
How To Edit Video Files With Wondershare Video Editor
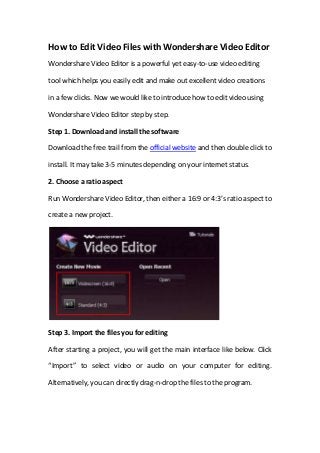
- 1. How to Edit Video Files with Wondershare Video Editor Wondershare Video Editor is a powerful yet easy-to-use video editing tool which helps you easily edit and make out excellent video creations in a few clicks. Now we would like to introduce how to edit video using Wondershare Video Editor step by step. Step 1. Download and install the software Download the free trail from the official website and then double click to install. It may take 3-5 minutes depending on your internet status. 2. Choose a ratio aspect Run Wondershare Video Editor, then either a 16:9 or 4:3’s ratio aspect to create a new project. Step 3. Import the files you for editing After starting a project, you will get the main interface like below. Click “Import” to select video or audio on your computer for editing. Alternatively, you can directly drag-n-drop the files to the program.
- 2. Step 4. Edit the files on the timeline Drag video or audio files from the source pane to the timeline tracks for editing. Then change the order to arrange them on the timeline.
- 3. Crop Right click the video on the timeline, and then choose Crop. Drag to resize and reposition the crop rectangle to select the part of the image you want. Rotate or flip Double-click the video clip and click rotate buttons in the editing window. Rotate or flip the videos 90° clockwise or 90° counterclockwise.
- 4. Merge Remove all the gaps among video clips and click “Create”. Then all the video clips can be merged into one.
- 5. Split Highlight one video or audio file on the timeline. Then move the timeline indicator to the point you want to split, and then hit scissor button. Step 5. Enhance the video effects Add background music Drag your favorite music to the background audio track to add your own music as background music. Double click it, you can personalize background music with fade-in & fade-out effect and adjust proper volume and pitch.
- 6. Adjust video settings Double click the video flip and an editing window pops up. Here you are flexible to crop, rotate, and add brightness, contrast, and saturation to get perfect video effect. Step 6. Add Texts
- 7. Click “Text”, and drag a text effect to the timeline. Then double click it. This lets you create and position your text on the video. Step 7. Add transition effect Hit “Transition”, and drag your favorite transition effect to the timeline. Double click it, and you can adjust the duration of the transition as you like.
- 8. Step 8. Use the Picture-in-picture (PIP) track There is PIP track for you to create a PIP video. Just drop the video or photo on the PIP track. Adjust the position and size or double click the target file for further editing.
- 9. Step 9. Use the Power Tool Besides the basic video editing features, you can right click the video and choose Power Tool to add more features like Mosaic, Tilt-shift and Face off. Step 10. Save or share your creation After editing, hit “Create”. You can select “Format” to convert the edited video file to the format you like and save it on your computer. Or click “device”, and then select the thumbnail of your portable devices, you can convert your video creations to the format which is compatible with
- 10. your devices. This video editor supports iPhone, iPod, iPad, PSP, etc. You can also click “YouTube” and “Facebook” to share your video online or “DVD” to burn a DVD collection.