SlideShare una empresa de Scribd logo
1 de 10
Container Gardens Go Wild
Tuesday, December 7th

Objective:
Find out how combinations of flowers, fruits, vegetables and/or herbs and the right soils can
create attractive patios, decks, and tabletops but also quick sources of food. Tips for
designing a container garden in this class will introduce successful traditional and non-
traditional garden possibilities.

   1. Inspiration: Photo journey through container garden dreams – beyond the everyday
      into the world of fantasy

   2. Style considerations: color, texture, geometry, location

   3. Location: sun, shade, patio, porch, garage

   4. Beyond pots – containers but also awesome pots

Basics

   1.   Pot placement
   2.   Pot selection – style, garden, traditional, new-age or whim,
   3.   Thirsty pots and plants – water strategies and drainage
   4.   Soil or no soil -- does the pot need a diet plan, how heavy is it?
   5.   Hungry plants – slow release fertilizers
   6.   Pot feet?

Planting
   1. Design
   2. Selection
   3. Likes and opposites – getting together
   4. Soil recipes
   5. Mulch

Goals
  1. Butterflies
  2. Hummingbirds
  3. Succulents
  4. Food – seed, seedlings, woody

Maintenance
  1. Constant chow
  2. A little nip
  3. Alien watch
  4. Hurricanes, Grasshoppers, and Winter

Demonstrations and videos throughout presentation

Bottomline: Prepare to take risks and replace if necessary.
To create a beautiful container garden, landscape designer Jan Johnsen recommends using plants with contrasting leaf
textures and varying growth habits. She suggests three different kinds of plants to a pot, including a tall element in the
middle like a tree and a trailing plant over the edge to droop over the sides. Or try the no-fail method of sticking to one
kind of plant, like impatiens or straw flower.

Color is also key: A pot can be filled with soft, romantic colors like pink and lavender, or bold hues like red and purple.
Johnsen says an eye-catching combination is a pot of primary colors red, blue and yellow. Or a monochromatic look, such
as all white flowers with lots of green foliage, will brighten up a shady corner.

Johnsen, nursery manager Michele Terlizzi and Ray Rogers, author of "Pots in the Garden," had these 10 tips for planting
and caring for container gardens:

1. Decide where the pots are going. The choice of plantings depends on whether they're going in shady or sunny spots.
2. Choose pots that suit the style of your house and garden or a whim, and plantings to go in them. Plants can share a
container if they have the same need for sunlight or shade.
3. While pots are generally low maintenance, they require more watering than an inground garden because the plants
absorb water faster. If you are going on vacation, invest in a plant sitter to water once or twice a week.
4. Add a slow-release fertilizer to help plants continue blooming all summer.
5. Watch the weight: Once a pot is planted, it can get heavy and collapse a deck or be difficult to move.
6. Make sure the pot has a hole for drainage, which prevents root rot. Most, but not all, pots come with holes. A hole can
be drilled into certain types of pots like plastic and wood.
7. Add pot feet to raise the pot to help with drainage.
8. Try different combinations in your pots. If you don't like it, you can easily change it.
9. Fear not: "Don't be afraid to make a mistake," says Rogers. "The thing I see so much is people come into a nursery and
very timidly say, 'Does this look good together?' If you like it, by all means do it."
10. If you're working with a landscape designer or nursery to create your pots, ask for the rates and to see a sample of
their work. Some nurseries don't charge to plant the pots if you buy the materials from them; others do.

With a container garden, you can grow something even where space is limited, add instant “curb appeal” to your
landscape, or just ease into gardening cautiously. And, of course, every container garden can also be a small contribution
to the environment.
Drying
Size matters when picking out the container. A large pot for several plants is a better investment than several small pots
with one plant each. Small pots dry out quickly, but larger ones seem stabilize by creating their own ecosystem. The
material of the container affects its drying rate, too. A plastic, wooden (with liner), or glazed ceramic container will keep
the soil moist longer than a terra cotta or concrete container, unless a liner is available.

Drainage
   • If your chosen container does not have a hole in the bottom, some nurseries will drill one for you. The container
       will drain best if it is not sitting directly on a surface. Place it on smooth flat stones for elegant ‘legs’, on a
       tray holding pea gravel, or on a dolly with casters. Inside the container, add a sheet of porous landscape fabric,
       or an inch or so gravel or pot shards to keep the soil from leaking through the hole. Fill the container with good
       potting soil. Soil directly from the garden is too heavy.
   • Plan for the top of the soil to be an inch below the rim of the container after the plants are in.

Planting
Gardeners used to be concerned primarily with what looked pretty and survived in Houston, but now we also consider
whether it supports wildlife, can be eaten by humans, and is not an invasive species. In warm weather and a sunny
location, try basil, mint, perilla, lemon grass, or lemon verbena together with insect-attracting plants like pentas, salvias,
black-eyed susan and coreopsis. In cool weather, you can plant chard, cilantro, parsley, arugula or dill together with
poppies, calendula, nasturtiums, and paperwhites. Some of the herbs have varieties with showy purple or striped leaves.
Thyme and oregano look nice draping over the side of a pot, and varieties of eggplant, chili peppers, and leaf lettuces are
as attractive as any ornamental plant.
If you don’t want to change plants by season or prefer simplicity, consider planting a small or dwarf variety of citrus, apple,
or fig in your container. Urban Harvest list ideal fruit tree varieties for Houston
at http://www.urbanharvest.org/advice/fruitgardening.html. A selection of perennial Texas natives in a large container
could include salvias, manfreda, Lindheimer muhly grass, coreopsis, winecup, switchgrass, and lazy daisy.
Maintenance
Synthetic fertilizers, among their other faults, cause a buildup of salts in the soil of the container. It’s another reason to
use organics. Save some rainwater for your container garden. It will help flush out minerals left behind by tap water.
Mulch will protect the plant roots, just as in a garden bed. Look for hardwood mulch made here in Houston from local tree
waste. For style points, you might try a layer of tumbled recycled glass in a container where plants are not changed often.
Now that the burn of summer is easing, a container garden is a good way to kick off the next planting season.

What makes a successful container garden? A good potting soil is the first key ingredient; you want a mixture that
provides a good combination of excellent drainage and aeration. Regular garden soil is too heavy and dense for use in
pots.

"Look for 'professional' on the label," suggests Dr. Susan Hamilton, who oversees the University of Tennessee Gardens.
"That word puts the potting soil in a whole different category. You'll be paying a little bit more, but it will be high quality. If
your container garden fails, it won't be because of the potting soil." To tell whether the potting soil has the right
consistency, give it the squeeze test. "If it feels like pastry dough, yet it still crumbles, that's a good sign."
Many growers like to mix their own and prefer particular blends. "Every greenhouse manager has his or her favorite
potting soil recipe, and each thinks theirs is the one to use," she says. Here, says Hamilton, are three great recipes:
Mix #1
2 parts peat: 1 part perlite: 1 part builder's sand
Mix #2
2 parts peat: 1 part builder's sand
Mix #3
1 part peat: 1 part builder's sand: 1 part pine-bark mulch
Is it really worth it to mix your own if you're a typical backyard gardener? "No," Hamilton says.

"When you look at price and volume versus what you really need, you usually have a lot of material left over. Besides,
bagged soils are pretty cost-effective because all the guesswork has been taken out of it. Professional blends have
already been charged with starter nutrients and pH adjusted. If you were going to do that part on your own, oh my, it gets
complicated."
More great advice from the experts:
M Select plants that are compatible in terms of light, water, growth and the conditions in the chosen site. Don't mix a
shade- and water-lover like impatiens with a dry-and-sunny plant like thyme. Some plants like mint are such aggressive
growers they need a pot of their own.

g Pay close attention to watering. For containers in sunny, hot or windy areas, watering twice a day may be necessary. A
plant that has outgrown its pot will also need more frequent watering.

p Consider using a water-absorbing polymer; it will improve the moisture retention of the potting soil. Follow the
directions on the package.

d Top-dress with mulch and a slow-release fertilizer. You'll be reducing the evaporation rate as well as eliminating
regular feedings.

Make Your Own Hypertufa Container
Hypertufa looks like stone but weighs less and takes whatever shape you want
by Michelle Gervais


                                       Photo/Illustration: Michelle Gervais
Containers made from hypertufa are wonderful for displaying rock-garden plants or succulents. Over time,
the hypertufa ages gracefully, collecting a patina of mosses and lichens. In this article you will find the
recipe and instructions for making hypertufa.

The process I use to mold containers is much simpler that the usual box-in-box method that sandwiches
hypertufa and some metal mesh in a frame. Instead, I simply pack hypertufa around an overturned plastic
pot or planter. And because it's so easy to work with, hypertufa can be molded into many sizes and
shapes.


Wondering what to plant in your new container? Browse our plant guide or check out more articles
on container gardening. To read more about hypertufa, click here.

Supplies
•   mixing tub
•   container for measuring
•   peat moss
•   perlite
•   Portland cement
•   concrete reinforcing fibers
•   dust mask
•   rubber gloves
•   trowel
•   plastic drop cloth
•   plastic container for a mold
•   wire brush

The recipe

1 part Portland cement
1 1/2 parts sphagnum peat moss
1 1/2 parts perlite

To add strength, I add a small handful of fibermesh, a synthetic concrete reinforcing fiber, to each batch,
which is easier to work with than sheets of wire mesh embedded in the hypertufa. You can find fibermesh
at masonry-supply stores or online.

Five easy steps
Step 1 —

Measure and mix the peat moss, perlite, cement, and a small handful of reinforcing fibers in your tub.
You’ll kick up plenty of dust at this stage, so be sure to wear your dust mask.

Add the water while stirring with your trowel. Test the consistency frequently, as it’s much easier to add
water than it is to readjust the dry ingredients. When a squeezed handful retains its shape and doesn’t
release more than a few drops of water, the mix is ready.

1. Create a vignette

A triangle always works
Containers can be grouped into vignettes the same way plants can. A triangular arrangement of pots will
produce quick, pleasing results. In design terms, a triangle consists of a dominant central element flanked
by components of smaller stature. This form is a staple of all art forms for good reason: It always works.
Allow one pot to dominate
A container grouping will quickly fall into place if the tallest element is placed at the rear of the
composition with the other pots on either side. Plant the tall container with something appropriately
commanding so it will dominate the grouping

Take it as far as you want
To expand on the classic triangle grouping, simply add more subordinate pots. While no hard-and fast
rules exist concerning how many to use, it is easier to arrange uneven numbers into a pleasing pattern.


                           A triangle always works: A colorful hibiscus serves as the apex of a triangular
composition completed by subordinate elements placed slightly in front and to the side.


                              Allow one pot to dominate: If you have two containers of similar stature, raise one
on a pedestal to give it prominence. Photo/Illustration: Virginia Small


                                Take it as far as yoy want: This complex grouping creates an irregular triangle and
includes pots of all sizes, a plant stand, and a whimsical sculpture. Photo/Illustration: Jennifer Benner
2. Add focal points

Provide something to look at
The purpose of a focal point is to attract attention. If you are burdened with an area where nothing
adequately does this job, a container will quickly fill the void. Because they can be planted and replanted
with colorful, eye-catching plants, containers have an advantage over inground combinations.

Create coherence in mixed plantings
The opposite of having nothing to look at is having too much to look at. Often in a mixed border, there
can be so much going on that one isn’t sure where to look first. Adding a focal point provides a sense of
order to such scenes.

3. Break up wall space

Masses calm a busy background
The rigid, repetitive pattern of a brick wall can be tiring on the eye. But when blurred by lush masses of
foliage and colorful flowers, the lines of mortar recede. The terra-cotta pots echo the warm color of the
brick. The clusters of bright red flowers contrast with the darker orange and the greens of the foliage,
bringing the whole scheme to life.

Fine texture stands out against a plain wall
A plain, unadorned wall can dominate an area with its monotony and mass. One can take advantage of
these features by using them as a backdrop for fine-textured foliage that can often get lost on a large
scale. The photo at right shows how simple means can achieve a beautiful effect. Large pots of small trees
with fine foliage are evenly spaced along a perfectly plain wall. A border of wispy ornamental grass
reinforces the container plantings so that, together, they hold their own against the bulk of the wall.

Saturated colors work with a light backdrop
Unadorned with plants, this white wall would dominate the area with glaring brightness. But as the
background for a dense, complex arrangement of forms and colors, it is perfect.

Growing plants in containers is one of my favorite ways to garden. Come August, however, I’ve had it with
deadheading and lugging watering cans. Last spring, when I was preparing to pot up my containers, the
memory of spent, sticky nicotiana blossoms clinging to my fingertips came rushing back, and I wondered
—is all this fuss and fluff worth it? Do containers really need that much care, or is it just a lot of hype?
That’s when I decided to embark on an experiment. I planted several sets of identical containers and gave
one pot in each set only water and the other the royal treatment: fertilizer, primping, and pruning.

By midsummer, it was clear that containers need more than just water. The water-only containers looked
pathetic: The plants were puny, had few flowers, and their leaves were often an unhealthy yellow. The
containers given more TLC thrived with abundant growth and flowers. The moral of the story is that a
regular-maintenance checklist is the best way to get great-looking containers from beginning to end. Now
that I know that all of the work really does pay off, it makes the rewards that much sweeter.


More Reading
A Basic Potting Soil Recipe
Root Pruning Container Plants
How to Repot Container Plants
Thrillers, Fillers & Spillers
1. Provide a steady supply of water and nutrients

The warm temperatures of summer send plants into a growing frenzy. If they don’t have access to
adequate water and nutrients, they will be stunted and sickly. Watering can be a bit of a balancing act:
too much or too little and your plantings will suffer. My strategy is to water containers thoroughly when
the soil surface becomes dry to the touch. During the hottest part of the summer, this can mean watering
at least every day. I add water to each pot until I see it draining from the bottom, which ensures that
moisture has reached the deepest roots. I also avoid watering at the end of the day. Without sunlight and
warmth to evaporate moisture on leaves, the foliage stays wet longer, making it more susceptible to foliar
diseases.


Given nothing but water all season long, this container looks acceptable until compared with the pot that got
the star treatment (right).


This container has the same plants grown in the same location as the one on the left. Its exuberant growth and
plethora of flowers testify to the benefits of complete and consistent care.
Most gardeners fill their pots with soilless mixes, which lack organic matter and nutrients. To provide
plants with the food they need, I give my containers a regular dose of fertilizer. I add a balanced,
granular, synthetic or organic, time-released fertilizer to the potting mix at planting time. This will slowly
feed the plants for the next few months. Because container plants are heavy feeders, I also begin feeding
the pots with water-soluble fertilizer, which roots can take up instantly, about a month after planting. I
mix the liquid fertilizer at half strength—because the soil already contains granular fertilizer—and apply it
at watering time every two to three weeks until the end of the season.

You get what you give


This container received routine watering and fertilizing.


With only an occasional visit from the watering can, this container can't compete with the one on the left.
2. Snip off spent flowers and unsightly foliage


I give my containers a good primping every week or so. Deadheading faded blossoms and removing
damaged or diseased leaves and stems not only keeps plants looking good but also keeps them productive
and healthy. Deadheading redirects a plant’s energy from seed production back into flower production.
When snipping off blooms, cut flower stems back to a leaf node or main stem. Do not leave any unsightly
headless or leafless stems.

Removing problem leaves back to the main stem is also important. If an entire stem is damaged or
diseased, cut it back to the nearest healthy growing point or all the way back to the base. It’s best to
remove disfigured leaves and stems as soon as you notice them. Injuries attract insects and encourage
diseases. Many container plants like pelargoniums, also known as annual geraniums (Pelargonium spp.
and cvs.), have a tendency to develop a fungal disease called botrytis on their lower leaves. Don’t be shy
about digging deep into plantings to look for problems. Likewise, take a peek under your trailing plants,
and remove any brown or tattered foliage.

3. Prune plants back into shape
Two or three times a season, I snip my containers back into shape. Some plants grow more vigorously
than others, so I cut aggressive plants back to size to keep my plantings balanced. I have a tendency to
overplant, so when I see a pot getting crowded, I remove a stem here or there to be sure the container
gets enough air circulation to stay healthy. If you have the opposite problem and your planting is not full
enough, pruning the tips of a few stems back a bit will encourage them to bush out.

Some plants need a total overhaul by midsummer. If a plant is appearing less productive and attractive
overall, I cut all the stems back by as much as half to a leaf node or growing point. The plant is usually up
and running again in a couple of weeks. If the idea of cutting the whole plant back intimidates you, do it
gradually over three weeks by cutting one-third of the stems back each week. Avoid pruning your plants
during the heat of the day, which is stressful for the plant. Prune them, instead, in the morning or evening
while the stems are firm yet bendable.

Don’t be a slave to watering

Keeping up with watering is one of the most important factors in beautiful containers, but sometimes it
seems like it’s a never-ending job. Here are a few things you can do to lessen the load.

Use saucers to save water for later
I often place saucers under containers that are located in hot, sunny locations to help the soil retain
moisture longer. The saucers also help when the soil is so dry that water just runs off the surface. By
having water sit in the saucer, the overly dry soil has a chance to wick up and absorb the moisture. I
avoid placing saucers under pots that are located in shady sites as they can keep the pots too damp, thus
killing the plants. For the same reason, I also remove the saucers during particularly rainy spells.

Choose the right pot
The type of container you use also influences how often you’ll need to water. Terra-cotta pots are porous
and tend to dry out quickly, while glazed, plastic, or metal pots hold more moisture.

Mix in some magic crystals
Moisture-retaining soil additives can minimize the need to water. In years with excessive rain or with pots
located in shade, however, the soil tends to stay too moist.

Más contenido relacionado

Más de LSC-CyFair Academy for Lifelong Learning

Más de LSC-CyFair Academy for Lifelong Learning (20)

Business and Employment Records
Business and Employment RecordsBusiness and Employment Records
Business and Employment Records
 
Immigration
ImmigrationImmigration
Immigration
 
Land - Genealogical Research
Land - Genealogical ResearchLand - Genealogical Research
Land - Genealogical Research
 
Wills & Probate
Wills & ProbateWills & Probate
Wills & Probate
 
Genealogy Research Class - Feb 26
Genealogy Research Class - Feb 26Genealogy Research Class - Feb 26
Genealogy Research Class - Feb 26
 
Genealogy Research Class Feb 26, 2016
Genealogy Research Class   Feb 26, 2016Genealogy Research Class   Feb 26, 2016
Genealogy Research Class Feb 26, 2016
 
Colonial States Information
Colonial States InformationColonial States Information
Colonial States Information
 
Vital Records Online
Vital Records OnlineVital Records Online
Vital Records Online
 
Vital Records Search
Vital Records SearchVital Records Search
Vital Records Search
 
A Cross to Share - Spring 2016
A Cross to Share  -  Spring 2016A Cross to Share  -  Spring 2016
A Cross to Share - Spring 2016
 
Census Forms 1900-1940
Census Forms 1900-1940Census Forms 1900-1940
Census Forms 1900-1940
 
Genealogy Census and Military Records
Genealogy Census and Military RecordsGenealogy Census and Military Records
Genealogy Census and Military Records
 
Birth Death Marriage Certificates by State
Birth Death Marriage Certificates by StateBirth Death Marriage Certificates by State
Birth Death Marriage Certificates by State
 
Class 1 - Welcome
Class 1 - WelcomeClass 1 - Welcome
Class 1 - Welcome
 
Virtual campus tour cal sp16
Virtual campus tour cal sp16Virtual campus tour cal sp16
Virtual campus tour cal sp16
 
Reason and Being Human
Reason and Being HumanReason and Being Human
Reason and Being Human
 
Relativism
RelativismRelativism
Relativism
 
Brooklyn and Manhattan
Brooklyn and ManhattanBrooklyn and Manhattan
Brooklyn and Manhattan
 
Women's Self-Defense Tips
Women's Self-Defense TipsWomen's Self-Defense Tips
Women's Self-Defense Tips
 
Philosophy Class Added to Schedule
Philosophy Class Added to SchedulePhilosophy Class Added to Schedule
Philosophy Class Added to Schedule
 

Container Gardening Handout

  • 1. Container Gardens Go Wild Tuesday, December 7th Objective: Find out how combinations of flowers, fruits, vegetables and/or herbs and the right soils can create attractive patios, decks, and tabletops but also quick sources of food. Tips for designing a container garden in this class will introduce successful traditional and non- traditional garden possibilities. 1. Inspiration: Photo journey through container garden dreams – beyond the everyday into the world of fantasy 2. Style considerations: color, texture, geometry, location 3. Location: sun, shade, patio, porch, garage 4. Beyond pots – containers but also awesome pots Basics 1. Pot placement 2. Pot selection – style, garden, traditional, new-age or whim, 3. Thirsty pots and plants – water strategies and drainage 4. Soil or no soil -- does the pot need a diet plan, how heavy is it? 5. Hungry plants – slow release fertilizers 6. Pot feet? Planting 1. Design 2. Selection 3. Likes and opposites – getting together 4. Soil recipes 5. Mulch Goals 1. Butterflies 2. Hummingbirds 3. Succulents 4. Food – seed, seedlings, woody Maintenance 1. Constant chow 2. A little nip 3. Alien watch 4. Hurricanes, Grasshoppers, and Winter Demonstrations and videos throughout presentation Bottomline: Prepare to take risks and replace if necessary.
  • 2. To create a beautiful container garden, landscape designer Jan Johnsen recommends using plants with contrasting leaf textures and varying growth habits. She suggests three different kinds of plants to a pot, including a tall element in the middle like a tree and a trailing plant over the edge to droop over the sides. Or try the no-fail method of sticking to one kind of plant, like impatiens or straw flower. Color is also key: A pot can be filled with soft, romantic colors like pink and lavender, or bold hues like red and purple. Johnsen says an eye-catching combination is a pot of primary colors red, blue and yellow. Or a monochromatic look, such as all white flowers with lots of green foliage, will brighten up a shady corner. Johnsen, nursery manager Michele Terlizzi and Ray Rogers, author of "Pots in the Garden," had these 10 tips for planting and caring for container gardens: 1. Decide where the pots are going. The choice of plantings depends on whether they're going in shady or sunny spots. 2. Choose pots that suit the style of your house and garden or a whim, and plantings to go in them. Plants can share a container if they have the same need for sunlight or shade. 3. While pots are generally low maintenance, they require more watering than an inground garden because the plants absorb water faster. If you are going on vacation, invest in a plant sitter to water once or twice a week. 4. Add a slow-release fertilizer to help plants continue blooming all summer. 5. Watch the weight: Once a pot is planted, it can get heavy and collapse a deck or be difficult to move. 6. Make sure the pot has a hole for drainage, which prevents root rot. Most, but not all, pots come with holes. A hole can be drilled into certain types of pots like plastic and wood. 7. Add pot feet to raise the pot to help with drainage. 8. Try different combinations in your pots. If you don't like it, you can easily change it. 9. Fear not: "Don't be afraid to make a mistake," says Rogers. "The thing I see so much is people come into a nursery and very timidly say, 'Does this look good together?' If you like it, by all means do it." 10. If you're working with a landscape designer or nursery to create your pots, ask for the rates and to see a sample of their work. Some nurseries don't charge to plant the pots if you buy the materials from them; others do. With a container garden, you can grow something even where space is limited, add instant “curb appeal” to your landscape, or just ease into gardening cautiously. And, of course, every container garden can also be a small contribution to the environment. Drying Size matters when picking out the container. A large pot for several plants is a better investment than several small pots with one plant each. Small pots dry out quickly, but larger ones seem stabilize by creating their own ecosystem. The material of the container affects its drying rate, too. A plastic, wooden (with liner), or glazed ceramic container will keep the soil moist longer than a terra cotta or concrete container, unless a liner is available. Drainage • If your chosen container does not have a hole in the bottom, some nurseries will drill one for you. The container will drain best if it is not sitting directly on a surface. Place it on smooth flat stones for elegant ‘legs’, on a tray holding pea gravel, or on a dolly with casters. Inside the container, add a sheet of porous landscape fabric, or an inch or so gravel or pot shards to keep the soil from leaking through the hole. Fill the container with good potting soil. Soil directly from the garden is too heavy. • Plan for the top of the soil to be an inch below the rim of the container after the plants are in. Planting Gardeners used to be concerned primarily with what looked pretty and survived in Houston, but now we also consider whether it supports wildlife, can be eaten by humans, and is not an invasive species. In warm weather and a sunny location, try basil, mint, perilla, lemon grass, or lemon verbena together with insect-attracting plants like pentas, salvias, black-eyed susan and coreopsis. In cool weather, you can plant chard, cilantro, parsley, arugula or dill together with poppies, calendula, nasturtiums, and paperwhites. Some of the herbs have varieties with showy purple or striped leaves. Thyme and oregano look nice draping over the side of a pot, and varieties of eggplant, chili peppers, and leaf lettuces are as attractive as any ornamental plant. If you don’t want to change plants by season or prefer simplicity, consider planting a small or dwarf variety of citrus, apple, or fig in your container. Urban Harvest list ideal fruit tree varieties for Houston at http://www.urbanharvest.org/advice/fruitgardening.html. A selection of perennial Texas natives in a large container could include salvias, manfreda, Lindheimer muhly grass, coreopsis, winecup, switchgrass, and lazy daisy. Maintenance Synthetic fertilizers, among their other faults, cause a buildup of salts in the soil of the container. It’s another reason to use organics. Save some rainwater for your container garden. It will help flush out minerals left behind by tap water.
  • 3. Mulch will protect the plant roots, just as in a garden bed. Look for hardwood mulch made here in Houston from local tree waste. For style points, you might try a layer of tumbled recycled glass in a container where plants are not changed often. Now that the burn of summer is easing, a container garden is a good way to kick off the next planting season. What makes a successful container garden? A good potting soil is the first key ingredient; you want a mixture that provides a good combination of excellent drainage and aeration. Regular garden soil is too heavy and dense for use in pots. "Look for 'professional' on the label," suggests Dr. Susan Hamilton, who oversees the University of Tennessee Gardens. "That word puts the potting soil in a whole different category. You'll be paying a little bit more, but it will be high quality. If your container garden fails, it won't be because of the potting soil." To tell whether the potting soil has the right consistency, give it the squeeze test. "If it feels like pastry dough, yet it still crumbles, that's a good sign." Many growers like to mix their own and prefer particular blends. "Every greenhouse manager has his or her favorite potting soil recipe, and each thinks theirs is the one to use," she says. Here, says Hamilton, are three great recipes: Mix #1 2 parts peat: 1 part perlite: 1 part builder's sand Mix #2 2 parts peat: 1 part builder's sand Mix #3 1 part peat: 1 part builder's sand: 1 part pine-bark mulch Is it really worth it to mix your own if you're a typical backyard gardener? "No," Hamilton says. "When you look at price and volume versus what you really need, you usually have a lot of material left over. Besides, bagged soils are pretty cost-effective because all the guesswork has been taken out of it. Professional blends have already been charged with starter nutrients and pH adjusted. If you were going to do that part on your own, oh my, it gets complicated." More great advice from the experts: M Select plants that are compatible in terms of light, water, growth and the conditions in the chosen site. Don't mix a shade- and water-lover like impatiens with a dry-and-sunny plant like thyme. Some plants like mint are such aggressive growers they need a pot of their own. g Pay close attention to watering. For containers in sunny, hot or windy areas, watering twice a day may be necessary. A plant that has outgrown its pot will also need more frequent watering. p Consider using a water-absorbing polymer; it will improve the moisture retention of the potting soil. Follow the directions on the package. d Top-dress with mulch and a slow-release fertilizer. You'll be reducing the evaporation rate as well as eliminating regular feedings. Make Your Own Hypertufa Container Hypertufa looks like stone but weighs less and takes whatever shape you want by Michelle Gervais Photo/Illustration: Michelle Gervais
  • 4. Containers made from hypertufa are wonderful for displaying rock-garden plants or succulents. Over time, the hypertufa ages gracefully, collecting a patina of mosses and lichens. In this article you will find the recipe and instructions for making hypertufa. The process I use to mold containers is much simpler that the usual box-in-box method that sandwiches hypertufa and some metal mesh in a frame. Instead, I simply pack hypertufa around an overturned plastic pot or planter. And because it's so easy to work with, hypertufa can be molded into many sizes and shapes. Wondering what to plant in your new container? Browse our plant guide or check out more articles on container gardening. To read more about hypertufa, click here. Supplies • mixing tub • container for measuring • peat moss • perlite • Portland cement • concrete reinforcing fibers • dust mask • rubber gloves • trowel • plastic drop cloth • plastic container for a mold • wire brush The recipe 1 part Portland cement 1 1/2 parts sphagnum peat moss 1 1/2 parts perlite To add strength, I add a small handful of fibermesh, a synthetic concrete reinforcing fiber, to each batch, which is easier to work with than sheets of wire mesh embedded in the hypertufa. You can find fibermesh at masonry-supply stores or online. Five easy steps Step 1 — Measure and mix the peat moss, perlite, cement, and a small handful of reinforcing fibers in your tub. You’ll kick up plenty of dust at this stage, so be sure to wear your dust mask. Add the water while stirring with your trowel. Test the consistency frequently, as it’s much easier to add water than it is to readjust the dry ingredients. When a squeezed handful retains its shape and doesn’t release more than a few drops of water, the mix is ready. 1. Create a vignette A triangle always works Containers can be grouped into vignettes the same way plants can. A triangular arrangement of pots will produce quick, pleasing results. In design terms, a triangle consists of a dominant central element flanked by components of smaller stature. This form is a staple of all art forms for good reason: It always works.
  • 5. Allow one pot to dominate A container grouping will quickly fall into place if the tallest element is placed at the rear of the composition with the other pots on either side. Plant the tall container with something appropriately commanding so it will dominate the grouping Take it as far as you want To expand on the classic triangle grouping, simply add more subordinate pots. While no hard-and fast rules exist concerning how many to use, it is easier to arrange uneven numbers into a pleasing pattern. A triangle always works: A colorful hibiscus serves as the apex of a triangular composition completed by subordinate elements placed slightly in front and to the side. Allow one pot to dominate: If you have two containers of similar stature, raise one on a pedestal to give it prominence. Photo/Illustration: Virginia Small Take it as far as yoy want: This complex grouping creates an irregular triangle and includes pots of all sizes, a plant stand, and a whimsical sculpture. Photo/Illustration: Jennifer Benner
  • 6. 2. Add focal points Provide something to look at The purpose of a focal point is to attract attention. If you are burdened with an area where nothing adequately does this job, a container will quickly fill the void. Because they can be planted and replanted with colorful, eye-catching plants, containers have an advantage over inground combinations. Create coherence in mixed plantings The opposite of having nothing to look at is having too much to look at. Often in a mixed border, there can be so much going on that one isn’t sure where to look first. Adding a focal point provides a sense of order to such scenes. 3. Break up wall space Masses calm a busy background The rigid, repetitive pattern of a brick wall can be tiring on the eye. But when blurred by lush masses of foliage and colorful flowers, the lines of mortar recede. The terra-cotta pots echo the warm color of the brick. The clusters of bright red flowers contrast with the darker orange and the greens of the foliage, bringing the whole scheme to life. Fine texture stands out against a plain wall A plain, unadorned wall can dominate an area with its monotony and mass. One can take advantage of these features by using them as a backdrop for fine-textured foliage that can often get lost on a large scale. The photo at right shows how simple means can achieve a beautiful effect. Large pots of small trees with fine foliage are evenly spaced along a perfectly plain wall. A border of wispy ornamental grass reinforces the container plantings so that, together, they hold their own against the bulk of the wall. Saturated colors work with a light backdrop Unadorned with plants, this white wall would dominate the area with glaring brightness. But as the background for a dense, complex arrangement of forms and colors, it is perfect. Growing plants in containers is one of my favorite ways to garden. Come August, however, I’ve had it with deadheading and lugging watering cans. Last spring, when I was preparing to pot up my containers, the memory of spent, sticky nicotiana blossoms clinging to my fingertips came rushing back, and I wondered —is all this fuss and fluff worth it? Do containers really need that much care, or is it just a lot of hype? That’s when I decided to embark on an experiment. I planted several sets of identical containers and gave one pot in each set only water and the other the royal treatment: fertilizer, primping, and pruning. By midsummer, it was clear that containers need more than just water. The water-only containers looked pathetic: The plants were puny, had few flowers, and their leaves were often an unhealthy yellow. The containers given more TLC thrived with abundant growth and flowers. The moral of the story is that a regular-maintenance checklist is the best way to get great-looking containers from beginning to end. Now that I know that all of the work really does pay off, it makes the rewards that much sweeter. More Reading A Basic Potting Soil Recipe Root Pruning Container Plants How to Repot Container Plants Thrillers, Fillers & Spillers
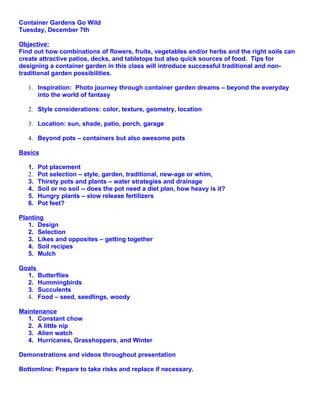
  • 7. 1. Provide a steady supply of water and nutrients The warm temperatures of summer send plants into a growing frenzy. If they don’t have access to adequate water and nutrients, they will be stunted and sickly. Watering can be a bit of a balancing act: too much or too little and your plantings will suffer. My strategy is to water containers thoroughly when the soil surface becomes dry to the touch. During the hottest part of the summer, this can mean watering at least every day. I add water to each pot until I see it draining from the bottom, which ensures that moisture has reached the deepest roots. I also avoid watering at the end of the day. Without sunlight and warmth to evaporate moisture on leaves, the foliage stays wet longer, making it more susceptible to foliar diseases. Given nothing but water all season long, this container looks acceptable until compared with the pot that got the star treatment (right). This container has the same plants grown in the same location as the one on the left. Its exuberant growth and plethora of flowers testify to the benefits of complete and consistent care.
  • 8. Most gardeners fill their pots with soilless mixes, which lack organic matter and nutrients. To provide plants with the food they need, I give my containers a regular dose of fertilizer. I add a balanced, granular, synthetic or organic, time-released fertilizer to the potting mix at planting time. This will slowly feed the plants for the next few months. Because container plants are heavy feeders, I also begin feeding the pots with water-soluble fertilizer, which roots can take up instantly, about a month after planting. I mix the liquid fertilizer at half strength—because the soil already contains granular fertilizer—and apply it at watering time every two to three weeks until the end of the season. You get what you give This container received routine watering and fertilizing. With only an occasional visit from the watering can, this container can't compete with the one on the left.
  • 9. 2. Snip off spent flowers and unsightly foliage I give my containers a good primping every week or so. Deadheading faded blossoms and removing damaged or diseased leaves and stems not only keeps plants looking good but also keeps them productive and healthy. Deadheading redirects a plant’s energy from seed production back into flower production. When snipping off blooms, cut flower stems back to a leaf node or main stem. Do not leave any unsightly headless or leafless stems. Removing problem leaves back to the main stem is also important. If an entire stem is damaged or diseased, cut it back to the nearest healthy growing point or all the way back to the base. It’s best to remove disfigured leaves and stems as soon as you notice them. Injuries attract insects and encourage diseases. Many container plants like pelargoniums, also known as annual geraniums (Pelargonium spp. and cvs.), have a tendency to develop a fungal disease called botrytis on their lower leaves. Don’t be shy about digging deep into plantings to look for problems. Likewise, take a peek under your trailing plants, and remove any brown or tattered foliage. 3. Prune plants back into shape
  • 10. Two or three times a season, I snip my containers back into shape. Some plants grow more vigorously than others, so I cut aggressive plants back to size to keep my plantings balanced. I have a tendency to overplant, so when I see a pot getting crowded, I remove a stem here or there to be sure the container gets enough air circulation to stay healthy. If you have the opposite problem and your planting is not full enough, pruning the tips of a few stems back a bit will encourage them to bush out. Some plants need a total overhaul by midsummer. If a plant is appearing less productive and attractive overall, I cut all the stems back by as much as half to a leaf node or growing point. The plant is usually up and running again in a couple of weeks. If the idea of cutting the whole plant back intimidates you, do it gradually over three weeks by cutting one-third of the stems back each week. Avoid pruning your plants during the heat of the day, which is stressful for the plant. Prune them, instead, in the morning or evening while the stems are firm yet bendable. Don’t be a slave to watering Keeping up with watering is one of the most important factors in beautiful containers, but sometimes it seems like it’s a never-ending job. Here are a few things you can do to lessen the load. Use saucers to save water for later I often place saucers under containers that are located in hot, sunny locations to help the soil retain moisture longer. The saucers also help when the soil is so dry that water just runs off the surface. By having water sit in the saucer, the overly dry soil has a chance to wick up and absorb the moisture. I avoid placing saucers under pots that are located in shady sites as they can keep the pots too damp, thus killing the plants. For the same reason, I also remove the saucers during particularly rainy spells. Choose the right pot The type of container you use also influences how often you’ll need to water. Terra-cotta pots are porous and tend to dry out quickly, while glazed, plastic, or metal pots hold more moisture. Mix in some magic crystals Moisture-retaining soil additives can minimize the need to water. In years with excessive rain or with pots located in shade, however, the soil tends to stay too moist.