SlideShare a Scribd company logo
1 of 11
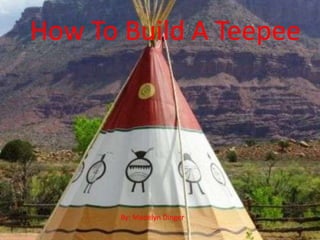
How To Build A Teepee  How To Build A Teepee By: Madelyn Dinger
History and Use of the Teepee The Apache Native Americans were people to have used the teepee’s many years ago. They were used as  shelter and they also were used to be the setting for ceremonial purposes.  Residential teepees were used with meaning. The doors were made to face the east, and there was a seat of power on the western wall. The Apache would travel around a lot and would set these up and take them down and use these as “mobile homes”.
			Step 1				 The first thing that you will have to do is hunt. The apache tribe used buffalo.  Now you will have to skin the buffalo and collect the hides and leave them to dry.  The hides of the buffalo are the things you will need as the main part of the teepee.
Step 2 For step two, you must nowcollect about 15 long wooden poles That are about 20 ft long.  As well as collecting logs you will need to have strong, durable ropes.  You must also gather some wooden floor boards so you will not have to sleep on the regular floor.  Once you have collected the hides, polls, wooden floor boards, and the ropes, you are ready to start constructing your teepee!
Step 3 Now that you have all the supplies that you need to construct your teepee, you must come up with some ground work.   As seen in the picture in the right, you must start with a tripod.  Then carefully and slowly keep adding on a pole.  Be sure to tie the poles together while setting them up.
Step 4 After you are done stetting up the poles in step three, your product should look like the figure to the right.  The circle in the middle is an optional fireplace.  Be sure to tighten the ropes and leave about two feet of rope loose. You will need this rope later.  Also you must remember to firmly place the ends of the poles in the ground, not too far in, but just be sure the teepee will last.
Step 5 Now, remember the buffalo you hunted, skinned, and let dry? Well it time to use that!  You can either decorate the hides after they are dried and sewn together. Or you can just let the teepee have no design.  The picture to the right is an example of what the Plains Indian Teepee’s would look like.
Step 6  On your last pole you will have to attach your buffalo hides on.  As seen on the figure to the right, you must punch in a  hole through the top , and bottom of your  buffalo hide and string a rope through them, and tighten it good so the hide will not come off.
Step 7  Now, you must tighten the rest of the two foot rope that you have left from step four, around the top of your teepee.  Now slowly wrap the buffalo hide around your poles so that barely any  area of your teepee skeleton is exposed. You will need a small opening for your door though. CONGRADULATIONS!!! You have successfully made your very own Teepee!
Step 8 To firmly secure your teepee into the ground, use nails or wooden stakes and drive them through the floor. This part is optional to have a door. If you have a long strip of hide left over, you may hang this down your teepee using small poles. Congratulations, you have completed making your teepee!!!
Bibliography  http://4.bp.blogspot.com/__TkYG1RhmoU/SwYNySzeOcI/AAAAAAAACUI/05i4revCuns/s1600/desert_tipi_painted.jpg http://1.bp.blogspot.com/__TkYG1RhmoU/SuPMjZLuj_I/AAAAAAAACQg/gUkK6zc9at4/s400/teepee400.jpg http://reference.findtarget.com/search/indigenous%20peoples%20of%20the%20Americas/ http://www.cowboypoetry.com/memories4.htm http://www.shelterpub.com/_shelter/www_teepee.html http://tatonkatradingcompany.com/plains_teepee.htm http://www.manataka.org/images/Teepee_Erecting2.gif http://s3.hubimg.com/u/4103134_f260.jpg http://www.theoriginaltipicompany.co.uk/sitebuildercontent/sitebuilderpictures/101_0269.JPG

More Related Content

Similar to How To Build A Teepee

Keepsake plywood-rocking-elephant
Keepsake plywood-rocking-elephantKeepsake plywood-rocking-elephant
Keepsake plywood-rocking-elephantDavidDavis228
 
Cedar treasure chest
Cedar treasure chestCedar treasure chest
Cedar treasure chestjessica30251
 
Napkin instructions
Napkin  instructionsNapkin  instructions
Napkin instructionsJemmy Eepana
 
readytoreportnapkinfolding-120222004211-phpapp01.pptx
readytoreportnapkinfolding-120222004211-phpapp01.pptxreadytoreportnapkinfolding-120222004211-phpapp01.pptx
readytoreportnapkinfolding-120222004211-phpapp01.pptxfernandopajar1
 
How to Guide
How to GuideHow to Guide
How to Guideabel6716
 
readytoreportnapkinfolding-120222004211-phpapp01.pptx
readytoreportnapkinfolding-120222004211-phpapp01.pptxreadytoreportnapkinfolding-120222004211-phpapp01.pptx
readytoreportnapkinfolding-120222004211-phpapp01.pptxfernandopajar1
 
Sew Your Own Octopus
Sew Your Own OctopusSew Your Own Octopus
Sew Your Own OctopusIan Kenworthy
 
DIY Wood Fired Cedar Hot Tub
DIY Wood Fired Cedar Hot TubDIY Wood Fired Cedar Hot Tub
DIY Wood Fired Cedar Hot TubDavid Thong
 
Brown Aesthetic Group Project Presentation.pdf
Brown Aesthetic Group Project Presentation.pdfBrown Aesthetic Group Project Presentation.pdf
Brown Aesthetic Group Project Presentation.pdfGenelynCdeJesus
 
Foosball table-diy
Foosball table-diyFoosball table-diy
Foosball table-diydiamante
 
apeluri ieftine internationale
apeluri ieftine internationaleapeluri ieftine internationale
apeluri ieftine internationalezobcornel
 
How to make_friendship_bracelets_1_[1]
How to make_friendship_bracelets_1_[1]How to make_friendship_bracelets_1_[1]
How to make_friendship_bracelets_1_[1]cubbypanda1234
 
How to make a tassel
How to make a tasselHow to make a tassel
How to make a tasselauriolcrochet
 
How to turn a wooden pen on a lathe
How to turn a wooden pen on a latheHow to turn a wooden pen on a lathe
How to turn a wooden pen on a lathejessica30251
 
How to make a tail props for a cosplay
How to make a tail props for a cosplayHow to make a tail props for a cosplay
How to make a tail props for a cosplaytriztan028
 
How to make a tail props for a cosplay
How to make a tail props for a cosplayHow to make a tail props for a cosplay
How to make a tail props for a cosplaytriztan028
 

Similar to How To Build A Teepee (20)

Keepsake plywood-rocking-elephant
Keepsake plywood-rocking-elephantKeepsake plywood-rocking-elephant
Keepsake plywood-rocking-elephant
 
Cedar treasure chest
Cedar treasure chestCedar treasure chest
Cedar treasure chest
 
Napkin instructions
Napkin  instructionsNapkin  instructions
Napkin instructions
 
Pdf flower loopbow
Pdf flower loopbowPdf flower loopbow
Pdf flower loopbow
 
readytoreportnapkinfolding-120222004211-phpapp01.pptx
readytoreportnapkinfolding-120222004211-phpapp01.pptxreadytoreportnapkinfolding-120222004211-phpapp01.pptx
readytoreportnapkinfolding-120222004211-phpapp01.pptx
 
How to Guide
How to GuideHow to Guide
How to Guide
 
readytoreportnapkinfolding-120222004211-phpapp01.pptx
readytoreportnapkinfolding-120222004211-phpapp01.pptxreadytoreportnapkinfolding-120222004211-phpapp01.pptx
readytoreportnapkinfolding-120222004211-phpapp01.pptx
 
Sew Your Own Octopus
Sew Your Own OctopusSew Your Own Octopus
Sew Your Own Octopus
 
Our toys
Our toys Our toys
Our toys
 
DIY Wood Fired Cedar Hot Tub
DIY Wood Fired Cedar Hot TubDIY Wood Fired Cedar Hot Tub
DIY Wood Fired Cedar Hot Tub
 
Brown Aesthetic Group Project Presentation.pdf
Brown Aesthetic Group Project Presentation.pdfBrown Aesthetic Group Project Presentation.pdf
Brown Aesthetic Group Project Presentation.pdf
 
Foosball table-diy
Foosball table-diyFoosball table-diy
Foosball table-diy
 
Tatting1
Tatting1Tatting1
Tatting1
 
apeluri ieftine internationale
apeluri ieftine internationaleapeluri ieftine internationale
apeluri ieftine internationale
 
How to make_friendship_bracelets_1_[1]
How to make_friendship_bracelets_1_[1]How to make_friendship_bracelets_1_[1]
How to make_friendship_bracelets_1_[1]
 
How to make a tassel
How to make a tasselHow to make a tassel
How to make a tassel
 
Viking Knit Tutorial
Viking Knit TutorialViking Knit Tutorial
Viking Knit Tutorial
 
How to turn a wooden pen on a lathe
How to turn a wooden pen on a latheHow to turn a wooden pen on a lathe
How to turn a wooden pen on a lathe
 
How to make a tail props for a cosplay
How to make a tail props for a cosplayHow to make a tail props for a cosplay
How to make a tail props for a cosplay
 
How to make a tail props for a cosplay
How to make a tail props for a cosplayHow to make a tail props for a cosplay
How to make a tail props for a cosplay
 

More from mdin6438

Come visit the apache
Come visit the apacheCome visit the apache
Come visit the apachemdin6438
 
Apache vs. Ancient Romans
Apache vs. Ancient RomansApache vs. Ancient Romans
Apache vs. Ancient Romansmdin6438
 
TT Journal
TT JournalTT Journal
TT Journalmdin6438
 
Optional Myth
Optional MythOptional Myth
Optional Mythmdin6438
 
Apache Recipe
Apache RecipeApache Recipe
Apache Recipemdin6438
 
Public announcement
Public announcementPublic announcement
Public announcementmdin6438
 
Apache map
Apache mapApache map
Apache mapmdin6438
 

More from mdin6438 (8)

Come visit the apache
Come visit the apacheCome visit the apache
Come visit the apache
 
Apache vs. Ancient Romans
Apache vs. Ancient RomansApache vs. Ancient Romans
Apache vs. Ancient Romans
 
TT Journal
TT JournalTT Journal
TT Journal
 
Optional Myth
Optional MythOptional Myth
Optional Myth
 
I Am Poem
I Am PoemI Am Poem
I Am Poem
 
Apache Recipe
Apache RecipeApache Recipe
Apache Recipe
 
Public announcement
Public announcementPublic announcement
Public announcement
 
Apache map
Apache mapApache map
Apache map
 

How To Build A Teepee

  • 1. How To Build A Teepee How To Build A Teepee By: Madelyn Dinger
  • 2. History and Use of the Teepee The Apache Native Americans were people to have used the teepee’s many years ago. They were used as shelter and they also were used to be the setting for ceremonial purposes. Residential teepees were used with meaning. The doors were made to face the east, and there was a seat of power on the western wall. The Apache would travel around a lot and would set these up and take them down and use these as “mobile homes”.
  • 3. Step 1 The first thing that you will have to do is hunt. The apache tribe used buffalo. Now you will have to skin the buffalo and collect the hides and leave them to dry. The hides of the buffalo are the things you will need as the main part of the teepee.
  • 4. Step 2 For step two, you must nowcollect about 15 long wooden poles That are about 20 ft long. As well as collecting logs you will need to have strong, durable ropes. You must also gather some wooden floor boards so you will not have to sleep on the regular floor. Once you have collected the hides, polls, wooden floor boards, and the ropes, you are ready to start constructing your teepee!
  • 5. Step 3 Now that you have all the supplies that you need to construct your teepee, you must come up with some ground work. As seen in the picture in the right, you must start with a tripod. Then carefully and slowly keep adding on a pole. Be sure to tie the poles together while setting them up.
  • 6. Step 4 After you are done stetting up the poles in step three, your product should look like the figure to the right. The circle in the middle is an optional fireplace. Be sure to tighten the ropes and leave about two feet of rope loose. You will need this rope later. Also you must remember to firmly place the ends of the poles in the ground, not too far in, but just be sure the teepee will last.
  • 7. Step 5 Now, remember the buffalo you hunted, skinned, and let dry? Well it time to use that! You can either decorate the hides after they are dried and sewn together. Or you can just let the teepee have no design. The picture to the right is an example of what the Plains Indian Teepee’s would look like.
  • 8. Step 6 On your last pole you will have to attach your buffalo hides on. As seen on the figure to the right, you must punch in a hole through the top , and bottom of your buffalo hide and string a rope through them, and tighten it good so the hide will not come off.
  • 9. Step 7 Now, you must tighten the rest of the two foot rope that you have left from step four, around the top of your teepee. Now slowly wrap the buffalo hide around your poles so that barely any area of your teepee skeleton is exposed. You will need a small opening for your door though. CONGRADULATIONS!!! You have successfully made your very own Teepee!
  • 10. Step 8 To firmly secure your teepee into the ground, use nails or wooden stakes and drive them through the floor. This part is optional to have a door. If you have a long strip of hide left over, you may hang this down your teepee using small poles. Congratulations, you have completed making your teepee!!!
  • 11. Bibliography http://4.bp.blogspot.com/__TkYG1RhmoU/SwYNySzeOcI/AAAAAAAACUI/05i4revCuns/s1600/desert_tipi_painted.jpg http://1.bp.blogspot.com/__TkYG1RhmoU/SuPMjZLuj_I/AAAAAAAACQg/gUkK6zc9at4/s400/teepee400.jpg http://reference.findtarget.com/search/indigenous%20peoples%20of%20the%20Americas/ http://www.cowboypoetry.com/memories4.htm http://www.shelterpub.com/_shelter/www_teepee.html http://tatonkatradingcompany.com/plains_teepee.htm http://www.manataka.org/images/Teepee_Erecting2.gif http://s3.hubimg.com/u/4103134_f260.jpg http://www.theoriginaltipicompany.co.uk/sitebuildercontent/sitebuilderpictures/101_0269.JPG