SlideShare una empresa de Scribd logo
1 de 16
Descargar para leer sin conexión
ROOF SYSTEM RETROFITS

                            Roof System Retrofit 1: Roof-to-Wall Connections

The roof-to-wall retrofit strengthens the connection of the roof rafters to the walls to withstand
negative (suction) pressures created by high winds. Contractors install metal clips to connect the rafters
and trusses to the top plate of the outer wall. In the majority of cases, construction will entail removing
the exterior soffit (the exposed undersurface of the roof overhang) to allow access to the roof-to-wall
connection area. In rare cases, approximately 12 inches of the exterior siding may be removed in
addition to the removal of the soffit. The post-inspection Homeowner Report will describe the type of
access required for each home.

Once the clips are installed, any reusable soffit material removed to allow access to the roof-to-wall
connection will be re-installed. Any soffit material not reusable will be replaced with new material.
When installing new material, reasonable effort will be made to match previous soffit material;
however, slight variations should be expected.

For non-vinyl soffits, one coat of primer will be applied to all new material. One coat of color paint will
be applied to all new material if the homeowner provides color paint by the start of construction. Any
noticeable changes to the appearance of the home will be due to variations between any new and old
soffit material and the change in soffit color, if the homeowner chooses not to provide color paint.

Homeowners should remove items from under the eaves of the house, such as lawn ornaments and
furniture obstructing access to the eaves anywhere along the exterior walls of the house. During
construction, occupants of the home should expect the normal inconveniences of a construction site
comparable to having new siding or a new roof installed. This retrofit will typically take 2 - 5 days to
install.


        Figure 1. Roof-to-Wall Connection                  Figure 2. Roof-to-Wall Connection


                                                                                                              1 of 16
Roof System Retrofit 2: Collar Tie/Ridge Board Connection

The collar tie retrofit strengthens the rafter-to-ridge board connection to withstand negative (suction)
pressures created by high winds. Contractors will install 2x6 wood collar ties in the attic near the ridge
board, as pictured below. Houses with existing collar ties may still require this retrofit depending on the
capacity of the existing tie. The capacity of existing collar ties will be determined during engineering
analysis using data collected during the initial inspection. To install the collar ties, contractors will
require access to the attic. This retrofit will not cause any noticeable changes to the overall appearance
of the home.

Homeowners should remove any fragile or large storage items to provide unobstructed workspace along
the center of the attic. This retrofit will typically take 1 day to install.


        Figure 3. Collar Tie/Ridge Board Connection       Figure 4. Collar Tie/Ridge Board Connection


                                                                                                              2 of 16
Roof System Retrofit 3: Hip Rafter Connection

The hip rafter connection retrofit strengthens the connection of the hip rafters to the jack rafters to help
withstand negative (suction) pressures created by high winds. Nails or metal clips are added inside the
attic to each hip rafter and jack rafter connection. To install this retrofit, contractors will require access
to the attic. This retrofit will not cause any noticeable changes to the overall appearance of the home.

Homeowners should remove any fragile or large storage items to provide unobstructed workspace in
the attic. This retrofit will typically take 1 day to install.


                            Jack Rafter
                                                            Common
                                                            Rafter


                     Hip Rafter


                                          Figure 5. Hip Rafter Connection


                                          Figure 6. Hip Rafter Connection


                                                                                                                 3 of 16
Roof System Retrofit 4: Gable End Bracing

The gable end bracing retrofit strengthens the gable ends to withstand pressures created by high winds.
Braces are installed in the attic to strengthen the gable end wall and the connections between the gable,
roof structure and the exterior walls. Depending on the existing framing, stiffeners, cross braces and/or
strong-backs will be installed. To install this retrofit, contractors will require access to the attic.

Homeowners should remove any fragile or large storage items to provide unobstructed workspace in
the attic. This retrofit will not cause any noticeable changes to the overall appearance of the home.
This retrofit will typically take 1 - 2 days to install.


       Figure 7. Gable End Cross Braces                    Figure 8. Gable End Strong-back Bracing


                                                                                                            4 of 16
Roof System Retrofit 5: Soffit Protection

In the event of hurricane force winds, adequate soffit protection prevents water from entering the attic
and the structure below. Hurricane force winds usually cause failure of soffits by blowing the soffit
material away from the structure. High winds then force rainwater into the attic space through the
open soffit and damaging the insulation and ceilings.         The soffit retrofit protects the exposed
undersurface of the roof overhang along the drip edge of the roof. This retrofit does not include gable-
end overhangs

This retrofit will install one or more of the following depending on the existing soffit conditions: stronger
soffit material, additional framing, and/or additional fasteners. Any adequate existing soffit material will
be reused if it was not significantly damaged during removal. Any soffit material not reusable will be
replaced with new material. When installing new material, reasonable effort will be made to match
previous or existing soffit material; however, slight variations should be expected. The preexisting
venting scheme will be followed when installing new plywood and cement board. One coat of primer
will be applied to all new plywood and cement board. One coat of color paint will be applied to new
plywood and cement board if the homeowner provides color paint at the start of construction. Any
noticeable changes to the appearance of the home will be due to variations between the new and old
soffit material and the change in soffit color if the homeowner chooses not to provide color paint.

The soffit retrofit ensures there is adequate backing behind vinyl soffit material and vinyl porch ceilings.
The backing protects the attic from wind and water if the vinyl is blown away during high winds. If the
soffit or porch does not have backing behind the vinyl or needs more substantial backing, the vinyl will
be removed and OSB board or plywood will be installed on the soffit or porch. Additional framing may
be added and/or existing backing re-nailed as needed. The original vinyl material will be reinstalled over
the backing. Openings will be cut into backing material at appropriate locations to provide soffit
venting.

This retrofit usually requires 2 - 3 days for installation, and is installed in conjunction with the Roof-to-
Wall retrofit, if that retrofit is needed. Homeowners should remove any items from under the eaves of
the house, such as lawn ornaments and furniture, which would obstruct access to the eaves anywhere
along the exterior walls of the house. During construction, occupants of the home should expect the
normal inconveniences of a construction site comparable to having new siding or a new roof installed.
This retrofit usually requires 2-3 days for installation and is installed in conjunction with the Roof-to-Wall
retrofit, if that retrofit is needed.


         Figure 9. Soffit Retrofit in Progress               Figure 10. Soffit Retrofit Complete


                                                                                                                 5 of 16
Roof System Retrofit 6: Roof Deck Attachment

The roof deck attachment retrofit strengthens the connection of the roof deck to the roof rafters to help
withstand the pressures created by high winds. This entails applying adhesive foam along the inside
edge of each rafter where it meets the roof decking. The adhesive foam bonds the rafters and roof
decking together and helps prevent the roof decking from peeling away during high winds. Horizontal
seams in the roof decking are also sealed with the foam. This provides a secondary water barrier to help
reduce water damage to the home in the event the shingles are blown off the roof.

Since the retrofit is installed in the attic, there will not be any noticeable changes to the appearance of
the home. Homeowners must remove any fragile or large storage items to provide unobstructed
workspace throughout the entire attic. Small foam droplets may settle on anything left in the attic. This
retrofit will typically take 1-2 days to install.


                                      Figure 11. Roof Deck Attachment


                                                                                                              6 of 16
OPENING RETROFITS

                                        Existing Protection

There are many “hurricane rated” shutters, doors and windows available which offer various levels of
protection. Any previously installed shutters, doors and windows will be examined to ensure the
products provide adequate protection, and to ensure they were installed correctly. Any openings
inadequately protected will receive protection, such as shutters, replacement doors or skylights,
depending on the type of opening.

The products used in this project have been independently tested to national standards and are
approved by the Florida Building Commission and/or Miami Dade County. As part of the engineering
process, engineers select shutters and doors that offer adequate levels of protection for the unique
requirements of each home.


                                                                                                       7 of 16
Opening Retrofit 1: Window Protection

 The window protection retrofit provides metal panel shutters for all windows reducing window
 breakage, water intrusion and internal pressures caused by windborne debris and high winds.

 The standard window protection retrofit includes metal panel shutters. Other types of shutters, such as
 accordion, bahama, roll-down and fabric, are considered upgrades from the standard package. If an
 upgrade is desired, the homeowner must pay the entire difference in cost. The FEMA match is not
 available for the difference in cost for upgrade shutters. The initial Homeowner Report will include costs
 for panel shutters. A shutter installer will conduct a follow-up inspection to determine the cost of
 upgrades, if desired.

 The metal panel shutters are manufactured from galvanized steel or aluminum. Due to the sectional
 design and lighter weight, many people find installing the metal panel shutters much easier than
 installing plywood over windows. As the name implies, panel shutters are comprised of several 16-inch
 wide corrugated metal panels. These panels are installed one at a time and weigh approximately 4-7
 pounds each, depending on the size of the window. Depending on the height of the window, a ladder
 may be required to install the metal panel shutters.

 While metal panel shutters are designed for temporary use, the shutter’s fastening hardware is
 permanently installed. A variety of fastening hardware is used to attach panel shutters, depending on
 the type of window and siding surrounding the window. For brick siding, shutters are typically mounted
 horizontally, and fastened using hand tightened wing nuts over threaded studs that remain in place.
 Windows surrounded by wood or vinyl siding typically require a track along the top and bottom edges of
 the window. The shutters are placed in the tracks and fastened with hand-tightened wing nuts.

 This retrofit will typically take 2 - 5 days to install.


Figure 12. Panel Shutters
Horizontal Installation


                                                                                Figure 13. Panel Shutters
                                                                                Horizontal Fasteners


                                      Figure 14. Top and Bottom Tracks


                                                                                                              8 of 16
Opening Retrofit 2: Entry Door Protection

The entry door protection retrofit includes panel shutters for all but one exterior door (see description
of panel shutters under window protection). To provide a means of egress, one door will receive a
shutter operable from inside the home or be replaced with a hurricane resistant door. An accordion
shutter is one of two possible operable shutters. The accordion will be installed if the door selected as
an egress door swings in, allowing the shutter to be opened and closed from inside the home. If an
accordion cannot be installed on the house, then a roll-down will be installed if there is enough room
above the door for the shutter. The roll-down shutter can be opened and closed using a crank handle
from inside the home.

If an accordion or a roll-down cannot be installed, then the door will be replaced with a hurricane
resistant door. This requires removing the existing exterior door and door frame and replacing it with a
hurricane resistant door and frame assembly. The existing hardware (door knob and dead bolt) is
usually adequate and can be reused in the new door. The CRM project does not provide door hardware
or change door locks. Homeowners should supply hardware if the existing door knob or deadbolt is
missing or inadequate.

The post-inspection Homeowner’s Report will identify which door has been designated as the egress
door and whether the door will receive a roll-down shutter, accordion shutter or be replaced with a
hurricane resistant door. This retrofit will typically take 1 day to install.


         Figure 15. Roll-Down     Figure 16. Entry Door Replacement    Figure 17. Accordion


                                                                                                            9 of 16
Opening Retrofit 3: Garage Door Protection

Garage doors are particularly vulnerable to failure due to windborne debris. Once the exterior of a
home is breached during a hurricane, the internal pressure builds up inside the home and increases the
likelihood of roof failure.

Existing garage doors will be examined to ensure they provide adequate protection, and to ensure they
were installed correctly. Any inadequate doors will be replaced or receive a fabric shutter - whichever is
more economical. The cost of the Garage Door retrofit is based on the size of the garage door, and the
type of door needed to withstand expected wind pressures. The post-inspection Homeowner’s Report
will indicate whether or not existing garage doors will be replaced or receive a shutter.

The replacement garage doors are both impact and pressure rated. They and operate like a normal door
and the existing garage door opener will be adequate to operate the new door. Replacement doors
with impact resistant windows are available as an upgrade.

The fabric shutter for a garage door is a single piece, of pliable, yet extremely strong fabric that can be
rolled or folded for storage. Construction entails installing fasteners on the outside of the wall either in
the mantel over the door and in the concrete threshold, or along both upright sides of the door. The
fastener spacing ranges from a few inches to 12 inches apart. To put up the shutter, homeowners
secure the fabric to the fasteners in the wall using hand tightened washer-wing nuts.

Prior to construction, homeowners must remove any items blocking access to the garage door rails. This
retrofit will typically take 1-2 days to install.


                                    Figure 18. Garage Door Replacement


                                                                                                               10 of 16
Opening Retrofit 4: Skylight Protection

New skylights fitted with impact resistant glass and stronger frames will replace any non impact rated
skylights. These features allow the skylights to withstand high winds and impact from windborne debris.
Regular skylights are especially vulnerable to failure due to impact. Once a skylight is broken and the
exterior of the home is breached, internal pressure builds up and increases the likelihood of roof failure.
Significant water damage is also caused by a skylight failure. Construction will involve removing all
existing, non-impact rated skylights and replacing them with hurricane resistant skylights. During
skylight replacement, some shingles must be removed. Any reusable shingles will be reused. Any
shingles not reusable will be replaced with new shingles. When installing new shingles, reasonable
effort will be made to match previous shingles; however, slight variations should be expected. This
retrofit will typically take 1-2 days to install.


                                       Figure 19. Skylight Protection


                                                                                                              11 of 16
IBHS BRONZE RETROFITS
                          IBHS Bronze Retrofit 1: Secondary Water Protection

Secondary water protection prevents water intrusion if the shingles or other primary roof covering are
blown away or damaged. This is achieved by applying adhesive foam in the attic against the underside
of the roof decking. All roof decking seams are sealed with the adhesive foam. The foam cannot be
installed in areas where vaulted ceilings prevent access to the roof deck in the attic. If one area of the
roof is inaccessible, the Secondary Water Protection retrofit will not be installed because the roof deck
is not able to be fully protected.

Any existing secondary water protection will be considered during engineering analysis to ensure it
provides adequate protection and was installed correctly. Common vapor barriers, such as tar paper or
felt, do not provide protection from water intrusion if the shingles are blown off. These are not
considered secondary water protection.

Since the retrofit is installed in the attic, there will not be any noticeable changes to the appearance of
the home. Homeowners must remove any fragile or large storage items to provide unobstructed
workspace throughout the entire attic. Small foam droplets may settle on anything left in the attic. This
retrofit will typically take 1-2 days to install.

Note: Houses requiring the Roof Deck retrofit will not require the Secondary Water Protection retrofit
because the Roof Deck retrofit naturally provides a secondary water barrier.


                                   Figure 20. Secondary Water Protection


                                                                                                              12 of 16
IBHS Bronze Retrofit 2: Ridge and Off-Ridge Vents

Strong winds can force rain water into the attic through the roof vents, soaking the insulation and
drywall below. To reduce water intrusion, the ridge and off-ridge vents will be replaced with high wind-
rated products which are resistant to water intrusion. These vents allow air movement during normal
conditions. All existing ridge and off-ridge vents will be replaced with wind-rated products. This does
not include installing vents where none already exist. Off-ridge vents include power vents, box vents
and turban vents. Reasonable effort will be made to match the style and color of existing vents.
However, variations should be expected due to product availability and fading.

Some shingles around the existing vents may be replaced with new shingles when the new vents are
installed. The new shingles will be the best match of the previous color and style. However, slight
variation should be expected due to product availability and fading.


                  Figure 21. Power Vent                           Figure 22. Box Vent


                                          Figure 23. Ridge Vent


                                                                                                           13 of 16
IBHS Bronze Retrofit 3: Gable End Vents

To prevent water intrusion through the gable end vents caused by high winds, shutters will be provided
for all gable end vents. This requires installing tracking above and below the vent or threaded studs,
depending on the siding type. Removable shutters are installed by the homeowner in the tracks or
threaded studs in order to close off the vents in the case of high winds. The shutters used for the gable
end vents are similar to the window and door shutters. Shutters are either fabric or metal panel
shutters.


                                       Figure 24. Gable End Vent


                                                                                                            14 of 16
IBHS Bronze Retrofit 4: Gable End Overhang

Gable end overhangs are vulnerable to uplift failure because they collect the wind load from above and
below the overhang. The Gable End Overhang retrofit also reduces wind and water intrusion into the
attic by strengthening the soffit material and attachment, if needed. Each overhang will be analyzed
during engineering analysis to determine if strengthening is required. Inadequate overhang framing and
soffits will be retrofitted.

To strengthen the overhang to resist the uplift forces, blocking and clips will be added in the attic and in
gable end overhangs. Typical blocking spacing ranges from approximately 12” to 24”. Installing the clips
and blocking will entail removing the overhang soffit, installing the blocking and clips then replacing the
overhang soffit.

To reduce wind and water intrusion, one or more of the following will be installed, depending on the
existing soffit conditions: stronger soffit material, additional framing, and/or additional fasteners. Any
adequate existing soffit material will be reused if it was not significantly damaged during removal. Any
soffit material not reusable will be replaced with new material. When installing new material,
reasonable effort will be made to match previous or existing soffit material; however, slight variations
should be expected. The preexisting venting scheme will be followed when installing new plywood and
cement board. One coat of primer will be applied to all new plywood and cement board. One coat of
color paint will be applied to new plywood and cement board if the homeowner provides color paint at
the start of construction. Any noticeable changes to the appearance of the home will be due to
variations between the new and old soffit material and the change in soffit color if the homeowner
chooses not to provide color paint.

The Gable End Overhang retrofit ensures there is adequate backing behind any vinyl soffit. The backing
protects the attic from wind and water intrusion if the vinyl is blown away during high winds. If the
soffit does not have backing behind the vinyl or needs more substantial backing, OSB board or plywood
will be installed on the soffit. Additional framing may be added and/or existing backing re-nailed as
needed. The original vinyl material will be reinstalled over the backing. Openings will be cut into
backing material at appropriate locations to provide soffit venting.

This retrofit usually requires 2-3 days for installation. This retrofit protects the gable-end overhangs. It
does not include the roof overhang along the drip edge of the roof. Any noticeable changes to the
appearance of the home will be due to variations between the new and old soffit material and the
change in soffit color if the homeowner chooses not to provide color paint. Homeowners must remove
any large storage items from around the gable ends to provide unobstructed access to the gable ends.

During construction, occupants of the home should expect the normal inconveniences of a construction
site comparable to having new siding or a new roof installed. Homeowners must remove any large
storage items from around the gable ends and from under the eaves of the house to provide
unobstructed access to the gable ends. This retrofit usually requires 2-3 days for installation.


                                                                                                               15 of 16
Figure 25. Gable End Overhang


                                16 of 16

Más contenido relacionado

La actualidad más candente

ROOF - Worksop and lecture at IIT Roorkee Department of Architecture
ROOF - Worksop and lecture at IIT Roorkee Department of ArchitectureROOF - Worksop and lecture at IIT Roorkee Department of Architecture
ROOF - Worksop and lecture at IIT Roorkee Department of ArchitectureAnurag Khandelwal
 
Roofs and roof covering
Roofs and roof coveringRoofs and roof covering
Roofs and roof coveringAbhishek kumar
 
visual dictionary- cornerbead
visual dictionary- cornerbeadvisual dictionary- cornerbead
visual dictionary- cornerbeadcornerbead
 
Roof covering-slideshare
Roof covering-slideshareRoof covering-slideshare
Roof covering-slideshareJulian Swindell
 
Visual Dictionary BSCI 2300
Visual Dictionary BSCI 2300Visual Dictionary BSCI 2300
Visual Dictionary BSCI 2300Sp10nail
 
Hillstone-en
Hillstone-enHillstone-en
Hillstone-enlibnam
 
2011 samplereport
2011 samplereport2011 samplereport
2011 samplereportInspectPro
 
Successful Tips to Prevent Roofing Leaks
Successful Tips to Prevent Roofing LeaksSuccessful Tips to Prevent Roofing Leaks
Successful Tips to Prevent Roofing LeaksAlpha Rain
 
Introduction to types of roofs
Introduction to types of roofsIntroduction to types of roofs
Introduction to types of roofsMile High Roofers
 
LMCurbs Roof Curb Installation Instructions For Vertical Standing Seam
LMCurbs Roof Curb Installation Instructions For Vertical Standing SeamLMCurbs Roof Curb Installation Instructions For Vertical Standing Seam
LMCurbs Roof Curb Installation Instructions For Vertical Standing SeamLMCurbs©
 
Pitched Roof
Pitched RoofPitched Roof
Pitched RoofRishii2i
 

La actualidad más candente (20)

Roof
RoofRoof
Roof
 
ROOF - Worksop and lecture at IIT Roorkee Department of Architecture
ROOF - Worksop and lecture at IIT Roorkee Department of ArchitectureROOF - Worksop and lecture at IIT Roorkee Department of Architecture
ROOF - Worksop and lecture at IIT Roorkee Department of Architecture
 
Roof and roof coverings
Roof and roof coveringsRoof and roof coverings
Roof and roof coverings
 
Roofs and roof covering
Roofs and roof coveringRoofs and roof covering
Roofs and roof covering
 
Roof
RoofRoof
Roof
 
visual dictionary- cornerbead
visual dictionary- cornerbeadvisual dictionary- cornerbead
visual dictionary- cornerbead
 
Roof covering-slideshare
Roof covering-slideshareRoof covering-slideshare
Roof covering-slideshare
 
Visual Dictionary BSCI 2300
Visual Dictionary BSCI 2300Visual Dictionary BSCI 2300
Visual Dictionary BSCI 2300
 
7 Bromley
7 Bromley7 Bromley
7 Bromley
 
Sp10waterproofing
Sp10waterproofingSp10waterproofing
Sp10waterproofing
 
Hillstone-en
Hillstone-enHillstone-en
Hillstone-en
 
invernadero
invernaderoinvernadero
invernadero
 
2011 samplereport
2011 samplereport2011 samplereport
2011 samplereport
 
Successful Tips to Prevent Roofing Leaks
Successful Tips to Prevent Roofing LeaksSuccessful Tips to Prevent Roofing Leaks
Successful Tips to Prevent Roofing Leaks
 
Roof and roof coverings
Roof and roof coveringsRoof and roof coverings
Roof and roof coverings
 
Roof
RoofRoof
Roof
 
Introduction to types of roofs
Introduction to types of roofsIntroduction to types of roofs
Introduction to types of roofs
 
LMCurbs Roof Curb Installation Instructions For Vertical Standing Seam
LMCurbs Roof Curb Installation Instructions For Vertical Standing SeamLMCurbs Roof Curb Installation Instructions For Vertical Standing Seam
LMCurbs Roof Curb Installation Instructions For Vertical Standing Seam
 
Pitched Roof
Pitched RoofPitched Roof
Pitched Roof
 
Powerpoint Pres.
Powerpoint Pres.Powerpoint Pres.
Powerpoint Pres.
 

Destacado

Glossario de Comunicação
Glossario de ComunicaçãoGlossario de Comunicação
Glossario de Comunicaçãocomunicar10b
 
Probabilidad y estadistica_basica
Probabilidad y estadistica_basicaProbabilidad y estadistica_basica
Probabilidad y estadistica_basicaHenry E. Herrera
 
Definiciones sobre Switche, Router, Modem, Wimax, Acces Point..
Definiciones sobre Switche, Router, Modem, Wimax, Acces Point..Definiciones sobre Switche, Router, Modem, Wimax, Acces Point..
Definiciones sobre Switche, Router, Modem, Wimax, Acces Point..William Javier Montealegre
 
Guia de ramais da uerj
Guia de ramais da uerjGuia de ramais da uerj
Guia de ramais da uerjnucane
 
INFLUENCIA DEL PROGRAMA “FORTALECIÉNDOME” PARA LA PREVENCIÓN DEL SÍNDROME DE...
INFLUENCIA DEL PROGRAMA “FORTALECIÉNDOME” PARA LA PREVENCIÓN  DEL SÍNDROME DE...INFLUENCIA DEL PROGRAMA “FORTALECIÉNDOME” PARA LA PREVENCIÓN  DEL SÍNDROME DE...
INFLUENCIA DEL PROGRAMA “FORTALECIÉNDOME” PARA LA PREVENCIÓN DEL SÍNDROME DE...Ambrocio Teodoro Esteves Pairazaman
 
Análisis de textos publicitarios
Análisis de textos publicitariosAnálisis de textos publicitarios
Análisis de textos publicitariosDaniela Escobar
 
La prueba en general
La prueba en generalLa prueba en general
La prueba en generalangeltineo123
 
Sistema financiero mexicano
Sistema financiero mexicanoSistema financiero mexicano
Sistema financiero mexicanoAdriana Romano
 
Equipos Inalambricos
Equipos InalambricosEquipos Inalambricos
Equipos Inalambricosdany alexis
 
Dental Anesthesia
Dental AnesthesiaDental Anesthesia
Dental AnesthesiaOzident
 
Reino das plantas rita ciencias 08 05 2014
Reino das plantas rita ciencias 08 05 2014Reino das plantas rita ciencias 08 05 2014
Reino das plantas rita ciencias 08 05 2014Delziene Jesus
 
Modelos de negocio
Modelos de negocioModelos de negocio
Modelos de negocioOmar Vite
 
ley federal de proteccion (vaneynorma)
ley federal de proteccion (vaneynorma)ley federal de proteccion (vaneynorma)
ley federal de proteccion (vaneynorma)Michi Vega
 

Destacado (20)

L10 Examen
L10 ExamenL10 Examen
L10 Examen
 
Glossario de Comunicação
Glossario de ComunicaçãoGlossario de Comunicação
Glossario de Comunicação
 
Probabilidad y estadistica_basica
Probabilidad y estadistica_basicaProbabilidad y estadistica_basica
Probabilidad y estadistica_basica
 
Transporte
TransporteTransporte
Transporte
 
Definiciones sobre Switche, Router, Modem, Wimax, Acces Point..
Definiciones sobre Switche, Router, Modem, Wimax, Acces Point..Definiciones sobre Switche, Router, Modem, Wimax, Acces Point..
Definiciones sobre Switche, Router, Modem, Wimax, Acces Point..
 
Guia de ramais da uerj
Guia de ramais da uerjGuia de ramais da uerj
Guia de ramais da uerj
 
portada08
portada08portada08
portada08
 
INFLUENCIA DEL PROGRAMA “FORTALECIÉNDOME” PARA LA PREVENCIÓN DEL SÍNDROME DE...
INFLUENCIA DEL PROGRAMA “FORTALECIÉNDOME” PARA LA PREVENCIÓN  DEL SÍNDROME DE...INFLUENCIA DEL PROGRAMA “FORTALECIÉNDOME” PARA LA PREVENCIÓN  DEL SÍNDROME DE...
INFLUENCIA DEL PROGRAMA “FORTALECIÉNDOME” PARA LA PREVENCIÓN DEL SÍNDROME DE...
 
Coevolucion
CoevolucionCoevolucion
Coevolucion
 
Análisis de textos publicitarios
Análisis de textos publicitariosAnálisis de textos publicitarios
Análisis de textos publicitarios
 
Clasificación de las vocales
Clasificación de las vocalesClasificación de las vocales
Clasificación de las vocales
 
La prueba en general
La prueba en generalLa prueba en general
La prueba en general
 
Sistema financiero mexicano
Sistema financiero mexicanoSistema financiero mexicano
Sistema financiero mexicano
 
Equipos Inalambricos
Equipos InalambricosEquipos Inalambricos
Equipos Inalambricos
 
Dental Anesthesia
Dental AnesthesiaDental Anesthesia
Dental Anesthesia
 
Anesth mouth
Anesth mouthAnesth mouth
Anesth mouth
 
Reino das plantas rita ciencias 08 05 2014
Reino das plantas rita ciencias 08 05 2014Reino das plantas rita ciencias 08 05 2014
Reino das plantas rita ciencias 08 05 2014
 
para hacer blogs
para hacer blogspara hacer blogs
para hacer blogs
 
Modelos de negocio
Modelos de negocioModelos de negocio
Modelos de negocio
 
ley federal de proteccion (vaneynorma)
ley federal de proteccion (vaneynorma)ley federal de proteccion (vaneynorma)
ley federal de proteccion (vaneynorma)
 

Similar a MS Coastal Retrofits

householders-guide-to-flat-roofing-2015
householders-guide-to-flat-roofing-2015householders-guide-to-flat-roofing-2015
householders-guide-to-flat-roofing-2015Vin Housley
 
What is Sprayed Polyurethane Foam?
What is Sprayed Polyurethane Foam?What is Sprayed Polyurethane Foam?
What is Sprayed Polyurethane Foam?Marissa Hornbuckle
 
Btech compile 6 oct 4am
Btech compile 6 oct 4amBtech compile 6 oct 4am
Btech compile 6 oct 4amCeline Tan
 
KB BreatheEZ Houswrap Installation Guide
KB BreatheEZ Houswrap Installation GuideKB BreatheEZ Houswrap Installation Guide
KB BreatheEZ Houswrap Installation GuideWestern-Building-Center
 
Visual Dictionary- Zoning
Visual Dictionary- ZoningVisual Dictionary- Zoning
Visual Dictionary- ZoningZoning
 
Asv 21st century tile roofs 2008-10-vandewater
Asv 21st century tile roofs 2008-10-vandewaterAsv 21st century tile roofs 2008-10-vandewater
Asv 21st century tile roofs 2008-10-vandewaterCool Roof Innovations
 
Basement waterproofing
Basement waterproofingBasement waterproofing
Basement waterproofingUnion, Nj
 
Avalon Log Homes Construction Manual 2011
Avalon Log Homes Construction Manual 2011Avalon Log Homes Construction Manual 2011
Avalon Log Homes Construction Manual 2011Avalon Log Homes
 
Visual Dictionary - sp10cladding
Visual Dictionary - sp10claddingVisual Dictionary - sp10cladding
Visual Dictionary - sp10claddingSp10cladding
 
Visual Dictionary Final
Visual Dictionary FinalVisual Dictionary Final
Visual Dictionary FinalSp10rebar
 
Home Fallout Shelter Above Ground - Civil Defense
Home Fallout Shelter Above Ground - Civil DefenseHome Fallout Shelter Above Ground - Civil Defense
Home Fallout Shelter Above Ground - Civil DefenseJTRourke
 

Similar a MS Coastal Retrofits (20)

Build a shed
Build a shedBuild a shed
Build a shed
 
Cavity wall
Cavity wall Cavity wall
Cavity wall
 
Construction Safety.
Construction Safety.Construction Safety.
Construction Safety.
 
householders-guide-to-flat-roofing-2015
householders-guide-to-flat-roofing-2015householders-guide-to-flat-roofing-2015
householders-guide-to-flat-roofing-2015
 
Air bricks
Air bricksAir bricks
Air bricks
 
Build a shed
Build a shedBuild a shed
Build a shed
 
What is Sprayed Polyurethane Foam?
What is Sprayed Polyurethane Foam?What is Sprayed Polyurethane Foam?
What is Sprayed Polyurethane Foam?
 
RESNET: Explaining the Thermal Bypass Checklist
RESNET: Explaining the Thermal Bypass ChecklistRESNET: Explaining the Thermal Bypass Checklist
RESNET: Explaining the Thermal Bypass Checklist
 
Btech compile 6 oct 4am
Btech compile 6 oct 4amBtech compile 6 oct 4am
Btech compile 6 oct 4am
 
KB BreatheEZ Houswrap Installation Guide
KB BreatheEZ Houswrap Installation GuideKB BreatheEZ Houswrap Installation Guide
KB BreatheEZ Houswrap Installation Guide
 
Air bricks
Air bricksAir bricks
Air bricks
 
Visual Dictionary- Zoning
Visual Dictionary- ZoningVisual Dictionary- Zoning
Visual Dictionary- Zoning
 
Curtain walls
Curtain wallsCurtain walls
Curtain walls
 
Rod Visual
Rod VisualRod Visual
Rod Visual
 
Asv 21st century tile roofs 2008-10-vandewater
Asv 21st century tile roofs 2008-10-vandewaterAsv 21st century tile roofs 2008-10-vandewater
Asv 21st century tile roofs 2008-10-vandewater
 
Basement waterproofing
Basement waterproofingBasement waterproofing
Basement waterproofing
 
Avalon Log Homes Construction Manual 2011
Avalon Log Homes Construction Manual 2011Avalon Log Homes Construction Manual 2011
Avalon Log Homes Construction Manual 2011
 
Visual Dictionary - sp10cladding
Visual Dictionary - sp10claddingVisual Dictionary - sp10cladding
Visual Dictionary - sp10cladding
 
Visual Dictionary Final
Visual Dictionary FinalVisual Dictionary Final
Visual Dictionary Final
 
Home Fallout Shelter Above Ground - Civil Defense
Home Fallout Shelter Above Ground - Civil DefenseHome Fallout Shelter Above Ground - Civil Defense
Home Fallout Shelter Above Ground - Civil Defense
 

MS Coastal Retrofits

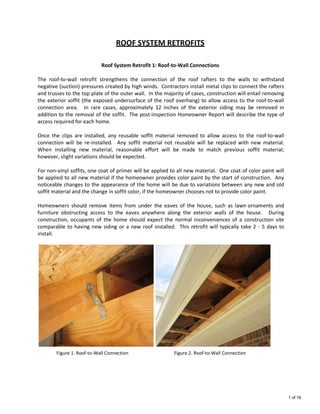
  • 1. ROOF SYSTEM RETROFITS Roof System Retrofit 1: Roof-to-Wall Connections The roof-to-wall retrofit strengthens the connection of the roof rafters to the walls to withstand negative (suction) pressures created by high winds. Contractors install metal clips to connect the rafters and trusses to the top plate of the outer wall. In the majority of cases, construction will entail removing the exterior soffit (the exposed undersurface of the roof overhang) to allow access to the roof-to-wall connection area. In rare cases, approximately 12 inches of the exterior siding may be removed in addition to the removal of the soffit. The post-inspection Homeowner Report will describe the type of access required for each home. Once the clips are installed, any reusable soffit material removed to allow access to the roof-to-wall connection will be re-installed. Any soffit material not reusable will be replaced with new material. When installing new material, reasonable effort will be made to match previous soffit material; however, slight variations should be expected. For non-vinyl soffits, one coat of primer will be applied to all new material. One coat of color paint will be applied to all new material if the homeowner provides color paint by the start of construction. Any noticeable changes to the appearance of the home will be due to variations between any new and old soffit material and the change in soffit color, if the homeowner chooses not to provide color paint. Homeowners should remove items from under the eaves of the house, such as lawn ornaments and furniture obstructing access to the eaves anywhere along the exterior walls of the house. During construction, occupants of the home should expect the normal inconveniences of a construction site comparable to having new siding or a new roof installed. This retrofit will typically take 2 - 5 days to install. Figure 1. Roof-to-Wall Connection Figure 2. Roof-to-Wall Connection 1 of 16
  • 2. Roof System Retrofit 2: Collar Tie/Ridge Board Connection The collar tie retrofit strengthens the rafter-to-ridge board connection to withstand negative (suction) pressures created by high winds. Contractors will install 2x6 wood collar ties in the attic near the ridge board, as pictured below. Houses with existing collar ties may still require this retrofit depending on the capacity of the existing tie. The capacity of existing collar ties will be determined during engineering analysis using data collected during the initial inspection. To install the collar ties, contractors will require access to the attic. This retrofit will not cause any noticeable changes to the overall appearance of the home. Homeowners should remove any fragile or large storage items to provide unobstructed workspace along the center of the attic. This retrofit will typically take 1 day to install. Figure 3. Collar Tie/Ridge Board Connection Figure 4. Collar Tie/Ridge Board Connection 2 of 16
  • 3. Roof System Retrofit 3: Hip Rafter Connection The hip rafter connection retrofit strengthens the connection of the hip rafters to the jack rafters to help withstand negative (suction) pressures created by high winds. Nails or metal clips are added inside the attic to each hip rafter and jack rafter connection. To install this retrofit, contractors will require access to the attic. This retrofit will not cause any noticeable changes to the overall appearance of the home. Homeowners should remove any fragile or large storage items to provide unobstructed workspace in the attic. This retrofit will typically take 1 day to install. Jack Rafter Common Rafter Hip Rafter Figure 5. Hip Rafter Connection Figure 6. Hip Rafter Connection 3 of 16
  • 4. Roof System Retrofit 4: Gable End Bracing The gable end bracing retrofit strengthens the gable ends to withstand pressures created by high winds. Braces are installed in the attic to strengthen the gable end wall and the connections between the gable, roof structure and the exterior walls. Depending on the existing framing, stiffeners, cross braces and/or strong-backs will be installed. To install this retrofit, contractors will require access to the attic. Homeowners should remove any fragile or large storage items to provide unobstructed workspace in the attic. This retrofit will not cause any noticeable changes to the overall appearance of the home. This retrofit will typically take 1 - 2 days to install. Figure 7. Gable End Cross Braces Figure 8. Gable End Strong-back Bracing 4 of 16
  • 5. Roof System Retrofit 5: Soffit Protection In the event of hurricane force winds, adequate soffit protection prevents water from entering the attic and the structure below. Hurricane force winds usually cause failure of soffits by blowing the soffit material away from the structure. High winds then force rainwater into the attic space through the open soffit and damaging the insulation and ceilings. The soffit retrofit protects the exposed undersurface of the roof overhang along the drip edge of the roof. This retrofit does not include gable- end overhangs This retrofit will install one or more of the following depending on the existing soffit conditions: stronger soffit material, additional framing, and/or additional fasteners. Any adequate existing soffit material will be reused if it was not significantly damaged during removal. Any soffit material not reusable will be replaced with new material. When installing new material, reasonable effort will be made to match previous or existing soffit material; however, slight variations should be expected. The preexisting venting scheme will be followed when installing new plywood and cement board. One coat of primer will be applied to all new plywood and cement board. One coat of color paint will be applied to new plywood and cement board if the homeowner provides color paint at the start of construction. Any noticeable changes to the appearance of the home will be due to variations between the new and old soffit material and the change in soffit color if the homeowner chooses not to provide color paint. The soffit retrofit ensures there is adequate backing behind vinyl soffit material and vinyl porch ceilings. The backing protects the attic from wind and water if the vinyl is blown away during high winds. If the soffit or porch does not have backing behind the vinyl or needs more substantial backing, the vinyl will be removed and OSB board or plywood will be installed on the soffit or porch. Additional framing may be added and/or existing backing re-nailed as needed. The original vinyl material will be reinstalled over the backing. Openings will be cut into backing material at appropriate locations to provide soffit venting. This retrofit usually requires 2 - 3 days for installation, and is installed in conjunction with the Roof-to- Wall retrofit, if that retrofit is needed. Homeowners should remove any items from under the eaves of the house, such as lawn ornaments and furniture, which would obstruct access to the eaves anywhere along the exterior walls of the house. During construction, occupants of the home should expect the normal inconveniences of a construction site comparable to having new siding or a new roof installed. This retrofit usually requires 2-3 days for installation and is installed in conjunction with the Roof-to-Wall retrofit, if that retrofit is needed. Figure 9. Soffit Retrofit in Progress Figure 10. Soffit Retrofit Complete 5 of 16
  • 6. Roof System Retrofit 6: Roof Deck Attachment The roof deck attachment retrofit strengthens the connection of the roof deck to the roof rafters to help withstand the pressures created by high winds. This entails applying adhesive foam along the inside edge of each rafter where it meets the roof decking. The adhesive foam bonds the rafters and roof decking together and helps prevent the roof decking from peeling away during high winds. Horizontal seams in the roof decking are also sealed with the foam. This provides a secondary water barrier to help reduce water damage to the home in the event the shingles are blown off the roof. Since the retrofit is installed in the attic, there will not be any noticeable changes to the appearance of the home. Homeowners must remove any fragile or large storage items to provide unobstructed workspace throughout the entire attic. Small foam droplets may settle on anything left in the attic. This retrofit will typically take 1-2 days to install. Figure 11. Roof Deck Attachment 6 of 16
  • 7. OPENING RETROFITS Existing Protection There are many “hurricane rated” shutters, doors and windows available which offer various levels of protection. Any previously installed shutters, doors and windows will be examined to ensure the products provide adequate protection, and to ensure they were installed correctly. Any openings inadequately protected will receive protection, such as shutters, replacement doors or skylights, depending on the type of opening. The products used in this project have been independently tested to national standards and are approved by the Florida Building Commission and/or Miami Dade County. As part of the engineering process, engineers select shutters and doors that offer adequate levels of protection for the unique requirements of each home. 7 of 16
  • 8. Opening Retrofit 1: Window Protection The window protection retrofit provides metal panel shutters for all windows reducing window breakage, water intrusion and internal pressures caused by windborne debris and high winds. The standard window protection retrofit includes metal panel shutters. Other types of shutters, such as accordion, bahama, roll-down and fabric, are considered upgrades from the standard package. If an upgrade is desired, the homeowner must pay the entire difference in cost. The FEMA match is not available for the difference in cost for upgrade shutters. The initial Homeowner Report will include costs for panel shutters. A shutter installer will conduct a follow-up inspection to determine the cost of upgrades, if desired. The metal panel shutters are manufactured from galvanized steel or aluminum. Due to the sectional design and lighter weight, many people find installing the metal panel shutters much easier than installing plywood over windows. As the name implies, panel shutters are comprised of several 16-inch wide corrugated metal panels. These panels are installed one at a time and weigh approximately 4-7 pounds each, depending on the size of the window. Depending on the height of the window, a ladder may be required to install the metal panel shutters. While metal panel shutters are designed for temporary use, the shutter’s fastening hardware is permanently installed. A variety of fastening hardware is used to attach panel shutters, depending on the type of window and siding surrounding the window. For brick siding, shutters are typically mounted horizontally, and fastened using hand tightened wing nuts over threaded studs that remain in place. Windows surrounded by wood or vinyl siding typically require a track along the top and bottom edges of the window. The shutters are placed in the tracks and fastened with hand-tightened wing nuts. This retrofit will typically take 2 - 5 days to install. Figure 12. Panel Shutters Horizontal Installation Figure 13. Panel Shutters Horizontal Fasteners Figure 14. Top and Bottom Tracks 8 of 16
  • 9. Opening Retrofit 2: Entry Door Protection The entry door protection retrofit includes panel shutters for all but one exterior door (see description of panel shutters under window protection). To provide a means of egress, one door will receive a shutter operable from inside the home or be replaced with a hurricane resistant door. An accordion shutter is one of two possible operable shutters. The accordion will be installed if the door selected as an egress door swings in, allowing the shutter to be opened and closed from inside the home. If an accordion cannot be installed on the house, then a roll-down will be installed if there is enough room above the door for the shutter. The roll-down shutter can be opened and closed using a crank handle from inside the home. If an accordion or a roll-down cannot be installed, then the door will be replaced with a hurricane resistant door. This requires removing the existing exterior door and door frame and replacing it with a hurricane resistant door and frame assembly. The existing hardware (door knob and dead bolt) is usually adequate and can be reused in the new door. The CRM project does not provide door hardware or change door locks. Homeowners should supply hardware if the existing door knob or deadbolt is missing or inadequate. The post-inspection Homeowner’s Report will identify which door has been designated as the egress door and whether the door will receive a roll-down shutter, accordion shutter or be replaced with a hurricane resistant door. This retrofit will typically take 1 day to install. Figure 15. Roll-Down Figure 16. Entry Door Replacement Figure 17. Accordion 9 of 16
  • 10. Opening Retrofit 3: Garage Door Protection Garage doors are particularly vulnerable to failure due to windborne debris. Once the exterior of a home is breached during a hurricane, the internal pressure builds up inside the home and increases the likelihood of roof failure. Existing garage doors will be examined to ensure they provide adequate protection, and to ensure they were installed correctly. Any inadequate doors will be replaced or receive a fabric shutter - whichever is more economical. The cost of the Garage Door retrofit is based on the size of the garage door, and the type of door needed to withstand expected wind pressures. The post-inspection Homeowner’s Report will indicate whether or not existing garage doors will be replaced or receive a shutter. The replacement garage doors are both impact and pressure rated. They and operate like a normal door and the existing garage door opener will be adequate to operate the new door. Replacement doors with impact resistant windows are available as an upgrade. The fabric shutter for a garage door is a single piece, of pliable, yet extremely strong fabric that can be rolled or folded for storage. Construction entails installing fasteners on the outside of the wall either in the mantel over the door and in the concrete threshold, or along both upright sides of the door. The fastener spacing ranges from a few inches to 12 inches apart. To put up the shutter, homeowners secure the fabric to the fasteners in the wall using hand tightened washer-wing nuts. Prior to construction, homeowners must remove any items blocking access to the garage door rails. This retrofit will typically take 1-2 days to install. Figure 18. Garage Door Replacement 10 of 16
  • 11. Opening Retrofit 4: Skylight Protection New skylights fitted with impact resistant glass and stronger frames will replace any non impact rated skylights. These features allow the skylights to withstand high winds and impact from windborne debris. Regular skylights are especially vulnerable to failure due to impact. Once a skylight is broken and the exterior of the home is breached, internal pressure builds up and increases the likelihood of roof failure. Significant water damage is also caused by a skylight failure. Construction will involve removing all existing, non-impact rated skylights and replacing them with hurricane resistant skylights. During skylight replacement, some shingles must be removed. Any reusable shingles will be reused. Any shingles not reusable will be replaced with new shingles. When installing new shingles, reasonable effort will be made to match previous shingles; however, slight variations should be expected. This retrofit will typically take 1-2 days to install. Figure 19. Skylight Protection 11 of 16
  • 12. IBHS BRONZE RETROFITS IBHS Bronze Retrofit 1: Secondary Water Protection Secondary water protection prevents water intrusion if the shingles or other primary roof covering are blown away or damaged. This is achieved by applying adhesive foam in the attic against the underside of the roof decking. All roof decking seams are sealed with the adhesive foam. The foam cannot be installed in areas where vaulted ceilings prevent access to the roof deck in the attic. If one area of the roof is inaccessible, the Secondary Water Protection retrofit will not be installed because the roof deck is not able to be fully protected. Any existing secondary water protection will be considered during engineering analysis to ensure it provides adequate protection and was installed correctly. Common vapor barriers, such as tar paper or felt, do not provide protection from water intrusion if the shingles are blown off. These are not considered secondary water protection. Since the retrofit is installed in the attic, there will not be any noticeable changes to the appearance of the home. Homeowners must remove any fragile or large storage items to provide unobstructed workspace throughout the entire attic. Small foam droplets may settle on anything left in the attic. This retrofit will typically take 1-2 days to install. Note: Houses requiring the Roof Deck retrofit will not require the Secondary Water Protection retrofit because the Roof Deck retrofit naturally provides a secondary water barrier. Figure 20. Secondary Water Protection 12 of 16
  • 13. IBHS Bronze Retrofit 2: Ridge and Off-Ridge Vents Strong winds can force rain water into the attic through the roof vents, soaking the insulation and drywall below. To reduce water intrusion, the ridge and off-ridge vents will be replaced with high wind- rated products which are resistant to water intrusion. These vents allow air movement during normal conditions. All existing ridge and off-ridge vents will be replaced with wind-rated products. This does not include installing vents where none already exist. Off-ridge vents include power vents, box vents and turban vents. Reasonable effort will be made to match the style and color of existing vents. However, variations should be expected due to product availability and fading. Some shingles around the existing vents may be replaced with new shingles when the new vents are installed. The new shingles will be the best match of the previous color and style. However, slight variation should be expected due to product availability and fading. Figure 21. Power Vent Figure 22. Box Vent Figure 23. Ridge Vent 13 of 16
  • 14. IBHS Bronze Retrofit 3: Gable End Vents To prevent water intrusion through the gable end vents caused by high winds, shutters will be provided for all gable end vents. This requires installing tracking above and below the vent or threaded studs, depending on the siding type. Removable shutters are installed by the homeowner in the tracks or threaded studs in order to close off the vents in the case of high winds. The shutters used for the gable end vents are similar to the window and door shutters. Shutters are either fabric or metal panel shutters. Figure 24. Gable End Vent 14 of 16
  • 15. IBHS Bronze Retrofit 4: Gable End Overhang Gable end overhangs are vulnerable to uplift failure because they collect the wind load from above and below the overhang. The Gable End Overhang retrofit also reduces wind and water intrusion into the attic by strengthening the soffit material and attachment, if needed. Each overhang will be analyzed during engineering analysis to determine if strengthening is required. Inadequate overhang framing and soffits will be retrofitted. To strengthen the overhang to resist the uplift forces, blocking and clips will be added in the attic and in gable end overhangs. Typical blocking spacing ranges from approximately 12” to 24”. Installing the clips and blocking will entail removing the overhang soffit, installing the blocking and clips then replacing the overhang soffit. To reduce wind and water intrusion, one or more of the following will be installed, depending on the existing soffit conditions: stronger soffit material, additional framing, and/or additional fasteners. Any adequate existing soffit material will be reused if it was not significantly damaged during removal. Any soffit material not reusable will be replaced with new material. When installing new material, reasonable effort will be made to match previous or existing soffit material; however, slight variations should be expected. The preexisting venting scheme will be followed when installing new plywood and cement board. One coat of primer will be applied to all new plywood and cement board. One coat of color paint will be applied to new plywood and cement board if the homeowner provides color paint at the start of construction. Any noticeable changes to the appearance of the home will be due to variations between the new and old soffit material and the change in soffit color if the homeowner chooses not to provide color paint. The Gable End Overhang retrofit ensures there is adequate backing behind any vinyl soffit. The backing protects the attic from wind and water intrusion if the vinyl is blown away during high winds. If the soffit does not have backing behind the vinyl or needs more substantial backing, OSB board or plywood will be installed on the soffit. Additional framing may be added and/or existing backing re-nailed as needed. The original vinyl material will be reinstalled over the backing. Openings will be cut into backing material at appropriate locations to provide soffit venting. This retrofit usually requires 2-3 days for installation. This retrofit protects the gable-end overhangs. It does not include the roof overhang along the drip edge of the roof. Any noticeable changes to the appearance of the home will be due to variations between the new and old soffit material and the change in soffit color if the homeowner chooses not to provide color paint. Homeowners must remove any large storage items from around the gable ends to provide unobstructed access to the gable ends. During construction, occupants of the home should expect the normal inconveniences of a construction site comparable to having new siding or a new roof installed. Homeowners must remove any large storage items from around the gable ends and from under the eaves of the house to provide unobstructed access to the gable ends. This retrofit usually requires 2-3 days for installation. 15 of 16
  • 16. Figure 25. Gable End Overhang 16 of 16