SlideShare una empresa de Scribd logo
1 de 41
Descargar para leer sin conexión
The Mathematical Function Atan2 • Resizing your Android partitions
Year One
Issue #6
Jun 2014
dreammachine
andwhisper
ALSO:
•packageyourownCUSTOMcompiledsoftware
•programyourodroidshowwithrebol
•enablemulti-channelaudiooutputwithXBMC
An inside look at prebuilt
ubuntu 13.04 and 13.10
DISK IMAGES that GET
YOUR ODROID UP AND
RUNNING fast!
Magazine
ODROIDMagazine
Lubuntu Whisper 13.10 Saucy Salamander
THE ODROID FAMILY
ODROID-X2
ODROID-XU
ODROID-U3
Blackbox LXDE XBMC
Ubuntu Mathematics Tools
What we stand for.
We strive to symbolize the edge technology,
future, youth, humanity, and engineering.
Our philosophy is based on Developers.
And our efforts to keep close relationships with
developers around the world.
For that, you can always count on having the quality
and sophistication that is the hallmark of our products.
Simple, modern and distinctive.
So you can have the best to accomplish
everything you can dream of.
We are now shipping the ODROID U3
devices to EU countries! Come and visit
our online store to shop!
Address: Max-Pollin-Straße 1
85104 Pförring Germany
Telephone & Fax
phone : +49 (0) 8403 / 920-920
email : service@pollin.de
Our ODROID products can be found at:
http://www.pollin.de/shop/suchergebnis.html?S_
TEXT=odroid&log=internal
ODROIDMAGAZINE	 3
EDITORIAL
E
ver since we began publishing ODROID Magazine, we’ve been
receiving some great articles from our international contribu-
tors involving their innovative hardware projects, including
the Giant Android Tablet, ODROID Truck PC, and the Unmanned
Ground Vehicle. The worldwide maker community has shown that
there is almost no limit as to what an
ODROID can do.
Because many ODROIDians are
involved in software projects as
well, we plan to feature some of the
many excellent OS images and software
that the ODROID community and Hard-
kernel developer team have been producing
in an ongoing series called OS Spotlight. We
kicked off the column last month with an overview
of the software included with the Fully Loaded Ubuntu 12.11 im-
age, and this month we are highlighting Dream Machine, which is ideal
for office work, programming, media playback, and anything else where a tra-
ditional desktop PC would be used.
As of June 1st, there are now over 5000 members in the ODROID forums at
http://forum.odroid.com, showing a phenomenal growth of 500% over the
last 1.5 years. With so much interest in the ODROID platform, the original version
of U3 actually sold out last month, most likely due to its small footprint and very
affordable price. To respond to the increased demand for the compact model,
Hardkernel will soon begin shipping its newest generation of the U series hard-
ware called the ODROID-U3+, containing several new features: http://bit.
ly/1p8zi6L.
For Android enthusiasts, Hardkernel published a sneak peek Beta version of
Android KitKat 4.4, which you can download and test at http://bit.ly/1hsFdRB.
It’s still a work in progress, so make sure to post any bugs and/or feedback on the
ODROID forums.
In response to many requests for HDMI Passthrough DTS audio, there is a new
inexpensive piece of hardware, now available from the Hardkernel Store, called
the USB-S/PDIF. The USB-S/PDIF sends DTS and AC3 digital encoding via the
HDMI cable to your audio receiver, delivering crisp 5.1 surround sound to your liv-
ing room or office via your ODROID running Linux and XBMC 13. It’s now available
for $16 at http://bit.ly/1kIt8aC.
Hardkernel has not only been upgrading its Ubuntu images to 14.04, but has
also improved the XBMC experience with their long-awaited official 1080p re-
lease of the popular XBMC-based Media Center image. The new version of XBMC
for Linux, available on all platforms, takes advantage of the recent improvements
to video decoding in the 3.8 kernel and delivers smooth 720p and 1080p video
for all of the encodings supported by the Mali GPU and VPU hardware. Keep in
mind that it is an experimental build, but has been reported to work very well. It’s
a great distribution for those who previously used OpenElec or Xbox as a set-top
box. Check out the build at http://bit.ly/1lfkYpN.
ODROID Magazine, published monthly at http://magazine.odroid.com/, is your source for all things ODROIDian.
Hard Kernel, Ltd. • 704 Anyang K-Center, Gwanyang, Dongan, Anyang, Gyeonggi, South Korea, 431-815
Makers of the ODROID family of quad-core development boards and the world’s first ARM big.LITTLE architecture
based single board computer.
Join the ODROID community with members from over 135 countries, at http://forum.odroid.com/, and explore the
new technologies offered by Hardkernel at http://www.hardkernel.com/.
ODROIDMAGAZINE	 4
STAFF
ODROIDMagazine
Robert Hall,
Chief Editor
I’m a computer
programmer liv-
ing and working in
San Francisco, CA,
designing and building web applica-
tions for local clients on my network
cluster of ODROIDs. My primary
languages are jQuery, Angular JS
and HTML5/CSS3. I also develop
pre-built operating systems, custom
kernels and optimized applications
for the ODROID platform based
on Hardkernel’s official releases, for
which I have won several Monthly
Forum Awards. I use my ODROIDs
for a variety of purposes, including
media center, web server, applica-
tion development, workstation, and
gaming console. You can check out
my 100GB collection of ODROID
software, prebuilt kernels and OS
images at http://bit.ly/1fsaXQs.
Bo
Lechnowsky,
Editor
I am President of
Respectech, Inc., a
technology consultancy
in Ukiah, CA, USA that I founded in
2001. From my background in elec-
tronics and computer programming, I
manage a team of technologists, plus
develop custom solutions for compa-
nies ranging from small businesses to
worldwide corporations. ODROIDs
are one of the weapons in my arsenal
for tackling these projects. My favor-
ite development languages are Rebol
and Red, both of which run fabu-
lously on ARM-based systems like the
ODROID-U3. Regarding hobbies, if
you need some, I’d be happy to give
you some of mine as I have too many.
That would help me to have more time
to spend with my wonderful wife of 23
years and my four beautiful children.
Bruno Doiche,
Art Editor
Secured his comput-
ing necromancy skills
after bringing a fiber
optics switch back to life, getting his
Macintosh back from death, getting a
PS3 back from death, getting his fian-
cee’s T400 back from death (which was
a old-style dd data transfer), and man-
aging how to handle the cold innards of
his steady job data center.
News from Art Editor Bruno:
Getting back to our regular schedule
is no small task. After a couple of mi-
nor setbacks, we throttled hard to get to
a speedier rhythm, but not without hav-
ing, as usual, the best fun! What were
our trade offs? Well... we didn’t manage
to pack our astounding amount of tips,
but now we nailed the code color palette
and type size!. It’s easy to read and good
looking!
The cover was also a challenging idea,
as when we were chatting and defined
that the centerpiece cover article would
be Rob’s Linux distros. I had this micro
obsession on getting all current produc-
tion ODROIDS together, but believe or
not, I don’t have the actual production
triad (U3, X2, XU). But as easy as seems
to get them side by side in a single photo,
there are plenty of ODROIDians that
never seen them together. But no longer!
I have a trusty friend that has three of
them, and sent me a photo of three of his
ODROIDS for me to put on the cover.
So here is my thanks Patola, and I hope to
feature you in an interview regarding 3D
printing using ODROIDS!
What else is new? Now, Rob is work-
ing directly on the art master files! We
have gotten so much more agile on the
revision process, and are as ever, working
hard to deliver to you, our trusty readers a
hard-fact, spot-on magazine that we love
to do! Not that we don’t get some crazy
issues now and then!
ODROIDMAGAZINE	 5
INDEXProgramming Your ODROID-Show 6
Recompiling Mali Drivers 7
Package Your Compiled Software for Installation 8
Describing the Mathematical Function Atan2 17
framebuffer terminal console 20
Mathematics Tools for the ODROID 20
Android Image Files 22
Resizing Android partitions 26
QUICK pictorial guide For Resizing An Android SD or eMMC 28
How to feed your cat over the Internet 30
How to enable multi-channel audio output with XBMC 34
Travel Back In Time with Telnet 35
OS Spotlight: Dream Machine and Whisper 36
You’ve got mail... or should! 39
Meet an ODROIDIAN 40
Make A CUstom lego case for your u3 33
ODROIDMAGAZINE	 6
TECHNICALARTICLE(BEGINNER)
T
he ODROID-Show module is
incredibly useful for many tasks.
For instance, it is a great de-
vice to display information that can be
viewed at a glance. However, it can be
cumbersome to display the information
you want in an easy manner.
To make things simpler, I used the
incredible capabilities of Rebol to create
an easy dialect to allow displaying many
types of information on the ODROID-
Show. Because Rebol is cross-platform,
the same scripts will run on any operat-
ing system.
You can also connect multiple
ODROID-Show modules to a single
ODROID, or any other computer with
USB ports. This dialect will allow easy
handling of that.
The function to initiate the dialect is
called oshow (The word show is already
used in Rebol to refresh GUI displays).
I’ve highlighted the code that is sent
to the ODROID-Show module via the
oshow dialect with bold letters. As is
well known, bash scripting isn’t the easi-
est to read, especially when interspersed
with control codes. In addition, the Re-
bol example above is about 35% smaller,
allows any order of color cycling, allows
any number of words of any length at
any number of coordinates, and will run
on any platform that has a Rebol 3 in-
terpreter (pretty much everything except
for Windows RT and IOS which will
come soon). I leave it to the reader to
decide which is easier to modify.
do %oshow.r3
call {port_open}
serialport: %/dev/ttyUSB0
display-text: [“ODROID” 25x100 “SHOW” 55x150]
oshow serialport [reset rotate 0]
forever [
foreach color [red green yellow blue magenta cyan white] [
foreach [word position] display-text [
oshow serialport compose [cursor to (position) font (color) 5]
foreach letter word [
oshow serialport compose [(to-string letter)]
wait .02
]
]
]
]
Using the oshow dialect, compare the program written in Rebol to the example pro-
vided in bash scripting in Tutorial #1: Text Output from the ODROID-Show user guide:
Programming Your
ODROID-Show
USING The Rebol PROGRAMMING Language
TO IMPROVE the HARDWARE INTERFACE
By Bo Lechnowsky
ODROIDMAGAZINE	 7
Here is the full dialect definition.
font optionally followed by:
black
red
green
yellow
blue
magenta
cyan
white
Examples:
oshow [font cyan]
oshow [font white default]
oshow [font 2] (sets text size to 12x16 pixels)
oshow [font 1 cyan “Hello “ 2 red “ODROID!”]
background followed by one of the colors listed under foreground coloring.
optionally followed by:
default (sets default color as background color)
Examples:
oshow [background black]
oshow [background yellow default]
cursor followed by:
down
up
position? (reports current cursor position)
save (saves the current cursor position)
restore (restores the cursor to the position previously saved)
to (followed by:)
3x5 (moves the cursor to column 3, row 5)
home (moves cursor to column 1, row 1)
bottom (moves cursor to row 1 of the same column)
reset (resets the LCD screen)
clear (clears the screen)
off (turns LCD screen off)
on (turns LCD screen on)
key (simulated keyboard press) followed by:
2 (optional: the number of keypresses - default is 1)
up
down
left
right
rotate (rotates the display in 90 degree increments) followed by:
left (counterclockwise 90 degrees)
right (clockwise 90 degrees)
draw (not yet functional) followed by:
10x20 (optional: the upper left corner of the image - default is 0x0)
50x50 (optional: the size of the image - default is 320x240)
<image data>
TECHNICALARTICLE
Recompiling
Mali Drivers
Updating TO the
latest RELEASE
(R4P0-00Rel1)
by Mauro Ribeiro
P
repare your ODROID to run
the latest R4P0 Mali drivers by
typing the following into a Ter-
minal window:
sudo apt-get install xserver-
xorg-video-armsoc xserver-xorg-
dev libudev-dev
As of May 5, 2014, Hardkernel is no
longer supporting the Mali r3p2 driv-
ers, and haved moved on to using the
R4P0 version exclusively. There are
two major changes:
1. Instead of using the Mali DDX, the
Armsoc driver is installed.
2. UMP no longer exists, and Mali is
now using dma-buf.
We have provided an updated Armsoc
DDX in order to adapt your existing
Ubuntu or Debian operating system to
the new Mali drivers. The source code
for the r4p0 branch of the repository
is located at http://bit.ly/1oySeYE.
Download the source to a temporary
folder, then type make install at
the command prompt after navigating
to the temporary folder.
BlobsforEGL/GLESv1/GLESV2are
available for free download at http://
bit.ly/1hiwJw9, which includes an
optional example xorg.conf file.
Note that if your defconfig still has
UMP, it will probably fail to build, so
make sure to remove it first.
If you have questions regarding the
new Mali drivers, feel free to ask them
in the ODROID community forums at
http://forum.odroid.com/.
TIPSANDTRICKS
optionally followed by:
default (sets default color
as foreground color)
optionally followed by:
1 (sets text size to: 6x8 pix-
els * the number specified here)
ODROIDMAGAZINE	 8
TECHNICALARTICLE
And here is the code for the oshow dialect, to be saved as “oshow.r3”, or it
can be downloaded from the URL link in the header below.
REBOL [
Title: {ODROID Show Dialect}
Date: 20-May-2014
Author: {Bohdan Lechnowsky}
URL: http://respectech.com/odroid/odroid-show.r3
Purpose: {
Provides a dialect to allow easy usage of the ODROID Show hard-
ware component
}
]
oshow: func [
{Allow easy utilization of the ODROID-Show display module}
serport {Name of the serial port to send to (i.e. “serial://
ttyUSB0/57600” or “%/dev/ttyUSB0”)}
specs [block!] “Dialect block of layout”
/local outstring
][
outstring: copy {}
out: func [str /local pstr buffs][
;Break string into lines and output lines one at a time
foreach lstr pstr: parse/all str “^/” [
;The ODROID-Show hardware is limited to 256 characters per
line, but this
; can be overcome by breaking the line into 256-character
chunks and
; outputting them one after the other.
buffs: copy []
;Replace tabs with four spaces before breaking apart into
chunks.
while [not tail? detab/size lstr 4][
append buffs copy/part lstr 256
lstr: skip lstr 256
]
foreach buff buffs [
write serport join buff “^J^M”
;In my tests, I find that wait values less than 80ms
often lead
; to output corruption. Longer waits may be required
with some
; output.
wait .08
]
append outstring lstr
Got Wiimote?
make yourself
an awesome
gyroscopic mouse
by Rob Roy
D
o you have a Wii remote that
hasn’t seen much use lately?
It’s actually a very elegant piece
of input hardware, with an ergonomic
design, infrared scanner and gyroscope
sensors. Ubuntu has several packages
available from its repositories that au-
tomatically read the sensors in the Wii
and translate them into mouse and but-
ton movements. To install the driver
software, type:
$ sudo apt-get install libcwi-
id1 lswm wmgui wminput
After installation has completed,
connect to the Wii remote by press-
ing 1 and 2 simultaneously, which
activates the Bluetooth Connect
mode. Once the Wiimote’s lights
start flashing, type:
$ hcitool scan
or
$ lswm
Either command will display the MAC
address for all nearby Wiimote con-
trollers that are currently in Bluetooth
Connect mode. Load the Wiimote
driver by typing the following, using the
MAC address from the previous step.
In this example, the MAC address is
01:FA:2C:9D:BB:05:
$ sudo wminput 
01:FA:2C:9D:BB:05
The wiimote will then be treated by
Ubuntu as a gyroscopic air mouse,
suitable for use in situations where
a normal mouse won’t work, such as
while delivering a group presentation
or sitting on a couch.
TIPSANDTRICKS
ODROIDMAGAZINE	 9
]
]
font-rules: [
color-rules (out join “^[[3” col)
| ‘default (out “^[[39m”)
| set font-sz integer! (out rejoin [“^[[“
font-sz “s”])
| set textout string! (out textout)
]
back-rules: [
color-rules (out join “^[[4” col)
| ‘default (out “^[[49m”)
]
color-rules: [
‘black (col: “0m”)
| ‘red (col: “1m”)
| ‘green (col: “2m”)
| ‘yellow (col: “3m”)
| ‘blue (col: “4m”)
| ‘magenta (col: “5m”)
| ‘cyan (col: “6m”)
| ‘white (col: “7m”)
]
cursor-rules: [
‘down (out “^[D”)
| ‘up (out “^[M”)
| ‘position? (out “^[[6n”)
| ‘save (out “^[[s”)
| ‘restore (out “^[[u”)
| ‘to any [
set cpos pair! (out rejoin [“^[[“ cpos/x
“;” cpos/y “H”])
| ‘home (out “^[[H”)
| ‘bottom (out “^[E”)
]
]
;’presses uses a fun trick. If keypresses have
been defined by the input from the user,
; then use that number. If not, use the default
(1 in this case). This is shorter than
; the old-school method that would look like
this:
;
; unless value? ‘keypresses [keypresses: 1]
; keypresses
;
; (52 bytes, not including the line break)
; (“unless” is a synonym in Rebol of “if not”,
which is not any shorter than “unless”)
TECHNICALARTICLE
;
; Another possible method could be like this:
;
; all [not value? ‘keypresses keypresses:
1]
; keypresses
;
; (53 bytes, not including the line break)
;
; (The “do pick” method below is only 41
bytes)
presses: [do pick [keypresses 1] value? ‘key-
presses]
key-rules: [
‘up (out rejoin [“^[[“ do presses “A”])
| ‘down (out rejoin [“^[[“ do presses
“B”])
| ‘left (out rejoin [“^[[“ do presses
“C”])
| ‘right (out rejoin [“^[[“ do presses
“D”])
| set keypresses integer!
]
rotate-rules: [
‘left (loop 3 [out “^[[r”])
| ‘right (out “^[[r”)
]
show-rules: [any [
‘font any font-rules
| ‘backdrop any back-rules
| ‘cursor any cursor-rules
| ‘reset (out “^[c”)
| ‘clear (out “^[[2J”)
| ‘off (out “^[[0q”)
| ‘on (out “^[[1q”)
| ‘key any key-rules
| ‘rotate any rotate-rules
| ‘draw
| set textout string! (out textout)
]]
parse specs show-rules
outstring
]
This simple Rebol program makes the ODROID-SHOW’s
commands more accessible by abstracting the native command
syntax.
Please refer to the Rebol website for more information
at http://www.rebol.com, or download the source code at
http://www.rebolsource.net.
ODROIDMAGAZINE	 10
LINUXGAMING(INTERMEDIATE)
I
n the previous article, I outlined the
process for compiling and porting soft-
ware and games to the ODROID, using
DOOM as an example. This month, I present
a technique for packaging the compiled bina-
ries for sharing and distribution.
Checkinstall
Checkinstall is very useful as a simple way to
create installation (.deb) files. It allows you to pack
everything your program need into a single file and add re-
quired libraries as a dependency, so that you can install it on
systems that do not yet have the required libraries installed.
If you run checkinstall on the sdldoom project, it will
look like this:
root@odroid-wheezy:/home/odroid/sources/sdldoom-1.10$
checkinstall
checkinstall 1.6.2, Copyright 2009 Felipe Eduardo
Sanchez Diaz Duran
This software is released under the GNU GPL.
The package documentation directory ./doc-pak does
not exist.
Should I create a default set of package docs? [y]:
Preparing package documentation...OK
Please write a description for the package.
End your description with an empty line or EOF.
>> SDL Doom
*****************************************
**** Debian package creation selected ***
*****************************************
This package will be built according to these values:
0 - Maintainer: [ root@odroid-wheezy ]
1 - Summary: [ SDL Doom ]
2 - Name: [ sdldoom ]
3 - Version: [ 1.10 ]
4 - Release: [ 1 ]
5 - License: [ GPL ]
6 - Group: [ checkinstall ]
7 - Architecture: [ armhf ]
8 - Source location: [ sdldoom-1.10 ]
9 - Alternate source location: [ ]
10 - Requires: [ ]
11 - Provides: [ sdldoom ]
12 - Conflicts: [ ]
13 - Replaces: [ ]
Enter a number to change any of them or press ENTER
to continue:
Checkinstall takes the name of the folder you are cur-
rently in as the package name (sdldoom) and automatically
takes the -1.10 that was added to the folder name as the
version number. If your folder names does not match,
you can alter these names here as well as setting the right
version here. Make sure to change #2 Name as well as
#11 Provides.
Here you can configure your installation and add re-
quired packages such as libsdl1.2debian, which is the libsdl
library needed for this build under #10 Requires. After
pressing Enter, it should generate a nice little .deb file.
Package Your
Compiled Software
for Installation
Compiling DOOM
PART 2
by Tobias Schaaf
DOOM originally came
on floppy disks that held
only 1.44MB of game data
and were very fragile.
ODROIDMAGAZINE	 11
Enter a number to change any of them or press ENTER
to continue:
Installing with make install...
========================= Installation results
===========================
make[1]: Entering directory `/home/odroid/sources/
sdldoom-1.10’
/bin/sh ./mkinstalldirs /usr/local/bin
/usr/bin/install -c doom /usr/local/bin/doom
make[1]: Nothing to be done for `install-data-am’.
make[1]: Leaving directory `/home/odroid/sources/sdl-
doom-1.10’
======================== Installation successful
==========================
Copying documentation directory...
./
./README.asm
./Changelog
./TODO
./FILES
./README.book
./README.SDL
./README.b
./README.gl
Copying files to the temporary directory...OK
Stripping ELF binaries and libraries...OK
Compressing man pages...OK
Building file list...OK
Building Debian package...OK
Installing Debian package...OK
Erasing temporary files...OK
Writing backup package...OK
OK
Deleting temp dir...OK
*****************************************************
*****************
Done. The new package has been installed and saved
to
/home/odroid/sources/sdldoom-1.10/sdldoom_1.10-1_arm-
hf.deb
You can remove it from your system anytime using:
dpkg -r sdldoom
*****************************************************
*****************
DOOM is where the fastest player with the biggest gun wins! Unless,
of course, you’ve modified the source code to make yourself 100%
invincible, or be able to shoot through walls.
LINUXGAMING
Although interactive mode is an easy method to create a
deb file, another way is to give the parameters right when you
start checkinstall, which allows for some extra options as well:
$ checkinstall --backup=no --install=no
--requires=”libsdl1.2debian” --pkgname=”sdldoom-
odroid” --pkgversion=1.10
If you start checkinstall without the “--backup=no” option,
a tar file is going to be created with all the files that were copied
during the install process. If you start checkinstall without the
“--install=no” option, your software will be installed right after
the package is done building. After all this is completed, you
will find a nice little .deb file in your folder.
$ ls -l *.deb
-rw-r--r-- 1 root root 174490 Apr 5 15:16 sdldoom_1.10-1_
armhf.deb
The .deb file can then be copied and installed to any other
ODROID, and if you have set the dependency requirements
right, it should start right away. Getting the requirements correct
will take some time and experience, depending on the project.
The libsdl1.2-dev package actually only includes the header files
for SDL (files ending on .h and located somewhere within /usr/
include/ ), but the actually SDL library is called libsdl1.2debian.
If you check on the libsdl1.2-dev package, you will see De-
pends: libsdl1.2debian (= 1.2.15-5)in the dependencies list.
apt-cache show libsdl1.2-dev
Package: libsdl1.2-dev
Source: libsdl1.2
Version: 1.2.15-5
Installed-Size: 2358
Maintainer: Debian SDL packages maintainers <pkg-sdl-
maintainers@lists.alioth.debian.org>
Architecture: armhf
Replaces: libsdl-dev
Provides: libsdl-dev
Depends: libsdl1.2debian (= 1.2.15-5), libasound2-dev,
libcaca-dev, libdirectfb-dev (>= 0.9.22), libglu1-me-
sa-dev | libglu-dev, libpulse-dev, libx11-dev, libts-
dev, libxext-dev
Conflicts: libsdl-dev
Description-en: Simple DirectMedia Layer development
files
SDL is a library that allows programs portable low
level access to a video
framebuffer, audio output, mouse, and keyboard.
This package contains the files needed to compile and
link programs which
use SDL.
Homepage: http://www.libsdl.org/
Description-md5: 9a82f59c5790721baad7ffc5f181d3d6
Tag: devel::library, role::devel-lib, uitoolkit::sdl
Section: libdevel
Priority: optional
Filename: pool/main/libs/libsdl1.2/libsdl1.2-
dev_1.2.15-5_armhf.deb
Size: 861890
MD5sum: 4295708cab85d1eb546b449350dd2da6
SHA1: 76fa9923c9765d7b92e373df6fe12949f2092db5
SHA256: 71def7638b06e6711f6fa8d96724aa7eb238a7b10f9f-
b14192b5a5c1018d1322
ODROIDMAGAZINE	 12
Libsdl1.2debian is the actual library that contains the bi-
nary files needed to run libsdl. As previously mentioned,
the -dev file only includes the headers, and is useless if you
only want to RUN the program. However, if you are un-
sure what libraries to add in checkinstall, you can add the
-dev libs as well. This method is not as clean, but it will
work well, since the program will always have the actual
library as a dependency.
Some special notes
about checkinstall
Since checkinstall copies the files to the location, you will
most likely have to run it as root, since the normal user will
not be allowed to copy files in certain folders and the build
will fail.
Sometimes, checkinstall fails even though it has root privi-
leges, and there sometimes seems to be a problem with the cre-
ation of folders when using checkinstall. If a program that you
installed requires creating a folder, checkinstall may fail because
it cannot create the folder to copy the files. To solve this, run
make install first and then run checkinstall again.
Checkinstall is very helpful, as it will strip all binary files
of unnecessary content such as comments and debug symbols
that are no longer needed after the program is build complete-
ly, which can reduce the size of files greatly.
Size of the doom binary before stripping:
$ ls -lh doom
-rwxr-xr-x 1 root root 423K Apr 5 11:33 doom
Size of the doom library in the .deb file:
$ ls -lh doom
-rwxr-xr-x 1 root root 368K Apr 5 15:16 doom
The file size for DOOM might not make a very huge impact,
but it can for other programs. For example, the kernel files pro-
vided by Hardkernel have a total of 354MB uncompressed.
$ du -h --max-depth=1
45M ./usr
307M ./lib
2.5M ./boot
354M .
And the same kernel files after stripping:
$ du -h --max-depth=1
45M ./usr
18M ./lib
2.5M ./boot
65M .
As we can see, the /usr and /boot directory have not
changed at at all, since they have only header files or files that
can not be excluded, but if you strip away the unnecessary
comments symbols on the actual libraries in the /lib folder, the
size is reduced from 307 to 18 MB, and still the libraries have
the same functionality as they did with 307 MB of size. As a
result, the install size of the kernel will be reduced from 354
MB to 65 MB using checkinstall. Depending on the software
packages you create, checkinstall can help you keep your soft-
ware nice and clean (and slim).
Checkinstall won’t always work. Some projects do not pro-
vide a make install function, and checkinstall won’t work
for those applications. But don’t worry, as you get more expe-
rienced in compilation, you’ll probably figure out how to build
your own install routines.
Building a larger project
For DOOM, compiling and packaging is very simple, and
we only had to download one file instead of ten, hundreds, or
thousands of files, and there was only one view dependency.
As an example of a larger project, I included compila-
tion instructions for OpenXCom. When you browse the
OpenXcom homepage, click on the following link in the
wiki sidebar: http://bit.ly/1rWH0ml.
Compiling OpenXCom
OpenXcom requires the following libraries to compile:
SDL (libsdl1.2)
SDL_mixer (libsdl-mixer1.2)
SDL_image (libsdl-image1.2)
SDL_gfx (libsdl-gfx1.2), version 2.0.22 or later
yaml-cpp, (libyaml-cpp), version 0.5 or later
This is great, because everything we need is right in front
of us, mostly because of OpenXcom’s excellent documen-
tation. It’s now a simple matter to install what we need.
apt-get install libsdl1.2-dev libsdl-mixer1.2-dev
libsdl-image1.2-dev libsdl-gfx1.2-dev
Some of the fiercest monsters in DOOM came straight from my worst
nightmares. MeetSpiderDemon,a4-leggedrobotbrainwithachaingun.
LINUXGAMING
ODROIDMAGAZINE	 13
I skipped the yaml-cpp because if you compile it on
Ubuntu, installing libyaml-cpp-dev will give you a version
0.5 or higher, but on Debian Wheezy, you only get libyaml-
cpp version 0.3 which doesn’t work.
To overcome this, I compiled libyaml-cpp myself which
can be installed by typing the following in Terminal:
$ wget http://oph.mdrjr.net/meveric/repository/liby-
aml-cpp0.5_0.5.1-1_armhf.deb
$ dpkg -i libyaml-cpp0.5_0.5.1-1_armhf.deb
Now that we have all the requirements, we can start
to download the sources. On the top of the OpenXCom
Wiki page, there is a link to a repository, which leads to a
project page containing lots of folder and files. It will be
very time-consuming to download them all with wget, but
luckily there is a faster alternative.
From the git repository, we can download all of the files
from the entire repository with just one command. First,
get the URL of the project site:
$ git clone https://github.com/SupSuper/OpenXcom.git
Cloning into ‘OpenXcom’...
remote: Reusing existing pack: 40755, done.
remote: Counting objects: 124, done.
remote: Compressing objects: 100% (118/118), done.
remote: Total 40879 (delta 67), reused 0 (delta 0)
Receiving objects: 100% (40879/40879), 14.05 MiB | 849
KiB/s, done.
Resolving deltas: 100% (33534/33534), done.
Well, that was nice, since we just downloaded about 700
files in a few seconds! For other projects that use subver-
sion instead of git, the command line is very similar: svn
checkout <url>. Shown below is a list of the new files:
$ ls -l
total 152
-rwxr-xr-x 1 root root 82 Apr 5 17:12 autogen.sh
drwxr-xr-x 3 root root 4096 Apr 5 17:12 bin
-rw-r--r-- 1 root root 32796 Apr 5 17:12 CHANGELOG.
txt
drwxr-xr-x 3 root root 4096 Apr 5 17:12 cmake
-rw-r--r-- 1 root root 5681 Apr 5 17:12 CMakeLists.
txt
-rw-r--r-- 1 root root 3385 Apr 5 17:12 configure.
ac
-rw-r--r-- 1 root root 35819 Apr 5 17:12 COPYING
drwxr-xr-x 2 root root 4096 Apr 5 17:12 docs
drwxr-xr-x 6 root root 4096 Apr 5 17:12 install
drwxr-xr-x 2 root root 4096 Apr 5 17:12 m4
-rw-r--r-- 1 root root 21142 Apr 5 17:12 Makefile.am
drwxr-xr-x 2 root root 4096 Apr 5 17:12 obj
-rw-r--r-- 1 root root 4446 Apr 5 17:12 README.txt
drwxr-xr-x 5 root root 4096 Apr 5 17:12 res
drwxr-xr-x 12 root root 4096 Apr 5 17:12 src
This time, there is no configure and no Makefile either,
just a Makefil.am. So what can we do now?
There are two things in this folder that will help: an execut-
able file called: autogen.sh and a file called CMakeList.txt.
LINUXGAMING
Autogen
Some projects have a file with the name autogen, au-
tomake or autoconf instead of a configure file in their
source directory.
$ ./autogen.sh
aclocal: installing `m4/pkg.m4’ from `/usr/share/aclo-
cal/pkg.m4’
autoreconf: Entering directory `.’
autoreconf: configure.ac: not using Gettext
autoreconf: running: aclocal --force -I m4
autoreconf: configure.ac: tracing
autoreconf: configure.ac: not using Libtool
autoreconf: running: /usr/bin/autoconf --force
autoreconf: configure.ac: not using Autoheader
autoreconf: running: automake --add-missing --force-
missing
configure.ac:106: installing `./config.guess’
configure.ac:106: installing `./config.sub’
configure.ac:17: installing `./install-sh’
configure.ac:17: installing `./missing’
Makefile.am: installing `./depcomp’
autoreconf: Leaving directory `.’
The output is very short, and it’s not apparent what has
been done. Let’s check if it did something.
$ ls -l
total 1204
-rw-r--r-- 1 root root 36830 Apr 5 17:23 aclocal.
m4
-rwxr-xr-x 1 root root 82 Apr 5 17:12 autogen.
sh
drwxr-xr-x 2 root root 4096 Apr 5 17:23 autom4te.
cache
drwxr-xr-x 3 root root 4096 Apr 5 17:12 bin
-rw-r--r-- 1 root root 32796 Apr 5 17:12 CHANGELOG.
txt
drwxr-xr-x 3 root root 4096 Apr 5 17:12 cmake
-rw-r--r-- 1 root root 5681 Apr 5 17:12 CMakeLists.
txt
lrwxrwxrwx 1 root root 37 Apr 5 17:23 config.guess
-> /usr/share/automake-1.11/config.guess
lrwxrwxrwx 1 root root 35 Apr 5 17:23 config.sub
-> /usr/share/automake-1.11/config.sub
-rwxr-xr-x 1 root root 211749 Apr 5 17:23 configure
-rw-r--r-- 1 root root 3385 Apr 5 17:12 configure.
ac
-rw-r--r-- 1 root root 35819 Apr 5 17:12 COPYING
lrwxrwxrwx 1 root root 32 Apr 5 17:23 depcomp ->
/usr/share/automake-1.11/depcomp
drwxr-xr-x 2 root root 4096 Apr 5 17:23 docs
drwxr-xr-x 6 root root 4096 Apr 5 17:12 install
lrwxrwxrwx 1 root root 35 Apr 5 17:23 install-sh
-> /usr/share/automake-1.11/install-sh
drwxr-xr-x 2 root root 4096 Apr 5 17:23 m4
-rw-r--r-- 1 root root 21142 Apr 5 17:12 Makefile.
am
-rw-r--r-- 1 root root 822542 Apr 5 17:23 Makefile.
in
lrwxrwxrwx 1 root root 32 Apr 5 17:23 missing ->
/usr/share/automake-1.11/missing
drwxr-xr-x 2 root root 4096 Apr 5 17:12 obj
-rw-r--r-- 1 root root 4446 Apr 5 17:12 README.
txt
drwxr-xr-x 5 root root 4096 Apr 5 17:12 res
drwxr-xr-x 12 root root 4096 Apr 5 17:19 src
After this step, there is now a configure file, which gives
the same starting point for compilation as the first example.
ODROIDMAGAZINE	 14
CMakeLists.txt
Cmake is also a very nice tool, and if a project has a
CMakeLists.txt in its directory, it supports cmake. We could
just go ahead and type cmake, but i would highly advise
NOT to do so!
Although cmake will work, and would generate the code
that we need, it’s somewhat messy. Also, you can’t figure
out what is source code and what comes from cmake, so
there is a better way to do it.
Instead, create a new folder change in that folder and
start cmake from there.
$ mkdir build
$ cd build
$ cmake ..
Cmake is started with a path to the CMakeLists.txt file.
In the DOOM example, it was “cmake .”. Since we were
in the same directory we used the “.” to tell cmake to use
the current directory. Now that we are in a subfolder called
build, we just tell cmake that the CMakeLists.txt is one fold-
er up by typing “cmake ..”. With everything setup correctly,
it should look similar to this:
$ cmake ..
-- The C compiler identification is GNU 4.7.2
-- The CXX compiler identification is GNU 4.7.2
-- Check for working C compiler: /usr/bin/gcc-4.7
-- Check for working C compiler: /usr/bin/gcc-4.7 --
works
-- Detecting C compiler ABI info
-- Detecting C compiler ABI info - done
-- Check for working CXX compiler: /usr/bin/g++-4.7
-- works
-- Detecting CXX compiler ABI info
-- Detecting CXX compiler ABI info - done
-- Looking for include file pthread.h
-- Looking for include file pthread.h - found
-- Looking for pthread_create
-- Looking for pthread_create - not found
-- Looking for pthread_create in pthreads
-- Looking for pthread_create in pthreads - not found
-- Looking for pthread_create in pthread
-- Looking for pthread_create in pthread - found
-- Found Threads: TRUE
-- Found PkgConfig: /usr/bin/pkg-config (found version
“0.26”)
-- Looking for XOpenDisplay in /usr/lib/arm-linux-
gnueabihf/libX11.so;/usr/lib/arm-linux-gnueabihf/
libXext.so
-- Looking for XOpenDisplay in /usr/lib/arm-linux-
gnueabihf/libX11.so;/usr/lib/arm-linux-gnueabihf/
libXext.so - found
-- Looking for gethostbyname
-- Looking for gethostbyname - found
-- Looking for connect
-- Looking for connect - found
-- Looking for remove
-- Looking for remove - found
-- Looking for shmat
-- Looking for shmat - found
-- Looking for IceConnectionNumber in ICE
-- Looking for IceConnectionNumber in ICE - found
-- Found X11: /usr/lib/arm-linux-gnueabihf/libX11.so
-- Found OpenGL: /usr/local/lib/libGL.so
found SDL 1.2.15 (/usr/lib/arm-linux-gnueabihf:/usr/
include/SDL)
found SDL_mixer 1.2.12 (/usr/lib/arm-linux-gnueabi-
hf:/usr/include/SDL)
found SDL_gfx 2.0.23 (/usr/lib/arm-linux-gnueabihf:/
usr/include/SDL)
found SDL_image 1.2.12 (/usr/lib/arm-linux-gnueabi-
hf:/usr/include/SDL)
found yaml-cpp(/usr/local/lib:/usr/local/include/
yaml-cpp;/usr/local/include/yaml-cpp/..)
-- Found Git: /usr/bin/git (found version “1.7.10.4”)
git found: /usr/bin/git
version:0.9.g8bcafea
No doxygen command found. Disable API documentation
generation
-- Configuring done
-- Generating done
-- Build files have been written to: /home/odroid/
sources/OpenXcom/build
$ ls -l
total 68
drwxr-xr-x 2 root root 4096 Apr 5 17:37 bin
-rw-r--r-- 1 root root 29527 Apr 5 17:37 CMakeCache.
txt
drwxr-xr-x 4 root root 4096 Apr 5 17:37 CMakeFiles
-rw-r--r-- 1 root root 1906 Apr 5 17:37 cmake_in-
stall.cmake
-rw-r--r-- 1 root root 3526 Apr 5 17:37 CPackConfig.
cmake
-rw-r--r-- 1 root root 3942 Apr 5 17:37 CPackSource-
Config.cmake
drwxr-xr-x 3 root root 4096 Apr 5 17:37 docs
-rw-r--r-- 1 root root 6481 Apr 5 17:37 Makefile
drwxr-xr-x 3 root root 4096 Apr 5 17:37 src
Since we got a Makefile here, so we run make and watch
the pretty colors go by!
$ make
Scanning dependencies of target openxcom
[ 0%] Building CXX object src/CMakeFiles/openxcom.
dir/main.cpp.o
[ 0%] Building CXX object src/CMakeFiles/openxcom.
dir/lodepng.cpp.o
[ 1%] Building CXX object src/CMakeFiles/openxcom.
dir/Basescape/BaseView.cpp.o
[ 1%] Building CXX object src/CMakeFiles/openxcom.
dir/Basescape/CraftSoldiersState.cpp.o
[...]
[ 99%] Building CXX object src/CMakeFiles/openxcom.
dir/Ufopaedia/ArticleStateTextImage.cpp.o
[ 99%] Building CXX object src/CMakeFiles/openxcom.
dir/Ufopaedia/ArticleStateArmor.cpp.o
[100%] Building CXX object src/CMakeFiles/openxcom.
dir/Ufopaedia/ArticleStateVehicle.cpp.o
Linking CXX executable ../bin/openxcom
[100%] Built target openxcom
Everything looks good, and we have an OpenxCom
build in the bin folder. Now, run checkinstall again. We
already know what libraries to add to the required list since
we got that list from the OpenXCom site.
$ checkinstall --backup=no --install=no
--requires=”libdl1.2debian, libsdl-image1.2, lib-
sdl-mixer1.2, libsdl-gfx1.2-4, libyaml-cpp0.5”
--pkgname=”openxcom” --pkgversion=”0.9.g8bcafea”
This is one of the moments when checkinstall will fail
LINUXGAMING
ODROIDMAGAZINE	 15
because of its issue with creating directories, so run make
install first and then re-run checkinstall.
$ checkinstall --backup=no --install=no
--requires=”libdl1.2debian, libsdl-image1.2, lib-
sdl-mixer1.2, libsdl-gfx1.2-4, libyaml-cpp0.5”
--pkgname=”openxcom” --pkgversion=”0.9.g8bcafea”
checkinstall 1.6.2, Copyright 2009 Felipe Eduardo San-
chez Diaz Duran
This software is released under the GNU GPL.
The package documentation directory ./doc-pak does not
exist.
Should I create a default set of package docs? [y]:
y
Please write a description for the package.
End your description with an empty line or EOF.
>> OpenXCom
>>
*****************************************
**** Debian package creation selected ***
*****************************************
This package will be built according to these values:
0 - Maintainer: [ root@odroid-wheezy ]
1 - Summary: [ OpenXCom ]
2 - Name: [ openxcom ]
3 - Version: [ 0.9.g8bcafea ]
4 - Release: [ 1 ]
5 - License: [ GPL ]
6 - Group: [ checkinstall ]
7 - Architecture: [ armhf ]
8 - Source location: [ build ]
9 - Alternate source location: [ ]
10 - Requires: [ libdl1.2debian, libsdl-image1.2, lib-
sdl-mixer1.2, libsdl-gfx1.2-4, libyaml-cpp0.5 ]
11 - Provides: [ openxcom ]
12 - Conflicts: [ ]
13 - Replaces: [ ]
Enter a number to change any of them or press ENTER to
continue:
Installing with make install...
========================= Installation results
===========================
[100%] Built target openxcom
Install the project...
-- Install configuration: “”
-- Installing: /usr/local/bin/openxcom
-- Removed runtime path from “/usr/local/bin/openx-
com”
-- Installing: /usr/local/share/openxcom/data
-- Installing: /usr/local/share/openxcom/data/Re-
sources
-- Installing: /usr/local/share/openxcom/data/Re-
sources/UI
-- Installing: /usr/local/share/openxcom/data/Resourc-
es/UI/reserve.png
-- Installing: /usr/local/share/openxcom/data/Re-
sources/Weapons
-- Installing: /usr/local/share/openxcom/data/Resourc-
es/Weapons/Terror.png
-- Installing: /usr/local/share/openxcom/data/Resourc-
es/Pathfinding
-- Installing: /usr/local/share/openxcom/data/Resourc-
es/Pathfinding/Pathfinding.png
-- Installing: /usr/local/share/openxcom/data/Resourc-
es/BulletSprites
-- Installing: /usr/local/share/openxcom/data/Resourc-
es/BulletSprites/BulletSprites.png
-- Installing: /usr/local/share/openxcom/data/Re-
sources/BulletSprites/TFTD-LAND.png
-- Installing: /usr/local/share/openxcom/data/Re-
sources/BulletSprites/TFTD-UNDERWATER.png
-- Installing: /usr/local/share/openxcom/data/Shaders
-- Installing: /usr/local/share/openxcom/data/Shad-
ers/Phosphor-simple.OpenGL.shader
-- Installing: /usr/local/share/openxcom/data/Shad-
ers/Openxcom.OpenGL.shader
CMake Error at src/cmake_install.cmake:54 (FILE):
file INSTALL cannot find
“/home/odroid/sources/test/OpenXcom/bin/data/Shaders/
heavybloom.OpenGL.shader”.
Call Stack (most recent call first):
cmake_install.cmake:38 (INCLUDE)
make: *** [install] Error 1
**** Installation failed. Aborting package cre-
ation.
Cleaning up...OK
Bye.
$ make install
[100%] Built target openxcom
Install the project...
-- Install configuration: “”
-- Installing: /usr/local/bin/openxcom
-- Removed runtime path from “/usr/local/bin/openx-
com”
-- Installing: /usr/local/share/openxcom/data
-- Installing: /usr/local/share/openxcom/data/Re-
sources
…
-- Installing: /usr/local/share/openxcom/data/Ruleset
-- Installing: /usr/local/share/openxcom/data/Rule-
set/Xcom1Ruleset.rul
$ checkinstall --backup=no --install=no
--requires=”libdl1.2debian, libsdl-image1.2, lib-
sdl-mixer1.2, libsdl-gfx1.2-4, libyaml-cpp0.5”
--pkgname=”openxcom” --pkgversion=”0.9.g8bcafea”
checkinstall 1.6.2, Copyright 2009 Felipe Eduardo San-
chez Diaz Duran
This software is released under the GNU GPL.
*****************************************
**** Debian package creation selected ***
*****************************************
This package will be built according to these values:
0 - Maintainer: [ root@odroid-wheezy ]
1 - Summary: [ OpenXCom ]
2 - Name: [ openxcom ]
3 - Version: [ 0.9.g8bcafea ]
4 - Release: [ 1 ]
5 - License: [ GPL ]
6 - Group: [ checkinstall ]
7 - Architecture: [ armhf ]
8 - Source location: [ build ]
9 - Alternate source location: [ ]
10 - Requires: [ libdl1.2debian, libsdl-image1.2, lib-
sdl-mixer1.2, libsdl-gfx1.2-4, libyaml-cpp0.5 ]
11 - Provides: [ openxcom ]
12 - Conflicts: [ ]
13 - Replaces: [ ]
Enter a number to change any of them or press ENTER
to continue:
LINUXGAMING
ODROIDMAGAZINE	 16
Installing with make install...
========================= Installation results
===========================
[100%] Built target openxcom
Install the project...
-- Install configuration: “”
-- Up-to-date: /usr/local/bin/openxcom
-- Installing: /usr/local/share/openxcom/data
-- Installing: /usr/local/share/openxcom/data/Resourc-
es
...
-- Installing: /usr/local/share/openxcom/data/Ruleset
-- Up-to-date: /usr/local/share/openxcom/data/Ruleset/
Xcom1Ruleset.rul
======================== Installation successful
==========================
Copying documentation directory...
./
./docs/
./docs/Makefile
./docs/CMakeFiles/
./docs/CMakeFiles/CMakeDirectoryInformation.cmake
./docs/CMakeFiles/progress.marks
./docs/cmake_install.cmake
Some of the files created by the installation are inside
the home directory: /home
You probably don’t want them to be included in the
package.
Do you want me to list them? [n]: n
Should I exclude them from the package? (Saying yes is
a good idea) [n]: y
Copying files to the temporary directory...OK
Stripping ELF binaries and libraries...OK
Compressing man pages...OK
Building file list...OK
Building Debian package...OK
NOTE: The package will not be installed
Erasing temporary files...OK
Deleting temp dir...OK
*****************************************************
*****************
Done. The new package has been saved to
/ h o m e / o d r o i d / s o u r c e s / t e s t / O p e n X c o m / b u i l d /
openxcom_0.9.g8bcafea-1_armhf.deb
You can install it in your system anytime using:
dpkg -i openxcom_0.9.g8bcafea-1_armhf.deb
*****************************************************
*****************
One this step completes, the OpenXcom .deb installa-
tion package is ready for use! This should be enough infor-
mation to get started with compiling your first projects.
Notes on cmake
There is something that I rather like about cmake. After
cmake is done creating the build-tree for a project, you will find
a folder with the name of the binary file of the project. For
example, on the OpenXcom project, the folder can be found
at src/CMakeFiles/openxcom.dir/. In this folder, you will al-
ways find a file called link.txt which will show you how the final
binary is built as well as which libraries are linked into it.
$ cat src/CMakeFiles/openxcom.dir/link.txt
[…]
-o ../bin/openxcom -rdynamic -lSDL_image -lSDL_mixer
-lSDL_gfx -Wl,-Bstatic -lSDLmain -Wl,-Bdynamic -lSDL
-lpthread /usr/local/lib/libyaml-cpp.so /usr/local/
lib/libGL.so -Wl,-rpath,/usr/local/lib:
If you check the last line, you will find the libraries that are
linked to the binary file, for example, -lSDL_image -lSDL_
mixer -lSDL_gfx -lSDL. As mentioned in the previous article,
the files starting with “-l” are libraries. These are exactly the
libraries that we used in our checkinstall command, and that
were listed on the OpenXCom site. So, in case you don’t know
which libraries you needed, you can also find them here.
Checking dependencies
With the ldd command, you can easily check on the depen-
dencies of a particular binary file that has already been compiled.
$ ldd /usr/local/bin/doom
libm.so.6 => /lib/arm-linux-gnueabihf/libm.so.6
(0xb6e80000)
libSDL-1.2.so.0 => /usr/lib/arm-linux-gnueabihf/libS-
DL-1.2.so.0 (0xb6e03000)
libc.so.6 => /lib/arm-linux-gnueabihf/libc.so.6
(0xb6d1e000)
/lib/ld-linux-armhf.so.3 (0xb6f08000)
[...]
Now, go play DOOM!
The Cyber Demon has a frightening description in the original DOOM
manual: “a missile-launching skyscraper with goat legs. ‘Nuff said”.
LINUXGAMING
ODROIDMAGAZINE	 17
M
any of us have been applying the casual trigono-
metric functions such as sin, cos or tan and their
reverse functions asin, acos, and atan to make geo-
metric computations. That is what also school mathematics
has taught us to do. While doing so, one meets such problems
as, the value interval of sin is [-π/2, π/2], and there is a chance
to divide with zero, when tan(y/x) is used. To solve these
problems, programs must branch with “if” sentences, and the
division by zero problem must be handled, too. There is an ex-
cellent method for solving all the mentioned problems within
computer programs by applying the atan2(y, x) method.
The atan2 function was originally introduced in FOR-
TRAN programming language to ease up trigonometric
computations [WIK14]. It is available also elsewhere, like
C, Java, and (surprise, surprise) in .NET and Excel, too.
The advantage of atan2 is that it gives continuous values in
the interval of (-π, π]. When expressed with atan function,
the definition is as follows:
atan2(y,x)=atan(yx),ifx>0atan(yx)+π,ify≥0,x<0atan
(yx)−π,ify<0,x=0π2,ify>0,x=0−π2,ify<0,x=0undefined
,ify=0,x=0
When one looks at the formula, the conclusion is that it is
quite a complex function, with many branches to implement
the functionality of atan2 with atan instead. The same applies
also if one tries to use asin or acos. An issue with the above
definition is that there is no defined value when both x and y
are zero. Another note is that the order of param-
eters is y, x instead of x, y. But, it is in
reverse order in Excel.
In a mouse-interactive clock, we can
compute, from the mouse location, the
angle of selected pointer to determine
how the selected time can be adjusted.
For instance, one can calculate the angle
from north to mouse click as follows:
Describing the
Mathematical
Function Atan2
A USEFUL TOOL FOR ProgrammING APPLICATIONS
THAT REQUIRE real-time Trigonometry
by Jussi Opas
double angleAsRadians = Math.atan2(point.y - centerY,
point.x - centerX);
// atan2 returns values in the range of [-PI, PI]
// so, we can get values into the ranges [0, 2PI] by
adding one PI
angleAsRadians += PI;
It is just so awesome that no “if” statements are needed.
Though, this is not expensive like a shooting game, where the
angle and distance to target must be calculated continuously.
Trigonometry is also heavily used in ray tracing applications,
such as radio coverage and 3D modelling, where atan2 can be
successfully applied. So, atan2 is a beast in its expressiveness,
therefore we can safely call it the best trigonometrical function
in a programmer’s toolkit.
The behavior of atan2 can be shown most easily with some
mathematics software such as Octave or Maxima. Both of
them are available in Ubuntu Software Center. Android has its
own versions available in PlayStore.
In the plot window, one can rotate to an appropriate view
angle with the mouse and watch the 3 dimensional view from
an appropriate angle.
Software development is driven by use cases and by user
TECHNICALARTICLE(EXPERT)
clock
Atan2 is beautiful!
ODROIDMAGAZINE	 18
stories to be fulfilled. Projects are often very busy with imple-
menting all necessary functionality, and performance testing is
done only in the end of the project. At that time it may be even
too late to react on poor performance, since it may be difficult
to improve in late project phase. Therefore it would be nice to
already know what the performance implication will be at the
program writing time.
If an application uses intensive math like distance and an-
gular computations, it would be good to know what it costs to
call these methods. In Java, for instance, calls like Math.sqrt,
Math.atan, or Math.atan2 are then important to understand.
We made a test by calling different distance and angle
computations methods 10 million times with Java. The test
framework adds on method call overhead to each functio-
nusing an ODROID XU at 1.6 GHz frequency running
Ubuntu with Java. The relative behavior of the tested math
methods are similar in other platforms. The results are
shown in the enclosed graph.
Computation of distance is fast, that is calling of sqrt(x*x
+ y*y)*r takes only 24 nano seconds on average. Multiplica-
tion with resolution r is almost free, since calling of plain
sqrt(x*x, y*y) is only 4 nanoseconds faster. Then, one sees
clearly that calling of pow(x,2) is essentially more expensive
than x*x. The next observation is that angle computation
methods are slow, especially Java’s trigonometric functions,
which is a tradeoff for their accurateness. In this case, the
precious atan2 seems to be slower that atan.
If we want to use the atan2 method, we must find some
means to compute it more quickly. We could ourselves imple-
ment a faster, but less accurate, method to compute atan2. We
could use parabolic approximation, Taylor series or Chebyshev
series or similar, [COR09], or a software implementation of
the famous CORDIC method. On the other hand, we could
implement some table lookup method. In the first place, utili-
zation of prior computed values might be the easiest to imple-
ment by creating the following look up methods for fast access
of atan2 values:
- binary search based on Java’s Arrays.binarySearch method
- binary find is a self implemented method to find aimed value
from array
- table lookup with a large n*n table, and, an
- octet math is another table lookup method where each
symmetric octet of a unit circle is represented as an array,
[RIV06].
The next figure shows the call time of atan2 against the
used look up methods. In the representative run, it took 368
nanoseconds to compute. Lookup methods are compared
against that value. The call of one access method is shown
with blue bar and the achieved improvement has been shown
with orange gradient bar.
It is a surprise that a self written binary find is faster than
the binary search that is based on Java’s standard method. One
should be suspicious of that, and the result would need to be
verified prior to using a newly written method in production
code.
The two array based look up methods, table lookup and
octet math are the fastest. By using octet math, an atan2 value
can be completed in about 50 nanoseconds. That is the meth-
od that we have been using in our sample application, too.
Here is the source code for those who are interested in the
actual Java implementation:
/**
* Octet based atan2 lookup method.
* Created by xyz on 12/13/13.
*/
public class OctetMath {
private static final double ROUND = 0.5;
private static final double PI = Math.PI;
// To be accurate enough, at least 2000 values are
needed, we use exponent of two in here.
// The memory consumption is 2048 * 8 * 4 = 65536
bytes ~ 65.5 kBytes.
// Using of bigger size will increase accuracy.
private static final int SIZE = 2048;
// last index per side
private static final float LAST = SIZE - 1;
private static final float NEGATIVE_LAST = -LAST;
// Octets are illustrated below.
// ^ y
// 8 | 1st octet
// 7 | 2nd octet
TECHNICALARTICLE
Computing distance and angle
Atan2 Lookup Methods
ODROIDMAGAZINE	 19
// ---------------> x
// 6 | 3
// 5 | 4
// |
// Array representations of strictly computed atan2
values.
// Using double would not make the result more ac-
curate.
private static final float[] OCTET1 = new
float[SIZE];
private static final float[] OCTET2 = new
float[SIZE];
private static final float[] OCTET3 = new
float[SIZE];
private static final float[] OCTET4 = new
float[SIZE];
private static final float[] OCTET5 = new
float[SIZE];
private static final float[] OCTET6 = new
float[SIZE];
private static final float[] OCTET7 = new
float[SIZE];
private static final float[] OCTET8 = new
float[SIZE];
static {
initializeOctets(SIZE);
}
/**
* Get atan2 as table lookup.
* The complexity of the method is 14, but we do
not want this method to be split.
* @param y
* @param x
* @return angle as radians, the value is in the
interval [-PI, PI]
*/
@SuppressWarnings(“all”)
public static float atan2(final float y, final float
x) {
if (0 <= x) {
if (0 <= y) {
if (x < y) {
return OCTET1[(int) (LAST * x / y
+ ROUND)];
} else {
return OCTET2[(int) (LAST * y / x
+ ROUND)];
}
} else {
if (-y < x) {
return OCTET3[(int) (NEGATIVE_LAST
* y / x + ROUND)];
} else {
return OCTET4[(int) (NEGATIVE_LAST
* x / y + ROUND)];
}
}
} else {
if (y < 0) {
// both x and y are negative
if (x > y) {
return OCTET5[(int) (LAST * x / y
+ ROUND)];
} else {
return OCTET6[(int) (LAST * y / x
+ ROUND)];
}
} else {
if (y < -x) {
return OCTET7[(int) (NEGATIVE_LAST
* y / x + ROUND)];
} else {
return OCTET8[(int) (NEGATIVE_LAST
* x / y + ROUND)];
}
}
}
}
private static void initializeOctets(final double
size) {
final double y = size;
for (double i = 0; i < size; i++) {
final double x = i;
final double theta = Math.atan2(y, x);
final int index = (int) i;
OCTET1[index] = (float) theta;
OCTET2[index] = (float) (PI / 2.0 - the-
ta);
OCTET3[index] = (float) (-PI / 2.0 + the-
ta);
OCTET4[index] = (float) -theta;
OCTET5[index] = (float) (-PI + theta);
OCTET6[index] = (float) (-PI / 2.0 - the-
ta);
OCTET7[index] = (float) (PI / 2.0 + the-
ta);
OCTET8[index] = (float) (PI - theta);
}
}
private OctetMath() {
//
}
}
One should always verify self-made implementations, since
the accuracy of the method is of concern. The correctness
and reached accuracy can be tested against the built-in Math.
atan2 Java method. The accuracy can be improved by using
larger arrays to represent prior computed atan2 values. The
disadvantage of bigger arrays is, of course, that more stati-
cally allocated memory is needed. The memory consumption
of three different memory layouts is shown comparatively in
logarithmic scale in the next figure.
The table memory layout is consuming the most memory.
The worst thing is that its behavior is exponential. As the 8
octets of a unit circle are symmetric, the same method could
be implemented by storing only the data of one of the oc-
tets, in which case only 1/8 of the memory amount is needed.
Then the call time would be bigger, since more control flow
branches must be traversed during one call.
TECHNICALARTICLE
Array and Memory Size
ODROIDMAGAZINE	 20
MULTIBOOTYOURODROID
Summary
With an ODROID, one can make
mathematical studies with dedicated
tools, by implementing his own appli-
cation and studying its behavior. We
warmly recommend application of atan2
in computer programs, especially inten-
sive programs that use a lot of angle and
distance computations such games and
ray tracing. Java’s accurate trigonomet-
ric methods are slow. Therefore some
faster methods should be available. We
implemented an octet based table lookup
method in order to access atan2 values
faster. Our self-made implementation
OctetMath.atan2 is about 7x faster than
the standard Math.atan2. It allocates 66
kB of static memory, which is affordable
in terms of resources.
References
[WIK14] atan2. 8 pages, 2014. http://
en.wikipedia.org/wiki/Atan2
[COR09] Coranac / Vijn Jasper. An-
other fast fixed-point sine approximation.
16.7.2009. www.coranac.com/2009/07/
sines
[RIV06] Riven X. 13.8x faster
atan2. 2006. http://www.java-gam-
ing.org/topics/13-8x-faster-atan2-
updated/14647/view.html
NEWSFROMODROIDWORLD
framebuffer
terminal console
for THOSE gui-less
moments
by Rob Roy
W
hen running an Ubuntu
distribution running Ker-
nel 3.8.13 or above on an
ODROID-X/X2/U2/U3, there is a
resident framebuffer terminal con-
sole that can be activated by pressing
Control-Alt-F[1-6]. To return to the
X11 graphical interface, press Con-
trol-Alt-F7. This gives you access to
the command line even if the X11
interface has stopped working.
INSTALLING MathematicAL
Tools FROM THE UBUNTU
SOFTWARE CENTER
Create beautiful 3D graphs FOR your OFFICE
AND impress your colleagues
by Jussi Opas
T
he Ubuntu Software center contains many free and low-priced applica-
tions, including scientific and mathematical programs. Not all of them
are available for ARM processor based computers, but many of them run
natively on the ODROID, and the Software Center ensures that one can load a
correctly compiled version. This article describes how to load a mathematics ap-
plication from the Ubuntu store.
In the upper right corner of the Ubuntu Software Center, there is a search box
which can be used if we know approximately what we are looking for. In the left
there is a category list, as shown in the first screenshot.
To find a mathematics tool, push the ‘Science & Engi-
neering’ button. Then the store gives a list of alternatives
represented as icons.
Select the Mathematics icon, and the next window will show a collection of
tools that are useful for doing mathematics. It is easy to install a selected tool, and
uninstallation is also possible from this interface.
To start, I recommend loading wxMaxima and/or QtOctave. To demonstrate
that the programs are working, let’s paint atan2 with Maxima and Octave.
Science and Engineering
Mathematics Ubuntu Shop Plot 3D
TECHNICALARTICLE TECHNICALARTICLE(BEGINNER)
ODROIDMAGAZINE	 21
MULTIBOOTYOURODROID
After installation, wxMaxima appears in the Education
menu. Select ‘Plot 3D...’ from wxMaxima’s Plot menu to see
the plotting dialog.
Next, write your favorite mathematical formula into the
Expression field and fill in the value intervals for x and y.
In the plot window, one can rotate to an appropriate view-
ing angle and see the 3D illustration from any side. This
same can be written also into a wxMaxima applications com-
mand line as follows: plot3d(atan2(y,x), [x,-5,5], [y,-5,5], [plot_
format,gnuplot], [gnuplot_pm3d,true]).
Also in QtOctave, one can define a formula, and then ro-
tate the resulting image with a mouse.
Mathematical tools are available also on Android in the Play
Store. The Maxima Android version is shown in the next fig-
atan2 Maxima
QTOctave Atan2
Atan2 ODROID
ure. However, in Android, one can not rotate the picture, un-
like the Linux version of the Maxima application.
Because Ubuntu is popular for running scientific applica-
tions, there are many interesting plotting programs available to
verify your experiment results, visualize mathematical formulas,
and create intricate 3D graphs. There is also a dedicated engi-
neering and scientific group on the official Ubuntu Engineer-
ing site at http://bit.ly/1vVlVHx, where you can find CAD
programs, electronics applications, data visualization packages,
and much more to help you have fun with your mathematical
projects on the ODROID!
TECHNICALARTICLE
Mathematica
ODROIDMAGAZINE	 22
MULTIBOOTYOURODROID(INTERMEDIATE)
T
he Android source code is incred-
ibly massive (more than 4GB),
but how does this large code base
gets installed onto phones, tablets and our
ODROID boards? The simple answer is
that the source gets compiled into com-
pact binary files and is then compressed
to a particular format. In the last 2 issues,
wehavebeenlookingintoAndroidsource
and how to compile it for ODROID-U3.
In this month’s article, we are going to
explore the different image files that are
generated by the Android build system.
Please note that all software tools used
in this article can be downloaded from
http://bit.ly/1hy3vdc.
Android devices run on very limited
resources and disk space, which makes it
crucial that the operating system, along
with the supporting files, be as small as
possible. The final image files generated
by the build system are:
boot.img
cache.img
recovery.img
system.img
userdata.img
There are a few scenarios in which
knowing more about the image files may
benefit:
Removing or adding files to the image file
Experimenting with different configurations
quickly
Upgrading Android versions without
compiling the full source code
Android Image
Files
A PEEK INTO the COMPRESSED FILES that make
android portable AND LIGHTWEIGHT
by Nanik Tolaram
boot.img
This image file contains the initialization (init) file that is used to boot up Android.
The file init.rc contains information for hosting the different services and configura-
tions that are needed to start Android. There are 2 files inside the /sbin directory, and
one in particular is very important, called adbd, which is the adb daemon that is run as
part of the Android startup process. Adbd allows you to connect to your device using
the adb command.
The following steps shows you how to extract the boot.img:
1. Run the unmkbooting utility by typing
$ unmkbooting boot.img.
Kernel size 3133124
Kernel address 0x10008000
Ramdisk size 167690
Ramdisk address 0x11000000
Secondary size 0
Secondary address 0x10f00000
Kernel tags address 0x10000100
Flash page size 2048
Board name is “”
Command line “”
Extracting kernel.gz ...
Extracting initramfs.cpio.gz ...
All done.
---------------
To recompile this image, use:
mkbooting --kernel kernel.gz --ramdisk initramfs.cpio.gz -o new_boot.img
---------------
ODROIDMAGAZINE	 23
MULTIBOOTYOURODROID
A set of directories files are then placed into the current di-
rectory.
2. Run the extract_uImage.sh script by typing
$ extract_uImage.sh initramfs.cpio.gz.
Checking for uImage magic word...
1+0 records in
0+1 records out
4 bytes (4 B) copied, 3.9012e-05 s, 103 kB/s
uImage recognized.
Extracting data...
2619+1 records in
327+1 records out
167626 bytes (168 kB) copied, 0.00185786 s, 90.2 MB/s
Checking for ARM mach-type...
3+0 records in
0+1 records out
3 bytes (3 B) copied, 3.5863e-05 s, 83.7 kB/s
Checking for zImage...
1+0 records in
0+1 records out
4 bytes (4 B) copied, 2.6783e-05 s, 149 kB/s
>>> initramfs.cpio.gz extracted to Image
Which the results in the files show here:
3. The extracted file is now a gzip file, so we need to rename it.
$ mv Image Image.gz
4. Extract the newly renamed file using gunzip.
$ gunzip Image.gz
Check the file type using the file tool by typing
$ file Image
Image: ASCII cpio archive (SVR4 with no CRC).
5. Use the cpio tool to extract the content
$ cpio -i < ./Image
563 blocks.
You will now see the full contents of the
boot.img as shown below. Previous files such
as boot.img have been removed from the
screenshot for easier viewing.
cache.img
This image file does not contain any-
thing major. As the name implies, it is used
as cache storage. On an Android device, this
particular image file will reside in its own partition, or sometimes
its own directory called /cache. The cache is used by Android
OTA (Over The Air) application to store updated image files, or
to upgrade your Android system.
The following steps shows you how to extract the cache.
img:
1. Use the simg2img tool to extract the image file by typing
$ simg2img cache.img cache.raw
computed crc32 of 0xc76ce614, expected 0x00000000
2. Using command file cache.raw you will see the type of the ex-
tracted file.
$ file cache.raw
cache.raw: Linux rev 1.0 ext4 filesystem data,
UUID=57f8f4bc-abf4-655f-bf67-946fc0f9f25b (extents)
(large files)
3. Create a directory to mount the extracted file to the directory.
$ mkdir cc
$ sudo mount -t ext4 -o loop cache.raw cc/
4. You will see there is nothing inside the cc/ directory.
recovery.img
The recovery image contains Linux kernel and busybox tool,
and resides in its own partition. In normal Android devices,
there is a particular physical key sequence that you normally have
to press in order to instruct the device to boot to the recovery
partition. There is another way to boot to recovery using the
following command inside Android:
adb reboot recovery
File list after extracting boot.img
Complete file list of boot.img
File list after extracting initramfs.cpio.gz
Complete file list of cache.img
ODROIDMAGAZINE	 24
MULTIBOOTYOURODROID
Follow these steps to extract the recovery.img:
1. Run the unmkbooting utility
$ unmkbooting recovery.img
Kernel size 3133124
Kernel address 0x10008000
Ramdisk size 1388735
Ramdisk address 0x11000000
Secondary size 0
Secondary address 0x10f00000
Kernel tags address 0x10000100
Flash page size 2048
Board name is “”
Command line “”
Extracting kernel.gz ...
Extracting initramfs.cpio.gz ...
All done.
---------------
To recompile this image, use:
mkbooting --kernel kernel.gz --ramdisk initramfs.
cpio.gz -o new_boot.img
---------------
By using the file command to the check the type of the init-
ramfs.cpio.gz file, you will see the following:
$ file
./initramfs.cpio.gz: u-boot legacy uImage, ramdisk, Li-
nux/ARM, RAMDisk Image (Not compressed), 1388671 bytes,
Wed Apr 2 10:35:12 2014, Load Address: 0x40800000,
Entry Point: 0x40800000, Header CRC: 0x70CA98DA, Data
CRC: 0xC14A4AFD
2. Run the extract_uImage.sh script
$ extract_uImage.sh initramfs.cpio.gz
Checking for uImage magic word...
1+0 records in
0+1 records out
4 bytes (4 B) copied, 2.322e-05 s, 172 kB/s
uImage recognized.
Extracting data...
21697+1 records in
2712+1 records out
1388671 bytes (1.4 MB) copied, 0.0140089 s, 99.1 MB/s
Checking for ARM mach-type...
3+0 records in
0+1 records out
3 bytes (3 B) copied, 3.6532e-05 s, 82.1 kB/s
Checking for zImage...
1+0 records in
0+1 records out
4 bytes (4 B) copied, 3.2578e-05 s, 123 kB/s
>>> initramfs.cpio.gz extracted to Image
3. The extracted file is now a gzip file, so we need to rename it:
$ mv Image Image.gz
4. Extract the newly renamed file using gunzip:
$ gunzip Image.gz
5. Use the cpio tool to extract the content
$ cpio -i < ./Image
3820 blocks
The /sbin direc-
tory contains lots of
tools, most of which are a symlink to recovery (via busybox
symlink) as shown in the screenshot.
system.img
The most important image file is system.img, which contains the
heart and soul of Android, and is the largest in terms of file size.
1. Use the simg2img tool to extract the image file
$ simg2img system.img system.raw
computed crc32 of 0x9a5d4d54, expected 0x00000000
Extracted file list for recovery.img
Complete file list for recovery.img
Busybox symlinks
ODROIDMAGAZINE	 25
MULTIBOOTYOURODROID
2. Using the file tool you will see the type of the extracted file.
$ file system.raw
./system.raw: Linux rev 1.0 ext4 filesystem data,
UUID=57f8f4bc-abf4-655f-bf67-946fc0f9f25b (extents)
(large files)
3. Create a directory to mount the extracted file and mount the
file to the directory
$ mkdir sys
$ sudo mount -t ext4 ./system.raw ./sys
4. You will see a lot of folders inside the sys/ directory.
If you look each of the folders, you will the application, con-
figuration and executables files that are used to run Android.
userdata.img
This particular image file resides in its own partition, and will
be used as the /data partition. The image file does not contain
many files, and sometimes, in different devices, it is just an empty
image file. Since this is used for data, it does not matter what it
contains, since Android does not use it, and is intended only for
storage purposes.
The following steps shows you how to extract the userdata.img:
1. Use the simg2img tool to extract the image file
$ simg2img userdata.img userdata.raw
computed crc32 of 0x20aec0ac, expected 0x00000000
2. Using the file tool, you can see the type of the extracted file.
$ file ./userdata.raw
./userdata.raw: Linux rev 1.0 ext4 filesystem data,
UUID=57f8f4bc-abf4-655f-bf67-946fc0f9f25b (extents)
(large files)
3. Create a directory to mount the extracted file and mount the
file to the directory
$ mkdir data
$ sudo mount -t ext4 ./userdata.raw ./data
4.Youwillseethatthereareonly2foldersinsidethe/datadirectory
(these 2 folders are not used in Android)
Packing
In the previous section, we unpacked the image file, so after
making changes to the image files, you will want to pack them
up again and use them to copy it into your sdcard or eMMC
storage.
boot.img and recovery.img part 2
After making the changes inside the directory, you need to
pack it up and convert it to a .gz file, using the following com-
mand.
$ find . | cpio -o -H newc | gzip > ../newramdisk.
cpio.gz
You have to run the above command inside of the extracted
directory after you unpack it, using the cpio command as shown
in the previous step.
A ../newramdisk.cpio.gz file will be created, and this file will
be packed together using another command:
$ mkbooting --kernel kernel.gz --ramdisk newramdisk.
cpio.gz -o new_boot.img
The kernel.gz comes from the original boot.img, while the
newramdisk.cpio.gz contains our changes. On completiong of
the mkbooting command, you will have a new boot image called
new_boot.img.
system.img part 2
After you make changes to the files inside the extracted
system.img directory, you can pack it using the following com-
mand:
sudo make_ext4fs -s -l 512M -a system ./system_new.
img ./system
The last parameter ./system is the directory that contains the
extracted image files.
Complete file list for system.img
ODROIDMAGAZINE	 26
ODROIDBASICS(BEGINNER)
L
arge capacity installation media
such eMMC or SD cards have a
lot of unallocated space avail-
able after initial installation of a Hard-
kernel or community image. The par-
titions are kept small during the image
creation process so that the resulting
file is more portable, and can still be
installed on smaller storage devices
of 4GB or 8GB size. With a 16GB,
32GB or 64GB device, the partitions
can be expanded in order to take ad-
vantage of the unused space, making
it available for system use.
This article presents the steps neces-
sary to properly resize your Android im-
age’s FAT32 partition, usually referred
to as /mnt/sdcard. If the partitions are
not resized properly, the resolution will
be locked to 720p because the boot.scr
file will not be found by the bootload-
er. The procedure essentially re-assigns
most of the unallocated space to the An-
droid partition while still allowing 1080p
resolution - it’s as simple as that!
Requirements
1. An ODROID U3 or XU board, with an
appropriate power adapter
2. Any MicroSD or an eMMC card of
8+ GB capacity, along with an SD Card
reader/writer, containing a freshly
copied, unbooted Android image. To
download the latest supported An-
droid version relevant to your plat-
form, check the following link, using
http://bit.ly/1k801bP.
Resizing Android
partitions
make full use of your large
sd card or Emmc
by Venkat Bommakanti
3. A (native) Linux host with GParted
(to graphically manage disk parti-
tions) installed. If you have access to
only an MS Windows system, you may
use one of two options:
A GParted Live CD for x86 systems
(http://bit.ly/1hGJVvw), or
An Ubuntu 14.04+ Desktop virtual
machine instance hosted on the X86
system with Gparted installed. See
http://bit.ly/1r2OP48 and http://bit.
ly/1nlDA5d) for details.
GParted for Linux is preferred
over tools such as EaseUS Partition
Master for Windows, since Gparted
detects Android ext3/ext4 partitions
properly without problems, but new-
er versions of EaseUS may not read
ext3/ext4 partitions at all. So, it is
advisable for MS Windows users to
run GParted via USB stick or Virtual
Machine, as mentioned above.
Overview
The first two steps involve moving
two partitions to the end of the storage
device (while still retaining their respec-
tive sizes), and
The third step is to combine most of
the unallocated space to the already ex-
isting Android partition.
The first screenshot in this article
shows the results of following the main
steps on a 32GB card. There are quite a
few sub-steps, so make sure to carefully
follow the figures below. Cards of a ca-
pacity greater than 64GB have not yet
been tested, but should work properly
if the extra room is created as a second
FAT32 partition.
The reason for separate instruc-
tions when using a 64GB card, is that
FAT32 partitions are limited to 32GB
in Android, although more recent An-
droid images allow for larger partition
sizes. Even though most of the steps
are shared between the procedure for
32GB (or less) and 64GB cards, we did
this unified chart that can help you for
either case.
In addition to the chart, there is also
a pictorial guide for resizing the parti-
tions in Gparted on pages 28 and 29.
If you have completed the steps
correctly, the boot.scr file should be
recognized properly and allow 1080p
resolution. It’s advisable to perform this
operation on a new copy of Android to
avoid any potential data loss. Always
make a backup first!
ODROIDMAGAZINE	 27
ODROIDBASICS
ResizinganeMMCorSDCardlessthan64GB
For eMMC or SD cards less than 64GB, follow steps 1-6,
then use steps 6a or 6b, then finish with steps 8-10.
6a. (<64GB) Move this 2nd-last partition towards the end,
just before the previously moved (last) partition. The last two
partitions should touch each other, with no empty (unallocated)
space in between them.
	 - select [Apply] to make the change permanent.
7a. (<64GB) When completed, the layout will look like so:
	 - a single untouched partition at the start of the card,
	 - a lot of blank space, and then,
	 - two partitions all the way at the end.
Resizing a 64GB eMMC or SDCard
The procedure for resizing a 64GB card is slightly different
because FAT32 partitions are limited to 32GB in size.
6b. (64GB) Move this 2nd-last partition roughly towards
the midpoint of the unused space, such that:
there is ~28GB space free to the left of the partition, and
there is ~26GB space free to the right.
	 - select [Apply] to make the change permanent.
7b. (64GB) Edit the 2nd-last partition:
	 - resize it to use the ~26GB available space to its right,
and lastly,
	 - select [Apply] to make the change permanent.
1. Insert the card or module into a Linux host using an appropriate USB adapter/reader.
2. Create a temporary directory on the host’s local drive, to receive the files from the
FAT32 partition of the card. Backup the files from the card’s FAT32 partition to the newly
created backup directory in the host.
3. Using GParted, perform the following operations on the FAT32 partition of the card:
	 - unmount the FAT32 partition,
	 - delete the FAT32 partition, and lastly,
	 - select [Apply] to make the change permanent.
4. While still in GParted, perform these operations:
	 - unmount the last partition of the card,
	 - move this last partition to the end of the card, and lastly,
	 - select [Apply] to make the change permanent.
5. Then perform these final move operations:
	 - unmount the 2nd-last partition
8. Format the unallocated (available) space as FAT32 and select [Apply].
9. Copy the backup files from the local temporary backup directory (created in the sec-
ond step) to the new FAT32 partition.
10. Reinsert the card into the Odroid device, boot and enjoy Android on your ODROID!
First, follow
these steps to
prepare your
eMMC or SD
card for its
resizing.
After doing
steps 1-5,
move on to
6a or 6b
depending
on your eMMC
or SD card’s
capacity.
Before resizing the Android partitions After resizing the Android partitions
ODROIDMAGAZINE	 28
ODROIDBASICS(BEGINNER)
QUICK pictorial
guide for RESIZING
AN ANDROID
SD OR EMMC
by Venkat Bommakanti
Initial parameters of 128 MB partition to be moved
Move the selected 2.12 GB partition
Initial parameters of 2.12 GB partition to be moved
Move the selected 128 MB partition
Initial partition layout
New parameters to move 2.12 GB partition
New parameters to move 128 MB partition
ODROIDMAGAZINE	 29
ODROIDBASICS
Copy original Android partition for backup
Enter parameters for new Android partition
Partition layout completed
Delete original Android partition
Request to create new Android partition
Apply new partition layout
Save the copy of original Android partition to backup folder
Copy contents of backup folder (original Android partition)
Restore backup Android files
ODROIDMAGAZINE	 30
TECHNICALARTICLE(HARD)
I
n the previous automation article,
we showed how to attach sensors to
the ODROID-XU: a temperature
sensor and a motion detector to monitor
a cat’s movement habits. In this article
we will go one step further, and learn
how to control a step motor using the
ODROID. And what better application
for a motor than building an Internet-
controlled automatic cat feeder!
We will start with the Cat Mate C50
feeder, shown in Figure 1.
This particular feeder has a battery-
powered clock mechanism that activates
every 24 hours, releasing the red lever
to the next position, which results in the
white hood moving to the next meal com-
partment. It is also very easy to hack - you
can just remove the clock mechanism that
rotates the lever, and replace it with a mo-
How to feed
your cat
over the Internet
A guide for attaching step motors
to the ODROID-U3
by Marian Mihailescu
tor, as shown in Fig-
ure 2 and Figure 3.
For this proj-
ect, I will be using
the ODROID-U3,
which has several
advantages over
the ODROID-XU
for this project: it’s
more affordable, re-
quires less power,
does not have a fan,
and has the optional
IO-SHIELD ac-
cessory, which pro-
vides extra GPIO
ports. The cat feeder will be controlled
using a 5V stepper motor (model 28BYJ-
48), which can be purchased from Ebay
together with the driver board ULN2003
for less than $3 USD. The stepper mo-
tor is ideal in this case, since it can rotate a
fixed number of steps, allowing us precise
control of the cat feeder. In particular, the
28BYJ-48 motor has 32 steps per revolu-
tion, with a gear reduction of 1/64, which
means that it does 2048 steps in one full
revolution (360 degrees). Most motors
usually need more current than develop-
ment boards can support, and thus are
usually connected to an external power
We interrupt this article to announce the return of the cat memes!
Figure 1. Cat Mate C50
Figure 2a - Clock mechanism removed
with lever gear visible Figure 2b - Front access to the lever gear
ODROIDMAGAZINE	 31
TECHNICALARTICLE
supply or a battery pack; however this particular motor can get all
the power it needs from the ODROID.
The role of the motor driver board is to allow the small current
output from the ODROID to control a bigger current needed for
the stepper motor. The driver board is controlled by four inputs
that determine how the coil is magnetized in order to rotate the
motor magnet core. There are also the 5V power and ground
inputs, for a total of six connections to the ODROID.
Since the motor requires 5V logic, we need a level shifter to
work with the 1.8V outputs of the ODROID. Similar to the pre-
vious automation article, where is explained in more detail, we will
be using the four port Freetronics Logic Level Converter. Since
the motor driver requires four GPIO pins for control and the
ODROID U3 only has three GPIOs (GPIO199, GPIO200 and
GPIO204), the ODROID IO-SHIELD is required. However, in
the absence of the IO-SHIELD, it is possible to control the driver
board with only three GPIO by using a shift register.
The shift register gets all required GPIO outputs in a serial way,
and then outputs them to the stepper motor in parallel. You need
to connect the SERIAL IN input to the GPIO that sends the mo-
tor control logic. CLOCK is used to make the shift register load
the logical value from SERIAL IN on a low-high transition, while
shifting the other stored values. LATCH enables the output of
the shift register on a low-high transition. OUTPUT ENABLE
is used to disable the outputs - since we want them enabled all the
time, we can connect it to GND, and RESET is used to clear the
shift register. We can connect OUTPUT ENABLE to 5V (VCC)
and set up all the outputs each time, such that RESET is not re-
quired. This particular shift register model has eight outputs, so
we will load eight values each time, even if we only need four.
The motor driver is connected to the motor in the feeder by
a 2m cable, which allows the board to be placed safely away from
the cat. To control the feeder, the bash script shown below is
executed by clicking a button in a webpage. A webcam was also
Even though a space hyperdrive would be far more useful, we dutifully
succumb to the will of our feline masters by combining both robotics
and Linux to automatically feed them, in case we suddenly “disappear”.
Figure 3a - 28BYJ-48
5V stepper motor with
ULN2003 Driver Board
Figure 4 - ODROID Internet-controlled cat feeder schematics
Figure 3b - Motor fits
right in the lever gear
ODROIDMAGAZINE	 32
TECHNICALARTICLE
added to the ODROID to provide visual feedback. Using Motion
webcam server, a live stream is embedded in the webpage with the
cat feeder controls. With a slightly more complex version of the
script and the Linux cron job scheduler, it is possible to activate the
feeder not only on-demand, but also automatically, at pre-defined
periods of time. Your cat has never been happier!
#!/bin/bash
### enable ODROID U3 GPIO
echo 199 > /sys/class/gpio/export
echo out > /sys/class/gpio/gpio199/direction
echo 0 > /sys/class/gpio/gpio199/value
echo 200 > /sys/class/gpio/export
echo out > /sys/class/gpio/gpio200/direction
echo 0 > /sys/class/gpio/gpio200/value
echo 204 > /sys/class/gpio/export
echo out > /sys/class/gpio/gpio204/direction
echo 0 > /sys/class/gpio/gpio204/value
### setup motor sequence
declare -a SEQ0=(0 0 0 0 1 0 0 0)
declare -a SEQ1=(0 0 0 0 0 1 0 0)
declare -a SEQ2=(0 0 0 0 0 0 1 0)
declare -a SEQ3=(0 0 0 0 0 0 0 1)
### define level shifter GPIO
IN=/sys/class/gpio/gpio204/value
LATCH=/sys/class/gpio/gpio200/value
CLK=/sys/class/gpio/gpio199/value
### control motor
STEP_COUNTER=0
for STEP in {1..4096}
do
echo 0 > $LATCH
for PIN_COUNTER in {0..7}
do
PIN_VALUE=”SEQ$STEP_COUNTER[$PIN_COUN-
TER]”
echo ${!PIN_VALUE} > $IN
echo 1 > $CLK
echo 0 > $CLK
done
STEP_COUNTER=$[$STEP_COUNTER + 1]
if [ “$STEP_COUNTER” = “4” ]
then
STEP_COUNTER=0
fi
echo 1 > $LATCH
echo 0 > $LATCH
sleep 0.000000001
done
### after feeder activated, reset motor inputs
for RESET in 0 0 0 0 0 0 0 0
do
echo $RESET > $IN
echo 1 > $CLK
echo 0 > $CLK
done
echo 1 > $LATCH
echo 0 > $LATCH
echo “[$(date)] : Feeder activated successfully...
meow!”
Figure 5a - Board with all components attached Figure 5b - Webpage to control the feeder over the internet
ODROIDMAGAZINE	 33
TECHNICALARTICLE
make A CUSTOM lego
case for your u3
don’t have your own 3d printer yet?
assemble THIS great case FROM your lego bucket!
by @Zylophone
ODROIDMAGAZINE	 34
Audio Flow Diagram
W
e have frequently received
requests on the forums for
instructions on how to en-
able 5-channel audio passthrough with
ODROID computers. However, we
couldn’t find out how to implement
the pass-through over the HDMI audio
channel with the native hardware, even
though we tried many different ways.
So, we decided to develop pass-through
functionality in another way, using a USB
to S/PDIF interface.
Hardware setup
To allow HDMI passthrough, we
created a USB-S/PDIF adapter board
using the CM108AH chipset. We called
it the USB-S/PDIF, which stands for
AUDIO LINK. The price is only $16
and it comes with a USB cable and plas-
tic shell.
The Cmedia CM108AH is a highly in-
tegrated single chip USB audio solution.
All essential S/PDIF optical TOSLINK
How to enable
multi-channel audio
output with XBMC
Using the USB-S/PDIF peripheral
to deliver digital 5.1 surround sound
by Justin Lee, CEO of Hardkernel
as well as Coaxial outputs, including PLL, regulator, and
USB transceiver could be implemented on a small PCB.
Software setup
The passthrough function in XBMC 12 Frodo doesn’t
work with the ODROID, but fortunately, XBMC 13
Gotham is capable of enabling HDMI passthrough out-
put. For best results, use the latest Ubuntu or Debian OS
image which has the XBMC 13 preinstalled.
We tested our hardware with these 2 prebuilt OS im-
TECHNICALARTICLE(BEGINNER)
What does this setup need? An ODROID powering it, of course!
PulseAudio Configuration SettingsODROID Audio Link 1
ODROIDMAGAZINE	 35
ages, either of which may be used to
achieve the necessary software configu-
ration for 5-channel surround:
http://forum.odroid.com/view-
topic.php?f=29&t=4823
http://forum.odroid.com/view-
topic.php?f=79&t=4626
To begin installation, plug in the
USB-S/PDIF and boot your board.
In order to activate Passthrough Co-
decs, first setup PulseAudio Volume
Control according to the screenshots.
Select Digital Output (S/PDIF), then
select AC3 and DTS in the Advanced
option menu.
Finally, start up XBMC, where you
can easily setup the passthrough func-
tion. Select the CM108 device in the
Audio output menu, then enable the op-
tions called Enable passthrough, Dolby
Digital AC3 capable receiver, and DTS.
used by the amplifier, and playing one
with DTS sound should indicate DTS
encoding.
Therearealsoseveralthird-partyUSB
sound cards that use S/PDIF output
which should work as 5.1 passthrough
devices as long as the Linux driver sup-
ports it. Please note that PulseAudio
does not currently allow TrueHD or
DTS-MA passthrough, which is a Pul-
seAudio limitation, unrelated to the
USB-S/PDIF hardware or XBMC soft-
ware configuration.
The USB-S/PDIF is now available
from the Hardkernel store for $16 at
http://bit.ly/1kIt8aC.
TECHNICALARTICLE
ODROID Audio Link 2
Our audio system displaying both Dolby
Digital and DTS sound. 5.1 surround is
awesome!
Setup on XBMC
The receiver which we used for this
tutorial is a very cheap entry level, which
works well for development and testing.
To verify that the hardware and soft-
ware are configured properly, playing a
video with AC3 sound should display
that Dolby Digital encoding is being
Travel Back In
Time with
Telnet
Dust off THAT OLD
1200 baud modem
by Rob Roy
B
efore the World Wide Web and
HTTP was invented, a protocol
called Telnet was a popular way
to communicate from one computer
to another. By creating a primitive
form of a web page that operated over
Telnet, computer hackers built a large
community of unique text-based serv-
er nodes running software called BBS
(Bulletin Board System). This network
included many special-interest commu-
nities that shared unique hobbies such
as role playing, music and program-
ming. To take a trip back in history to
1984, when the BBS network was in its
golden age, type either of the following
into a Terminal window:
telnet 1984.ws 23
telnet gcomm.com
Register and enjoy some of the most
advanced ASCII graphics from the
early days of network computing!
More nostalgic BBS experiences such
as multi-user dungeons (MUDs), chat
programs and other epic systems can
be found at http://bit.ly/1qnkmSq.
TIPSANDTRICKS
ODROIDMAGAZINE	 36
OSSPOTLIGHT(BEGINNER)
D
ream Machine, a community
prebuilt OS image, offers nearly
every flavor of Ubuntu desktop
available for versions 13.04 and 13.10,
including Lubuntu, LXDE, Kubuntu
(KDE), Blackbox, Openbox, Matchbox,
Unity and Xubuntu (XFCE). The desk-
top environment can be selected by us-
ing the gear icon in the upper corner of
the Dream Machine login screen. Whis-
per comes with a single performance-
oriented speed-optimized environment
called Lightweight X11 Desktop Envi-
ronment (LXDE), which is graphically
very fast and offers a similar interface to
Windows.
Because the software on Dream Ma-
chine includes everything on the Fully
Loaded Ubuntu 12.11 image, please re-
fer to the previous OS Spotlight column
(May 2014) for details on the included
packages. However, Dream Machine also
OS Spotlight:
Dream Machine
and Whisper
Ubuntu 13.04 and 13.10 with 8 Desktop
Environments Also Available in Turbo
by Rob Roy, Editor-In-Chief
comes with XBMC, which is not includ-
ed with Fully Loaded, since XBMC only
works with ODROID Kernel 3.8. There
have been several improvements to 1080p
playback in XBMC since Dream Machine
13.10 was finalized, and the latest version
of XBMC will be included in the upcom-
ing Dream Machine 14.04 release.
KDE Plasma
Workspace
Although every desktop environment
on Dream Machine contains basically the
same software, there are many differences
in the look of each desktop as well as ad-
ditional UI features. The default environ-
ment in the 13.10 version is KDE Plas-
ma Workspace, which features beautiful
hardware-accelerated fade and transition
effects in its windowing environment.
KDEcomeswithadriverforOpenGLES
called kwin_gles, so that the animations
remain smooth and don’t stress the CPU.
Because other Ubuntu desktops are (gen-KDE Plasma Workspace features Open GLES2
GPU acceleration and has gorgeous effects! Blackbox adheres to a minimalist aesthetic.
erally) written for OpenGL, which is not
supported by the Mali GPU, rendering in
those environments is done at the soft-
ware level, but KDE offers very fast UI
responsiveness.
KDE Plasma Workspace will be fa-
miliar to users of Windows operating
systems, since it has a well organized
Start Menu and uses a similar desktop
layout, with a notification area in the bot-
tom right. It has its own robust screen
saver program, and is the only environ-
ment to include dozens of notification
sounds. It also has a Recent Docu-
ments and Applications area, as well as
many useful widgets such as clocks and
weather. It’s my favorite desktop, and
is a great choice for office work or web
browsing. For more information on
the KDE desktop, or to contribute to
the ongoing open-source project, visit
http://www.kde.org/.
Dream Machine and Whisper
with Kernel 3.8 for the U2/
U3/X/X2 may be downloaded
from http://bit.ly/1rhHymu.
Watch the ODROID forums at
http://forum.odroid.com/ for
the 14.04 versions, coming
soon!
ODROIDMAGAZINE	 37
OSSPOTLIGHT
Blackbox
The simplest desktop environment
on Dream Machine is called Blackbox,
which displays only a task bar and a com-
pact Applications menu, accessed by
right-clicking the Desktop. It’s meant as
a very lightweight way to monitor system
processes, or just to reduce CPU cycles
for power-hungry applications. A typical
scenario for using Blackbox is an embed-
ded Linux system that runs a single cus-
tom application, such as a robotics con-
troller. The design is visually minimalist,
it runs applications quickly, and also has a
small memory footprint.
LXDE
LXDE stands for Lightweight X11
Desktop Environment, and is best suited
for those who wish to get the maximum
performance from the ODROID while
still retaining a robust interface. It looks
and feels like Windows XP, and excludes
graphic compositing and other visual ef-
fects in order to boost the environment’s
efficiency.
XBMC runs very well using LXDE,
and is the best choice for those who
wish to setup a Linux set-top box run-
ning XBMC, Transmission or Youtube.
LXDE also offers a unique File Man-
ager called PCManFM, which leverages
the gio/gvfs libraries to connect to sftp,
webdav, smb, and other Gnome Virtual
File System-supported protocols.
Lubuntu
Lubuntu, which is based on LXDE,
offers some visual improvements to
the basic LXDE interface with larger,
squared-off icons and a streamlined
taskbar. It also features many new soft-
ware packages, including the Lubuntu
Software Center.
Matchbox
Matchbox is different from other
environments in its use of the entire
desktop as an Applications menu. Click
the arrows in the upper left and right to
page through the categories, and scroll
down the desktop to see more applica-
LXDE(LightweightX11DesktopEnvironment)
balances performance, speed and features.
Lubuntu is built on LXDE and offers a wide
range of unique software applications.
tions. Matchbox is perfect for access-
ing programs and icons quickly without
needing to constantly open a menu, since
every application shortcut is displayed
on a single page. Although Matchbox
was designed for PDAs and tablets, it
looks great on a 1080p HDMI monitor.
Matchbox shows only one window at a
time rather than using a multi-window
layout.
Openbox
Openbox isn’t actually a desktop en-
vironment, but a stand-alone Window
Manager. It can be run by itself or within
another desktop environment, and uses
the minimum amount of resources nec-
essary to launch programs and manage
windows. The main focus of Openbox
is speed, and is ideal for time-sensitive
programs, high-traffic servers, and other
applications where memory and proces-
sor use is important. Openbox is ex-
tremely sparse, has very few dependen-
cies, and is delightfully compact.
Matchbox is designed for PDAs, but also looks
sharp on an HD 1080p monitor.
Openbox comes with only a terminal and web
browser, and is perfect for embedded systems.
ODROIDMAGAZINE	 38
OSSPOTLIGHT
Razor
The Razor-qt desktop is written en-
tirely in the QT programming language,
and is one of the more recent desktop
environments to be included in Ubuntu
13.10. While still a new project, Razor-
qt already contains many key compo-
nents, such as a panel, desktop, applica-
tion launcher, settings center, and user
session. Built for versatility and reuse,
Razor-qt runs in conjunction with any
number of window managers, although
most Razor developers prefer to use
Openbox. It’s possible to use Razor with
any modern window manager, from gw-
wm2 to kwin, including running KDE
without the Plasma Desktop.
XFCE and Xubuntu
Xubuntu is based on the XFCE desk-
top environment, with the addition of
many useful bundled packages which are
meant to replace many Gnome-based
software applications. It has a useful
shortcut bar in the bottom area that ap-
pears on mouse hover, and an upper left
start menu like Gnome. XFCE is a fa-
vorite of many Ubuntu users because of
its nice balance between speed and func-
tionality, as well as its convenient orga-
nization of applications into categories.
The Search feature, represented by a
magnifying glass in the shortcut bar, is
similar to the Unity search bar, and can
be used to find any program easily.
XBMC
XBox Media Center (XBMC) can
run as a standalone application, but can
also be enjoyed as its own desktop envi-
ronment by installing the “xbmc-stand-
alone” package from Synaptic Package
Manager. It is an all-in-one solution
for audio and video playback, support-
ing Samba server connections, 5.1 DTS
playback, third-party add-ons, and beau-
tiful audio visualizations. It can also
be used to launch Linux programs, so
that software packages can be accessed
within the need to go back to an Ubuntu
desktop. For more information on us-
ing XBMC, please read the Quick-Start
Guide at http://bit.ly/1kTXKXI.
Razor is written entirely in the advanced QT
programming language.
Xubuntu is a favorite of Ubuntu enthusiasts
and offers many user-friendly features.
XBMC is the go-to program for all media
playback, and can launch programs too.
Whisper (LXDE)
Whisper is a single-user version of
Dream Machine that offers one desk-
top environment (LXDE) and boots
straight to the desktop very quickly
by setting the auto-login variables in
/etc/lightdm/lightdm.conf. It is de-
signed for performance and speed,
and contains the same major software
packages as Dream Machine. Whis-
per is one of the most popular images
available on the forums, and provides
a familiar Windows XP-style interface
which is ideal for programming, video
playback, CPU-intensive applications,
or just for lightweight use such as web
browsing and document editing.
Although Dream Machine is not
yet available for the XU series, Whis-
per has been successfully ported to the
XU, and
offers GX-
ine instead
of XBMC
for video
playback,
since the
XU version
of XBMC does not run within X11.
Open any media file from the File Ex-
plorer to automatically launch GXine,
and double-click the playback window
to enable full-screen viewing.
Now that that the Hardkernel
14.04 images have been released, an
updated version of Dream Machine
and Whisper will be released to the fo-
rums in the next few months. The re-
cent improvements to XBMC that en-
able smooth 1080p playback will also
be included in the X and U versions.
Hardkernel is constantly improving its
3.8 kernel branch, and has recently re-
placed the kernel-update.sh script with
the new odroid-utility package, which
will also be added to the new releases.
Whisper, as fast as your ODROID can go!
Here are the steps to program your ODROID-Show module with Rebol:1. Install Rebol on your ODROID. Rebol is available in the Ubuntu repositories.2. Connect your ODROID-Show module to your ODROID via USB. It will appear as a serial device like /dev/ttyUSB0. 3. Save the code from the article into a file called oshow.r3 in your home directory.4. Open a terminal and run the command: %oshow.r35. This will load the oshow dialect which defines functions to communicate with the ODROID-Show over the serial port. 6. Use the display-text variable to

Más contenido relacionado

Similar a Here are the steps to program your ODROID-Show module with Rebol:1. Install Rebol on your ODROID. Rebol is available in the Ubuntu repositories.2. Connect your ODROID-Show module to your ODROID via USB. It will appear as a serial device like /dev/ttyUSB0. 3. Save the code from the article into a file called oshow.r3 in your home directory.4. Open a terminal and run the command: %oshow.r35. This will load the oshow dialect which defines functions to communicate with the ODROID-Show over the serial port. 6. Use the display-text variable to

ODROID Magazine September 2014
ODROID Magazine September 2014ODROID Magazine September 2014
ODROID Magazine September 2014Nanik Tolaram
 
ODROID Magazine April 2014
ODROID Magazine April 2014ODROID Magazine April 2014
ODROID Magazine April 2014Nanik Tolaram
 
ODROID Magazine January 2015
ODROID Magazine January 2015ODROID Magazine January 2015
ODROID Magazine January 2015Nanik Tolaram
 
ODROID Magazine December 2014
 ODROID Magazine December 2014 ODROID Magazine December 2014
ODROID Magazine December 2014Nanik Tolaram
 
ODROID Magazine June 2015
ODROID Magazine June 2015ODROID Magazine June 2015
ODROID Magazine June 2015Nanik Tolaram
 
Odroid Magazine March 2014
Odroid Magazine March 2014Odroid Magazine March 2014
Odroid Magazine March 2014Nanik Tolaram
 
24 best2
24 best224 best2
24 best2kurtbru
 
Full Circle número 90
Full Circle número 90Full Circle número 90
Full Circle número 90Huehue 1
 
Discovering The Unknown Aspects Of Nuke
Discovering The Unknown Aspects Of NukeDiscovering The Unknown Aspects Of Nuke
Discovering The Unknown Aspects Of NukeAnimation Kolkata
 
Docker for the Internet of Things (IoT): An Introduction
Docker for the Internet of Things (IoT): An IntroductionDocker for the Internet of Things (IoT): An Introduction
Docker for the Internet of Things (IoT): An Introductionmsyukor
 
BSD Magazine December issue
BSD Magazine December issueBSD Magazine December issue
BSD Magazine December issueValerie Heatley
 
Intro to Open Source Hardware (OSHW)
Intro to Open Source Hardware (OSHW)Intro to Open Source Hardware (OSHW)
Intro to Open Source Hardware (OSHW)Drew Fustini
 
Open source and_latest_development_in_ict
Open source and_latest_development_in_ictOpen source and_latest_development_in_ict
Open source and_latest_development_in_ictKanisRauKing
 
X86 ROM Cooking 101 (Android Builders Summit 2014)
X86 ROM Cooking 101 (Android Builders Summit 2014)X86 ROM Cooking 101 (Android Builders Summit 2014)
X86 ROM Cooking 101 (Android Builders Summit 2014)Ron Munitz
 
Open frameworks 101_fitc
Open frameworks 101_fitcOpen frameworks 101_fitc
Open frameworks 101_fitcbenDesigning
 
Hacker's friendly Open Source Hardware DIY modular Laptop
Hacker's friendly Open Source Hardware DIY modular LaptopHacker's friendly Open Source Hardware DIY modular Laptop
Hacker's friendly Open Source Hardware DIY modular LaptopOlimex Bulgaria
 
Hacking with Linux on Android devices #MOCPON
Hacking with Linux on Android devices    #MOCPONHacking with Linux on Android devices    #MOCPON
Hacking with Linux on Android devices #MOCPONNetwalker lab kapper
 

Similar a Here are the steps to program your ODROID-Show module with Rebol:1. Install Rebol on your ODROID. Rebol is available in the Ubuntu repositories.2. Connect your ODROID-Show module to your ODROID via USB. It will appear as a serial device like /dev/ttyUSB0. 3. Save the code from the article into a file called oshow.r3 in your home directory.4. Open a terminal and run the command: %oshow.r35. This will load the oshow dialect which defines functions to communicate with the ODROID-Show over the serial port. 6. Use the display-text variable to (20)

ODROID Magazine September 2014
ODROID Magazine September 2014ODROID Magazine September 2014
ODROID Magazine September 2014
 
ODROID Magazine April 2014
ODROID Magazine April 2014ODROID Magazine April 2014
ODROID Magazine April 2014
 
ODROID Magazine January 2015
ODROID Magazine January 2015ODROID Magazine January 2015
ODROID Magazine January 2015
 
ODROID Magazine December 2014
 ODROID Magazine December 2014 ODROID Magazine December 2014
ODROID Magazine December 2014
 
ODROID Magazine June 2015
ODROID Magazine June 2015ODROID Magazine June 2015
ODROID Magazine June 2015
 
Odroid Magazine March 2014
Odroid Magazine March 2014Odroid Magazine March 2014
Odroid Magazine March 2014
 
24 best2
24 best224 best2
24 best2
 
Full Circle número 90
Full Circle número 90Full Circle número 90
Full Circle número 90
 
Discovering The Unknown Aspects Of Nuke
Discovering The Unknown Aspects Of NukeDiscovering The Unknown Aspects Of Nuke
Discovering The Unknown Aspects Of Nuke
 
Docker for the Internet of Things (IoT): An Introduction
Docker for the Internet of Things (IoT): An IntroductionDocker for the Internet of Things (IoT): An Introduction
Docker for the Internet of Things (IoT): An Introduction
 
BSD Magazine December issue
BSD Magazine December issueBSD Magazine December issue
BSD Magazine December issue
 
Intro to Open Source Hardware (OSHW)
Intro to Open Source Hardware (OSHW)Intro to Open Source Hardware (OSHW)
Intro to Open Source Hardware (OSHW)
 
2nd
2nd2nd
2nd
 
Open source and_latest_development_in_ict
Open source and_latest_development_in_ictOpen source and_latest_development_in_ict
Open source and_latest_development_in_ict
 
X86 ROM Cooking 101 (Android Builders Summit 2014)
X86 ROM Cooking 101 (Android Builders Summit 2014)X86 ROM Cooking 101 (Android Builders Summit 2014)
X86 ROM Cooking 101 (Android Builders Summit 2014)
 
Open frameworks 101_fitc
Open frameworks 101_fitcOpen frameworks 101_fitc
Open frameworks 101_fitc
 
Hacker's friendly Open Source Hardware DIY modular Laptop
Hacker's friendly Open Source Hardware DIY modular LaptopHacker's friendly Open Source Hardware DIY modular Laptop
Hacker's friendly Open Source Hardware DIY modular Laptop
 
Raspberry Pi
Raspberry PiRaspberry Pi
Raspberry Pi
 
Hacking with Linux on Android devices #MOCPON
Hacking with Linux on Android devices    #MOCPONHacking with Linux on Android devices    #MOCPON
Hacking with Linux on Android devices #MOCPON
 
Linux Presentation
Linux PresentationLinux Presentation
Linux Presentation
 

Más de Nanik Tolaram

Barcelona Meetup Presentation
Barcelona Meetup PresentationBarcelona Meetup Presentation
Barcelona Meetup PresentationNanik Tolaram
 
Diving inside Android Wifi
Diving inside Android WifiDiving inside Android Wifi
Diving inside Android WifiNanik Tolaram
 
Android Internal Services
Android Internal ServicesAndroid Internal Services
Android Internal ServicesNanik Tolaram
 
Peeking into Android Source
Peeking into Android SourcePeeking into Android Source
Peeking into Android SourceNanik Tolaram
 
Building Android Devices
Building Android DevicesBuilding Android Devices
Building Android DevicesNanik Tolaram
 
ODROID Magazine August 2014
ODROID Magazine August 2014ODROID Magazine August 2014
ODROID Magazine August 2014Nanik Tolaram
 
Android Wear Presentation
Android Wear PresentationAndroid Wear Presentation
Android Wear PresentationNanik Tolaram
 
"Learning AOSP" - Android Hardware Abstraction Layer (HAL)
"Learning AOSP" - Android Hardware Abstraction Layer (HAL)"Learning AOSP" - Android Hardware Abstraction Layer (HAL)
"Learning AOSP" - Android Hardware Abstraction Layer (HAL)Nanik Tolaram
 
Learning AOSP - Android Booting Process
Learning AOSP - Android Booting ProcessLearning AOSP - Android Booting Process
Learning AOSP - Android Booting ProcessNanik Tolaram
 
Learning AOSP - Building AOSP for Nexus 7
Learning AOSP - Building AOSP for Nexus 7Learning AOSP - Building AOSP for Nexus 7
Learning AOSP - Building AOSP for Nexus 7Nanik Tolaram
 
Learning AOSP - Android Linux Device Driver
Learning AOSP - Android Linux Device DriverLearning AOSP - Android Linux Device Driver
Learning AOSP - Android Linux Device DriverNanik Tolaram
 

Más de Nanik Tolaram (12)

Barcelona Meetup Presentation
Barcelona Meetup PresentationBarcelona Meetup Presentation
Barcelona Meetup Presentation
 
Diving inside Android Wifi
Diving inside Android WifiDiving inside Android Wifi
Diving inside Android Wifi
 
Android Source Code
Android Source CodeAndroid Source Code
Android Source Code
 
Android Internal Services
Android Internal ServicesAndroid Internal Services
Android Internal Services
 
Peeking into Android Source
Peeking into Android SourcePeeking into Android Source
Peeking into Android Source
 
Building Android Devices
Building Android DevicesBuilding Android Devices
Building Android Devices
 
ODROID Magazine August 2014
ODROID Magazine August 2014ODROID Magazine August 2014
ODROID Magazine August 2014
 
Android Wear Presentation
Android Wear PresentationAndroid Wear Presentation
Android Wear Presentation
 
"Learning AOSP" - Android Hardware Abstraction Layer (HAL)
"Learning AOSP" - Android Hardware Abstraction Layer (HAL)"Learning AOSP" - Android Hardware Abstraction Layer (HAL)
"Learning AOSP" - Android Hardware Abstraction Layer (HAL)
 
Learning AOSP - Android Booting Process
Learning AOSP - Android Booting ProcessLearning AOSP - Android Booting Process
Learning AOSP - Android Booting Process
 
Learning AOSP - Building AOSP for Nexus 7
Learning AOSP - Building AOSP for Nexus 7Learning AOSP - Building AOSP for Nexus 7
Learning AOSP - Building AOSP for Nexus 7
 
Learning AOSP - Android Linux Device Driver
Learning AOSP - Android Linux Device DriverLearning AOSP - Android Linux Device Driver
Learning AOSP - Android Linux Device Driver
 

Último

[2024]Digital Global Overview Report 2024 Meltwater.pdf
[2024]Digital Global Overview Report 2024 Meltwater.pdf[2024]Digital Global Overview Report 2024 Meltwater.pdf
[2024]Digital Global Overview Report 2024 Meltwater.pdfhans926745
 
Automating Google Workspace (GWS) & more with Apps Script
Automating Google Workspace (GWS) & more with Apps ScriptAutomating Google Workspace (GWS) & more with Apps Script
Automating Google Workspace (GWS) & more with Apps Scriptwesley chun
 
The 7 Things I Know About Cyber Security After 25 Years | April 2024
The 7 Things I Know About Cyber Security After 25 Years | April 2024The 7 Things I Know About Cyber Security After 25 Years | April 2024
The 7 Things I Know About Cyber Security After 25 Years | April 2024Rafal Los
 
From Event to Action: Accelerate Your Decision Making with Real-Time Automation
From Event to Action: Accelerate Your Decision Making with Real-Time AutomationFrom Event to Action: Accelerate Your Decision Making with Real-Time Automation
From Event to Action: Accelerate Your Decision Making with Real-Time AutomationSafe Software
 
Workshop - Best of Both Worlds_ Combine KG and Vector search for enhanced R...
Workshop - Best of Both Worlds_ Combine  KG and Vector search for  enhanced R...Workshop - Best of Both Worlds_ Combine  KG and Vector search for  enhanced R...
Workshop - Best of Both Worlds_ Combine KG and Vector search for enhanced R...Neo4j
 
A Domino Admins Adventures (Engage 2024)
A Domino Admins Adventures (Engage 2024)A Domino Admins Adventures (Engage 2024)
A Domino Admins Adventures (Engage 2024)Gabriella Davis
 
Neo4j - How KGs are shaping the future of Generative AI at AWS Summit London ...
Neo4j - How KGs are shaping the future of Generative AI at AWS Summit London ...Neo4j - How KGs are shaping the future of Generative AI at AWS Summit London ...
Neo4j - How KGs are shaping the future of Generative AI at AWS Summit London ...Neo4j
 
EIS-Webinar-Prompt-Knowledge-Eng-2024-04-08.pptx
EIS-Webinar-Prompt-Knowledge-Eng-2024-04-08.pptxEIS-Webinar-Prompt-Knowledge-Eng-2024-04-08.pptx
EIS-Webinar-Prompt-Knowledge-Eng-2024-04-08.pptxEarley Information Science
 
🐬 The future of MySQL is Postgres 🐘
🐬  The future of MySQL is Postgres   🐘🐬  The future of MySQL is Postgres   🐘
🐬 The future of MySQL is Postgres 🐘RTylerCroy
 
04-2024-HHUG-Sales-and-Marketing-Alignment.pptx
04-2024-HHUG-Sales-and-Marketing-Alignment.pptx04-2024-HHUG-Sales-and-Marketing-Alignment.pptx
04-2024-HHUG-Sales-and-Marketing-Alignment.pptxHampshireHUG
 
Developing An App To Navigate The Roads of Brazil
Developing An App To Navigate The Roads of BrazilDeveloping An App To Navigate The Roads of Brazil
Developing An App To Navigate The Roads of BrazilV3cube
 
CNv6 Instructor Chapter 6 Quality of Service
CNv6 Instructor Chapter 6 Quality of ServiceCNv6 Instructor Chapter 6 Quality of Service
CNv6 Instructor Chapter 6 Quality of Servicegiselly40
 
GenCyber Cyber Security Day Presentation
GenCyber Cyber Security Day PresentationGenCyber Cyber Security Day Presentation
GenCyber Cyber Security Day PresentationMichael W. Hawkins
 
Mastering MySQL Database Architecture: Deep Dive into MySQL Shell and MySQL R...
Mastering MySQL Database Architecture: Deep Dive into MySQL Shell and MySQL R...Mastering MySQL Database Architecture: Deep Dive into MySQL Shell and MySQL R...
Mastering MySQL Database Architecture: Deep Dive into MySQL Shell and MySQL R...Miguel Araújo
 
Exploring the Future Potential of AI-Enabled Smartphone Processors
Exploring the Future Potential of AI-Enabled Smartphone ProcessorsExploring the Future Potential of AI-Enabled Smartphone Processors
Exploring the Future Potential of AI-Enabled Smartphone Processorsdebabhi2
 
Raspberry Pi 5: Challenges and Solutions in Bringing up an OpenGL/Vulkan Driv...
Raspberry Pi 5: Challenges and Solutions in Bringing up an OpenGL/Vulkan Driv...Raspberry Pi 5: Challenges and Solutions in Bringing up an OpenGL/Vulkan Driv...
Raspberry Pi 5: Challenges and Solutions in Bringing up an OpenGL/Vulkan Driv...Igalia
 
Partners Life - Insurer Innovation Award 2024
Partners Life - Insurer Innovation Award 2024Partners Life - Insurer Innovation Award 2024
Partners Life - Insurer Innovation Award 2024The Digital Insurer
 
2024: Domino Containers - The Next Step. News from the Domino Container commu...
2024: Domino Containers - The Next Step. News from the Domino Container commu...2024: Domino Containers - The Next Step. News from the Domino Container commu...
2024: Domino Containers - The Next Step. News from the Domino Container commu...Martijn de Jong
 
Unblocking The Main Thread Solving ANRs and Frozen Frames
Unblocking The Main Thread Solving ANRs and Frozen FramesUnblocking The Main Thread Solving ANRs and Frozen Frames
Unblocking The Main Thread Solving ANRs and Frozen FramesSinan KOZAK
 
Data Cloud, More than a CDP by Matt Robison
Data Cloud, More than a CDP by Matt RobisonData Cloud, More than a CDP by Matt Robison
Data Cloud, More than a CDP by Matt RobisonAnna Loughnan Colquhoun
 

Último (20)

[2024]Digital Global Overview Report 2024 Meltwater.pdf
[2024]Digital Global Overview Report 2024 Meltwater.pdf[2024]Digital Global Overview Report 2024 Meltwater.pdf
[2024]Digital Global Overview Report 2024 Meltwater.pdf
 
Automating Google Workspace (GWS) & more with Apps Script
Automating Google Workspace (GWS) & more with Apps ScriptAutomating Google Workspace (GWS) & more with Apps Script
Automating Google Workspace (GWS) & more with Apps Script
 
The 7 Things I Know About Cyber Security After 25 Years | April 2024
The 7 Things I Know About Cyber Security After 25 Years | April 2024The 7 Things I Know About Cyber Security After 25 Years | April 2024
The 7 Things I Know About Cyber Security After 25 Years | April 2024
 
From Event to Action: Accelerate Your Decision Making with Real-Time Automation
From Event to Action: Accelerate Your Decision Making with Real-Time AutomationFrom Event to Action: Accelerate Your Decision Making with Real-Time Automation
From Event to Action: Accelerate Your Decision Making with Real-Time Automation
 
Workshop - Best of Both Worlds_ Combine KG and Vector search for enhanced R...
Workshop - Best of Both Worlds_ Combine  KG and Vector search for  enhanced R...Workshop - Best of Both Worlds_ Combine  KG and Vector search for  enhanced R...
Workshop - Best of Both Worlds_ Combine KG and Vector search for enhanced R...
 
A Domino Admins Adventures (Engage 2024)
A Domino Admins Adventures (Engage 2024)A Domino Admins Adventures (Engage 2024)
A Domino Admins Adventures (Engage 2024)
 
Neo4j - How KGs are shaping the future of Generative AI at AWS Summit London ...
Neo4j - How KGs are shaping the future of Generative AI at AWS Summit London ...Neo4j - How KGs are shaping the future of Generative AI at AWS Summit London ...
Neo4j - How KGs are shaping the future of Generative AI at AWS Summit London ...
 
EIS-Webinar-Prompt-Knowledge-Eng-2024-04-08.pptx
EIS-Webinar-Prompt-Knowledge-Eng-2024-04-08.pptxEIS-Webinar-Prompt-Knowledge-Eng-2024-04-08.pptx
EIS-Webinar-Prompt-Knowledge-Eng-2024-04-08.pptx
 
🐬 The future of MySQL is Postgres 🐘
🐬  The future of MySQL is Postgres   🐘🐬  The future of MySQL is Postgres   🐘
🐬 The future of MySQL is Postgres 🐘
 
04-2024-HHUG-Sales-and-Marketing-Alignment.pptx
04-2024-HHUG-Sales-and-Marketing-Alignment.pptx04-2024-HHUG-Sales-and-Marketing-Alignment.pptx
04-2024-HHUG-Sales-and-Marketing-Alignment.pptx
 
Developing An App To Navigate The Roads of Brazil
Developing An App To Navigate The Roads of BrazilDeveloping An App To Navigate The Roads of Brazil
Developing An App To Navigate The Roads of Brazil
 
CNv6 Instructor Chapter 6 Quality of Service
CNv6 Instructor Chapter 6 Quality of ServiceCNv6 Instructor Chapter 6 Quality of Service
CNv6 Instructor Chapter 6 Quality of Service
 
GenCyber Cyber Security Day Presentation
GenCyber Cyber Security Day PresentationGenCyber Cyber Security Day Presentation
GenCyber Cyber Security Day Presentation
 
Mastering MySQL Database Architecture: Deep Dive into MySQL Shell and MySQL R...
Mastering MySQL Database Architecture: Deep Dive into MySQL Shell and MySQL R...Mastering MySQL Database Architecture: Deep Dive into MySQL Shell and MySQL R...
Mastering MySQL Database Architecture: Deep Dive into MySQL Shell and MySQL R...
 
Exploring the Future Potential of AI-Enabled Smartphone Processors
Exploring the Future Potential of AI-Enabled Smartphone ProcessorsExploring the Future Potential of AI-Enabled Smartphone Processors
Exploring the Future Potential of AI-Enabled Smartphone Processors
 
Raspberry Pi 5: Challenges and Solutions in Bringing up an OpenGL/Vulkan Driv...
Raspberry Pi 5: Challenges and Solutions in Bringing up an OpenGL/Vulkan Driv...Raspberry Pi 5: Challenges and Solutions in Bringing up an OpenGL/Vulkan Driv...
Raspberry Pi 5: Challenges and Solutions in Bringing up an OpenGL/Vulkan Driv...
 
Partners Life - Insurer Innovation Award 2024
Partners Life - Insurer Innovation Award 2024Partners Life - Insurer Innovation Award 2024
Partners Life - Insurer Innovation Award 2024
 
2024: Domino Containers - The Next Step. News from the Domino Container commu...
2024: Domino Containers - The Next Step. News from the Domino Container commu...2024: Domino Containers - The Next Step. News from the Domino Container commu...
2024: Domino Containers - The Next Step. News from the Domino Container commu...
 
Unblocking The Main Thread Solving ANRs and Frozen Frames
Unblocking The Main Thread Solving ANRs and Frozen FramesUnblocking The Main Thread Solving ANRs and Frozen Frames
Unblocking The Main Thread Solving ANRs and Frozen Frames
 
Data Cloud, More than a CDP by Matt Robison
Data Cloud, More than a CDP by Matt RobisonData Cloud, More than a CDP by Matt Robison
Data Cloud, More than a CDP by Matt Robison
 

Here are the steps to program your ODROID-Show module with Rebol:1. Install Rebol on your ODROID. Rebol is available in the Ubuntu repositories.2. Connect your ODROID-Show module to your ODROID via USB. It will appear as a serial device like /dev/ttyUSB0. 3. Save the code from the article into a file called oshow.r3 in your home directory.4. Open a terminal and run the command: %oshow.r35. This will load the oshow dialect which defines functions to communicate with the ODROID-Show over the serial port. 6. Use the display-text variable to

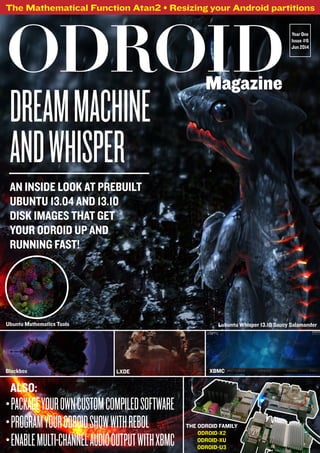
  • 1. The Mathematical Function Atan2 • Resizing your Android partitions Year One Issue #6 Jun 2014 dreammachine andwhisper ALSO: •packageyourownCUSTOMcompiledsoftware •programyourodroidshowwithrebol •enablemulti-channelaudiooutputwithXBMC An inside look at prebuilt ubuntu 13.04 and 13.10 DISK IMAGES that GET YOUR ODROID UP AND RUNNING fast! Magazine ODROIDMagazine Lubuntu Whisper 13.10 Saucy Salamander THE ODROID FAMILY ODROID-X2 ODROID-XU ODROID-U3 Blackbox LXDE XBMC Ubuntu Mathematics Tools
  • 2. What we stand for. We strive to symbolize the edge technology, future, youth, humanity, and engineering. Our philosophy is based on Developers. And our efforts to keep close relationships with developers around the world. For that, you can always count on having the quality and sophistication that is the hallmark of our products. Simple, modern and distinctive. So you can have the best to accomplish everything you can dream of. We are now shipping the ODROID U3 devices to EU countries! Come and visit our online store to shop! Address: Max-Pollin-Straße 1 85104 Pförring Germany Telephone & Fax phone : +49 (0) 8403 / 920-920 email : service@pollin.de Our ODROID products can be found at: http://www.pollin.de/shop/suchergebnis.html?S_ TEXT=odroid&log=internal
  • 3. ODROIDMAGAZINE 3 EDITORIAL E ver since we began publishing ODROID Magazine, we’ve been receiving some great articles from our international contribu- tors involving their innovative hardware projects, including the Giant Android Tablet, ODROID Truck PC, and the Unmanned Ground Vehicle. The worldwide maker community has shown that there is almost no limit as to what an ODROID can do. Because many ODROIDians are involved in software projects as well, we plan to feature some of the many excellent OS images and software that the ODROID community and Hard- kernel developer team have been producing in an ongoing series called OS Spotlight. We kicked off the column last month with an overview of the software included with the Fully Loaded Ubuntu 12.11 im- age, and this month we are highlighting Dream Machine, which is ideal for office work, programming, media playback, and anything else where a tra- ditional desktop PC would be used. As of June 1st, there are now over 5000 members in the ODROID forums at http://forum.odroid.com, showing a phenomenal growth of 500% over the last 1.5 years. With so much interest in the ODROID platform, the original version of U3 actually sold out last month, most likely due to its small footprint and very affordable price. To respond to the increased demand for the compact model, Hardkernel will soon begin shipping its newest generation of the U series hard- ware called the ODROID-U3+, containing several new features: http://bit. ly/1p8zi6L. For Android enthusiasts, Hardkernel published a sneak peek Beta version of Android KitKat 4.4, which you can download and test at http://bit.ly/1hsFdRB. It’s still a work in progress, so make sure to post any bugs and/or feedback on the ODROID forums. In response to many requests for HDMI Passthrough DTS audio, there is a new inexpensive piece of hardware, now available from the Hardkernel Store, called the USB-S/PDIF. The USB-S/PDIF sends DTS and AC3 digital encoding via the HDMI cable to your audio receiver, delivering crisp 5.1 surround sound to your liv- ing room or office via your ODROID running Linux and XBMC 13. It’s now available for $16 at http://bit.ly/1kIt8aC. Hardkernel has not only been upgrading its Ubuntu images to 14.04, but has also improved the XBMC experience with their long-awaited official 1080p re- lease of the popular XBMC-based Media Center image. The new version of XBMC for Linux, available on all platforms, takes advantage of the recent improvements to video decoding in the 3.8 kernel and delivers smooth 720p and 1080p video for all of the encodings supported by the Mali GPU and VPU hardware. Keep in mind that it is an experimental build, but has been reported to work very well. It’s a great distribution for those who previously used OpenElec or Xbox as a set-top box. Check out the build at http://bit.ly/1lfkYpN. ODROID Magazine, published monthly at http://magazine.odroid.com/, is your source for all things ODROIDian. Hard Kernel, Ltd. • 704 Anyang K-Center, Gwanyang, Dongan, Anyang, Gyeonggi, South Korea, 431-815 Makers of the ODROID family of quad-core development boards and the world’s first ARM big.LITTLE architecture based single board computer. Join the ODROID community with members from over 135 countries, at http://forum.odroid.com/, and explore the new technologies offered by Hardkernel at http://www.hardkernel.com/.
  • 4. ODROIDMAGAZINE 4 STAFF ODROIDMagazine Robert Hall, Chief Editor I’m a computer programmer liv- ing and working in San Francisco, CA, designing and building web applica- tions for local clients on my network cluster of ODROIDs. My primary languages are jQuery, Angular JS and HTML5/CSS3. I also develop pre-built operating systems, custom kernels and optimized applications for the ODROID platform based on Hardkernel’s official releases, for which I have won several Monthly Forum Awards. I use my ODROIDs for a variety of purposes, including media center, web server, applica- tion development, workstation, and gaming console. You can check out my 100GB collection of ODROID software, prebuilt kernels and OS images at http://bit.ly/1fsaXQs. Bo Lechnowsky, Editor I am President of Respectech, Inc., a technology consultancy in Ukiah, CA, USA that I founded in 2001. From my background in elec- tronics and computer programming, I manage a team of technologists, plus develop custom solutions for compa- nies ranging from small businesses to worldwide corporations. ODROIDs are one of the weapons in my arsenal for tackling these projects. My favor- ite development languages are Rebol and Red, both of which run fabu- lously on ARM-based systems like the ODROID-U3. Regarding hobbies, if you need some, I’d be happy to give you some of mine as I have too many. That would help me to have more time to spend with my wonderful wife of 23 years and my four beautiful children. Bruno Doiche, Art Editor Secured his comput- ing necromancy skills after bringing a fiber optics switch back to life, getting his Macintosh back from death, getting a PS3 back from death, getting his fian- cee’s T400 back from death (which was a old-style dd data transfer), and man- aging how to handle the cold innards of his steady job data center. News from Art Editor Bruno: Getting back to our regular schedule is no small task. After a couple of mi- nor setbacks, we throttled hard to get to a speedier rhythm, but not without hav- ing, as usual, the best fun! What were our trade offs? Well... we didn’t manage to pack our astounding amount of tips, but now we nailed the code color palette and type size!. It’s easy to read and good looking! The cover was also a challenging idea, as when we were chatting and defined that the centerpiece cover article would be Rob’s Linux distros. I had this micro obsession on getting all current produc- tion ODROIDS together, but believe or not, I don’t have the actual production triad (U3, X2, XU). But as easy as seems to get them side by side in a single photo, there are plenty of ODROIDians that never seen them together. But no longer! I have a trusty friend that has three of them, and sent me a photo of three of his ODROIDS for me to put on the cover. So here is my thanks Patola, and I hope to feature you in an interview regarding 3D printing using ODROIDS! What else is new? Now, Rob is work- ing directly on the art master files! We have gotten so much more agile on the revision process, and are as ever, working hard to deliver to you, our trusty readers a hard-fact, spot-on magazine that we love to do! Not that we don’t get some crazy issues now and then!
  • 5. ODROIDMAGAZINE 5 INDEXProgramming Your ODROID-Show 6 Recompiling Mali Drivers 7 Package Your Compiled Software for Installation 8 Describing the Mathematical Function Atan2 17 framebuffer terminal console 20 Mathematics Tools for the ODROID 20 Android Image Files 22 Resizing Android partitions 26 QUICK pictorial guide For Resizing An Android SD or eMMC 28 How to feed your cat over the Internet 30 How to enable multi-channel audio output with XBMC 34 Travel Back In Time with Telnet 35 OS Spotlight: Dream Machine and Whisper 36 You’ve got mail... or should! 39 Meet an ODROIDIAN 40 Make A CUstom lego case for your u3 33
  • 6. ODROIDMAGAZINE 6 TECHNICALARTICLE(BEGINNER) T he ODROID-Show module is incredibly useful for many tasks. For instance, it is a great de- vice to display information that can be viewed at a glance. However, it can be cumbersome to display the information you want in an easy manner. To make things simpler, I used the incredible capabilities of Rebol to create an easy dialect to allow displaying many types of information on the ODROID- Show. Because Rebol is cross-platform, the same scripts will run on any operat- ing system. You can also connect multiple ODROID-Show modules to a single ODROID, or any other computer with USB ports. This dialect will allow easy handling of that. The function to initiate the dialect is called oshow (The word show is already used in Rebol to refresh GUI displays). I’ve highlighted the code that is sent to the ODROID-Show module via the oshow dialect with bold letters. As is well known, bash scripting isn’t the easi- est to read, especially when interspersed with control codes. In addition, the Re- bol example above is about 35% smaller, allows any order of color cycling, allows any number of words of any length at any number of coordinates, and will run on any platform that has a Rebol 3 in- terpreter (pretty much everything except for Windows RT and IOS which will come soon). I leave it to the reader to decide which is easier to modify. do %oshow.r3 call {port_open} serialport: %/dev/ttyUSB0 display-text: [“ODROID” 25x100 “SHOW” 55x150] oshow serialport [reset rotate 0] forever [ foreach color [red green yellow blue magenta cyan white] [ foreach [word position] display-text [ oshow serialport compose [cursor to (position) font (color) 5] foreach letter word [ oshow serialport compose [(to-string letter)] wait .02 ] ] ] ] Using the oshow dialect, compare the program written in Rebol to the example pro- vided in bash scripting in Tutorial #1: Text Output from the ODROID-Show user guide: Programming Your ODROID-Show USING The Rebol PROGRAMMING Language TO IMPROVE the HARDWARE INTERFACE By Bo Lechnowsky
  • 7. ODROIDMAGAZINE 7 Here is the full dialect definition. font optionally followed by: black red green yellow blue magenta cyan white Examples: oshow [font cyan] oshow [font white default] oshow [font 2] (sets text size to 12x16 pixels) oshow [font 1 cyan “Hello “ 2 red “ODROID!”] background followed by one of the colors listed under foreground coloring. optionally followed by: default (sets default color as background color) Examples: oshow [background black] oshow [background yellow default] cursor followed by: down up position? (reports current cursor position) save (saves the current cursor position) restore (restores the cursor to the position previously saved) to (followed by:) 3x5 (moves the cursor to column 3, row 5) home (moves cursor to column 1, row 1) bottom (moves cursor to row 1 of the same column) reset (resets the LCD screen) clear (clears the screen) off (turns LCD screen off) on (turns LCD screen on) key (simulated keyboard press) followed by: 2 (optional: the number of keypresses - default is 1) up down left right rotate (rotates the display in 90 degree increments) followed by: left (counterclockwise 90 degrees) right (clockwise 90 degrees) draw (not yet functional) followed by: 10x20 (optional: the upper left corner of the image - default is 0x0) 50x50 (optional: the size of the image - default is 320x240) <image data> TECHNICALARTICLE Recompiling Mali Drivers Updating TO the latest RELEASE (R4P0-00Rel1) by Mauro Ribeiro P repare your ODROID to run the latest R4P0 Mali drivers by typing the following into a Ter- minal window: sudo apt-get install xserver- xorg-video-armsoc xserver-xorg- dev libudev-dev As of May 5, 2014, Hardkernel is no longer supporting the Mali r3p2 driv- ers, and haved moved on to using the R4P0 version exclusively. There are two major changes: 1. Instead of using the Mali DDX, the Armsoc driver is installed. 2. UMP no longer exists, and Mali is now using dma-buf. We have provided an updated Armsoc DDX in order to adapt your existing Ubuntu or Debian operating system to the new Mali drivers. The source code for the r4p0 branch of the repository is located at http://bit.ly/1oySeYE. Download the source to a temporary folder, then type make install at the command prompt after navigating to the temporary folder. BlobsforEGL/GLESv1/GLESV2are available for free download at http:// bit.ly/1hiwJw9, which includes an optional example xorg.conf file. Note that if your defconfig still has UMP, it will probably fail to build, so make sure to remove it first. If you have questions regarding the new Mali drivers, feel free to ask them in the ODROID community forums at http://forum.odroid.com/. TIPSANDTRICKS optionally followed by: default (sets default color as foreground color) optionally followed by: 1 (sets text size to: 6x8 pix- els * the number specified here)
  • 8. ODROIDMAGAZINE 8 TECHNICALARTICLE And here is the code for the oshow dialect, to be saved as “oshow.r3”, or it can be downloaded from the URL link in the header below. REBOL [ Title: {ODROID Show Dialect} Date: 20-May-2014 Author: {Bohdan Lechnowsky} URL: http://respectech.com/odroid/odroid-show.r3 Purpose: { Provides a dialect to allow easy usage of the ODROID Show hard- ware component } ] oshow: func [ {Allow easy utilization of the ODROID-Show display module} serport {Name of the serial port to send to (i.e. “serial:// ttyUSB0/57600” or “%/dev/ttyUSB0”)} specs [block!] “Dialect block of layout” /local outstring ][ outstring: copy {} out: func [str /local pstr buffs][ ;Break string into lines and output lines one at a time foreach lstr pstr: parse/all str “^/” [ ;The ODROID-Show hardware is limited to 256 characters per line, but this ; can be overcome by breaking the line into 256-character chunks and ; outputting them one after the other. buffs: copy [] ;Replace tabs with four spaces before breaking apart into chunks. while [not tail? detab/size lstr 4][ append buffs copy/part lstr 256 lstr: skip lstr 256 ] foreach buff buffs [ write serport join buff “^J^M” ;In my tests, I find that wait values less than 80ms often lead ; to output corruption. Longer waits may be required with some ; output. wait .08 ] append outstring lstr Got Wiimote? make yourself an awesome gyroscopic mouse by Rob Roy D o you have a Wii remote that hasn’t seen much use lately? It’s actually a very elegant piece of input hardware, with an ergonomic design, infrared scanner and gyroscope sensors. Ubuntu has several packages available from its repositories that au- tomatically read the sensors in the Wii and translate them into mouse and but- ton movements. To install the driver software, type: $ sudo apt-get install libcwi- id1 lswm wmgui wminput After installation has completed, connect to the Wii remote by press- ing 1 and 2 simultaneously, which activates the Bluetooth Connect mode. Once the Wiimote’s lights start flashing, type: $ hcitool scan or $ lswm Either command will display the MAC address for all nearby Wiimote con- trollers that are currently in Bluetooth Connect mode. Load the Wiimote driver by typing the following, using the MAC address from the previous step. In this example, the MAC address is 01:FA:2C:9D:BB:05: $ sudo wminput 01:FA:2C:9D:BB:05 The wiimote will then be treated by Ubuntu as a gyroscopic air mouse, suitable for use in situations where a normal mouse won’t work, such as while delivering a group presentation or sitting on a couch. TIPSANDTRICKS
  • 9. ODROIDMAGAZINE 9 ] ] font-rules: [ color-rules (out join “^[[3” col) | ‘default (out “^[[39m”) | set font-sz integer! (out rejoin [“^[[“ font-sz “s”]) | set textout string! (out textout) ] back-rules: [ color-rules (out join “^[[4” col) | ‘default (out “^[[49m”) ] color-rules: [ ‘black (col: “0m”) | ‘red (col: “1m”) | ‘green (col: “2m”) | ‘yellow (col: “3m”) | ‘blue (col: “4m”) | ‘magenta (col: “5m”) | ‘cyan (col: “6m”) | ‘white (col: “7m”) ] cursor-rules: [ ‘down (out “^[D”) | ‘up (out “^[M”) | ‘position? (out “^[[6n”) | ‘save (out “^[[s”) | ‘restore (out “^[[u”) | ‘to any [ set cpos pair! (out rejoin [“^[[“ cpos/x “;” cpos/y “H”]) | ‘home (out “^[[H”) | ‘bottom (out “^[E”) ] ] ;’presses uses a fun trick. If keypresses have been defined by the input from the user, ; then use that number. If not, use the default (1 in this case). This is shorter than ; the old-school method that would look like this: ; ; unless value? ‘keypresses [keypresses: 1] ; keypresses ; ; (52 bytes, not including the line break) ; (“unless” is a synonym in Rebol of “if not”, which is not any shorter than “unless”) TECHNICALARTICLE ; ; Another possible method could be like this: ; ; all [not value? ‘keypresses keypresses: 1] ; keypresses ; ; (53 bytes, not including the line break) ; ; (The “do pick” method below is only 41 bytes) presses: [do pick [keypresses 1] value? ‘key- presses] key-rules: [ ‘up (out rejoin [“^[[“ do presses “A”]) | ‘down (out rejoin [“^[[“ do presses “B”]) | ‘left (out rejoin [“^[[“ do presses “C”]) | ‘right (out rejoin [“^[[“ do presses “D”]) | set keypresses integer! ] rotate-rules: [ ‘left (loop 3 [out “^[[r”]) | ‘right (out “^[[r”) ] show-rules: [any [ ‘font any font-rules | ‘backdrop any back-rules | ‘cursor any cursor-rules | ‘reset (out “^[c”) | ‘clear (out “^[[2J”) | ‘off (out “^[[0q”) | ‘on (out “^[[1q”) | ‘key any key-rules | ‘rotate any rotate-rules | ‘draw | set textout string! (out textout) ]] parse specs show-rules outstring ] This simple Rebol program makes the ODROID-SHOW’s commands more accessible by abstracting the native command syntax. Please refer to the Rebol website for more information at http://www.rebol.com, or download the source code at http://www.rebolsource.net.
  • 10. ODROIDMAGAZINE 10 LINUXGAMING(INTERMEDIATE) I n the previous article, I outlined the process for compiling and porting soft- ware and games to the ODROID, using DOOM as an example. This month, I present a technique for packaging the compiled bina- ries for sharing and distribution. Checkinstall Checkinstall is very useful as a simple way to create installation (.deb) files. It allows you to pack everything your program need into a single file and add re- quired libraries as a dependency, so that you can install it on systems that do not yet have the required libraries installed. If you run checkinstall on the sdldoom project, it will look like this: root@odroid-wheezy:/home/odroid/sources/sdldoom-1.10$ checkinstall checkinstall 1.6.2, Copyright 2009 Felipe Eduardo Sanchez Diaz Duran This software is released under the GNU GPL. The package documentation directory ./doc-pak does not exist. Should I create a default set of package docs? [y]: Preparing package documentation...OK Please write a description for the package. End your description with an empty line or EOF. >> SDL Doom ***************************************** **** Debian package creation selected *** ***************************************** This package will be built according to these values: 0 - Maintainer: [ root@odroid-wheezy ] 1 - Summary: [ SDL Doom ] 2 - Name: [ sdldoom ] 3 - Version: [ 1.10 ] 4 - Release: [ 1 ] 5 - License: [ GPL ] 6 - Group: [ checkinstall ] 7 - Architecture: [ armhf ] 8 - Source location: [ sdldoom-1.10 ] 9 - Alternate source location: [ ] 10 - Requires: [ ] 11 - Provides: [ sdldoom ] 12 - Conflicts: [ ] 13 - Replaces: [ ] Enter a number to change any of them or press ENTER to continue: Checkinstall takes the name of the folder you are cur- rently in as the package name (sdldoom) and automatically takes the -1.10 that was added to the folder name as the version number. If your folder names does not match, you can alter these names here as well as setting the right version here. Make sure to change #2 Name as well as #11 Provides. Here you can configure your installation and add re- quired packages such as libsdl1.2debian, which is the libsdl library needed for this build under #10 Requires. After pressing Enter, it should generate a nice little .deb file. Package Your Compiled Software for Installation Compiling DOOM PART 2 by Tobias Schaaf DOOM originally came on floppy disks that held only 1.44MB of game data and were very fragile.
  • 11. ODROIDMAGAZINE 11 Enter a number to change any of them or press ENTER to continue: Installing with make install... ========================= Installation results =========================== make[1]: Entering directory `/home/odroid/sources/ sdldoom-1.10’ /bin/sh ./mkinstalldirs /usr/local/bin /usr/bin/install -c doom /usr/local/bin/doom make[1]: Nothing to be done for `install-data-am’. make[1]: Leaving directory `/home/odroid/sources/sdl- doom-1.10’ ======================== Installation successful ========================== Copying documentation directory... ./ ./README.asm ./Changelog ./TODO ./FILES ./README.book ./README.SDL ./README.b ./README.gl Copying files to the temporary directory...OK Stripping ELF binaries and libraries...OK Compressing man pages...OK Building file list...OK Building Debian package...OK Installing Debian package...OK Erasing temporary files...OK Writing backup package...OK OK Deleting temp dir...OK ***************************************************** ***************** Done. The new package has been installed and saved to /home/odroid/sources/sdldoom-1.10/sdldoom_1.10-1_arm- hf.deb You can remove it from your system anytime using: dpkg -r sdldoom ***************************************************** ***************** DOOM is where the fastest player with the biggest gun wins! Unless, of course, you’ve modified the source code to make yourself 100% invincible, or be able to shoot through walls. LINUXGAMING Although interactive mode is an easy method to create a deb file, another way is to give the parameters right when you start checkinstall, which allows for some extra options as well: $ checkinstall --backup=no --install=no --requires=”libsdl1.2debian” --pkgname=”sdldoom- odroid” --pkgversion=1.10 If you start checkinstall without the “--backup=no” option, a tar file is going to be created with all the files that were copied during the install process. If you start checkinstall without the “--install=no” option, your software will be installed right after the package is done building. After all this is completed, you will find a nice little .deb file in your folder. $ ls -l *.deb -rw-r--r-- 1 root root 174490 Apr 5 15:16 sdldoom_1.10-1_ armhf.deb The .deb file can then be copied and installed to any other ODROID, and if you have set the dependency requirements right, it should start right away. Getting the requirements correct will take some time and experience, depending on the project. The libsdl1.2-dev package actually only includes the header files for SDL (files ending on .h and located somewhere within /usr/ include/ ), but the actually SDL library is called libsdl1.2debian. If you check on the libsdl1.2-dev package, you will see De- pends: libsdl1.2debian (= 1.2.15-5)in the dependencies list. apt-cache show libsdl1.2-dev Package: libsdl1.2-dev Source: libsdl1.2 Version: 1.2.15-5 Installed-Size: 2358 Maintainer: Debian SDL packages maintainers <pkg-sdl- maintainers@lists.alioth.debian.org> Architecture: armhf Replaces: libsdl-dev Provides: libsdl-dev Depends: libsdl1.2debian (= 1.2.15-5), libasound2-dev, libcaca-dev, libdirectfb-dev (>= 0.9.22), libglu1-me- sa-dev | libglu-dev, libpulse-dev, libx11-dev, libts- dev, libxext-dev Conflicts: libsdl-dev Description-en: Simple DirectMedia Layer development files SDL is a library that allows programs portable low level access to a video framebuffer, audio output, mouse, and keyboard. This package contains the files needed to compile and link programs which use SDL. Homepage: http://www.libsdl.org/ Description-md5: 9a82f59c5790721baad7ffc5f181d3d6 Tag: devel::library, role::devel-lib, uitoolkit::sdl Section: libdevel Priority: optional Filename: pool/main/libs/libsdl1.2/libsdl1.2- dev_1.2.15-5_armhf.deb Size: 861890 MD5sum: 4295708cab85d1eb546b449350dd2da6 SHA1: 76fa9923c9765d7b92e373df6fe12949f2092db5 SHA256: 71def7638b06e6711f6fa8d96724aa7eb238a7b10f9f- b14192b5a5c1018d1322
  • 12. ODROIDMAGAZINE 12 Libsdl1.2debian is the actual library that contains the bi- nary files needed to run libsdl. As previously mentioned, the -dev file only includes the headers, and is useless if you only want to RUN the program. However, if you are un- sure what libraries to add in checkinstall, you can add the -dev libs as well. This method is not as clean, but it will work well, since the program will always have the actual library as a dependency. Some special notes about checkinstall Since checkinstall copies the files to the location, you will most likely have to run it as root, since the normal user will not be allowed to copy files in certain folders and the build will fail. Sometimes, checkinstall fails even though it has root privi- leges, and there sometimes seems to be a problem with the cre- ation of folders when using checkinstall. If a program that you installed requires creating a folder, checkinstall may fail because it cannot create the folder to copy the files. To solve this, run make install first and then run checkinstall again. Checkinstall is very helpful, as it will strip all binary files of unnecessary content such as comments and debug symbols that are no longer needed after the program is build complete- ly, which can reduce the size of files greatly. Size of the doom binary before stripping: $ ls -lh doom -rwxr-xr-x 1 root root 423K Apr 5 11:33 doom Size of the doom library in the .deb file: $ ls -lh doom -rwxr-xr-x 1 root root 368K Apr 5 15:16 doom The file size for DOOM might not make a very huge impact, but it can for other programs. For example, the kernel files pro- vided by Hardkernel have a total of 354MB uncompressed. $ du -h --max-depth=1 45M ./usr 307M ./lib 2.5M ./boot 354M . And the same kernel files after stripping: $ du -h --max-depth=1 45M ./usr 18M ./lib 2.5M ./boot 65M . As we can see, the /usr and /boot directory have not changed at at all, since they have only header files or files that can not be excluded, but if you strip away the unnecessary comments symbols on the actual libraries in the /lib folder, the size is reduced from 307 to 18 MB, and still the libraries have the same functionality as they did with 307 MB of size. As a result, the install size of the kernel will be reduced from 354 MB to 65 MB using checkinstall. Depending on the software packages you create, checkinstall can help you keep your soft- ware nice and clean (and slim). Checkinstall won’t always work. Some projects do not pro- vide a make install function, and checkinstall won’t work for those applications. But don’t worry, as you get more expe- rienced in compilation, you’ll probably figure out how to build your own install routines. Building a larger project For DOOM, compiling and packaging is very simple, and we only had to download one file instead of ten, hundreds, or thousands of files, and there was only one view dependency. As an example of a larger project, I included compila- tion instructions for OpenXCom. When you browse the OpenXcom homepage, click on the following link in the wiki sidebar: http://bit.ly/1rWH0ml. Compiling OpenXCom OpenXcom requires the following libraries to compile: SDL (libsdl1.2) SDL_mixer (libsdl-mixer1.2) SDL_image (libsdl-image1.2) SDL_gfx (libsdl-gfx1.2), version 2.0.22 or later yaml-cpp, (libyaml-cpp), version 0.5 or later This is great, because everything we need is right in front of us, mostly because of OpenXcom’s excellent documen- tation. It’s now a simple matter to install what we need. apt-get install libsdl1.2-dev libsdl-mixer1.2-dev libsdl-image1.2-dev libsdl-gfx1.2-dev Some of the fiercest monsters in DOOM came straight from my worst nightmares. MeetSpiderDemon,a4-leggedrobotbrainwithachaingun. LINUXGAMING
  • 13. ODROIDMAGAZINE 13 I skipped the yaml-cpp because if you compile it on Ubuntu, installing libyaml-cpp-dev will give you a version 0.5 or higher, but on Debian Wheezy, you only get libyaml- cpp version 0.3 which doesn’t work. To overcome this, I compiled libyaml-cpp myself which can be installed by typing the following in Terminal: $ wget http://oph.mdrjr.net/meveric/repository/liby- aml-cpp0.5_0.5.1-1_armhf.deb $ dpkg -i libyaml-cpp0.5_0.5.1-1_armhf.deb Now that we have all the requirements, we can start to download the sources. On the top of the OpenXCom Wiki page, there is a link to a repository, which leads to a project page containing lots of folder and files. It will be very time-consuming to download them all with wget, but luckily there is a faster alternative. From the git repository, we can download all of the files from the entire repository with just one command. First, get the URL of the project site: $ git clone https://github.com/SupSuper/OpenXcom.git Cloning into ‘OpenXcom’... remote: Reusing existing pack: 40755, done. remote: Counting objects: 124, done. remote: Compressing objects: 100% (118/118), done. remote: Total 40879 (delta 67), reused 0 (delta 0) Receiving objects: 100% (40879/40879), 14.05 MiB | 849 KiB/s, done. Resolving deltas: 100% (33534/33534), done. Well, that was nice, since we just downloaded about 700 files in a few seconds! For other projects that use subver- sion instead of git, the command line is very similar: svn checkout <url>. Shown below is a list of the new files: $ ls -l total 152 -rwxr-xr-x 1 root root 82 Apr 5 17:12 autogen.sh drwxr-xr-x 3 root root 4096 Apr 5 17:12 bin -rw-r--r-- 1 root root 32796 Apr 5 17:12 CHANGELOG. txt drwxr-xr-x 3 root root 4096 Apr 5 17:12 cmake -rw-r--r-- 1 root root 5681 Apr 5 17:12 CMakeLists. txt -rw-r--r-- 1 root root 3385 Apr 5 17:12 configure. ac -rw-r--r-- 1 root root 35819 Apr 5 17:12 COPYING drwxr-xr-x 2 root root 4096 Apr 5 17:12 docs drwxr-xr-x 6 root root 4096 Apr 5 17:12 install drwxr-xr-x 2 root root 4096 Apr 5 17:12 m4 -rw-r--r-- 1 root root 21142 Apr 5 17:12 Makefile.am drwxr-xr-x 2 root root 4096 Apr 5 17:12 obj -rw-r--r-- 1 root root 4446 Apr 5 17:12 README.txt drwxr-xr-x 5 root root 4096 Apr 5 17:12 res drwxr-xr-x 12 root root 4096 Apr 5 17:12 src This time, there is no configure and no Makefile either, just a Makefil.am. So what can we do now? There are two things in this folder that will help: an execut- able file called: autogen.sh and a file called CMakeList.txt. LINUXGAMING Autogen Some projects have a file with the name autogen, au- tomake or autoconf instead of a configure file in their source directory. $ ./autogen.sh aclocal: installing `m4/pkg.m4’ from `/usr/share/aclo- cal/pkg.m4’ autoreconf: Entering directory `.’ autoreconf: configure.ac: not using Gettext autoreconf: running: aclocal --force -I m4 autoreconf: configure.ac: tracing autoreconf: configure.ac: not using Libtool autoreconf: running: /usr/bin/autoconf --force autoreconf: configure.ac: not using Autoheader autoreconf: running: automake --add-missing --force- missing configure.ac:106: installing `./config.guess’ configure.ac:106: installing `./config.sub’ configure.ac:17: installing `./install-sh’ configure.ac:17: installing `./missing’ Makefile.am: installing `./depcomp’ autoreconf: Leaving directory `.’ The output is very short, and it’s not apparent what has been done. Let’s check if it did something. $ ls -l total 1204 -rw-r--r-- 1 root root 36830 Apr 5 17:23 aclocal. m4 -rwxr-xr-x 1 root root 82 Apr 5 17:12 autogen. sh drwxr-xr-x 2 root root 4096 Apr 5 17:23 autom4te. cache drwxr-xr-x 3 root root 4096 Apr 5 17:12 bin -rw-r--r-- 1 root root 32796 Apr 5 17:12 CHANGELOG. txt drwxr-xr-x 3 root root 4096 Apr 5 17:12 cmake -rw-r--r-- 1 root root 5681 Apr 5 17:12 CMakeLists. txt lrwxrwxrwx 1 root root 37 Apr 5 17:23 config.guess -> /usr/share/automake-1.11/config.guess lrwxrwxrwx 1 root root 35 Apr 5 17:23 config.sub -> /usr/share/automake-1.11/config.sub -rwxr-xr-x 1 root root 211749 Apr 5 17:23 configure -rw-r--r-- 1 root root 3385 Apr 5 17:12 configure. ac -rw-r--r-- 1 root root 35819 Apr 5 17:12 COPYING lrwxrwxrwx 1 root root 32 Apr 5 17:23 depcomp -> /usr/share/automake-1.11/depcomp drwxr-xr-x 2 root root 4096 Apr 5 17:23 docs drwxr-xr-x 6 root root 4096 Apr 5 17:12 install lrwxrwxrwx 1 root root 35 Apr 5 17:23 install-sh -> /usr/share/automake-1.11/install-sh drwxr-xr-x 2 root root 4096 Apr 5 17:23 m4 -rw-r--r-- 1 root root 21142 Apr 5 17:12 Makefile. am -rw-r--r-- 1 root root 822542 Apr 5 17:23 Makefile. in lrwxrwxrwx 1 root root 32 Apr 5 17:23 missing -> /usr/share/automake-1.11/missing drwxr-xr-x 2 root root 4096 Apr 5 17:12 obj -rw-r--r-- 1 root root 4446 Apr 5 17:12 README. txt drwxr-xr-x 5 root root 4096 Apr 5 17:12 res drwxr-xr-x 12 root root 4096 Apr 5 17:19 src After this step, there is now a configure file, which gives the same starting point for compilation as the first example.
  • 14. ODROIDMAGAZINE 14 CMakeLists.txt Cmake is also a very nice tool, and if a project has a CMakeLists.txt in its directory, it supports cmake. We could just go ahead and type cmake, but i would highly advise NOT to do so! Although cmake will work, and would generate the code that we need, it’s somewhat messy. Also, you can’t figure out what is source code and what comes from cmake, so there is a better way to do it. Instead, create a new folder change in that folder and start cmake from there. $ mkdir build $ cd build $ cmake .. Cmake is started with a path to the CMakeLists.txt file. In the DOOM example, it was “cmake .”. Since we were in the same directory we used the “.” to tell cmake to use the current directory. Now that we are in a subfolder called build, we just tell cmake that the CMakeLists.txt is one fold- er up by typing “cmake ..”. With everything setup correctly, it should look similar to this: $ cmake .. -- The C compiler identification is GNU 4.7.2 -- The CXX compiler identification is GNU 4.7.2 -- Check for working C compiler: /usr/bin/gcc-4.7 -- Check for working C compiler: /usr/bin/gcc-4.7 -- works -- Detecting C compiler ABI info -- Detecting C compiler ABI info - done -- Check for working CXX compiler: /usr/bin/g++-4.7 -- Check for working CXX compiler: /usr/bin/g++-4.7 -- works -- Detecting CXX compiler ABI info -- Detecting CXX compiler ABI info - done -- Looking for include file pthread.h -- Looking for include file pthread.h - found -- Looking for pthread_create -- Looking for pthread_create - not found -- Looking for pthread_create in pthreads -- Looking for pthread_create in pthreads - not found -- Looking for pthread_create in pthread -- Looking for pthread_create in pthread - found -- Found Threads: TRUE -- Found PkgConfig: /usr/bin/pkg-config (found version “0.26”) -- Looking for XOpenDisplay in /usr/lib/arm-linux- gnueabihf/libX11.so;/usr/lib/arm-linux-gnueabihf/ libXext.so -- Looking for XOpenDisplay in /usr/lib/arm-linux- gnueabihf/libX11.so;/usr/lib/arm-linux-gnueabihf/ libXext.so - found -- Looking for gethostbyname -- Looking for gethostbyname - found -- Looking for connect -- Looking for connect - found -- Looking for remove -- Looking for remove - found -- Looking for shmat -- Looking for shmat - found -- Looking for IceConnectionNumber in ICE -- Looking for IceConnectionNumber in ICE - found -- Found X11: /usr/lib/arm-linux-gnueabihf/libX11.so -- Found OpenGL: /usr/local/lib/libGL.so found SDL 1.2.15 (/usr/lib/arm-linux-gnueabihf:/usr/ include/SDL) found SDL_mixer 1.2.12 (/usr/lib/arm-linux-gnueabi- hf:/usr/include/SDL) found SDL_gfx 2.0.23 (/usr/lib/arm-linux-gnueabihf:/ usr/include/SDL) found SDL_image 1.2.12 (/usr/lib/arm-linux-gnueabi- hf:/usr/include/SDL) found yaml-cpp(/usr/local/lib:/usr/local/include/ yaml-cpp;/usr/local/include/yaml-cpp/..) -- Found Git: /usr/bin/git (found version “1.7.10.4”) git found: /usr/bin/git version:0.9.g8bcafea No doxygen command found. Disable API documentation generation -- Configuring done -- Generating done -- Build files have been written to: /home/odroid/ sources/OpenXcom/build $ ls -l total 68 drwxr-xr-x 2 root root 4096 Apr 5 17:37 bin -rw-r--r-- 1 root root 29527 Apr 5 17:37 CMakeCache. txt drwxr-xr-x 4 root root 4096 Apr 5 17:37 CMakeFiles -rw-r--r-- 1 root root 1906 Apr 5 17:37 cmake_in- stall.cmake -rw-r--r-- 1 root root 3526 Apr 5 17:37 CPackConfig. cmake -rw-r--r-- 1 root root 3942 Apr 5 17:37 CPackSource- Config.cmake drwxr-xr-x 3 root root 4096 Apr 5 17:37 docs -rw-r--r-- 1 root root 6481 Apr 5 17:37 Makefile drwxr-xr-x 3 root root 4096 Apr 5 17:37 src Since we got a Makefile here, so we run make and watch the pretty colors go by! $ make Scanning dependencies of target openxcom [ 0%] Building CXX object src/CMakeFiles/openxcom. dir/main.cpp.o [ 0%] Building CXX object src/CMakeFiles/openxcom. dir/lodepng.cpp.o [ 1%] Building CXX object src/CMakeFiles/openxcom. dir/Basescape/BaseView.cpp.o [ 1%] Building CXX object src/CMakeFiles/openxcom. dir/Basescape/CraftSoldiersState.cpp.o [...] [ 99%] Building CXX object src/CMakeFiles/openxcom. dir/Ufopaedia/ArticleStateTextImage.cpp.o [ 99%] Building CXX object src/CMakeFiles/openxcom. dir/Ufopaedia/ArticleStateArmor.cpp.o [100%] Building CXX object src/CMakeFiles/openxcom. dir/Ufopaedia/ArticleStateVehicle.cpp.o Linking CXX executable ../bin/openxcom [100%] Built target openxcom Everything looks good, and we have an OpenxCom build in the bin folder. Now, run checkinstall again. We already know what libraries to add to the required list since we got that list from the OpenXCom site. $ checkinstall --backup=no --install=no --requires=”libdl1.2debian, libsdl-image1.2, lib- sdl-mixer1.2, libsdl-gfx1.2-4, libyaml-cpp0.5” --pkgname=”openxcom” --pkgversion=”0.9.g8bcafea” This is one of the moments when checkinstall will fail LINUXGAMING
  • 15. ODROIDMAGAZINE 15 because of its issue with creating directories, so run make install first and then re-run checkinstall. $ checkinstall --backup=no --install=no --requires=”libdl1.2debian, libsdl-image1.2, lib- sdl-mixer1.2, libsdl-gfx1.2-4, libyaml-cpp0.5” --pkgname=”openxcom” --pkgversion=”0.9.g8bcafea” checkinstall 1.6.2, Copyright 2009 Felipe Eduardo San- chez Diaz Duran This software is released under the GNU GPL. The package documentation directory ./doc-pak does not exist. Should I create a default set of package docs? [y]: y Please write a description for the package. End your description with an empty line or EOF. >> OpenXCom >> ***************************************** **** Debian package creation selected *** ***************************************** This package will be built according to these values: 0 - Maintainer: [ root@odroid-wheezy ] 1 - Summary: [ OpenXCom ] 2 - Name: [ openxcom ] 3 - Version: [ 0.9.g8bcafea ] 4 - Release: [ 1 ] 5 - License: [ GPL ] 6 - Group: [ checkinstall ] 7 - Architecture: [ armhf ] 8 - Source location: [ build ] 9 - Alternate source location: [ ] 10 - Requires: [ libdl1.2debian, libsdl-image1.2, lib- sdl-mixer1.2, libsdl-gfx1.2-4, libyaml-cpp0.5 ] 11 - Provides: [ openxcom ] 12 - Conflicts: [ ] 13 - Replaces: [ ] Enter a number to change any of them or press ENTER to continue: Installing with make install... ========================= Installation results =========================== [100%] Built target openxcom Install the project... -- Install configuration: “” -- Installing: /usr/local/bin/openxcom -- Removed runtime path from “/usr/local/bin/openx- com” -- Installing: /usr/local/share/openxcom/data -- Installing: /usr/local/share/openxcom/data/Re- sources -- Installing: /usr/local/share/openxcom/data/Re- sources/UI -- Installing: /usr/local/share/openxcom/data/Resourc- es/UI/reserve.png -- Installing: /usr/local/share/openxcom/data/Re- sources/Weapons -- Installing: /usr/local/share/openxcom/data/Resourc- es/Weapons/Terror.png -- Installing: /usr/local/share/openxcom/data/Resourc- es/Pathfinding -- Installing: /usr/local/share/openxcom/data/Resourc- es/Pathfinding/Pathfinding.png -- Installing: /usr/local/share/openxcom/data/Resourc- es/BulletSprites -- Installing: /usr/local/share/openxcom/data/Resourc- es/BulletSprites/BulletSprites.png -- Installing: /usr/local/share/openxcom/data/Re- sources/BulletSprites/TFTD-LAND.png -- Installing: /usr/local/share/openxcom/data/Re- sources/BulletSprites/TFTD-UNDERWATER.png -- Installing: /usr/local/share/openxcom/data/Shaders -- Installing: /usr/local/share/openxcom/data/Shad- ers/Phosphor-simple.OpenGL.shader -- Installing: /usr/local/share/openxcom/data/Shad- ers/Openxcom.OpenGL.shader CMake Error at src/cmake_install.cmake:54 (FILE): file INSTALL cannot find “/home/odroid/sources/test/OpenXcom/bin/data/Shaders/ heavybloom.OpenGL.shader”. Call Stack (most recent call first): cmake_install.cmake:38 (INCLUDE) make: *** [install] Error 1 **** Installation failed. Aborting package cre- ation. Cleaning up...OK Bye. $ make install [100%] Built target openxcom Install the project... -- Install configuration: “” -- Installing: /usr/local/bin/openxcom -- Removed runtime path from “/usr/local/bin/openx- com” -- Installing: /usr/local/share/openxcom/data -- Installing: /usr/local/share/openxcom/data/Re- sources … -- Installing: /usr/local/share/openxcom/data/Ruleset -- Installing: /usr/local/share/openxcom/data/Rule- set/Xcom1Ruleset.rul $ checkinstall --backup=no --install=no --requires=”libdl1.2debian, libsdl-image1.2, lib- sdl-mixer1.2, libsdl-gfx1.2-4, libyaml-cpp0.5” --pkgname=”openxcom” --pkgversion=”0.9.g8bcafea” checkinstall 1.6.2, Copyright 2009 Felipe Eduardo San- chez Diaz Duran This software is released under the GNU GPL. ***************************************** **** Debian package creation selected *** ***************************************** This package will be built according to these values: 0 - Maintainer: [ root@odroid-wheezy ] 1 - Summary: [ OpenXCom ] 2 - Name: [ openxcom ] 3 - Version: [ 0.9.g8bcafea ] 4 - Release: [ 1 ] 5 - License: [ GPL ] 6 - Group: [ checkinstall ] 7 - Architecture: [ armhf ] 8 - Source location: [ build ] 9 - Alternate source location: [ ] 10 - Requires: [ libdl1.2debian, libsdl-image1.2, lib- sdl-mixer1.2, libsdl-gfx1.2-4, libyaml-cpp0.5 ] 11 - Provides: [ openxcom ] 12 - Conflicts: [ ] 13 - Replaces: [ ] Enter a number to change any of them or press ENTER to continue: LINUXGAMING
  • 16. ODROIDMAGAZINE 16 Installing with make install... ========================= Installation results =========================== [100%] Built target openxcom Install the project... -- Install configuration: “” -- Up-to-date: /usr/local/bin/openxcom -- Installing: /usr/local/share/openxcom/data -- Installing: /usr/local/share/openxcom/data/Resourc- es ... -- Installing: /usr/local/share/openxcom/data/Ruleset -- Up-to-date: /usr/local/share/openxcom/data/Ruleset/ Xcom1Ruleset.rul ======================== Installation successful ========================== Copying documentation directory... ./ ./docs/ ./docs/Makefile ./docs/CMakeFiles/ ./docs/CMakeFiles/CMakeDirectoryInformation.cmake ./docs/CMakeFiles/progress.marks ./docs/cmake_install.cmake Some of the files created by the installation are inside the home directory: /home You probably don’t want them to be included in the package. Do you want me to list them? [n]: n Should I exclude them from the package? (Saying yes is a good idea) [n]: y Copying files to the temporary directory...OK Stripping ELF binaries and libraries...OK Compressing man pages...OK Building file list...OK Building Debian package...OK NOTE: The package will not be installed Erasing temporary files...OK Deleting temp dir...OK ***************************************************** ***************** Done. The new package has been saved to / h o m e / o d r o i d / s o u r c e s / t e s t / O p e n X c o m / b u i l d / openxcom_0.9.g8bcafea-1_armhf.deb You can install it in your system anytime using: dpkg -i openxcom_0.9.g8bcafea-1_armhf.deb ***************************************************** ***************** One this step completes, the OpenXcom .deb installa- tion package is ready for use! This should be enough infor- mation to get started with compiling your first projects. Notes on cmake There is something that I rather like about cmake. After cmake is done creating the build-tree for a project, you will find a folder with the name of the binary file of the project. For example, on the OpenXcom project, the folder can be found at src/CMakeFiles/openxcom.dir/. In this folder, you will al- ways find a file called link.txt which will show you how the final binary is built as well as which libraries are linked into it. $ cat src/CMakeFiles/openxcom.dir/link.txt […] -o ../bin/openxcom -rdynamic -lSDL_image -lSDL_mixer -lSDL_gfx -Wl,-Bstatic -lSDLmain -Wl,-Bdynamic -lSDL -lpthread /usr/local/lib/libyaml-cpp.so /usr/local/ lib/libGL.so -Wl,-rpath,/usr/local/lib: If you check the last line, you will find the libraries that are linked to the binary file, for example, -lSDL_image -lSDL_ mixer -lSDL_gfx -lSDL. As mentioned in the previous article, the files starting with “-l” are libraries. These are exactly the libraries that we used in our checkinstall command, and that were listed on the OpenXCom site. So, in case you don’t know which libraries you needed, you can also find them here. Checking dependencies With the ldd command, you can easily check on the depen- dencies of a particular binary file that has already been compiled. $ ldd /usr/local/bin/doom libm.so.6 => /lib/arm-linux-gnueabihf/libm.so.6 (0xb6e80000) libSDL-1.2.so.0 => /usr/lib/arm-linux-gnueabihf/libS- DL-1.2.so.0 (0xb6e03000) libc.so.6 => /lib/arm-linux-gnueabihf/libc.so.6 (0xb6d1e000) /lib/ld-linux-armhf.so.3 (0xb6f08000) [...] Now, go play DOOM! The Cyber Demon has a frightening description in the original DOOM manual: “a missile-launching skyscraper with goat legs. ‘Nuff said”. LINUXGAMING
  • 17. ODROIDMAGAZINE 17 M any of us have been applying the casual trigono- metric functions such as sin, cos or tan and their reverse functions asin, acos, and atan to make geo- metric computations. That is what also school mathematics has taught us to do. While doing so, one meets such problems as, the value interval of sin is [-π/2, π/2], and there is a chance to divide with zero, when tan(y/x) is used. To solve these problems, programs must branch with “if” sentences, and the division by zero problem must be handled, too. There is an ex- cellent method for solving all the mentioned problems within computer programs by applying the atan2(y, x) method. The atan2 function was originally introduced in FOR- TRAN programming language to ease up trigonometric computations [WIK14]. It is available also elsewhere, like C, Java, and (surprise, surprise) in .NET and Excel, too. The advantage of atan2 is that it gives continuous values in the interval of (-π, π]. When expressed with atan function, the definition is as follows: atan2(y,x)=atan(yx),ifx>0atan(yx)+π,ify≥0,x<0atan (yx)−π,ify<0,x=0π2,ify>0,x=0−π2,ify<0,x=0undefined ,ify=0,x=0 When one looks at the formula, the conclusion is that it is quite a complex function, with many branches to implement the functionality of atan2 with atan instead. The same applies also if one tries to use asin or acos. An issue with the above definition is that there is no defined value when both x and y are zero. Another note is that the order of param- eters is y, x instead of x, y. But, it is in reverse order in Excel. In a mouse-interactive clock, we can compute, from the mouse location, the angle of selected pointer to determine how the selected time can be adjusted. For instance, one can calculate the angle from north to mouse click as follows: Describing the Mathematical Function Atan2 A USEFUL TOOL FOR ProgrammING APPLICATIONS THAT REQUIRE real-time Trigonometry by Jussi Opas double angleAsRadians = Math.atan2(point.y - centerY, point.x - centerX); // atan2 returns values in the range of [-PI, PI] // so, we can get values into the ranges [0, 2PI] by adding one PI angleAsRadians += PI; It is just so awesome that no “if” statements are needed. Though, this is not expensive like a shooting game, where the angle and distance to target must be calculated continuously. Trigonometry is also heavily used in ray tracing applications, such as radio coverage and 3D modelling, where atan2 can be successfully applied. So, atan2 is a beast in its expressiveness, therefore we can safely call it the best trigonometrical function in a programmer’s toolkit. The behavior of atan2 can be shown most easily with some mathematics software such as Octave or Maxima. Both of them are available in Ubuntu Software Center. Android has its own versions available in PlayStore. In the plot window, one can rotate to an appropriate view angle with the mouse and watch the 3 dimensional view from an appropriate angle. Software development is driven by use cases and by user TECHNICALARTICLE(EXPERT) clock Atan2 is beautiful!
  • 18. ODROIDMAGAZINE 18 stories to be fulfilled. Projects are often very busy with imple- menting all necessary functionality, and performance testing is done only in the end of the project. At that time it may be even too late to react on poor performance, since it may be difficult to improve in late project phase. Therefore it would be nice to already know what the performance implication will be at the program writing time. If an application uses intensive math like distance and an- gular computations, it would be good to know what it costs to call these methods. In Java, for instance, calls like Math.sqrt, Math.atan, or Math.atan2 are then important to understand. We made a test by calling different distance and angle computations methods 10 million times with Java. The test framework adds on method call overhead to each functio- nusing an ODROID XU at 1.6 GHz frequency running Ubuntu with Java. The relative behavior of the tested math methods are similar in other platforms. The results are shown in the enclosed graph. Computation of distance is fast, that is calling of sqrt(x*x + y*y)*r takes only 24 nano seconds on average. Multiplica- tion with resolution r is almost free, since calling of plain sqrt(x*x, y*y) is only 4 nanoseconds faster. Then, one sees clearly that calling of pow(x,2) is essentially more expensive than x*x. The next observation is that angle computation methods are slow, especially Java’s trigonometric functions, which is a tradeoff for their accurateness. In this case, the precious atan2 seems to be slower that atan. If we want to use the atan2 method, we must find some means to compute it more quickly. We could ourselves imple- ment a faster, but less accurate, method to compute atan2. We could use parabolic approximation, Taylor series or Chebyshev series or similar, [COR09], or a software implementation of the famous CORDIC method. On the other hand, we could implement some table lookup method. In the first place, utili- zation of prior computed values might be the easiest to imple- ment by creating the following look up methods for fast access of atan2 values: - binary search based on Java’s Arrays.binarySearch method - binary find is a self implemented method to find aimed value from array - table lookup with a large n*n table, and, an - octet math is another table lookup method where each symmetric octet of a unit circle is represented as an array, [RIV06]. The next figure shows the call time of atan2 against the used look up methods. In the representative run, it took 368 nanoseconds to compute. Lookup methods are compared against that value. The call of one access method is shown with blue bar and the achieved improvement has been shown with orange gradient bar. It is a surprise that a self written binary find is faster than the binary search that is based on Java’s standard method. One should be suspicious of that, and the result would need to be verified prior to using a newly written method in production code. The two array based look up methods, table lookup and octet math are the fastest. By using octet math, an atan2 value can be completed in about 50 nanoseconds. That is the meth- od that we have been using in our sample application, too. Here is the source code for those who are interested in the actual Java implementation: /** * Octet based atan2 lookup method. * Created by xyz on 12/13/13. */ public class OctetMath { private static final double ROUND = 0.5; private static final double PI = Math.PI; // To be accurate enough, at least 2000 values are needed, we use exponent of two in here. // The memory consumption is 2048 * 8 * 4 = 65536 bytes ~ 65.5 kBytes. // Using of bigger size will increase accuracy. private static final int SIZE = 2048; // last index per side private static final float LAST = SIZE - 1; private static final float NEGATIVE_LAST = -LAST; // Octets are illustrated below. // ^ y // 8 | 1st octet // 7 | 2nd octet TECHNICALARTICLE Computing distance and angle Atan2 Lookup Methods
  • 19. ODROIDMAGAZINE 19 // ---------------> x // 6 | 3 // 5 | 4 // | // Array representations of strictly computed atan2 values. // Using double would not make the result more ac- curate. private static final float[] OCTET1 = new float[SIZE]; private static final float[] OCTET2 = new float[SIZE]; private static final float[] OCTET3 = new float[SIZE]; private static final float[] OCTET4 = new float[SIZE]; private static final float[] OCTET5 = new float[SIZE]; private static final float[] OCTET6 = new float[SIZE]; private static final float[] OCTET7 = new float[SIZE]; private static final float[] OCTET8 = new float[SIZE]; static { initializeOctets(SIZE); } /** * Get atan2 as table lookup. * The complexity of the method is 14, but we do not want this method to be split. * @param y * @param x * @return angle as radians, the value is in the interval [-PI, PI] */ @SuppressWarnings(“all”) public static float atan2(final float y, final float x) { if (0 <= x) { if (0 <= y) { if (x < y) { return OCTET1[(int) (LAST * x / y + ROUND)]; } else { return OCTET2[(int) (LAST * y / x + ROUND)]; } } else { if (-y < x) { return OCTET3[(int) (NEGATIVE_LAST * y / x + ROUND)]; } else { return OCTET4[(int) (NEGATIVE_LAST * x / y + ROUND)]; } } } else { if (y < 0) { // both x and y are negative if (x > y) { return OCTET5[(int) (LAST * x / y + ROUND)]; } else { return OCTET6[(int) (LAST * y / x + ROUND)]; } } else { if (y < -x) { return OCTET7[(int) (NEGATIVE_LAST * y / x + ROUND)]; } else { return OCTET8[(int) (NEGATIVE_LAST * x / y + ROUND)]; } } } } private static void initializeOctets(final double size) { final double y = size; for (double i = 0; i < size; i++) { final double x = i; final double theta = Math.atan2(y, x); final int index = (int) i; OCTET1[index] = (float) theta; OCTET2[index] = (float) (PI / 2.0 - the- ta); OCTET3[index] = (float) (-PI / 2.0 + the- ta); OCTET4[index] = (float) -theta; OCTET5[index] = (float) (-PI + theta); OCTET6[index] = (float) (-PI / 2.0 - the- ta); OCTET7[index] = (float) (PI / 2.0 + the- ta); OCTET8[index] = (float) (PI - theta); } } private OctetMath() { // } } One should always verify self-made implementations, since the accuracy of the method is of concern. The correctness and reached accuracy can be tested against the built-in Math. atan2 Java method. The accuracy can be improved by using larger arrays to represent prior computed atan2 values. The disadvantage of bigger arrays is, of course, that more stati- cally allocated memory is needed. The memory consumption of three different memory layouts is shown comparatively in logarithmic scale in the next figure. The table memory layout is consuming the most memory. The worst thing is that its behavior is exponential. As the 8 octets of a unit circle are symmetric, the same method could be implemented by storing only the data of one of the oc- tets, in which case only 1/8 of the memory amount is needed. Then the call time would be bigger, since more control flow branches must be traversed during one call. TECHNICALARTICLE Array and Memory Size
  • 20. ODROIDMAGAZINE 20 MULTIBOOTYOURODROID Summary With an ODROID, one can make mathematical studies with dedicated tools, by implementing his own appli- cation and studying its behavior. We warmly recommend application of atan2 in computer programs, especially inten- sive programs that use a lot of angle and distance computations such games and ray tracing. Java’s accurate trigonomet- ric methods are slow. Therefore some faster methods should be available. We implemented an octet based table lookup method in order to access atan2 values faster. Our self-made implementation OctetMath.atan2 is about 7x faster than the standard Math.atan2. It allocates 66 kB of static memory, which is affordable in terms of resources. References [WIK14] atan2. 8 pages, 2014. http:// en.wikipedia.org/wiki/Atan2 [COR09] Coranac / Vijn Jasper. An- other fast fixed-point sine approximation. 16.7.2009. www.coranac.com/2009/07/ sines [RIV06] Riven X. 13.8x faster atan2. 2006. http://www.java-gam- ing.org/topics/13-8x-faster-atan2- updated/14647/view.html NEWSFROMODROIDWORLD framebuffer terminal console for THOSE gui-less moments by Rob Roy W hen running an Ubuntu distribution running Ker- nel 3.8.13 or above on an ODROID-X/X2/U2/U3, there is a resident framebuffer terminal con- sole that can be activated by pressing Control-Alt-F[1-6]. To return to the X11 graphical interface, press Con- trol-Alt-F7. This gives you access to the command line even if the X11 interface has stopped working. INSTALLING MathematicAL Tools FROM THE UBUNTU SOFTWARE CENTER Create beautiful 3D graphs FOR your OFFICE AND impress your colleagues by Jussi Opas T he Ubuntu Software center contains many free and low-priced applica- tions, including scientific and mathematical programs. Not all of them are available for ARM processor based computers, but many of them run natively on the ODROID, and the Software Center ensures that one can load a correctly compiled version. This article describes how to load a mathematics ap- plication from the Ubuntu store. In the upper right corner of the Ubuntu Software Center, there is a search box which can be used if we know approximately what we are looking for. In the left there is a category list, as shown in the first screenshot. To find a mathematics tool, push the ‘Science & Engi- neering’ button. Then the store gives a list of alternatives represented as icons. Select the Mathematics icon, and the next window will show a collection of tools that are useful for doing mathematics. It is easy to install a selected tool, and uninstallation is also possible from this interface. To start, I recommend loading wxMaxima and/or QtOctave. To demonstrate that the programs are working, let’s paint atan2 with Maxima and Octave. Science and Engineering Mathematics Ubuntu Shop Plot 3D TECHNICALARTICLE TECHNICALARTICLE(BEGINNER)
  • 21. ODROIDMAGAZINE 21 MULTIBOOTYOURODROID After installation, wxMaxima appears in the Education menu. Select ‘Plot 3D...’ from wxMaxima’s Plot menu to see the plotting dialog. Next, write your favorite mathematical formula into the Expression field and fill in the value intervals for x and y. In the plot window, one can rotate to an appropriate view- ing angle and see the 3D illustration from any side. This same can be written also into a wxMaxima applications com- mand line as follows: plot3d(atan2(y,x), [x,-5,5], [y,-5,5], [plot_ format,gnuplot], [gnuplot_pm3d,true]). Also in QtOctave, one can define a formula, and then ro- tate the resulting image with a mouse. Mathematical tools are available also on Android in the Play Store. The Maxima Android version is shown in the next fig- atan2 Maxima QTOctave Atan2 Atan2 ODROID ure. However, in Android, one can not rotate the picture, un- like the Linux version of the Maxima application. Because Ubuntu is popular for running scientific applica- tions, there are many interesting plotting programs available to verify your experiment results, visualize mathematical formulas, and create intricate 3D graphs. There is also a dedicated engi- neering and scientific group on the official Ubuntu Engineer- ing site at http://bit.ly/1vVlVHx, where you can find CAD programs, electronics applications, data visualization packages, and much more to help you have fun with your mathematical projects on the ODROID! TECHNICALARTICLE Mathematica
  • 22. ODROIDMAGAZINE 22 MULTIBOOTYOURODROID(INTERMEDIATE) T he Android source code is incred- ibly massive (more than 4GB), but how does this large code base gets installed onto phones, tablets and our ODROID boards? The simple answer is that the source gets compiled into com- pact binary files and is then compressed to a particular format. In the last 2 issues, wehavebeenlookingintoAndroidsource and how to compile it for ODROID-U3. In this month’s article, we are going to explore the different image files that are generated by the Android build system. Please note that all software tools used in this article can be downloaded from http://bit.ly/1hy3vdc. Android devices run on very limited resources and disk space, which makes it crucial that the operating system, along with the supporting files, be as small as possible. The final image files generated by the build system are: boot.img cache.img recovery.img system.img userdata.img There are a few scenarios in which knowing more about the image files may benefit: Removing or adding files to the image file Experimenting with different configurations quickly Upgrading Android versions without compiling the full source code Android Image Files A PEEK INTO the COMPRESSED FILES that make android portable AND LIGHTWEIGHT by Nanik Tolaram boot.img This image file contains the initialization (init) file that is used to boot up Android. The file init.rc contains information for hosting the different services and configura- tions that are needed to start Android. There are 2 files inside the /sbin directory, and one in particular is very important, called adbd, which is the adb daemon that is run as part of the Android startup process. Adbd allows you to connect to your device using the adb command. The following steps shows you how to extract the boot.img: 1. Run the unmkbooting utility by typing $ unmkbooting boot.img. Kernel size 3133124 Kernel address 0x10008000 Ramdisk size 167690 Ramdisk address 0x11000000 Secondary size 0 Secondary address 0x10f00000 Kernel tags address 0x10000100 Flash page size 2048 Board name is “” Command line “” Extracting kernel.gz ... Extracting initramfs.cpio.gz ... All done. --------------- To recompile this image, use: mkbooting --kernel kernel.gz --ramdisk initramfs.cpio.gz -o new_boot.img ---------------
  • 23. ODROIDMAGAZINE 23 MULTIBOOTYOURODROID A set of directories files are then placed into the current di- rectory. 2. Run the extract_uImage.sh script by typing $ extract_uImage.sh initramfs.cpio.gz. Checking for uImage magic word... 1+0 records in 0+1 records out 4 bytes (4 B) copied, 3.9012e-05 s, 103 kB/s uImage recognized. Extracting data... 2619+1 records in 327+1 records out 167626 bytes (168 kB) copied, 0.00185786 s, 90.2 MB/s Checking for ARM mach-type... 3+0 records in 0+1 records out 3 bytes (3 B) copied, 3.5863e-05 s, 83.7 kB/s Checking for zImage... 1+0 records in 0+1 records out 4 bytes (4 B) copied, 2.6783e-05 s, 149 kB/s >>> initramfs.cpio.gz extracted to Image Which the results in the files show here: 3. The extracted file is now a gzip file, so we need to rename it. $ mv Image Image.gz 4. Extract the newly renamed file using gunzip. $ gunzip Image.gz Check the file type using the file tool by typing $ file Image Image: ASCII cpio archive (SVR4 with no CRC). 5. Use the cpio tool to extract the content $ cpio -i < ./Image 563 blocks. You will now see the full contents of the boot.img as shown below. Previous files such as boot.img have been removed from the screenshot for easier viewing. cache.img This image file does not contain any- thing major. As the name implies, it is used as cache storage. On an Android device, this particular image file will reside in its own partition, or sometimes its own directory called /cache. The cache is used by Android OTA (Over The Air) application to store updated image files, or to upgrade your Android system. The following steps shows you how to extract the cache. img: 1. Use the simg2img tool to extract the image file by typing $ simg2img cache.img cache.raw computed crc32 of 0xc76ce614, expected 0x00000000 2. Using command file cache.raw you will see the type of the ex- tracted file. $ file cache.raw cache.raw: Linux rev 1.0 ext4 filesystem data, UUID=57f8f4bc-abf4-655f-bf67-946fc0f9f25b (extents) (large files) 3. Create a directory to mount the extracted file to the directory. $ mkdir cc $ sudo mount -t ext4 -o loop cache.raw cc/ 4. You will see there is nothing inside the cc/ directory. recovery.img The recovery image contains Linux kernel and busybox tool, and resides in its own partition. In normal Android devices, there is a particular physical key sequence that you normally have to press in order to instruct the device to boot to the recovery partition. There is another way to boot to recovery using the following command inside Android: adb reboot recovery File list after extracting boot.img Complete file list of boot.img File list after extracting initramfs.cpio.gz Complete file list of cache.img
  • 24. ODROIDMAGAZINE 24 MULTIBOOTYOURODROID Follow these steps to extract the recovery.img: 1. Run the unmkbooting utility $ unmkbooting recovery.img Kernel size 3133124 Kernel address 0x10008000 Ramdisk size 1388735 Ramdisk address 0x11000000 Secondary size 0 Secondary address 0x10f00000 Kernel tags address 0x10000100 Flash page size 2048 Board name is “” Command line “” Extracting kernel.gz ... Extracting initramfs.cpio.gz ... All done. --------------- To recompile this image, use: mkbooting --kernel kernel.gz --ramdisk initramfs. cpio.gz -o new_boot.img --------------- By using the file command to the check the type of the init- ramfs.cpio.gz file, you will see the following: $ file ./initramfs.cpio.gz: u-boot legacy uImage, ramdisk, Li- nux/ARM, RAMDisk Image (Not compressed), 1388671 bytes, Wed Apr 2 10:35:12 2014, Load Address: 0x40800000, Entry Point: 0x40800000, Header CRC: 0x70CA98DA, Data CRC: 0xC14A4AFD 2. Run the extract_uImage.sh script $ extract_uImage.sh initramfs.cpio.gz Checking for uImage magic word... 1+0 records in 0+1 records out 4 bytes (4 B) copied, 2.322e-05 s, 172 kB/s uImage recognized. Extracting data... 21697+1 records in 2712+1 records out 1388671 bytes (1.4 MB) copied, 0.0140089 s, 99.1 MB/s Checking for ARM mach-type... 3+0 records in 0+1 records out 3 bytes (3 B) copied, 3.6532e-05 s, 82.1 kB/s Checking for zImage... 1+0 records in 0+1 records out 4 bytes (4 B) copied, 3.2578e-05 s, 123 kB/s >>> initramfs.cpio.gz extracted to Image 3. The extracted file is now a gzip file, so we need to rename it: $ mv Image Image.gz 4. Extract the newly renamed file using gunzip: $ gunzip Image.gz 5. Use the cpio tool to extract the content $ cpio -i < ./Image 3820 blocks The /sbin direc- tory contains lots of tools, most of which are a symlink to recovery (via busybox symlink) as shown in the screenshot. system.img The most important image file is system.img, which contains the heart and soul of Android, and is the largest in terms of file size. 1. Use the simg2img tool to extract the image file $ simg2img system.img system.raw computed crc32 of 0x9a5d4d54, expected 0x00000000 Extracted file list for recovery.img Complete file list for recovery.img Busybox symlinks
  • 25. ODROIDMAGAZINE 25 MULTIBOOTYOURODROID 2. Using the file tool you will see the type of the extracted file. $ file system.raw ./system.raw: Linux rev 1.0 ext4 filesystem data, UUID=57f8f4bc-abf4-655f-bf67-946fc0f9f25b (extents) (large files) 3. Create a directory to mount the extracted file and mount the file to the directory $ mkdir sys $ sudo mount -t ext4 ./system.raw ./sys 4. You will see a lot of folders inside the sys/ directory. If you look each of the folders, you will the application, con- figuration and executables files that are used to run Android. userdata.img This particular image file resides in its own partition, and will be used as the /data partition. The image file does not contain many files, and sometimes, in different devices, it is just an empty image file. Since this is used for data, it does not matter what it contains, since Android does not use it, and is intended only for storage purposes. The following steps shows you how to extract the userdata.img: 1. Use the simg2img tool to extract the image file $ simg2img userdata.img userdata.raw computed crc32 of 0x20aec0ac, expected 0x00000000 2. Using the file tool, you can see the type of the extracted file. $ file ./userdata.raw ./userdata.raw: Linux rev 1.0 ext4 filesystem data, UUID=57f8f4bc-abf4-655f-bf67-946fc0f9f25b (extents) (large files) 3. Create a directory to mount the extracted file and mount the file to the directory $ mkdir data $ sudo mount -t ext4 ./userdata.raw ./data 4.Youwillseethatthereareonly2foldersinsidethe/datadirectory (these 2 folders are not used in Android) Packing In the previous section, we unpacked the image file, so after making changes to the image files, you will want to pack them up again and use them to copy it into your sdcard or eMMC storage. boot.img and recovery.img part 2 After making the changes inside the directory, you need to pack it up and convert it to a .gz file, using the following com- mand. $ find . | cpio -o -H newc | gzip > ../newramdisk. cpio.gz You have to run the above command inside of the extracted directory after you unpack it, using the cpio command as shown in the previous step. A ../newramdisk.cpio.gz file will be created, and this file will be packed together using another command: $ mkbooting --kernel kernel.gz --ramdisk newramdisk. cpio.gz -o new_boot.img The kernel.gz comes from the original boot.img, while the newramdisk.cpio.gz contains our changes. On completiong of the mkbooting command, you will have a new boot image called new_boot.img. system.img part 2 After you make changes to the files inside the extracted system.img directory, you can pack it using the following com- mand: sudo make_ext4fs -s -l 512M -a system ./system_new. img ./system The last parameter ./system is the directory that contains the extracted image files. Complete file list for system.img
  • 26. ODROIDMAGAZINE 26 ODROIDBASICS(BEGINNER) L arge capacity installation media such eMMC or SD cards have a lot of unallocated space avail- able after initial installation of a Hard- kernel or community image. The par- titions are kept small during the image creation process so that the resulting file is more portable, and can still be installed on smaller storage devices of 4GB or 8GB size. With a 16GB, 32GB or 64GB device, the partitions can be expanded in order to take ad- vantage of the unused space, making it available for system use. This article presents the steps neces- sary to properly resize your Android im- age’s FAT32 partition, usually referred to as /mnt/sdcard. If the partitions are not resized properly, the resolution will be locked to 720p because the boot.scr file will not be found by the bootload- er. The procedure essentially re-assigns most of the unallocated space to the An- droid partition while still allowing 1080p resolution - it’s as simple as that! Requirements 1. An ODROID U3 or XU board, with an appropriate power adapter 2. Any MicroSD or an eMMC card of 8+ GB capacity, along with an SD Card reader/writer, containing a freshly copied, unbooted Android image. To download the latest supported An- droid version relevant to your plat- form, check the following link, using http://bit.ly/1k801bP. Resizing Android partitions make full use of your large sd card or Emmc by Venkat Bommakanti 3. A (native) Linux host with GParted (to graphically manage disk parti- tions) installed. If you have access to only an MS Windows system, you may use one of two options: A GParted Live CD for x86 systems (http://bit.ly/1hGJVvw), or An Ubuntu 14.04+ Desktop virtual machine instance hosted on the X86 system with Gparted installed. See http://bit.ly/1r2OP48 and http://bit. ly/1nlDA5d) for details. GParted for Linux is preferred over tools such as EaseUS Partition Master for Windows, since Gparted detects Android ext3/ext4 partitions properly without problems, but new- er versions of EaseUS may not read ext3/ext4 partitions at all. So, it is advisable for MS Windows users to run GParted via USB stick or Virtual Machine, as mentioned above. Overview The first two steps involve moving two partitions to the end of the storage device (while still retaining their respec- tive sizes), and The third step is to combine most of the unallocated space to the already ex- isting Android partition. The first screenshot in this article shows the results of following the main steps on a 32GB card. There are quite a few sub-steps, so make sure to carefully follow the figures below. Cards of a ca- pacity greater than 64GB have not yet been tested, but should work properly if the extra room is created as a second FAT32 partition. The reason for separate instruc- tions when using a 64GB card, is that FAT32 partitions are limited to 32GB in Android, although more recent An- droid images allow for larger partition sizes. Even though most of the steps are shared between the procedure for 32GB (or less) and 64GB cards, we did this unified chart that can help you for either case. In addition to the chart, there is also a pictorial guide for resizing the parti- tions in Gparted on pages 28 and 29. If you have completed the steps correctly, the boot.scr file should be recognized properly and allow 1080p resolution. It’s advisable to perform this operation on a new copy of Android to avoid any potential data loss. Always make a backup first!
  • 27. ODROIDMAGAZINE 27 ODROIDBASICS ResizinganeMMCorSDCardlessthan64GB For eMMC or SD cards less than 64GB, follow steps 1-6, then use steps 6a or 6b, then finish with steps 8-10. 6a. (<64GB) Move this 2nd-last partition towards the end, just before the previously moved (last) partition. The last two partitions should touch each other, with no empty (unallocated) space in between them. - select [Apply] to make the change permanent. 7a. (<64GB) When completed, the layout will look like so: - a single untouched partition at the start of the card, - a lot of blank space, and then, - two partitions all the way at the end. Resizing a 64GB eMMC or SDCard The procedure for resizing a 64GB card is slightly different because FAT32 partitions are limited to 32GB in size. 6b. (64GB) Move this 2nd-last partition roughly towards the midpoint of the unused space, such that: there is ~28GB space free to the left of the partition, and there is ~26GB space free to the right. - select [Apply] to make the change permanent. 7b. (64GB) Edit the 2nd-last partition: - resize it to use the ~26GB available space to its right, and lastly, - select [Apply] to make the change permanent. 1. Insert the card or module into a Linux host using an appropriate USB adapter/reader. 2. Create a temporary directory on the host’s local drive, to receive the files from the FAT32 partition of the card. Backup the files from the card’s FAT32 partition to the newly created backup directory in the host. 3. Using GParted, perform the following operations on the FAT32 partition of the card: - unmount the FAT32 partition, - delete the FAT32 partition, and lastly, - select [Apply] to make the change permanent. 4. While still in GParted, perform these operations: - unmount the last partition of the card, - move this last partition to the end of the card, and lastly, - select [Apply] to make the change permanent. 5. Then perform these final move operations: - unmount the 2nd-last partition 8. Format the unallocated (available) space as FAT32 and select [Apply]. 9. Copy the backup files from the local temporary backup directory (created in the sec- ond step) to the new FAT32 partition. 10. Reinsert the card into the Odroid device, boot and enjoy Android on your ODROID! First, follow these steps to prepare your eMMC or SD card for its resizing. After doing steps 1-5, move on to 6a or 6b depending on your eMMC or SD card’s capacity. Before resizing the Android partitions After resizing the Android partitions
  • 28. ODROIDMAGAZINE 28 ODROIDBASICS(BEGINNER) QUICK pictorial guide for RESIZING AN ANDROID SD OR EMMC by Venkat Bommakanti Initial parameters of 128 MB partition to be moved Move the selected 2.12 GB partition Initial parameters of 2.12 GB partition to be moved Move the selected 128 MB partition Initial partition layout New parameters to move 2.12 GB partition New parameters to move 128 MB partition
  • 29. ODROIDMAGAZINE 29 ODROIDBASICS Copy original Android partition for backup Enter parameters for new Android partition Partition layout completed Delete original Android partition Request to create new Android partition Apply new partition layout Save the copy of original Android partition to backup folder Copy contents of backup folder (original Android partition) Restore backup Android files
  • 30. ODROIDMAGAZINE 30 TECHNICALARTICLE(HARD) I n the previous automation article, we showed how to attach sensors to the ODROID-XU: a temperature sensor and a motion detector to monitor a cat’s movement habits. In this article we will go one step further, and learn how to control a step motor using the ODROID. And what better application for a motor than building an Internet- controlled automatic cat feeder! We will start with the Cat Mate C50 feeder, shown in Figure 1. This particular feeder has a battery- powered clock mechanism that activates every 24 hours, releasing the red lever to the next position, which results in the white hood moving to the next meal com- partment. It is also very easy to hack - you can just remove the clock mechanism that rotates the lever, and replace it with a mo- How to feed your cat over the Internet A guide for attaching step motors to the ODROID-U3 by Marian Mihailescu tor, as shown in Fig- ure 2 and Figure 3. For this proj- ect, I will be using the ODROID-U3, which has several advantages over the ODROID-XU for this project: it’s more affordable, re- quires less power, does not have a fan, and has the optional IO-SHIELD ac- cessory, which pro- vides extra GPIO ports. The cat feeder will be controlled using a 5V stepper motor (model 28BYJ- 48), which can be purchased from Ebay together with the driver board ULN2003 for less than $3 USD. The stepper mo- tor is ideal in this case, since it can rotate a fixed number of steps, allowing us precise control of the cat feeder. In particular, the 28BYJ-48 motor has 32 steps per revolu- tion, with a gear reduction of 1/64, which means that it does 2048 steps in one full revolution (360 degrees). Most motors usually need more current than develop- ment boards can support, and thus are usually connected to an external power We interrupt this article to announce the return of the cat memes! Figure 1. Cat Mate C50 Figure 2a - Clock mechanism removed with lever gear visible Figure 2b - Front access to the lever gear
  • 31. ODROIDMAGAZINE 31 TECHNICALARTICLE supply or a battery pack; however this particular motor can get all the power it needs from the ODROID. The role of the motor driver board is to allow the small current output from the ODROID to control a bigger current needed for the stepper motor. The driver board is controlled by four inputs that determine how the coil is magnetized in order to rotate the motor magnet core. There are also the 5V power and ground inputs, for a total of six connections to the ODROID. Since the motor requires 5V logic, we need a level shifter to work with the 1.8V outputs of the ODROID. Similar to the pre- vious automation article, where is explained in more detail, we will be using the four port Freetronics Logic Level Converter. Since the motor driver requires four GPIO pins for control and the ODROID U3 only has three GPIOs (GPIO199, GPIO200 and GPIO204), the ODROID IO-SHIELD is required. However, in the absence of the IO-SHIELD, it is possible to control the driver board with only three GPIO by using a shift register. The shift register gets all required GPIO outputs in a serial way, and then outputs them to the stepper motor in parallel. You need to connect the SERIAL IN input to the GPIO that sends the mo- tor control logic. CLOCK is used to make the shift register load the logical value from SERIAL IN on a low-high transition, while shifting the other stored values. LATCH enables the output of the shift register on a low-high transition. OUTPUT ENABLE is used to disable the outputs - since we want them enabled all the time, we can connect it to GND, and RESET is used to clear the shift register. We can connect OUTPUT ENABLE to 5V (VCC) and set up all the outputs each time, such that RESET is not re- quired. This particular shift register model has eight outputs, so we will load eight values each time, even if we only need four. The motor driver is connected to the motor in the feeder by a 2m cable, which allows the board to be placed safely away from the cat. To control the feeder, the bash script shown below is executed by clicking a button in a webpage. A webcam was also Even though a space hyperdrive would be far more useful, we dutifully succumb to the will of our feline masters by combining both robotics and Linux to automatically feed them, in case we suddenly “disappear”. Figure 3a - 28BYJ-48 5V stepper motor with ULN2003 Driver Board Figure 4 - ODROID Internet-controlled cat feeder schematics Figure 3b - Motor fits right in the lever gear
  • 32. ODROIDMAGAZINE 32 TECHNICALARTICLE added to the ODROID to provide visual feedback. Using Motion webcam server, a live stream is embedded in the webpage with the cat feeder controls. With a slightly more complex version of the script and the Linux cron job scheduler, it is possible to activate the feeder not only on-demand, but also automatically, at pre-defined periods of time. Your cat has never been happier! #!/bin/bash ### enable ODROID U3 GPIO echo 199 > /sys/class/gpio/export echo out > /sys/class/gpio/gpio199/direction echo 0 > /sys/class/gpio/gpio199/value echo 200 > /sys/class/gpio/export echo out > /sys/class/gpio/gpio200/direction echo 0 > /sys/class/gpio/gpio200/value echo 204 > /sys/class/gpio/export echo out > /sys/class/gpio/gpio204/direction echo 0 > /sys/class/gpio/gpio204/value ### setup motor sequence declare -a SEQ0=(0 0 0 0 1 0 0 0) declare -a SEQ1=(0 0 0 0 0 1 0 0) declare -a SEQ2=(0 0 0 0 0 0 1 0) declare -a SEQ3=(0 0 0 0 0 0 0 1) ### define level shifter GPIO IN=/sys/class/gpio/gpio204/value LATCH=/sys/class/gpio/gpio200/value CLK=/sys/class/gpio/gpio199/value ### control motor STEP_COUNTER=0 for STEP in {1..4096} do echo 0 > $LATCH for PIN_COUNTER in {0..7} do PIN_VALUE=”SEQ$STEP_COUNTER[$PIN_COUN- TER]” echo ${!PIN_VALUE} > $IN echo 1 > $CLK echo 0 > $CLK done STEP_COUNTER=$[$STEP_COUNTER + 1] if [ “$STEP_COUNTER” = “4” ] then STEP_COUNTER=0 fi echo 1 > $LATCH echo 0 > $LATCH sleep 0.000000001 done ### after feeder activated, reset motor inputs for RESET in 0 0 0 0 0 0 0 0 do echo $RESET > $IN echo 1 > $CLK echo 0 > $CLK done echo 1 > $LATCH echo 0 > $LATCH echo “[$(date)] : Feeder activated successfully... meow!” Figure 5a - Board with all components attached Figure 5b - Webpage to control the feeder over the internet
  • 33. ODROIDMAGAZINE 33 TECHNICALARTICLE make A CUSTOM lego case for your u3 don’t have your own 3d printer yet? assemble THIS great case FROM your lego bucket! by @Zylophone
  • 34. ODROIDMAGAZINE 34 Audio Flow Diagram W e have frequently received requests on the forums for instructions on how to en- able 5-channel audio passthrough with ODROID computers. However, we couldn’t find out how to implement the pass-through over the HDMI audio channel with the native hardware, even though we tried many different ways. So, we decided to develop pass-through functionality in another way, using a USB to S/PDIF interface. Hardware setup To allow HDMI passthrough, we created a USB-S/PDIF adapter board using the CM108AH chipset. We called it the USB-S/PDIF, which stands for AUDIO LINK. The price is only $16 and it comes with a USB cable and plas- tic shell. The Cmedia CM108AH is a highly in- tegrated single chip USB audio solution. All essential S/PDIF optical TOSLINK How to enable multi-channel audio output with XBMC Using the USB-S/PDIF peripheral to deliver digital 5.1 surround sound by Justin Lee, CEO of Hardkernel as well as Coaxial outputs, including PLL, regulator, and USB transceiver could be implemented on a small PCB. Software setup The passthrough function in XBMC 12 Frodo doesn’t work with the ODROID, but fortunately, XBMC 13 Gotham is capable of enabling HDMI passthrough out- put. For best results, use the latest Ubuntu or Debian OS image which has the XBMC 13 preinstalled. We tested our hardware with these 2 prebuilt OS im- TECHNICALARTICLE(BEGINNER) What does this setup need? An ODROID powering it, of course! PulseAudio Configuration SettingsODROID Audio Link 1
  • 35. ODROIDMAGAZINE 35 ages, either of which may be used to achieve the necessary software configu- ration for 5-channel surround: http://forum.odroid.com/view- topic.php?f=29&t=4823 http://forum.odroid.com/view- topic.php?f=79&t=4626 To begin installation, plug in the USB-S/PDIF and boot your board. In order to activate Passthrough Co- decs, first setup PulseAudio Volume Control according to the screenshots. Select Digital Output (S/PDIF), then select AC3 and DTS in the Advanced option menu. Finally, start up XBMC, where you can easily setup the passthrough func- tion. Select the CM108 device in the Audio output menu, then enable the op- tions called Enable passthrough, Dolby Digital AC3 capable receiver, and DTS. used by the amplifier, and playing one with DTS sound should indicate DTS encoding. Therearealsoseveralthird-partyUSB sound cards that use S/PDIF output which should work as 5.1 passthrough devices as long as the Linux driver sup- ports it. Please note that PulseAudio does not currently allow TrueHD or DTS-MA passthrough, which is a Pul- seAudio limitation, unrelated to the USB-S/PDIF hardware or XBMC soft- ware configuration. The USB-S/PDIF is now available from the Hardkernel store for $16 at http://bit.ly/1kIt8aC. TECHNICALARTICLE ODROID Audio Link 2 Our audio system displaying both Dolby Digital and DTS sound. 5.1 surround is awesome! Setup on XBMC The receiver which we used for this tutorial is a very cheap entry level, which works well for development and testing. To verify that the hardware and soft- ware are configured properly, playing a video with AC3 sound should display that Dolby Digital encoding is being Travel Back In Time with Telnet Dust off THAT OLD 1200 baud modem by Rob Roy B efore the World Wide Web and HTTP was invented, a protocol called Telnet was a popular way to communicate from one computer to another. By creating a primitive form of a web page that operated over Telnet, computer hackers built a large community of unique text-based serv- er nodes running software called BBS (Bulletin Board System). This network included many special-interest commu- nities that shared unique hobbies such as role playing, music and program- ming. To take a trip back in history to 1984, when the BBS network was in its golden age, type either of the following into a Terminal window: telnet 1984.ws 23 telnet gcomm.com Register and enjoy some of the most advanced ASCII graphics from the early days of network computing! More nostalgic BBS experiences such as multi-user dungeons (MUDs), chat programs and other epic systems can be found at http://bit.ly/1qnkmSq. TIPSANDTRICKS
  • 36. ODROIDMAGAZINE 36 OSSPOTLIGHT(BEGINNER) D ream Machine, a community prebuilt OS image, offers nearly every flavor of Ubuntu desktop available for versions 13.04 and 13.10, including Lubuntu, LXDE, Kubuntu (KDE), Blackbox, Openbox, Matchbox, Unity and Xubuntu (XFCE). The desk- top environment can be selected by us- ing the gear icon in the upper corner of the Dream Machine login screen. Whis- per comes with a single performance- oriented speed-optimized environment called Lightweight X11 Desktop Envi- ronment (LXDE), which is graphically very fast and offers a similar interface to Windows. Because the software on Dream Ma- chine includes everything on the Fully Loaded Ubuntu 12.11 image, please re- fer to the previous OS Spotlight column (May 2014) for details on the included packages. However, Dream Machine also OS Spotlight: Dream Machine and Whisper Ubuntu 13.04 and 13.10 with 8 Desktop Environments Also Available in Turbo by Rob Roy, Editor-In-Chief comes with XBMC, which is not includ- ed with Fully Loaded, since XBMC only works with ODROID Kernel 3.8. There have been several improvements to 1080p playback in XBMC since Dream Machine 13.10 was finalized, and the latest version of XBMC will be included in the upcom- ing Dream Machine 14.04 release. KDE Plasma Workspace Although every desktop environment on Dream Machine contains basically the same software, there are many differences in the look of each desktop as well as ad- ditional UI features. The default environ- ment in the 13.10 version is KDE Plas- ma Workspace, which features beautiful hardware-accelerated fade and transition effects in its windowing environment. KDEcomeswithadriverforOpenGLES called kwin_gles, so that the animations remain smooth and don’t stress the CPU. Because other Ubuntu desktops are (gen-KDE Plasma Workspace features Open GLES2 GPU acceleration and has gorgeous effects! Blackbox adheres to a minimalist aesthetic. erally) written for OpenGL, which is not supported by the Mali GPU, rendering in those environments is done at the soft- ware level, but KDE offers very fast UI responsiveness. KDE Plasma Workspace will be fa- miliar to users of Windows operating systems, since it has a well organized Start Menu and uses a similar desktop layout, with a notification area in the bot- tom right. It has its own robust screen saver program, and is the only environ- ment to include dozens of notification sounds. It also has a Recent Docu- ments and Applications area, as well as many useful widgets such as clocks and weather. It’s my favorite desktop, and is a great choice for office work or web browsing. For more information on the KDE desktop, or to contribute to the ongoing open-source project, visit http://www.kde.org/. Dream Machine and Whisper with Kernel 3.8 for the U2/ U3/X/X2 may be downloaded from http://bit.ly/1rhHymu. Watch the ODROID forums at http://forum.odroid.com/ for the 14.04 versions, coming soon!
  • 37. ODROIDMAGAZINE 37 OSSPOTLIGHT Blackbox The simplest desktop environment on Dream Machine is called Blackbox, which displays only a task bar and a com- pact Applications menu, accessed by right-clicking the Desktop. It’s meant as a very lightweight way to monitor system processes, or just to reduce CPU cycles for power-hungry applications. A typical scenario for using Blackbox is an embed- ded Linux system that runs a single cus- tom application, such as a robotics con- troller. The design is visually minimalist, it runs applications quickly, and also has a small memory footprint. LXDE LXDE stands for Lightweight X11 Desktop Environment, and is best suited for those who wish to get the maximum performance from the ODROID while still retaining a robust interface. It looks and feels like Windows XP, and excludes graphic compositing and other visual ef- fects in order to boost the environment’s efficiency. XBMC runs very well using LXDE, and is the best choice for those who wish to setup a Linux set-top box run- ning XBMC, Transmission or Youtube. LXDE also offers a unique File Man- ager called PCManFM, which leverages the gio/gvfs libraries to connect to sftp, webdav, smb, and other Gnome Virtual File System-supported protocols. Lubuntu Lubuntu, which is based on LXDE, offers some visual improvements to the basic LXDE interface with larger, squared-off icons and a streamlined taskbar. It also features many new soft- ware packages, including the Lubuntu Software Center. Matchbox Matchbox is different from other environments in its use of the entire desktop as an Applications menu. Click the arrows in the upper left and right to page through the categories, and scroll down the desktop to see more applica- LXDE(LightweightX11DesktopEnvironment) balances performance, speed and features. Lubuntu is built on LXDE and offers a wide range of unique software applications. tions. Matchbox is perfect for access- ing programs and icons quickly without needing to constantly open a menu, since every application shortcut is displayed on a single page. Although Matchbox was designed for PDAs and tablets, it looks great on a 1080p HDMI monitor. Matchbox shows only one window at a time rather than using a multi-window layout. Openbox Openbox isn’t actually a desktop en- vironment, but a stand-alone Window Manager. It can be run by itself or within another desktop environment, and uses the minimum amount of resources nec- essary to launch programs and manage windows. The main focus of Openbox is speed, and is ideal for time-sensitive programs, high-traffic servers, and other applications where memory and proces- sor use is important. Openbox is ex- tremely sparse, has very few dependen- cies, and is delightfully compact. Matchbox is designed for PDAs, but also looks sharp on an HD 1080p monitor. Openbox comes with only a terminal and web browser, and is perfect for embedded systems.
  • 38. ODROIDMAGAZINE 38 OSSPOTLIGHT Razor The Razor-qt desktop is written en- tirely in the QT programming language, and is one of the more recent desktop environments to be included in Ubuntu 13.10. While still a new project, Razor- qt already contains many key compo- nents, such as a panel, desktop, applica- tion launcher, settings center, and user session. Built for versatility and reuse, Razor-qt runs in conjunction with any number of window managers, although most Razor developers prefer to use Openbox. It’s possible to use Razor with any modern window manager, from gw- wm2 to kwin, including running KDE without the Plasma Desktop. XFCE and Xubuntu Xubuntu is based on the XFCE desk- top environment, with the addition of many useful bundled packages which are meant to replace many Gnome-based software applications. It has a useful shortcut bar in the bottom area that ap- pears on mouse hover, and an upper left start menu like Gnome. XFCE is a fa- vorite of many Ubuntu users because of its nice balance between speed and func- tionality, as well as its convenient orga- nization of applications into categories. The Search feature, represented by a magnifying glass in the shortcut bar, is similar to the Unity search bar, and can be used to find any program easily. XBMC XBox Media Center (XBMC) can run as a standalone application, but can also be enjoyed as its own desktop envi- ronment by installing the “xbmc-stand- alone” package from Synaptic Package Manager. It is an all-in-one solution for audio and video playback, support- ing Samba server connections, 5.1 DTS playback, third-party add-ons, and beau- tiful audio visualizations. It can also be used to launch Linux programs, so that software packages can be accessed within the need to go back to an Ubuntu desktop. For more information on us- ing XBMC, please read the Quick-Start Guide at http://bit.ly/1kTXKXI. Razor is written entirely in the advanced QT programming language. Xubuntu is a favorite of Ubuntu enthusiasts and offers many user-friendly features. XBMC is the go-to program for all media playback, and can launch programs too. Whisper (LXDE) Whisper is a single-user version of Dream Machine that offers one desk- top environment (LXDE) and boots straight to the desktop very quickly by setting the auto-login variables in /etc/lightdm/lightdm.conf. It is de- signed for performance and speed, and contains the same major software packages as Dream Machine. Whis- per is one of the most popular images available on the forums, and provides a familiar Windows XP-style interface which is ideal for programming, video playback, CPU-intensive applications, or just for lightweight use such as web browsing and document editing. Although Dream Machine is not yet available for the XU series, Whis- per has been successfully ported to the XU, and offers GX- ine instead of XBMC for video playback, since the XU version of XBMC does not run within X11. Open any media file from the File Ex- plorer to automatically launch GXine, and double-click the playback window to enable full-screen viewing. Now that that the Hardkernel 14.04 images have been released, an updated version of Dream Machine and Whisper will be released to the fo- rums in the next few months. The re- cent improvements to XBMC that en- able smooth 1080p playback will also be included in the X and U versions. Hardkernel is constantly improving its 3.8 kernel branch, and has recently re- placed the kernel-update.sh script with the new odroid-utility package, which will also be added to the new releases. Whisper, as fast as your ODROID can go!