SlideShare una empresa de Scribd logo
1 de 11
Descargar para leer sin conexión
26 
5.0 Backyard Rain Garden Design 
5.1 Overview of Practice 
A rain garden (a small bioretention area) is a depressed area in the landscape designed to retain and infiltrate stormwater runoff (Figures 5.1 and 5.2). Rain gardens offer an attractive, versatile and multi-functional option for stormwater treatment. Rain gardens can sometimes be installed without the help of heavy equipment although a small excavator is beneficial in many cases. Surface ponding should not occur for more than 3 days in a rain garden, wetter systems would be considered “backyard wetlands”. Rain gardens are typically planted with a combination of trees, shrubs and perennials and mulched. Grass can also be used as cover without other vegetation or along with trees, shrubs or perennials. Cover and layout of rain gardens can be very flexible. 
Figures 5.1 & 5.2 A completed rain garden in Oak Ridge, NC (left) and Wilmington, NC (right). 
5.2 Rain Garden Siting 
5.2.1 Choosing a site 
There are a number of siting concerns regarding rain gardens. Rain gardens should ideally be located between the source of runoff (roofs, driveways, sidewalks, etc.) and the runoff destination (storm drains, streams, low spots, etc.). The lowest spot in a yard, or an area that stays wet for extended periods of time after rainfall events, is not a suitable location for a rain garden. These locations are better suited for backyard wetlands. It is best to locate a rain garden so that it will intercept the water quality volume during storm events and convey overflows to existing drainage structures or paths (Figure 5.3).
27 
Figure 5.3 Locate rain gardens between the runoff source and its destination (an existing storm drain). 
To avoid damage to buildings and building foundations, rain gardens should be located at least 10 feet away from structures. For buildings with a basement or crawl space, rain gardens should only be located lateral to or downslope of the building. If a building is built on a slab foundation (no basement and no crawl space), the rain garden may be located uphill, but should still be at least 10 feet away. Additionally, the rain garden should be located lateral to or downslope of septic system drain fields and well heads with a minimum 25 feet of separation. Rain gardens should be sited to avoid conflicts with utilities, which should be located and marked prior to construction. Finally, for the best plant growth, the rain garden should be located in an area that receives partial to full sun exposure. 
5.2.2 Rain Garden Soils 
Soils with moderate to good permeability must be present in order for a rain garden to function properly. At each location that meets the siting requirements above, dig a 1-foot deep hole. Fill these holes with water, let them drain, and then fill them again. Record the drainage time for each test hole. 
If the hole drains in less than 12 hours, the site is suitable for a quick-draining rain garden. If the drainage time is between 12 hours and 3 days, the site is suitable for a standard rain garden. If the hole takes longer than 3 days to drain, the practice should be designed as a backyard wetland (Chapter 6). See the table below.
28 
Infiltration Test: The Results 
Drain Time Appropriate BMP < 12 hours Quick-Draining Rain Garden 12 hours – 3 days Standard Rain Garden > 3 days Backyard Wetland 
Please note: These are backyard rain gardens and backyard wetlands. Larger bioretention areas and stormwater wetlands require design and approval by a Professional Engineer (PE). If the area of impervious surface draining to the BMP exceeds 2500 square feet, the engineered practice is required, along with design approval by a PE. 
For sites located in a floodplain, a low-lying area, or east of Interstate 95, an additional test is highly encouraged to determine the height of the water table and check for the presence of wetland soils. 
Wetland soils and/or a high water table will limit drainage from the system between rain events. A visual analysis of the subsurface soil is sufficient when checking for a high water table. Dig a hole 2 feet in depth. Soils with a grey matrix with brown or orange mottles (areas of color) are indicative of areas where the soil is in contact with the water table for extended periods of time. As the soil is removed from the hole, it should be observed for these signs of saturation. The seasonal high water table is located at the depth where mottled soils are first encountered. If groundwater is encountered as the hole is being dug, the site very likely has a high water table (Section 4.4.4). Seasonally high water tables are described in greater detail in Richardson and Vepraskas (2001). Districts may also contact division technical services staff to assist with soil analysis, if needed. If water or indications of saturated soils are encountered in the 2 foot hole, the site is not suitable for a rain garden. A backyard wetland (Chapter 6) should be considered or another location should be selected. 
The soil extracted from the 2-foot hole may be submitted to the NC Department of Agriculture and Consumer Services Soils Laboratory to determine if lime is necessary for proper plant growth. The soils test report should indicate the amount of lime needed (for more information on soils testing visit http://ncagr.gov/agronomi/sthome.htm). Fertilizer should only be applied to rain gardens during initial plant establishment, if it is needed at all based on the soils test.
29 
5.3 Rain Garden Sizing 
5.3.1 Determine watershed and impervious area draining to BMP 
After a suitable location is chosen for the rain garden, the next step is determining the watershed area that drains to the proposed rain garden site. The contributing watershed should contain impervious areas such as driveways, sidewalks and/or rooftops. The best way to determine drainage patterns is to visit the site during a storm event. A visual analysis of the site during dry weather may also be used to identify landscape features that affect the flow of water (swales, hills, raised flower beds, curbs, etc.). Detailed topographic surveys are another method of revealing the direction of flow on the site. Using USGS topographic maps or online GIS mapping program contours should only be a preliminary method of determining drainage patterns, as they are not detailed enough at the site scale. 
Rooftops are drained via gutters which may not drain to the proposed location. In this case, a pipe can be used to route water to the proposed location. The pipe should be sized to equal or exceed the cross-sectional area of the existing downspout. For example, if an existing downspout is 3” x 4”, it has a total cross-sectional area of 12 in2. A 4-inch pipe has a cross- sectional area of 12.5in2, so it exceeds the area of the downspout and may be used to route the downspout to the rain garden. Use extreme caution when combining downspouts; again, make sure the cross-sectional area of the pipe is at least the total area of the contributing downspouts. 
A rule of thumb for sizing downspouts is that there should be 1 inch of downspout per 100 square feet of roof. Downspouts that are undersized for the roof area will result in the roof runoff overflowing the gutter, reducing the expected volume of harvested water. 
After any modifications are considered (such as routing rooftop drainage to the proposed area), calculate the watershed area and impervious area draining to the proposed location. Field measurements taken with a tape measure will suffice for determining the area draining to the BMP. GIS mapping programs can also be used to measure the area of the contributing watershed and the total impervious area. 
Once these two areas are determined, calculate the percent impervious. 
Percent impervious = (Impervious area / Total watershed area) X 100 
5.3.2 Sizing the Rain Garden 
Rain gardens should be sized to capture the first flush event. The runoff capture depth is the amount of rainfall that you want the rain garden to treat; usally 1 inch in North Carolina. Once the percent impervious has been calculated, the Simple Method (Section 3.3) can be used to determine the volume of water that will enter the BMP during the first flush event. The surface area required for the rain garden is the runoff volume divided by the ponding depth, which is the depth water will pond within the rain garden before overflowing. A depth of 6” is recommended, but may vary between 3” and 9”. A depth greater than 9” is not recommended, as this risks becoming a safety hazard and decreases plant survival.
30 
The depth of ponding in the rain garden can be selected based upon topography, available area and home owner preference. Shallow rain gardens (a smaller ponding depth) take up more surface area than deeper systems (a larger ponding depth). Keep in mind that the ponding depth of the BMP will affect the type of plants that can thrive, so if there is a particular preference of the plants to be used, the ponding depth should be selected accordingly. 
5.3.3 Rain garden construction 
Determine where utility lines are located BEFORE starting to dig. Although the N.C. one-call should have been called and utility lines located before the rain garden site was selected, this step should be repeated prior to digging. Talking with the landowner may also be helpful to identify utilities that are not marked by 811 (such as gas lines running to a grill, outdoor lighting that was installed by the homeowner, etc.). 
Once it has been determined that the selected site is clear of utilities, mark the outline of the rain garden with paint, flags or rope (Figure 5.4). Consult with the landowner/homeowner when laying out the rain garden to ensure they are content with the location. The shape of the rain garden may vary greatly, so long as the area is equal or greater than the required size determined in Section 5.3.2. 
Figure 5.4 Laying out the boundary of a rain garden with paint and flags. 
A typical lawn has three soil layers: sod, topsoil and sub-soil. If sod is present on the site, remove this by skimming a shovel just below the root mat of the sod. Place the sod aside – it can be used for the berm or weir. Next, remove any and all topsoil and stockpile for later use. Finally, the ponding area of the rain garden can be excavated. Digging may be done by hand or with heavy equipment (backhoe, etc.). The depth of excavation (after the removal of sod and topsoil) should be the chosen ponding depth (discussed in Section 5.3.3), plus as additional 3”
31 
to account for mulch. For example, excavation for a rain garden with a 6” ponding depth would be a total of 9” (6” for ponding depth, 3” for mulch). 
After excavating to the appropriate depth, use a tiller, backhoe bucket teeth or other implement to break up the underlying 4”-6” of soil. Mix in the topsoil that was removed from the area prior to excavation. This increases infiltration and helps plants survive. If the results from the soils test performed (discussed in Section 5.3.1) indicate that lime is needed to raise the soil pH, lime should be mixed in at this time also. 
5.3.4 Berm construction 
The excess soil from excavation can be used to create a berm around the downslope side of the rain garden. A berm is an earthen dam used to hold water inside the garden. A berm can help reduce the amount of excavation necessary and can also help tie a rain garden into a sloped surface. When constructing the berm, place soil in 4”-6” lifts and compact tightly. 
It is strongly recommended that the berm be planted with sod to assure proper stabilization. Seeding and mulching the berm may be appropriate and more cost effective, but care should be taken to assure that proper ground cover is established due to potential difficulties with establishing vegetation on fill material. 
The berm should have a top width of 2-3 feet. The slide slope should preferably be 3:1 or a maximum slope of 2:1. The height of the berm should be 3-6 inches above the height of the water when the weir is flowing at its design depth. 
Figure 5.5 Examples of a berm and a weir in a backyard stormwater practice. 
5.3.5 Inlet protection and pretreatment 
Water entering the rain garden needs to be slowed down prior to entering the ponding area to limit erosion of mulch and soil. Also, sediment carried by the stormwater will settle out when the water velocity decreases. There are several types of pretreatment: 
• Direct flow into the garden as sheet flow over a vegetated surface, such as a lawn (Figure 5.6). This spreads the stormwater out, creating sheet flow, thereby avoiding 
Berm 
Berm 
Weir
32 
concentrated flow and erosive velocities. It is important the vegetated area over which water is flowing is flat, as this is the only way to ensure sheet flow. To determine if an area is level, insert two stakes in the ground, one on each side of the area. Tie a string line between the stakes and attach a bubble level (sold at the hardware store) to the string line. Keeping the string taught, adjust the stakes until the string line is level. The ground may then be graded (either cut or filled) to meet the elevation of the string. 
• Water can be introduced into the rain garden via a vegetated swale, which aids in slowing water down, allows infiltration to occur, and settling of sediment. See Section 8.0 for more information on designing swales. 
• Measures may be required where flow entering the rain garden may cause scour and erosion. If this is necessary, these components would require approval by a PE 
• A small forebay will allow stormwater to pool, settle out sediment, and dissipate energy before flow enters the main body of the rain garden (See Figure 5.7). These features should be used particularly in larger watersheds. The forebay may be either lined with rip-rap or sodded. During construction of the forebay, the berm that separates the forebay and the rain garden should be installed in 4”-6” lifts, with each lift well compacted. If using sod to vegetate the berm, the sod set aside during construction of the rain garden can be placed on the berm and staked down. If using seed, scarify the surface of the berm, sow the seed and cover with erosion control matting. Rip-rap berms are not recommended. 
• A gravel verge is frequently used when space is limited or when stormwater enters as sheet flow from an impervious surface directly adjacent to the garden, such as from a driveway. Figure 5.8 shows a gravel verge and vegetated filter strip combination on the slope of a rain garden. The gravel verge consists of washed #57 stone placed over geotextile fabric. The grass filter strip is typically immediately downslope of the gravel verge; both should be at least 1 foot wide. 
Figure 5.6 Stormwater flowing across flat, grassed slope before entering a rain garden.
33 
Figure 5.7 Rain garden in Wilmington, NC with a small forebay. 
Figure 5.8 Examples of a gravel verge and vegetated filter strip receiving 
sheet flow from a parking lot. 
5.3.6 Outlet design 
The outlet structure controls the ponding depth in the rain garden. It also should allow overflow to exit the rain garden in a controlled, non-erosive manner. The most common outlet used for rain gardens is a weir, a flat opening in the berm of a rain garden (Figure 5.9). To determine how long the weir should be, the Rational Method (discussed in Section 3.4) should be used to calculate the peak flow rate from the watershed. The Rational Method requires rainfall intensity for a given design storm as an input. The design storm for rain gardens in the CCAP program is the 10-year, 5 minute storm. Using the peak flow rate, the minimum weir length can be determined using Equation 3-10. Section 3.7.1 discusses weir sizing in greater detail.
34 
Figure 5.9 An example of a wooden weir installation. 
Figure 5.10 Earthen weir immediately following installation. 
Weirs may be wooden or earthen (Figure 5.9 and 5.10). An earthen weir is constructed by creating a flat length of lower elevation in the berm of the rain garden. The width of this opening should be at least the length calculated using Equation 3-10. Care should be taken to ensure the opening is level, as any low spots will lead to erosion. Lay sod over the weir and stake it down or seed the weir and cover it with erosion control matting. Sod is the preferable vegetative material for an earthen weir. 
A weir may also be constructed of wood. This is a popular choice for larger rain gardens, as it is easier to construct a level weir out of wood than soil. Also, a wooden weir is stable immediately after construction, while an earthen weir needs vegetation to establish before becoming stable. To construct a wooden weir, dig a small trench, approximately 4”-5” wide and at least 2 feet longer than the minimum required weir size. Stack 4”x4” boards in the trench, caulking between them to prevent leaks. The top of the last board should be at the height of the ponding depth above the surface of the mulch. For example, in a rain garden that has a 3”
35 
ponding depth, the boards should protrude 3” above the mulch surface, thus allowing water to pond 3” deep before overflowing. Fill soil around the boards in 4”-6” lifts and compact tightly. 
Appendix B describes another method of constructing a wooden weir structure that can be used for larger practices or practices receiving high flows. Typically, treated 2”x8” or treated 2”x12” will suffice. A weir notch will have to be cut into the uppermost board. Regardless of the board size, all structures should extend at least 6 inches below final grade at the base and 12 inches into the sides of the berm. The rain garden ponding zone should be designed so that no sensitive upstream areas (houses, driveways, etc.) are flooded because of the garden during any rain event. 
Note: The engineers are working on consistent guidance regarding the use of an earthen vs wooden weir. It appears that the maximum velocities possible from a backyard practice’s maximum drainage area would not require the need for a wooden weir. An earthen weir should be appropriate for most backyard practices. 
The one exception is that an earthen weir is only appropriate on natural ground where vegetation establishment is possible. A wooden structure may be required on some areas with fill material. 
Proposed guidance for sizing of an earthen weir include: Always use a H (height of water over top of the weir) = 0.5 ft (See Equation 3-9) The minimum size (L) of a weir should be = 2 ft Always use temporary matting to assure vegetation establishment 
Engineering Notes: An earthen weir should be appropriate for most backyard raingardens. The height of water over the top of the weir (H, in Equation 3.9) = 0.5 ft. The minimum length of the weir (L in Equation 3.9) should be a minimum of 2 feet 
See the CCAP Rain Garden Checklist and Rain Garden Design Worksheets for more information on rain garden sizing and eligibility. 
5.3.7 Plant selection 
Rain garden plants should be selected based upon the drainage rate of the practice. 
When the rain garden drains in less than 12 hours, the bioretention plant list in Appendix E can be used as a guide to plant selection. When the garden drains between 12 and 24 hours, the plants in Appendix F should be used. In each case it is good to use a variety of native plants for aesthetic value and to improve the chances of plant survival. In gardens that have deeper ponding depths or have slower drainage times, it may be helpful to place water-loving plants in the ponding zone of the garden and plants that prefer drier conditions in higher areas and on the banks. When planting shrubs or trees, it is recommended that they be planted ‘high’. In other words, when the plant is placed in the hole, the top of the root ball should be 1”-2” above the surface of the ground.
36 
Grass may be used as an alternative to other vegetation or in combination with other vegetation. Warm season grasses (e.g. Bermuda, Centipede, Zoysia) are recommended in much of the state, but cool season grasses (Fescue, Kentucky 31) can be used in cooler climates or to match existing lawn. It may be necessary to re-seed the cell in the fall. 
When using mulch, triple-shredded hardwood mulch is best. While all mulch floats, this type of mulch floats less than others (such as pine straw, pine bark nuggets, etc.). Mulch should be applied at a depth of 3 inches. 
5.4 Rain Garden Maintenance 
Inlet pretreatment devices such as vegetated swales, gravel verges, and forebays should be inspected regularly to ensure they are stable and functioning properly. If erosion within the rain garden is evident, further steps should be taken to slow down the incoming water and dissipate the energy. This can be done by installing rip rap or creating a small forebay. The outlet structure should be checked frequently to make sure it is functioning properly. Any and all sediment accumulated within the rain garden should be removed as soon as possible to prevent clogging. Trash and debris should be removed from the garden regularly. 
Irrigating plants in the rain garden may be necessary during establishment and during periods of drought. Fertilizers should not be used in rain gardens, as sufficient nutrients for the plants are delivered from the watershed. Fertilizers may be used on the berm surrounding the garden to help establish vegetation. Take care not to over fertilize these areas, as excess fertilizer can wash into the garden. Weeds will need occasional removal. Pesticides are not recommended for weed control in rain gardens. Shrubs and trees need to be pruned annually. 
Mulch may need to be replenished 1 or 2 times per year to maintain a depth of 3 inches and to keep weeds out. The depth of mulch should never exceed 3 inches. Mulch should be completely removed and replaced every 3 years. 
See the CCAP Rain Garden Operation & Maintenance Plan for more information.

Más contenido relacionado

La actualidad más candente

New York: Alternative Stormwater Management Practice - Rain Gardens
New York: Alternative Stormwater Management Practice - Rain GardensNew York: Alternative Stormwater Management Practice - Rain Gardens
New York: Alternative Stormwater Management Practice - Rain GardensSotirakou964
 
IRRIGATION SYSTEMS AND DESIGN - IWRE 317 questions collection 1997 - 2018 ...
IRRIGATION SYSTEMS AND DESIGN - IWRE 317 questions collection 1997 - 2018    ...IRRIGATION SYSTEMS AND DESIGN - IWRE 317 questions collection 1997 - 2018    ...
IRRIGATION SYSTEMS AND DESIGN - IWRE 317 questions collection 1997 - 2018 ...musadoto
 
sprinkler irrigation system
sprinkler irrigation systemsprinkler irrigation system
sprinkler irrigation systemmehmet demir
 
A04320105
A04320105A04320105
A04320105theijes
 
1 Sprinkler Irrigation System: components, types of system &amp; layout
1 Sprinkler Irrigation System: components, types of system &amp; layout1 Sprinkler Irrigation System: components, types of system &amp; layout
1 Sprinkler Irrigation System: components, types of system &amp; layoutSuyog Khose
 
Water harvesting: Past and Future
Water harvesting: Past and FutureWater harvesting: Past and Future
Water harvesting: Past and FutureSotirakou964
 
Multi slot divisor
Multi slot divisorMulti slot divisor
Multi slot divisorRaghu1522
 
Rain water harvesting (complete)
Rain water harvesting (complete)Rain water harvesting (complete)
Rain water harvesting (complete)Abhay Goyal
 
A case study on water storage tank design, constrution, operation and assessm...
A case study on water storage tank design, constrution, operation and assessm...A case study on water storage tank design, constrution, operation and assessm...
A case study on water storage tank design, constrution, operation and assessm...Alexander Decker
 
Methods of irrigation
Methods of irrigationMethods of irrigation
Methods of irrigationnumber113
 
Watering system
Watering systemWatering system
Watering systemmisancor13
 

La actualidad más candente (16)

New York: Alternative Stormwater Management Practice - Rain Gardens
New York: Alternative Stormwater Management Practice - Rain GardensNew York: Alternative Stormwater Management Practice - Rain Gardens
New York: Alternative Stormwater Management Practice - Rain Gardens
 
Rainwater harvesting
Rainwater harvestingRainwater harvesting
Rainwater harvesting
 
Drainage water management
Drainage water management Drainage water management
Drainage water management
 
IRRIGATION SYSTEMS AND DESIGN - IWRE 317 questions collection 1997 - 2018 ...
IRRIGATION SYSTEMS AND DESIGN - IWRE 317 questions collection 1997 - 2018    ...IRRIGATION SYSTEMS AND DESIGN - IWRE 317 questions collection 1997 - 2018    ...
IRRIGATION SYSTEMS AND DESIGN - IWRE 317 questions collection 1997 - 2018 ...
 
Water harvesting
Water harvestingWater harvesting
Water harvesting
 
sprinkler irrigation system
sprinkler irrigation systemsprinkler irrigation system
sprinkler irrigation system
 
A04320105
A04320105A04320105
A04320105
 
1 Sprinkler Irrigation System: components, types of system &amp; layout
1 Sprinkler Irrigation System: components, types of system &amp; layout1 Sprinkler Irrigation System: components, types of system &amp; layout
1 Sprinkler Irrigation System: components, types of system &amp; layout
 
Water harvesting: Past and Future
Water harvesting: Past and FutureWater harvesting: Past and Future
Water harvesting: Past and Future
 
Multi slot divisor
Multi slot divisorMulti slot divisor
Multi slot divisor
 
Rain water harvesting (complete)
Rain water harvesting (complete)Rain water harvesting (complete)
Rain water harvesting (complete)
 
A case study on water storage tank design, constrution, operation and assessm...
A case study on water storage tank design, constrution, operation and assessm...A case study on water storage tank design, constrution, operation and assessm...
A case study on water storage tank design, constrution, operation and assessm...
 
Rainwater Harvesting Answer Book
Rainwater Harvesting Answer BookRainwater Harvesting Answer Book
Rainwater Harvesting Answer Book
 
Water requirement of crops and reservoir planing
Water requirement of crops and reservoir planingWater requirement of crops and reservoir planing
Water requirement of crops and reservoir planing
 
Methods of irrigation
Methods of irrigationMethods of irrigation
Methods of irrigation
 
Watering system
Watering systemWatering system
Watering system
 

Similar a North Carolina - Backyard Rain Garden Design

WA: Pierce County: Small Rain Garden Technical Guide
WA: Pierce County: Small Rain Garden Technical GuideWA: Pierce County: Small Rain Garden Technical Guide
WA: Pierce County: Small Rain Garden Technical GuideSotirakou964
 
MECHANICAL MEASURES OF SOIL CONSERVATION.pptx
MECHANICAL MEASURES OF SOIL CONSERVATION.pptxMECHANICAL MEASURES OF SOIL CONSERVATION.pptx
MECHANICAL MEASURES OF SOIL CONSERVATION.pptxAkshay Duddumpudi
 
Stormwater Planters
Stormwater PlantersStormwater Planters
Stormwater PlantersSotirakou964
 
Terraces:Soil Water Conservation structure
Terraces:Soil Water Conservation structureTerraces:Soil Water Conservation structure
Terraces:Soil Water Conservation structureMoudud Hasan
 
Corsica River Watershed, Maryland: Rain Gardens Homeowners Guide
Corsica River Watershed, Maryland: Rain Gardens Homeowners GuideCorsica River Watershed, Maryland: Rain Gardens Homeowners Guide
Corsica River Watershed, Maryland: Rain Gardens Homeowners GuideSotirakou964
 
PRACTICAL AND DESIGN ASPECTS OF TERRACING (2)-4.pptx
PRACTICAL AND DESIGN ASPECTS OF TERRACING (2)-4.pptxPRACTICAL AND DESIGN ASPECTS OF TERRACING (2)-4.pptx
PRACTICAL AND DESIGN ASPECTS OF TERRACING (2)-4.pptxsiddhantshukla53
 
Bs finallll (1)
Bs finallll (1)Bs finallll (1)
Bs finallll (1)Lam Yu
 
Virginia Constructed Wetlands Design Spec
Virginia Constructed Wetlands Design SpecVirginia Constructed Wetlands Design Spec
Virginia Constructed Wetlands Design SpecFu Michael Justin
 
Sustainable School Projects: Rain Garden
Sustainable School Projects: Rain GardenSustainable School Projects: Rain Garden
Sustainable School Projects: Rain GardenSotirakou964
 
Stormwater Guidebook_Permeable Pavement Systems.pdf
Stormwater Guidebook_Permeable Pavement Systems.pdfStormwater Guidebook_Permeable Pavement Systems.pdf
Stormwater Guidebook_Permeable Pavement Systems.pdfShielaSorino1
 
Rutgers Cook College: Rain Gardens Fact Sheet
Rutgers Cook College: Rain Gardens Fact SheetRutgers Cook College: Rain Gardens Fact Sheet
Rutgers Cook College: Rain Gardens Fact SheetSotirakou964
 

Similar a North Carolina - Backyard Rain Garden Design (20)

New York: Alternative Stormwater Management Practice - Rain Gardens
New York: Alternative Stormwater Management Practice - Rain GardensNew York: Alternative Stormwater Management Practice - Rain Gardens
New York: Alternative Stormwater Management Practice - Rain Gardens
 
North Carolina, Asheville - Rain Gardens
North Carolina, Asheville - Rain Gardens North Carolina, Asheville - Rain Gardens
North Carolina, Asheville - Rain Gardens
 
WA: Pierce County: Small Rain Garden Technical Guide
WA: Pierce County: Small Rain Garden Technical GuideWA: Pierce County: Small Rain Garden Technical Guide
WA: Pierce County: Small Rain Garden Technical Guide
 
Stormwater and Your Rain Garden
Stormwater and Your Rain GardenStormwater and Your Rain Garden
Stormwater and Your Rain Garden
 
MECHANICAL MEASURES OF SOIL CONSERVATION.pptx
MECHANICAL MEASURES OF SOIL CONSERVATION.pptxMECHANICAL MEASURES OF SOIL CONSERVATION.pptx
MECHANICAL MEASURES OF SOIL CONSERVATION.pptx
 
Stormwater Planters
Stormwater PlantersStormwater Planters
Stormwater Planters
 
Ohio Rain Gardens: A How to Guide
Ohio Rain Gardens: A How to GuideOhio Rain Gardens: A How to Guide
Ohio Rain Gardens: A How to Guide
 
Mill Creek Watershed, Ohio - Rain Gardens: A How to Guide
Mill Creek Watershed, Ohio - Rain Gardens: A How to GuideMill Creek Watershed, Ohio - Rain Gardens: A How to Guide
Mill Creek Watershed, Ohio - Rain Gardens: A How to Guide
 
Terraces:Soil Water Conservation structure
Terraces:Soil Water Conservation structureTerraces:Soil Water Conservation structure
Terraces:Soil Water Conservation structure
 
Corsica River Watershed, Maryland: Rain Gardens Homeowners Guide
Corsica River Watershed, Maryland: Rain Gardens Homeowners GuideCorsica River Watershed, Maryland: Rain Gardens Homeowners Guide
Corsica River Watershed, Maryland: Rain Gardens Homeowners Guide
 
Sustainable School Projects: Rain Garden
Sustainable School Projects: Rain GardenSustainable School Projects: Rain Garden
Sustainable School Projects: Rain Garden
 
PRACTICAL AND DESIGN ASPECTS OF TERRACING (2)-4.pptx
PRACTICAL AND DESIGN ASPECTS OF TERRACING (2)-4.pptxPRACTICAL AND DESIGN ASPECTS OF TERRACING (2)-4.pptx
PRACTICAL AND DESIGN ASPECTS OF TERRACING (2)-4.pptx
 
Bs finallll (1)
Bs finallll (1)Bs finallll (1)
Bs finallll (1)
 
Virginia Constructed Wetlands Design Spec
Virginia Constructed Wetlands Design SpecVirginia Constructed Wetlands Design Spec
Virginia Constructed Wetlands Design Spec
 
Sustainable School Projects: Rain Garden
Sustainable School Projects: Rain GardenSustainable School Projects: Rain Garden
Sustainable School Projects: Rain Garden
 
Stormwater Guidebook_Permeable Pavement Systems.pdf
Stormwater Guidebook_Permeable Pavement Systems.pdfStormwater Guidebook_Permeable Pavement Systems.pdf
Stormwater Guidebook_Permeable Pavement Systems.pdf
 
Vermont Rain Garden Manual - Gardening to Absorb the Storm
Vermont Rain Garden Manual - Gardening to Absorb the StormVermont Rain Garden Manual - Gardening to Absorb the Storm
Vermont Rain Garden Manual - Gardening to Absorb the Storm
 
South Carolina Rain Garden Manual
South Carolina Rain Garden ManualSouth Carolina Rain Garden Manual
South Carolina Rain Garden Manual
 
Rutgers Cook College: Rain Gardens Fact Sheet
Rutgers Cook College: Rain Gardens Fact SheetRutgers Cook College: Rain Gardens Fact Sheet
Rutgers Cook College: Rain Gardens Fact Sheet
 
UNIT.2.pptx
UNIT.2.pptxUNIT.2.pptx
UNIT.2.pptx
 

Más de School Vegetable Gardening - Victory Gardens

Más de School Vegetable Gardening - Victory Gardens (20)

Behind Enemy Lines - Marthe Cohn - One Woman against Nazi Germany
Behind Enemy Lines - Marthe Cohn - One Woman against Nazi GermanyBehind Enemy Lines - Marthe Cohn - One Woman against Nazi Germany
Behind Enemy Lines - Marthe Cohn - One Woman against Nazi Germany
 
Classical Art School Gardening Posters
Classical Art School Gardening PostersClassical Art School Gardening Posters
Classical Art School Gardening Posters
 
One Teacher Saves her School & her Students
One Teacher Saves her School & her StudentsOne Teacher Saves her School & her Students
One Teacher Saves her School & her Students
 
Coconut Oil helps Heal Children's ADHD - ADD Disease, Autism & Alzheimer Disease
Coconut Oil helps Heal Children's ADHD - ADD Disease, Autism & Alzheimer DiseaseCoconut Oil helps Heal Children's ADHD - ADD Disease, Autism & Alzheimer Disease
Coconut Oil helps Heal Children's ADHD - ADD Disease, Autism & Alzheimer Disease
 
One Teacher Makes Students into Champions
One Teacher Makes Students into ChampionsOne Teacher Makes Students into Champions
One Teacher Makes Students into Champions
 
Good Books help Students Excel in Life & School
Good Books help Students Excel in Life & SchoolGood Books help Students Excel in Life & School
Good Books help Students Excel in Life & School
 
Greening & Restoring the Sahara Desert with the Groasis Waterboxx
Greening & Restoring the Sahara Desert with the Groasis WaterboxxGreening & Restoring the Sahara Desert with the Groasis Waterboxx
Greening & Restoring the Sahara Desert with the Groasis Waterboxx
 
Groasis Waterboxx Lets Trees Grow Up in Unfriendly Places
Groasis Waterboxx Lets Trees Grow Up in Unfriendly PlacesGroasis Waterboxx Lets Trees Grow Up in Unfriendly Places
Groasis Waterboxx Lets Trees Grow Up in Unfriendly Places
 
Explanation of the Groasis Technology for Growing Food in Desert Regions
Explanation of the Groasis Technology for Growing Food in Desert RegionsExplanation of the Groasis Technology for Growing Food in Desert Regions
Explanation of the Groasis Technology for Growing Food in Desert Regions
 
Groasis Waterboxx & the Agua, Vida Naturaleza Project for Growing Food in Des...
Groasis Waterboxx & the Agua, Vida Naturaleza Project for Growing Food in Des...Groasis Waterboxx & the Agua, Vida Naturaleza Project for Growing Food in Des...
Groasis Waterboxx & the Agua, Vida Naturaleza Project for Growing Food in Des...
 
Groasis Waterboxx Handbook on Planting Instructions for Trees & Crops in Dese...
Groasis Waterboxx Handbook on Planting Instructions for Trees & Crops in Dese...Groasis Waterboxx Handbook on Planting Instructions for Trees & Crops in Dese...
Groasis Waterboxx Handbook on Planting Instructions for Trees & Crops in Dese...
 
Groasis Waterboxx Manual for Growing Vegetables in Arid Lands
Groasis Waterboxx Manual for Growing Vegetables in Arid LandsGroasis Waterboxx Manual for Growing Vegetables in Arid Lands
Groasis Waterboxx Manual for Growing Vegetables in Arid Lands
 
Water Saving Measures of Using the Groasis Waterboxx in Organic Gardening in ...
Water Saving Measures of Using the Groasis Waterboxx in Organic Gardening in ...Water Saving Measures of Using the Groasis Waterboxx in Organic Gardening in ...
Water Saving Measures of Using the Groasis Waterboxx in Organic Gardening in ...
 
Making a Week’s Worth of Rain Last the Whole Year
Making a Week’s Worth of Rain Last the Whole YearMaking a Week’s Worth of Rain Last the Whole Year
Making a Week’s Worth of Rain Last the Whole Year
 
Using the Groasis Waterboxx to Plant New Trees in Desert Regions
Using the Groasis Waterboxx to Plant New Trees in Desert RegionsUsing the Groasis Waterboxx to Plant New Trees in Desert Regions
Using the Groasis Waterboxx to Plant New Trees in Desert Regions
 
Greening the World - Desert Restoration, Reduce CO2, Feed the People & Create...
Greening the World - Desert Restoration, Reduce CO2, Feed the People & Create...Greening the World - Desert Restoration, Reduce CO2, Feed the People & Create...
Greening the World - Desert Restoration, Reduce CO2, Feed the People & Create...
 
Groasis Technology Compared to Drip Irrigation
Groasis Technology Compared to Drip IrrigationGroasis Technology Compared to Drip Irrigation
Groasis Technology Compared to Drip Irrigation
 
Groasis Waterboxx - Palm Springs Students Test New Planter Designed to Fight ...
Groasis Waterboxx - Palm Springs Students Test New Planter Designed to Fight ...Groasis Waterboxx - Palm Springs Students Test New Planter Designed to Fight ...
Groasis Waterboxx - Palm Springs Students Test New Planter Designed to Fight ...
 
Groasis Waterboxx Handbook for Planting Methods & Sample of Crop Test Results...
Groasis Waterboxx Handbook for Planting Methods & Sample of Crop Test Results...Groasis Waterboxx Handbook for Planting Methods & Sample of Crop Test Results...
Groasis Waterboxx Handbook for Planting Methods & Sample of Crop Test Results...
 
Groasis Waterboxx Technology Offers Possible Cure for the Deserts
Groasis Waterboxx Technology Offers Possible Cure for the DesertsGroasis Waterboxx Technology Offers Possible Cure for the Deserts
Groasis Waterboxx Technology Offers Possible Cure for the Deserts
 

Último

Transaction Management in Database Management System
Transaction Management in Database Management SystemTransaction Management in Database Management System
Transaction Management in Database Management SystemChristalin Nelson
 
Active Learning Strategies (in short ALS).pdf
Active Learning Strategies (in short ALS).pdfActive Learning Strategies (in short ALS).pdf
Active Learning Strategies (in short ALS).pdfPatidar M
 
Student Profile Sample - We help schools to connect the data they have, with ...
Student Profile Sample - We help schools to connect the data they have, with ...Student Profile Sample - We help schools to connect the data they have, with ...
Student Profile Sample - We help schools to connect the data they have, with ...Seán Kennedy
 
ENG 5 Q4 WEEk 1 DAY 1 Restate sentences heard in one’s own words. Use appropr...
ENG 5 Q4 WEEk 1 DAY 1 Restate sentences heard in one’s own words. Use appropr...ENG 5 Q4 WEEk 1 DAY 1 Restate sentences heard in one’s own words. Use appropr...
ENG 5 Q4 WEEk 1 DAY 1 Restate sentences heard in one’s own words. Use appropr...JojoEDelaCruz
 
Visit to a blind student's school🧑‍🦯🧑‍🦯(community medicine)
Visit to a blind student's school🧑‍🦯🧑‍🦯(community medicine)Visit to a blind student's school🧑‍🦯🧑‍🦯(community medicine)
Visit to a blind student's school🧑‍🦯🧑‍🦯(community medicine)lakshayb543
 
USPS® Forced Meter Migration - How to Know if Your Postage Meter Will Soon be...
USPS® Forced Meter Migration - How to Know if Your Postage Meter Will Soon be...USPS® Forced Meter Migration - How to Know if Your Postage Meter Will Soon be...
USPS® Forced Meter Migration - How to Know if Your Postage Meter Will Soon be...Postal Advocate Inc.
 
Integumentary System SMP B. Pharm Sem I.ppt
Integumentary System SMP B. Pharm Sem I.pptIntegumentary System SMP B. Pharm Sem I.ppt
Integumentary System SMP B. Pharm Sem I.pptshraddhaparab530
 
ClimART Action | eTwinning Project
ClimART Action    |    eTwinning ProjectClimART Action    |    eTwinning Project
ClimART Action | eTwinning Projectjordimapav
 
TEACHER REFLECTION FORM (NEW SET........).docx
TEACHER REFLECTION FORM (NEW SET........).docxTEACHER REFLECTION FORM (NEW SET........).docx
TEACHER REFLECTION FORM (NEW SET........).docxruthvilladarez
 
Millenials and Fillennials (Ethical Challenge and Responses).pptx
Millenials and Fillennials (Ethical Challenge and Responses).pptxMillenials and Fillennials (Ethical Challenge and Responses).pptx
Millenials and Fillennials (Ethical Challenge and Responses).pptxJanEmmanBrigoli
 
Inclusivity Essentials_ Creating Accessible Websites for Nonprofits .pdf
Inclusivity Essentials_ Creating Accessible Websites for Nonprofits .pdfInclusivity Essentials_ Creating Accessible Websites for Nonprofits .pdf
Inclusivity Essentials_ Creating Accessible Websites for Nonprofits .pdfTechSoup
 
Presentation Activity 2. Unit 3 transv.pptx
Presentation Activity 2. Unit 3 transv.pptxPresentation Activity 2. Unit 3 transv.pptx
Presentation Activity 2. Unit 3 transv.pptxRosabel UA
 
GRADE 4 - SUMMATIVE TEST QUARTER 4 ALL SUBJECTS
GRADE 4 - SUMMATIVE TEST QUARTER 4 ALL SUBJECTSGRADE 4 - SUMMATIVE TEST QUARTER 4 ALL SUBJECTS
GRADE 4 - SUMMATIVE TEST QUARTER 4 ALL SUBJECTSJoshuaGantuangco2
 
Daily Lesson Plan in Mathematics Quarter 4
Daily Lesson Plan in Mathematics Quarter 4Daily Lesson Plan in Mathematics Quarter 4
Daily Lesson Plan in Mathematics Quarter 4JOYLYNSAMANIEGO
 
How to do quick user assign in kanban in Odoo 17 ERP
How to do quick user assign in kanban in Odoo 17 ERPHow to do quick user assign in kanban in Odoo 17 ERP
How to do quick user assign in kanban in Odoo 17 ERPCeline George
 
Dust Of Snow By Robert Frost Class-X English CBSE
Dust Of Snow By Robert Frost Class-X English CBSEDust Of Snow By Robert Frost Class-X English CBSE
Dust Of Snow By Robert Frost Class-X English CBSEaurabinda banchhor
 
ANG SEKTOR NG agrikultura.pptx QUARTER 4
ANG SEKTOR NG agrikultura.pptx QUARTER 4ANG SEKTOR NG agrikultura.pptx QUARTER 4
ANG SEKTOR NG agrikultura.pptx QUARTER 4MiaBumagat1
 
Incoming and Outgoing Shipments in 3 STEPS Using Odoo 17
Incoming and Outgoing Shipments in 3 STEPS Using Odoo 17Incoming and Outgoing Shipments in 3 STEPS Using Odoo 17
Incoming and Outgoing Shipments in 3 STEPS Using Odoo 17Celine George
 
Field Attribute Index Feature in Odoo 17
Field Attribute Index Feature in Odoo 17Field Attribute Index Feature in Odoo 17
Field Attribute Index Feature in Odoo 17Celine George
 

Último (20)

FINALS_OF_LEFT_ON_C'N_EL_DORADO_2024.pptx
FINALS_OF_LEFT_ON_C'N_EL_DORADO_2024.pptxFINALS_OF_LEFT_ON_C'N_EL_DORADO_2024.pptx
FINALS_OF_LEFT_ON_C'N_EL_DORADO_2024.pptx
 
Transaction Management in Database Management System
Transaction Management in Database Management SystemTransaction Management in Database Management System
Transaction Management in Database Management System
 
Active Learning Strategies (in short ALS).pdf
Active Learning Strategies (in short ALS).pdfActive Learning Strategies (in short ALS).pdf
Active Learning Strategies (in short ALS).pdf
 
Student Profile Sample - We help schools to connect the data they have, with ...
Student Profile Sample - We help schools to connect the data they have, with ...Student Profile Sample - We help schools to connect the data they have, with ...
Student Profile Sample - We help schools to connect the data they have, with ...
 
ENG 5 Q4 WEEk 1 DAY 1 Restate sentences heard in one’s own words. Use appropr...
ENG 5 Q4 WEEk 1 DAY 1 Restate sentences heard in one’s own words. Use appropr...ENG 5 Q4 WEEk 1 DAY 1 Restate sentences heard in one’s own words. Use appropr...
ENG 5 Q4 WEEk 1 DAY 1 Restate sentences heard in one’s own words. Use appropr...
 
Visit to a blind student's school🧑‍🦯🧑‍🦯(community medicine)
Visit to a blind student's school🧑‍🦯🧑‍🦯(community medicine)Visit to a blind student's school🧑‍🦯🧑‍🦯(community medicine)
Visit to a blind student's school🧑‍🦯🧑‍🦯(community medicine)
 
USPS® Forced Meter Migration - How to Know if Your Postage Meter Will Soon be...
USPS® Forced Meter Migration - How to Know if Your Postage Meter Will Soon be...USPS® Forced Meter Migration - How to Know if Your Postage Meter Will Soon be...
USPS® Forced Meter Migration - How to Know if Your Postage Meter Will Soon be...
 
Integumentary System SMP B. Pharm Sem I.ppt
Integumentary System SMP B. Pharm Sem I.pptIntegumentary System SMP B. Pharm Sem I.ppt
Integumentary System SMP B. Pharm Sem I.ppt
 
ClimART Action | eTwinning Project
ClimART Action    |    eTwinning ProjectClimART Action    |    eTwinning Project
ClimART Action | eTwinning Project
 
TEACHER REFLECTION FORM (NEW SET........).docx
TEACHER REFLECTION FORM (NEW SET........).docxTEACHER REFLECTION FORM (NEW SET........).docx
TEACHER REFLECTION FORM (NEW SET........).docx
 
Millenials and Fillennials (Ethical Challenge and Responses).pptx
Millenials and Fillennials (Ethical Challenge and Responses).pptxMillenials and Fillennials (Ethical Challenge and Responses).pptx
Millenials and Fillennials (Ethical Challenge and Responses).pptx
 
Inclusivity Essentials_ Creating Accessible Websites for Nonprofits .pdf
Inclusivity Essentials_ Creating Accessible Websites for Nonprofits .pdfInclusivity Essentials_ Creating Accessible Websites for Nonprofits .pdf
Inclusivity Essentials_ Creating Accessible Websites for Nonprofits .pdf
 
Presentation Activity 2. Unit 3 transv.pptx
Presentation Activity 2. Unit 3 transv.pptxPresentation Activity 2. Unit 3 transv.pptx
Presentation Activity 2. Unit 3 transv.pptx
 
GRADE 4 - SUMMATIVE TEST QUARTER 4 ALL SUBJECTS
GRADE 4 - SUMMATIVE TEST QUARTER 4 ALL SUBJECTSGRADE 4 - SUMMATIVE TEST QUARTER 4 ALL SUBJECTS
GRADE 4 - SUMMATIVE TEST QUARTER 4 ALL SUBJECTS
 
Daily Lesson Plan in Mathematics Quarter 4
Daily Lesson Plan in Mathematics Quarter 4Daily Lesson Plan in Mathematics Quarter 4
Daily Lesson Plan in Mathematics Quarter 4
 
How to do quick user assign in kanban in Odoo 17 ERP
How to do quick user assign in kanban in Odoo 17 ERPHow to do quick user assign in kanban in Odoo 17 ERP
How to do quick user assign in kanban in Odoo 17 ERP
 
Dust Of Snow By Robert Frost Class-X English CBSE
Dust Of Snow By Robert Frost Class-X English CBSEDust Of Snow By Robert Frost Class-X English CBSE
Dust Of Snow By Robert Frost Class-X English CBSE
 
ANG SEKTOR NG agrikultura.pptx QUARTER 4
ANG SEKTOR NG agrikultura.pptx QUARTER 4ANG SEKTOR NG agrikultura.pptx QUARTER 4
ANG SEKTOR NG agrikultura.pptx QUARTER 4
 
Incoming and Outgoing Shipments in 3 STEPS Using Odoo 17
Incoming and Outgoing Shipments in 3 STEPS Using Odoo 17Incoming and Outgoing Shipments in 3 STEPS Using Odoo 17
Incoming and Outgoing Shipments in 3 STEPS Using Odoo 17
 
Field Attribute Index Feature in Odoo 17
Field Attribute Index Feature in Odoo 17Field Attribute Index Feature in Odoo 17
Field Attribute Index Feature in Odoo 17
 

North Carolina - Backyard Rain Garden Design

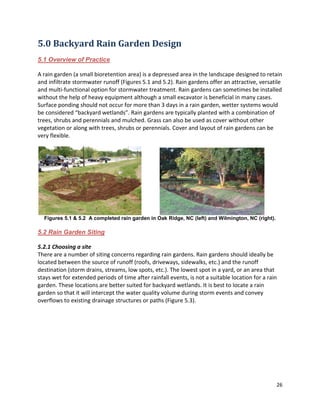
  • 1. 26 5.0 Backyard Rain Garden Design 5.1 Overview of Practice A rain garden (a small bioretention area) is a depressed area in the landscape designed to retain and infiltrate stormwater runoff (Figures 5.1 and 5.2). Rain gardens offer an attractive, versatile and multi-functional option for stormwater treatment. Rain gardens can sometimes be installed without the help of heavy equipment although a small excavator is beneficial in many cases. Surface ponding should not occur for more than 3 days in a rain garden, wetter systems would be considered “backyard wetlands”. Rain gardens are typically planted with a combination of trees, shrubs and perennials and mulched. Grass can also be used as cover without other vegetation or along with trees, shrubs or perennials. Cover and layout of rain gardens can be very flexible. Figures 5.1 & 5.2 A completed rain garden in Oak Ridge, NC (left) and Wilmington, NC (right). 5.2 Rain Garden Siting 5.2.1 Choosing a site There are a number of siting concerns regarding rain gardens. Rain gardens should ideally be located between the source of runoff (roofs, driveways, sidewalks, etc.) and the runoff destination (storm drains, streams, low spots, etc.). The lowest spot in a yard, or an area that stays wet for extended periods of time after rainfall events, is not a suitable location for a rain garden. These locations are better suited for backyard wetlands. It is best to locate a rain garden so that it will intercept the water quality volume during storm events and convey overflows to existing drainage structures or paths (Figure 5.3).
  • 2. 27 Figure 5.3 Locate rain gardens between the runoff source and its destination (an existing storm drain). To avoid damage to buildings and building foundations, rain gardens should be located at least 10 feet away from structures. For buildings with a basement or crawl space, rain gardens should only be located lateral to or downslope of the building. If a building is built on a slab foundation (no basement and no crawl space), the rain garden may be located uphill, but should still be at least 10 feet away. Additionally, the rain garden should be located lateral to or downslope of septic system drain fields and well heads with a minimum 25 feet of separation. Rain gardens should be sited to avoid conflicts with utilities, which should be located and marked prior to construction. Finally, for the best plant growth, the rain garden should be located in an area that receives partial to full sun exposure. 5.2.2 Rain Garden Soils Soils with moderate to good permeability must be present in order for a rain garden to function properly. At each location that meets the siting requirements above, dig a 1-foot deep hole. Fill these holes with water, let them drain, and then fill them again. Record the drainage time for each test hole. If the hole drains in less than 12 hours, the site is suitable for a quick-draining rain garden. If the drainage time is between 12 hours and 3 days, the site is suitable for a standard rain garden. If the hole takes longer than 3 days to drain, the practice should be designed as a backyard wetland (Chapter 6). See the table below.
  • 3. 28 Infiltration Test: The Results Drain Time Appropriate BMP < 12 hours Quick-Draining Rain Garden 12 hours – 3 days Standard Rain Garden > 3 days Backyard Wetland Please note: These are backyard rain gardens and backyard wetlands. Larger bioretention areas and stormwater wetlands require design and approval by a Professional Engineer (PE). If the area of impervious surface draining to the BMP exceeds 2500 square feet, the engineered practice is required, along with design approval by a PE. For sites located in a floodplain, a low-lying area, or east of Interstate 95, an additional test is highly encouraged to determine the height of the water table and check for the presence of wetland soils. Wetland soils and/or a high water table will limit drainage from the system between rain events. A visual analysis of the subsurface soil is sufficient when checking for a high water table. Dig a hole 2 feet in depth. Soils with a grey matrix with brown or orange mottles (areas of color) are indicative of areas where the soil is in contact with the water table for extended periods of time. As the soil is removed from the hole, it should be observed for these signs of saturation. The seasonal high water table is located at the depth where mottled soils are first encountered. If groundwater is encountered as the hole is being dug, the site very likely has a high water table (Section 4.4.4). Seasonally high water tables are described in greater detail in Richardson and Vepraskas (2001). Districts may also contact division technical services staff to assist with soil analysis, if needed. If water or indications of saturated soils are encountered in the 2 foot hole, the site is not suitable for a rain garden. A backyard wetland (Chapter 6) should be considered or another location should be selected. The soil extracted from the 2-foot hole may be submitted to the NC Department of Agriculture and Consumer Services Soils Laboratory to determine if lime is necessary for proper plant growth. The soils test report should indicate the amount of lime needed (for more information on soils testing visit http://ncagr.gov/agronomi/sthome.htm). Fertilizer should only be applied to rain gardens during initial plant establishment, if it is needed at all based on the soils test.
  • 4. 29 5.3 Rain Garden Sizing 5.3.1 Determine watershed and impervious area draining to BMP After a suitable location is chosen for the rain garden, the next step is determining the watershed area that drains to the proposed rain garden site. The contributing watershed should contain impervious areas such as driveways, sidewalks and/or rooftops. The best way to determine drainage patterns is to visit the site during a storm event. A visual analysis of the site during dry weather may also be used to identify landscape features that affect the flow of water (swales, hills, raised flower beds, curbs, etc.). Detailed topographic surveys are another method of revealing the direction of flow on the site. Using USGS topographic maps or online GIS mapping program contours should only be a preliminary method of determining drainage patterns, as they are not detailed enough at the site scale. Rooftops are drained via gutters which may not drain to the proposed location. In this case, a pipe can be used to route water to the proposed location. The pipe should be sized to equal or exceed the cross-sectional area of the existing downspout. For example, if an existing downspout is 3” x 4”, it has a total cross-sectional area of 12 in2. A 4-inch pipe has a cross- sectional area of 12.5in2, so it exceeds the area of the downspout and may be used to route the downspout to the rain garden. Use extreme caution when combining downspouts; again, make sure the cross-sectional area of the pipe is at least the total area of the contributing downspouts. A rule of thumb for sizing downspouts is that there should be 1 inch of downspout per 100 square feet of roof. Downspouts that are undersized for the roof area will result in the roof runoff overflowing the gutter, reducing the expected volume of harvested water. After any modifications are considered (such as routing rooftop drainage to the proposed area), calculate the watershed area and impervious area draining to the proposed location. Field measurements taken with a tape measure will suffice for determining the area draining to the BMP. GIS mapping programs can also be used to measure the area of the contributing watershed and the total impervious area. Once these two areas are determined, calculate the percent impervious. Percent impervious = (Impervious area / Total watershed area) X 100 5.3.2 Sizing the Rain Garden Rain gardens should be sized to capture the first flush event. The runoff capture depth is the amount of rainfall that you want the rain garden to treat; usally 1 inch in North Carolina. Once the percent impervious has been calculated, the Simple Method (Section 3.3) can be used to determine the volume of water that will enter the BMP during the first flush event. The surface area required for the rain garden is the runoff volume divided by the ponding depth, which is the depth water will pond within the rain garden before overflowing. A depth of 6” is recommended, but may vary between 3” and 9”. A depth greater than 9” is not recommended, as this risks becoming a safety hazard and decreases plant survival.
  • 5. 30 The depth of ponding in the rain garden can be selected based upon topography, available area and home owner preference. Shallow rain gardens (a smaller ponding depth) take up more surface area than deeper systems (a larger ponding depth). Keep in mind that the ponding depth of the BMP will affect the type of plants that can thrive, so if there is a particular preference of the plants to be used, the ponding depth should be selected accordingly. 5.3.3 Rain garden construction Determine where utility lines are located BEFORE starting to dig. Although the N.C. one-call should have been called and utility lines located before the rain garden site was selected, this step should be repeated prior to digging. Talking with the landowner may also be helpful to identify utilities that are not marked by 811 (such as gas lines running to a grill, outdoor lighting that was installed by the homeowner, etc.). Once it has been determined that the selected site is clear of utilities, mark the outline of the rain garden with paint, flags or rope (Figure 5.4). Consult with the landowner/homeowner when laying out the rain garden to ensure they are content with the location. The shape of the rain garden may vary greatly, so long as the area is equal or greater than the required size determined in Section 5.3.2. Figure 5.4 Laying out the boundary of a rain garden with paint and flags. A typical lawn has three soil layers: sod, topsoil and sub-soil. If sod is present on the site, remove this by skimming a shovel just below the root mat of the sod. Place the sod aside – it can be used for the berm or weir. Next, remove any and all topsoil and stockpile for later use. Finally, the ponding area of the rain garden can be excavated. Digging may be done by hand or with heavy equipment (backhoe, etc.). The depth of excavation (after the removal of sod and topsoil) should be the chosen ponding depth (discussed in Section 5.3.3), plus as additional 3”
  • 6. 31 to account for mulch. For example, excavation for a rain garden with a 6” ponding depth would be a total of 9” (6” for ponding depth, 3” for mulch). After excavating to the appropriate depth, use a tiller, backhoe bucket teeth or other implement to break up the underlying 4”-6” of soil. Mix in the topsoil that was removed from the area prior to excavation. This increases infiltration and helps plants survive. If the results from the soils test performed (discussed in Section 5.3.1) indicate that lime is needed to raise the soil pH, lime should be mixed in at this time also. 5.3.4 Berm construction The excess soil from excavation can be used to create a berm around the downslope side of the rain garden. A berm is an earthen dam used to hold water inside the garden. A berm can help reduce the amount of excavation necessary and can also help tie a rain garden into a sloped surface. When constructing the berm, place soil in 4”-6” lifts and compact tightly. It is strongly recommended that the berm be planted with sod to assure proper stabilization. Seeding and mulching the berm may be appropriate and more cost effective, but care should be taken to assure that proper ground cover is established due to potential difficulties with establishing vegetation on fill material. The berm should have a top width of 2-3 feet. The slide slope should preferably be 3:1 or a maximum slope of 2:1. The height of the berm should be 3-6 inches above the height of the water when the weir is flowing at its design depth. Figure 5.5 Examples of a berm and a weir in a backyard stormwater practice. 5.3.5 Inlet protection and pretreatment Water entering the rain garden needs to be slowed down prior to entering the ponding area to limit erosion of mulch and soil. Also, sediment carried by the stormwater will settle out when the water velocity decreases. There are several types of pretreatment: • Direct flow into the garden as sheet flow over a vegetated surface, such as a lawn (Figure 5.6). This spreads the stormwater out, creating sheet flow, thereby avoiding Berm Berm Weir
  • 7. 32 concentrated flow and erosive velocities. It is important the vegetated area over which water is flowing is flat, as this is the only way to ensure sheet flow. To determine if an area is level, insert two stakes in the ground, one on each side of the area. Tie a string line between the stakes and attach a bubble level (sold at the hardware store) to the string line. Keeping the string taught, adjust the stakes until the string line is level. The ground may then be graded (either cut or filled) to meet the elevation of the string. • Water can be introduced into the rain garden via a vegetated swale, which aids in slowing water down, allows infiltration to occur, and settling of sediment. See Section 8.0 for more information on designing swales. • Measures may be required where flow entering the rain garden may cause scour and erosion. If this is necessary, these components would require approval by a PE • A small forebay will allow stormwater to pool, settle out sediment, and dissipate energy before flow enters the main body of the rain garden (See Figure 5.7). These features should be used particularly in larger watersheds. The forebay may be either lined with rip-rap or sodded. During construction of the forebay, the berm that separates the forebay and the rain garden should be installed in 4”-6” lifts, with each lift well compacted. If using sod to vegetate the berm, the sod set aside during construction of the rain garden can be placed on the berm and staked down. If using seed, scarify the surface of the berm, sow the seed and cover with erosion control matting. Rip-rap berms are not recommended. • A gravel verge is frequently used when space is limited or when stormwater enters as sheet flow from an impervious surface directly adjacent to the garden, such as from a driveway. Figure 5.8 shows a gravel verge and vegetated filter strip combination on the slope of a rain garden. The gravel verge consists of washed #57 stone placed over geotextile fabric. The grass filter strip is typically immediately downslope of the gravel verge; both should be at least 1 foot wide. Figure 5.6 Stormwater flowing across flat, grassed slope before entering a rain garden.
  • 8. 33 Figure 5.7 Rain garden in Wilmington, NC with a small forebay. Figure 5.8 Examples of a gravel verge and vegetated filter strip receiving sheet flow from a parking lot. 5.3.6 Outlet design The outlet structure controls the ponding depth in the rain garden. It also should allow overflow to exit the rain garden in a controlled, non-erosive manner. The most common outlet used for rain gardens is a weir, a flat opening in the berm of a rain garden (Figure 5.9). To determine how long the weir should be, the Rational Method (discussed in Section 3.4) should be used to calculate the peak flow rate from the watershed. The Rational Method requires rainfall intensity for a given design storm as an input. The design storm for rain gardens in the CCAP program is the 10-year, 5 minute storm. Using the peak flow rate, the minimum weir length can be determined using Equation 3-10. Section 3.7.1 discusses weir sizing in greater detail.
  • 9. 34 Figure 5.9 An example of a wooden weir installation. Figure 5.10 Earthen weir immediately following installation. Weirs may be wooden or earthen (Figure 5.9 and 5.10). An earthen weir is constructed by creating a flat length of lower elevation in the berm of the rain garden. The width of this opening should be at least the length calculated using Equation 3-10. Care should be taken to ensure the opening is level, as any low spots will lead to erosion. Lay sod over the weir and stake it down or seed the weir and cover it with erosion control matting. Sod is the preferable vegetative material for an earthen weir. A weir may also be constructed of wood. This is a popular choice for larger rain gardens, as it is easier to construct a level weir out of wood than soil. Also, a wooden weir is stable immediately after construction, while an earthen weir needs vegetation to establish before becoming stable. To construct a wooden weir, dig a small trench, approximately 4”-5” wide and at least 2 feet longer than the minimum required weir size. Stack 4”x4” boards in the trench, caulking between them to prevent leaks. The top of the last board should be at the height of the ponding depth above the surface of the mulch. For example, in a rain garden that has a 3”
  • 10. 35 ponding depth, the boards should protrude 3” above the mulch surface, thus allowing water to pond 3” deep before overflowing. Fill soil around the boards in 4”-6” lifts and compact tightly. Appendix B describes another method of constructing a wooden weir structure that can be used for larger practices or practices receiving high flows. Typically, treated 2”x8” or treated 2”x12” will suffice. A weir notch will have to be cut into the uppermost board. Regardless of the board size, all structures should extend at least 6 inches below final grade at the base and 12 inches into the sides of the berm. The rain garden ponding zone should be designed so that no sensitive upstream areas (houses, driveways, etc.) are flooded because of the garden during any rain event. Note: The engineers are working on consistent guidance regarding the use of an earthen vs wooden weir. It appears that the maximum velocities possible from a backyard practice’s maximum drainage area would not require the need for a wooden weir. An earthen weir should be appropriate for most backyard practices. The one exception is that an earthen weir is only appropriate on natural ground where vegetation establishment is possible. A wooden structure may be required on some areas with fill material. Proposed guidance for sizing of an earthen weir include: Always use a H (height of water over top of the weir) = 0.5 ft (See Equation 3-9) The minimum size (L) of a weir should be = 2 ft Always use temporary matting to assure vegetation establishment Engineering Notes: An earthen weir should be appropriate for most backyard raingardens. The height of water over the top of the weir (H, in Equation 3.9) = 0.5 ft. The minimum length of the weir (L in Equation 3.9) should be a minimum of 2 feet See the CCAP Rain Garden Checklist and Rain Garden Design Worksheets for more information on rain garden sizing and eligibility. 5.3.7 Plant selection Rain garden plants should be selected based upon the drainage rate of the practice. When the rain garden drains in less than 12 hours, the bioretention plant list in Appendix E can be used as a guide to plant selection. When the garden drains between 12 and 24 hours, the plants in Appendix F should be used. In each case it is good to use a variety of native plants for aesthetic value and to improve the chances of plant survival. In gardens that have deeper ponding depths or have slower drainage times, it may be helpful to place water-loving plants in the ponding zone of the garden and plants that prefer drier conditions in higher areas and on the banks. When planting shrubs or trees, it is recommended that they be planted ‘high’. In other words, when the plant is placed in the hole, the top of the root ball should be 1”-2” above the surface of the ground.
  • 11. 36 Grass may be used as an alternative to other vegetation or in combination with other vegetation. Warm season grasses (e.g. Bermuda, Centipede, Zoysia) are recommended in much of the state, but cool season grasses (Fescue, Kentucky 31) can be used in cooler climates or to match existing lawn. It may be necessary to re-seed the cell in the fall. When using mulch, triple-shredded hardwood mulch is best. While all mulch floats, this type of mulch floats less than others (such as pine straw, pine bark nuggets, etc.). Mulch should be applied at a depth of 3 inches. 5.4 Rain Garden Maintenance Inlet pretreatment devices such as vegetated swales, gravel verges, and forebays should be inspected regularly to ensure they are stable and functioning properly. If erosion within the rain garden is evident, further steps should be taken to slow down the incoming water and dissipate the energy. This can be done by installing rip rap or creating a small forebay. The outlet structure should be checked frequently to make sure it is functioning properly. Any and all sediment accumulated within the rain garden should be removed as soon as possible to prevent clogging. Trash and debris should be removed from the garden regularly. Irrigating plants in the rain garden may be necessary during establishment and during periods of drought. Fertilizers should not be used in rain gardens, as sufficient nutrients for the plants are delivered from the watershed. Fertilizers may be used on the berm surrounding the garden to help establish vegetation. Take care not to over fertilize these areas, as excess fertilizer can wash into the garden. Weeds will need occasional removal. Pesticides are not recommended for weed control in rain gardens. Shrubs and trees need to be pruned annually. Mulch may need to be replenished 1 or 2 times per year to maintain a depth of 3 inches and to keep weeds out. The depth of mulch should never exceed 3 inches. Mulch should be completely removed and replaced every 3 years. See the CCAP Rain Garden Operation & Maintenance Plan for more information.