

Recomendados
Más contenido relacionado
La actualidad más candente
La actualidad más candente (18)
Destacado
Similar a Struts tutorial
Similar a Struts tutorial (20)
Más de OPENLANE
Más de OPENLANE (20)
Último
Último (20)
Struts tutorial
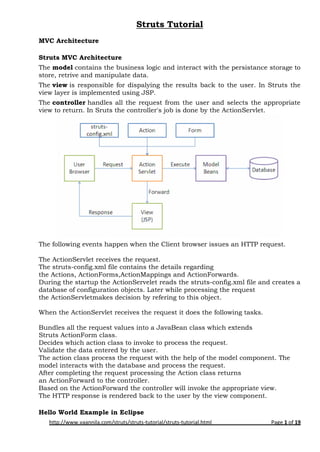
- 1. Struts Tutorial MVC Architecture Struts MVC Architecture The model contains the business logic and interact with the persistance storage to store, retrive and manipulate data. The view is responsible for dispalying the results back to the user. In Struts the view layer is implemented using JSP. The controller handles all the request from the user and selects the appropriate view to return. In Sruts the controller's job is done by the ActionServlet. The following events happen when the Client browser issues an HTTP request. The ActionServlet receives the request. The struts-config.xml file contains the details regarding the Actions, ActionForms,ActionMappings and ActionForwards. During the startup the ActionServelet reads the struts-config.xml file and creates a database of configuration objects. Later while processing the request the ActionServletmakes decision by refering to this object. When the ActionServlet receives the request it does the following tasks. Bundles all the request values into a JavaBean class which extends Struts ActionForm class. Decides which action class to invoke to process the request. Validate the data entered by the user. The action class process the request with the help of the model component. The model interacts with the database and process the request. After completing the request processing the Action class returns an ActionForward to the controller. Based on the ActionForward the controller will invoke the appropriate view. The HTTP response is rendered back to the user by the view component. Hello World Example in Eclipse http://www.vaannila.com/struts/struts-tutorial/struts-tutorial.html Page 1 of 19
- 2. Struts Tutorial In this tutorial you will learn how to create a Struts hello world application in eclipse. First create a new project, go to File->New and select DynamicWebProject. Enter the project name and click the Finish button. http://www.vaannila.com/struts/struts-tutorial/struts-tutorial.html Page 2 of 19
- 3. Add the following jar files to the WEB-INFlib directory. Right click the src folder and select New->Package. http://www.vaannila.com/struts/struts-tutorial/struts-tutorial.html Page 3 of 19
- 4. Enter the package name as com.vaannila.form and click Finish. Now right click the newly created package and select New->Class. Enter the class name as HelloWorldForm and the superclass name asorg.apache.struts.action.ActionForm and click Finish. http://www.vaannila.com/struts/struts-tutorial/struts-tutorial.html Page 4 of 19
- 5. In the HelloWorldForm class add the following code. 01.package com.vaannila.form; 02. 03.import org.apache.struts.action.ActionForm; 04. 05.public class HelloWorldForm extends ActionForm { 06. 07.private static final long serialVersionUID = -473562596852452021L; 08. 09.private String message; 10. 11.public String getMessage() { 12.return message; 13.} 14. 15.public void setMessage(String message) { 16.this.message = message; 17.} 18.} In the same way create a new package com.vaannila.action and create http://www.vaannila.com/struts/struts-tutorial/struts-tutorial.html Page 5 of 19
- 6. a HelloWorldActionclass extending org.apache.struts.action.Action. Add the following code to the action class and save it. 01.package com.vaannila.action; 02. 03.import javax.servlet.http.HttpServletRequest; 04.import javax.servlet.http.HttpServletResponse; 05. 06.import org.apache.struts.action.Action; 07.import org.apache.struts.action.ActionForm; 08.import org.apache.struts.action.ActionForward; 09.import org.apache.struts.action.ActionMapping; 10. 11.import com.vaannila.form.HelloWorldForm; 12. 13.public class HelloWorldAction extends Action { 14. 15.@Override 16.public ActionForward execute(ActionMapping mapping, ActionForm form, HttpServletRequest request, HttpServletResponse response) throwsException { 17.HelloWorldForm hwForm = (HelloWorldForm) form; 18.hwForm.setMessage("Hello World"); 19.return mapping.findForward("success"); 20.} 21.} Here we typecast the ActionForm to HelloWorldForm and set the message value. Add the following entries in the struts-config.xml file. 01.<?xml version="1.0" encoding="ISO-8859-1" ?> 02. 03.<!DOCTYPE struts-config PUBLIC 04."-//Apache Software Foundation//DTD Struts Configuration 1.3//EN" 05."http://struts.apache.org/dtds/struts-config_1_3.dtd"> 06. 07.<struts-config> 08. 09.<form-beans> 10.<form- bean name="helloWorldForm"type="com.vaannila.form.HelloWorldForm"/> 11.</form-beans> 12. 13.<global-forwards> 14.<forward name="helloWorld" path="/helloWorld.do"/> 15.</global-forwards> 16. 17.<action-mappings> 18.<action path="/helloWorld"type="com.vaannila.action.HelloWorldAction"n ame="helloWorldForm"> 19.<forward name="success" path="/helloWorld.jsp" /> 20.</action> 21.</action-mappings> 22. http://www.vaannila.com/struts/struts-tutorial/struts-tutorial.html Page 6 of 19
- 7. 23.</struts-config> Now configure the deployment descriptor. Add the following configuration information in theweb.xml file. 01.<?xml version="1.0" encoding="UTF-8"?> 02.<web-app xmlns:xsi="http://www.w3.org/2001/XMLSchema- instance"xmlns="http://java.sun.com/xml/ns/javaee"xmlns:web="http://jav a.sun.com/xml/ns/javaee/web- app_2_5.xsd"xsi:schemaLocation="http://java.sun.com/xml/ns/javaee http://java.sun.com/xml/ns/javaee/web- app_2_5.xsd" id="WebApp_ID"version="2.5"> 03.<display-name>StrutsExample1</display-name> 04. 05.<servlet> 06.<servlet-name>action</servlet-name> 07.<servlet-class>org.apache.struts.action.ActionServlet</servlet-class> 08.<init-param> 09.<param-name>config</param-name> 10.<param-value>/WEB-INF/struts-config.xml</param-value> 11.</init-param> 12.<load-on-startup>2</load-on-startup> 13.</servlet> 14. 15.<servlet-mapping> 16.<servlet-name>action</servlet-name> 17.<url-pattern>*.do</url-pattern> 18.</servlet-mapping> 19. 20.<welcome-file-list> 21.<welcome-file>index.jsp</welcome-file> 22.</welcome-file-list> 23.</web-app> When we run the application the index.jsp page will be executed first. In the index.jsp page we redirect the request to the helloWorld.do URI, which inturn invokes the HelloWorldAction. 1.<%@ taglib uri="http://struts.apache.org/tags-logic" prefix="logic" %> 2.<logic:redirect forward="helloWorld"/> In the action class we return the ActionForward "success" which is mapped to thehelloWorld.jsp page. In the helloWorld.jsp page we display the "Hello World" message. 01.<%@taglib uri="http://struts.apache.org/tags-bean" prefix="bean" %> 02.<html> 03.<head> 04.<meta http-equiv="Content-Type" content="text/html; charset=ISO-8859- 1"> 05.<title>Hello World</title> 06.</head> 07.<body> 08.<bean:write name="helloWorldForm" property="message"/> 09.</body> 10.</html> After creating all the files the directory structure of the application looks like this. http://www.vaannila.com/struts/struts-tutorial/struts-tutorial.html Page 7 of 19
- 8. On executing the application the "Hello World" message gets displayed to the user. Hello World Application Lets say a quick hello to struts. Struts follows MVC 2 pattern. The following files are needed to create a hello world application. index.jsp helloWorld.jsp web.xml struts-config.xml HelloWorldAction.java HelloWorldActionForm.java http://www.vaannila.com/struts/struts-tutorial/struts-tutorial.html Page 8 of 19
- 9. web.xml web.xml is used to configure the servlet container properties of the hello world appliation. 1.<welcome-file-list> 2.<welcome-file>index.jsp</welcome-file> 3.</welcome-file-list> The gateway for our hello world application is index.jsp file. The index.jsp file should be mentioned in web.xml as shown above. index.jsp In the hello world example the index.jsp page simply forwards the request to the hello world action. 1.<jsp:forward page="HelloWorld.do"/> struts-config.xml struts-config.xml file is used to configure the struts framework for the hello world application. This file contains the details regarding the form bean and the action mapping. 01.<struts-config> 02. http://www.vaannila.com/struts/struts-tutorial/struts-tutorial.html Page 9 of 19
- 10. 03.<form-beans> 04.<form-bean name="HelloWorldActionForm" 05.type="com.vaannila.HelloWorldActionForm"/> 06.</form-beans> 07. 08.<action-mappings> 09.<action input="/index.jsp" name="HelloWorldActionForm"path="/HelloWo rld" scope="session"type="com.vaannila.HelloWorldAction"> 10.<forward name="success" path="/helloWorld.jsp" /> 11.</action> 12.</action-mappings> 13. 14.</struts-config> HelloWorldActionForm.java HelloWorldActionForm extends org.apache.struts.action.ActionForm. HelloWorldActionForm class has one String variable message and the corresponding getter and setter methods. 01.public class HelloWorldActionForm extends 02.org.apache.struts.action.ActionForm { 03. 04.private String message; 05. 06.public HelloWorldActionForm() { 07.super(); 08.} 09. 10.public String getMessage() { 11.return message; 12.} 13. 14.public void setMessage(String message) { 15.this.message = message; 16.} 17. 18.} HelloWorldAction.java HelloWorldAction class extends org.apache.struts.action.Action. The action class contains an execute method which contains the business logic of the application. To access the HelloWorldActionForm variables in the Action we need to type caste the form object to HelloWorldActionForm. Then we can access the variables using the getter and setter methods. The execute method returns a value of type ActionForward, based on its value the corresponding view will be called. This configuration is done in struts- config.xml file. 01.public class HelloWorldAction extends org.apache.struts.action.Action { 02. 03.private final static String SUCCESS = "success"; 04. 05.public ActionForward execute(ActionMapping mapping,ActionForm form, http://www.vaannila.com/struts/struts-tutorial/struts-tutorial.html Page 10 of 19
- 11. 06.HttpServletRequest request,HttpServletResponse response)throws Exception { 07. 08.HelloWorldActionForm helloWorldForm = (HelloWorldActionForm) form; 09.helloWorldForm.setMessage("Hello World!"); 10.return mapping.findForward(SUCCESS); 11. 12.} 13.} 1.<action-mappings> 2.<action input="/index.jsp" name="HelloWorldActionForm"path="/HelloWorl d" 3.scope="session" type="com.vaannila.HelloWorldAction"> 4.<forward name="success" path="/helloWorld.jsp" /> 5.</action> 6.</action-mappings> The name "success" is mapped to the view helloWorld.jsp. So when the execute method in the action returns "success" the request will be forwarded to the helloWold.jsp page. helloWorld.jsp In helloWorld.jsp we get the value of the form variable message and display it. We use struts bean tag to do this. The name attribute of the bean tag hold the value of the action form and the property attribute holds the value of the variable to be displayed. 01.<%@taglib uri="/WEB-INF/struts-bean.tld" prefix="bean" %> 02.<html> 03.<head> 04.<title>Hello World</title> 05.</head> 06.<body> 07.<h1> 08.<bean:write name="HelloWorldActionForm" property="message" /> 09.</h1> 10.</body> 11.</html> Extract the downloaded files into the webapps folder of the Tomcat server. Start the Tomcat server. Type the following url in the browser "http://localhost:8080/Example1/index.jsp". There you go, you have your first struts program up and running. http://www.vaannila.com/struts/struts-tutorial/struts-tutorial.html Page 11 of 19
- 12. Login Application Using Action Form Login Application Using Action Form In this example we will see how to create a login application using ActionForm. The following files are required for the login application. login.jsp success.jsp failure.jsp web.xml struts-config.xml LoginAction.java LoginForm.java ApplicationResource.properties web.xml The first page that will be called in the login application is the login.jsp page. This configuration should be done in web.xml as shown below. 1.<welcome-file-list> 2.<welcome-file>login.jsp</welcome-file> 3.</welcome-file-list> login.jsp We use Struts HTML Tags to create login page. The form has one text field to get the user name and one password field to get the password. The form also has one submit button, which when clicked calls the login action. <html:errors /> tag is used to display the error messages to the user. 01.<%@taglib uri="/WEB-INF/struts-html.tld" prefix="html" %> 02.<html> 03.<head> 04.<title>Login Page</title> 05.</head> http://www.vaannila.com/struts/struts-tutorial/struts-tutorial.html Page 12 of 19
- 13. 06.<body> 07.<div style="color:red"> 08.<html:errors /> 09.</div> 10.<html:form action="/Login" > 11.User Name :<html:text name="LoginForm" property="userName" /> 12.Password :<html:password name="LoginForm" property="password" /> 13.<html:submit value="Login" /> 14.</html:form> 15.</body> 16.</html> The user enters the user name and password and clicks the login button. The login action is invoked. struts-config.xml The validate method in the LoginForm class is called when the Form is submitted. If any errors are found then the control is returned back to the input page where the errors are displayed to the user. The input page is configured in the action tag of strut-config file. <html:errors /> tag is used to display the errors in the jsp page. 01.<struts-config> 02.<form-beans> 03.<form-bean name="LoginForm" type="com.vaannila.LoginForm"/> 04.</form-beans> 05. 06.<action-mappings> 07.<action input="/login.jsp" name="LoginForm" path="/Login"scope="sessio n" type="com.vaannila.LoginAction"> 08.<forward name="success" path="/success.jsp" /> 09.<forward name="failure" path="/failure.jsp" /> 10.</action> 11.</action-mappings> 12.</struts-config> Here the action is "/Login" , the input page is "login.jsp" and the corresponding action class is LoginAction.java. Now the validate method in the LoginForm class will be invoked. LoginForm.java Inside the validate method, we check whether the user name and password is entered. If not the corresponding error message is displayed to the user. The error messages are configured in the ApplicationResource.properties file. 01.public ActionErrors validate(ActionMapping mapping, HttpServletRequest request) { 02.ActionErrors errors = new ActionErrors(); 03.if (userName == null || userName.length() < 1) { 04.errors.add("userName", newActionMessage("error.userName.required")); 05.} 06.if (password == null || password.length() < 1) { 07.errors.add("password", newActionMessage("error.password.required")); 08.} http://www.vaannila.com/struts/struts-tutorial/struts-tutorial.html Page 13 of 19
- 14. 09.return errors; 10.} ApplicationResource.properties The ApplicationResource.properties file contains the error messages. The key "error.userName.required" is used in the validate function to add a new error. Since the error messages are configured in a seperate properties file they can be changed anytime without making any changes to the java files or the jsp pages. 1.error.userName.required = User Name is required. 2.error.password.required = Password is required. If either user name or password is not entered then the corresponding error message will be added to the ActionErrors. If any errors are found then the control is returned back to the input jsp page, where the error messages are displayed using the <html:errors /> tag. The validate method is used to perform the client-side validations. Once when the input data is valid the execute method in the LoginAction class is called. LoginAction.java The execute method contains the business logic of the application. Here first we typecast the ActionForm object to LoginForm, so that we can access the form variables using the getter and setter methods. If the user name and password is same then we forward the user to the success page else we forward to the failure page. 01.public class LoginAction extends org.apache.struts.action.Action { 02. 03.private final static String SUCCESS = "success"; 04.private final static String FAILURE = "failure"; 05. 06.public ActionForward execute(ActionMapping mapping, ActionForm form, HttpServletRequest request, HttpServletResponse response) throwsException { 07.LoginForm loginForm = (LoginForm) form; 08.if (loginForm.getUserName().equals(loginForm.getPassword())) { 09.return mapping.findForward(SUCCESS); 10.} else { 11.return mapping.findForward(FAILURE); 12.} 13.} 14.} Lets enter the user names and password as "Eswar". Since the user name and password is same the execute method will return an ActionForward "success". The corresponding result associated with the name "success" will be shown to the user. This configuration is done in struts-config.xml file. 1.<action-mappings> 2.<action input="/login.jsp" name="LoginForm" path="/Login"scope="session" type="com.vaannila.LoginAction"> 3.<forward name="success" path="/success.jsp" /> http://www.vaannila.com/struts/struts-tutorial/struts-tutorial.html Page 14 of 19
- 15. 4.<forward name="failure" path="/failure.jsp" /> 5.</action> 6.</action-mappings> So according to the configuration in struts-config.xml the user will be forwarded to success.jsp page. If the user name and password did not match the user will be forwarded to the failure page. Lets try entering "Joe" as the user name and "Eswar" as the password, the following page will be displayed to the user. http://www.vaannila.com/struts/struts-tutorial/struts-tutorial.html Page 15 of 19
- 16. DispatchAction Class DispatchAction Class DispatchAction provides a mechanism for grouping a set of related functions into a single action, thus eliminating the need to create seperate actions for each functions. In this example we will see how to group a set of user related actions like add user, update user and delete user into a single action called UserAction. The class UserAction extends org.apache.struts.actions.DispatchAction. This class does not provide an implementation of the execute() method as the normal Action class does. The DispatchAction uses the execute method to manage delegating the request to the individual methods based on the incoming request parameter. For example if the incoming parameter is "method=add", then the add method will be invoked. These methods should have similar signature as the execute method. 01.public class UserAction extends DispatchAction { 02. 03.private final static String SUCCESS = "success"; 04. 05.public ActionForward add(ActionMapping mapping, ActionForm form, 06.HttpServletRequest request, HttpServletResponse response) 07.throws Exception { 08.UserForm userForm = (UserForm) form; 09.userForm.setMessage("Inside add user method."); 10.return mapping.findForward(SUCCESS); 11.} 12. 13.public ActionForward update(ActionMapping mapping, ActionForm form, 14.HttpServletRequest request, HttpServletResponse response) 15.throws Exception { 16.UserForm userForm = (UserForm) form; 17.userForm.setMessage("Inside update user method."); 18.return mapping.findForward(SUCCESS); 19.} 20. 21.public ActionForward delete(ActionMapping mapping, ActionForm form, http://www.vaannila.com/struts/struts-tutorial/struts-tutorial.html Page 16 of 19
- 17. 22.HttpServletRequest request, HttpServletResponse response) 23.throws Exception { 24.UserForm userForm = (UserForm) form; 25.userForm.setMessage("Inside delete user method."); 26.return mapping.findForward(SUCCESS); 27.} 28.} If you notice the signature of the add, update and delete methods are similar to the execute method except the name. The next step is to create an action mapping for this action handler. The request parameter name is specified using the parameter attribute. Here the request parameter name is method. 1.<action-mappings> 2.<action input="/index.jsp" parameter="method" name="UserForm"path="/U serAction" scope="session" type="com.vaannila.UserAction"> 3.<forward name="success" path="/index.jsp" /> 4.</action> 5.</action-mappings> Now lets see how to invoke a DispatchAction from jsp. We have a simple form with three buttons to add, update and delete a user. When each button is clicked a different method in UserAction class is invoked. 01.<html> 02.<head> 03.<script type="text/javascript"> 04.function submitForm() 05.{ 06.document.forms[0].action = "UserAction.do?method=add" 07.document.forms[0].submit(); 08.} 09.</script> 10.</head> 11.<body> 12.<html:form action="UserAction" > 13.<table> 14.<tr> 15.<td> 16.<bean:write name="UserForm" property="message" /> 17.</td> 18.</tr> 19.<tr> 20.<td> 21.<html:submit value="Add" onclick="submitForm()" /> 22.</td> 23.</tr> 24.<tr> 25.<td> 26.<html:submit property="method" value="update" /> 27.</td> 28.</tr> 29.<tr> 30.<td> 31.<html:submit property="method" >delete</html:submit> 32.</td> http://www.vaannila.com/struts/struts-tutorial/struts-tutorial.html Page 17 of 19
- 18. 33.</tr> 34.</table> 35.</html:form> 36.</body> 37.</html> Now consider the update and the delete button. The request parameter name specified in the action handler is "method". So this should be specified as the property name for the submit button. The name of the method to be invoked and the value of the button should be the same. So when the button is clicked the corresponding method in the UserAction will be called. The delete button shows an alternate way to specify the value of the button. Here the main constraint is the method name and the button name should be same. So we can't have an update button like this "Update". Inorder to avoid this you can call a javascript function on click of the button. Specify the action and submit the form from javascript. In this way we can have a different button name and method name. On click of the Add button the action value is set to "UserAction.do?method=add" and the form is submitted from javascript. On executing the sample example the following page is displayed to the user. After clicking the add button the following page is displayed. http://www.vaannila.com/struts/struts-tutorial/struts-tutorial.html Page 18 of 19
- 19. http://www.vaannila.com/struts/struts-tutorial/struts-tutorial.html Page 19 of 19