1. Biogas generator 1.1 Science activity sheets
Build a
biogas generator
Key question Setting up your
I How can we make and collect generator
flammable methane?
1: Fill the bottle, which you will use as
Biogas is the name given to the gas that your generator, about 3/4 full with
can be collected from decaying biomass. distilled water. Measure and record this
It is a mixture of about 60 per cent volume. Empty this water into a bucket.
methane, 40 per cent carbon dioxide and 2: Decide what feedstock(s) you are
trace amounts of hydrogen sulphide and going to use in your generator, then
nitrogen. carefully measure them out and record
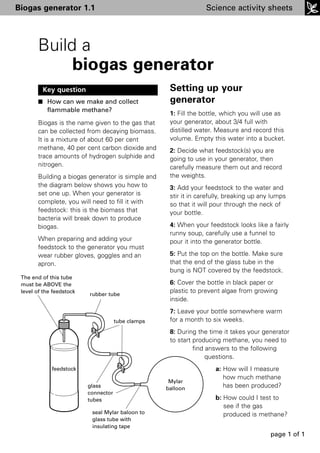
Building a biogas generator is simple and the weights.
the diagram below shows you how to 3: Add your feedstock to the water and
set one up. When your generator is stir it in carefully, breaking up any lumps
complete, you will need to fill it with so that it will pour through the neck of
feedstock: this is the biomass that your bottle.
bacteria will break down to produce
biogas. 4: When your feedstock looks like a fairly
runny soup, carefully use a funnel to
When preparing and adding your pour it into the generator bottle.
feedstock to the generator you must
wear rubber gloves, goggles and an 5: Put the top on the bottle. Make sure
apron. that the end of the glass tube in the
bung is NOT covered by the feedstock.
The end of this tube
must be ABOVE the 6: Cover the bottle in black paper or
level of the feedstock
rubber tube
plastic to prevent algae from growing
inside.
7: Leave your bottle somewhere warm
tube clamps for a month to six weeks.
8: During the time it takes your generator
to start producing methane, you need to
find answers to the following
questions.
feedstock a: How will I measure
how much methane
Mylar
glass balloon has been produced?
connector
tubes b: How could I test to
see if the gas
seal Mylar baloon to produced is methane?
glass tube with
insulating tape
page 1 of 1
2. Biogas generator 1.2 Science activity sheets
Recording information
about your biogas generator
1: Date of building your generator
2: Feedstock information
Description of feedstock Weight used (g)
3: Volume of water used (litres)
4: We used distilled water instead of tap water because...
5: We wrapped the generator in black paper/plastic because...
6: Results
Date of checking gas produced
Volume of gas produced (litres)
Was the gas flammable? (yes/no)
Did the gas smell? (yes/no)
page 1 of 1
3. Hydroelectric power plant 2.1 Science activity sheets
Build a
hydroelectric power plant
Key question
I Can we use water to generate electricity?
Hydroelectric power plants generate electricity from the
gravitational potential energy of water. They do this by
forcing water to flow through a turbine which is
water connected to a generator.
The diagram below shows a simple version that you can
build for yourself.
blobs of Vaseline
axle
motor /
generator
milk container with
base removed
motor completed
connector turbine
ammeter
low-voltage
bulb
Building your power plant
1: The turbine. In your power plant kit you should have
a large rubber or cork bung with a metal axle fitted.
There should be slits cut along the length of the bung.
voltmeter Now:
a: Cut the handles off some plastic spoons about
1cm from the bowl end (1 or 2 for each slit,
depending on the size of your bung).
b: Push these spoon heads into the bung. You now
have a model of a type of turbine called a Pelton
wheel.
page 1 of 2
4. Hydroelectric power plant 2.1 Science activity sheets
2: Attaching the generator
a: Cut the base off a 2-litre plastic milk bottle.
b: Carefully make holes in the sides, as shown in the diagram above,
for the axle to pass through. These holes must not be too big or
water will leak out, and they must not be too small or energy will
be lost through friction between the axle and milk bottle.
c: Insert your turbine into the milk bottle and slide the axle through
the holes.
d: Push a generator-axle joining block onto the axle. Push the
generator shaft into the other side of the joining block.
e: Set up a retort stand and clamp to support the generator and
turbine.
f: Add a blob of Vaseline inside the milk bottle to each hole where
the axle passes through. This will provide lubrication and help to
stop water leaking out.
3: Connecting the circuit
a: Connect a low-voltage bulb or LED to the generator.
b: Connect a voltmeter in parallel with the bulb/LED.
c: Connect an ammeter in series with the bulb/LED.
Your hydroelectric power plant is now ready for operation.
page 2 of 2
5. Hydroelectric power plant 2.2 Science activity sheets
Using your
hydroelectric power plant
Key question
I Does the height of the water running through a turbine affect
the voltage level of a power plant?
The electrical power produced by your power plant will depend on the
energy of the water that runs through it. This experiment will
investigate the relationship between the gravitational potential energy
of the water and the electrical power produced by the generator.
Set up
1: Set up your generator so that the water that passes through it can
escape into a drain, sink or bucket without spilling. Make sure that
there is a mop nearby to clear up any accidental spillages. Check that
the electrical circuit attached to the generator will not get wet.
2: Fill a bucket approximately half full of water and use a hose to
siphon water from the bucket down through the generator. The set-up
is shown below.
Do not suck water through the hose. Instead, use the following
procedure.
hose
I Run some water through the hose from a tap.
I Put your thumb over the end and let the hose fill up.
I When the hose is full, put your thumb over the other end.
I Place one end under the water in the bucket and the
other end through the top of the milk bottle.
water
I For the siphon to work, the end of the hose in the
bucket must be higher than the end of the hose in the
milk bottle. Now remove your thumbs from the tube.
bucket
turbine and
generator
water to
sink/drain
page 1 of 2
6. Hydroelectric power plant 2.2 Science activity sheets
Doing the experiment
3: Once everything is set up, you will need to measure the following.
a: The height (h) of the bucket above the level of the turbine in
metres.
b: The voltage (V) produced by the generator in volts.
c: The current (I) produced by the generator in amps.
Repeat these readings for at least five different heights. If you have
time, take several readings for each height so that an average can be
found. Organise your data in a table.
4: Once you have taken your readings, plot a graph of voltage (V)
against height of water (h). You can also add another scale onto your
graph to plot current (I) against height of water (h).
5: What does this tell you about the relationship between electrical
energy produced and the gravitational potential energy of the water?
page 2 of 2
7. Anemometer 3.1 Science activity sheets
Make your own
anemometer
An anemometer is a device for
Key question
measuring wind speed. The diagram and
I Can we measure the speed of the instructions below show you how to
wind using simple everyday make a simple type of anemometer.
objects? Where would be the best
place to put a wind turbine at How to build your
school?
anemometer
1: Using a needle, carefully make a hole
Modelling clay/Blutack wind direction
right through the centre of a ping-pong
counter balance vane
ball. Thread a 30cm-length of fishing line
drawing pin through this hole.
2: Using a hot glue gun, glue the free
end of the fishing line to the centre spot
wooden dowel
of the protractor.
3: Lay the protractor on a piece of paper
and push the flat edge up against a level
bubble level surface, like a flat block of wood.
4: Put a blob of glue from the hot glue
gun onto the protractor where the
bubble level needs to go, against the flat
edge.
5: Push the bubble level into the glue
and up against the flat surface. It is
protractor
important that the bubble level is fixed to
the protractor as level as possible.
fishing line 6: Cut out the parts for your wind
direction vane from some stiff card as
shown in the diagram below.
ping-pong ball
cut slot here
vane fits in slot
page 1 of 2
8. Anemometer 3.1 Science activity sheets
7: Using a drawing pin, fix the vane to the top of your Angle made Wind speed
piece of dowel. Make sure that the vane can move by fishing (kilometres
freely and that it is balanced on the top of the dowel. line and per hour)
8: Push the protractor into the slot in the base of the ping-pong
dowel and, once it is in the correct position, fix it with ball
the hot glue gun.
90° 0
9: Hold up your anemometer and check that the wind
vane is balanced and moving freely. If it is not balanced, 85° 9
add some modelling clay or Blutack to the bottom of it
80° 13
until it does balance.
Your anemometer is now complete, so how do you 75° 16
use it? 70° 19
Using your anemometer 65° 22
Your anemometer works because any wind will push 60° 24
against your ping-pong ball and cause the fishing line to
make an angle with the protractor: the stronger the 55° 26
wind, the bigger the angle.
50° 29
1: To use your anemometer, hold the wooden dowel
and see which way the wind is blowing by looking at 45° 32
the wind vane. Turn and face into the wind and check
40° 34
the bubble level to make sure that the anemometer is
level. 35° 38
2: Once the anemometer is level, look at the angle the 30° 42
fishing line is making on the protractor. Make a note of
this angle and look it up on the table below. This table 25° 46
helps you to convert the angles made by your fishing
line and ping-pong ball into wind speeds. 20° 52
page 2 of 2
9. Wind turbine 4.1 Science activity sheets
Build a
wind turbine
Wind turbines generate electricity by
Key question
using the power of the wind to spin a
I How can we harness wind energy generator. The diagrams and instructions
to power machines at home and at below show you how you can build a
school? simple version yourself.
Building your wind
turbine
1: Cut out two pieces of corriflute. These
cable ties
should be rectangular and slightly bigger
than the motor you will use as your
generator (50 x 30mm should be the
right size). It is important that one piece
of corriflute has the channels running
across its width and the other piece has
generator connection to circuit
connection to circuit the channels running along its length.
Note: it is important that the
corriflute base
channels in the corriflute
bases are running in the
place hot glue direction shown in the
on ‘X’s on diagram
corriflute base
2: Push two cable ties through the piece
of corriflute with the channels running
across its width and use them to secure
mdf block the generator in place. Do not pull them
so tight that the corriflute bends out of
shape. Make sure that the shaft of your
40mm
generator sticks far enough over the
waste pipe
edge of the corriflute so that you can
attach your propeller and it will spin
without interference.
3: Line up the second piece of corriflute
underneath the piece with the generator
attached. Make a mark where the middle
of the generator is.
page 1 of 2
10. Wind turbine 4.1 Science activity sheets
4: Push a small flat-head nail through the
corriflute where you have made your
mark.
5: Line up the piece of corriflute that has
the nail in it with the centre of the small
mdf block as in the diagram to the right.
6: Carefully tap the nail in with a tack hammer. Make sure that the
piece of corriflute is free to spin around the nail.
7: Place blobs of hot glue on the corners of the corriflute, taking care
not to get any near the nail. Then line up the piece of corriflute holding
the generator and stick the two together. Make sure that the generator
can now spin easily on the nail. This will form the bearing that will allow
your wind turbine to swing around to face into the wind.
8: Fix the generator and bearing assembly to the top of the plastic pipe
with some more hot glue.
9: When the glue has set, fix your propeller onto the generator.
10: Cut out a corriflute tail plane and rudder as in the diagram below.
(You could use stiff card instead of corriflute.)
rudder
use hot glue to secure
rudder to tail
tail
bamboo/balsa strips secured in
place with hot glue
The bamboo or balsa strips need to be about 25cm long. The rudder
needs to be about 12cm high and the tail plane about 12cm wide.
11: When the glue has set, push the bamboo/balsa strips into the
channels in the bottom piece of corriflute in your bearing assembly.
12: You can now put your finished wind turbine on its stand and get
ready to test it.
page 2 of 2
11. Wind turbine 4.2 Science activity sheets
Testing your
wind turbine
Your wind turbine can be tested either indoors using a desk
Key question
fan or outdoors using the wind. In each case, you will need to
I How can we optimise build the circuit below and attach it to your wind turbine.
the energy we get
from wind turbines? If your turbine is not generating enough electricity to light a
small bulb, you might want to try a light-emitting diode (LED)
instead.
Testing inside
If you are testing your turbine inside, fit it on the stand
provided and place it in front of a desktop fan. Make sure that
wind turbine
your circuit is connected, then start the fan. Answer these
questions either on a separate piece of paper or as part of an
experiment write-up your teacher might ask you to do.
1: Does your light bulb or LED light up?
2: What is the reading on your voltmeter?
3: If your fan has different speed settings: in a table, record
how the voltage in your circuit changes with a faster or
slower wind.
4: Try moving the fan around in front of the turbine. Does
your turbine keep facing into the wind?
Testing outside
If you are testing your turbine outside you will need a broom
handle to fit your turbine on and a small box to put the circuit
in so that you can carry it easily.
1: Try placing your turbine in different positions around the
school and record readings of the voltages it produces.
2: Based on the readings you have taken, where do you think
the windiest place in the school is?
3: Do you think it would be possible to place a real wind
turbine here?
4: What objections do you think people would have to this?
5: What would be the positive things about having a wind
turbine to supply some of your school’s electricity?
page 1 of 1
12. Savonius wind turbine and generator 7.2 Science activity sheets
Test your ‘Cross-Wind Savonius’
wind turbine and generator
You can now test your wind turbine using a desk fan.
You will need to build the circuit on the left and attach it
to your wind turbine at the stator.
wind turbine
Remember that your generator is producing alternating
current (a.c.) electricity so your voltmeter and ammeter
must be set to measure a.c. voltage and current.
The objective is to calculate the power your turbine can
generate. This is best done indoors with a desk fan as
wind speed can then be controlled.
Arrange your turbine and generator so that it can be
spun by a desk fan. Attach the above circuit and take
three or four readings for a given fan speed of voltage
and current. Record these readings in a table, along with
the speed setting of the fan. For each fan speed,
calculate the power generated by multiplying voltage (in
volts) and current (in amps) to give power (in watts).
These can then be averaged to give a more accurate
result.
If your fan allows, you may be able to do this for a
number of different wind speeds.
Now plot a graph of electrical power against wind
speed.
Answer the following questions either in your
experiment write-up or on a separate sheet of paper.
1: Does the power generated by your wind turbine vary
with the wind speed?
2: Describe how it varies.
3: Try to explain why it varies. You will need to know
how an electrical generator works to do this.
4: How could you make this experiment more accurate?
5: Can you suggest five different ways that you might
be able to make your generator and turbine produce
more power?
page 1 of 1
13. Solar water heating 5.1 Science activity sheets
Solar clear front sheet
water heating
Key question
I How can we optimise the energy
we get from the sun using solar
water heaters?
Solar water heating is becoming
increasingly popular in the UK. The
principle of using the sun’s energy to
heat water is very simple. It works for
the same reason that the inside of a car
can get extremely hot on a sunny day.
Heat energy from the sun travels
through the glass and heats the things
inside the car, it is then re-radiated at a
slightly different wavelength and cannot
get back out through the glass. This heat
energy is trapped, so it builds up,
causing the temperature to rise much
higher than the temperature outside.
We can use this idea to build a solar
water heater.
thermometer
Your task now is to build the most boiling tube filled
effective solar water heater you possibly with water
can, using the materials to hand. The shoe box packed with
following instructions and diagram will insulating material
help you to do this. Remember that what
you are trying to do is get heat energy
into your shoebox through the clear front
and then to stop it from escaping.
thermometer
Your teacher will have a selection of
different materials you can use to build
your water heater.
control boiling tube
filled with water
page 1 of 2
14. Solar water heating 5.1 Science activity sheets
Hints on how to set up your solar water
heater
1: Think about the colour of your water heater. Will changing its colour
make any difference to how well it works? Are some colours better at
absorbing heat energy than others?
2: How could you prevent heat energy escaping from your box once it
is in there? Would some form of insulation be a good idea? If so,
discuss with the rest of your group what properties make a material a
good insulator, and make a choice based on what you have discussed.
3: Can you think of any other ways heat energy might be escaping from
your box? If so, is there any way that you can prevent this?
4: How might you increase the amount of energy being collected by
your box?
Testing your solar water heater
1: The easiest way to test how well your water heater works is to use
it to heat water. Choose two identical boiling tubes with bungs that
have thermometers fitted in them.
2: Fill the boiling tubes with water and put the bungs in.
3: Place one boiling tube in your shoebox. The other will remain outside
the box to act as a control. Make sure that you can read the
thermometer in the boiling tube. You might want to fix the boiling tube
in place with a piece of sticky tape.
4: Place another thermometer inside the box to check the temperature
under the glass. You might want to fix it in place with a piece of sticky
tape.
5: Once your box is complete, fix the glass or polycarbonate sheet in
place with insulating tape.
6: Your solar water heater is now ready for testing in the sunshine.
Recording results
1: Your box will begin to heat up as soon as the sun shines on it so you
will need to start taking readings as soon as the box is in position.
2: Every 30 seconds, take readings from the three thermometers and
record them in a table. This information can then be plotted on a graph
of temperature against time to show how effective your shoebox water
heater has been.
page 2 of 2
15. Renewables at home 6.1 Science activity sheets
Renewables
at home
Key question
I How much of the electricity we use at home is generated from
renewable energy? Could this figure be increased?
The average UK household uses about 80 to 90kWh or ‘units’ of
electricity per week. On average, for each unit of electricity generated,
about 120g of carbon1 is released into the atmosphere.
In 2003, the total amount of carbon released into the atmosphere as a
result of electricity production was 46 million tonnes1.
There is little doubt that the amount of carbon in the form of carbon
dioxide gas being released into the atmosphere is beginning to affect
the world’s climate. Reducing the amount of carbon dioxide and other
greenhouse gases being released into the atmosphere is likely to be
one of the biggest challenges that the world faces over the next
century.
Despite the scale of the problem, it is important to realise that every
single person can play a part in reducing carbon emissions. This activity
will help you see where you can make a difference.
1: How much electricity does your family use per week?
To work this out you will need to see an electricity bill. These bills will
cover a certain time period – it could be a month or a quarter (three
months). They will refer to your use of electricity in ‘units’. A unit is one
kilowatt hour (kWh).
To calculate your weekly usage, just divide the total number of units
used, as shown on the bill, by the time period the bill is for in weeks.
Write your answer in the box below.
If it is not possible to see an electricity bill, use the average figures
above.
Our weekly usage of electricity is units.
2: How much carbon has been released into the atmosphere from
generating this electricity? To calculate this, take your answer from
question 1 and multiply it by 0.12. This will give you your answer in
kilograms. Write your answer in the box below.
Each week our use of electricity causes the emission of
kilograms of carbon into the atmosphere.
1 DTI, UK Energy Sector Indicators 2004 as accessed from www.aepuk.com/need_info.php page 1 of 2
16. Renewables at home 6.1 Science activity sheets
3: How much of our weekly electricity consumption is already
generated from renewable sources? Currently about 3 per cent of
the UK’s electricity comes from renewable sources. To take this into
account, subtract 3 per cent from the answer you had to question 1
and fill in the boxes below.
The equivalent of units of the electricity that we use
in a week is generated from renewable sources.
This means that the equivalent of units is generated
from non-renewable sources.
4: Your project. Now that you know how much electricity you use in a
week and how much already comes from renewable sources, it is your
task to discover how you could increase this percentage.
There are two main ways that you can do this and your teacher may
want you to look into both possibilities.
I Some electricity generating companies will offer to supply you with
100 per cent renewable electricity. But does this mean that the
actual electricity you are using has been generated from renewable
sources? Will it cost you more than ‘normal’ electricity? You will
need to compare several different companies
I Generate your own electricity. Look at the information cards that
came with this pack to see what kinds of technology might be
available for generating electricity at home. You could also look at
solar water heating. This does not generate electricity but it will
save you from using electricity to heat your water.
It is important that your ideas are practical. If, for example, you are
considering using a wind turbine, what power output will it need to
have? Where could you put it? Would the neighbours object? Could you
make money by selling surplus electricity back to the electricity
companies? How much would your wind turbine cost?
Put all of this information into a report. At the end of the report, include
a conclusion and recommendation. State clearly what you think would
be the best solution and why. Estimate how much of your weekly
electricity usage could be generated from renewable sources and how
much carbon this would prevent from being released into the
atmosphere.
page 2 of 2
17. Savonius wind turbine and generator 7.1 Science activity sheets
Build a ‘Cross-Wind Savonius’
wind turbine and generator
induce a voltage in that conductor. This
Key question
produces an electrical current.
I How does a wind turbine and
generator work? In this activity, you will see that not all
wind turbines look like giant propellers,
Wind turbines use the power of the wind and you will also see that building an
to spin a generator. The generator itself electrical generator is quite simple.
relies on a conductor (usually coils of
A diagram of the finished ‘Cross-Wind
wires) cutting through a magnetic field to
Savonius’ wind turbine and generator is
Diagram 1 shown below in diagram 1.
turbine stator axle
axle support
rotor
metal bracket
base board
Building your Cross-Wind 4: Draw around the bottom of the bottle
pieces to produce the shape shown.
Savonius’ wind turbine and
Mark an ‘x’ in the centre of the shape.
generator
5: Cut out 2 copies of the shape.
The turbine Diagram 2
1: Cut the top and bottom off a plastic
bottle. The bottle needs to be about 1.5
to 2 litres in volume and have a circular
cross section. Certain types of mineral
water bottle are just right for this.
2: Cut the bottle in half lengthways as
accurately as possible.
3: Stand the two halves upright on a
piece of thick corrugated cardboard as
shown in diagram 2. page 1 of 4
18. Savonius wind turbine and generator 7.1 Science activity sheets
6: Trim the shapes so that they will fit inside the ends of the bottle
pieces.
7: When you are sure that the pieces will fit, make a hole in each one
at the position marked by the ‘x’. The hole is for the axle and needs to
be large enough for the dowel to fit through snugly.
Diagram 3
8: Using a hot glue gun, glue
the pieces of card in position
in the bottle halves as shown
in diagram 3.
9: Once the glue has set, push the axle through the holes in the card
end-pieces so that about 2 or 3cm protrude from one end, and about
10cm at the other end.
10: Glue the axle into position in approx 10cm
the card end-pieces. of axle
11: Your completed turbine should
now look like diagram 4.
The stator
The stator is the part of the
generator that remains stationary.
2 or 3cm
This is the part of the generator Diagram 4
of axle
that holds the coils.
1: Use a small piece of mdf as a jig on which to wind your coils as
shown in diagram 5.
2: Start winding with a wire lead-in of about 5cm.
3: The coils must be wound as neatly as
Diagram 5 possible and each one needs to have
200 turns.
winding jig
m 4: When each coil is complete, leave
3c
insulating about 5cm of wire lead-out.
tape
lead out 5: Wrap the coil with two pieces of
insulating tape to keep it secure.
6: Now sand off the enamel from the
finished coil
last centimetre of each lead.
lead in
page 2 of 4
19. Savonius wind turbine and generator 7.1 Science activity sheets
7: You need to wind four coils. Diagram 6
8: When the coils are wound, cut out a 11cm
cardboard disc 11cm in diameter. Cut a
hole in the centre about the size of a two
clockwise winding
pence coin.
9: Arrange the coils on the disc as anti-
clockwise
shown in diagram 6. It is very important winding
that the windings are arranged in the
correct directions or your generator will
not work. anti-
clockwise
10: When the coils are correctly winding
positioned, fix them in place with the hot
glue gun.
11: When the glue is set, the bare ends hole
of the coils can be joined together with
cable connector blocks, and these can be clockwise winding
fixed to the stator plate with the hot glue
gun.
12: Lastly, glue the stator plate to the
11cm
supporting bracket as shown in diagram
1. Once fixed, this bracket needs to
support the stator so that the hole in the
axle hole
magnet centre is about 20cm above the base
board.
The rotor
The rotor is the part of the generator that
moves. It holds the magnets that
produce the magnetic field that sweeps
over the coiled conductors and induces a
voltage, causing a current to flow.
1: Cut out another 11cm diameter
cardboard disc. This time make a hole in
Diagram 7 it so that the axle will just push through.
2: Glue the magnets to the rotor disc as
shown in diagram 7.
3: Make sure that the magnets are
arranged with their polarities as shown in
diagram 7.
page 3 of 4
20. Savonius wind turbine and generator 7.1 Science activity sheets
Assembling the turbine and generator
1: Push the rotor disc onto the long end of the axle with the magnets
facing away from the turbine assembly. Slide the disc up so that it is
touching the turbine. (Diagram 1 shows a gap between the rotor and
turbine, but this is so that the shape of the turbine can be seen.)
2: Try to get the rotor disc as square as possible on the axle. When you
are happy with its position, glue it in place with the hot glue gun.
3: Lay the turbine and rotor assembly on the base board where it will
eventually be installed.
4: The stator needs to be fixed as closely as possible to the rotor, but
they must not rub or the turbine will not be able to spin properly.
5: Estimate where you will have to fix the stator support bracket to
allow this. Mark this position and screw the bracket and stator in place.
6: Cut out the two end supports for your turbine axle from the
cardboard, as shown in diagram 8.
7: Slip the turbine axle through the hole in the stator plate so that the
rotor and stator are in the correct position (and not able to rub). Support
the axle so that it is in the position it will need to be fixed in.
8: Stand the left-hand end support as
10cm shown in diagram 1 so that the end of
the axle just touches it. Glue the end
support to the base board.
5cm
9: Check that the axle is in the correct
position, then push a large drawing pin
through the end support into the end of
the axle.
10: Install the right-hand end support and
score lines 30cm fix the other end of the axle in the same
way.
11: Check that your turbine rotates
freely.
You are now ready for testing.
2.5cm 2.5cm
Diagram 8
page 4 of 4
21. Solar cooker 8.1 Science activity sheets
Build a
solar cooker
Solar cookers are used in a lot of
Key question
developing countries where fuel is in
I Is it possible to cook food without short supply, but where there is
fire, gas or electricity? abundant sunshine.
Even in the UK, the amount of energy
reaching each square metre of the
ground can reach 4.5 to 5kWh per
square metre per day in July. This is
enough energy to heat the water for a
Diagram 1 large hot bath. This energy can also be
solar energy
funnel captured and concentrated by a solar
cooker.
There are many solar cooker designs, but
this is one of the simplest and most
popular. In fact, it is so simple that
people sometimes forget that
temperatures inside it can reach over
100°C, so make sure that you wear oven
gloves when handling it. It is also a good
idea to wear sun glasses as there can be
a lot of glare from the reflective surfaces.
insulated
cardboard box Diagram 1 on the left shows the
metal cooking completed cooker.
container
Diagram 2
50cm 60cm
Building your own solar
cooker
1: Before you start. Paint the inside of
your baking tin with the matt black metal 65cm 65cm
paint and allow it to dry.
2: The solar energy funnel
a: Using a large pair of scissors or a
craft knife, cut out two sets of
cardboard panels to the dimensions
15cm 25cm
shown in diagram 2.
page 1 of 2
22. Solar cooker 8.1 Science activity sheets
b: Lay out the panels as they are going to be assembled and, using a
small piece of cardboard, spread a thin layer of PVA glue over the
surface of one of the panels, which will form the reflective
surface.
c: Carefully lay sheets of tin foil onto the glue and smooth them
down. Try not to tear the tin foil and make sure that the shiny side
is facing upwards.
d: Repeat for the other three panels.
e: When all of the panels have been coated on one side with tin foil,
assemble them into a funnel shape, with the tin foil on the inside
of the funnel. Join them together with duct tape to make the solar
energy funnel shown in diagram 1.
3: The cooking box
a: Stand your solar energy funnel upright in a photocopier paper box.
b: When the box and funnel are lined up straight, duct tape the box
in position. You may also want to tape up any holes in the box.
c: Fill the box with shredded paper or cardboard to act as insulation,
but leave enough space to fit in the foil baking container.
d: Place the baking container in position and wedge it in place with
pieces of cardboard.
e: When the baking container is in position, the toughened glass
sheet should rest on top. Try to minimise any air gaps as the
cooker will lose heat through these.
Your solar cooker is now ready for testing.
4: Testing your solar cooker
a: Your cooker will work best on a warm sunny day. To get it
working, angle it towards the sun and just wait. You may have to
use a few stones and whatever else is to hand to achieve the
correct angle. Do not look at the sun while you are doing this.
b: Place an oven thermometer in the baking container and take
temperature readings at regular time intervals. Be careful as you
do this, because the inside of the cooker will be hot and there
may be considerable glare from the reflective surfaces of the
funnel. A much more comfortable way to do this is with a data
logger and temperature probe.
c: The cooker should be taken through the cooking cycle at least two
or three times before food is put in it to bake off any impurities.
When food is placed in the cooker it should be held in a clean,
heat-proof container and not placed directly into the painted foil
baking container.
The use of oven bags is recommended.
page 2 of 2
23. Solar water heater 9.1 Science activity sheets
Build a
solar water heater
This simple design uses a pressed steel radiator to act
Key question
as the collector in the solar panel. This helps to reduce
I How can we heat the construction time and costs associated with building
water for our homes the collector from pipe work and sheet metal.
without fire, gas or
electricity? The best type of radiator to use for the purposes of this
project is the ‘Stelrad’. These are particularly suitable
because they have four tapped connection holes, one in
each corner. This allows the necessary diagonal flow of
water. This project is based around the use of a Stelrad
No.44 section 1780 x 580mm radiator and all of the
component dimensions are given accordingly. If a
different size radiator is used, the component
dimensions will have to be adjusted accordingly.
The tools and components required to complete the
project are listed separately on Activity sheet 9.2.
Diagram 1 below shows a cross-section view of the
completed heater.
top beading glazing tape
support
beading absorber
metal foil
retaining block
cross brace retaining hook
plywood
insulation
Diagram 1
drain hole
The construction process
1: Paint your radiator and all other pipes and connectors
that will be exposed to the sunlight with matt black
metal paint. This will increase the efficiency of your
radiator as an absorber of solar radiation.
2: Cut all of the wood to the sizes given in Activity sheet
9.2. If the wood being used is untreated, this will be the
best time to treat it for protection against weathering.
page 1 of 3
24. Solar water heater 9.1 Science activity sheets
top beading Diagram 2 An exploded view of the solar
water heater
glass
absorber
retaining block
beading
short side
support brace corner
brace
insulation
metal foil
cross brace
corner
plywood brace
drain hole
long side bottom
short side
3: Fix the frame of the box together using screws and
glue.
4: Fix the plywood sheet to the back of the frame with
screws and glue.
5: Fit the four corner braces and corner brackets onto
the frame and plywood backing.
6: Fix the two cross braces inside the box, then put
Warmcel insulation between the sections.
page 2 of 3
25. Solar water heater 9.1 Science activity sheets
7: Cover the inside of the box with metal foil,
stapling it in position.
8: Connect a short length of 15mm copper
pipe to the corners of the radiator as shown
in diagram 3. The pipe needs to be long
enough to protrude from the frame so that it
can be joined to external pipe work.
The pipe should be fixed using the correct
radiator fittings. Remember to use PTFE tape
on the thread to help produce a water-tight
seal.
9: Drill two 15mm holes in the frame to line
up with the short lengths of pipe fixed to the Diagram 3
radiator. Cut out a ‘v’ shape for fixing the
pipes in place as shown in diagram 3.
10: Carefully place the radiator in position and secure it in place with
the retaining blocks. It is important to make sure that there is no gap
between the insulator and the radiator. Air movement between the
radiator and insulator will reduce efficiency.
11: Fix the v-shape wedges back in place over the pipes with screws
only. Do not glue them as you may need to remove them at some
point in the future so you can get at the radiator to fix leaks. Seal the
pipes to the box with silicon sealant.
12: Fit beading around the sides and top of the box to support the
glazing.
13: Drill drainage holes in the bottom of the frame.
14: Paint the outside of the box with primer, then undercoat, then
gloss.
15: When the paint is dry, fit the foam bedding strip on the beading and
along the bottom edge for the glass to rest on.
16: Fit the glass retaining hooks at the bottom of the box.
17: Carefully position your glazing and secure it with silicon mastic,
acrylic putty or glazing tape. Linseed oil putty is not recommended as it
does not weather well.
18: Screw the glass retaining cover strips in place.
19: Your solar heater is now complete. It can be fitted to a domestic
hot water system and details on how to do this are available from The
Centre for Alternative Technology (www.cat.org.uk). For demonstration
purposes, it can be connected to a circulation pump and home-made
heat exchanger.
page 3 of 3
26. Solar water heater 9.2 Science activity sheets
Tools and materials needed to
build a solar water heater
Tools Materials
Hammer Softwood Planed all round, treated against rot. The
dimensions given below are finished sizes in mm. For
Saw
example, 95 x 20 is the planed size of 100 x 25.
Tape measure
Screwdriver Part Size Length Amount
(mm) (mm)
Electric drill and a variety
of drill bits Long side, top 95 x 20 1875 1
Stanley knife Long side, bottom 89 x 20 1835 1
Bradawl End sides 95 x 20 670 2
Plane Beading, top side 20 x 10 1835 1
Chisels
Beading, ends 20 x 10 640 2
Adjustable spanner
Cross brace 45 x 20 650 2
Mastic gun
Corner braces 20 x 50 350 4
Putty knife
Central beading 45 x 20 650 1
Top beading, long side 40 x 8 1875 1 mitre
end
Top beading, end sides 40 x 8 702 2 mitre
ends
Top beading 40 x 8 665 1
Retaining blocks 45 x 20 60 4
Plywood Exterior quality 9mm, 1875 x 690mm
Glazing This can be glass, ‘Filon’ or polycarbonate.
Two 3mm thick sheets are needed. The dimensions will
be 900 x 680mm, but it is recommended that this is
measured from the completed box.
page 1 of 2
27. Solar water heater 9.2 Science activity sheets
Absorber ‘Stelrad’ No.44 section 1780 x 580mm
radiator available from most builders’ or plumbers’
merchants.
Glass retaining hooks
4 x flattened 15mm copper pipe
Corner brackets
Sheet metal 60 x 60mm right angle, 95mm deep
Insulation 50mm thick Warmcel. This material is a
cellulose fibre insulation made from recycled
newspaper. It is available from Excel Industries, 13
Rassau Industrial Estate, Ebbw Vale, Gwent NP3 5SD
Tel: 01685 845200
Alternatively, glass fibre loft insulation can be used but
remember to take the necessary safety precautions
when handling it.
A sheet of aluminised building paper
approx 2 x 0.75m
Miscellaneous
Matt black metal paint
Wood primer
Undercoat and gloss
Foam bedding strip
Silicon mastic, acrylic putty or glazing tape
Two screw thread fittings for connecting 15mm copper
pipe to the radiators
A selection of screws
PVA wood glue
page 2 of 2
28. Renewables at school 10.1 Science activity sheets
Renewables
at school
Key question Your project
I How much of our school’s Your project is to examine the energy
electricity is generated from consumption of your school and make
renewable energy? How could we recommendations as to how these
increase this figure? energy needs can be met in part or in full
using renewable energy sources. The
Introduction project can be divided into three phases
– collecting data and information,
As you are no doubt already aware, the
examining the options and making
use of fossil fuels is crucial to the way
recommendations. The instructions
we live today. We use them for
below will guide you through these
generating electricity, for powering our
phases.
vehicles, making plastics and many other
applications. However, it is clear that If you are working in a group, make sure
fossil fuels are not going to last forever. each member of the group has a set task
Some forecasts expect the world’s oil to carry out. One member of the group
fields to start running dry in the next 40 should take on the role of Project
years. Fossil fuels also pollute. Every Manager. This person will need to
time fossil fuels are burnt, they release oversee the development of the project
carbon dioxide gas into the atmosphere. and ensure that all tasks are completed
This gas is believed to be a major cause correctly and to schedule.
of the climate change scientists are
observing around the world. Phase 1 – Collecting data
It is clear that we have to reduce our use and information
of fossil fuels and find alternative 1: Firstly, you will need to find out which
sources of energy. energy sources your school already uses.
This project is designed to help you These might include electricity, gas, oil or
explore the different options available for your school may already use some
generating energy from renewable renewable sources.
sources. It is also designed to show you 2: You will then need to find out how
that all methods of generating energy much energy is used and how it is used,
have positive and negative aspects e.g. heating, lighting, power etc. Your
associated with them. These may be teacher may be able to provide you with
environmental, such as pollution from a sheet with some or all of this
fossil fuels and flooding of valleys for information already on it.
hydroelectric projects. They can also be
social, for example, not everyone would
be happy living next to a wind turbine.
page 1 of 2
29. Renewables at school 10.1 Science activity sheets
3: You will need to collect information 2: You may also want to use some ICT
about what resources might be available skills to show what a wind turbine might
for use with renewable energy look like on your playing field, or what
technology. For example, your school the school roofs might look like covered
may have a large, windy playing field, it in solar panels.
may be close to a fast running stream, it
3: You will also need to consider the
may be in a rural area where straw and
costs and whether there might be any
animal waste is abundant.
grants available for the options you are
4: You will also need to collect considering.
information about what technology is
available for generating electricity from Phase 3 – Making
renewable sources. It is important that recommendations
you keep this part of the project realistic.
There are a huge number of companies Based on what you have found out in
with websites advertising the kind of Phase 1 and Phase 2, you need to make
technology that you might use. a set of recommendations. These
recommendations will need to be
Phase 2 – Examining the justified. If you recommend installing a
hydrogen fuel cell, explain why. Back up
options your recommendation with details of
1: When you have collected all of the possible power output, cost to install,
information and data you need, you must cost to run, etc, and feedback from your
examine the options. Would a wind surveys.
turbine be practical? How much energy
Your report should be as professional as
would it generate? How big would it be?
possible. Hopefully it will show you the
Would it distract students in the
potential of renewable energy and
classrooms? These are the kinds of
maybe some of your recommendations
questions you would need to ask. To
will be implemented.
answer some of them, you may need to
conduct some surveys with students and
staff. Think of some more questions and
design a table to help you keep track of
all the factors you would need to
consider for each option.
page 2 of 2