Windsor tie knot instructions
•
0 recomendaciones•310 vistas

Step-By-Step Instructions on How To Tie a Windsor Tie Knot. Be sure to click on the video link inside if you would like to watch the video.

Recomendados
Más contenido relacionado
Destacado
Destacado (20)
Windsor tie knot instructions
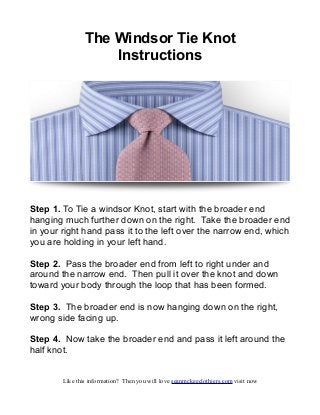
- 1. The Windsor Tie Knot Instructions Step 1. To Tie a windsor Knot, start with the broader end hanging much further down on the right. Take the broader end in your right hand pass it to the left over the narrow end, which you are holding in your left hand. Step 2. Pass the broader end from left to right under and around the narrow end. Then pull it over the knot and down toward your body through the loop that has been formed. Step 3. The broader end is now hanging down on the right, wrong side facing up. Step 4. Now take the broader end and pass it left around the half knot. Like this information? Then you will love seanmckeeclothiers.com visit now
- 2. Step 5. Next, with the thick end of the necktie in your left hand, pass it up from below and behind the knot and through the loop around your neck. Step 6. Pull the broader end forward over the half-completed knot and let it hang down. Step 7. Next, put the tip of the broad end underneath the outer layer of the knot. Step 8. Pull the broad end right through and carefully adjust the knot, holding it gently and pulling the narrower end. Step 9. The broader end of the neck tie should now hang down further than the narrow end. If not, tie another knot ot tuck the narrow end into your waistband. Click the player below to watch the video instructions Like this information? Then you will love seanmckeeclothiers.com visit now