1. Reference Guide GarageBand Lessons 13
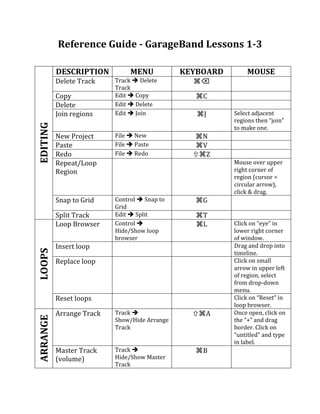
DESCRIPTION MENU KEYBOARD MOUSE
Delete Track Track Delete ⌘⌫
Track
Copy Edit Copy ⌘C
Delete Edit Delete
Join regions Edit Join ⌘J Select adjacent
regions then “join”
EDITING
to make one.
New Project File New ⌘N
Paste File Paste ⌘V
Redo File Redo ⌘Z
Repeat/Loop Mouse over upper
Region right corner of
region (cursor =
circular arrow),
click & drag.
Snap to Grid Control Snap to ⌘G
Grid
Split Track Edit Split ⌘T
Loop Browser Control ⌘L Click on “eye” in
Hide/Show loop lower right corner
browser of window.
Insert loop Drag and drop into
LOOPS
timeline.
Replace loop Click on small
arrow in upper left
of region, select
from drop‐down
menu.
Reset loops Click on “Reset” in
loop browser.
Arrange Track Track ⌘A Once open, click on
ARRANGE
Show/Hide Arrange the “+” and drag
Track border. Click on
“untitled” and type
in label.
Master Track Track ⌘B
(volume) Hide/Show Master
Track
2. Reference Guide GarageBand Lessons 46
DESCRIPTION MENU KEYBOARD MOUSE
Single GB project Share Burn song
to CD
EXPORTING
Multiple songs: Share Send song
to iTunes
GB iTunes
iTunes Playlist File New Playlist ⌘N
Aiff (GB) MP3 Advanced Create
MP3 version
iTunes file type? File Get info ⌘I
Output folder Drop‐down menu
(where your converted in Switch window.
file will end up)
SWITCH
Convert Convert Convert ⌘C Click on icon in
files lower right corner
of window:
Importing audio files:
MIDI – Save song as a Quicktime movie ( at right end of player) and convert
file to mp3 in iTunes.
Loops – Note the tempo of any loop you download. Save; do not open. Change
tempo of GarageBand project before you drag it in.
Others – Click on file name or link.
‐‐‐‐‐‐‐‐‐‐‐‐‐‐‐‐‐‐‐‐‐‐‐‐‐‐‐‐‐‐‐‐‐‐‐‐‐‐‐‐‐‐‐‐‐‐‐‐‐‐‐‐‐‐‐‐‐‐‐‐‐‐‐‐‐‐‐‐‐‐‐‐‐‐‐‐‐‐‐‐‐‐‐‐‐‐‐‐‐‐‐‐‐‐‐‐‐‐‐‐
✪ Check copyright restrictions on any audio file you use! Files on the sites linked
in Lesson 6 will, at most, need attribution. Two excellent resources for copyright
information are http://www.copyrightbook.net/ and
http://www.benedict.com/Default.aspx.